Transcripts
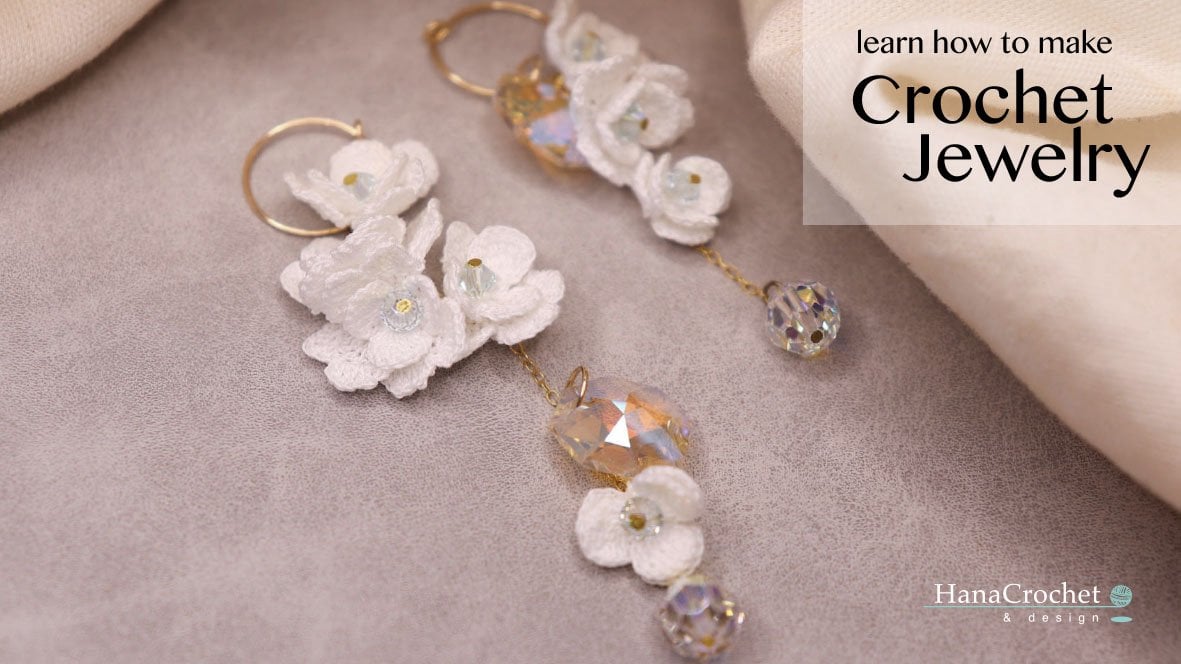
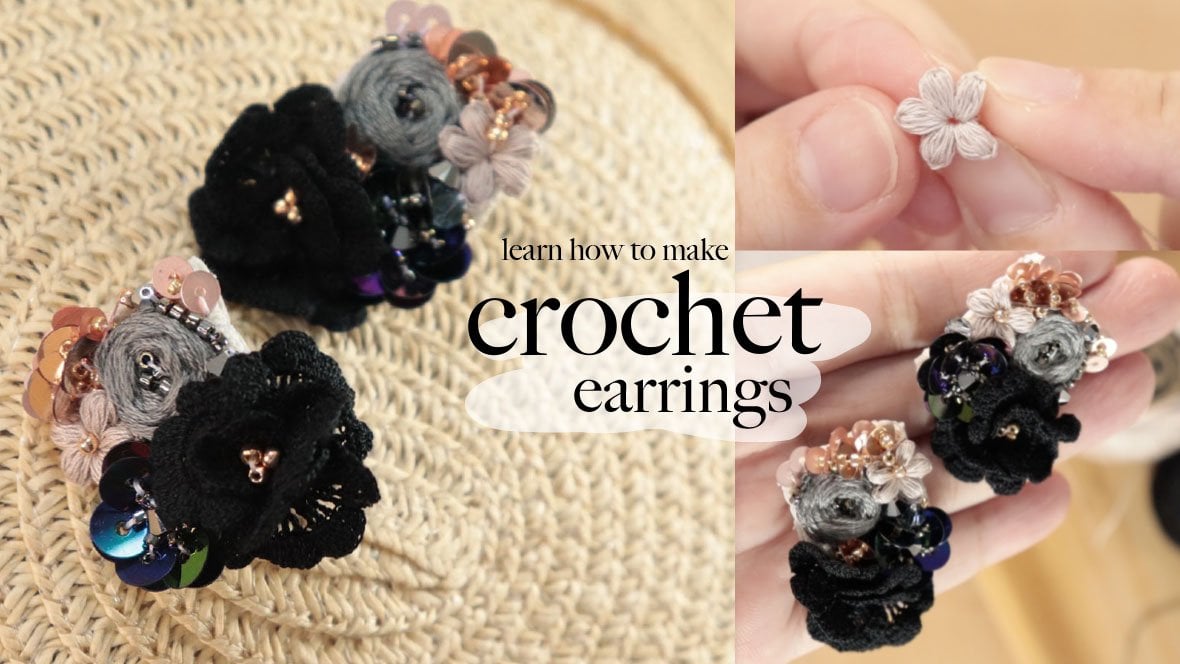
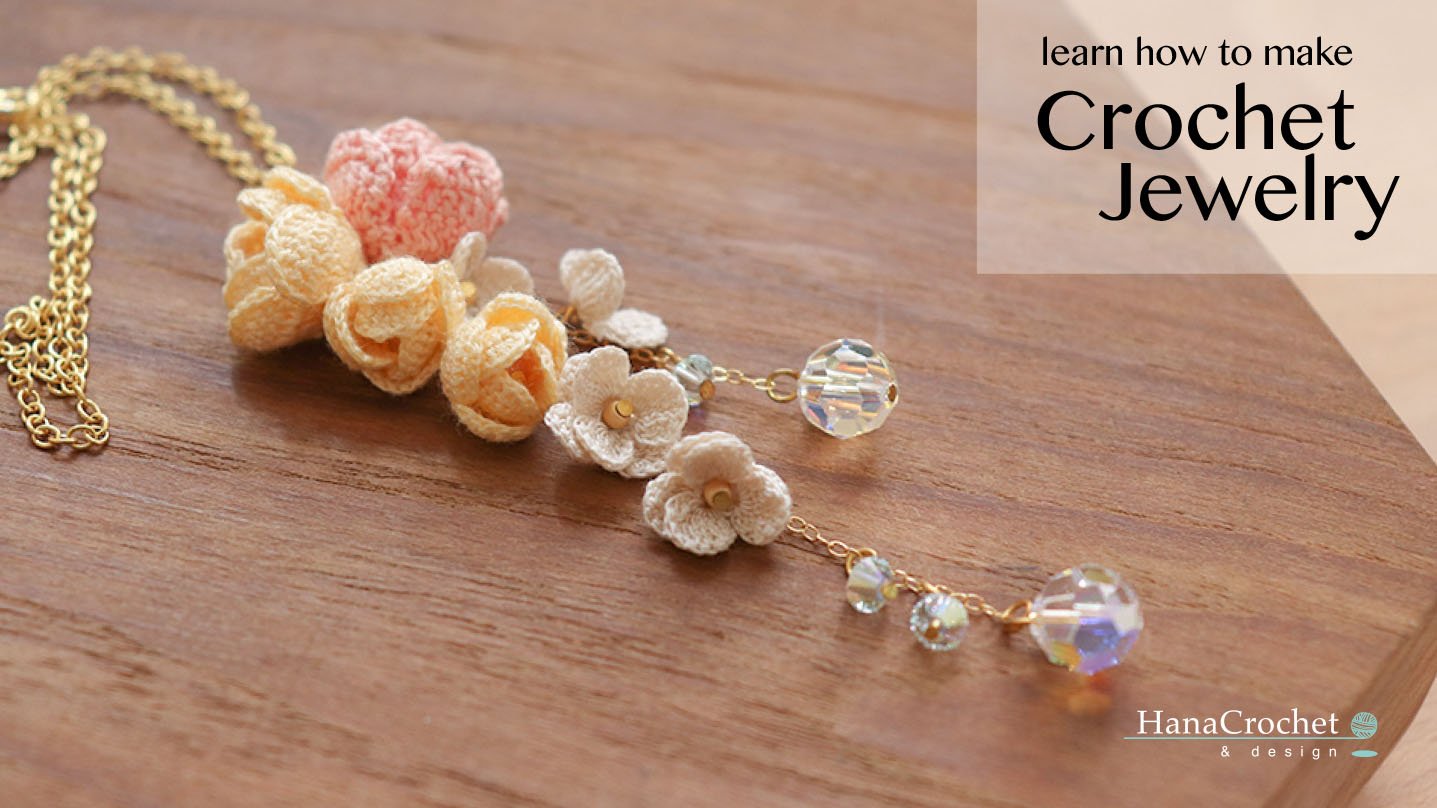
1. introduction - class project: Hello everyone. My name is Eva. I am a crochet jewelry at
the space in Singapore. And Hannah crochet design
is my jewelry line. These are some of my
crochet jewelry collection. You can get the PDF pattern in my Etsy shop, Hannah
crochet design. If you are interested
to check them out. I have put the link in
the info box below. In this class, I'm
gonna teach you how to make these crochet
flower earrings. I'm going to demonstrate how the Crochet the flowers and how to put the
earrings together. I will also share
all the tools and materials such as the
crochet hook now, the beats and crystals and other materials
that you're gonna need to make this earrings. By the end of this lesson, you'll be able to create your own crochet or flower
earrings like this. I hope you will like this
class and let's get started.
2. lesson 1 : Basic stitches: Hi everyone. So today I'm
going to demonstrate some of the basic stitches
that weren't going to use the meat flowers
on this tutorial, I'm using microtia address size for this one is Clover
hook size one meeting. We'll start with slipknot, wrap the yarn over, insert your hook and then either drawn a second
year for each row. Then you'll go into
let go the urine on your finger and then the
type and asleep not you pull the tail of the
track, Meet the gene. You wrap the yarn
over your hook. Then it should a loop. Wrap the yarn over your hook. Yarn over. The next stage
is called single crochet. Already made my first
single crochet here. You have to do is you insert your hook into the next stage. And then you yarn over, pull. It's true. When you have two loops on
your hook, yarn over again. For each row, two loops. Insert your hook yarn
over, pull it through. Now you have two
loops on the hook. Yarn over, pull it through. The next stage is called
half double crochet. You're going to yarn over. Insert your hook
into the stitch. You're going to yarn
over and pull each row. Now you have three loops on, you're going to yarn over, pull through three loops. We do it one more time. Yarn over, insert your hook. Yarn over, pull each rule. Now you have three loops on
your hook. Yarn over again. Pull through three loops. The next feature is called
double crochet. Yarn over. Insert your hook
into the stitch. Yarn over, pull through. You have three
loops on your hook. Yarn over, pull
through two loops. Now you have two loops
on your hook. Yarn over. Pull shorter. Whoops. Let's do it one more
time. Yarn over. Insert your hook
into the stitch. Yarn over. Pull through
three loops on your hook. Yarn over, pull
through two loops. Yarn over, goes
through two loops. The next stage is
called trouble crochet. You're going to yarn
over two times. One. You're going to insert
your hook into the stitch. Yarn over. Pull
through the stitch. Now you have four
loops on your hook. Yarn over, pull
through two loops. Now you have three
loops on your hook. Yarn over, pull
through two loops. You have in two
loops on your hook. Yarn over, pull
through two loops. Let's do it one more time. You're going to wrap your yarn around your
hook two times, 12. Then you're going to insert
your hook into the stitch. You're going to yarn
over, pull through. You have followed
loops on your hook. Yarn over, pull
through two loops. Now you have three
loops on your hook. Yarn over, pull
through two loops. Now you have two
loops on your hook. Yarn over, pull
through two loops. The next stage is called
doubled trebled crochet. You're going to yarn over
three times 12 tree. You're going to insert
your hook into the stitch. Going to yarn over and
then pull it through. Now you have five
loops on your hook. Yarn over, pull
through two loops. Yarn over, pull
through two loops. Yarn over, pull
through two loops. And the last one, yarn over, pull through two loops. Let's do it one more time. We're going to yarn
over three times 12. Tree. Insert your hook. Yarn over, pull through. You have five loops
on your hook. Yarn over, pull
through two loops. Yarn over, pull
through two loops. Yarn over, pull
through two loops, yarn over, pull
through two loops. Next one we're going to learn
how to make magic circle. Wrap your yarn around
your finger like this. Insert your hook and
then in the first year and then draw the second
yarn, pull it through. Tweets. Then Jane one. This is your magic circle. I'm going to make
six single crochet into this magic circle. I just made six single crochet
into the magic circle. Now the magic circle, you're going to pull this tail. Then you're going to
make us sleep stage. These are the basics
teachers that we're going to use to make our
cushy forward to you. Let me thank you for
watching everyone.
3. Lesson 2 : tools and materials: In this video, I'm gonna share
with you all the tools and materials that you're gonna need to make this flower earrings. Let's start with a
crochet threats. To make this white flower. I'm using the MC codon, that special number 80. I'm using this DMC
embroidery thread number seven for seven to make
this small flower. I'm using this DMC
embroidery thread number 162 for the center
part of the flower. I'm using this soft grip at
the Mottola crochet hook. And the number that I use is
0.5 millimeter crochet hook. Let's talk about the
beats and crystal. You're gonna need for M, M Swarovski crystal in a BY the whole round
seed bits size 11. You're going to need six
millimeter flat sequence. A piece of renin fabric
and embroidery hoop, 1.8 centimeter brooch frame. I've got these from AliExpress, a piece of sweet fabric. I've got this from AliExpress and a pair of stainless
steel air posts. Last but not least,
you're gonna need this fabrics different or to
block your crochet flower. That's all for the
tools and materials. In the next lesson,
I'm going to teach you about the basic
crochet stitches.
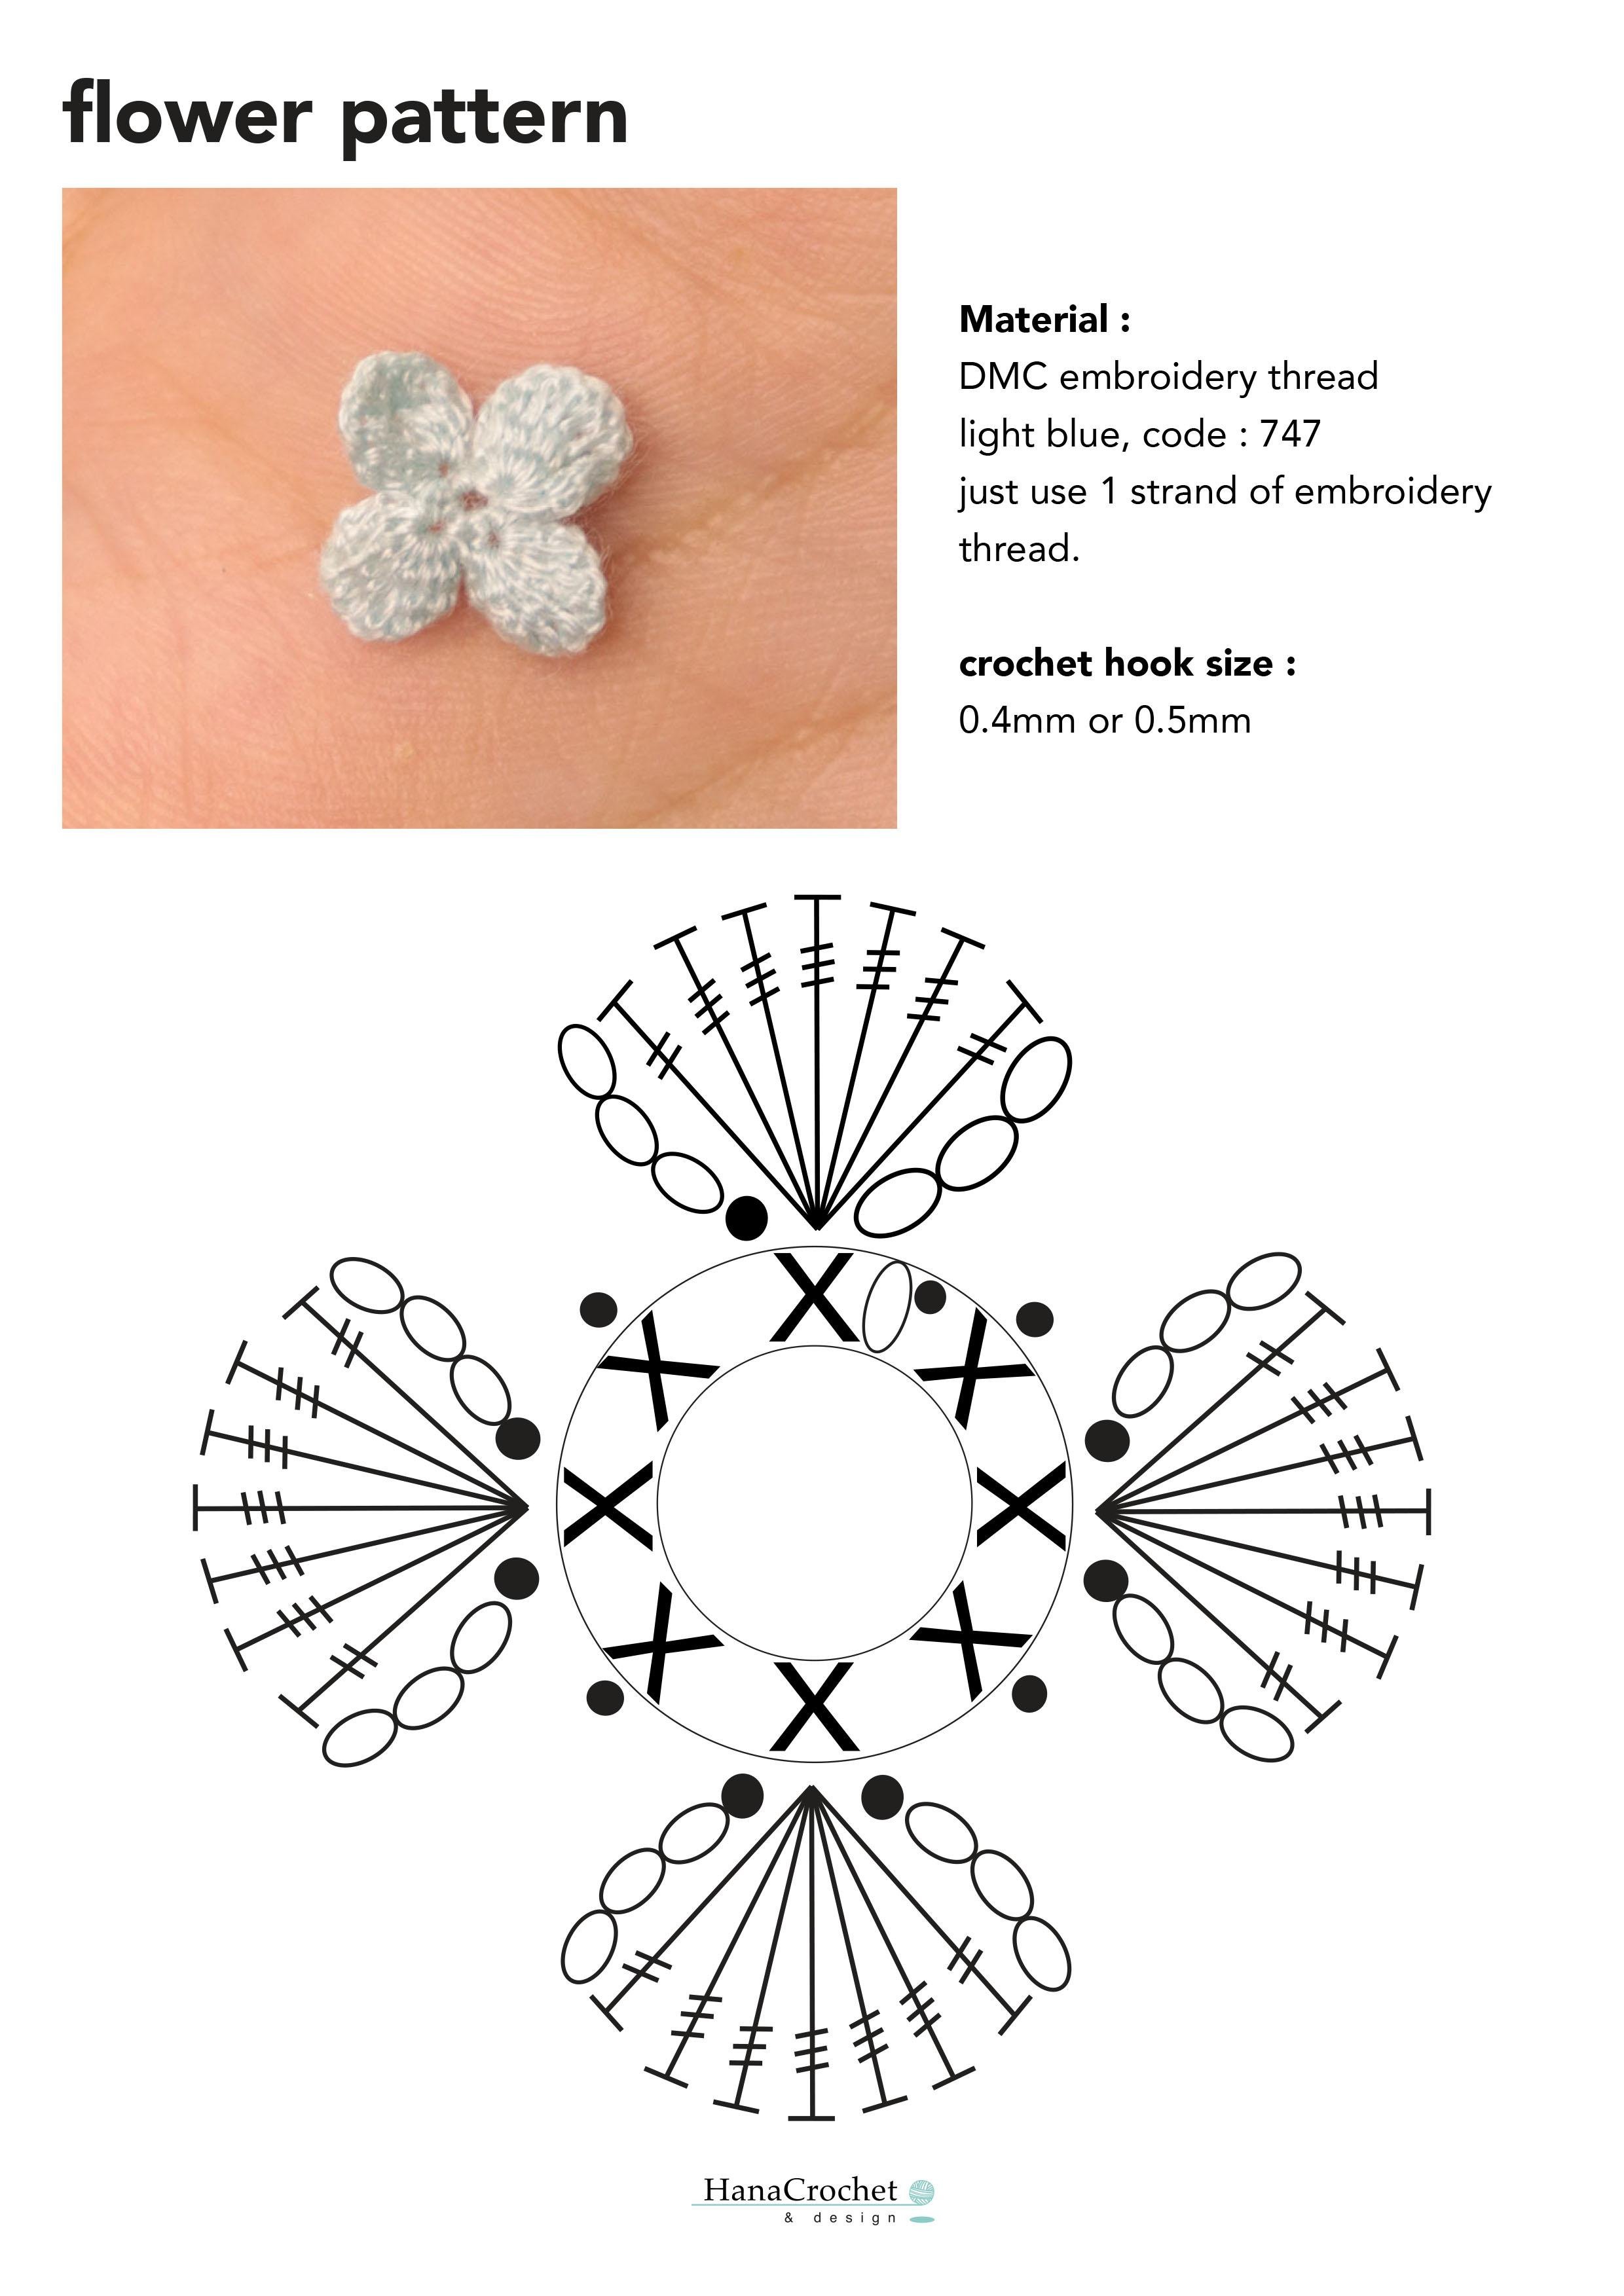
4. Lesson 3 : how to crochet small blue flower: In this lesson, I'm going
to show you how to crochet this flower with one strand
of embroidery thread. I use regular DMC embroidery
thread number seven for 7.40 millimeter crochet hook. There are six strands
of embroidery thread, so you just need to pull
one string just like this. We're going to start
with magic circle. Looked at threat
around your finger. Slide the hook under the
first strep and grabbed a second tread bullet
shrew and twist the hook, yarn over and chain one. I'm going to make for single
crochet in the magic circle. So this is my first
single crochet. And I'm going to keep my
single crochet loose because we are going to work the
petals in this single crochet. So this is the second
single crochet. This is that that
single crochet. This is the fourth
single crochet. Then from here you can type in your magic circle by pulling
the tail of the threat. Then I'm going to join the
circle with a slip stitch. Then after that we're gonna
start with our first petal. I will start with a chain tree. Then after that
I'm going to make a treble crochet in the
same stitch to make a trouble crochet
unit tow yarn over twice and then insert your hook. Then you're going to yarn over and pull through two loops. And then you're going
to yarn over again, pull through two loops, yarn over, pull
through two loops. Last one, yarn over, pull through two loops. Next I'm going to make six
double trouble crochet in the same stage. To make that you need to
yarn over three times. Then you're going to insert
your hook in the same stitch. Yarn over, pull through. And then you're going
into yarn over, pull through two loops. Yarn over, pull
through two loops. Yarn over, pull
through two loops. Last one, yarn over, pull through two loops. So that's the first one. This is the second
double trouble crochet, doubled trebled crochet. They're both terrible crochet. Double trouble crochet. This is the sixth
doubled trouble crochet. Right next I'm going to make a trouble crochet.
In the same stage. After that, I'm going to chain tree to tree and then I'm going to make a slip
stitch in the same stage. This is how our first
petal looks like. Continue to the next petal. I'm going to start with a slip
stitch in the next stage. And after that, the pattern is exactly the same as
the first button. So I'm gonna start with
a chain tree, 12 tree. And then I'm going
to make trouble crochet in the same stage. Then after that
we're going to make six double trouble crochet
in the same stage. This is my second
doubled trebled crochet. There are doubled
trebled crochet, double trouble, crochet, fifth doubled trebled crochet. And last 16 doubled
trebled crochet. After that I'm going to make a trouble crochet
in the same stitch. Then I'm going to chain tree and we're going to make a slip
stitch in the same stage. This is how the
petals looks like. I'm going to continue to the
third and the fourth petal, since the feathers
are exactly the same as the first and
the second petal. So I'm going to
speed up the video. Same thing again.
We're going to start with a slip stitch
in the next stage. Then I'm going to chain tree, then troubled crochet
in the same stage. Then after that
I'm going to make six double trouble crochet. In the same stage. I finished with my six
doubled trouble crochet. Next, I'm going to make a trouble crochet
in the same stage. We're going to chain tree and slip stitch in the same stage. Continue to the fourth petal. I'm going to make a slip
stage in the next page. And then I'm going to change a treble crochet
in the same stage. Then after that six
double trouble crochet in the same stage. I finished my six
double trouble crochet. Then next I'm going to make a troubled crochet
in the same stage. And then after that
I'm going to change tree and slip stitch
in the same stage. After that easily. I'm just
going to tie not twice. Then after that, I usually
apply a fabric steep NOR, or fabric glue at the
end of the threat. This is how the
flower looks like. For a pair of earrings unit the Crochet for small flowers. And continue to
the next lesson to see how I cruciate
is white flowers.
5. Lesson 4 : how to crochet white flower: In this lesson, I'm going
to show you how to crochet these white flour
to make the flower. I'm using the Crochet
trap from the MC. This is the MC coordinate
special number 80. You will also need 0.5
millimeter crochet hook. But for this tutorial, I'm going to use thicker
thread so you can see all these teachers
better on screen. We're going to
start with asleep. Nope. Then after that you're gonna make
56 change teachers. Once you're done with that, we're going to create single crochet in the
second chain from the hoop. Then after that, continue with one single crochet in every stage until
the end of this row. So by the end of this
role there will be 55 single crochet stitches. This is how it looks like
when you're finished and this is gonna be your
foundation for the petals. Then after that, we're going to start with our first petal. I'm going to start by
making a chain stitches. And then after that
I'm going to make a double crochet in
the first stage. Three double crochets
in the next stage. This is our first
double crochet, and this is the second one. This is the last double crochet. Two double crochet
in the next page. This is our first
double crochet. This is the second double
crochet in the same stage. One double crochet
in the next page. After this, I'm
going to change one. And then I'm going to
flip my crochet work. And we're going to start
with a second layer. The second layer,
I'm gonna start with a half double crochet
in the first stage. And then after that
I'm going to make two double crochet
in the next pitch. This is my first double crochet. This is the second double
crochet in the same stage. Next, I'm going to make
a troubled crochet. In the next stage
we're going to yarn over twice in set your hope. In the next stage. Yarn
over, pull it through. We're going to yarn over, pull through two
loops, yarn over, pull through two
loops, and yarn over, pull through two loops. Next, I'm going to make
two trouble crochet. In the next stage. This is
my first trouble crochet. And I'm gonna make
the second trouble crochet in the same stitch. Next I'm going to make
one trouble crochet. In the next stage. The next stage, I'm going
to make two double crochet. This is my first double crochet. This is the second double
crochet in the same stage. We are at the last
stitch now I'm going to make a half double crochet. In that last stage. This is how our petal
looks like so far. Next we're going to chain one. Flip your crochet
work that we're going to start with
the next layer. We will start by making a single crochet in
the first stage, and then a half double
crochet in the next stage. Two double crochet
in the next stage. This is our first
double crochet. This is the second
double grocery. Also in the same stage. A double crochet and a
half double crochet. In the next stage, we start
with a double crochet. Then after that, a
half double crochet, also in the same stage. A double crochet and a trouble
crochet in the next stage. So this is a double crochet. Then a troubled crochet
in the same stage. Next, I'm gonna make
a trouble crochet and a double crochet
in the next stage. This is the trouble
crochet and an x, I'm going to make a double
crochet in the same stage. Next, I'm gonna make a
double crochet and a half double crochet
in the next stitch. Next one is a half
double crochet. Also in the same stage. Double crochet and a
half, double crochet. In the next stage. This is the double crochet,
and then after that, a half double crochet, also in the same stage. A half double crochet
in the next stage. Lastly, a single crochet
in the last stage. After that, I'm going to make a slip stitch in the same stage. This is how our first
petal looks like. And then from here we're gonna
come back the stitch that a single crochet
stitch just below that works as the foundation
of the petal. To do that, we're going to chain one and then make a slip stitch, the double crochet stitch
in the first layer. Then from here, we're
going to change. We're gonna make slip stitch
in the single crochet below. Just take note that you
have those slip stitch, the single crochet where you made a double crochet before. You don't slip stitch in
the new single crochet. Alright, we have finished
our first petal. And before we start
with the second petal, I'm going to make those slip stitch in the next two stitches. So this is my first slip stitch. One more slip stitch
in the next stage. Then after that we're going to continue with the second petal. The pattern is exactly the
same as the first petal. So I'm gonna start with
to change the gist. Then after that, a double
crochet in the same stage. Three double crochet
in the next stage. This is our first
double crochet. This is the second double
crochet in the same stage. This is the third double
crochet in the same stage. Next, I'm going to make
two double crochet. In the next stage. This is our first
double crochet. And this is the second double
crochet in the same speech. A double crochet
in the next page. This is gonna be our last
stitch for this row. From here I'm going
to change one and I'm gonna flip
my crochet work. Then we're gonna start
with the second row. Since the pattern is exactly
the same as first petal, I'm going to speed up the video and come back at the
end of this row. Now we are at the
end of this row. For the last page, I'm gonna
make a half double crochet. All right, From
here we're going to start with the next row. I'm going to start
with a chain one, flip the Crochet work. We're going to start with a single crochet in
the first stage. And again, since the pattern is exactly the same as first petal, I'm going to speed up the video and come back at the
end of this row. All right, we are at the
last stage now and I'm gonna make a single
crochet in that stage, and I'm gonna slip stitch
in the same stage. From here, we're gonna
connect the speech to the single crochet
stitches below that works as the foundation
of the petal. And to do that, we're going
to chain one and then make a slip stitch in a double crochet stitch
in the first layer. And then after-death
chain though. And make a slip stitch in
a single crochet below. And again, you want to make sure that you make a slip stitch in the single crochet where you made a double crochet before. So you don't slip stitch in
their new single crochet. Before you start
with a third petal. Same thing again, you're
gonna make to sleep speeches in the
next two stitches. This is my first sleep stage, and another slip stitch
in the next stage. Then from here we're
going to chain TO. Then you can start
with your third petal. The pattern is exactly the
same as the PBS top petals. I'm going to speed up
the video and come back after I
finished that petal. I'm almost finished
with that third petal. Now I'm going to make a single
crochet in the last stage. Then after that I'm
gonna make a slip stitch in the same stage. Then I'm going to change one. Then make a slip stitch in the last double crochet
in the first row. Then from here we're gonna change and then make a slip stitch in the
single crochet below. This is how the
petal looks like. Before you continue
to the next petal. Same thing again. You're going to make
those slip stitch in the next dose teachers, before you start
with a new petal, you're gonna continue
this pattern until the end of the single
crochet foundation. And once you finish, you're going to have
11 flower petals. This is how small
the petal looks like if you're using cruciate
read number 80.
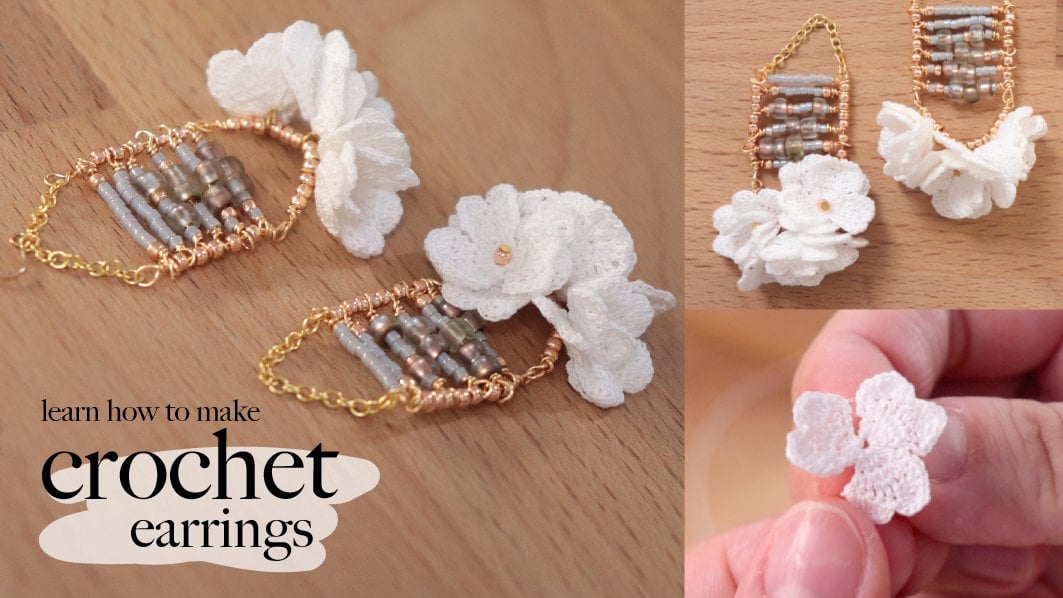
6. Lesson 5 : how to put the earrings together: Hi everyone. In this
video I'm gonna share with you how to put
the earrings together. First, you need to
prepare the brooch frame. And I'm going to trace
it on the linen fabric that I have attached to
the embroidery hoop. After that, I'm going to draw a small circle
close to the edge. This will be the spot
where I'm going to, so my flower on. Then I'm gonna get my
crochet flower and I'm going to sort the first petal
around that small circle. Remember not those, so
the petal in that circle, but it should be
around a circle. First layer, I saw four
petals around that circle. Then after that you
can solve the rest of the petals around
the first layer. When you saw the second
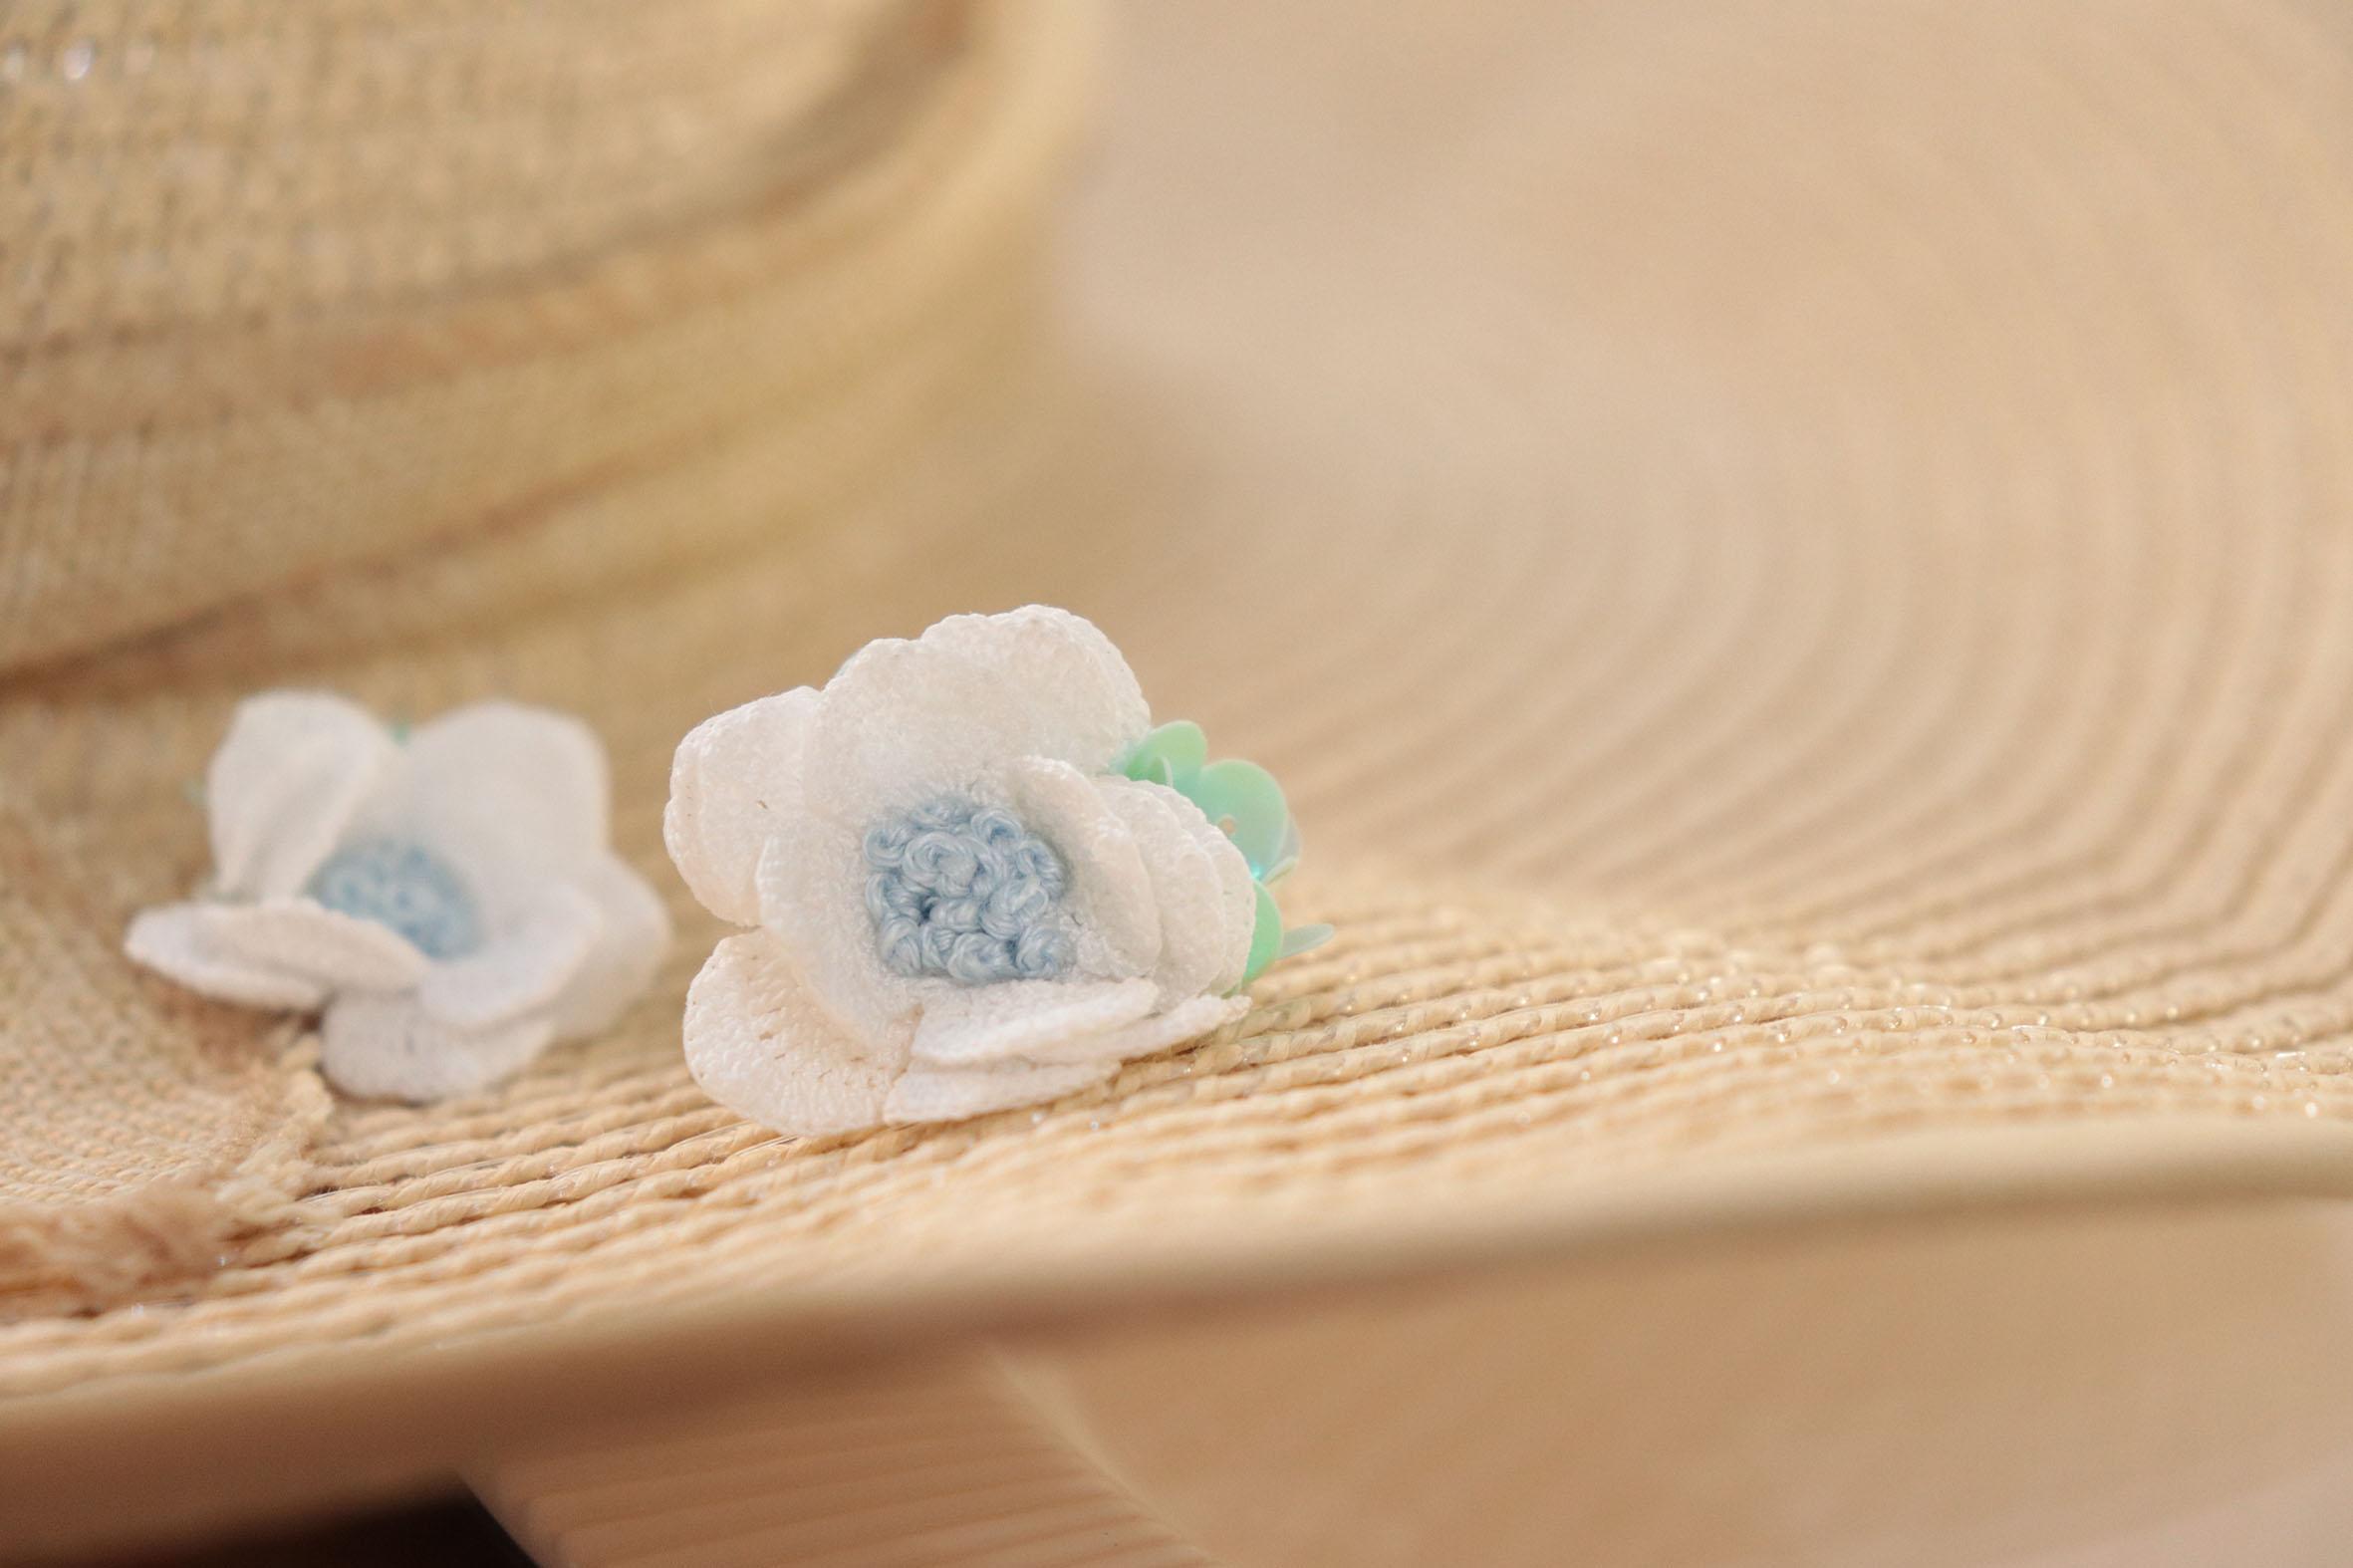
layer group of petals, just make sure that you sold them close to the first layer. This is how it looks
like after you finish, if you notice my flower
has more pathos, is because I crochet that the thin petals
instead of 11 petals. If you want to make
the thin petals flower like I have here, you can check the pattern in the PDF file that you get
when you purchase my pattern. Next, we are going to source some French knots stitch in
the middle of the flower. And to make that, I'm gonna use this light blue
embroidery thread and I'm going to use
six trends altogether. This is how I make
my French knot. You need to bring
your needle up, then wrap the thread
around the needle twice. Then bring the needle
down through the fabric, and then pull the needle and you will see your French knot. You're gonna continue
this until your cover the entire circle with a
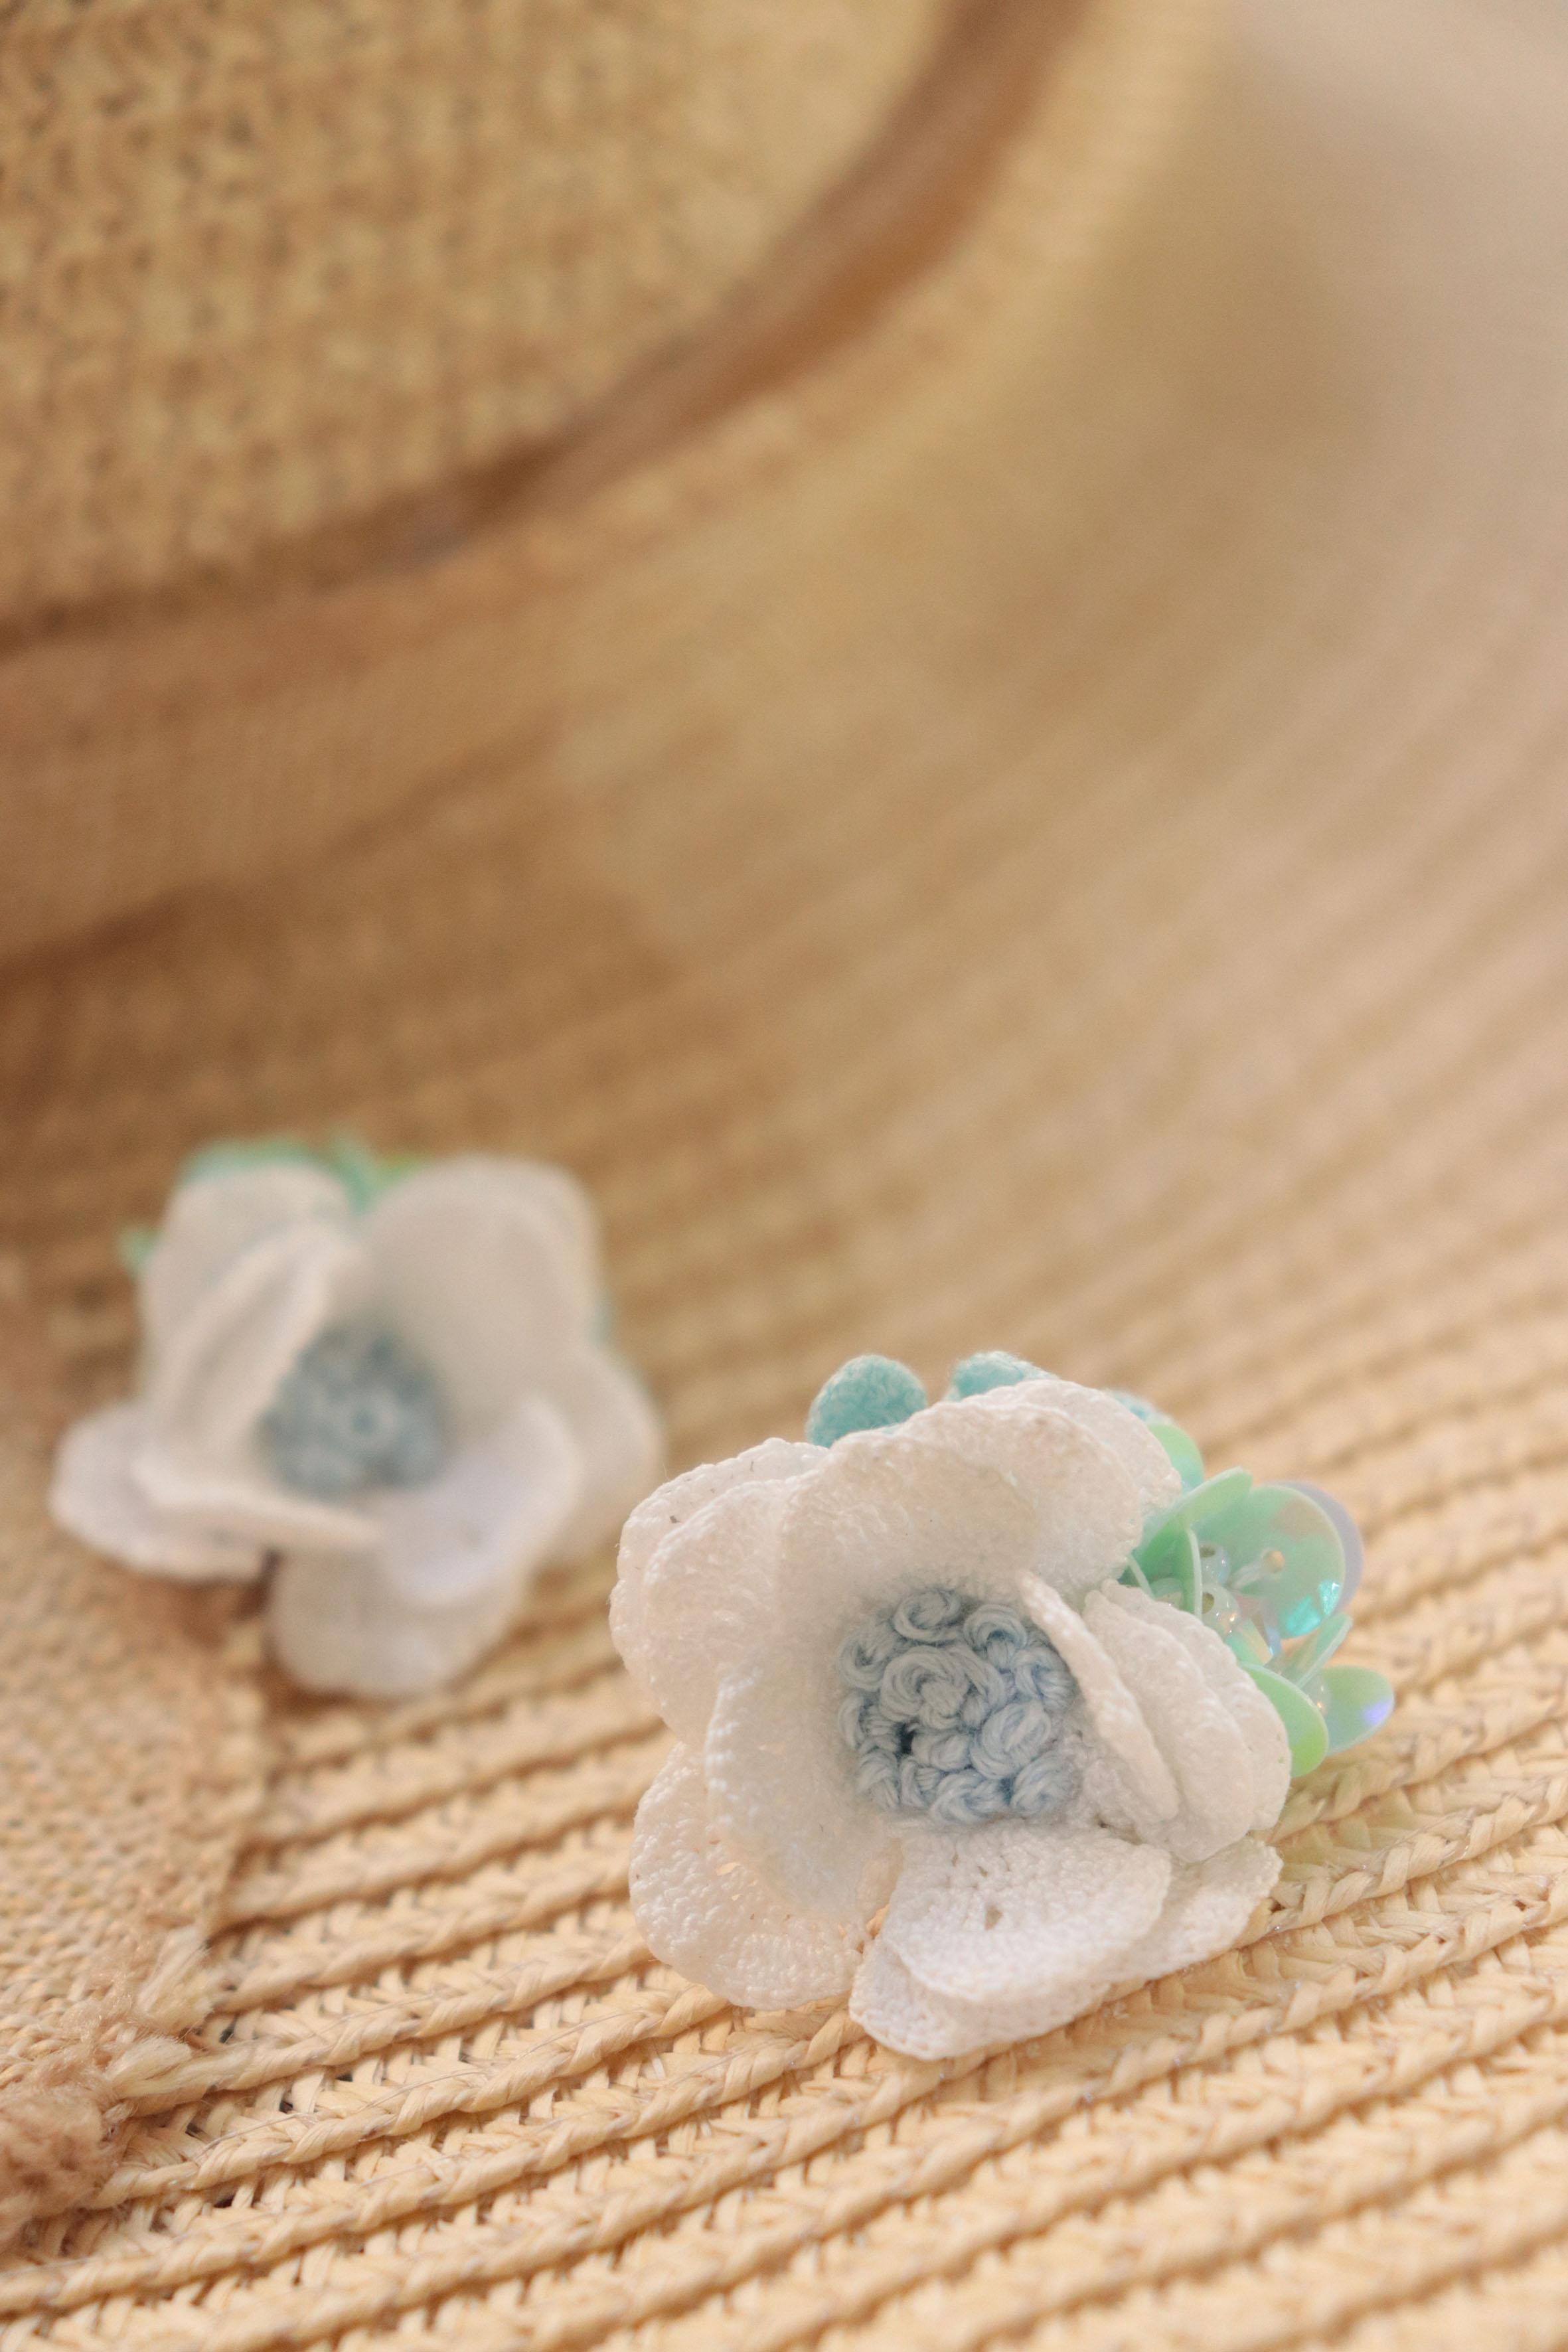
French knots teachers. Next we are going to
make sequence flower. You're seeing six MM flat sequence and the
hormones 8-bits size 11. First I'm gonna draw
a small circle. Then I mark five small
dots around that circle. And another five dots
outside the circle. After that, I'm going to bring my needle up through the fabric. We're going to solve this
six MM Swarovski crystal. I'm using bigger crystal here so you all can see it
better on screen. Then I'm going to
bring my needle up through the inner top. After that, I'm going to insert the seat bits and
sequence like this. So you want to alternate
between the sequence and as if bits then bring your needle
down through the outer dot. This is how the first
sequent pattern looks like. Then you can continue
with the rest of the petals for the second petal. The same thing again,
I'm going to bring my needle up through
the second inner dot. And then I'm going to prepare my seatbelts and
Cygwin like this. And then bring your needle
down through the outer dot. Alright, this is how my
sequence flower looks like. Now I'm gonna make the
same thing on my earrings, but for the center
part of the flower, I'm using a smaller
Swarovski crystal. This is four MMAE white
Swarovski crystal. As for the seat bits, I'm using toehold
round seed bed size 116 MM flat sequence. Next we're gonna solve
this blue crochet flower that I crochet from embroidery thread
in-between the white flower and the second flower. I'm going to sort this
stuff around bit size 11 in the middle of
that blue flower. And then I'm gonna
do the same thing with the other blue flower. Alright, we're pretty much done. You can remove the fabric from embroidery hoop and cut the
fabric around the flower. And to finish this airing, I'm going to solve
large running stitches around the flower. When you reach the
starting stage, plays the brooch frame in the middle and pull the end of the thread
that I attend the fabric. To secure it. I'm just
going to continue with running stitches around
the folding of the fabric. Next we're going to glue
the ear posts at the back. And you can use glue
gun to Goodyear posts. This is a stainless steel
one centimeter ear posts. You can get them at
AliExpress or Amazon. Then we're going to
cover the back of the earrings with
this swayed fabric. I'm gonna cut a small circle, just make sure that
the circle is bigger than the diameter
of your ear posts. For the last step, I'm going
to use this liquid fabric, stiffen up 200 microtia flour, water in the small container. I'm just going to
use a droplet of stiffness, mix them together. And with research you can
apply the liquid onto each petal. That's it. This is how the earrings
look like when you are done. Thank you everyone for watching. I hope you'll find
this tutorial useful and see you in my
next video. Bye.
 Hanacrochetdesign Eva Widjaja, hanacrochetdesign