Transcripts
1. Introduction: Hello, everyone. Thank you so much for picking up this course. This is where we're going to take your visual
to the next step. Whether are you working
on high energy, music, video or a deep
motion short film. Caligory can completely
transform your world. You're going to
learn how to make the mood of the
music or the story, creates coercive high cetching visual and master
advanced techniques like light tracking. By the end of this course, you have the skills to make your project
not just stand up, but truly shine like the star.
2. Episode 01 Understanding Contracts and Exposure: All right, so before you
begin any collaborting, before we dive into
having our notes. So one thing that you
should pay attention to is color you create a story line
and create three colors. So now we're going to
take just what you need to know about the basis
the basis of collabrating. We're going to do a
notary step by step until we achieve our grading, we achieve the kind of grade that you have for the work
that you're working on. So mainly what we're
going to do now? I'm going to reset this note. It seems like there
was something in here. So I'm going to create
a couple of nodes. So this one we're going
to have a our noise. So this is why we're
going to remove if there's anything that we don't want to see
in the footage, like any grain from the
exposure and everything. Then the second node, this is what we're going
to call it our CC. And you can see in
all my tutorials, the reason why I'm calling
the CC is for color coration. This just help us to
get back our colors. When we talk about colour
coration is the color that we had in mind, not
like we had in mind, the color that we filmed with as you filming the color that
you will see with your eyes, so you need to bring that
back so that you are able to do your calibration. We're going to do our exposure. So we're going to do exposure, we're going to
create another node, we're going to
call this contrast and we're going to
have this saturation. We're going to
have another node, parallel node if you
hold on ds plus P, we're going to call and
we're going to call this U versus saturation. I'll show you why
we have this node. Y, so we don't want to do
anything on the calibrating. So now we're just going
to focus on this. So as long as you are good
on doing your calibration, you really good
on your exposure, contrast, then we can
move in dreading, right? So we're going to
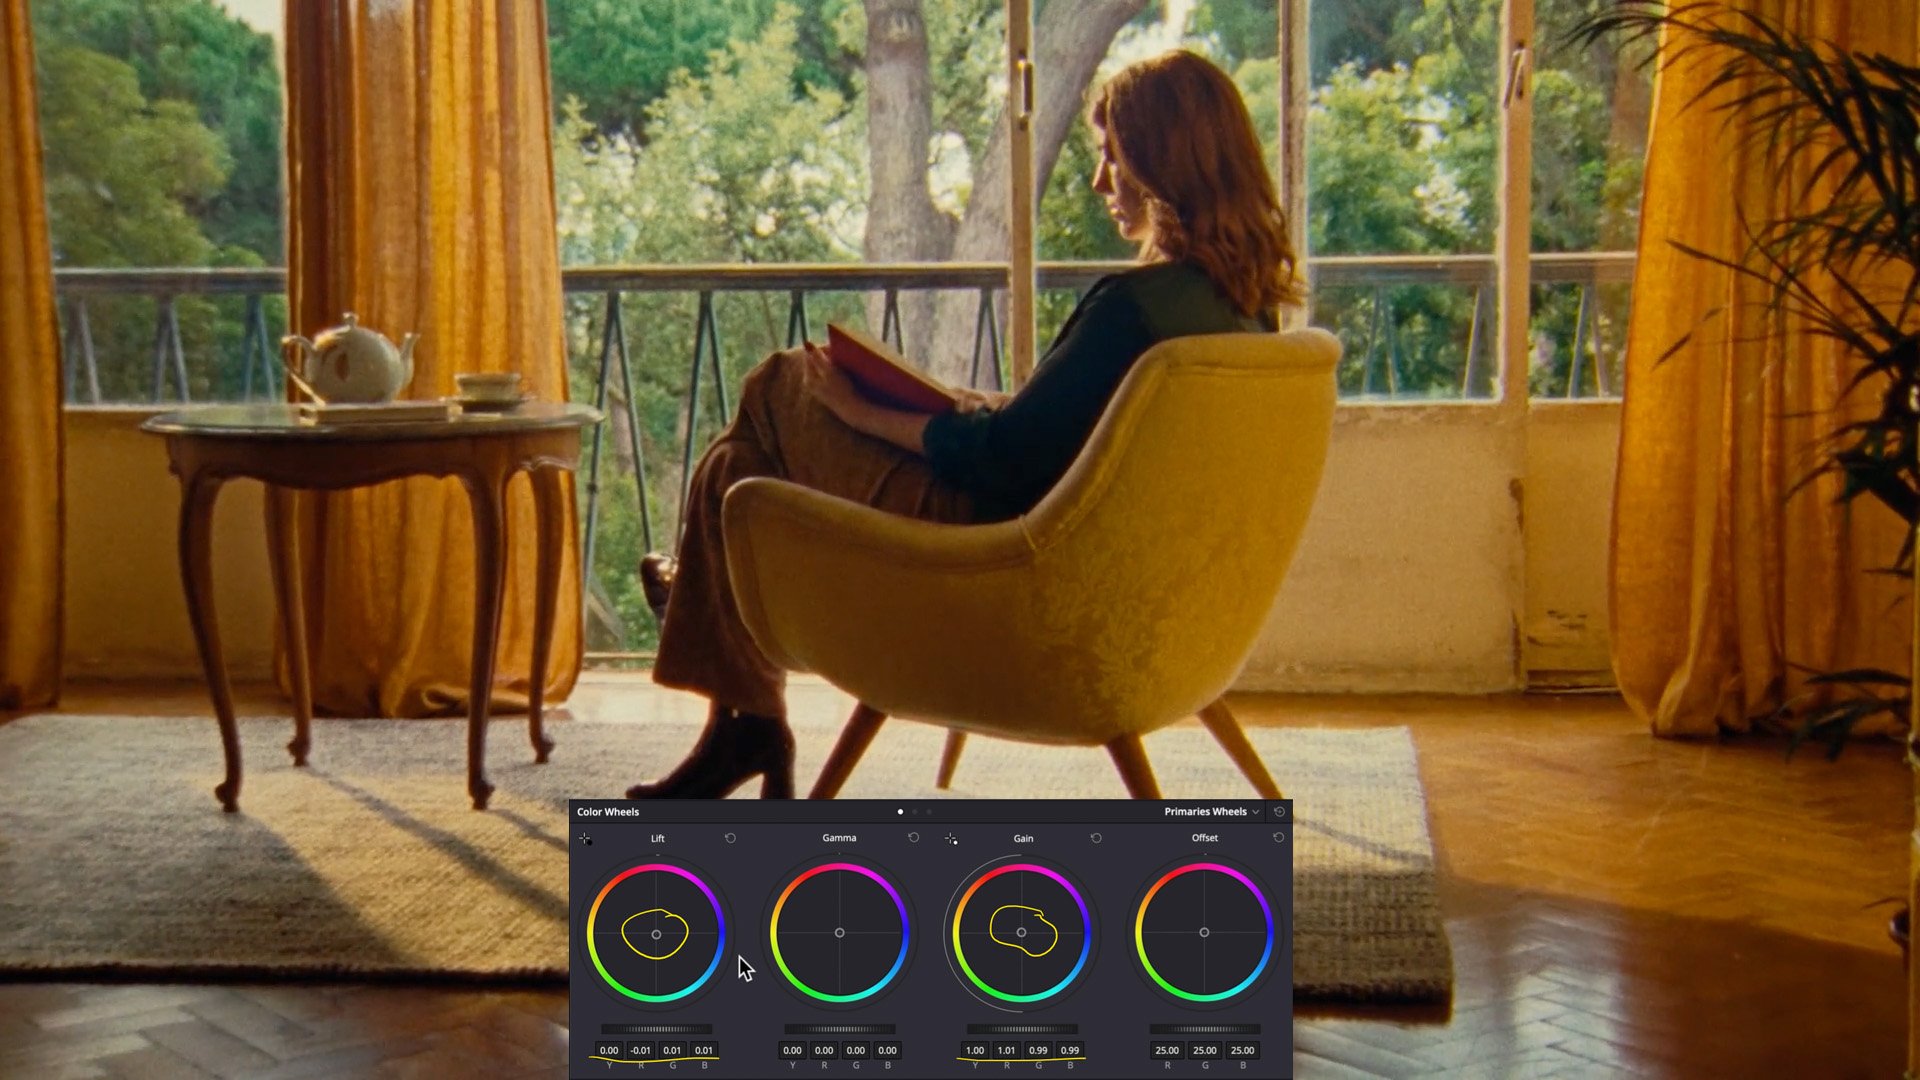
come on the exposure. So the best you can do, guys, I can share with you is
that if you master out, you usually clothes and
create so many good things. But there's a reason why
you need to use gain. You need to use lift. I need you guys to
have this in mind. When we talk about lift, we talk about shadows. When we talk about gain, we
talk about exposure, right? So if we bring down our gain, we're going to bring
it down. Sorry, guys. So this is As Lg two. So one thing that we need
to do is a Sony aslo two. All this footage will be provided so you guys can
also just off the steps. So we're going to go for
color space transform, you're going to drag and drop. And then on the
input color space, we're going to use this is a setting that I had on
my cameras or shooting. We're going to go Alo two. The output color space, we're going to use we're
going to use reg reg 79 and the game
we're going to go for game of 2.2 or game at 2.4. The reason why I have 2.4 because I want to have
more exposure in. So we're going to close it down. So we're going to
go back, as you can see our image is kind of warm, but we need to fix the reason why we have our corrections. So we're going to
go on the exposure. We're going to bring
down the lift. This is our lift. This is a shadow side. This
is the shadow side. And we have exposure. After this, then we
have a contrast. So by coming to the contrast, you can increase the contrast, and then you go to the pivot
so that you need more. You just having a little
bit of exposure in the
3. Episode 02 The S Curve and Color Correction: Another way that I'm showing you guys that you can keep in mind. So what I'm going to
bring this contrast on top of the contrast on
top of the exposure, and we're going to go
and focus on our care. So we're going to
create a shadows, contrast and
everything right here. So we're going to come down on the we're going to
create an ace, right? So bring it down here. So what we're doing is we
actually bringing a lot of contrast in our shadows. I think this is good to go. We're going to add a
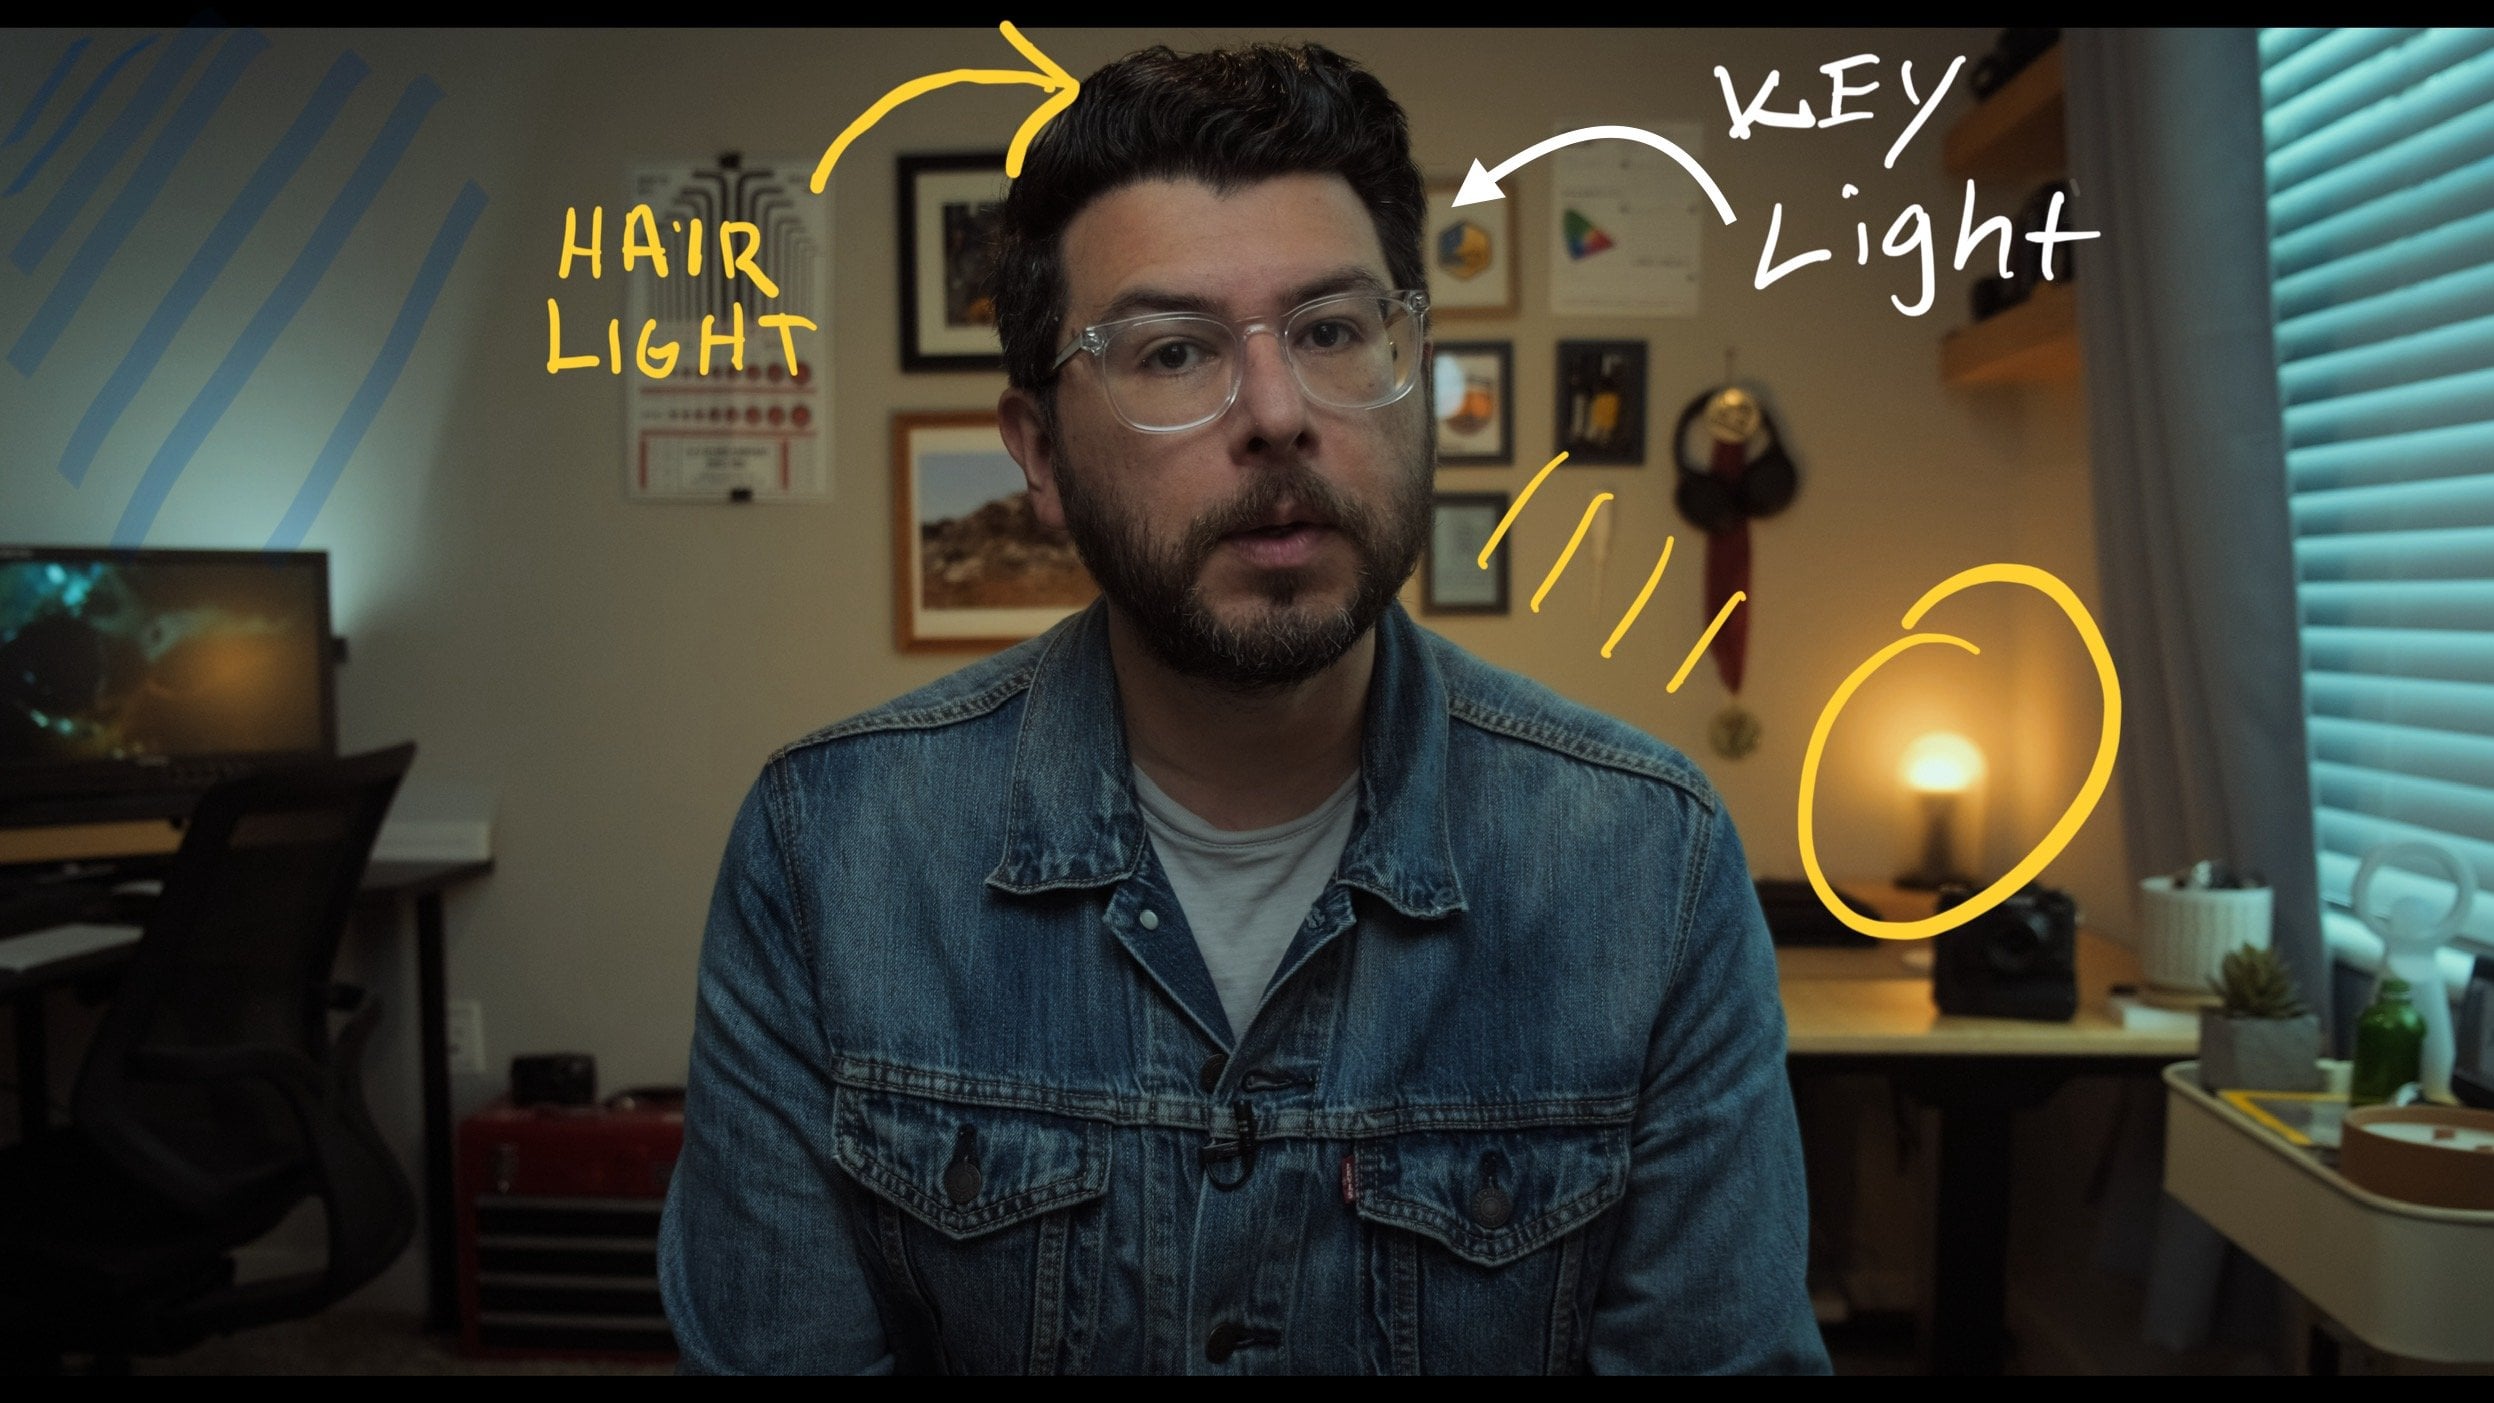
little bit of light. So now we're just doing Scale. It's so similar to the
exposure and contrast. So this is I need you guys just to pay attention
to the eyelight. So as long as I'm
playing with this, you can see we having some
eyelights being fixed. And this is how we
created fade kind of thing in our shadows that make the video
look so cinematic. So if I bring it all the way
up, this is what we get. So we're going to sort
of just make sure that it's slightly
ag bring it down. So we're going to see before
and after, before and after, you can see we have
so much contrast, and we can go back and fix all that so that we are
happy with what we have. So now we need to fix
our footage because this is looking to too warm. We need to go back to it and make sure that
it's all fixed. If we check on our scope, this is a where we can see
that our RGB are not even, so we need to fix it. So we're going to
go to the gain, and then we're going to
play with the blue channel. We're going to bring
it up a little bit. And we're also going to
bring down the red channel, and boom, there we go. Gonna bring it down again. Slightly down. Also the drain. So let's see before and
after, before and after. So if you understand
these steps, guys, it's going to solve
so much problem when it comes to doing
caligraing because if you have not done
with calicoration, then you're going to have
issues doing your caligrating.
4. Episode 03 Color Grading for Short Films: Alright, so now we're going to create our calibrating, right? So we have our collaboration. Now we're going to
do our calibrating. So I'm going to just fix all my nodes so that
we're good to go. So we're going to
create another node, and we're going to have we're going to call this skin tone. We're going to all
the ds plus A. We're going to create this
what do you call this node? Let me just have a look at it. I should come to colors, notes. So mainly what we have
created is a layer note. We have created a layer note. Alright, so we're going
to have a skin ton right. Let me just clean all notes.
So this is what we have. And one thing that
I don't like this cause it takes a lot of space. Alright, so now we're going to create other parallel notes. We're going to do four of them. This is where we're going
to have a Caligari guys. This is why you're going to put all the painting that
you have in mind, the story that you want
to tell with your colors, and this is where I'm going to share all that with you Bays. So we're going to
call this GR one, This is where we're going
to have first grade, and we're going to
call this GR two. And then this is where we're
going to have a GR four. Three. So one thing that we're picking
up with our grading, we can see that things are
not looking the way that we want them to look all you still having a little
bit of shadows, based on what I have in mind. And there's one
thing that you guys should really patent
calibrating is that you need to create based on your understanding
of what you have in mind. So there's no specific way that you should delve any
tool that sharing that say, you should take this as a
photoshop, as light room, is Premiere Pro, do what
makes things better for. So I see that were a
little bit of shadow. So what I'm going to do is I'm going to come on
the shadow side. I'm going to crank
it up a little bit so we can see some details, and then I'm going to
go on the highlights. I'm going to bring
it all the way down because I just
want to keep it clean. I can see that I'm losing contrast, but we're
going to fix that. So now we fix our shadows
on the light on this note. We're going to
jump on the second note where we're going
to do upgrading. We're going to go
on a log wheel. If you click on the log wheel, you have this me tone. If you bring it up
because I'm just going to show you a variety of loop
that you're going to create. I'm just going to
bring it all the way up and we have range down
and we have a range up. If I begin to scale this range, this is what we're
getting, right? I'm going to bring all the range all the way like some orange. It's gonna play the range
dance, like some orange. Let's say I want to
create a cool look, anything that I do like aura, drama, anything that is
based on the short film. So we're going to cran
all the way down, right? So if I bring it down here, you can see we're having
like a sort of like a orange entleT is the look
now that we're having. If I bring it on the blue color, this is what we're
getting, and we can always adjust all the
settings that we have. This is a loop that
we're getting. We can do just a mix of that, and this is where we're getting. And we need to go back to our contrast so that we
can add a little bit of contrast because we're
losing contrast in there and which is not
looking very professional. So we can sort of, like, slightly down a little bit of contrast and bring it all
the way up a little bit. There we go. And just
by playing with this, you're going to create as many
looks as you have in mind. And remember, you need to pay attention to your
skin tone, right? So the reason why I'm
using the range is that is that you need to
preserve your skin tone. So with the range, you mainly have I
need guys just to pay attention on the skin tone because we have not had
anything on the skin tone, which we're going
to do right now. So we're still on a gray note. So if you play with the
range down up down, this is what you get, right? So mainly when we talk about the ranges that we have in
this sort of a line where when you push up range button
so that the grade keeps on moving from the background
to the foreground, this is what you get in, right? So I'm going to
reset all that up, and we're going
to create a look. So I'm going to bring
it sort of like down here and I'm going to bring in a little bit and then we're
going to go on the lights. We also need to because
you can see this is white. We're going to add some orange, a little bit also
play the range. Let's see what we're
getting, a little bit. You can see that we have a film look in just matter of second. We don't have to
know so many thing about adventures I
just need to know specific tools to edge that you need to know what you're going
to do with them, right?
5. Episode 04 Using Saturation to Create Mood: Is on the saturation. One thing about
saturation is that there's a cool way that
you can do saturation. Either way, you have this old techniques
common saturation and your saturation,
you're good to go. But I prefer using this. This is so professional. It makes things
easier for you and the grade just pop in so good. You're going to come on the HCL and then you're going
to go on your channel. And now we just have to
stay with channel three. That's all we need, right? I'm going to come on the again. I'm going to crank it all the way up and this is
what we're getting. And one thing that you
want to have sort of like all all those type of grading
wall sort of grading, you can just crank
all the way down, crank it down, and then you're going to come
on your skin tone. This is where we
have a skin tone. I'm going to go color three set. We're going to go red,
we need to make sure that we have a skin toy
gonna come right here. Selected. We need
to fix it quick. We don't want anything else. We sort have a skin toy
right there. There we go. So I can literally just
push it a little bit, make sure that we
have some colors on the skin tone. All right. So now, the reason why
nothing showing because we mainly have it on top
and that has to be done. So you're going to hold
on Control plus C, controls plus V,
you're going to copy and paste, and there we have it. So we can reset this note. This is what we have before
and after, before and after. You have a good
reading. All right.
6. Episode 05 How to Use LUTs for Different Looks: Alright, so I'm going to show
you how you're going to use different lights to create different loop for
different short film. So what you're going to
do is you're going to create another note
by holding ls, and now we're going
to call this light. I'm going to call this lax. And then we're going
to have either note or you're going to
use later, right? So how do you apply light
in the windshields out, and that is going to give you the kind of
look that you want? Now we have a primary
grading and you can just take a crap so so that
you keep the grade. You can always bring it back
whenever that you want. So what you're going to do now
is you're going to come on your color space transform,
you're going to go to effect. And then on the gama what
you're going to use? There's a cool setting, you're going to use
sigion foam lights. So if you click on them, then you can apply any
light that you have. Mainly, what you need to
know is you need to know the specific light that
you're going to use and the color is going to give
you don't just use anything. So we're going to
come to light and that vince of some cool
light that you can use. So we're going to
go to foam light, and there's a lot of them
that you can create. A foam look that you have. Going to pick this. And this
is what we're getting guys, this is so cool. You don't have to just
do a lot of work. You have your
grading mode now you want to create different look. So we're going to
try another one, just click it, drop,
and then you go, you're going to try
this other one, drop, and we're getting some cool guys that you can use in
your short form. Let's just go right here. There we go. I feel like this is really,
really looking good. I'm going to use
Let me see this. This kind of look
like, you know, the metric form that we
used to enjoy. All right.
7. Episode 06 Maintaining Consistency in Color Grading: A, guys. So now I'm going to
show you how you're going to keep the consistency
in your grading. I have a lot of clips
right here that I've been using with what
I'm showing you guys. So how do you keep things look the same throughout
your entire frame? So let's create another
store album, right? So we're going to grab
this. This is what we have. We're just going to bring
all these down, right? So now we mainly using the
light that we have applied. I'm sure you guys
have already have screenshot of the other
part that we starting with. So we're going to
come to this image. We're going to reset
all the nodes. We're going to drag it and
drop, and there we go. This is a look that we have. We can see that we
have a little bit of highlight reason
why we have to name all our not because we can go back to it and fix
it as quick as we can. One thing that I always do, I'm just going to reset
everything up. I'm going to bring it all
the way down Sartore. So just a little bit
as quick as I can. And we have our kind
of looking small, so I need to bring this
down, clean up the notes. This is looking like
a mess, so you guys. So we're going to go
on a grade one where we have shadows and eyelet. I want to bring down the eyelet. And this is what we're
getting All right. And we have that clean. We want to go on
this other note. We want to bring this up. We can see that this
is what we're getting. The reason why we're
getting this because of the light that we have used, that's why
we're getting that. But how do you fix that? We want to come on a grade two. We're going to go on lights. Let's just fix that. We're going to come
here, bring it down, and then we go to go. So, guys, there you have it. Thank you so much for
watching these tutorials. I'm sure you have
learned so much today. In this show, Tutorials, I need you guys to
go back to it and go out and come back, collaborate, share with
everyone in the course. If there's anything that you
want to know about all this. Kindly reach out. I'm always
willing to help you out. And I'll be seeing you
guys in the next course, which is, you're going to
calibrate your music video.
 Tom Heiry, Filmmaker