Transcripts
1. Introduction to Embroidery: Welcome to hand
embroidery for beginners. I'm Shanaz and I'm
thrilled to share my passion for hand
embroidery with you. As a teacher, I love seeing the spark of creativity
ignite in my students eyes, and I believe hand embroidery
has that same magic. I love to combine my passion for embroidery with my love for
exploring the outdoors. Embroidery is more
than just a hobby. It's a journey of
self expression, a source of relaxation
and a way to tap into your inner
creativity. And who knows? Maybe you'll even discover
a new way to share your passion and earn
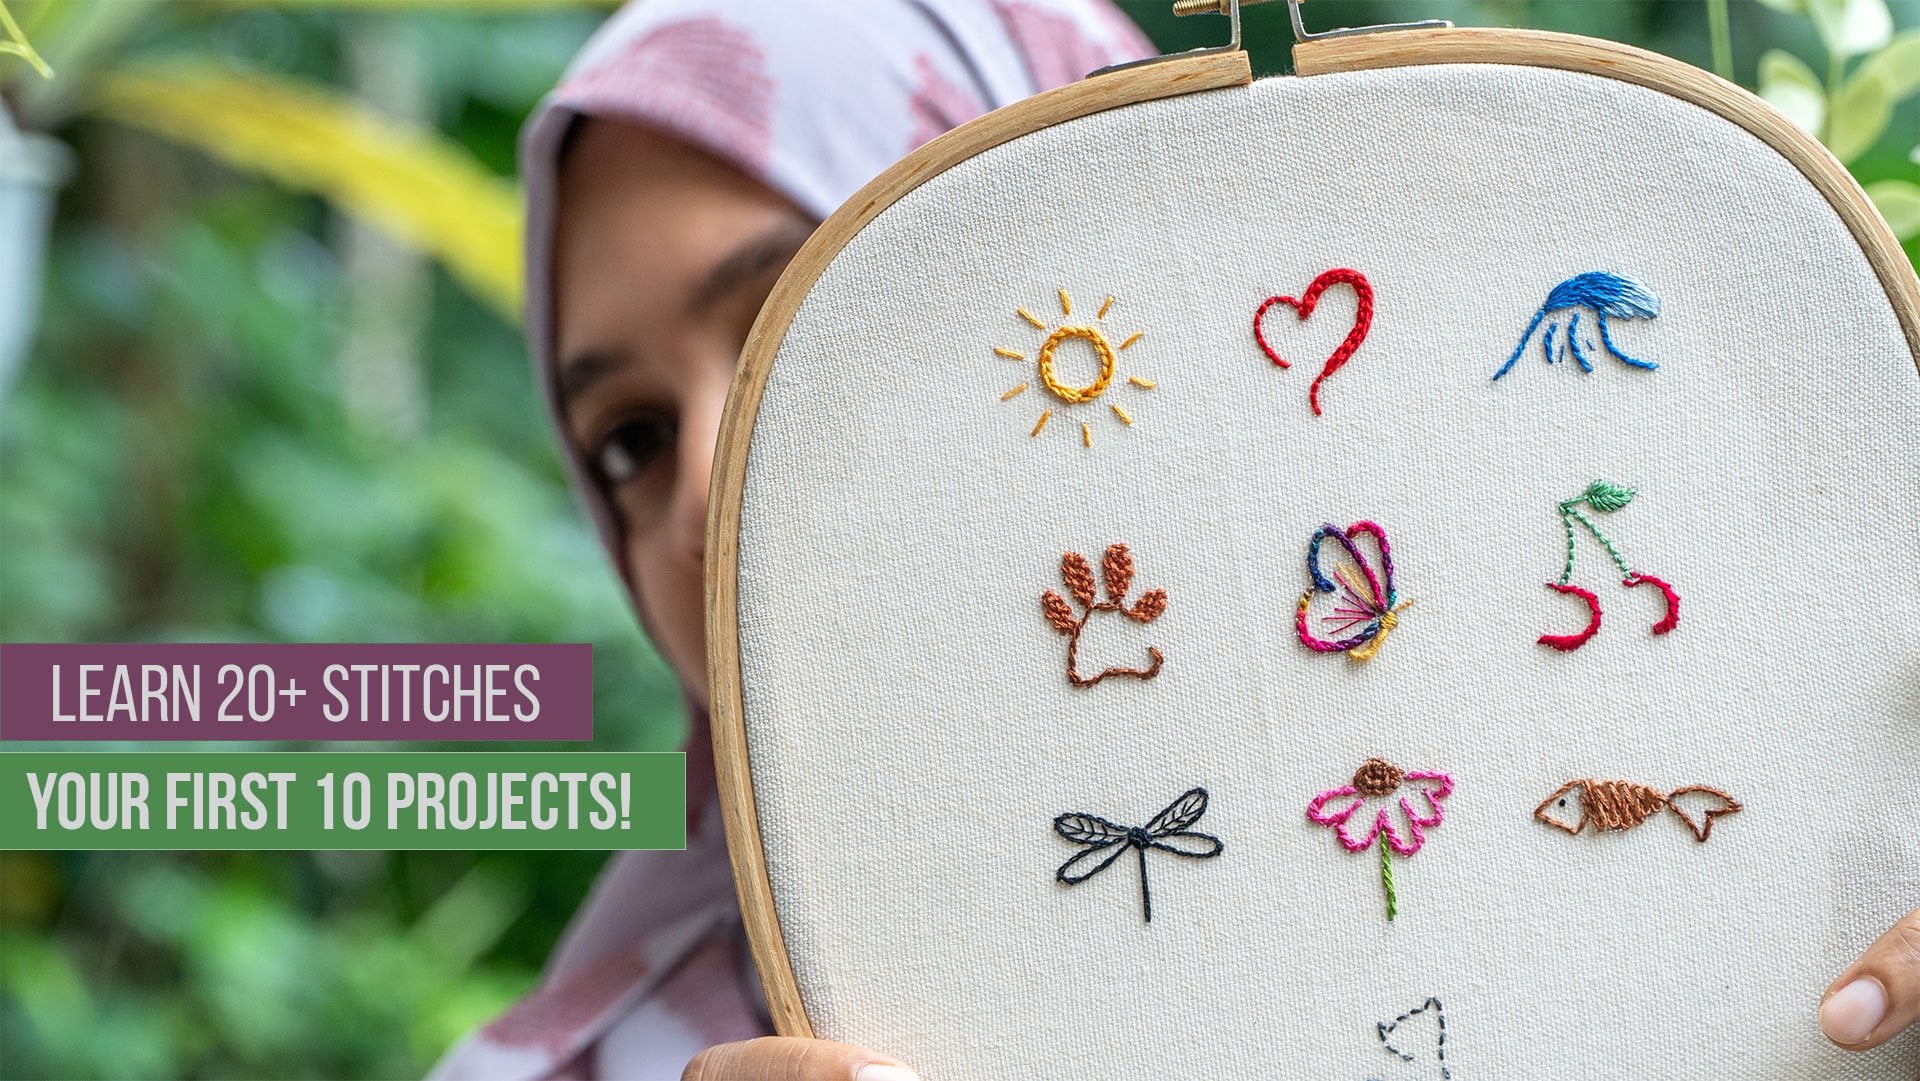
money doing what you love. In this course, we'll
journey together through the basics
of hand embroidery. You'll master 20
essential stitches, and then we'll put them to use creating ten stunning designs. No prior experience is needed, just a willingness to
learn and have fun. We'll start with the essentials, needles, threads,
fabrics and hoops. I'll guide you through
transferring designs onto fabric, and we'll cover those all
important beginner tips like threading your needle
and securing those stitches. By the end of this course, you'll be confidently stitching beautiful designs
and discovering the joy of hand embroidery. Let's get started on this
creative adventure together.
2. Section 1 Essential Tools and Materials: Alright, let's dive into the wonderful world of
embroidery supplies. There's a whole universe
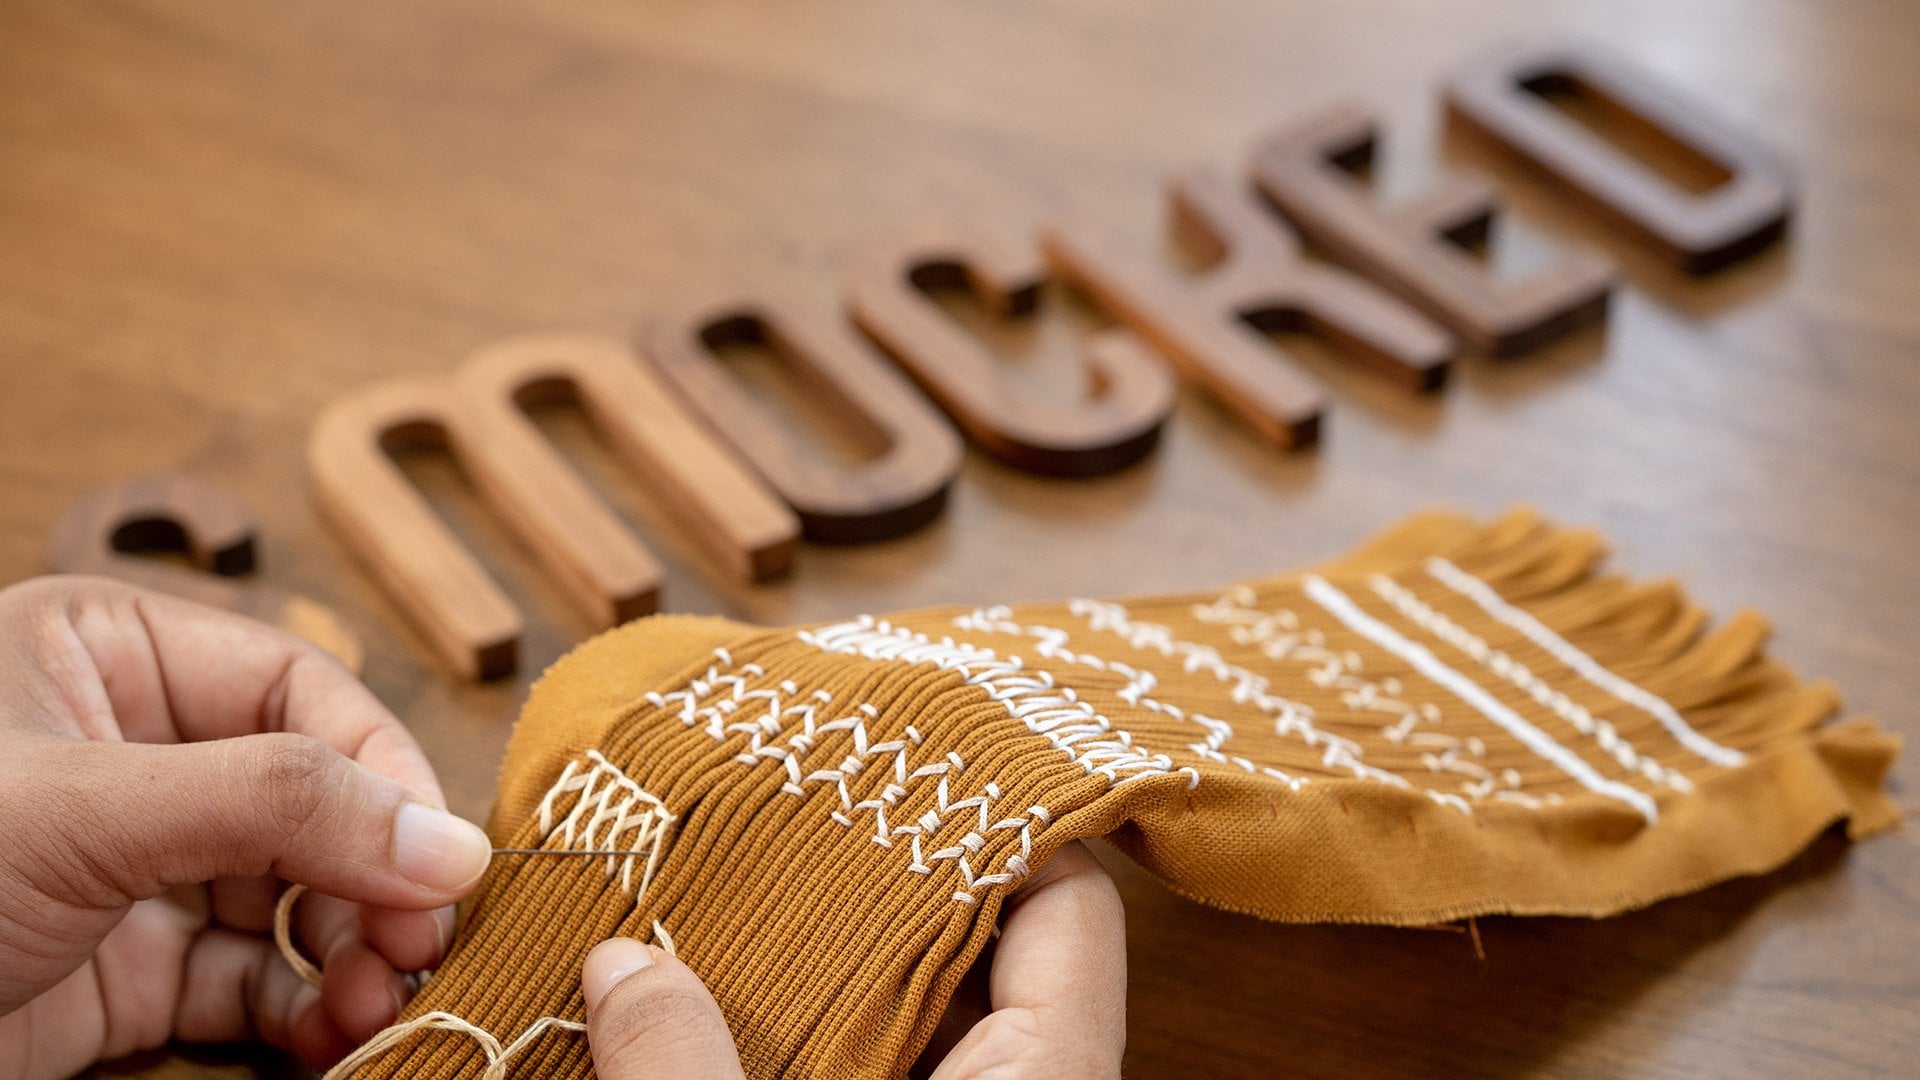
of fabrics out there, but don't get overwhelmed. Today, I'm showing you
some of my favorites, linen, Osnaburg and
hand loom cotton. Let's talk about one of my favorite fabrics
for embroidery, linen. See how the threads
are woven together. Linen often has a
slightly looser weave, which makes it easy to pass your needle
and thread through. This makes it a great
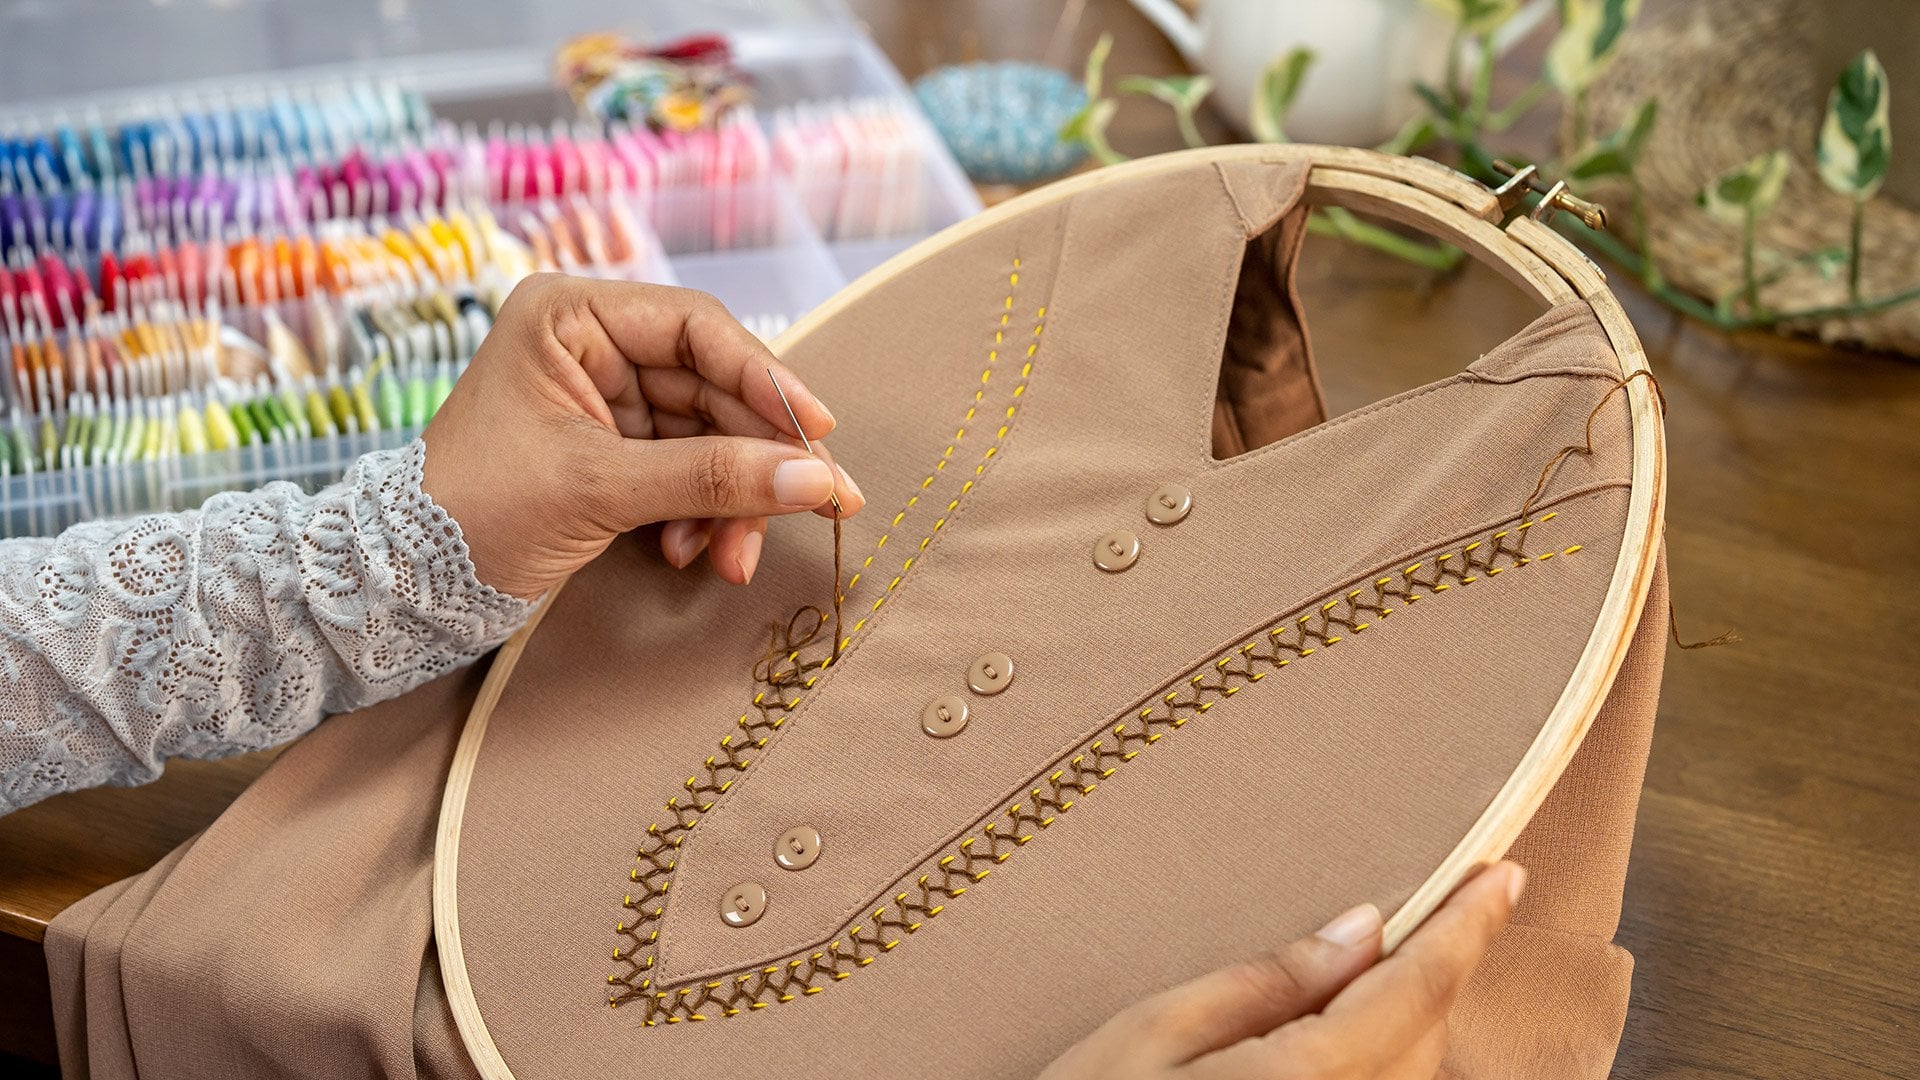
choice for beginners. Osnaburg is a bit more rustic, perfect for a vintage vibe. And hand loom cotton. Oh, it's so soft and
dreamy to stitch on. But honestly, you can
embroider on almost anything, denim jackets, canvas toed bags, even old t shirts. Let your imagination run wild. Next, let's talk needles. I love using tapestry needles
for most of my stitching. They have a blunt tip so they
won't pierce your fabric. Tapestry needles have a
blunt point and a large eye. They are commonly used for
needle point, cross stitch, and other embroidery techniques
where you need to pass the needle through closely
woven fabric or canvas. Chenille needles have a large elongated eye
and a sharp point. They are ideal for creating textured stitches such as henle embroidery
or tufted effects. Embroidery needles are versatile and come in different sizes. They have a sharp point and a slightly larger eye
allowing for easy threading. These needles work well with various embroidery techniques
and thread weights. Milliners needles, also known as straw needles are long thin
needles with round eyes. They are perfect for creating
decorative stitches, such as French knots
or boolean knots. Bading needles are very fine
and have a long narrow eye. They are specifically
designed for adding beads and sequins to
embroidery projects. These needles make it easier to thread through
small bead holes. Let's talk about
embroidery hoops. These handy tools keep your
fabric taut while you stitch, making it easier to create
neat and even stitches. I'm a big fan of wooden hoops. They're sturdy. They come in a variety of shapes and sizes, and they have a classic
look that I love. Here are a few of my favorites, a round hoop which is
perfect for most projects, an oval hoop which is
great for longer designs, and a square hoop which
can add a modern touch. Next up, embroidery scissors. These small sharp scissors are designed for snipping
threads close to the fabric. They're essential for keeping
your work neat and tidy. Now let's talk about thread. I love using stranded
cotton floss for my embroidery. It's soft. It comes in a huge
range of colors, and it's easy to separate into strands to get the perfect
thickness for your stitches. Two of my favorite brands
are anchor and DMC. They both offer
high quality floss with vibrant colors
that won't fade. Look at this gorgeous
array of colors. From soft pastels to
bold jewel tones, there's a shade
for every project. To keep my floss
collection organized, I use a floss organizer
box like this one. It has compartments
for each color and I wind my floss onto bobbins
to keep it from tangling. This makes it easy to find the perfect shade
when I need it. Those are a few of my
essential embroidery tools. With these supplies,
you'll be well on your way to creating
beautiful hand embroidery. There are countless different
types of hand embroidery, each with its own
unique characteristics. If you're just starting out, grab yourself a beginner's kit. It'll have all the essentials to get you stitching right away. Don't worry about
fancy tools just yet. Focus on the basics
and have fun.
3. Preparing to Stitch Getting Your Tools and Materials Ready: Before we dive into our
20 essential stitches, let's get familiar with our embroidery floss and
some basic techniques. Here's a skein of
stranded cotton floss. It's made up of six
individual strands that are loosely
twisted together. When you start, it's
best to pull out an arm's length of
floss about 18 to 20 ". This prevents tangles
and knots as you stitch. You can use one or more strands depending on the thickness
you need for your stitch. For delicate lines, a single
strand might be perfect. For bolder outlines
or filling in areas, you might use two
or three strands, experiment and see what
works best for your project. To separate a strand, gently pull it away
from the others. You can use one or more strands depending on the thickness
you need for your stitch. Now let's thread our needle. Take the end of the floss and pass it through the
eye of the needle. If you find it difficult
to thread the needle, you can use a needle threader. It's a small tool that helps you get the thread through
the eye of the needle. To secure the thread, we'll tie a simple
knot at the end. Next, let's attach our fabric
to the embroidery hoop. Place the fabric over
the smaller inner hoop, then push the outer
hoop over it. Three. Now tighten
the screw a bit more. You might need to repeat this process a few
times as you stitch, especially with larger projects because the fabric can
loosen up a bit as you work. Work your way around the hoop, gently pulling the
fabric at the edges. This helps to evenly
distribute the tension and make sure the fabric in
the center is really taut. Make sure the fabric is
taut and wrinkle free. To finish the
backside of the hoop, you can trim the excess fabric or fold it over
and secure it with a running stitch. All right. Now we're all set to
start stitching almost. Before we jump into
those stitches, I want to show you
something that can make your embroidery life
a whole lot easier, especially if you like to
get comfy while you stitch. It's a hoop stand.
Basically, it holds your hoop for you so you can have both hands
free for stitching. Now we're ready
to get stitching. Grab your fabric, hoop
needle and threads, and let's dive into those
20 essential stitches.
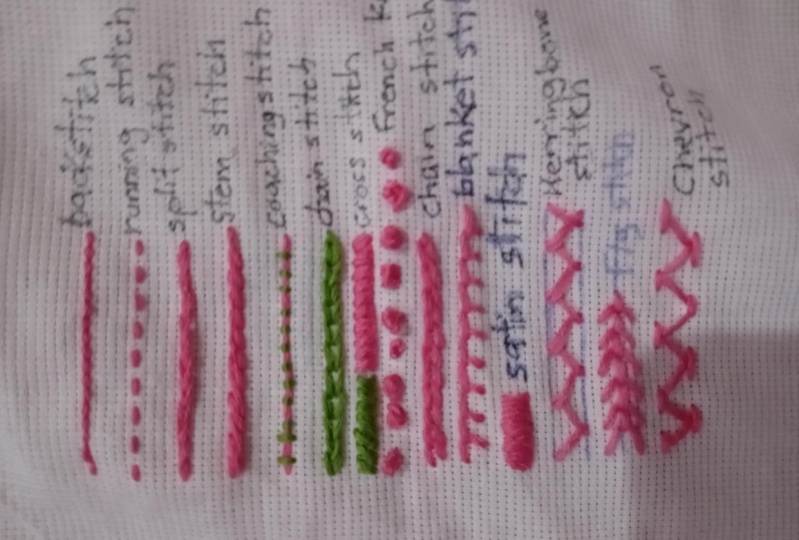
4. Essential Stitches Part 1: Remember how we prepped
our fabric and thread. Now it's time to put
those skills to work. First up is the back stitch. This is a strong
stitch that's perfect for outlines and
creating solid lines. Bring your needle up
through the fabric. Then take a small
stitch backward. Now bring the needle up a
stitch length ahead and insert it back down where
your previous stitch ended. See how it creates
that unbroken line. A versatile stitch that creates
a solid, continuous line. It's perfect for outlining designs or adding fine details. Keep practicing and you'll soon be backstitching
like a pro. Remember, consistency is key. Take your time, keep
those stitches even, and don't pull your
thread too tight. Bring your needle to the
backside of your fabric. Make a small loop
with the thread. Insert the needle through
the loop you just created. Gently pull the thread to tighten the knot
against the fabric. Carefully trim any remaining
thread close to the knot. Next, we have the
running stitch. This is a simple stitch
that's great for creating dashed lines or filling
in areas quickly. You bring the needle
up through the fabric, then insert the needle
a short distance away. Use your finger to gently push the point of the needle
back up to the surface. Then just pull the needle and
thread all the way through. See, it's like magic. You've created a stitch
without having to go to the back of the
fabric each time. Just keep going,
insert the needle, pop it up with your finger
and pull it through. Easy, right? You can vary the stitch length to
create different effects, play around with it and see
what you can come up with. It's like weaving the needle
in and out of the fabric. Let's get those needles moving
with the running stitch. This simple stitch
creates a dash line, perfect for adding
texture or outlining shapes. And there you have it. The running stitch. It's
perfect for outlines for creating texture or for filling in large areas. Give it a try. Now, let's add some texture
with the split stitch. It creates a lovely
slightly raised line, perfect for outlining
or adding dimension. Bring your needle up, then
take a small stitch forward. Now, bring the needle up again in the middle of that
previous stitch, splitting it in half. See how it creates
that texture defect. The split stitch is
a bit like magic, simple, but with
beautiful results. So The stem stitch is another great one for
outlines and curves. It creates a smooth,
rope like line. Bring the needle up through the fabric at your
starting point. Then insert the needle
a short distance away, just like we did with
the running stitch. Instead of going all the way
to the back of the fabric, use your finger to gently push the point of the needle
back up to the surface. Now, here's the key difference
with the stem stitch. As you're bringing
the needle up, angle it slightly to the side. This creates that
slanted rope like effect that makes the
stem stitch so special. Then just pull the needle and
thread all the way through. Keep going, remembering to angle the needle to the
same side each time. This creates a
beautiful flowing line that's perfect for outlines, stems, and all sorts
of delicate details. And there you have
it the stem stitch. It takes a little practice to get the hang of
angling the needle. But once you do, you'll love how versatile and
elegant this stitch is. This is a really versatile
stitch that's perfect for creating smooth flowing lines
like stems and outlines. It has a slightly textured look that adds a bit of
dimension to your work. The stem stitch takes
a bit of practice, but once you get the hang of it, you'll love the elegant
lines it creates. Let's add some decorative lines
with the couching stitch. It's perfect for attaching
thicker threads or yarns to your fabric,
creating beautiful accents. I've chosen a contrasting
color so it really pops. Now I'm going to hold
it in place with my fingers and use a different
thread to couch it down. Lay your thicker thread
or yarn on the fabric. Now use a contrasting thread and small stitches to secure the
thicker thread in place. You can space these
stitches closer together or further apart depending
on the look you want. The couching stitch is all about adding texture and
visual interest. You can get creative with
different thread combinations. It's basically like attaching a thread or cord to the
surface of your fabric. It's also a great way to add interesting textures
to your embroidery, like using thicker yarns
or even metallic threads. So we've learned five
amazing stitches today. Give yourselves a
pat on the back. Now grab your practice fabric and give these stitches a try. The more you practice, the
more confident you'll become. Get ready for the
next five stitches in our next lesson.
I'll see you there.
5. Assignment One : 5 Stitches challenge: Hey, everyone. It's time
for your first assignment, and I'm so excited to
see what you create. I've got my fabric secured in my trusty eight
inch wooden hoop. Remember how we talked about getting that fabric
nice and tight? Make sure yours is
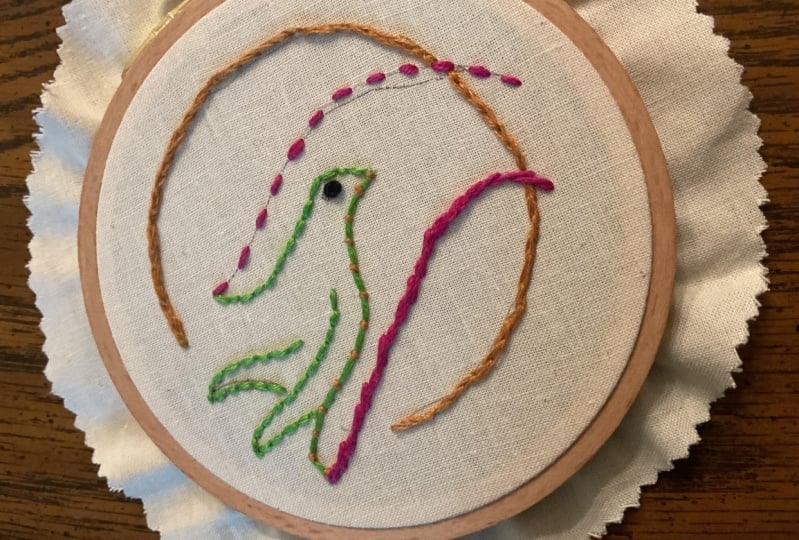
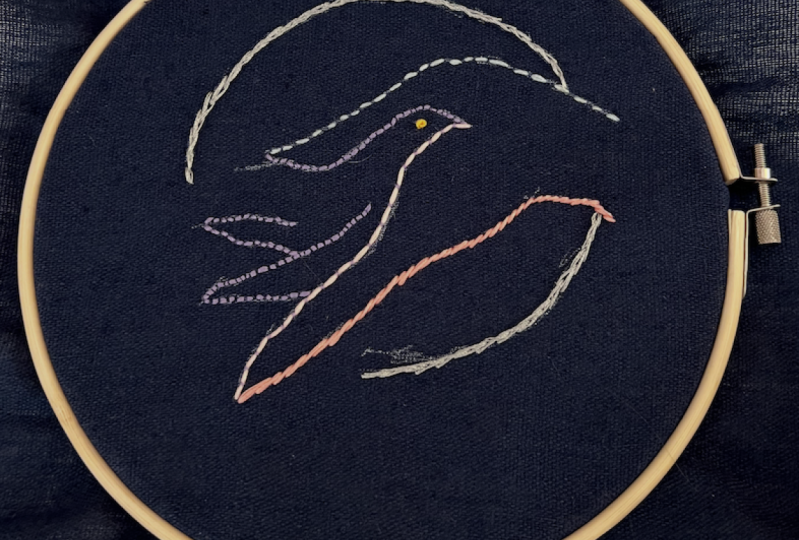
drum tight too. We are going to be stitching this beautiful woman
bird and moon design, putting those first five
stitches we learned to good use. If you have a darker fabric, just use the backlight
from your phone to see the pattern
through it. Easy, Ps. I've already transferred
the pattern onto my fabric. I chose a light
colored cotton fabric so I could easily
trace the design. All right, let's
start stitching. I'm going to use split stitch for the outline of this circle. Remember how we do that? Bring the needle up,
take a stitch forward, then come up through
the middle of that last stitch to
split the thread. It creates such a
lovely textured line. I'm using this gorgeous
brown floss for this part. And remember to hold
your needle lightly. No need to grip it too tightly, relax your hands and
enjoy the process. And there's our split
stitch outline. Don't forget to finish your
thread neatly at the back. Bring your needle to the
backside of your fabric. Make a small loop
with the thread. Insert the needle through
the loop you just created. Gently pull the thread to tighten the knot
against the fabric. Next, I'm going to use the running stitch for
the outline of the hand. This is a quick and easy stitch that's perfect for longer lines. Just weave the needle in
and out of the fabric, keeping your stitches
nice and even. I'm using a vibrant
purple thread for this. Um, Now, for the bottom line of the hand, I'm going to use
the stem stitch. Remember how we angle the needle slightly to create
that rope like effect? It's perfect for adding
a bit of dimension. I'm sticking with the
purple floss for this part. Time to add our
cute little bird. I'm going to use the couching
stitch for the outline. This is where we
use two threads, one for the couching thread, and one to stitch it down. I'm using this vibrant green for the couching thread and a contrasting orange
to secure it. Remember to keep those couching
stitches nice and even. S It's a strong stitch that will give our bird
a nice solid shape. And there's our couched outline. Now for the bird's body, I'm going back to
the backstitch. Now, as you're stitching, it's really important to
follow each step carefully, keep a close eye on where the needle goes
down and comes up. This will help you
create the stitch correctly and keep
your tension even. If you're ever unsure, don't hesitate to rewind the video and watch the
demonstration again. You can also pause the video at each step to make sure you're
following along correctly. So finish off our bird, I'm adding a little bead
for the eye. Isn't it cute? And there you have
it, our woman bird and moon design complete with all five stitches.
Now it's your turn. Download the pattern, choose your colors and get stitching. Don't be afraid to
change things up a bit. Maybe use a different stitch for the outline or add
some extra details. Once you're finished,
take a photo of your work and attach
it below this video. I can't wait to see
your creations. O
6. Essential Stitches Part 2: Welcome back, stitchers. I'm excited to continue our stitch exploration with
five more essential stitches. Remember, practice
makes perfect. So grab your needle, thread, and hoop, and let's
stitch together. First up is the chain stitch. This versatile stitch creates a lovely chain like line
that's perfect for outlines, borders, and filling in areas. Bring the needle up
through the fabric, then hold the thread
down with your thumb and insert the needle back down at the same point
where it came up. Bring the needle up again a short distance away,
creating a loop. Continue this with
each new stitch coming up through the loop
of the previous stitch. Insert the needle back
down where it came up, keeping the loop on top. Now bring the needle up again
inside the loop and repeat. A few things to keep in mind, try to keep an even distance or gap between your stitches. This will help create a
neat and consistent look. Time to link things up
with the chain stitch. It creates a lovely
chain like line, perfect for outlines
or decorative borders. It's like creating a chain
of connected stitches. The chain stitch is fun and adds a playful touch
to your designs. Next, we have the
classic cross stitch. This stitch is worked on
an even weave fabric, creating small Xs
that form a design. Bring the needle up
through the fabric, then diagonally across to
create a slanted stitch. Come up again below the end of the first stitch and cross
over to complete the X. Bring your needle up, then
take a diagonal stitch. Now, bring the needle up again crossing over the first
stitch to create an X. Cross stitch is like
painting with thread. You can create intricate
designs or keep it simple. It's a fun and relaxing stitch. A few things to keep in mind, try to keep an even distance or gap between your stitches. This will help create a
neat and consistent look. Let's dive into the world of
pixels with cross stitch. It's all about creating patterns with tiny
egg shaped stitches. Now for the French knots, these little knots add a lovely textured touch
to your embroidery. Bring the needle up
through the fabric, then wrap the thread around
the needle once or twice. Hold the thread taut and insert the needle very
close to where it came up. Pull the needle
through to the back, creating a small raised knot. Bring your needle up, then wrap the thread around the
needle once or twice. Now hold the thread
taut and insert the needle back down close
to where it came up. It's great for
adding details like flower centers or creating
a sprinkled effect. I might feel a bit
fiddly at first, but with practice, you'll be making perfect French
knots in no time. The twisted chain stitch
is a variation of the chain stitch that adds a beautiful
twist to your lines. It's worked just like
the chain stitch. But as you bring the needle
up for the next stitch, you twist it slightly, creating a spiral effect. The twisted chain stitch is
great for creating outlines, borders, and decorative lines. It adds a touch of elegance and texture to your embroidery. Have fun experimenting with it. And remember to hold
your needle lightly. No need to grip it too tightly, relax your hands and
enjoy the process. Finally, let's try
the blanket stitch. This stitch is
perfect for finishing edges and creating
decorative borders. Bring the needle up
through the fabric. Then hold the thread
down with your thumb and insert the needle
a short distance away. As you pull the needle through, make sure the loop of thread
stays under the needle. Then loop the thread under the needle and pull it through. Continue making these
looped stitches along the edge of your fabric. The blanket stitch is both
functional and decorative. It's a great way to add a finishing touch
to your projects. How are those stitches coming along? Remember, it's all about practice and finding
your rhythm. Okay. It's perfect for creating a neat and decorative border
around your embroidery. Don't be afraid to
experiment and try these stitches on
different fabrics and with different threads. And there we have it, another
five stitches mastered. Can you believe we've
already covered ten essential
embroidery stitches? You're well on your way to
becoming an embroidery pro. Keep practicing,
explore different ways to use these stitches, and I'll see you in the next
lesson where we'll dive into five more exciting
stitches. Happy stitching.
7. Essential Stitches Part 3: Hi again. Let's learn five more stitches in
our embroidery journey. Grab your supplies and
let's get started. First, we'll do
the satin stitch. This stitch is perfect
for filling in shapes and creating a
smooth, satiny finish. Bring the needle up through the fabric at one
edge of the shape, then down at the opposite edge. Keep your stitches close together and parallel
to each other. A smooth and elegant stitch
perfect for filling in shapes and creating smooth,
satin like surfaces. Simply bring your needle
up through the fabric, make a straight
stitch and then bring the needle back down next
to the starting point. Repeat this process, keeping your stitches close together
for a seamless finish. Next, we have the
Herring bone stitch. This stitch creates a
beautiful textured line that's perfect for borders
and decorative edges. See how I've drawn
two parallel lines here with dots marked
at equal distances. This will help us
keep our stitches even and create a
nice balanced look. Bring the needle up
through the fabric, then take a small
stitch to the right. Bring the needle up
again to the left of the first stitch and cross over to create a slanted stitch. Continue this pattern
alternating sides. Try to keep an even distance or gap between your stitches. And remember to hold
your needle lightly. No need to grip it too tightly, relax your hands and
enjoy the process. Now for the fly stitch, this stitch creates
small V shaped stitches that resemble flying birds. Bring the needle up
through the fabric, then hold the thread
down with your thumb and insert the needle
a short distance away. As you pull the needle through, make sure the loop of thread
stays under the needle. Mm. Try to keep an even distance or gap between your stitches. This stitch lets you create delicate leaves, petals, and even
playful accents. Let your needle take flight
with the fly stitch. And remember to hold
your needle lightly. No need to grip it too tightly, relax your hands and
enjoy the process. The Chevron stitch is a fun stitch that creates
a zig zag pattern. Bring the needle up
through the fabric, then take a small
stitch to the right. Now, as you're stitching, it's really important to
follow each step carefully. Keep a close eye on where the needle goes
down and comes up. This will help you
create the stitch correctly and keep
your tension even. Continue this
pattern, alternating sides and creating
a mirrored effect. Just keep repeating
this process up down, up, down to create
a line of stitches. Try to keep your stitches an even length and
distance apart. This will help create a
neat and consistent look. Again, if you're not
comfortable with the shortcut method we used
for the running stitch, you can absolutely
stitch this way, completing each stitch fully. Try to keep an even distance or gap between your stitches. If you're ever unsure, don't hesitate to rewind the video and watch the
demonstration again. You can also pause the video at each step to make sure you're
following along correctly. And remember to hold
your needle lightly. No need to grip it too tightly, relax your hands and
enjoy the process. Finally, let's try the feather stitch. This stitch creates a
beautiful open work pattern that's perfect for borders
and decorative edges. We'll begin our feather
stitch from the middle. Bring the needle up through the fabric at the top
of the third line. Then take a small stitch diagonally across
to the first line. Bring the needle up again, angle downwards to
the second line, making sure the thread
loops around the needle. Now we'll work outwards. Take a small stitch diagonally
across to the fourth line. Bring the needle up
again at the third line, angle downwards, and again, make sure the thread
loops around the needle. Continue this pattern,
alternating sides and working outwards
to create a series of connected loops that
resemble a feather. The feather stitch
is quite versatile. You can adjust the
length and spacing of your stitches to
create different effects. Experiment with different
threads and colours to add even more dimension to
your feather stitch designs. Don't be afraid to
experiment and try these stitches on
different fabrics and with different threads. And there we have it,
another five stitches down. We've now covered 15 essential
embroidery stitches. You're making
fantastic progress. Remember, the key to mastering these stitches is practice. The more you practice, the
more confident you'll become.
8. Essential Stitches Part 4: Welcome to our final lesson
on essential stitches. I'm so excited to guide you through these last
five techniques. Let's gather our materials and get ready to
stitch together. First up is the long
and short stitch. This stitch is
fantastic for creating smooth shading and blending
colors in your embroidery. See how I've drawn four
parallel lines here. This will help us
keep our stitches organized and create a
gradual blend of colors. We'll start with a long stitch, then a short stitch and
continue alternating. The beauty and
effectiveness of the stitch come from the variation
in the stitch lengths. It's not about making all
the short stitches the same length or all the long
stitches the same length. It's about strategically
varying the lengths to create a smooth transition
of color or tone. Remember, the key to mastering these
stitches is practice. So keep stitching, explore different ways to
use these stitches, and don't be afraid
to experiment and develop your own style. I'm using two colors of thread to demonstrate
the shading effect. Continue alternating between
long and short stitches, filling the space
between the lines. Imagine you're
shading a drawing. You wouldn't use just one
shade of pencil, right? You'd use a variety of shades to create
depth and dimension. The long and short
stitch works in a similar way. Mix it up. Use some really long stitches, some medium length stitches, and some short stitches to
create a gradual blend. Next, we have the
fish bone stitch. This stitch is perfect
for filling in leaf shapes and creating a
textured almost woven effect. I've drawn a leaf shape here and we'll fill it in with
the fish bone stitch. Follow along carefully as we create this intricate stitch. Bring your needle
up from the back of the fabric at the far
tip of the shape. Now do a short straight
stitch down the spine. Now, bring your needle up again, just to the right of
your stitch at the top. Bring your needle
back down again on the center line just below the bottom of
the first stitch. Bring your needle up
again at the top, but this time on
the left side of the top stitch and once again, poke it down on the center line underneath the last stitch. Keep doing this on alternate
sides to fill your shape. Continue alternating
sides, creating a series of stitches that
resemble a fishbone. Yeah. Now for the lazy daisy stitch, this stitch is
ideal for creating flower petals and other
delicate curved shapes. Bring the needle up through the fabric at the base
of the petal shape. Hold the thread down
with your thumb and insert the needle a short
distance away, creating a loop. Bring the needle up
again at the same point where it first came
up, securing the loop. Take a small stitch over the end of the loop
to hold it in place. Repeat for each petal. I'm stitching five
lazy daisy stitches here to form a flower. It's a simple stitch that adds a touch of whimsy
to your embroidery. The bullion stitch creates beautiful textured knots that
add dimension to your work. Bring the needle up through the fabric at your
starting point. Wrap the thread around
the needle several times, creating a long coiled stitch. Gently pull the needle
through the coils, keeping them close together. Repeat for each bullion knot. I'm stitching four
Bullion knots here, and you'll see how they create
a lovely raised effect. Finally, let's try
the cast on stitch. This stitch is
perfect for creating delicate lines and adding a touch of elegance
to your embroidery. Bring the needle out
from one location. Go in a little back and come out from the first
location as shown. Place the thread
over your finger. Twist the thread
with your finger. This creates a twisted loop. Take it closer to the
tip of the needle. Touch the tip of the
needle lightly with your index finger and slip
the loop onto the needle. Keep making more loops in the same way and build up
the wraps on the needle. The wraps should be at least as much as the space
created by the needle. Now, hold the wraps between your fingers and pull out
the needle completely. Take the needle in through
the point closer to the earlier stitch point
to finish the stitch. Don't be afraid to
experiment and try these stitches on
different fabrics and with different threads. I'm stitching three
cast on stitches here, and you'll see how they create
a beautiful flowing line. Now, let's stitch together and explore the wonderful
world of embroidery. And there we have
it. We've reached the end of our 20 essential
embroidery stitches. Congratulations on completing
this beginner's journey. I'm so proud of your progress. Congratulations on
making it this far. You've now learned
a fantastic range of embroidery stitches. To put your skills to the test, it's time to start thinking
about your final assignment. In the next video, I'll be walking you through
the project in detail. So make sure you
watch it carefully. Get ready to create
something amazing. Journey. Happy stitching.
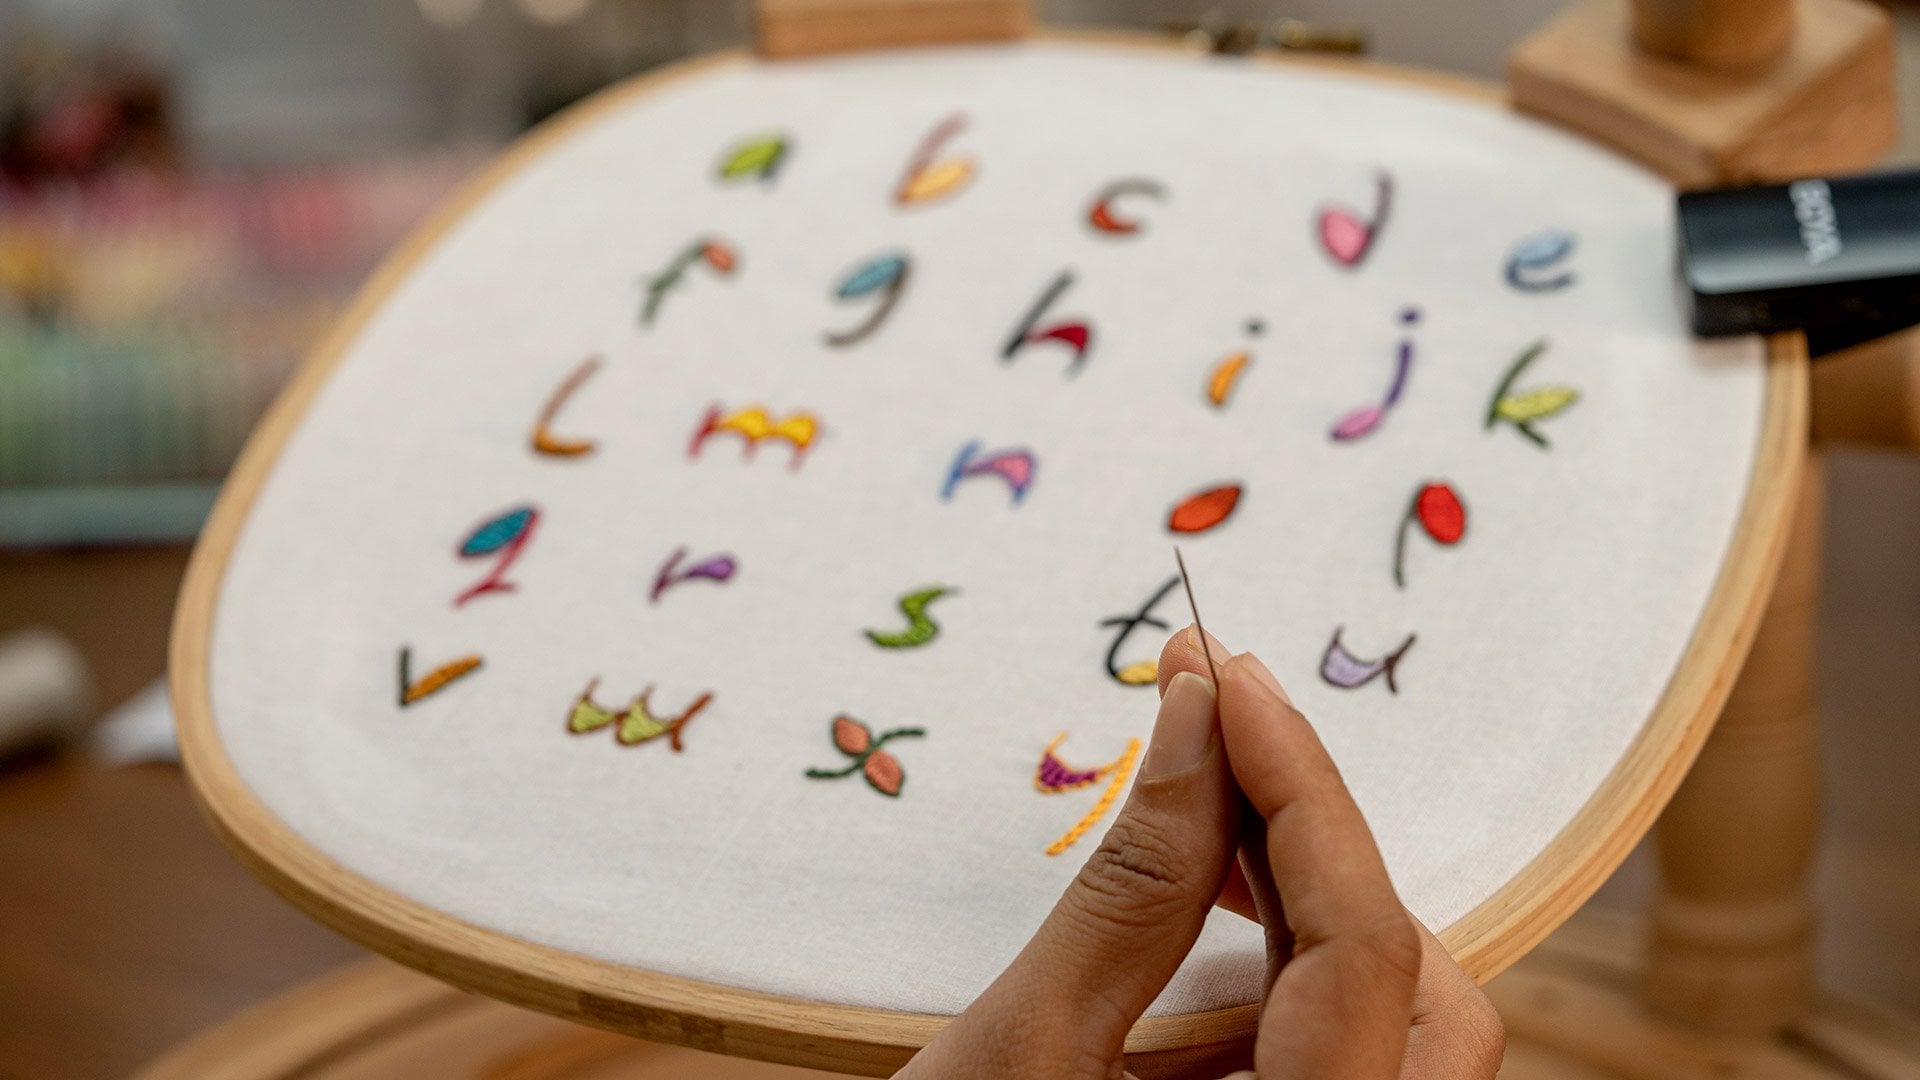
9. How to Transfer Embroidery Patterns onto Fabric: In this section, we'll explore a variety of techniques for transferring embroidery
patterns from classic methods to
modern innovations. We'll learn how to use tools like light boxes, carbon paper, printable stabilizer sheets, and even simple tissue paper to trace our designs
with precision. Before we get into tracing, remember, free hand embroidery, draw your own designs right
on the fabric or use a ruler, circle template or drawing
grids to get started. Lots of embroidery,
especially Sashko works great without a
pattern. So get creative. Many embroidery flowers can be stitched without a
transferred pattern, and most Sashko
stitching relies on drawn grids rather
than traced designs. So embrace your inner artist and see what you can create
without a pattern. Remember, the best method depends on your design
and your fabric, so let's get started. Number one, direct trace. Let me share the easiest
transfer method of all. With light fabrics, you
can skip the fancy tools, print your design
and trace it onto your fabric using
a pen or pencil. Then stitch away. Next, we have my
personal favorite, the light box method. I just love how versatile it is. It works beautifully for
lighter colored fabrics, but you can even use it
with some darker fabrics, especially if you have
a good light source. Simply place your pattern
on the light box, secure your fabric on top, and trace those lines. I'm using a heat
erasable pen here, which shows up nicely on
both light and dark fabrics. Just make sure it disappears completely with a touch of heat. If you don't have a dedicated
light box, don't worry. You can use your
phone's flashlight, a small LED light or tape your pattern to a window and
let the sun do the work. Number three, carbon paper. This old school technique is still a favorite
for a reason. Place your carbon paper between
your fabric and pattern. Then use a tracing wheel or a stylus to transfer the design. This method is especially handy for darker or
thicker fabrics, where a light box
wouldn't be much help. Always test your carbon
paper on a scrap piece of fabric first to make sure it doesn't leave
any unwanted marks. And remember, a gentle
touch is all you need. Number four, printable
sticky stabilizer. Now for a more modern approach, printable sticky stabilizer. This stuff is amazing. You print your design
directly onto the stabilizer. It has a special surface that works just like paper
in your printer. Then peel off the backing and stick it right
onto your fabric. No tracing needed. It's perfect for
intricate designs or when you need super
accurate placement. This sticky stabilizer
is a dream because it holds your design securely
in place while you stitch, but it won't leave any sticky
residue on your needle. It acts as a stabilizer, preventing your fabric from
puckering or stretching, a lifesaver for thicker
or textured fabrics. When you're finished stitching, just rinse the stabilizer
away with cool water. It dissolves like magic, leaving you with a clean,
beautifully embroidered piece. Number five, tissue
paper methods. This method is great for those who like a bit of a
free hand approach. Trace your design onto some tissue paper.
Any kind will do. Pin it to your fabric
and you're ready to go. Use a contrasting
thread to stitch a simple running stitch along
the outline of your design. This creates a temporary
guide for your embroidery. Here's another variation. Trace your pattern onto a piece of pattern
tracing fabric. I like to use a soft
embroidery stabilizer fabric. Then place it on top of
your fabric and trace the design with a
heat erasable pen or a water soluble pen. This gives you a more
stable guide to work with, especially for detailed designs. Kgratulations. You've mastered the art
of pattern transfer, and now it's time to
put those skills to the test and truly
unleash your creativity. I've created ten unique embroidery designs,
especially for you, and in this final section, you'll embark on a stitching journey to bring them to life.
10. 10 Simple Embroidery Designs: And now the moment
you've been waiting for, it's time to take everything
you've learned and embark on a creative adventure with ten beginner friendly
embroidery designs. So download that A
four pattern sheet, choose your threads
and get ready to stitch your way to
embroidery success. I can't wait to see
what you create. I've drawn all these designs onto dark cotton fabric using a heat erasable pen and my small LED light box
for easy transfer. Whether you prefer
light or dark fabrics, simply choose your favorite
tracing method from light boxes to tissue paper and get those
designs transferred. For our first design, I'm stitching a simple
mountain and sun scene using straight stitch for
the mountain peaks and chain stitch for the sun. As you stitch each design, you'll practice
essential stitches like the straight stitch, chain stitch, backstitch,
and many more. I used bright yellow
and gray floss threads to give it a lovely contrast. This is a great minimalist design that can look stunning
on tote bags, hats, or even the
pocket of your jeans. Next up, we have a cute little elephant
outlined with backstitch and filled in the ears using detached buttonhole stitch
all done with beige floss. And Now for the elephant's ear, we'll be using a stitch
that might be new to you, the detached buttonhole stitch. It may sound a bit intimidating, but trust me, it's
easier than it seems. Just watch closely as I demonstrate and you'll
pick it up in no time. If you're feeling
a bit unsure about the detached buttonhole
stitch, no worries. You can always substitute
it with a cast on stitch. It will give the ear a
slightly different look, but it's still a beautiful
and effective stitch. The choice is yours. This adorable design
would be perfect for a child's clothing item
like a onesie or a t shirt, or even a small
decorative cushion. I've stitched a coconut tree using couching for the trunk, bullion knots for the leaves. I chose brown and green floss
to give it a natural look. This tropical design would be fantastic on a beach
bag or summer dress. Feel free to personalize
your projects by choosing thread colors that perfectly complement your
fabric and style. Our next design is a serene sunset at the lake. I used running stitch for both the water and the
sun with orange flows for the sun and blue flows for the water beautifully
representing the sky and lake. This would look beautiful on a canvas tote bag or
a casual T shirt. For the dragonfly, I
used pink floss and combined braided chain
stitch and outline stitches. You can mix and match
these designs on t shirts, denim jackets, or even around the hem of
skirts and dresses. The designs are small enough to fit into any space you
want to brighten up. This delicate design would be perfect on a handkerchief, the corner of a napkin, or even on a baby's bib. Our sixth design is a
cozy coffee cup using twisted chain stitch and split stitch with
shades of brown. It's a simple and fun design that can be embroidered
onto kitchen towels, aprons, or even a mug cozy to add a personalized
touch to your coffee time. Next up is a simple
dancing couple. I stitched this with whipped running stitch and stem stitch. I started with the whipped
running stitch for the woman, adding a beautiful texture
and flow to her dress. This design would look charming on the front pocket of a T shirt or a summer dress, adding a little flare and
movement to your clothing. For the bird, I
use backstitch and Portuguese knotted stitch
with blue and beige flows. This elegant design would be lovely on pillowcases, the corner of a scarf, or even a decorative
wall hanging. The leaf design
was stitched using heavy chain stitch and outline stitch with
light green floss. It's a versatile pattern that can be used on almost anything, pocket edges, collars, or even borders on table
runners and napkins. Finally, we have a cute snail
stitched with split stitch and palestrina stitch using
green and pink floss threads. This whimsical design would
be perfect for kids clothes, backpacks, or even a
fabric book cover. Congratulations. You've reached the end of this beginner's embroidery
course, but guess what? You're not a beginner anymore. You've learned
essential stitches, mastered tracing techniques, and completed ten beautiful
embroidery designs. That's something to be
incredibly proud of. For those eager to continue
their embroidery adventure, I'll be launching
a new course soon, specifically designed
for embroidery experts. We'll delve into more
intricate stitches, complex designs, and
exciting new techniques.
 Shanas, Embroidery for Everyone