Transcripts
1. Intro: Have you ever wanted to
style your own website? If so, you'll need to
know and to master CSS. Today, we're going
to do just that by building out this project. Hi, my name is Zoe. I'm a software engineer
and former professor who loves helping others
get started with coding. I've created tons of websites
and web apps using React, CSS, HTML, and more. Today, we're going to be going
over the essentials of CSS and use those skills to add
styling to our HML website. If you're not
familiar with HTML, I'd highly recommend
checking out my previous class where we built the base code
for this project. But either way, I'll have the starter code
linked in the project and resources tab below. In this class, we'll
talk all about cascade, style sheets, and the
different rules of CSS. First, we'll start
off with an overview of what CSS is and
how it's used. Then we'll dive right
into our tutorial. In the tutorial, you can expect to learn
how to write CSS, how to connect your
CSS to your HTML, how to use a stylesheet
effectively, and how to use CSS to quickly
bring a design to life. This course is for anyone who's interested in building and styling their own websites and learning how
to work with CSS. By the end of this
course, you'll be able to do this for yourself.
So let's get started.
2. Class Project: Class project. Our
project for this class will be to style a simple
website using only CSS. For this class, it
will be essential to have access to a
computer that you can run Visual Studio code or another code editor
of your choice. You'll also want
to have a browser like Google Chrome
up and running, as we'll be using it to
display our webpage. As I mentioned
before, there will be some starter code available if you want to follow along
with the tutorial. I'll leave links to any
assets and resources you'll need in the project
and resources tab below.
3. What is CSS?: What is CSS? CSS stands for
cascading style sheets, and it is a style
sheet language used to describe the way in which HML
is presented to the user. CSS can either be linked using an external sheet or written within the
HML document itself. We'll explore both options
throughout this course. As a language, CSS is made up of two primary parts,
selectors and rules. Let's dive into what
each of those are.
4. Selectors & Rules: Selectors and rules.
Selectors are indicators that tell the computer which elements to oblide the
desired styles to, and the rules are those styles. Each CSS rule starts
with at least one, but possibly more
than one selector. These can select either a type of element such as an H one, P or image, a specific
class of element, or the idea of a
singular element. Both classes and
IDs can be added to any HTML element to help
group or identify them. But there's one key difference
between classes and IDs. Whereas classes can be added to multiple elements to help carry across a consistent
set of styles, sort of a webpage
or entire site. IDs, on the other hand, are meant to be unique
to only one element. Depending on your styling goal, you might want to use either
classes or IDs or both. Most websites have a healthy
combination of the two. Class selectors are written in CSS by prepending the
name of the class, which you choose
yourself with a dot. IDs are written in
almost the same way, but instead of a
dot, you use a hash.
5. Cascade: Cascade. As you can see, there are multiple ways to
select an element using CSS. But how do you know
whether or not your rule will be
applied correctly? CSS has two features
that can help with this cascade and specificity. As the name implies,
the styles in CSS are applied in
a cascading manner. That means that the
styles that are written at the top of the
file are applied first, and then as you go down, the other styles are applied on top of that initial style. If you happen to have written two conflicting styles
for the same element, as a basic level, the one that appears later in the CSS sheet will be
the one that is applied. However, this isn't
very maintainable, especially if you have multiple style
sheets to work with. So there is a way to
override this behavior. Let's take a look at another
feature called specificity.
6. Specificity: Specificity. Specificity
allows us to override previously stated rules based on how specifically the
element is selected. For instance, if all P tags were set to have the color red, but then we gave a specific
P tag the class of special and gave that class
the rule color of blue, regardless of where that rule
was stated in the document. So irrespective of the cascade, that P tag would be forced
to take on the color blue because classes are more
specific than element selectors. The same is true for IDs. If we gave that same
P tag the ID of unique and set the rule for that ID to be
the color green, that P tag would then
take on the color green. This is because IDs are the most specific of all three of
our selector options. So going from least
specific to most, we have elements, then
classes, then IDs.
7. Declarations: Declarations. Once
you've correctly targeted the element or elements
you'd like to work with, it's time to write your styles. As you might have
already picked up on, CSS rules are written
using a set of declarations that levy the
use of properties and values. The property on the left
side of declaration is the stylistic feature that we want to modify with our rule. The value on the right side is the specific style
choice we've made. When we combine the property on the left and the
value on the right, we get a CSS declaration. These declarations
will live inside our CSS rule sets or rules and then will be
applied to our HTM.
8. Additional Information: Additional info. As
you can imagine, CSS has hundreds of
different properties, but don't worry, you're not meant to memorize all of them. You can use sites
like W three Schools, Mozilla developer dots, and stack overflow to look up the correct CS property to
use whenever you need them. Each property can have many different values
which need to be spelled correctly or written in the right order
for them to work. So if you're ever unsure about the property or styling
you're working with, it's best practice to just
look up the documentation.
9. Tutorial: All right. So now it's
time to add some CSS, some styling to our page. But how do we even
work with CSS, and where does it go,
and how does it connect? And let's just dive in
from the beginning. The best place to write
CSS is in its own file. So what we're going to do
is create our own CSS file. So to do that, let's go into our folder where
Indext HTML lives, and let's create a new file. We'll call it files dot CSS. Awesome. We've
created our CSS file. Perfect. What we need to
do now is to link it to our HTML file because right now they're just kind of
sitting beside each other, but they don't necessarily know that they're meant
to work together. So what we need to do is go over to our index dot HTML file. We're going to go ahead and link our CSS file to our HTML. So we're going to go
into the head section, and we're going to use what
is called a link element. So the link element
does just that. It links one file to another. So we're going to use ink, and then the relationship. There are a couple of
different attributes that link that the
link element has. So one is RL, which
stands for relationship. So wants to know why these two sheets need
to, like, work together. So we're going to call this one. The relationship here is
style sheet because CSS, the CSS sheet we're working
with is a style sheet. It's meant to style HTML. And then we're going to use another um attribute called HRF. HRF is basically the URL or the location of
what the file is. In this case, because it's a local file, it's going
to be, right there, but you can even use, google.com for your HRF if
that's what it needs to be. You wouldn't use it as
your sale sheet because Google is not a CSS file,
but you get the idea. HRF can be used in a variety of situations for
different types of links, and we'll use Links a
little bit later on. So for now, what we're going
to do is take our HRF, and we are going to put it we're going to link it
to our style dot CSS. Now, remember how when
we were talking about terminal and the dot dot
slash and all of that, well, quite similarly, we can
indicate a file is in the same folder as the one we're currently in by using dot slash. So if I go dot slash, and you'll see that VSCode already recognizes
what I'm trying to do, it will list all of
the directories in the files that are in the current folder
that I'm working in. So if I go dot slash and
I go to styles dot CSS, that is actually the style
sheet that we just created. So hit Enter, and it has
already underlined it because it's basically created that link within VSCode telling me, Yeah, yeah, we've
linked this CSS file. So all I have to do
now is close out, again, a self closing tag. You'll notice that most of
the tags in the head are actually self closing because there's nothing between them. They're just meant to hold
pieces of information, and we'll go ahead
and save that. And now we should have our
style sheet to our HTML. But nothing happens
yet. Again, because we haven't put
anything in our CSS. So let's go ahead and
start styling this. There are a couple
of ways that you can target HTML elements with CSS, let's go ahead and
move this over here so we can look at
both at the same time. So you can target them by using what type of
element they are, right? So you can target the body. You can target all
the divs, H ones, Ps, strongs, inputs
forms, et cetera. That is one way of targeting. And if you have sort of a overarching change that
you'd like to make, that's probably the
best way to do it. So, for instance, one
thing that I'd like to change because
as you notice here, it is a SNSerf font and the font that we're
using has serifs. It has those little
edges, those little hats. I want to make sure that the
font that's used throughout this document is San, son serif. So we're going to
select the body tag. The body so we're going
to sect the body element, and we're going to
do font family. So font family. So there are all these
different types of properties that you
can access within CSS. Font family is just one of quite literally
dozens and hundreds. So font family allows you to determine what type of font
is. Generally speaking. You can sometimes
specify the actual font. Sometimes that
involves downloading the font or linking
it and all of that. But in this case, I just
want a San sera font. So I'm going to scroll down
here to where it says Ariel, Helvetica, and SNSerf
and click on that. So now, hopefully, everything in the body
should be SNSerf. And one really, really important
thing to remember to do after you make a change to
your files is always is safe. So let's take a look over
there, and look at that. All of our text is now SNSerf. It has There are no more
little hats and tails. It's perfectly clean and
looking a little bit modern. Perfect. Alright, so let's see what else we can do with this page. Now, here's a thing. I want to target the H
one, and to be fair, I can do it just by, let's see. I want to target
actually, let's see. I want to target some of
the text on the page, but not all of the
text on the page. If you take a look
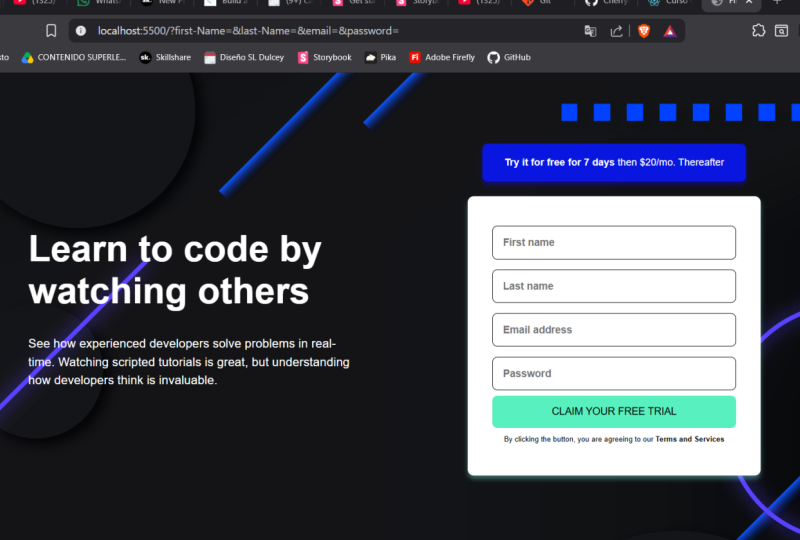
at our image here, you'll see that a lot of
the text is actually white. So this is white, that is white. Try it free for
seven days is white. But this text at the
bottom appears to be gray, and this text appears to be, like, pink or red or something. So we want to have a combination of different types and
different colors of text. Now, as I mentioned, with coding, there's different ways
to approach everything. Some ways are
better than others, but it's really up to you and
your personal preference. So the way I would like
to approach this is to make the overall color white and then probably target
the non white elements. I think that's the
cleanest way to do this. So another way I can do
that is I target the body, and I use the I use
the property color, which is meant for font color, and I'll just name it white. Now, you might already have picked up what's
going to happen. Our page looks like there's almost nothing
on there, right? Right. So what we're
going to do now is actually implement
our background. So now it's kind of essential that we get
the background going. We know from our files, so if we go into the files
that are included with our project that we have a background image, this
background desktop. But it's not actually
the pink image. It's just, like, the little
icons that are on top. So we need to do some work
with this background. Alright, so let's
go ahead and make our background background image. And we're going to use
we're going to link it to our desktop BG into
or desktop PNG. So the best way to do
this is to use a URL, just like you have google.com,
just like you have hf, you're going to
use a URL to link this selector to that background image file
that's in our project. So we'll do URL. URL, brackets. And then in quotation marks, I'm going to specify
the location of that BG Intro
desktop file, right? So if I look at where we are, we are currently
in styles dot CSS, I need to go down a
level to images and then into the Bg
introdsktop dot png. So in order to get
there, what I do is I type dot slash
indicating this folder. Then I want to go to
the Images folder, so I'll add images to that
and then click on Well, I'll type out the Bg
intro desktop dot png, and that should link it
right to that image. So if I click Save and
I navigate back over. Great. We can start to see that our image is being applied.
But there's one more thing. There's this, like, pink color that is not part of
the background image. How do we even get
that on there? Well, there's another property
called background color. So I think this comes
with a style guide, which is why they've
given us all these files. So if we go over to
style guide dot D, and we go over to, let's see. There's a layout. The colors. There's primates are red, a green and accent
color blue, a font. Alright, they'd actually
given us a specific font, so we can definitely
use that if we'd like. I'm not quite sure which color
it is, but you know what? We don't even have to guess. Let's take advantage of another tool that we
have at our disposal. So there's this tool
called the Eyedropper. It's an extension that you can add onto your Google
Chrome account, totally free, and you
just click on it. Once you have it installed on your Google Chrome extensions, you click on it and
you click where it says Pick Color from webpage, and you can actually just hover over the part of your
webpage to get that color. So because we were unsure
about what color this was, we've just grabbed that color, and we can see that there are three different ways
it's described to us. So it's in a hash hash EC 7476. So that's one way
of describing it. It's also in an HSL, hue, saturation and luma,
as 359, 76%, and 69%. Uh, or it's in an RGB, so it's a combination
of red, green, and blue, and those
are the numbers. So 236 red, 116
green, and 118 blue. We can use any of these. There's no right
or wrong answer. For the purpose of
this. I'll just use the hash because
it's the shortest. So if I go back over and
I go back to our styles, I'll create a new property. And I'm just putting these
in alphabetical order, but you can really do it
in any order you want. I just find it easier to
find when it's alphabetical. You can go background color,
and I'll add the hash. I'll save. You'll see that VS code actually
populates it for me. It tells me which color
it is. And there we go. Now we have our, like,
pink background. We can see our white text, and we're like, well on our way. Awesome. Great. We're
in a good spot. In fact, we're in such
a good spot that we might actually want
to commit this to our GitHub repository because say we do something else and
we completely screw it up, we might end up wishing that we could come
back to this spot. So let's go ahead
and do just that. So we're working with a couple
of different pieces now. So let's go ahead and commit the background intro desktop, which is the image
that we're using. Let's go ahead and commit
our styles dot CSS, as well. And let's go and commit
our index dot HTML, which links these files
together. Awesome. So let's give our message
as initial styles. Initial let's try and spell
correctly. There we go. And we're going to
commit this. And now that we've made this commit, we're actually
going to push it to our remote repository
to make sure that, even if our computer just
vanishes in the next 5 minutes, it's it's still there
on the Internet. And when we get a new computer,
we can bring it back. So what we'll do is we'll tap these little
three buttons right here, these little three dots up here, and we're going to
click the word push because we've already connected
the two repositories, it's going to know that
when I say push, I mean, push it to the remote that
we've connected it to. Let's go ahead and
click push. And you'll see the little blue bar
goes starting to go. It wasn't very many files, so it's not going to
take a very long time. But if we go over to GitHub and we go back to our code
for our sign up form, we'll see that we just
had recent pushes. So we have a styles at CSS file, which is our initial
styling right here, and we have our Images file, which has our Images folder, which has one file, which
is the desktop PNG. Awesome. Great place to be.
We're flying through this. So the next thing we
want to go and tackle, let's take a look at
what we have here. The next thing we want
to probably tackle is either the separation or putting these into
different elements. We can go either way. Let's start by
tackling these, like, little elements, and then we'll
separate the two of them. And again, as I
said, with coding, there are eight different
ways to do anything. It's totally up to you and
what you prefer to do first. And, of course, you
can always change your mind and do
something different. If you've decided
that, you know, you've chosen the
wrong approach, totally fine, especially
as you're learning. Feel free to make mistakes and then just Control Z
and do something new. So, let's start by taking this. Try it free for seven days
and $20 a month after. Let's go ahead and try
and create this box. Let me go back to our style guide and see if
there's anything there. I think this might be that dark blue or maybe the grayish blue.
I'm not quite sure. Let's take a stab at it
and see what we can do. So in order to target
this line right here, this P tag, right, there are a couple of
ways we can do it. We can either add padding
to the P tag or we can wrap it in a divider and add
the styling to the divider. Totally up to you
what you want to do. Just, you know, make your
choice and stick with it. So let's talk about padding. What padding is is
that little space, that space between
the space between the text and the outside
boundary of the box. That is padding. So actually, I've just answered
my own question. We have to use a div if
we want to use padding. Margin, however, is the thing on the outside of
something, right? So the margin is the distance
between two objects. So, for instance, because we want to use a background color, we need to have it as the
background for an element. So let me show you what I. If I had the background
color for this pea tag, and I made it that, bluish grayish color. So let's
try something here. Let's take all the pea tags, and we'll do background
color, and then we'll select. Let's try this grayish blue. I'm not sure. And we'll
do that and we'll save. All the P tags have that color. But as you see, there's not a lot of room around the
p tags either, right? They're kind of all
just, like, really long straight lines. What we can do to
avoid this is to actually create a
box around the P tag and use some padding within that box to specify how much space we want
for that element. So let me show you what I mean. Let's get rid of this P
tag background color. And let's create a box
around our P tag, right? So we're going to
create this, like, larger box around our
little line of text here. So let's create another div and let's wrap that around
our P tag. Awesome. Alright. So now we want to
target that specific P tag, too, because, as you noticed, when I put that
color on the P tag, it did, like, all of
the p tags, right? That's not what we want. We want that specific div surrounding
that specific P tag. Now, there are a couple
of ways to do this. We can actually, like,
try and do, like, a nested kind of thing
where we might write something like we
might write something. We might write
something like, um, body, and then the child
of the body is a div. And then I think it's within
another div and then we have a Ptag and that is the petag we're
looking to target. But one, we're not
looking to target the Pe tag. We're looking
to target the div. And two, this is still
not specific enough. Like, sure, this will target this one specific
div, and it will work. So if I do background color, and let's do I don't think
that was the right blue. Let's do a different
blue this time. Let's do the dark blue. Might just be regular blue, but we'll see. We'll do this. That will target
that specific div. But the only reason it targets that is because there
is only one div. Let's take another look
at what I did here. So I targeted the
body, the body. And then I targeted the
divs within the body, which is this div and this div. Then I targeted the
divs within the divs, and there's only, in this case, one div within a div. I know it gets a little
bit complicated, but in this case, there's only one
div within a div, and that is this div. So that's not the
best way of going about this because even me trying to explain it
to you was confusing. What we'd rather do is just
target this specific divider, this specific element, and
not any other element. So there are two
ways we can do this. If the design we're
looking to implement will be re used somewhere else. We can use something
called a class. So a class is a type of property that gets put
on any visible HTML. So you can type in class, and then you can name a
class anything you want. Any text that you want to give
it, you can name it that. So if I call this
class, you know, call CTA like call to action, then that will be the name
of the class to target. And if I have any other calls
to action on the website, maybe I want them to
all look the same. So then when I go here, I can actually just change this structure and I
can target the CTA. Now, to target a class, you actually need to put a dot before whatever the text is. So the dot specifies classes. When I type in CTA and I put the background
colors this and I identify as this having the class CTA and this is the only thing
with a class CTA, it should only once again
target this specific thing. Great. I did it again. Perfect. Now, what if we wanted to target only a singular instance
of something, right? Like, we didn't want to
target any other type of CTA? This is literally just for
this one and only CTA. Well, what we can do then is use this other identifier
called an ID, a piece of, like,
identification, essentially. It's another attribute
that you can use on visible HTML or non
visible HTML elements. And you can you call it you
literally just type in ID. And just like class, you can give it
whatever name you want. So you can type for this one, I might type in Unique CTA. And save that. And then when I go
here to specify it, I'm actually going to use
a hash because a hash is the selector for IDs in CSS. So I'll just type
in the name of it, Unique CTA, and I'll
do my little brackets, and then maybe I'll change
the background color. This time, I'll put it as blue. But, we've already said it, so it shouldn't change, right? Wrong. It definitely changed. Now, why did that happen? Well, the thing about CSS
is that it has a hierarchy. So there are two ways to
determine this hierarchy and the specificity that
is called upon by CSS. At the lowest at the sort of level of least importance
is the element. So those are our body tags. When we type H one, H two, they're generally
just referring to the type of element
in general, right? Those are non specific elements. Following that is classes. If I specify that all the H ones should have the
color red as a text. But then I specify I give one of my H ones a class, H one class. Whatever I put as the
color in that H one class will actually override what I
put for that H one element. So, you know, that H one will then be
blue instead of red. Does that make sense? All right. Now, being even more specific, as you just saw, are IDs. IDs are meant to be
unique identifiers for only one element. You shouldn't reuse them
for more than one element. It's really just meant for
that one individual element. And so if I wanted to be really, really specific and I said, Just that H one, that one div, I would then use an ID and say H one ID and then change
the color to yellow. Right? And so if I went and I took my H one and I added all
of these classes. So I added class
equals H one class, and ID equals H one ID. I spell it correctly,
very important. Which one do you think
would come out on top? Hopefully, you guessed H one ID. And if you did, you'd guess,
right, because it's yellow. So it's meant to be it's meant
to go through specificity. But say I didn't
have this H one ID, right? Say, I just had class. It should be blue,
right? And it is. But there's one other
thing to be aware of. CSS also works in terms of what it sees in
which order it sees it. The last thing CSS sees is
the thing that it will take. So if you've written H one class and you've
called it blue here, and you've called it green
here, and then Oops. And then you've gone
under the green, you've said, actually, no,
I'm going to color it purple. If you have your
linter on for this, it will actually probably
trigger an error. But, say you don't
and you save that, it should choose
the last version of that class that you specify. So if you guess, it
should be purple. And when you check,
it is purple. So what we need to take away from this
lesson is two things. One that CSS uses classes. So you can specify classes and apply them to multiple elements.
So I can actually apply. Even though they're not
H ones, I can apply to this PTAG and, you
know, save that. And then I should have well, it's a bit hard to tell, but this is purple as well. So I can apply it to
multiple different elements. Classes are meant to share within a certain
amount of elements. You can target the element itself, the type of the element, but just know that
it will transfer across all of those
types of those elements, really only recommended
to do for, like, the body or if you know that all PTAs should be a certain
size or something like that. And then we have IDs, right? IDs are meant to actually
target something very specific. They're only meant
to be singular? You should only
ever use one ID for one element and you
should not repeat them. That's what
classes are for. Awesome. So let's go ahead and style the
rest of this page. So let's go ahead and add the padding that we were talking about before to our element. So it seems like there's
a good amount of, like, padding on the left and
padding on the right, and a little bit of padding at the top and a little bit
of padding at the bottom. As we mentioned, padding is the stuff that's
inside an element. It's basically making the
element itself bigger, right? Think about it as,
like, natural padding. You're like, putting
on extra layers to pad yourself up
against the cold. So let's add in a couple
let's add in some padding. So the way you write padding, there are two ways
to write padding. You can actually
write padding Um, and then specify the direction. So padding left. And then you
can specify it in pixels. So let's say it's
like 20 pixels. And that will add some
padding to the left there, just a little bit of
padding right there. There's another way and then you do that
for padding left, right, top and bottom. Those are the four sides
of any element in CSS, left, right, top and bottom. That's one way to target
things using padding. You can also type in padding just the word by itself
and use two selectors. So you can select the
top and the bottom, as well as the left
and the right. It's a bit of a
shortcut in order to be able to write padding
in just one line. So you could write the top and bottom
padding because also, if we look at our design, it looks like they should
be pretty similar, right? The left and the
right look similar, and the top and the
bottom look similar. So we could put our left
and right as, let's say, 40 pixels or sorry, the top and bottom should
probably be about 20 pixels. And the left and right,
maybe 40 or 60 pixels. Um let's take a look. And, like, it's roughly kind
of what we're looking for, maybe not exactly what we're
looking for, but roughly. The problem here,
though, is that our elements are stretching
all the way across the page, which is not what we
want to do at all. We want to make sure
that they're just, like, nice and cute and, like, wrapped up how they have them
here in the image, right? So in order to do that, we're going to have to
employ some sort of, like, larger container,
something to, like, make all of this basically fit into these,
they're like, two columns. We need to, like, get
them to stay within two columns and then also, like, fix up this padding and, like, you know, make it look
a little bit more pretty. So let's take a couple of
steps towards doing that. First things first, let's
separate these into two columns because
I think that's going to make our styling
a little bit easier. So the way that I'm going
to choose to do this, and again, 100 different ways
to do 100 different things. But the way that I'm
going to choose to do this is with Flexbox. Flexbox is one of the
greatest tools in CSS, and I really recommend that you take some time and
learn it because you're going to
be using it every single day, I guarantee you. Flexbox is a flexible
box layout that essentially creates a type of container that holds
various elements. And depending on what properties you give to that flexbox, it will basically shift in size based on the size of the
window and the screen it is. It's really great to use for responsive design and
responsive layouts, and it's a bit of
a game changer. So, let's use Flexbox and let's employ some of these tools to get our page look how
we want it to look. And I'll have this link to CSS Trix in the description below so you can take
a look for yourself. Looking at the
design, we know that these two pieces of text
are meant to be together, and this whole section is
kind of meant to be together, these two columns that
we're looking at. And then larger than that,
there seems to be this, like, side padding or whatever on the body or maybe a margin,
haven't decided yet. So, let's go ahead and
give some identifiers to these two to these two
divs and then go from there. So what we can do here is, in fact, you
know what we'll do? We'll wrap everything in one big div and we'll put
all the styles on that. So, this is a div, and you can see sort of
where things capture things. So there's the body, which is, like, sort
of the page element. I'm not gonna mess
around with that. Let's use a div that wraps around all the
elements within it. And we're going to give
this the let's give it the class name of container in case I want to use it again on a different
page or something. And let's now give
that container, the let's select that container. Um, select that container. And let's give it
the display of flex. So when you type
in display flex, that actually creates
a flexbox container. So if we've done it right, you'll see here our two pieces of information are now
next to one another. Now, they're already separated because if you remember earlier, we went ahead and
created these two divs. So Flexbox has kind
of done a lot of the work for us already,
which is awesome. So let's take a look at
what else we need to do. We need to make sure
that we have, like, some sort of space,
some padding here. It looks pretty even
all the way around. So let's go ahead
and add that in. So let's do some padding. And we're going to
do all four sides. Now, another trick to
padding is when you do all four sides,
it's the same amount. You can just put
it in one number. So if you put like 50 pixels, it should do 50 pixels
on all four sides. So pixels or REM or EM are basically two different
ways of describing size. Personally, I prefer
to use REM or EM just because it's a
bit more customizable. So you have if your particular browser is
set to font size 16 pixels, then all the sizes of all of the font that follows will be based
off of that root size. So I prefer to use REM just because it's
a little bit more adaptable because if somebody changes their pixel size to, like, 24, to be able
to see things better, it will adjust, and it won't maintain this, very small size. It's hard to see. So I'm
actually going to go ahead. Oh, and also most browsers, default pixels the default
font size is 16 pixels. So basically, everything in REM that follows that is
a multiplication of that. So one REM is 16 pixels. Two REM is 32 pixels. Three REM is 30 No. Three REM is 48 pixels, et cetera, et cetera, et cetera. And so once you get used to it a bit more, you'll
get the hang a bit. So what I'm going to
do here is actually change this to three REM, and I'm going to go
ahead and change the padding on my
CTA here to REM, as well, just to make my
life a little bit easier. And these are
approximate bellies. I'm sort of playing around
the slings, as well. So if I go back here,
starting to see, you know, starting to form around
the edges there, let's make the padding
a little bit greater. And the great thing
about RMT, just, like, bump it up a couple of numbers, and it's like a
ton more padding. Like that there's a ton more
padding on the side there. I think it might be
even as high as ten. Alright, let's leave it at that. For now, that seems like
a good amount Awesome. So we have the padding
around our elements, and now we have our two
elements side by side. Let's take a look at
our design again. Alright, so another
thing to notice here is that our text
here is centered, and I'm guessing this
is centered, as well, because it's, like, sort of
centered on centered, right? That's an important
thing to pay attention to when you're looking
to implement a design, where things are centered,
if they're like, leaning to the left, leaning
to the right, et cetera. The really awesome thing about Flexbox and about using
Google Chroma General is that you can actually
play around with these styles in the
browser itself. So you don't have
to, like, code up a whole bunch of stuff and
then wonder if it works. You can really just
actually play around with this here and
see if it works. Alright, so what I'm going
to start to do first is actually centering these elements within
this container. So you'll see our
container here. And if you actually
scroll down under the styles piece right here, you can actually
see the padding. So we have ten rams of
padding around all sides, and that is 160 pixels of
padding around all sides. That's that green margin right
there. Pretty cool, huh? Um, so the middle here, that is the size of our
actual elements themselves. So a couple issues here. The form is not
really built out, so that's why it's
looking so shrunk. Maybe the text is a little
bit small, as well. So let's go ahead and
sort of flesh out these components and then
see how much more padding we need to add padding and Margus that we need
to add to our elements. So let's start over here on the right because it's
the most complex one. And let's see what we can do. Let's finish up what
we're doing here with this try it free CTA. So if we take a good look at it, we'll notice actually
that the edges are rounded and they seem to have some sort of
shadow underneath them, too, because that's,
like, part of this. And if we look at
it now, there's no shadow. There's no rounding. And also, there's
a significant gap between this and
the form itself. So what we want to do here
is do a couple of things. We want to round these edges. And actually, it
appears these edges are similarly round and
have a similar border. So we might actually just
create a class for this. We'll round the edges,
and then we will add the little
shadow border there. Alright, so let's create a
class called round edges. Dot round edges. And let's go over so
which div was it? It was the CTA. So another thing is, you can add multiple classes
to each element. So we'll add the second
class here of round edges. And then we'll add
the other class here to our form of round Oops. Class. Round edges.
But actually, you know what? I've
changed my mind. I realized that we should actually wrap this form in a div because this PTAg here is
part of this larger thing, but it's not actually part of the formally this defined form. So let's cancel this. And let's create
another div here. Whoops, Div. And then let's wrap that
around our P tag here. And then let's add
this class here. Class equals Whoops. Round edges. Awesome. Cool. So now that we've
created this class, let's make it do something. So there is a CSS property
called border radius. And yes, I do have a
lot of these memorized, but it's only after working with them over and over
and over again. You can literally just look up CSS properties for a border
or CSS properties to do this, and you'll get exhaustive list of all the properties you
could possibly target. Um, there might even be
better ways to do what I'm doing here with just
playing CSS and HTML, but it's what I'm working
with at the moment. So round edges, we're going
to target the border, but it's actually the radius of the border. So border radius. And we are going to make it, let's say, let's
curve it maybe 20%. Let's see if that works.
Now, that looks super weird. Let's curve it
using REM instead. Let's use two REM. That
looks a bit more normal. Alright, cool. Let's
compare it in. Uh, maybe maybe it's a little
bit too sharp, actually. Let's do one rim. That seems a little bit closer. That's a
little bit closer. Alright. And now we can already
tell that our actually, I'll move this over
here since we're not. We can already
tell that there's, like, way too much
padding here, right? So let's take a look at where
we can remove some padding. We definitely remove some up and down padding top
and bottom padding, and some left and right padding. So let's remove let's go ahead and remove
which one was it? It was the CTA. So top and bottom padding,
let's change it to one. That is already looking
a whole lot better. And actually, the thing
here is this is centered. So we want to actually do a
text align center on the CTA, and then we'll take we'll
revise our padding. So let's add the property. Text Align center, which will actually align our text to
the center of our page. There we go. That's perfect. And let's take it.
Let's compare it again to our image here. Not too bad. Not too bad. I think it might actually be the element itself
is a bit too wide. So let's tackle that
in the next bit. What we want to
do first, though, is add some more
adding that shadow, that little border
radius shadow there. Let's go ahead and see
if we can add that. And actually, let me sorry, let me modify this
a little bit more. 1.5 rim, I think
that's probably best. Yeah, that looks a
little bit more natural. Maybe there should be two rim. No, that's not gonna
change until we change it. Alright, so 1.5 Rm. And then let's add
that border shadow. So it's a shadow on the bottom of the
element here, right? So I believe it's
called box shadow, if I'm not mistaken.
Um, box shadow. And the great thing is here, you can see the instructions
for how to use this, right? So attaches one or more
drop shadows to the box. The property is comma
separated list of shadows, each specified by two
to four length values, an optional color and an
optional inset keyword Otic lens or zero colors. Okay. So let me pull the MDM reference because even that is still a
little bit cryptic for me. Let's copy that, and let's paste it in this tab right here. Okay, so the great thing
about MDN is you can actually see like tangible
examples of the thing. So what we want to
do here is play around with these box shadows to sort of get what
we're looking for. Alright, so I think this is
kind of close in terms of, like, the sharpness
of the edges, but the placement's
a little bit off. So let's read a
little bit further. So box shadow, this is the syntax that
we'll be employing. So box shadow, oh, so the first number
is the offset X, so it's sending it like left
or right on the X axis. The second number is the
offset Y on the Y axis. And then the third
one is the color. Okay, that makes sense. So Oh, and you can add more. You can add a blur
radius, a spread radius. We don't need all of
that. I think we just need the offset Y and the color. So I think we probably
have to put box shadow. And put a zero for the first one because we don't
want to go left and right. In our design, it's literally just right underneath
our element. And then we'll do
the offset Y of 0.25 REM. We'll see
what that looks like. And then we'll do the
color of, like, gray. We'll try gray for now. And
then stick another look. And you can kind of see it,
but it's not really there. Let me add a margin to the
bottom of our elements, so we can kind of see
it a little bit better. And just for reference, the margin is the space
between two elements. Now, when two elements
are next to each other, the margin actually gets
merged and combined, and it's just the combination
of those two margins. So let's go add a margin. Of one rim, and great. Now we have a little
bit more room to see what's going on. Let's even make it a little
bit further, let's do two Rm. Let's see what's going on
with our box shadow there. Alright, so it's giving us a little kind of weird shadow, maybe, it's a
10. Conclusion: Conclusion. We've talked
about a lot in this video from the basics of CSS to
styling your own website. Going forward, you
should be able to start styling your own
website from scratch. Just remember to look up something whenever
you're unsure of it. I'd love to see how your
website turned out. So please leave it
link to your code, a screenshot or the hosted site in the projects and resources tab below so that I can see all of the hard
work that you've done. I do read every comment, every review, and look at
every project submission. So if you do have any questions, please feel free to
leave a comment in the review section below or
to reach out to me directly. Check out my profile page for
more information on that. If you'd like to learn
more about coding, check out the other videos
I have on my profile page. I also have videos on Next S and React available on my
YouTube channel and website. I'll link those below and
on my profile if you're interested in learning those as well, and I'll see
you in the next one.
 Zoë Davidson, Software Engineer & Cinematographer