Transcripts
1. Welcome to the course: Hi, my name's Adam Daniel. I'm a graphic designer and online course instructor. And I'd like to welcome you to this brand new course about Canvas brand new video design functionality. Now, as I record, this aids autumn 2021 and canada have recently added a whole bunch of new video editing tools and created a new video design interface in their online design products. And this video will take you from start to finish of how you use this new video design to design any sort of video that you might need. You can design videos for YouTube. You can design online instructional video. If you need a video, and you can now use Canva to produce that for you. In this course, we'll show you exactly how to do that. Now, this course is for people that have a free account. You do not need to have a paid Canva account. Follow along with this course. And even if you've never used Canvas before, should be able to follow this course from start to finish and end up with exactly the same quality product as everybody else at the end, I'm excited to share this course with you. I hope you got a lot of value from it. If you've got any questions or comments along the way, please let me know and I will do my utmost to get back to you. I usually answer every student in the first 24 hours. Please let me know how you get on. As always. Thank you for your time.
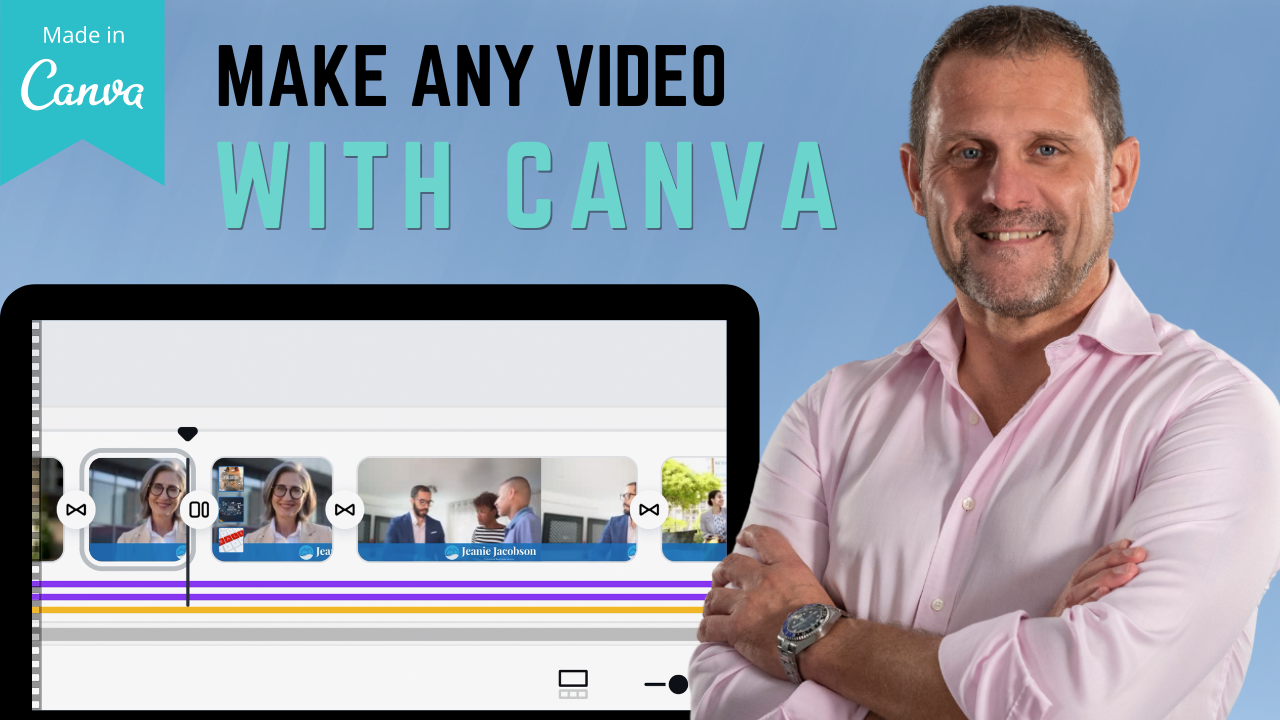
2. The new Canva Video Interface: Well, hello and welcome. And in this lesson, we're going to look at how to create a video in Canvas using the new canva video design interface. And it's fairly self-explanatory and intuitive. But I'd like you to do is open up your Canvas account and create a video. Simply go to the search bar and search and type video. Okay, and we want to create a blank video. And here's our design window. Most of it is the design space itself. And we have a timeline on the bottom here that currently only has one page or one video scene in it. And we can add as many scenes as we want. And we can also add audio and images to this as needed, as well as illustrations and text, and animations and transitions. And I'm going to use all of those in our video. And if you don't know what any of those are, don't worry. I'll explain as I go along. In this lesson, you're going to follow along with me as we make a brief 20-second long advertisement for a fictional finance company. So let's begin. So what I'd like you to do is go to the assets that come with this lesson and download those and upload those into Canvas before you do anything else. And of course you upload assets into Canva by going to the upload section on the left and using the Upload Media button. And then you can select the videos and audio that you've downloaded from this course. So why don't you do that now pause the course and then restart once you've uploaded all of those items into Canada. Okay, so let's take a look what you've loaded. You've got three videos. One of somebody making a bed, one of them, I'm counting cash in front of a laptop and one of a man working on some charts and illustrations in front of a laptop. And you've got an audio file mysteriously titled GarageBand 500, 310 2021. The first thing I want you to do is bring the audio into our piece. Just drag that and drop it in the design window. Now, if we come down to our timeline, you'll notice here in page 1, page 1 is five seconds long, so there's only five seconds of audio selected. So what I'd like you to do is take your mouse to the right-hand edge of the page one icon, the little purple box. And your mouth should turn into a double-headed arrow. When it does, click your mouse down and just drag to the right until you're about 25 seconds long. Now our audio track has expanded to its maximum length, which is 20, 0.8 seconds. If you hover over it, you'll see that information. And let's return to the beginning of this scene. Press play to listen to our audio. And the way we're gonna do that is I'm just going to zoom in here to show you what we have here. It's a horizontal line, black line, and a triangular icon above it, that's called our playhead. And wherever that play head is in your video, when you press Play, it will start to play from that point onwards. To move it about, you simply put the mouse over it, click down and drag it as needed. So let's drag it to the start of our peace. And right now we can click play to play a piece, or we can hit the space bar, still hiding money under a mattress. Contrary to popular belief, intestinal financial assets, government ceilings been, can help your money grow. Our team of professionals will raise and nurture your investments as if they were their very own. Let's now are experts and take em your hard-earned money and make it work for you. I stopped the playhead by hitting the spacebar a second time. So there's our voice-over. Generally, you'll find it's accepted amongst most video producers that it's easier to make the voice-over first and then edit the video to fit the voice-over rather than making your video first and then trying to voice over it. You'll find that it's much more difficult in practice. Although if you make enough videos for YouTube and Twitter and Facebook, you'll find yourself having to do both, okay, Now the first video I want to use is this image of somebody making a bad. So I'm going to drag that down and drop it into C1. Now, C1 now shrinks to 16.6 seconds, which is the whole length of that particular video. But I don't want to use all 16 seconds of this and our finished piece. I just want to use a few seconds to just convey the image of a bed as our voice-over talks about hiding Monday under a mattress. So let's listen to move the playhead to the start of the video. I'm going to just listen to the first few seconds of the video and then hit the play head again to stop it. But I want this first scene to end. Still highly money under your mattress. There you go. Immediately after the word matters. I wanted to seem to end, but I actually want to do is use the last few seconds of this video. So I'm gonna go to the left-hand side of scene one. As you can see, it turns into a single-sided arrow. I'm going to drag that to the right until I get approximately three or four seconds there. Let it go. Now Canvas automatically now resizes the audio to fit the video timeline. This is a little bit awkward to work with, but unfortunately it's, that's what we have to work with going forward. If I check to make sure that our video ends in the exact spot, I'm going to add seem too, that allows me to click on the audio track and expanded towards the end of s2. So let's listen to what we have. Still hiding money under your mattress. Okay. I'm not going to shrink that down to 3.7 seconds. Still highly money under a mattress. Perfect. And now I want s2 to start immediately after the word mattress. And s2 is going to have our expert here working on some charts. This video is 16 seconds long, 16.7 seconds long. I'm going to drag that into for him to kind of, uh, now assumes I want to use all 16.7 seconds of this, which is actually not the case. But it does allow me to expand the audio quite a bit. So let's listen to seem too, dragging the playhead back to the start that s2 and hitting the space bar. Contrary to popular belief as the no financial assets and savings bond and how beyond money grow. Okay, I'd like s2 to end afterward grow. What I'm gonna do now is I'm not going to edit the length of s2. I'm actually going to drag the video for Scene 3 into plus, which is this man counting money in front of a laptop. Now that I've done that, I should be able to shrink, seem to, without canvas shrinking the underlying audio. I go back to the right-hand edge of s2 until I got my double-headed arrow and I drag that till it meets the playhead. I'm seeing professionals will raise and nurture your investments as if they were their very own. That's where seeing three is going to end. And bring that down. What you'll see now since I like where the mouse is, Canva, we'll edit the underlying audio track to shorten it. But that's okay because we've only got one scene left and that's a picture of a woman fanning yourself with some money and smiling. Now, we don't have that video and the uploads because it's a canva video. So once you've gotta elements, and I want you to search for adolescent cash casual. The words cache casual should be enough. And you should see this video, landscape video of a woman fanning herself or some cash. There's actually several versions of this in different shapes. This is one we want in landscape if for any reason. And this is a video, by the way, not a photograph. If for any reason you can't find it, then open up the text file that came with the assets for this lesson. Copy the link that's there into a browser window, and it will open up this video as a canva template and you can copy this element from there into your own work. I am not allowed to download this particular video and then give it to you as a separate video for you to work with. Because downloading individual assets from Canva is against Canvas terms of service. So this video is seen for going to drag it down, drop it into place. Click on Audio, expanded all the way through and we'll go anymore and come to the end of the video sinful and shorten it until it meets the end of our audio. Okay, let's look what we have. Still hiding money under a mattress, contrary to popular belief in St. no financial assets. You know, government savings bond and how people money grow on team of professionals will raise and nurture your investments as if they were their very own trust our experts to take care of your hard-earned money and maybe worked for you. Okay, so there's the backbone, the basis of our piece. Now we know finished by a long way. What we're going to do is we're going to add an intro and outro to this video, just some branding messages. We're going to add some transitions. So that is a graphical change between. We're also going to add some animated photographs and text. And we're going to add some backing music.
3. The new Canva Video Interface: Okay, well what should we do first? Well, let's add the intro and the outro before we do anything else. So an intro and outro are basically simply branding messages. They serve several purposes. They obviously convey the branding to your audience. And they also show the viewer unconsciously that a video advert is about to begin and about to end. So let's come to the right-hand side of our timeline here and click the plus button. It'll give us a new page, page five. And I want you to try and get to the left and drop it in front of seeing one. So page this is now scene one. Scene one becomes seem to seem to be some scene 3, etc. Now unfortunately, what Canada does is when you add a new scene to the start of a piece, it assumes you want to start the audio from the beginning of that new scene, which in our case we don't. So I simply want you to click on the audio and dragging to the right until it begins at the start of scene to collect to a 100 percent C1, I'm actually going to cut down from five to 2.5 seconds. I'm going to click on that there. I can drag it. Or I can come up here to the Edit timing option and just type in 2.5. Now I'm going to add a static photograph here. Let's go back to elements. And the recently used, it should show me my photo, plants growing on coin piles. So what I want you to do is go to elements and search for plants growing on coin files and click photographs. And this is the one we want. Bring it into your piece, into seeing one, right-click it. Set images background. Now, when you're using images like this in a video, It's best to give them a small amount of motion. A static image can be quite frustrating to the viewer's eyes. They're accustomed to things moving in video. And we want to give it some movement. We don't want to give it a huge amount. So I don't want you to do is click on it. Click Animate, and come up here to Photos Zoom. So this static image will now have a slight animation of movement. When the viewer begins to watch our video. If you want to see that in effect, you can just drag the timeline through this scene. I also want to add a logo and branding message to this intro. So once again, I'm gonna go to elements. And as such are logos. I want a free logo. And this is the one I want green circle check vector, such that you should find it. If for any reason you don't come, it does change these elements around from time to time. And just open the template and you'll be able to copy and pasted from the template into your own design piece. And make that about 250 wide. Puff up here in the top left. Now I'm also going to go, I'm going to clear our search on the left here, back to elements and bring a regular circle into a piece. And to make the circles smaller than our logo. Let me change the color to white. Put that over our logo, Right-click and send backward. So I'll load up the tick in our logo is now white. I'm going to go to Text and heading friction. I'm going to call this company fictional finance. And I'm going to make that text white and bring that in place underneath. I'm going to put it on two lines, centered. Okay, Now, I'm not particularly happy with that text. I'd like it to stand out a little more. So I'm going to do is I'm going to click on it, go to effects. And I'm going to click the splice option. And what that does is it gives us an outline of the text and gives us an insight color. The outline is the original color of the text, and walk is white and the inside is now a gray. What I want to do is I want to change the inside color from gray to white, which you do inside the effects panel on the left. And we're going up to the original text color option. You can change that to black. Now. Our effect is now going to slightly embossed. That wasn't my intention. You click on fictional finance again and click affects. Splice is selected and you're gonna see thickness, offset and direction, and your saturation to 0. And I want you to pick Offset and drag to the left to the till it becomes 0 as well. Now you'll notice instead of the underlying color of the text being slightly offset to the outline of the text. They now sync up perfectly. This is a little workaround to allow you to put a border around text in Canada. And as you can see, by using that black outline on the text and the white text itself, the logo, the name fictional finance now stands out against the background image. A great deal better.
4. Transitions & Animations: Okay, so let's now work on our outro. And to do that, we simply copy our logo, copy our text, and you use Command C to copy those. Come down here to our timeline and add a pitch command in V, and pop those into this pitch. I'm now going to put those roughly in the middle. I'm going to expand our icon considerably. And I'm going to put the words fictional finance on one line and drag them to their bigger. And I may change the colors involved here. And I'm gonna do is I'm going to click on the text, come up here to the tax color and change it from black to green. Then I'm gonna click on the animate, on the effects option. Comes into the white option. I'm going to turn that to a light gray. So there's our ultra pitch. However, like the entropy, we want some movement, we want some animation. And we're actually going to do that using a transition. But we want to apply a transition to every scene in the video. So let's take our playhead and go all the way back to the beginning. And I'm going to expand the screen and show you the transition options between each of the scenes in our video, there's a cross icon. If you click on it, you get two options. The first one allows you to add a page, which lava Seattle page between the two scenes in question. Or you can add a transition. If I click the Add a transition, let me shrink this so I can show you the window. Then you have four transitions currently available to you. In Canada, you have a dissolve. If you hover over it, camber will give you a preview of what that looks like. You have a slide, you have a circle wipe, and you have a linewidth. And the transition is just a graphical effect that leads you from one scene to the next. You don't have to use transitions. You can just jump from one scene to the next one, and that's called a jump cut. But Viewers are accustomed to seeing transitions, are not actually noticing them. I would advise you not use the silk white and the line wipe unless you want the customers, viewers actually see those transitions and notice them. We're going to use dissolve for most of this video. And in the end then we're going to use slide. So between scenes 12, click on the Plus, Add Transition and click dissolve. This is set for 0.5 seconds. Let's leave the duration of the transition at that for now. Click between scenes 2 and 3. I transition Dissolve. Click between seen stream for our transition Dissolve. Between 45, I transition Dissolve. And then between 56, which is our outro, our transition slide from the top. And now let's look at our video with our intro and outro in place. And are transitions still hiding money under a mattress? Contrary to popular belief in stdio financial assets and gentlemen savings bond and how people money grow on team of professionals will raise annuity or investments as if they were their very own trust. Our experts can take MPO, HOD and money, make it work for you. I'll videos taking ship, but to hold the view as eye and to give the visual a little more punch and possess, want to add a couple of animations and some text. So let's go to seeing three, which is 6.9 seconds long. And these are the longest individual scene. And there's not really much happening is that as a man talking with some graphs. So what I wanted to do is, let's look at the message that scene three conveys. Let's listen to the voice over. Contrary to popular belief in the no financial assets, government savings, bond, and how your money grow. Okay, That's interesting. We are, audio has shifted slightly in comparison to where we'd edited it earlier. This does happen with Canva because the audio doesn't simply remain in its timeline. If you change the length of video clips, Canva will change the length of your audio so it can move slightly nine. But let's just put it back in place. So I'll click on the audio. And let's see what we have. I think adding the transitions has pushed out tight timeline, slightly out of place. Still hiding money under a mattress, con under a mattress. K. I want that piece to be a little bit longer. Still hiding money under a mattress. And contrary to popular belief in as the no financial assets, government savings bond, and how people money grow. And so he is timeless. He has all play head. I want seem to, to actually end that signing it with prematurity. So I'm going to drag it. To our playhead was, and see if it's in, if it ends in the right spot. Now, government savings bond and how people money grow and on team of professionals will raise and nurture your investments as if they were the very young and trust our experts to take care of your hard-earned money and make it work for you. Okay, perfect. Even though you can see the full video that you can tell it, the scenes now begin and end in the right place again. Okay, so let's go back to Scene 3. This is now 8.2 seconds long. That's quite long in a 20-second piece. Okay, So we've got government savings, bond and money growing. Let's see if we can add some illustrations to this piece to convey those messages. Now, what I want to do is I want to add some photos that will pop up into the screen as this scene unfolds. I don't want them to pop up immediately and start a sketch of the scene. Because that defeats the purpose that the viewer is going to have eight seconds for the eye to scan. The piece of magnetic gets slightly bored of it. We want those photos that crop up during the scene, not just appear at the beginning. So what I'm gonna do is I'm using Zoom. And again to show you, I'm going to go, the scene starts at 4.1 seconds. Mock. Let's go to 6.1 seconds with the playhead. Right-click. And you'll see the option to split. And all that does is split this into two pieces using the same video for both. And there we go. Okay, so what I'm gonna do in what is now seen four is I'm going to add three photographs. They're going to be in frames. And then I'm going to animate each of them so they appear on our screen in sequence. So it's gotta elements. Make sure there's nothing in our search box. Combined frames. You can choose any frame you want. I'm going to offer round corner frame. Click on it to bring it into our peace. Make it about 330 wide. Selected. Come up here to the top right and click Duplicates twice. And put these pieces roughly in line. Select them all. Come up to position and tidy up. And that now means that the vertical gaps between these three pieces are identical. I'm going to select them all again. And hit Group. And hit Group. Okay, so I'm gonna put these into position. I'll play with the spacing. Now I'm going to go back to elements, clear our search bar. Put in the word grow. Go to photos. Okay, well here's a man holding a plant and sand. This is called hands planting seedlings. I'm going to drag that into one of our pieces. We have money and jaws. I'm going to drag that into another piece expanded. So it's just the jar and the plant showing some plants growing there. There's another handle, the plant as drag that into this piece right there. Okay, so we've got the theme of growth in our images. Now if we play the timeline now, these will just appear two seconds into the scene. Contrary to popular belief, I see no financial assets. Government savings, bond, and help your money grow. Okay? I ungroup these and apply a animation to each of them individually. If they were grouped when applied the animation, the animation would apply to all of them at the same time. Cisco, from left to right. I'm getting like animate. And I'm going to check for the Zoom and go to the middle one. And a clear photo zoom again. And the third line. And for the Zoom. Now let's go back to the start of the scene and see what we have, contrary to popular belief as the no financial assets has been and how people money grow. Okay, that's roughly what we want, but it's still starts a bit too soon. So to adjust that, I'm going to expand this scene, scene three to three seconds. And I'm going to take 1 second of sinful, which is 6.2 seconds long, until it's 5.2 seconds. Hopefully, all my timings should still work with the underlying voice or Cisco to the startup scene to come back to 100%. Here, we have our timeline. Contrary to popular belief as the no financial assets. And how people money grow on team of professionals will raise your investments as if we were live very long. In this scene, I'd just like to add a text message to emphasize how many experts this company has to give it some credibility. I'm simply gonna do that by having some text appear and that text will appear on a colored background. So the text is obvious, it draws the eye and can be easily read. So. This is, this piece is 6.4 seconds. Again, I'm going to go about two seconds into it. One thing professional, I'm going to right-click and split this. And then the second piece that's just appeared now, I'm going to add an element. I'm going to clear our search box, swab and various options appear. And there's lines and shapes. I'm going to choose a rounded Square pope that in place, changing it to the same green as we've been using in our logos. I'll put that box in place in the bottom left. Come to text. How to heading? Licensed advises. I'm just going to drag that. So it's approximately the right size for a textbox. For our underlying elements. I mean, drag it again, bring it into place. I'm going to change it so it's white. I'm going to click on Effects and give it a shadow. Shadow colors. Why chat? I'm going to change that to black. And there you go. That no stands out very nicely against that background. And let's make it a little bit bigger. I'm going to group the text and the box together because I want to apply an animation to it, but I want the animation to apply to it as if it's a single element. Now I click it, come up to animate. I'm going to click Block. So let's see what we've got. On team of professionals will raise and nurture your investments as if they were their very own. That happens, that animation happens a bit quick. I think I'd like something a little slower. So I'm going to go back into peace. Click on it. I mean, the animator window, I'm going to put breathes that. Let's see how that looks. I'll team of professionals will raise our nurture your investments as if they were very young. Trust our experts to take him Johan and money maybe for you. Okay, I'm going to leave that animation as, ASE on not putting an animation in the final scene. Because I wanted the viewer to focus on the eyes. This woman is looking straight at us because, you know, that creates an element of confrontation. It draws the eyes. And she's smiling, she's happy and she's waving money and a face. That's the message I want the viewer to get. So I'm not going to put anything on this scene that will distract them from that. Okay.
5. Adding Backing Tracks: Okay, so we've got our final video. The various scenes, they transition and change in timing with the underlying voice-over. We've got some animated elements in place. We've got an intro and outro. The only thing we don't have is a backing track, a little bit of music. And we use music primarily to convey emotion. We can use music to think suspenseful. We can use music to make something scary, something lighthearted, something irreverent. We can put a country track behind something country, and we can put a orchestra behind something elegant. Music conveys emotion. So what music and we're going to use in this piece? Well, I want something lighthearted. I don't want something Samba. Even though we're talking about finance, which is quite as somber, serious concept, I'd like something lighthearted, happy, upbeat. Okay, so let's go back to elements. Clear the search box. If there's anything there, go down to Audio and click See All. Now you've got two options for using backing music. You can use the options account that gives you, it doesn't give you a huge amount of free options, but there are some decent options there. Or you can find free copies music online. Just go to Google and search for copyright free music. And there are plenty of options, then you download that piece and uploaded into Canada. But the piece I'm going to use is called advertising. So trick, It's simply called advertising. Or you can use the keywords ambient, euphoric, bright and running. And once again, if you can't find this encumber, just use the link in the text file that you downloaded with the assets for this course. Pop that into a browser and you'll be able to copy this soundtrack from the template into your own piece. Now to use this, we simply drop it. You simply drag it and drop it into our piece. And now cameras given us a second audio track, and as you can see, it goes from the start to the end. But the one thing I'll tell you about this audio track now is it's going to be too loud. Let's listen to a little bit of it. And savings bond, too loud. So there's click on the blue audio track. Got to the volume option tick are down to about 30. Let's listen to that again. One thing we're professionals will raise and nurture your investments as if they were their very own. Trust, our experts and take out your hard-earned money. Now, in other video editing software, you have the ability to edit the start and the end of an audio track, so it fades in and fades out. Unfortunately, you can't do that on Canvas just yet. Although I'm fairly certain Canada will add that feature at some point in the future. It's a common sense feature that I'm sure a lot of users will ask for. Canvas video development functionality is getting far better very, very quickly. So I'm sure that they will overcome that problem. So right now you've got two choices. You can start the music piece at the beginning. So it starts cleanly with your advert. Or you can end the music piece at the end. So it ends cleanly with the advert. And what I mean by that is this. Let me expand this once again. Taking our piece and expand, I'm going to click in the blue. And as you can see, here's our double-click the blue. This then allows me to highlight which part of the song I want to show in our video. And I'm dragging from right to left. So I can find the end of this piece of music. And you can see the wave forms of the audio here. I don't know how long this piece is out there we go. Here's the end, as you can see. So now let's listen. I'll come back to the regular Zoom. Now let's listen to the end of our adverts. And hopefully this song she trailed off naturally. Okay, that looks really good. The music still a little loud. I'm going to change the volume setting down to about 23. Unfortunately, what that does mean is at the start of the video, the musical probably start quite abruptly. Let's listen. Money under the mattress. Personally, I think it's better to begin the music track abruptly than it is to ended abruptly. Because the user will probably assume they'd just missed the first, second or two of audio due to their Internet connectivity or their headphones or whatever, it might be. Far more professional looking, in my personal opinion, to end the video with the music trailing out. But if you're lucky and you can find. Shorter that piece of music than ideally you want both. So we've added our voiceovers, we've added our backing track, we've added our transitions are animations, I intro and outro. So I'm going to put this piece into full-screen. Please forgive my neighbors barking dog, he's excited as well. And let's take a look at our finished piece. Still hiding money under the mattress. Contrary to popular belief as the no financial assets, savings bond, and how people money grow. On team of professionals will raise and nurture your investments as if they were their very own trust our experts to take him, Johan and money for you. Okay. There was one slight glitch in that piece, so I'm sure you saw it when Allah page here, when this animation popped up. I think that the breathe animation is added to the entire page that I'm going to remove that, I'm going to click on the element and put the brief element just on that. If it's open fit available to us. No, it isn't. Lattes in that case. Let's have our text simply shifted to press. Let's see this. Again. Latino professionals were raised and nurture your investments as if they were their very own money. Okay? And of course, now that our video is ready to download, we simply come to the top right-hand corner here, the download option. We download our video as an MP4 file. If the eventual file that you download is a little too large to work with, then there is a free program called hand brake Hambrick dot FR that you can download and hand brake compressors video files into much smaller files without losing too much quality. In fact, the video you're watching now is a file. It's being compressed using Hambrick. And there you go. That's our finished video. The purpose of this lesson was to show you how to use the new canva video interface. There you go. There is in all its glory. To get the best from it, I simply suggest you spend time finding the photo and the video assets that are very applicable to the message you want to give your viewer. The more applicable as photos and videos, product shots, service messaging, or a spokesperson talking, the more on-point your video is going to be. I hope you liked the video. If they've got any comments, questions, or concerns, please put them in the messaging. Please put it in the Q and a. Send me a message and I'll be only too happy to answer. But as always, thank you very much for your time.
6. Congratulations: Well, hi and welcome back. If you're watching this, then you've got to the end of the course. Congratulations. I hope the coast provided something of value to you. And I think you'll agree that Canvas, latest video adding until huge improvement on the old one. Simple to use and very powerful. Indeed. I'm excited about the videos I'm going to create using Canva. I hope you are too. I do hope to see you on another Canvas course in the future. I'm going to keep making these if you're watching them. But as always, thank you very much. All right.
 Adam Daniel