Transcripts
1. Introduction: Using layers in photography is a technique that can
totally change the way you capture images by adding complexity and a touch of
chaos in your compositions. Your photos will
stand so motion. They will feel more
interesting, more authentic, and they will capture
the true essence of real post moments. Hello, I'm Robert and joining me in this class as a guest
teacher is my wife, Sonny together, We run a
wedding filmmaking and photography business that has taken us all over the world. Photography is not only our job, but it is such an important
part of who we are. We love going out and shooting the streets in
Mexico where we live. We also love documenting
our everyday lives. We capture moments, whether
we are meeting with family, friends, or even if
we're just going out for a walk with
our little ducks. In this class, we will guide you through the art of
your photography. Well, this technique
may seem advanced. We assure you that
it can be learned by anyone who wants to
go beyond the basics, will demystify the
process and show you how to create
impressive compositions. Our goal with this class is to make it simple for
you to understand, starting with the foundations
and building your skills. From there, we will start by explaining what layer
photography is. We will analyze some basic
composition techniques that will serve as your took
when shooting for layers. From there, we will explore specific considerations when shooting with
layers in mind. And finally, we will talk about cropping and how the simple tool can help you grow more
as a photographer and at the same time
elevate your compositions. This class is great if you're just getting started
in photography because we will be approaching the subject from a very
non technical perspective. Yes, we will talk
a little bit about **** aperture and even
**** compression, but don't get scared
by these words. In the end, our goal is to show you that everyone can make this layered image by simple knowing what you're looking
for through the glass. We will be showing analyzing work we have done
with murals cameras, but also a lot of things that
we have shot on our phone. You do not need a big professional
camera for this class. If you put a phone
with a camera on it, that will be good enough. Our hope is that this
class will inspire you to capture the world around
you with a fresh perspective. You will learn a
powerful technique that will take your photography
to a new level. You can apply this to any style of photography
you're interested in. So get ready. We will
start with some theory and later we will jump
into more practical stuff. See you in the first
session. See you there.
2. Understanding Layered Photography: Welcome, We are
thrilled to have you join us in this class
about layered photography. Before we jump into the techniques and all
the practical stuff, let's take a moment to talk
about the concept itself. Layered photography can mean different things to
different people. Throughout this class,
we hope to help you discover your own personal
perspective on this technique. But first, let's make sure
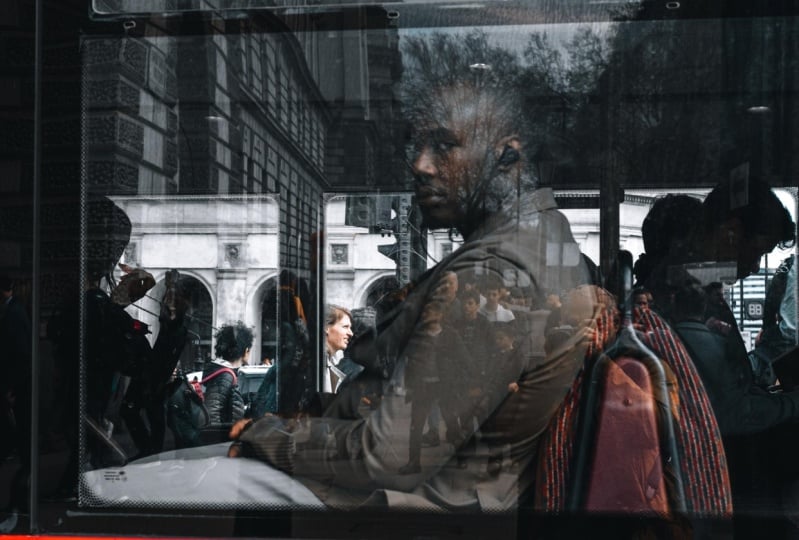
that we're on the same page. Layered photography is when
you put different things together in one picture to
make a cool and inciting. Instead of just
showing one thing, you show many things to make the picture
more interesting. To do this, you
need to carefully place the things you want
to show in the front, middle, and the background
of the picture. Now, why do we use
this technique? What's the goal
when using layers? The answer is simple. We want to add depth, dimension, and meaning
to our images. Layers, like other
composition techniques, guide the viewer's eye
throughout the image. But layers also serve
as a powerful tool for visual storytelling
by intentionally deciding what to include or
exclude in our compositions. By being conscious of the
placement of elements, we can capture the essence of a moment in a way that
is truly remarkable. When layers are used well, they can make you stop and
look closely at a picture. They can grab your
attention with all the things happening
in the picture. You may have already taken layered pictures before
without knowing it. But if you understand and
started this technique, you can start using
it on papers. The more you think
about layering, the better you will be at taking pictures that match
what you want to show. It also helps you to see the
possibilities of a picture. Well, you're taking it, editing it, or even cropping it. Let's talk about some use, key scenarios for
layered photography. First, every day photography, you can apply layered
photography to every day situations such as photographing family
gatherings or the people that you love
or that hang out with. You have the power to
create, captivating, and visually reach images by capturing moments that hold
special meaning to you. Adding your own personal
touch is really nice. Now let's talk about
the street photography. When you see layers in
street photography, it makes the story
more interesting. You can capture the
feeling of a place, is a great way to show the interesting things
happening on the streets. Documentary photography
is another area where layered
photography shines. By including multiple elements or subjects within
a single frame, you can convey
complex narratives, profound impact on the viewer. It's all about capturing layers of stories
within each shot. In winding photography, using layers gives you a new
way of looking at things. It lets you capture not just the messing you're
taking a picture of, but also what surrounded this. Make your picture feel
more alive and inciting. Okay, now that we're starting to understand more
about the concept, let's go back a
tiny bit and talk about some important
composition principles that will be very helpful to us once we start incorporating
these layers in our photos.
3. Essential Composition Principles: Before we go deeper in the
whole concept of layers, let's take a moment to understand the importance
of composition. This is what helps us create images that are not
flat and make something dynamic or with a sense of
immersion when we see things our man understand more than just what's
right in front of us. As people who take pictures, we try to make our photos feel like you are really
there in that moment. That's where composition
comes into play. It's all about intentionally filling the frame with
elements organized or distributed in
such a way that they contribute to the story or message that we want to convey. By eliminating distractions and finding the correct balance, guide the viewers
attention and make our images communicate
more effectively. We think about
what's in the photo, the colors, the light,
and other things. It's important that we
pay attention on how composition helps us to tell
a story with our pictures. It's really important to know
about this before we try to add more stuff or interesting
points to our photos. Perhaps one of the most fundamental composition principles is the
rule of thirds. It involves dividing the
frame into thirds and placing our subjects at the spots where the imaginary
lines intercept. This technique creates visually balanced and engaging images. If you want something
a bit more advanced, you can look into the
golden rectangle, also called the
Fibonacci spiral, which I prefer over
the rule of thirds. This adds more dynamism by
following this line and placing elements of importance
around or under it. Another compensation
idea to think about when taking a
photo is using lines. And let your eye these lines could be things like
streets, fences, or river that help
guide your eyes through the picture And make the
picture feel like it's moving. Give it more depth. Oh, and we cannot
forget about framing. It's a way to use
elements like windows, doorways, or trees to enclose
or surround our subjects. The human eye naturally
gravitates towards these shapes that have
a sense of geometry, instantly drawing attention
to our point of interest. So now we have four things to think about when
we take a photo. The role of cert, the spiral
composition, framing, and the lines that let your
eye using these ideas, we can make it
interesting photos even if there's only
one thing to look at. However, the real challenge comes when we start to introduce multiple points
of interest while still using these
composition ideas. This is where we will now be able to start building layers. I hope that you
are ready because next lesson you will have a lot to take in and
a lot to practice. I believe this is the right time to discuss
your class project. As your poorly guest, we want you to take
your camera and try out everything
we have discussed. Especially what
you will learn in the next two classes
about layering. You can use any camera
you have available. We will not be
pixel peeping here. We actually shoot a lot with our phones when we're not
in a professional setting. Specifically, we want you
to post a project with about three to five of your favorite
photos that you take. And we know that good photos
speak for themselves, but we would love for you
to share something about your experience here
as what you liked. What was difficult,
where you did well. Oh, what you want
to get better at. We think that layer
photography is great for getting real
and natural movement. But if you don't
like this style, we still want to say how you use these ideas in a different
way of taking pictures. We just want to know that you got something from this class. You want constructive feedback on your photos, let us know. But if you just want to show
what you have captured, we're also okay with that. Remember, your photos must have at least more than one point of interest for them to be
considered layered photos. Hopefully, you're
applying some of the composition
techniques that we have discussed here to
put it all together. The next section
is more practical. We will discuss lenses and different ways to
direct wheeler size. You will also get more
ideas on how to make your photo feel balanced
like we talked about here. We'll see you there. See you.
4. Layering Technique and Practical Tips: As photographers, we
strive to recreate some of that experience that we had
when we noticed something. We want to capture the
essence of a moment. I'm sure I have
heard it many times. It's all about capturing not how something looks like,
but what it feels like. Layers in essence, breathe
life into our images, awakening the viewer's curiosity and instantly drawing attention. It's a way to get close to that depth that we
want to capture. There's no straight rules
for this technique. If you understand
the basic idea of composition we
discussed last time, you're already on
the right path. Your job now is to
add more elements to your photos and find ways
to make them work together. Now, while there's
no specific rules, we want to give you some
tips that will help you get results like the ones that we have shown
you until now. A great way to
make the layers in your photography shine is
by using a wider ****. We suggest that you
stick to something under 50 millimeters
under Fuji cameras, we use 23 millimeters
most of the time, which is the equivalent
of a 35 millimeter ****. This is great to
avoid distortion, but we also shoot a lot
with the 24 millimeters, which is what we
have on our phones. Try to stay away from
zoom lenses for now. If you are using one of those, just leave it fixed
on a wide setting. When you use a wide angle ****, your photos will include
more of the same. This might mean you
have to get closer to a subject to keep drawing
the attention you want them. Don't be scared to get close. As you get closer and
include more in your photo, your pictures will
feel more real. It will be like the
viewers is there with you. This is also a chance to include more than just one
subject in your photo. Layering, combined with
capturing movement, our energy will make your
photo really stand out. Another thing that will happen when you shoot, why is that? More things will be in focus. This is important to consider. Basically, we are trying to do the opposite of the typical blur background
portrait photos. We want to integrate the subjects with everything
else in your photos. That is why having things in focus is something important. If you are new to photography, we suggest that you
start experimenting in broad daylight with aperture at eight or something higher, since that will make understanding
this technique a lot easier when we should with our phone because
of the sensor size, we do not have to worry
about this a lot way to lock focus on every camera
model is different, but what you want to
search is how to use back button focus for
your specific model. This is not necessary, but super useful to avoid your camera hunting for
focus with every snap. When you take
pictures like this, you don't need to constantly worry about getting
the focus just right. As long as you know about what distance your focus is
set and the era it covers. One last thing that
we have to tell you, which is a great reason to
shoot layers with wide lenses, is because of **** compression. This has to do with the science
or physics of our lenses. The longer the **** that
you are shooting with, the more compressed our subjects and their background
will appear. The opposite happens
with wider lenses. Simply speaking,
**** compression when shooting wide will help our composition by creating separation between our subjects. This separation allows
us more freedom at the time of applying a better composition
to our images, since it gives breathing
space and makes our points of interest clear
apart from one another. Now that we have discussed
technical stuff, let's talk about some
practical ideas. Taking layered shots in photography is about
having the right mindset. You need to learn to say the potential insinuation or moments happening
in front of you. You will start to see
many elements and figure out how to include them
all in one picture. Layering them in a
way that looks good. If you do it right, it
will add more depth and interest to your photo and
make them look more powerful. If it's not done right, something will feel
a little bit wrong. But making mistake is also
a great way to learn. We will talk more about
this in the next section, but before that, let's break
this down a bit further. When you are overlapping
multiple subjects, what you're looking at is not
only position and balance, but you are also looking for clarity in your
points of interest. By this I mean that there's nothing more frustrating
for a viewer than to have the feeling of wanting
to see something that is not there or maybe
it's not clear. It just creates this
confusing feeling and the viewer will never know what is he supposed to be paying attention to before
taking a photo, it's always good
to ask yourself, what is the point of
interest of this photo? What caught your attention? People's eyes are naturally drawn to certain
things in a picture. Like the brightest
part a person's eyes. Things you put inside
frame where lines lead to, like we talk about in our
last section on composition, what you want to know is, where is your interest? And make that the foundation
of your composition, whether it's an
expression in the eyes of your subject or a
moment or a thing, or the light or a background. Clean layers or placement of the elements should go together
with this composition. Should not fight your intention. It should make it clear, even if the subject of your photo is something
more abstract. Shapes or movement
balance or energy. We want everything
working together, not against one another. Keep it simple, pink. One thing to focus on, maybe it's a cool
wall or a nice frame. As you notice a subject that
you want to photograph, start to look at the
background. Is it clean? How can you place your subject so that it doesn't go
against the background? Then what else can you
include in that picture? Sometimes you just have
to go with your feeling. Don't wait for the
perfect shot or you might miss it.
Take a picture. When you say something
interesting, you may be surprised by how the different parts of
your picture interact. They can guide the viewer's
eyes across the picture. Sometimes what's outside
of the picture can make the viewer of your photo wonder about what
they cannot see. This can make your
picture really special. You cannot see everything inside a frame when
you're shooting. You cannot always anticipate
everything to be perfect. But that's part of the surprise and magic of this technique. The result is often
more than what you saw. A lot of this is about
following your feelings, that's why it's hard to teach. You have to learn it yourself by taking lots of pictures
and try new things. Photographing
layers is great for incorporating many different composition
techniques or ideas, like shooting clean
surfaces or reflections, or mirrors, shooting
silhouettes, shooting through objects
and through glass. I personally like to
look for vertical lines that divide my frame and also create some
visual separation. I mean, the possibilities
are endless. But it all starts with this
principle of trying to capture more than a single point of interest in our photos. Wow, that was allowed to cover. Yeah. You all start
to make more sense the moment that you
start to actually do it. Grab your camera, go outside, go hang around with your
family, with friends, or go to the streets anywhere, look for layers, and go capture some interesting
compositions. See you in the next lesson, where we will talk about
cropping and some things to keep in mind when you
are revisiting your work.
5. Learning by Cropping: All right, we have discussed about what to look for
when we are shooting. We suggested settings
and focal length, but now you should have
already started to experiment shooting with
all of this in mind. Now it is time to talk about after shooting in this class, the only type of editing we
will talk about is cropping. If you know about photography, you know it's important to get things right when
you take the photo. There's only so much you
can fix later if you make mistakes with settings
like exposure and focus. But if the composition
feels a little off, you can still improve
it by cropping. If you want to be a
better photographer, it's not enough to try to
always make the best photos, but also you need to think about how your photos
could be improved. What I mean is that
every small mistake can become a fantastic
learning opportunity. Don't be afraid of making
them or identifying them. Don't let it get you down. It doesn't mean that
we're encouraging you to rely on heavy editing
to fix things, but rather to notice
that there's always room for improvement and
doing things better. Because of that, we
think that cropping can teach you a lot in
the editing stage. With cropping,
actually sometimes you can take your photos
from good to great. Well, we do have to mention
that cropping has been a topic of endless debate
among photographers. Some say that it ruins the original artistic
vision of the photographer, while others believe
that it clarifies and enhances the intention that you had in the first place. Actually, many
times, especially in a street photographer
documentary setting, I photographed by
intuition and feeling. But without knowing exactly
what will I capture, I am okay with being surprised later when I look
at my frames in the big screen and doing any adjustments that will make my discoveries clear
at that stage. Our advice is if cropping makes
your photo better, do it. Don't be afraid to try different crops to fund
the best composition. Cropping is another
way to understand balance and train your eye it. You are looking for those spots
that we mentioned before. You are looking at the borders. You are looking at
how the elements connect with one another. The direction where the
subjects are looking at, all of that informs something to the viewer and you want it to make
sense in your frame. It's also a good time to break the rules and maybe
introduce some tension. Most professional camera give
you enough resolution for some cropping without
too much quality loss for social media posting online. You can even crop photos from your phone depending on the
quality you will get from it. Of course, only if it's needed and if it will truly be
making your photo better. Okay, now that we have talked composition techniques
involved in layering, and how can we
improve our images and learn about
them by cropping. Let's close our class with
some thoughts on ideas on how to use this for
creating meaningful photos. And some things that you can
continue doing to explore the complexity of layering
in your photography. See you in the next lesson.
6. Closing Thoughts: We have reached the
end of our class. We hope that you have learned some new ways to incorporate
layers in your photos. I think layers really allow you to play around
with composition and with the subjects
of your images in a way that allows for a
lot of creative freedom. Taking photos with layers
in many ways means that you don't have to follow all of the traditional
composition rules. You can be creative
and try to fund the best balance in the
middle of some busy moments. Don't be scared to take
photos that look different, link into the moments that
feel real and emotional, even if they're not perfect. I believe that using
layers is a way not only to create photos
with balance and energy, but also this allows you to
find your own personal voice and vision as a photographer by practicing everything
that we have discussed. You are exploring more about
your interests in subjects, moments, style, or composition. After all, layers only work when all of these
elements work together. Keep practicing this technique. If you want to even
learn more of it, I highly suggest that you
go on line and look for some masters in photography that uses this technique
in their work. Some of my personal
favorites are Alex Webb, Constantin Manos, Harry Guard, David Al, and Harvey. Study their photos and see what else you
can learn from them. Just like real life photos
don't have to be perfect. Some of the best photos
show lives, imperfections. Don't be afraid of little
messiness in your shots. Use layers to capture the
beauty of the real world. Remember, the more you found your personal interest
in your photos, the more meaningful images
you will be creating. We are excited to see the
photos that you will be submitting as part of the
project for this class. Don't forget to let us
know if you would like some feedback and share some thoughts about
your creative process. Before we go, we want to say thank you for
drawing this class. We will love it if
you leave a review, if you think what you learned was useful and if you
have any questions. There's also an area where you can leave some comments here, just write something there, and we will try our best
to get back to you. Thank you so much for watching
guys. We'll see you soon. See.
 Robert J. P. Oberg, Creative - Filmmaker - Photographer