Transcripts
1. Welcome to the Landscape Photography Workshop: Welcome to this landscape
photography workshop. My name is Phil webinar and I'm so excited to have you here. What is this course all about? This is a class that's meant to help inspire you and give you some really practical
ways to take your landscape photography
to the next level. You might be scrolling
through Instagram or reading the National
Geographic magazine saying, why can't I take
photos like that? Well, it does take lots
of practice to get to the level of a National
Geographic photographer. But that being said, there are some really
practical ways that you can capture amazing landscape
photos yourself. And we're going to go through those steps so that by
the end of this course, when you're out on
your next adventure, whether it's close to
home or across the globe, you are confident
and excited to be able to take better landscape
photos than ever before. So without further delay, we're going to jump right into the lessons in the next video, starting with what makes
a good landscape photo.
2. Your Location Matters for Great Landscape Photos: What makes a good
landscape photo? Let's break down
the typical things that a good landscape photo has. Most landscape photos use a wide angle lens with
a large depth of field. So most things are in focus, a low ISO not getting a
lot of noise or grain. Good exposure overall,
it's generally not to contrast D or creatively contrast it with
things that are super. Blacks are overblown, generally
good overall exposure, and an interesting location. And that's the most
important thing when it comes to landscape photos, because we have to
start with location. And the truth is that not every single location is going to result in
epic landscape photos. So there are times and
locations where it just lends itself to a better
photo at the end of the day. And that might not be right
in your own backyard. But I am hoping that throughout
this class you will learn ways to take better
photos of the landscape, right in your own backyard
before you actually go out traveling or going
on a photo adventure, It's important to
scout the location. Look at the time
you'll be there. What's the weather
going to be like? And look for photos, spots that people have
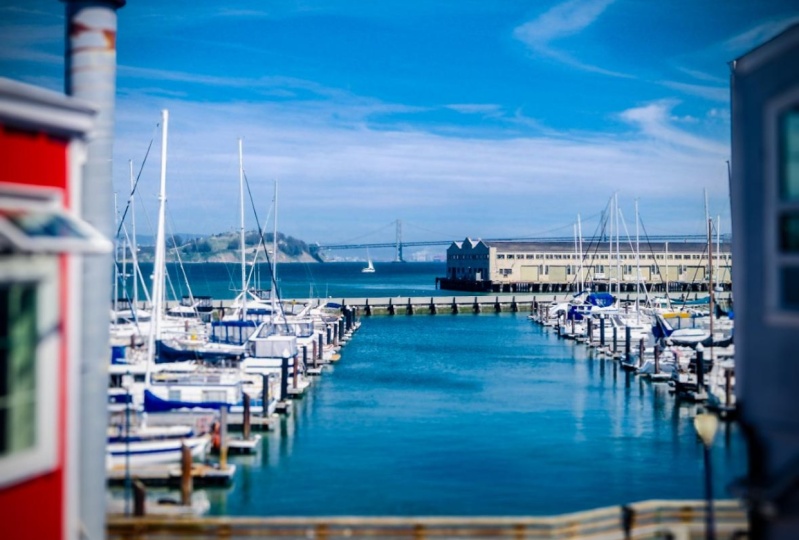
photograph from before. Here's a photo from a trip that I recently did to Big Sur. Big Sur is one of the most
iconic highways in the world. It's in central California, between just south
of San Francisco, between San Luis Obispo
and San Francisco. And when I was
planning this trip, I made sure to go online
and not only look for the specific highlights and the things that might look cool, just make sure I was
going to stop there. But it also I looked for specific photographs to see what angle do people shoot at, what time of day where
people shooting at, and what did those
photos result in? You can look on you
can look on Instagram, you can look on Google
and just search for the location and look for
photos and the images. On Instagram, you can
actually just put in a specific location
and photos that are tagged at that location
will pop up and generally the most popular ones will
appear in the results first. And so that gives
you a good sense of specific photos that you
might be able to capture. Sometimes you might
want to go into a place without any of
those distractions, without a preconceived notion in your mind of what a
photo might look like. But I've found that for myself
when preparing for a trip, I end up taking better photos. When I do scout the location, talking about whether to there's a lot of things that will
change if it's a cloudy day, if it's a bright sunny
day, if it's rainy. So that's going to
play a big part. One of my students went to Paris recently on a photo trip and she was a little bummed
because it was rainy the entire
weekend she was there. I encouraged her to get out
there and take photos because Paris in the rain is
also a beautiful site. So you can always come
back with great photos, no matter what the weather is, it just might not be as
epic or as beautiful or as specific as what you're
idea was in the first place. Here's an example of this. Here is big B bridge in Big Sur, and this is a photo and most of these photos that I'm showing
you are either my own. They are from photographers on unsplash.com or we have some great photos
from Ansel Adams, one of the greatest landscape
photographers of all time. Here. I know that this photo was taken at sunrise or a little after sunrise because
the sun is coming from that particular
side of the bridge. And I really liked the lighting that it has on this bridge. I'm always a fan of backlighting
are subjects where in this photo the the subject
is the bridge itself. Here are two other photos
from the exact same location. The one on the left,
you will see the sun is setting and it has a
lot of golden light, golden shy at golden hour shining on the face
of the bridge. But to me this is just isn't
as interesting as a photo. And this is one location
where golden hour at sunset, I don t think was as
good as at sunrise. On the bottom right, you see a photo where it was a little bit more overcast shot during
the middle of the day. Nothing wrong with this photo, but as you can see, the weather completely changes. What this photo looks like and the time of day that
you're shooting. Here's a photo that I saw before I went to Big Sur
and I was like, I want to get this photo. The Milky Way over these mountains and
somewhat long exposure, you see the streaks of the headlights going
across the bridge. Really, really cool photo. Well, you're not always
going to see the Milky Way. Depending on your location. If you're in anywhere
with light pollution, you likely won't see the
Milky Way galaxy like this. And depending on what
time of the month, If it's a full moon or
anywhere near a full moon, you're not going to see
the stars like this. And that's what
happened when I went, this is the photo I captured and I didn't get the Milky Way. And you can see that
I compose the photo a little bit differently
because of that, I panned or tilted
down a little bit, and you still see
a lot of stars. But the ocean itself is really brightly lit and that's
because of that moon. So a lot more light in general compared to this one
where you can barely see the hillsides and the ocean down below compared to mine where
there's just so much light. Still though. I think it was a pretty good
photo that I came away with. I'm really happy with it. This is one that
we'll be editing later on in the course
because there's some fun things that
I'm going to show you about landscape photo
editing later on. But the point is that if you're going and
you're thinking, Oh, I'm gonna get
that Milky Way shot. Well, it really
depends on going at a specific window of
time during the month, and that might not be
possible when you are going. The location is
really important. And before you go
out and location, make sure you scout it. Look for spots that you'll
be able to take photos, get inspiration from others, and prepare for what the
weather is going to be like. The best thing you can do to
improve your photography and your landscape photography is to take your photos at a
different time of day. If you're generally out during the middle of the day
when the sun is shining, everything's evenly lit
and you kinda get a good, decent photo, but it's
not as Interesting. Well, try going at sunrise or sunset and stay after
sunset or go before sunrise because those are the
times where the light and the color in the sky is the most complex and the
most interesting. So that's my number one
takeaway from this video. If you're going out and
you want a great photo, try going super early or
super late in the day. Alright, see you in
the next lesson.
3. Why do you want to take this Landscape Photo?: Like any photo, there should be a reason behind why you
are taking that photo. With landscape photography, you generally will still
have a subject and it's good to have a
specific subject in mind when you are
taking your photos. You might be taking that photo because the subject
is interesting. Perhaps. You are simply just documenting your trip and you're
just taking photos of the various locations
you've been so that you can look back and have
those memories clear in your mind
with those photos. Are the photos you're taking informative or more abstract? For informative, I would
say that it's more aware. You see that photo and
you look and you say, oh, that is Yosemite Valley. I know where that is and I can see what time of year it is. I can see the
colors in the tree, the weather, what it was like, versus a photo like this
that you see where this is a photo of some
sand and sand dune. And it's more of an abstract visual and that you're just
trying to get more creative. And at the same
location you might be able to get both
types of photos, but have, think about it. Why are you taking that photo? Perhaps you're capturing time, you're capturing the
change in season. Here. You're capturing photos
of the landscape for scientific information showing
the change in the weather, change in the climate, or long exposure like this. Just a capturing the time
right here in this moment. Or of course, maybe encompassing all of
these reasons here. Just simply taking
a photo because it's interesting to look at it visually beautiful when you're heading out to take photos, just keep these things in mind. Why are you taking this photo? What is the subject? Who are you taking
the photo for? These things will change what
you actually end up with. Alright, let's get
to actually how we improve our landscape
photography. Coming up in the next lesson.
4. Choose the Right Lens for Landscape Photography: How to capture a better
landscape photos. The first thing is choosing what lens you're
going to be using. I'm not going to talk about camera bodies because
I believe that you can take amazing photos with
any type of camera. Think about the first
digital cameras that came out in the nineties
and the early 2000s. The sensors that were on
those cameras are nowhere near what our smartphones
sensors are like today in terms of
megapixel and nowhere near what the cheapest entry-level
DSLR cameras are today. And they were still taking
amazing photos back then. So I don't want you
to get in your head thinking that if I
had a better camera, I could take better
landscape photos. Absolutely not true. That being said, the
choice of a lens will affect what your landscape
photo looks like. Generally wide-angle lenses is what we go to for
landscape photography. And that's because
landscape photography we generally think of as
a wide-open Vista. We see the hillside, we see the Great Plains, we see the big desert, the vast forests, whatever
your landscape is. We generally think of it as
wide on a crop sensor camera. This could be something
like a ten to 16, maybe 20 millimeter on
a full frame sensor. This is more anything like a
16 to 24 millimeter around. They're not exactly. Once you get wider than that and you start getting
that fisheye effect, you can still take
great landscape photos, but it might be a
little bit warped and not as natural looking. I find though, that
even shooting on a 16 millimeter on
my crop sensor, sometimes it's not wide enough. And that's because when
you're out shooting at specific vistas like
you see in this photo, you might not be able to get this entire rock formation in
your frame with that lens. And so sometimes
having a wider or an ultra wide angle lens is necessary to get that
shot in your mind. You can also shoot
with telephoto lenses. This allows you to more single out a specific
part of the landscape, especially if you
are farther away. Here's a photo of the
Matterhorn and Switzerland. And this was shot with a
relatively telephoto lens. I'm not exactly sure
what it was shot on, but the focus is
of this mountain. We will see later on in the course examples of
the same location shot with a wider lens
and how that changes what the photo story is. Basically, having both
lenses is important and I think it's a great thing to have both when you're out shooting. Here we see the cliffs of more in Ireland and you
can see a wide angle shot on the left
side versus a more telephoto lens are
shot on the right. Different stories. On the right you are
simply seeing the cliffs. On the left, you are seeing
the cliffs with people above the paths telling
a different story of what this location
is all about. If I were to take
this photo myself, and if I were using
a telephoto lens, I wish I would have had
something that could zoom in further on the
photo on the right so that that one
rock formation water is more of the subject. And I could get a little
bit tighter on this photo. Out of the two of these,
what do you like? I think I prefer the
one on the left, just because the composition, the leading lines
that we'll talk about later in this
course about composition. Everything comes together in a more interesting photo
to look at, in my opinion. And maybe the editing
comes into play to telephoto lenses are great at capturing those specific
details of the landscape, abstract photos,
things like that. So don't discount using a telephoto lens for your
landscape photography. Next, we're going to talk
about lighting in more depth.
5. Lighting: The Easiest Way to Improve Your Landscape Photography: Let's talk about lighting
for landscape photos. And the light source for your
landscape photos is going to be the sun or the moon, which is I guess just reflecting
the light of the sun. So the sun is your
light source and where it is in the sky
high, how bright it is, what's filtering
the sun is going to dramatically change what
your photos look like, like I mentioned earlier, it's the single thing that
you could change yourself to take a dramatically
better photo simply by changing the time of day that you take your photo. Here we see Yosemite Valley
in the afternoon light. You can see that because the
sun is a little bit lower, we're getting some
shadows on these epic, majestic rock formations
in the Yosemite Valley. Still a great photo, but different than the ones
we're going to see here. Here's sunrise, and it's a completely different
type of photo. Now, this might be edited to
add these types of colors, but I'm sure that there is some integrity here
in the colors of the sky and the landscape shot here at Sunrise or
before sunrise. Shooting at those times
adds more color to the sky and usually results
in a more dynamic sky. Now, the time, I will say that doesn't
happen is if you have some really interesting clouds or cloud movement that you can capture with perhaps
a long exposure right in the middle of the day. But in terms of getting color in the sky, sunrise or sunset. As I said, this is
the easiest way to quickly improve your
landscape photography. Here is another example of this, the cliffs of more again, on the left and
overcast day shot, I would guess a little
bit earlier in the day. On the right, it looks
like a sunset shot. I think the lighting,
the warm tones, much more beautiful on the right right-hand photo doesn't make the one
on the left bad, but I just prefer that
one on the right. What do you think? Here is a dramatic example of the difference
of time of day. Here is Arches National Park from in the Southwest of the US. Here's a general photo captured during the
middle of the day, cloudy sky, even lighting. So interesting shot. And if you are here
at this time of day, this is a great shot to have. But if you were to stay
here in the evening, at night, when it's
not a full moon. When you can see
all these stars, here's the type of shot. You can get. Completely different photos. Same location shows how you can capture a completely
different photo. Here I am in Big Sur and this was the location I went during the
middle of the day, five for state
beach and the sun. You can see on the top
left, just nothing special. Here I am standing in front of that documentation type of photo on the right using
a more telephoto lens. Joshua Sortino
captured this photo in the fading light of sunset. With that light bursting through that opening of the rocks. With the midst of the
ocean waves being able to cast that light even
further and glow even more, I think is super interesting. I just wasn't at this
location at this time. And so I never would've
been able to capture this this boat on
the right-hand side. And I accept that.
I'm okay with that. But it's just important to know that when you are
taking your photos, that there might be photos that you see that you
just can't capture because the lighting
is not not there. Here's another example. I shot the photo
in the top left, beautiful waterfall and
this cove in Big Sur, the ocean looks beautiful. It almost looks tropical
that teal in that water. But it's a different
photo than the one on the right shot at sunset. Now, I don't know which
one I necessarily prefer. I think the one on
the bottom right, I think is one most
people will prefer. The one in the top-left is a great general photo of what
this location looks like. It's not very artistic. The one in the bottom-right shot with a longer shutter speed. So you get that smooth
motion in the water. The light changes. Everything. Might not be the
last time I say it, but it is one of the most important things
I want you to take away. Get there for Sunrise, get there for sunset, and see how much
better your photos quickly turn out to be.
6. Composition and Landscape Photography: Now we turn our attention to something that you
have more control of. Sometimes you don't have control of the lighting
when you can be at a location and
you definitely don't have control of the weather. So what can you control
with photography? And that is composition. Composition is what's
in your frame, is how you compose the
landscape in your frame, where you place the subjects. How wide, how narrow
isn't on the left, right centered up, down, what's on the edge of the frame. Everything that is in your frame makes up
your composition and what are you choosing to not include in your
frame as well? And how does this help tell
the story of your photo? Here's an example
of some skiers that appear to be flying right above or in front
of the Matterhorn. A completely different story. The photo that we saw before
of the Matterhorn itself, including elements can
change what your photos say. So in the next videos, I'm going to break down specific compositional
techniques in terms of landscape photography. And these are just ideas I want you to look at the photos, see how these
techniques are used. So that next time you
go out and take photos, specifically think about, okay, how can I use leading
lines in this photo? How can I captured this
landscape using framing within a frame and all of the other techniques
we're gonna go through. Let's get to it.
7. Leading Lines | Landscape Photography Composition Tip: Composition technique
number one, look for leading lines. Leading lines are the lines
in your frame that naturally draw the eye towards something
or through your frame. Here in this photo we can see that there are
a couple of lines. One going from the bottom, we have this pathway, this is in Yosemite, and we have this path that
goes towards the waterfall. For future photos, I want
you to pay attention to what is your eyes
naturally go to? Does it jumped to the waterfall? That waterfall goes
down, down, down. Does your eyes follow that waterfall down into
this forest and then maybe bounce down to this guy
walking down this pathway. Do all these lines in the
mountain help naturally guide your eye down towards this person at
the bottom of the frame. These are just things that when you're consciously
thinking about it, it's hard to understand. Is that really happening or is it something that I'm
thinking too hard about now? But as a photographer
know that when you have leading lines that lead
to a specific subject, it does make that
photo a little bit more interesting for viewers. And one of the
reasons is it just draws our attention and it lets the viewer stick with
your photo a little bit longer than if
there was nothing. Drawing our attention in. Let's look at another example
here again at Yosemite. Here's the photo of Half Dome, one of the most iconic
mountain rock formations. And if it was just a
photo of Half Dome, it would be interesting. But here we have framed between these trees the lines of
this road leading us to that rock formation are I drawn down the
path of this highway to this rock formation telling a different story than
just the rock itself. This is telling you the story of being here at this location, driving down this path, seeing this epic location while you drive
down the highway, it almost feels like you are driving down that
highway yourself. Here's one where the
leading lines don't necessarily lead to
a specific subject, but this is often what
leading lines do in a landscape photo
and that's just lead us into the horizon. So here we have these
lines along the edge of this lake going to the horizon that ends up being blurred out
into the distance. Here we have these lines on the sand dune leading us
again to the horizon. This photo is not as
powerful as I would say. This one is. In terms of we have the leading
lines of the foot prints, the peak of the sand dune leading to our subject
in the distance. Now I wish I had this photo
was a little bit brighter. I think in terms of the editing, it could be a little bit more easy to see visually
if it was brighter. This one shot at a different
time of day obviously is interesting in that it's abstract but not as interesting
in terms of the subject. And so I like how this photo, the lines lead us to the
subject on the peak. Here we have one of the photography grades and slow atoms taking
landscape photos, photos that many people have
had never seen until an SSL, Adams was taking these
types of photos. The leading lines of
the river leading us to these giant mountain tops in the distance. Here
we have this photo. I just want you to look
at it for a second and see where your eye ends up. If it started on the cliff side, it probably was drawn down to these dwellings
that were built into the side of this cliff by the native inhabitants of
the southwest United States. And just incredible photo and it would just be a lot
different if we didn't have these lines on these hills or if it
was cropped or shot in a different way to not see these lines that just
draw our eye down. And I like showing these
old photos by photographer is like Ansel Adams because it shows that these techniques, he might not have called it leading lines back in the day. But it was a natural way that prolific photographers
composed images to be able to use these natural
leading lines in their photos to draw our
eye to a specific subject. It's just more
pleasing to look at. When you're out there
shooting photos. Look out for those
leading lines.
8. Negative Space | Landscape Photography Composition Tip: Use negative space. Negative space and positive
space make up your photos. Positive space is
the space that is taken up by the subject. So in this photo here we
have the Matterhorn again. And the Matterhorn, the
mountains at the bottom of the frame are what I would
call the positive space. This photographer Joshua, frame, this photo specifically to show the stars in the
sky that make up. What I will say is the
negative space of this photo. Now the stars themselves are
a great subject and I think that some would argue that
that's positive space. If you couldn't see
the stars though, if it was just a blink
blue, dark night sky, that would definitely be
more of negative space in a very interesting way
to compose this image. And almost makes the matter
or not as epic as it is when you see it like
this with the rest of the mountains next to it. And still protrudes
and it's still epic, but negative space
can have that impact. It can sometimes make your
subject feel smaller, while it could also
make them feel more epic because they're alone. And then the only
thing in your photo here is a shot of the sand dune. Remember the one we saw in the last lesson with leading
lines where you were seeing most of the sand dune
took up the frame here. Most of this photo is
negative space of the sky. I find this composition
very well balanced. It's using the rule of
thirds as well with the horizon line about at
the third of the frame. Here is a different kind
of landscape photo. This tree in the
middle of this body of water and lots of negative
space around the tree. Here, hansel Adams is using negative space with
this landscape. Using the sky. It's just showing how big this landscape is into a
more extreme checkout, this one where he composes the water and the mountains at the very bottom of the frame. So the point of this is
to get to a location. And perhaps you might
generally frame this mountain range right in
the middle of your frame. But try to think, can you compose this
in a different way? Can I use negative
space in this location? Maybe it's simply
just tilting up a bit so that the subject, the landscape is at the
very bottom of the frame. Maybe I am at a
location like this one where if I was tilted up or
if I was zoomed out a bit, there would be
boats around here. You could see the top of
the edge of the lake, at the top of the frame, maybe some foreground elements. But I want to compose it
using negative space. And so I'm going to
zoom in a little bit tighter so that I just see this one tree on this rock in the middle of
the water with nothing else. These are things that as
a beginner photographer, you might have to
consciously remind yourself, write it down, keep
it in your phone. Say try a negative space photo. As you progress, you might just naturally end up composing
your images that way. I don't necessarily believe that insulin Adams
was there thinking, okay, I gotta get my
leading line shot, I gotta get my
negative space shot. I think he just got to a
point where he was composing images the way that we're
pleasing to his eye. And we're able to categorize these compositional styles
now with these terms. But as a beginner, I think it is important
to test it out, try it out and be conscious of the compositions you
are trying to achieve. Alright, that's it
for negative space. Let's move on to symmetry
in the next video.
9. Symmetry | Landscape Photography Composition Tip: Our next compositional technique
is to look for symmetry. Here we again have
the Matterhorn, but they found this body of water where they can
use the reflection of the Matterhorn to make it
a more symmetrical image. Again, doesn't make
it a better photo, doesn't make it a worst photo. If it wasn't symmetrical, It's up to you to decide. I find symmetrical photos
interesting to look at. But sometimes I like completely
off symmetrical things. I generally like things
that are like off-kilter, off to the side of a photo. But that being said, another thing to check out this photo particular
if I were them, I would have just
cropped it a little bit because it's the horizon line
is not completely level. It's not completely centered. But that can be done
in post-production. Here is another photo
of a landscape, the dolomite in Italy, again with the reflection in the water showing
that symmetry. Similar location and
the doll amides. You can see though, how the reflection
and the symmetry of that reflection change
the photo dramatically. And this is because at
different times of day, depending where the sun is, depending on where you are, how your angled, you're
just not going to see that reflection
in the water. Doesn't make the photo
on the right bad. I love that teal blue water
that you're seeing there. But on the left-hand side, it's very interesting
to see that reflection. If I were them, I
would have tried to widen out a little bit. Again, maybe not possible if they didn't have an
ultra wide lens. But just to see the peak, the top of the mountains in the reflection to make it
a little more symmetrical. Now I'm showing you
photos of reflections, but also when you're looking at different elements
in the landscape, maybe there's ways to
balance either side of the frame with the landscape on the left and right as well, and not just reflections
top and bottom.
10. Foreground Elements | Landscape Photography Composition Tip: Add foreground elements. This is something that I
think will really take your landscape photos to the next level in terms of just being more
interesting to look at, but also telling a different
story of your landscape. Here you can see the Matterhorn
with the foreground of the town or the village underneath this
amazing mountain top. Completely different
story than just seeing that mountain
top by itself. Here is this waterfall,
long exposure. And the photographer decided to include this mossy rock with
this one sort of plant, leafy plant in the foreground, everything is in focus. And this photo, in
terms of the subjects, the waterfall to this
foreground element and we'll talk about focus in
a future lesson. Dive deep into
advanced ways to focus and get things in the foreground and the background in focus. But this was a conscious
decision to compose this photo, not just of the waterfall, which would have been
interesting in itself, but also to include that
foreground element. Why is this interesting? Why is it a better photo? Maybe it's not a better photo. It's up to you to decide. But for me it's
interesting because it just keeps my attention
on the photo. There's more things to look at. I am looking from top to bottom to see what
is in this photo. And sometimes that's simply
what makes a photo better. It just what it's going
to keep your viewers attention on that photo
a little bit longer. Here we have some more
photos of the Matterhorn. Different though
we're shooting from a different perspective lower. So we see this
giant mountain top looming over this village
versus the one we saw before, which was from up above. Here we have the
foreground elements of the villages in the
buildings and the cabins, chalets, whatever you call them. Underneath the
dolomite in Italy. Different story than
just seeing those rocks. Here we have the cliffs
of Maher, again, very similar spot are
practically the same location. But the photographer on the
right decided to widen out, tilt down a little bit to include the foreground
grass in front. This is a case where I think I prefer the one on the left. I like the clean
line of those clips, just being able to see it. But the one on the right
is also interesting. It tells more about maybe the
time of year this was at. And it shows you, it feels like you
are there yourself standing on that hill with
that grass in front of you. Here's a photo that a
couple of photos I shot in Big Sur using the
foreground element. Standing up on this little
cliff overlooking this cove. Both have foreground
elements, but the right one, I really focused actually on the succulents and the
plants in front of you. And I actually didn't
get this right because the focus was on those flowers and the background
was not in focus. We're gonna learn
how to prevent that in the focusing
lessons of this class. But I would think
that for this photo, everything should be
completely in-focus. Here we have Angela atoms, including this tree in the foreground in front
of these mountains. I believe this is the
Teton mountain range in the United States. Without this tree
here, it would be a completely different photo. Might be just as good of a
photo or a better photo. But this one's
interesting to see that tree here on the left. The Tetons, big, majestic
snowy mountains. On the right. You see those mountains, but in the foreground
is that this driftwood. He's on the lake or
the body of water. And it's a compositionally, a more complex image. And therefore a little bit
more interesting to look at. Sometimes you want
both photos though. And speaking of
forgone elements, sometimes you want to simply focus on that
foreground element. You want the background
to be out-of-focus. You want it to just play
that background role. And then here we have
a photo from Big Sur. Focus on these flowers
in the foreground with the landscape behind
falling out-of-focus. Here's a couple of
photos from Lake Tahoe, the same little bay or cove with this little rock
island in the middle. The photos are very different. They're shot at similar times
of day, but on the left, they decided to edit it so that the landscape
is silhouetted. On the right. The
editing is different. The shadows are brighter. You can see the trees, but you also see that
they have focused on this snowy patch
in front of them. Very conscious decision to capture it and
compose it like this, tells a different story. You can tell the weather
what it was like sitting there on that rock
more than the one on the left. Both are really great photos. Here, hansel Adams
focuses on the water, the ripples of the water
in this landscape. Which I think was probably
a smart idea because if he was focusing just on the
hills in the background, It's honestly not
that interesting of a photo seeing that
rippling water. That is what is really
interesting, that pattern, the textures of the water, I think is more interesting and the right thing to focus on. So try when you're out
shooting landscapes, adding some foreground elements, maybe it means tilting
down, crouching down, moving to a different
location with some foreground elements
and try focusing on those with the background
out-of-focus or focusing with everything
in focus as well. And if you need tips on that, we'll get to those
lessons coming up on focusing because there's some really cool techniques to make sure that you're
getting everything from your foreground elements
to infinity in focus.
11. Show Scale | Landscape Photography Composition Tip: Something that can make your landscape photos
even more epic is to show the scale of the landscape with people or other
elements in your frame. Here we can see another location
at Arches National Park. And because this person is standing underneath
these rock formations, you can see how intense and how giant these truly are completely different than
just seeing them alone. Here, I took these two
photos of this cove. On the right-hand side. It's a little bit further
down the cliff side. But my brother-in-law
was climbing down ahead of me and I
thought it was It's interesting to see
him walking down. Not only does it help
with the perspective of looking down and seeing what it feels
like to be there. But it also tells the story. Maybe just to me as a
reminder, maybe not to you, but to me as a reminder that we had to climb up that
cliff to get this shot. I just think that the
one on the right side to me is a little bit more
interesting of a photo. Here we have two
different forms of scale. On the left you see the gigantic sand dunes dwarfed by even
bigger mountain tops. On the right you see these gigantic sand
dunes that are so big compared to this lone figure walking down at the
bottom of the frame. Both sand dunes, these aren't on the same
location, I don't believe, but probably similar in
size and epiglottis, but a much different story you're telling
with these photos. Being able to see
them compared to other landscape elements
or compared to the person. So if you're in a
location with something that is just ginormous, made me take a photo with
someone in IT. Do a self. He can't hear yourself in that photo to show the
scale of those elements.
12. Framing within a Frame | Landscape Photography Composition Tip: Look for natural frames. Framing your subject or your
lens gapes within frames in your photo can make it a very interesting photo to
look at here we see a DWI, Sioux Falls, South America. And you see that these falls are framed by the forest that
is in the foreground. So this is foreground elements, but in terms of actually framing and not just at
the bottom of the frame. Here we see the same Falls,
two different photos. The one on the left
not being framed, the one on the right framed by the tree branch at the top. Now, between these two photos, I think I prefer the composition
of the one on the left. Maybe would change things
a little bit editing wise. If it was shot at the different day where
the water looked a little bit more blue with the sky being a little
bit more blue as well, it would be more interesting. But out of all three of
these photos like this one, I think that this one is
probably my favorite in terms of being just the most
interesting to look at. I always go back to which
one would I want on my wall? I think this one. Here we
have the doll minds again. Some rock formation in
this mountainous region. Interesting photo. They've centered it, which is a different
composition all style as well as centering
your objects. Much different than
this photo here, where the photographer found
this cave-like structure and was able to backup
into this cave to be able to frame
these rock formations. Both are interesting photos. The one on the right, I find a little bit more interesting
with that framing. So again, when you're out there shooting your
landscapes, remember, frame within a frame, how can you compose the same exact scene using
some sort of natural A-frame?
13. Patterns & Textures | Landscape Photography Composition Tip: Lookout for patterns
and textures. This is something that I find to inspire me
to get out and take photos when I'm a little bit sort of board of my location. And this might be something
if you are trying to photograph around where you
live and you feel like, Oh, well there's nothing
interesting to look at. See if you could find
some patterns or textures within the landscape. And maybe it means
using a telephoto lens or just looking at things
in a different way. Here we have these
beautiful mountains and the misty clouds that could be photographed really
anywhere in the world. This could be any number
of mountain ranges. And what makes it interesting is this staggered
pattern that we see. Here. We see from the sky view
these great texture of the forest beating up
against this body of water. And of course, this means using a drone likely to take this photo that you
might not have. But this photographer
was able to make this location more interesting by shooting from
this perspective. Looking up, we see the
texture of the sky, the patterns within
these rocky arch way. Very interesting
perspective to look at. Here, hansel Adams takes
and captures the patterns and the textures of
the Grand Canyon and beautiful black
and white photography. The one on the right is a
little bit more telephoto. And I actually prefer the one
on the left because it's, it's more patterned in a sense compared to
the one on the right. You still have these
great textures. I like the contrast and just
the lines that you see, but the one on the left, I just like the repetitive
pattern that you see there. So look out for
those patterns and textures when you're
out taking photos.
14. Change Your Perspective | Landscape Photography Composition Tip: Change your perspective. What this means is
simply changing. Like are you looking up, are you looking
down at something? How are you looking at the subject of your
landscape photo? And to really showcase this, we're going to look
at how one location, one rock is photographed in a number of
perspectives and how that changes everything in terms of how that rock is seen. This is El Capitan, That's great cliff in Yosemite. Here we have a standard photo of this Great Big
Rock. Great photo. You got the foreground
of the forest below that would be very
difficult to get rid of. Looks big, right? Well, let's look
at it compared to this photo and this photo
captured from farther away. But the size of the rock and
the frame is about similar. And that's because even
though further away, they were probably
zoomed in a little bit more and having this sort of framing
with the trees on the either sides symmetrically
framing this rock. You see the highway down
at the bottom as well. And it really just shows
how epic this mountain is looming over you as you
drive down this road. Both great photos, but it
gives off a different feeling. Here. You're closer to it, you're a little bit
closer to the base of it. You're looking up at it. It's blooming at you a
little bit differently, like it's about to topple over. You. Also shot at a
different time of day, which makes this photo interesting in a
different way, way too. Here we are zoomed
in to the top. And this is where we saw at the very
beginning of the class. We saw the lighting
From son sat, where as the sun goes down, you're somebody
valley of the shadow goes up over the face
of these cliffs. And I think it was a great
decision to make this a black and white photo
because you can see the textures really
well of this cliff. And it is highlighting
the peak of El Capitan. Here we have from a
different perspective, were turned to the side. It's like a profile
shot, a copy ten. There's a few interesting
things about this. One is if there was a person in this photo
scaling this mountain, you would see how small they are compared to this
giant cliff face. The other is you see
what's called Fire Falls. This is when just for a
couple of days of the year, I believe the light at it for just a moment shines onto
where this waterfall is. And it looks like fire falling down the face
of this mountain. And seeing it from
this perspective is just completely different
than those other shots. Here we have another shot from down on the floor of the valley. El Capitan is just
part of the story. This is a beautiful shot. I love the lighting, I love the perspective, the wide angle lens
makes it look epoch. And then here we have the
entire valley El Capitan, just part of the family of majestic rock formations with
Half Dome in the distance. These other great rock
formations forming this valley. And it doesn't necessarily mean make El Capitan less impressive, but it certainly does
make it seem like just one part of this
beautiful location. So how can you take a
photo of your landscape? Different perspectives. Sometimes you're stuck. There's one little cliff overlook where that's where you're going to take
the photo from. Other times. Maybe you could
change things up. You can move around, go to a different location,
go up, down, fly a drone, go down from underneath
whatever the landscape is. Try changing the perspective. Try capturing your location in multiple ways so that when you get back from your
photo adventure, you have multiple
options and see how it tells the story of that
location in a different way. So in conclusion, composing your image is what
you have control of. And I think the best
thing to do to improve your landscape photography
now is to have these things, these techniques in mind
while you are going out, just like you have
to have in mind. Okay, I'm gonna go at
sunrise, not at noon. You want to be thinking, Okay, I'm going to try to capture
this with leading lines or negative space or
symmetry or any number. Because you can combine these, these compositional
techniques as well, but try to be conscious of them. Now, so that later on it
just comes naturally.
15. Focusing Basics in Landscape Photography: Let's talk about focus. Generally, there are
some tips that will help you to get the best focus
for landscape photos, whether you are focusing on just a distant horizon or if
you are trying to include things in the foreground
that you want in focus along with what's
in the background. So let's get to
some of those tips. The first thing that we
need to think about though, is what is acceptable focus? Not everything is going to be perfect focus depending on what lens you're using and
where you are focusing. But there is such thing as acceptable focus in
the sense that while, what's that 20 feet away is going to be
the perfect focus, that's where your
lenses sharpest focusing on what's
in front of that will also be in focus
and what's behind that will also be in
focus to arrange. And the key with landscape photography and
photography in general is to make sure what in your frame that you want
people to be able to see. Is it an acceptable focus? Because you have to choose, or there's times where
we have to choose, where, whether
you're focusing on just the distance or
something closer up. And it's going to maybe
not be the sharpest focus, but is it in-focus enough? And that's what you want. You might think that you want to just jump to the highest F, stop the smallest
aperture so that you have the deepest depth of
field to get the sharpest, best, most in-focus photos when you're shooting landscapes. And in reality, that's
actually not true. There's a phenomenon called diffraction where
using a higher f-stop, even if something's in focus, you get a little
bit of distortion along the edges of things. The lines of you zoom into the highest quality photo of
you zoom in as far as you can and you compare it from an F eight photo
to an F22 photo. If you're focused
on the same thing, the focus will actually look sharper with the lower aperture. So a good range to use
for landscape photos is around F eight to 11. You still get a very
deep depth of field, but you're not getting
that diffraction. Another common misconception is that focusing to infinity
is what you want. Sometimes you might want
to focus to infinity, meaning the longest or the
farthest part of your lens. And this might happen
if you're shooting in autofocus and you're just pointing your camera
out the distance, it might just automatically
shoot or focus to infinity. But if you are trying
to capture things in the foreground as well
as the background. One, you might want to change from autofocus to
manual focus and to focusing to infinity isn't going to give you the
biggest range of focus. Meaning things in the foreground
might be out-of-focus. And when you're trying to capture foreground to
infinity and focus, focus, setting your
manual focus to infinity or automatically doing it is not the right thing. One quick rule of thumb
that might work for you is if you're
using manual focus, set it to infinity and just
back-off, just a touch. Remember that when
we set our cameras focus to a specific distance, that it's a range. It's not just like that one
plane of view is in-focus. Some in front and some
in back is in focus. So setting in front of infinity will also include what's in at infinity and focus, but also what's in front of it. If you're shooting landscape
photos where there's layers of elements from
ten feet to 30 feet, 200 feet to 1 thousand feet. And beyond. Focusing on infinity and backing off just a touch might
be a better option. Very unscientific way
to approach this. Another rule of
thumb that you can use is to focus 1
third up the frame. And this is often if you want or have
foreground elements. Because your foreground
elements will generally take that bottom quarter to
a third of the frame, whether you're shooting
portrait or landscape mode. But those foreground
elements will generally be around that fourth to
a third of your frame. If you're focusing on that, with most wide angle lenses, that element plus what's
in the background will be in focus if you're using
an f-stop around F8 to f 11. Now this isn't going
to change depending on what camera lens and what
aperture you're using. And depending on how far that subject is at a
third of the frame, if what's that 1 third line is relatively far away
from you, then yeah, it's gonna be easy to get the infinity background in focus all the way to in front
of that 1 third line. But if that 1 third line is only a couple
of feet away from you and you're trying to get that in focus with
the background. Then the next step, a more scientific approach is probably what you
want to think about.
16. Advanced Focusing Techniques in Landscape Photography: Have you heard the term
hyper focal distance before? This is a scientific term to define the distance
between the camera and a point in your scene
where everything is an acceptable focus from
half that point to infinity. And really what we're
trying to do is get the biggest amount of range in focus from infinity
to whatever's closest. And so an example of this
is if you have a subject standing at ten feet and that's your hyper
focal distance. Everything from five feet to
infinity will be in focus. And for that hypothetical
camera and lens and aperture because it changes with whatever lens and whatever
aperture you are using. But with this example, this would be the biggest
rain that you can get. If you, perhaps we're focusing at something
at eight feet, What's add infinity
wouldn't be in focus. Or if your, if your
focus at something at 20 feet, then what's that? Infinity will be in focus, but maybe only up to
15 feet or ten feet. And so the hyper focal
distance is really the way that you can get the most in-focus with your
specific camera, with your specific lens at
your specific aperture. How do we figure this out? Well, there are some apps
and there are free apps. If you just search for hyper focal distance and
the App Store, you'll find some free apps that will calculate
this for you. You can put in your
lens, your aperture, and where your
subject is standing. And it'll tell you where is
the hyper focal distance? Or you can, it will
tell you, okay, you want to put your
subject at ten feet and focus on that so that
the most is in-focus. Doesn't sound like a fun way
to do photography though out in the field and we'll
get to what, how to do this. But in a more simplified
method in a minute. But I think to help understand why this is
important and why this works or doesn't work for photographing landscapes
with foreground elements. Let's look at this graphic. I have put in my camera on my crop sensor
Fujifilm camera with my 16 millimeter lens at an F8. And the hyper focal
distance that it gave me back was 1.6 meters. And so that's why
at the very top, there's that graph
line that shows the hyper focal distance
being 1.6 meters. Then I have from 0 feet
or meters to infinity. Now jump down to where
it says hyper focal. And here it shows that the x
is where my focus point is. So if I manually focus my
camera lens to 1.6 meters, which you generally can kinda figured out
because of the lens, will have either numbers on the lens or in your viewfinder. You will see as you
manually adjust your focus, you will see the
graph or the bar going from 0 to infinity
or whatever it, it shows up on your camera. And so if I manually set my
camera's lens to 1.6 meters, That's going to give me the
biggest range of focus, all the way acceptable focus, all the way from 0.8
meters to infinity. So everything from a little
less than three feet to infinity will be in focus. And that's great because I can now have foreground elements, some flowers, a person that, That's only three feet away. And there'll be in focus
and the background will be in sharp focus as well
are acceptable focus. Converse that with
if you jump up above really quickly
to infinity. If I had, if I have
foreground elements, but I'm setting my
camera to infinity focus or automatically it
jumps to infinity focus. Only things from two meters
to infinity will be in focus. Now again, remember this
is with my cameras, 16 millimeter lens out F8, and it might be different
with your camera and lens. So if I had a
subject that was at five feet from my camera, then it's not going
to be in focus. And that might be an issue
if I want it to be in focus. So that's why
focusing to infinity might not work for this example. Now what happens if I
manually adjust my focus? But I miss the hyper
focal distance 1.6 meters just slightly, and I'm focused on
something like 1.4 meters. Because that can
be kind of easy to do accidentally if you're
just manually adjusting. We can't tell our camera and
lens exactly 1.6 meters. Usually it's just a little
range and you're adjusting it. If I accidentally bump
it or focus just that once something in front of
the hyper focal distance, what happens is that
I'm focusing closer, so things closer
will be in focus. So something like 0.6 meters
away will be in focus, but infinity won't be in
focus. Does that makes sense? And that's the
problem because if we are using this method to try
to get the most focus range, hyper focal distance
is the most range, but there's so much room for error that if you're manually focusing and you just bump it a little bit closer than
hyper focal distance. What's at infinity or in the background might not
be acceptable focus, and that range is smaller. So what do we do? One rule of thumb is to focus at what's two times you're
hyper focal distance. And so you would say, Okay, I know my hyper focal
distance is at 1.6 meters. And so I'm going to set
my focus to 3.2 meters. And if I set my
focus to 3.2 meters, then everything out at infinity
is going to be in focus. As you can see here, the range at the bottom of this graphic, all the way as close
as 1.07 meters. So I'm not getting as
close to the 0.8 meters. 1.07 meters is almost
three extra fee or an entire meter
closer and focus. Then if I set to infinity focus and anything that's two meters
or further is in focus. But I'm not living on the edge of having the
background out of focus. If I'm trying to
focus or setting my focus to 1.6
meters or 1.5 meters. And so this is a rule
of thumb that if you want to go to the
scientific approach and use your hyper focal
distance, setting your foot, find out what your
hyper focal distances, but then manually set your
focus to two times that you'll still get most of your foreground
elements and focus and the background as well. Now, a lot of us aren't
going to want to do this. Again, doesn't sound fun to
do photography this way. So is there a general rule that we can follow to
achieve our goal? And yes, there is. It's called the double
the distance method. And it's basically doing what all of these
calculations is doing. But not in a mathematical way
or not using calculators. What you wanna do is
get to your landscape. If you have foreground elements, this is all if you have
forgotten elements. Calculate or just
roughly estimate how far that foreground element is
three feet away from you, Is it five feet away from you? If it's five feet away from you, then set your focus to ten
feet, double that distance. So we're not really caring what the hyper focal distances. But the way that most cameras work with an aperture that's a little bit larger
or smaller aperture higher f-stop like an F8 to FL1. If your subjects 5D and
your focus to ten feet, then that subject should
be an acceptable focus. If your subject is three feet away and you're
focusing to six feet, it should be an
acceptable focus as well as infinity or
your background. The only issue when you have
this as if you're trying to focus on something
that's like one foot away. And then you say, oh, well now I'm going
to double my focus. I'm gonna focus to two feet. Most lenses, when you're
getting closer than one meter, then the range will
not be enough to get that subject and the
background in focus. And that's just the nature of shooting at something
super, super close up. But for most of us, when we're shooting landscapes, even with foreground
elements there gonna be a meter away or two meters
away or even further. And so just using the double the distance,
quick and easy, just guesstimate my
subjects ten feet away, I'm going to manually
focus to 20 feet. You're likely going to get what's in the foreground
and in the background. In focus. The key is to not
focus closer than what the hyper focal distance is unless you want a
blurry background, which is a totally
legitimate style that you might want to go for. And the only way you really
know exactly what you're hyper focal distance if you are, if you are calculating it and finding out
what it is using an app or an online hyper
focal distance calculator. But using this knowledge, basically the premise
is that if you have a subject that's
closer to your camera, then the background don't set your focus to exactly
that subject. Focus on behind that subject. Either double or at least
a little bit further past that subject so that
that background is in focus. And that's why if you're
struggling with capturing foreground elements in
your landscape photos and getting the foreground to
the background in focus. You don't want to use autofocus because you're autofocus
is going to try to sharply attached
to your subject. If that's where your focus
point is on your camera, and that might be at three feet or exactly what you're
hyper focal distances. Or it might be closer than
your hyper focal distance. Alright? I think you've
probably heard me say hyper focal distance enough. I hope this makes sense. I think this is definitely
something that for me. It took me a while to
capture and understand, and it also took me going
out and trying to capture photos with foreground elements to really see this in action. The takeaway. If you want to not think
about this at all, using the focus 1 third of the frame is generally
going to work. And the other is
double the distance. Thanks for watching and we'll
see you in another lesson.
17. How Editing Improves Your Landscape Photos: Let's talk about editing
landscape photos because truly, editing can make your photos more interesting to
look at or better. So what do I typically do
with landscape photos? I start with the fixes, I crop. I rotate so that the
composition looks just right. I straighten out those horizons. I fix the white
balance if it's off. Although most cameras nowadays, the auto white
balance is amazing. I fix exposure so that it's
not too bright to dark. Oftentimes I will lift, I will brighten
up the shadows of the photo so that I
can see more details. And here's an example of a somewhat natural edit that I did of The Big Sur coastline. I made those colors a
little bit more vibrant. The exposure was
generally spot on, but I added a little
bit more contrast to make it more dynamic. I perhaps did a tiny bit of
copying in there as well. Generally, I like to keep my landscape photos
somewhat natural, somewhat realistic, and
not completely abstract. Here we have one location. We saw this earlier. This is Lake Tahoe. And you can see how different
editing can change a photo. And these photos
were also shot at different times of day so that the lighting and
things are going to change when you're shooting
at different times, the clouds in the sky, all that's going to change. But you can see some
photographers chose to edit it with super
high contrast so that the landscape is
silhouetted versus being able to see the trees, the boats in the water, shooting at a long
exposure so that water is smooth and glossy
versus a not long exposure. So you can see the
detail of the waves now that's not
necessarily editing, but I just wanted to
bring that up to show you how these photos
are shot differently. And then mostly with the colors. Generally, I think it's
good to just enhance the colors that are already
in your photo and your frame. Not try to make a cool blue
sky look warm and Sadie. But there's times where
you might want to add a little bit of magenta or
yellow or orange or green, make those trees pop a
little bit more and more. A forestry green
than a teal green. Those are things you
can do while editing. Here we have the Fire
Falls and Yosemite. And you can see very
similar photos. But based off of the settings
or just simply editing, the colors are different, the contrast is different. On the photo on the
right, you can see more detail in the clips, in the rocks, the textures, compared to the one on the
left where the rocks fall, fall a little bit
into the shadows, it's a little bit darker. You don't see those textures. Look at the sky, see how that sky is a completely
different color. Was that editing, was
that what it looked like? I only the photographer
knows for sure, but I can tell you
that the one on the right seems like
they added a little bit more magenta to end red and orange to that photo to
make the Fire Falls pop. And I think it also made the sky a little bit
more purple as well. Whereas on the
left it's a little bit more of a teal sky with that yellowish Fire Falls light. Not so much the orange. Here, the photographer chose
to edit in black and white. And it's a lovely decision. I think editing your
photos in black and white can be one
of the best moves, especially if the sky and the colors aren't
as interesting. Now, here's a photo that
I decided to add it in black and white and there's a few things I like about that. One, I just like seeing the
textures of the cliffs and the water and that
is brought out by getting rid of the color. I liked the shadows and the contrast because this
was shot during the middle of the day and just that
lighting wasn't that interesting and making
it black and white, I thought was interesting. And the last thing I
like about this photo, because compositionally
it's just not that interesting
of a location. But story wise for myself, I like it because you can see at the bottom a mom and her daughter sitting
there on these rocks. They had climbed around the
face of this rocks over here from the left side and
we couldn't see them. So we didn't know
where they were. And we're like, I hope
that family is okay. And when we climbed up
the cliffs ourselves, we saw them sitting on the other side just
enjoying the view. And so I thought
having them here in this photo was
somewhat interesting. After I do my basic fixes, the ways that I make my
landscape photos better include using my
favorite tools like vibrance and saturation
to make our colors pop, clarity and texture to make those textures more
texture dehaze, which will bring back some
information in detail, especially in the sky which you will often have
if you're shooting on a day where it's a
little bit cloudy and or muddy,
dodging and burning. What I mean by that is
you are literally making certain aspects of your photo brighter or darker
using brushes, radial filters,
adjustment filters. We'll go into this in Lightroom in just a second
to show you some examples doing selective sky edits because sometimes your skies
just don't look that great. And so changing the color, the vibrance of the sky, the texture just
of the sky itself, can be very good. And then specific
color adjustments to bring out certain greens. The landscape were reds
and oranges in the sky. In the right, you can
see the before and after of this Big Sur photo. Be Bridge. Here's the before. Here's the after. You
can see a lot going on, I started with a decent
composition, decent exposure. But editing, I was able to bring out a lot of the
color and the sky, the stars, the
landscape as well. And so we're gonna go into
the editing room and I'm going to show you how I
added a couple of photos. Now the point of this
is not to teach you how to use Lightroom to
edit landscape photos. I actually have a full class on that if you're interested. I just want to show
you the specific techniques that I'm using so that hopefully whatever
editing app you're using, you can follow along and do similar edits to
your own photos.
18. Basic Landscape Photo Editing: Here I am in Adobe
Lightroom Classic. And the point of this lesson
and the following ones is not to show you how to use
Lightroom to edit photos. As I mentioned, I have a course specifically on Lightroom and on landscape photo editing
in Lightroom for an in-depth training
of how this all works. What I do want to show you are the basic tools that I use and some more advanced
techniques that I used in that Big Sur
photo right here. So here let's go and look at just basic photo and we
saw that before and after. But I think you can
see it a little bit better here before, after some of the basic
things I've done. And you can see here as I toggle in our main basic
settings adjustments, Well, I have adjusted the crop. So one thing I did was I just cropped in
just a little bit. I felt like that tree at the
top was taking up a lot of space compared to really
the star of the show, which is this coastline. And then in terms of
straightening out the horizon, I did that as well. Straight horizons are generally necessary for a photo
that looks balanced and not sort of off unless you're
going for that feeling of all off-kilter horizon. Then I just boosted the colors. So here you can see that
I boosted the contrast. I brought the highlights down, I brought the shadows up, and then I brought
the blacks down to bring back some
of that contrast. I usually start with
the highlights, bringing them down,
the shadows bring up. Then, because I got a
lot of information back in some of these leaves that I want with bringing
up the shadows, I do lose a little
bit of contrast. There's lots of ways to add contrast with these
editing applications. You have the contrast slider, you can bring your blacks down. We also have the tone
curve down here. Again, if I'm moving too fast, make sure you check out
those other courses that go at a slower pace. Bringing up things like
Clarity and Vibrance will also make your landscapes
just pop a little bit more. So here if I see the
before and after of what I've just edited here. There we go. So those are some basic edits, but I do want to tell
you a little secret about this photo in particular. So here's what I started with, but I actually didn't edit
all of that manually. I actually used a preset. Presets aren't for everyone, and these will only work
in Adobe Lightroom. But if you want, you can download these
actually for yourself. Because I've included
this pack of presets, the HDR nature pop set here. And I'll include instructions on how to download
and install them. You can see that they
really make some of the colors and the vibrance and contrast pop for
your nature photos depending on how much you want. The one that I used
for this photo and for most of the photos on this trip is the HDR
nature pop eight. And so here's the after, except for the crop, it's the same photo. So that is what I do with
some of my landscape photos. When I just want a quick edit, I just slap on a preset. Here's the other one right here, the big waterfall cove. And we're just going to
slap on that nature eight, if that's too much for you, maybe you want to bring down that amount which
Lightroom now has an amount slider for the
overall preset adjustment, which is pretty cool. And this one after
you slap on a preset, it might not be perfect. I think this is a little bright, so I'm just going to bring
down the overall exposure. And there's lots of other
minor things I can do. The only thing I might
do with these photos say you want a
different type of blue. Let's go into our HSL panel. If I go to the hue and
then I do my color picker for this ocean and
drag up or down, you can get more
of a deeper blue instead of that teal blue. But of course, if you might want more of a teal blue
if you want as well, you could also pick that
specific color here in the slider as well if you don't want to use
the color picker. Alright, so those are
some basic things to do. I would definitely recommend checking out those
other courses. But in the next lesson,
I'm going to go through some more advanced
techniques that I use to edit this photo
here. See you there.
19. Advanced Landscape Photo Editing: Alright, welcome to this
landscape photography editing tutorial. I'm going to show you what
I've done to this photo here on the right that resulted
in this photo in the left. And I'm using a few more
advanced techniques, specifically the
dodging and burning of editing specific
aspects of our photo, making some brighter,
some darker, but also on top of just
dodging and burning, adding specific color edits and clarity edits and things like that to the landscape
and the sky. Let's get into it. Alright, so here we are
with our initial photo, which compositionally it's a
decent photo exposure wise. It's a bit dark, but because it's a raw photo, we have some room to play with. And that's the first
thing I'm going to do is really bring
up our shadows to see what information we have in that landscape
in those shadows. If you really want to
see what we can do more, instead of just the shadows, I'm going to just bring up
the overall exposure and you can start to see that while
we have that information, there is a quite, quite a bit of noise in there. I'm not too concerned
about that right now. I brought up the shadows. At the same time, I'm going
to bring down the highlights. You, you're probably
wondering, well, Phil, why are you bringing
down the highlights, this photos generally
a bit dark. Why are we going to
make it darker at all? And that's just
because it's going to make those stars pop. Actually bring up our whites. Shadows, bring down our
highlights just a little bit. I don't like playing, bringing up our blocks, because once I start
to do that too much, it starts to look a
little bit faded out. So I might do some
specific edits to the landscape later on. But right now this is
a good place to start. Next, I'm going to add a
bit of clarity and texture. And D Hayes, under
this Presence slider, clarity is just going to bring
out some of those details. It also adds a bit more
contrast in that landscape. So if I zoom in here, see how that brings
some contrast and it just makes all those details
a little bit clearer. And overall, dehaze is also going to help
just a little bit. Generally, I only do dehaze
if it's mostly a sky photo, but it adds a little
bit more detail to the landscape as well. I'm also going to
bring up some of that vibrance just to add
some color to that sky. I want to bring some of that
green in the landscape, but I'll do that with
a specific edit. Maybe a little touch of
overall saturation as well. Vibrance is bringing
up the saturation of the colors in your photo
that are not as saturated. So it's a more
intelligent way to make your overall
photo feel more colorful without making
certain colors oversaturated. So that's a pretty
good starting point. And then I'm going to just jump right into these more
specific adjustments. Lightroom Classic
has some great tools to mask certain
parts of your image, such as selecting the sky. We have our traditional
tools like the brush, linear gradient and
radial gradient. Again, this is some
more advanced stuff. If you don't know
how to use these, I definitely recommend checking out my other Lightroom course. It's a good precursor to this class with a
select skies tool. It does the job of basically
selecting the sky. And you can see that it actually selects a little bit of
the hillside as well. But that's perfectly
okay because sometimes I find that when the sky is selected
and it's just like a sharp line on the
horizon or on these hills. Whatever I do to this guy
looks a little unnatural in generally in photos when
you're looking at the sky, the colors of the
sky, the blues, will actually fade onto
that landscape as well. So if I want to
make this guy more blue and just drop the temperature down
just a little bit. It makes sense that it's
happening a little bit along the edge of the
ridge line here as well. So one of the things
I'm definitely going to do with the sky is decreased. Some of the noise there, there's a lot of
noise in the sky. If I zoom in, you can
see it's super noisy. And that's because I was
shooting out a little bit of a higher ISO and
a long exposure. So if I increase
this noise slider, you can see that it gets
rid of some of that noise. And I'm fine with that. It actually makes the sky
look a little bit cleaner. You'll notice that
the stars move a little bit in this
photo and that's not because the stars are moving
or the camera's moving, but that's actually because
the rotation of the Earth, if you're shooting at
a long shutter speed, you're actually going to
capture that in your photos. Pretty crazy, right? I'm definitely going to bring up the dehaze a little bit
more for just the sky. Now if I go too crazy with it, it starts to look a
little unnatural. So I'm just gonna do a
little bit like that. Maybe do a little bit of
editing with the highlights. I'm just trying to
make those clouds pop, stars, pop just a
little bit more. Alright, so that's
looking pretty dang good. I can see what it looks
like with this mask on or off with this little eye picker. Pretty good. If you want to add more, a different type of blue, you could either now play
with the tint a little bit. So something like
a more purply blue or more greenish blue. Or you could even use this
hue selector or color. So hue, going to do
some crazy stuff. So you're going to just
want to do it very subtly. Or the color down here. I can just add a little bit
of any sort of specific blue. See how I scrub through this. So if I wanted to just a
little bit of a darker blue, maybe something like that. All these tools, again, I go in depth in the
Lightroom course. So that looks pretty good. Alright, so now what
I'm going to do is I want to edit just the landscape. So I'm going to click
Add a new mask. Now how do I select
the landscape? There's no landscape featured everything underneath
the skyline. What I can do is select
the sky and then click the little invert button here and it selects
the landscape. So now what I'm going to do is bring up the shadows
of the landscape. Maybe just bring up the overall exposure just a little bit. Overall exposure. And then maybe bring down the
blacks just a little bit. So we still have that contrast. The tint, I'm going to
move a little bit down, so we have a little bit
more of that green there. And let's just bring up the overall saturation
just a little bit. See, I like these mountains
get faded out just a little bit in the background when
I brought up the exposure, I don't like that
in the background. I could go do a separate brush and try
to edit that separately. But a quick way to edit this, I think is just bringing back
down our whites over here. You can use the up and
down arrow keys on your keyboard if you're hovering over any of these sliders. And it does a little jump up to the next edit
rather than drying, dragging these up and down. I think that's
pretty, pretty good. Let's see the before and after. Pretty good. I'm gonna do one more to
really highlight this streak. I'm going to click Plus, I'm
going to use a brush now. You can adjust your brush
settings here I'm going to set my flow and my density
up quite a bit. I'm just going to brush over
this light streak like so. Then what I wanna do
is just warm it up. Warm it up like that. Maybe bring up the contrast
just a little bit. And maybe the overall
exposure just a little bit. Doesn't that make it pop
just a little bit more? Pretty cool, huh? Alright, so those
are some basic ways to edit specific
parts of your image. One other thing that I want
to show you with this photo is I got this lens
flare from the moon. I didn't have my
lens hood on it. And you can see this lens
flare that really bothers me. So I'm going to use
the healing brush, which allows me to basically brush over this specific
part of the sky. And then it's going to
take another part of the sky and try to
use that to blend in and actually remove that
quote-unquote blemish. This is a way you can
remove things like pimples and unwanted items
in your photo. Now, the problem
with this is that you lose the integrity of what the stars and the constellations
actually look like. And that's something
that does bother me. But for the sake of this photo, I don't think anyone
is really going to say anything unless you
are a star expert. So that's pretty good. The last couple of
things I'm gonna do is there is a little bit
too much noise overall, even in the landscape. So I am going to go down
to our detail panel. I'm going to bring up
our noise reduction and just get rid of some of
that additional noise. And that helps with
the sky as well. Then maybe just a touch change
to our overall exposure. I want to bring up the
mids just a little bit, bring back down the highlights. Just a subtle little curve, just trying to bring up some of those shadows just
a little bit more. Alright, so I think this edit, it looks a little
bit different than our original edit that we did. Let's check it out. So here we have on the
left, the original edit. Here on the right we
have the active edit. I think one of the
differences that I had on this new edit is I, the sky looks a
little bit different. And I think what
I did to the sky was I added a little bit more
texture in the other photo. Maybe some clarity as well. Brought back, brought out
even more of those stars. The colors. I also punched
up a bit and this new edit. One other thing I can do is play around with the
individual colors, with the HSL panel,
with the hue. If I want to take maybe my yellows and make them
a little bit more green. I can do that. That makes that hillside
a little bit more green. Now this is where you're starting to get a
little bit more creative and artistic
with your photo. Is this an exact replica of what I was looking
at when I stood here? No. Obviously not. It's not
because it's a long exposure. That's not what my eyeballs SAW. But as an artist, this is what I want this
photo to look like. So some people might say that's not fair, that's
not what you should do. I am up to open to anybody
editing your photos, how you will to create art. Sometimes I want
my photos to look exactly like what I
saw with my own eyes. Sometimes I want to
create something that's a little bit more visually
pleasing to my eye. And that's what I've done here. Alright, thank you so
much for watching this. Hopefully you get some
ideas for how you can use editing tools to
edit your photos. After watching this. If you have questions,
let me know. Otherwise, get out there and start taking photos
and make sure you're using your editing tools to enhance them and make
them even better. Cheers.
20. Course Wrap Up: Thank you so much for watching
this series of videos. I hope that it has helped you understand ways to improve
your landscape photos. And I know it was a
short quick course, but I hope that being able to see these photos as inspiration and talk about them
in more detail of what lighting techniques
they're using, what compositional
techniques they were using will help you when you go out on your next
landscape photo adventure. I'm going to drill into
your head one more time. I think the most
important things to take away from this course to improve your photos is to go
at a different time of day. If you're not getting the
photos that you want. But you're only going out when the sun is high in the sky. Go at sunrise, go at sunset, and then write down those
compositional techniques. And when you're out there, make a conscious effort
to try something new. Alright, if you
haven't done so yet, please leave a rating and review for this
course that helps other students know
whether this is the right course
for them or not. Check out my profile. I have dozens of other photography courses
that you might be interested in to advance
your photography, taking and the
editing and lots of other creative skills to thank you so much
for being here. Much love, have a
beautiful day and share your work with me on social media or hear
on the platform, post your photos so I can
check them out myself. Cheers.
 Phil Ebiner, Video | Photo | Design