Transcripts
1. Welcome to the Advanced Photography Course: Welcome to the class. This is Advanced
Photography with me, William Carnahan,
you can call me. Will I really appreciate
you being here? You could be in any other advanced
photography class and they'd be teaching you lots of technical, wonderful things. And I encourage you to go
do that for this class. Specifically, we're
going to talk about what I do to better myself as a photographer and how you can do
the same thing. You can go ahead and download
the slides if you want to follow along on like an
ipad or on a tablet, or on your phone, or something
separately, it might help. I would also employ you to join the Photography in
France community online, where you can connect and
talk to everyone else who's taking classes
and going through photography journeys
like yourself, it's a really, really good way to get better
at photography. And that is just community. That's how I've gotten better. That's how I've
worked with Phil and Sam for years now and
we've pushed each other in photography
and I think you can do that the same way with
your fellow students. Check out all our socials. We're on Instagram,
we're on Facebook, we're on Youtube, we're on Tiktop, we're on all the things. You can also check
out my Instagram specifically at
William Carnahan. That Instagram itself is
actually where most of my photography has been and
will be as a portfolio. You can also look at
my personal website at Will Carnahan.com You can check
out my photography there. You'll see a lot of photos in these slides that you won't
see on all my portfolio. Which I think is really kind
of a cool thing for you. Because I'm not going to be
posting all my photos, right? I'm only posting the
best of the best. But in this course, you're
going to see my okay best. Or the photos that I delivered to the client that
I think they want, not necessarily what I
put on my portfolio. So we're going to be looking at the techniques,
the equipment, the philosophy behind taking photos for specific
genres of photography. The big thing that
I need you to know is I need you to have
the basics down. I'm not going to be talking
about exposure triangle. I'm not going to be
talking about what the best camera
for you to buy is. I'm not going to
be talking about what an F stop is,
what a shutter is. I need you to already have those base
skills kind of down. So that would mean
that you probably took our photography master class or you took one of
our other intro to photography courses or with
someone else or you have a knowledge already
and you're already out there taking photos and whatnot. And also feel free
to skip around. We've broken this into
different sections so that you can decide
where you want to learn. If you're not into head shot photography, you don't
need to watch that. And if you're specific towards so weddings or astrophotography, you can go to those
sections specifically. Or if you know, in
six months to a year, you have a job where you need
to be taking family photos. You can come back and look
at that specific section, pull up your notes or
whatever like that. So feel free to skip around. Repeat, repeat, repeat.
Watch something. Give it a month. Watch it
again before your client, before you're starting to shoot, something is going
to see your photos. So thanks for being here. I'm so excited that you
are going to listen to all my advanced techniques.
Let's get started.
2. 5 Principles to Improving Your Photos: How I take better photos. I want to start here, right. There are some baseline
things across all genres of photography that will allow
you to take better photos. And these are the
things that push me as a photographer and we'll
push you to basically, here are my five principles
to improve your photography. We're going to go
through all top five and then we're going to
get more specific. Number one, look for emotion, that's across all photography. Look for emotion and
not just people, but in your composition, In the feeling, the lighting. Number two, put your camera
where your eyes are. Not often. We're
just here, right? We're just taking photos, right? Why not find a
different perspective? Put it on the floor. Put it on the sky. Bend down. Turn it. We're so used to looking right here while
we're walking around. It should be something
different, something creative, something that says
something that's not normal to our normal eye. Number three, push
your exposure. I don't normally say this in
introduction to photography, but you can lose the darks and
the blacks in the shadows. You can overexpose
the highlights in the whites because you're
trying to be creative. Now that you
understand exposure, now that you know how to
expose properly an image, push it, make it wild, make it interesting,
make it have emotion. Number four, be patient. And I think this is something
I've struggled with forever across all forms of art. But being patient is really key. And that means being patient
with your skill level, with practice, with
waiting to buy equipment, with waiting for
the sun to change, with waiting for a person
to change emotions, with waiting for an animal. There's literally
infinite things to be patient about
in photography, and we'll go more into that in this section and
the rest of them. And number five, fail again. You're not seeing
all my worst photos, and you're going
to take a lot of bad photos to get the
really, really good ones. And in fact, when I
delivered a clients, I'd say on an average wedding, I'm probably taking close to 5,000 photos and they're
only seeing 250. That's 4,600 700 and something. I can't do math photos
that no one will ever see and they're bad
and I'm failing at. And that's okay because you have to understand what is bad, what is not good in order
to have the good come out. It is night and day. There's
no light without dark. It's in and yang, it's contrast. It's everything. So I
think you need to fail. All right, so let's go deeper. Number one, look free motion. I look for emotion in my
photos because that is what's going to evoke
something in the viewer. That's what's going to inspire, that's what's going to
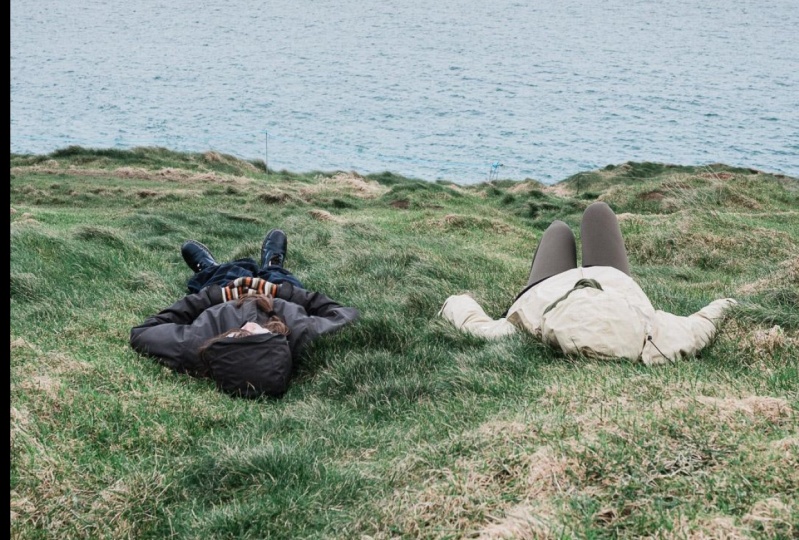
make something look and feel like a really good photo. So these three photos I have
as a really good example for emotion because you want to see and connect
with what's going on. The photo on the
left, we have a Dr. I made her laugh. You can really see her personality here, right? You feel the emotion of someone
laughing and I love that. The second photo is
a man jumping off this barge in a very quick
moment of street photography. And you feel the
like, anticipation of the cold water, right? That's the emotion
there, he's just static. The third one we see like a
very cool Quintinera girl in front of her name all lit up. She's got some attitude, there's a lot of emotive, you know, attitude in it and
that also is a vibe, right? Look for these little
moments that have pure emotion that you can
inspire your viewer to see. Pay attention to that.
Number two, right? Put your camera
where your eyes are. Not. These three specifically
are on the ground. On the floor, right? The pet, the dog,
get on their level, get where their eyes are. What are the
perspectives of animals? We don't get to see
that that often. This is going to push
your photography from just walking around and
being right here, right? Move around, get on your knees, put your hand up over a crowd. You know, here's a manhole down in New York,
yet really low. You see the perspective
from, again, the road. I have this in my
photography a lot where I'm shooting down
roads quite a bit. In fact, this one down in
Monument Valley on the right, is me on my knees looking
down at the road. Because I want to see
the perspective of the road going into the hills and have the
horizon at the center. If I was just standing up here, the road would be very low
and it would be kind of like, you know, not as interesting
because we're just here, you know, looking
versus being there, getting down,
feeling, the texture of the road creates
the sort of like, you know, like you're
there, you're in the middle of this place and it's
new and it's different. Number three, remember
push your exposure. These are some examples of
me pushing my exposure. The one on the left and
the right is letting the shadows fall into
the shadows, let him go. I know we say that we want
like a full exposure, but this is when you can get really created
with the light. Look at the emotion that we are creating by letting the
exposure be really dark, right? The photo on the left,
it's falling off. You don't even see
the edge of his back, but we get this vibe of this
strong boxer on the right. We don't see the
man's face at all. We just see this light
coming over top and I let Be dark. I let the
exposure just fall off into the darkness
in the middle. The other way, right?
I overexpose the veil. There's just whiteness around. We don't see anything. But
that's not what matters. What matters is the
kiss, the couple. We're inside this veil. So I let the exposure go. If I didn't let it go and there's more detail in the veil, we may not see their
faces as clearly and it wouldn't be this
bright, sunny spot. Our eyes wouldn't get focused
right in on the couple. In all these images, there's a ton of
exposure difference. We're not in the middle
of your light meter. We're going left,
we're going right. And then I take
that and I push it even more in post editing, so you can see even
in the star photo, we're going to get
to astrophotography. But this image I've brought
up quite a bit in post, but when I shot it,
it was pretty dark. We'll see the
difference in letting your exposure go
when you take it and when you do it in editing
number four, be patient. I brought these two photos
up specifically because concert and music photography
requires a ton of patience, but also requires a ton
of being in a hurry. You have to hurry up and wait and wait for
that moment that you feel will get your
emotion expose, right. Have your camera in
the right place. That's not your eyes.
Nail it, right. This photo on the
left, this guy is playing Giant Stadium
in Indianapolis. And I'm, you know,
I'm in the pit so I'm like not in the crowd. But I was looking
and I was shooting. I was shooting and he
finally saw me and he had a break in his play. I mean, he's playing
to like, you know, 30,000 people and
he's able to take a moment and throw up a
like, yeah, let's rock sign. And I was there ready to
snap. But I was patient. I waited and I held, and I held, and I held for something
cool to kind of happen. And again, over
here on the right, Music's the same way, right? I was just waiting for her to have a little bit
more emotion and I caught this moment where
she's kind of thinking to herself and being in
her own sort of world. And I felt like that
carried some emotion. The big thing is I'm
being patient, right? And we'll go into specifics. And being patient, I think
I bring it up in a lot of other specific genres
of photography fail. Well, these four photos are actually pretty fun
looking, they are failures. You can see the one on the far left with the animal is me, out of focus. It's on film. It doesn't really
have any emotion. There's nothing to it. There's a head shot
of my buddy here, Matt, way under exposed. I couldn't even bring that
back and make it look good. There's a couple down on
the bottom right where I missed focus on them and I
focused on the background. There's another film
photo where there's just a gnarly flare coming across. You can't
even see your face. It would have been
a really great photo if that flare
wasn't there. And I can't get rid of it.
Make mistakes all the time. All four of these photos
that you're looking at I've taken since this
recording in the last year. I've been doing photography
for 15 plus years. Close to 20 years at this point. And I'm still taking bad
photos every once in a while. That's just going
to happen and you have to let yourself
be okay with that. I think the more you take
bad photos or you mess up, the better idea you'll
have of what is a good photo and how you
can get there on your own. Be patient with yourself. Be okay failing and
taking bad photos. You can always take more.
3. The Gear that Has Improved My Photography: Are my five tips.
What about gear? Like, I feel that like gear is kind of a big deal and a
lot of questions arise, especially when you're
advancing your photography. So there are a few
specific things. I'd say there's five things
that I've taken really into account that have
improved my photography. I don't know in a creative way. Right. I have a general rule that while gear is
always fun to get, it does cost a lot of money. And the rule is generally like, I don't buy the new
fancy thing unless I feel like I absolutely need it to push my
creativeness. I guess. Like if you have a camera
and you have lenses and you feel like that camera in those lenses are
holding you back from achieving exactly what
you're trying to do. Sure. Then I think it's time to advance and put money into
what you're trying to do. A really good example of that is if you've started
out in photography, and you've sort of
boutten a little less expensive of like a camera, the ISO isn't as good, it may not be full frame,
or maybe, you know, just a little slower than
a fast camera would, and you're starting
to get like weddings, you're starting to get
like bigger clients. You need to be able to nail those things when you're out working and being creative. Or like lenses, right? You want to be shooting sports but you only have a kit lens. Well, probably time to get a longer lens in order to
advance your photography. So let's talk about these
five things that I think are kind of base level
things that you can probably go from
beginner to advance. You'd probably need these
things to get going. Number one, prime lenses.
Prime lenses are huge. I think prime
lenses specifically if you're trying to do
portraits more than anything, but also if you're just trying
to automatically create that sort of professional
look, right? Our aesthetic for
professional look tends to be a lot of things out of focus
and very little in focus. And then also
compression, right? We think about your
mobile camera, you know, the normal camera, not the portrait version, the normal camera or like a Go pro action camera
or a disposable camera. All those things have a
lot of things in focus. Right? And so they don't look as professional as we think
as our aesthetic does. So to advance your photography
on your mobile camera, on your mobile phone, you would probably go to
portrait mode, right? And that portrait mode is mimicking what prime
lenses tend to do. And that is very little in
focus and a lot out of focus. And typically that
means the human face in focus and everything in the
background out of focus, It also compresses, right? I don't think portrait mode on mobile phones have really
gotten the compression down as well as
they've gotten the in focus, out of
focus thing out. But let's look at these examples
of prime lenses, right? These three photos right
here are all shot on an 85 millimeter at various
levels of camera equipment. And you can see that in
the photo on the left. The backgrounds of focus
is a great linked in shot. The photo on the right has
a really nice fall off with focus and you can see how the background
is really fuzzy. The photo in the center of the couple does the same
thing as the other two, but it also compresses
everything. You can see how far away I am, but it also feels like the
trees are closer in a sense, and it just has this
nice sharp feeling where they are and this fall off into the background that looks really
aesthetically beautiful. This is a really good way to advance your photography, right? Ditch the kit lens and
go to a prime lens. Something like a 3,550.85, 100. We're going to talk all
about that stuff as we get into specifics and
genres of photography. But think about upgrading to a prime lens, a small camera. Now, I know I said earlier, if you're trying to
advance in photography, you need to get the
next biggest camera. But sometimes it doesn't
mean it needs to be a giant Behemoth DSLR, Nikon, whatever it can be, a small mirrorless camera that you feel comfortable
and fast with. That allows for really
great street photography, really great photo
journalism when you're out in an event or at a wedding
or something like that. For example, this shot these two girls I was just talking to and I had my camera
down at my hip and I was able just
to take the photo, I was able to get a lot
of this emotion across. They were none the wiser. And it really has upped my photo journalistic street
photography in a way. And I actually, when
I shoot weddings, I always have a smaller camera that I take around with me, not just the big one
with a big long lens. A lot of times when you have a giant camera with a
big lens or a big flash, it kind of freaks people out. And so you lose some
of the emotion. People might clam up or
they might act differently. If you have a smaller camera, you will be able to get that emotion without freaking
them out right away. I mean, if you're in their
face it might be tough. But you know, just
casually and taking a photo you'll get
a lot more emotion. So thinking about
having a small camera is a really good way to up game. Now it's a balance, right?
Because not all small cameras are fast enough
for other things. So you kind of have to find the camera that
will work for you. That's part of the
reason why I would be positive about mirrorless
cameras. High megapixels? Yeah. I mean, I know it's
kind of silly to think about high megapixels and I'm not
like a big fan of being like, oh, we'll just reframe it later. But it can be helpful, especially when you're shooting landscapes or you're not
able to get close enough. Having a high megapixel
camera is going to help you advance your
photography in so many ways. One, you can crop in, and two, you'll be able to deliver
a more high res image depending on what
your clients want. Right? If you need to make
a big print for someone, if you need to make
a book for someone, you're going to want the
higher megapixels potentially. And you can see right
here in this image, this is a nice, really
beautiful landscape photo. But you can punch
in so much more and fill out a frame with a
high megapixel camera. This will advance your
photography in the sense of you'll have more range to do what you would like to do. And I think that's a sense
with all these things, right? Having more range and pushing what you're
already capable of doing. I'd say most cameras at this point you can
print pretty big. Even your mobile phones print pretty well if that's
your end game. But having more megapixels is just going to
allow more of that. Les cameras and straps. This is a photo of me with my T two when I was
shooting a wedding, and originally I
was taking photos, especially weddings
with bigger DSLRs. Right. Like I had a Nikon D 800 and then I would
rent like a D 700 and I'd be shooting
ten to 12 hours a day with these big hefty,
you know, cameras. I switched down to a
crop sensor camera, a mirrorless cameras because a they were just lighter,
They were cheaper. I could afford the lenses
better and then I was able to basically blend in
with the guests more. Same thing goes for
these straps, right? Having dual camera
straps where I can have a long lens and then a
short lens really allows me to be quick at
events so the guests aren't waiting around
or the couples not waiting around for
me to change lenses. Having dual cameras with
straps and mirrorless really, really changed my
wedding photography. I think I'm able to cover much, much more without participating and disrupting what's happening in front of me, and I
think that's the key. Right. The mirrorless
cameras, the dual cameras, strapped multiple cameras really allowed me to not disrupt
what was going on. Right. It's like you're
in the wild life and you don't want to like
mess with the animals, you just want to have the tools and shoot and
capture that moment. Because all it's about is being able to capture that
moment with the tools you got. That being said, I ended
up having to upgrade my mreless cameras to a
different camera system because they weren't
fast enough, but started down that mreless
path with those Fuji. I think now thinking
about running a big DSLR or a big
camera now with everything I do just
seems outrageous to thinking about upgrading
a camera that's mirrorless. I think it's great. I'm a big person. I think other people might say different if they're
doing different things. But for general photography, having a mirrorless
camera, I think will help advance
your photography. And thinking about
having straps that look nice, that
are professional, where you could
have two cameras, or even having just any
camera strap that looks nice will make you appear
more professional. And it will also let you blend in with your subjects and so they don't know that
you're out there trying to get their photos,
which I think is fun.
4. Activities You Can Do to Improve Your Photography: All right, here's some
activities that you can do yourself to improve your
photography, right? It's not just about gear, It's not just about what you're shooting and lighting,
all the technical stuff. There are actual things that you can practice to do to
improve your photography. It's like if you're a surfer and you want to
get better at surfing, you should probably
do shoulder exercises so that you can
swim better and do breathing exercises in case
you get bail out on a wave. These are things that
you can do to improve your photography that
aren't necessary. Technical. Take your
camera everywhere. If you're going to take photos, you need to practice, right? What better way to practice than to take photos everywhere? And I got to be honest
with you, I take one of my cameras with
me everywhere I go. It's my every day camera
that I take everywhere. I also use it to
shoot professionally. Even if you're not going to take any photos, take it with you. Even if you don't
think that you're going to take any photos,
take it with you. I can't tell you
how many times I've been places where I've
wanted to take a photo. I didn't bring my
camera. You just have to kind of get over that. You have to bring it with you
as long as you feel safe. I think there is a balance of, if you're starting to take
it with you too much or it's becoming too much in your life, it's taking away
from being present. Maybe you don't
take it with you, but every chance you get, I would be taking photos, and I can guarantee you it's if you wrote every day or you
drew something every day, over a month, over two
months, over a year. If you do it every day
or every other day, you're going to
get better at it. If you play piano every day, you're going to
get better at it. If you take photos every day, you're going to
get better at it. Taking your camera with you everywhere you go is
going to be a huge plus. You can also use your
mobile phone, right? Obviously, a lot of us take our mobile phones with
us everywhere, take more photos, just
take them everywhere. I think it helps if you take your professional camera with you because you're
getting used to it. Right. It's becoming
an extension of you. And in turn it, it'll let you express
your art in a better way. And it'll just be natural to you when you're taking photos of clients and whatnot,
photos with your phone. I already started
talking about this, but right again,
practice, practice. Practice is all I'm
getting at. Take both. I think it's just
really imperative that you practice
your compositions, you practice looking
at lighting, you practice messing
with your exposure. You fail with all this stuff. Because when it comes
time to perform well, you'll be practiced in both
equipment and taking photos. Number three, do other
art, try things out. I actually do drawing a lot. Noticing when I draw a lot, that I look at different
shading and different lighting. And that may inform
you when you're taking photos or you're setting up a
light for like a head shop. Where's the lighting come from? Look at paintings. Look at
old Renaissance paintings. There's a lot of
information out there that adds to your creativeness
in other art. Listen to music, get inspired, listen to your headphones,
read literature. All these artistic things
are going to inform you on how you take
photos and what you do. It doesn't always
just have to be about photography and Instagram, there are expressionisms,
lots of form of art, in acting, in writing, in drawing, all these things. Do other art appreciate
other art study, other art. It will make you a better
photographer, I promise. So those are some things that
overall I would, you know, think about doing,
activating thinking about that will advance your
photography in general. Right? All those things will go across every genre
of photography. And I really, really think that if you just did
those things alone, your photography is going to
get better very, very soon. So let's go into more
specifics, right? Let's talk about
different genres of photography and what
I do personally to help advance those photos and have them be better
really in each genre.
5. Advance Your Headshot Photography: All right, let's talk about
how to take better photos, no matter what style
you're photographing. We're going to go into
every different type of genre that I take photos of so that you can see what I do to advance
my photography. So let's start off with
headshot photography. I've been doing head shots for
as long as I can remember. I think being in Los Angeles helps because there are a lot of actors that
need headshots. And I'm going to say 90% of the head shots I'm
about to show you are actors needing head
shots to show for roles. And so they need
multiple styles, multiple looks, all
these sort of things. And so why are headshots great? I think head shots are a
really good way to start your business if you're trying to advance your photography. Everybody needs them,
especially nowadays. I think head shots
are actually more prevalent now than they
were 20 years ago. I think mostly because of the avatar right on linked
in on social sites. If you're teaching at a school, if you're working at a business, if you need an ID card, you need some sort of head shot. And the more
professional that looks, the better the person looks. So of course, they're
always going to want something
that looks really, really good. So
everyone needs them. You need them for businesses,
you need them for socials. But the place that I focus on, our actors and artists, they need head shots
for press releases to get jobs to put on
flyers, everything. So it's a really, really good way to advance your photography. Let's talk about
the lighting first. You can get out there and
you can put a lens on, and you can put them
in the right spot, and you can take a head shot and everything
will look good. But if you want to really, really dial in your head shots
and make them look good, I'm going to show you what I do. I use big natural light. Right now in this video, I'm being lit by a big light. That's not a huge light, but it's bigger than like
a little tiny light. And it's about three
quarters off, right. I'm facing you right now and
the light is right here. And it's lighting me
this way. And this is very similar to how I
would light a head shot. I think for more even look, I would move the light over above the camera or I would have a big open window of
non direct light. Right? I don't want sun
coming right in at me. I want nice ambient, full light coming in
and being soft so that we don't create any deep
shadows on the face. Because that's what looks nice
in a real, real head shot. So let's look at these
two photos, right? The photo on the left
and the photo on the right are both
actor headshots. However, I am lighting
them very differently. Can you tell what I'm
doing differently? The photo on the left,
I'm using a strobe light. And the photo on the right, I'm using a nice big
garage door window. Both of these photos work great. And I did a bunch of different
versions for both of them. I actually have started
preferring using the stroke because I can't always count on
the natural light. You know, what if it's
cloudy? You know, it's too hot or too cold. What if the time of
day we need to shoot? When the sun is down or during the fall when the
sun goes down early. I can't use that ambient light, so it's not as dependable. However, in a pinch, I would do a lot of head
shots with a big open window. And you can do this
anywhere really. I mean, you can go
to your front door and as long as there's
ambient light coming in, set up a backdrop and let
all that light spill in. If you want to be
advanced about it, which is why we're here,
we would use a stroke. Let's look at the
difference in set ups. These are overhead
lighting set ups for both of these photos.
This is what I did. On the left, I have the
camera facing there and I have a strobe
with double diffusion. And it's shooting right over
the camera at the subject. And it's filling out
his entire body. You can see, we'll go
back to the bigger image. It falls off on the
edge of his right arm, you start to see some shadows. You start to see some
shadows under his neck, but we don't see it coming out so much that it's unflattering. It also causes this
nice little pin light inside his eyeball, which adds depth and it adds way to connect
with the person. Having a little eye
light is really, really important in headshots. I think it allows a
sparkle in the eye, a little bit of connectivity
and depth in the eye. It's almost like you're seeing
into the person they are, that big giant strobe. I have a big octagon, it's
about three feet wide, and I have it wirelessly
hooked up to my camera, and I'm taking photos with
it just above the camera. Now on the right, it's
a little different. There's a giant door
behind me and it's letting all this ambient light
in and it's really lighting up her face perfectly. Even right. We don't
really see any shadows. There's a little bit
shadow coming off into the back and I have a
white backdrop set up. Now, at the time I
remember editing this, this, I probably edited this
like five or six years ago. If I were to redo this edit, I would bring up the background, the white a little
bit more to have it be a little bit
less gradient. You can see how
it starts to be a little shadowy at the bottom
and brighter at the top. Same with the
strobe on the left. You can change this by moving the subject further
from the backdrop. It'll start to even it out. And then you can also add another strobe light if you
have two strobe lights, or you can bring it up in post. The cool thing about having the strobe is that you
just have more control. You can be more
creative with it. If you're using a door,
it's great, it's fine. It's good and a
pinch, like I said, but you kind of just relegated to just one big source light. Me taking head shots like this. The bigger, the softer
the source light, the nicer and the more
natural it will look. Here are three examples
of different situations, right, with my light. Now the one on the far left is natural light. It's outside. I put the sun behind her. I made sure that her face is in the shade and I exposed to evenly lighting her face so that the sun became this
nice back light. It works really great
for people who have blond hair because
it highlights them. The problem is, it creates
all these flyaway, little stranglly lines from their hair that you could
go in and meticulously fix. But it's not, it's
not really ideal. The photo in the
middle, I have again, a black backdrop
with a big strobe overhead and just looking straight on. Again,
nice and even. But you can see
again the gradient starts to go off
because the black soaks in all the light and the background starts to
get really, really dark. She is getting that
nice pin light though, especially for a brown eyed
person or a dark eyed person. We want to create the depth. Same thing on the right,
it's the same gentleman we used with the
same background. The overhead light was a little
bit more over the camera, looking right down and
evenly lit on his face. Super soft, right?
So we don't have any hard shadows and it
looks really natural. Nice pin light, again, it just really depends
on your style. But on the right, I only use one stroke, one big stroke, double diffused. It's like that big. Can
you see the whole frame, Phil? Yeah, it's like that big. Again, let's look at these three natural light from
the door on the left, but you can see how it's
lighting up her entire body and we're losing like a really
tight pin light in her eye. It's more of like a
bigger spread out light. The photo in the middle
is a static light. Now, I used this to be
more of a hard light. He wanted more creative. He's a writer, he's a
director, he's on set. He wanted a little
bit, something more creative for a head shot. And so I use a static light
at the same position, much like this light
that we're using now, but it was less diffused. Notice the deep, deep shadow under his neck
that's just covering it. Now we notice it and we can look at it and
we don't like it. Maybe because if we
look at it too long, it'll start to look weird. But at first glance, it's a
fine photo and it's harsher. And I think on men, a lot
of times you want a hard, hard light will add
a little bit more of a masculine look as
opposed to the soft look. It depends on what your client
is trying to say and do. For the center photo,
he wanted it a little bit darker, a
little bit moodier. And actually, I think when
we turn it black and white, it looks even better. The photo on the right
back to our strobe, again, we have it right
over the camera and it's evenly lighting
his entire face. I've cropped him in a little bit because I don't need to
see the rest of his body. I really just need
to see who he is in the expression that
he has on his face. We got a nice pin
light in his eye. And what's fun about this one
is I had to really position the strobe to not reflect in
his glasses. Very difficult. And if you can get
used to doing that, there's a specific place
when you're photographing someone with glasses that
you get that away from. So keep in mind where
are you going to put your strobe again
in all three cases. One source of light, and that's all you really, really need as far as lighting
goes, whether it be very, very big and soft
on the left, very, very hard and harsh
in the middle, or again, a smaller source but more targeted strobe light. To this day, whenever I get
hired to take head shots, I will always use the
strobe at this point. And that's because
I'm so mobile. I used to use the big window because I had an
office in a stage where I could use the big
light. So it just made sense. Now that I'm traveling around, I can really just dial in the strobe where
I need to do it. It packs up really,
really small and I'm able to travel with it very
easily and it looks great. I mean, look at this
guy on the right. He's tappy and it looks perfect. Let's talk about the next thing that you would need
for head shots. I do all my head shots with
an 85 millimeter prime. You can use any lens
you want, right? I just love the look of an 85 prime and I know a lot of photographers
that use the 85. First of all, I would
recommend using a prime lens. You can do portraits
with a 355,075.85, 90, 100, whatever you
feel comfortable with. I personally feel like the
75 and the 85 are a really, really, really good place
for head shots specifically. And that's on a full
frame sensor, right? So 85 on a full frame sensor. If we translate that down
into most crop centers, that'd be closer to like a 55, 56, which we'll talk
about with crop sensors. This is how I've
upped my photography. I used to use a lot of 24, 70 or like a kit, or I've even used a 70 to
200 to shoot some portraits. But I feel like
you're getting too far away from your subject. 75, 85 puts you in a
really good place with your subject distance wise that you can talk to them and
be connected with them. But it also allows the nice
fall off from the background. And then if you're
shooting outside, it gives a really,
really nice Boca. You look in the background. It also has a lot of really
good speed attributes, right? You don't want to necessarily
be shooting at a 1.41 0.7 Because you don't want just their nose and focus
and one eye in focus. You want most of
their face and focus. It's nice that they have
the option for speed, and I'll use my 85, which is I think,
a 1.8 at weddings, when it gets to too dark,
it'll be nice to have. But even at like a 28 or a four, sometimes we'll
even shoot at a 56. The 85 will still hold
that nice fall off. And deep focus or shallow focus
that looks nice outdoors. But it will also keep
two eyes in focus, which is really the
important thing, right? We don't want one eye
in focus, on one eye not in focus. That's
not a great thing. But the fact that
they still hold that cool depth of feel that like an F four really important, especially as you
start to go up in prime lenses right
35 will still do it, but not as much as say 100 will. You can see the scale of that. I also really, really like
the compression of the lens, and you've probably seen
these on social media, but where they'll take a picture of like close up of a face. And they'll start at like
a wide lens and go all the way down to like 100
millimeter or 200 millimeter. You start to see the shape
of the person's face for my personal taste and I
feel like advancement 50, 75, 85 is a much more
natural representation of a human face than
any other lens will be. If you go too far in
like 100 or 200 or 600, you really start to
see some compression and it starts to
look a little funky. And if you go the other way,
if you go like a wide lens, like a 28, or an 18, or a 16, or a fish eye, you know it's like real
wide. And it looks weird. And everything's bowed. 50, 75, 85 is like the sweet spot for a natural
looking human face. And that's what we're
trying to do, right? We're trying to make
them look inviting. We're trying to make them look, you know, like a normal person. And that's the best way to do it when you're
shooting headshots, focusing on a prime that's a 50, 75 or 85 would be the best
thing to do, in my opinion. Here's some examples of
me shooting on an 85, and in fact, that's
just me on the right. That's actually an 80 millimeter on a medium format sensor. And you can see, because
the sensor is bigger, even though we're
shooting at 80, that becomes more like, closer to like a 50 would
be on a full frame. We're going the other
direction, right? Sam actually shot this and it's the head shot that
I use for everything now. It has a nice little
fall off on the right. I think it looks great for me. It's a good artist profile shot. The fall off looks really nice. My face is in focus. My neck starts to go off focus. The static light is
looking nice On the left, I shot this on a cropped sensor, on my Fuji T two. Using a 56 millimeter
that Fuji has, which is on a full frame, would be closer to
80, 85 millimeter. You can see again, we see
her whole face in focus. Both her eyes are in focus. And then we get some fall off
into the rest of her body. We use some nice color tones. She had these bright blue eyes that worked great
with that backdrop. I actually don't mind
that. I'm cutting her head off again because we want
her eyes in the sweet spot. We don't need to
see her whole body. We just want to connect with
the person that's there. And I think that that's okay. If you want to crop off the top of her head and get in close. The closer you get to someone,
the more intimate it is, the more you can
connect with someone and instantly she needs to be able to show this head
shot to get acting jobs. This again, is
when I used to use a garage and the big
outdoor soft light. Everything is perfectly even and soft and that's how
I'm lighting that one. Specifically, these two are proper 85 millimeter
full frame camera shots. Shut these on my like a SL back here and the one on the
left is our gentleman, again that we used
with the glasses. And the nice big
strobe, big even light. I'm showing more of
his body this time. And again, you can see that 85, his face is nice in focus. It falls off into the
background a little bit. You can see the back
of his jacket is out of focus, but it looks nice. This is a really, really
good business head shot, and I know he's still using that and I've shot that, like, I don't know, 56 years ago
and maybe not that long, four years ago, he's still
using it, which is great. The photo on the
right is part of a job that I did for
a company where I took 90 headshots and I put
everyone in the same spot. Just because his company employs a lot of kids, like
right out of college. And not a lot of them had
professional looking headshots. So they hired me to
come in and again, 85 millimeter, I shot
it horizontally. So they had options to
use it for other things. But I let the background go
out of focus with the 85. And she is perfectly in focus. It's important that her eyes
are in focus, of course. But we nailed it
so that her body could be in focus and
it looked professional. It looked like she
was at an office. I'm using my strobe
to light her, but I'm letting the rest
of the natural light from the windows to light the
rest of the background. The idea here is to light both of them so that they're
matching a little bit, but so that it looks still
natural and professional. The 85 here is such a really, really great lens to use because the background is
just out of focus. Enough that we can kind
of tell what's going on, but it looks like it's in
a professional setting. So again, really good time
to use 85 millimeter. Another tip for head shots
is disarming your subject. When I walk in for a session
with someone for head shots, I like to take my
time to set up. And while I'm setting up,
I like to talk to them. If I haven't set up before they've gotten there,
I'll be doing this. If I have set up, I'll
still sort of pretend like I'm setting up the
camera so I can talk to them. When you start to
bring your camera out right away, people
get nervous, right? A lot of people that
you're taking photos of, unless they're trained, actors are not going to be used to
being in front of the camera. So there's anxiety behind it. Even actors will have some anxiety behind
being on camera. I have anxiety about being in front of the
camera right now. Just a thing if you can get them to be used to
being in front of the camera. Get them to feel comfortable
with not only you, but with you taking their photo. That's a really good thing. Their emotion is going
to come across and you want their emotion to
be positive, right? Not one of anxiety. The best way to do that
is just disarm them. And you can do this
by talking to them, asking them about their day, asking about their job, just relating and
connecting to them. And that will come
across the camera. I'm really a big person to shoot with my eye in the
camera, a lot like that. But sometimes that can be a, I don't know, unpersonal. It's really nice that we have screens on because you
can shoot like this and you can be talking
to a person and you can connect with them while
you're taking photos. Sometimes that can be
a little rough because they'll be looking at
you and not the glass. But try doing that. Maybe take the first couple photos like this so you can
connect with them. You know, they may not be good, but you'll be talking to them. And I think that's
a really, really good way to start off and then bring it up to your
eye, take the photo. The most important thing is that you're just making your subject feel comfortable because that's what it's all about, right? You want to show
their personality in a really positive way, not in an anxious way. So those are some tips
for headshot photography. Again, you know, the big, nice soft open lighting, the use of prime lenses, and interacting
with your client. Now we can go in and
talk about the F stops and the shutters
and all the stuff, but it's going to be very
specific to your situation. I think of those three things. Having the lighting right is really going to be kind
of the more crucial thing. Um, you can get away with shooting on a kit
lens or a long lens, and you can get away without
connecting with your person. But if the lighting is not good, it's just not going
to look good. Making that your priority. Making sure that your
lighting is nice and even, and it's going to
separate you from other photographers who may
not have good lighting. I'd say after that, connecting with your person is
the next priority, and then your lens after that. But all these things are
these tiny little things that you can really do to make
really, really good headshots. And I'll mention this
all again at the end, but we do have a specific
lighting portrait course that you can check out
and you're interested in. We go into all sorts of different ways of
lighting your subject.
6. Advance Your Portrait Photography: Let's talk about family
portrait photography. This can be very difficult
for very many reasons, right? It's not just a technical
aspect of what you're doing, but you're also
dealing with kids. A lot of times, sometimes pets, you can't predict kids, right. You have to do the best you can do with what
you've got going on. And this photo is like one of my favorite photos I've
ever taken in a family. In fact, I think it's
the same one that's in Phil's home hanging over
his one of them anyway. But you can see
even in this photo, it doesn't necessarily need to have everybody
looking at camera. You're still feeling the family. You're still getting the
happiness, the vibe, right? The two boys and the mom
are looking at the camera. Phil, smiling and looking up in their direction
still looks good. And Lucia is also smiling and happy so you still
get the vibe of it. But there are a few
things that you can do specifically to make sure that you're upping your game in family portrait
photography would be one, making sure that your
family's out in the shade. If you're not doing a
portrait session indoors in like a studio, right? You want to put
them in the shade because you want all that, even nice beauty lighting, very similar to our head shots. Right? And then we
also want to make sure that when
they're in the shade, the sun is behind them. Because you don't want
their faces squinting. And if you're ever going
to put the sun anywhere, you want to make sure
that it's highlighting them for blowing up their faces. And the next thing to
think about is making sure that all the faces are
on the same plane. I know that we've sort
of been taught to create that sort of shallow depth of field by
shooting wide open, right? By shooting at a 2.8
or shooting at a two, or 1.4 or whatever. As soon as you do that,
if you're shooting multiple people in a photograph, everything is going
to be out of focus if they're on different
planes, right? So if you're gonna
shoot at an F two or an F28 or 14 or whatever, you want to make sure that
all the faces are going to be on the same plane And
that's fine. That's great. You can shoot at
an F two and wide open and have the
background fall off. Just make sure they're on the same plane so
everyone's in focus. I can't tell you how many
times I've messed up or I've shot with a wide
open F stop like that and you know the kids are in the front and the
parents are in the back and the kids faces are
out of focus or the parents phases
are out of focus. It's just not a good look. So either put them all on the same plane or shoot at
a deeper F stop, right. Shoot at a 56 and
use a prime lens and the background will still go out of focus and
it'll look great. The last thing is
going to be thinking about action and
posing naturally. Specific poses that we can do, we'll talk about
that is natural, but I think giving
them an action, especially when there's kids, will give you those
moments, right? Think back to what
I talked about earlier in this whole course. Emotion, we want that emotion, so acting out something will create that
emotion automatically. So first of all, lighting with the shade and
the sun behind them, these two photographs
specifically are in a park in shade, and you can see I'm
having a general vibe in my style of photography
where it's like a warm look. I also tend to do
family sessions closer to the end
of the day when the sun is getting
a little bit lower, especially in the fall, you get this nice warm look. And typically, I
think I do a lot of family portraits for clients, especially in October, November, around the time where
they're starting to put together cards for the holidays. So looking at this, I
put the sun behind them. Their faces are nice and
evenly lit on the left. My friend, Julia K here, her legs are out of focus, but her husband and her and
her baby are all in focus. While there is a
grumpy looking baby, at least henley is in focus. And we can see the whole
family as a whole. And that's what's
important, right? The photo on the right. They're not looking at us, but we're getting the emotion and we're seeing that the light is falling across all
their faces evenly, and we're getting that nice,
warm vibe from behind them. The sun is
highlighting his body. You can see the nice, nice sharp high light
around his back and then the daughter's hair
and the mom's hair, it's just giving
this nice glow to them and it's separating
them from the background, which is popping them out. And that's what looks really, really nice, Making sure you have the sun
in the background, somehow going that direction and exposing for the
shadows in their faces. That's what's going
to look really good. Here's an example of faces
on the same plane, right? Again, I'm doing the
same thing, right? They're a little bit
more in the sun, but they're also in the shade. I had them all have their
faces close together, versus having Mom and
Dad stand too tall. We want to have them come
down to the daughter. Right. We want them
all to be close and together because they're
a unit and their family. If we separate their
faces too much, you kind of lose that sort of connectivity and warmth, right? The whole idea behind
family portraits is being a family and we want to get that emotion out of being close. If we move their faces into a different plane or they're
not next to each other, it'll start to look a little
bit more robotic and static. That can be a style,
especially if it's like, you know, a photo with Santa. Or like a photo the
department store on a white background with for
rugs that can be a vibe. But for me, when you're
out in the natural get the faces together
and on the same plane, it'll create this
emotional intimacy that you won't be able
to get any other way. Here's another one
with a big group. This is multiple people, right? This is a big family, right? Grandma, grandpa, other
kids all on the same plane. I definitely shot this
at closer to a 4.56 because I wanted
everyone to be in focus and let it fall off
into the background. Unfortunately, this was shot up in Kentucky and
they're starting to come. A little bit of clouds in this one is a
little stormy day. Not as easy to shoot.
Beautiful sunsets out there versus California, but we got them all
on the same plane and you still have a little bit of fall off in the background. And the important
thing is that we see that everyone's
there and together, again, faces on the same plane. We're going back to
this first photo. While they're not all
looking at camera, we can see that they're
all in focus and we can see that they're all happy and smiling and
they're together. Had mom and dad been up and holding one kid up
and two kids down, it just wouldn't
feel as intimate. So having them on
the same plane, this is one of my favorite
family photos I've taken ever. And I love that it's
Phil and his family. I think it's just one
of the greatest photos. This is another way to get
more creative with it. Do you have just the kids on the same plane and the
parents are out of focus? If you're going to have
the parents be out of focus, do it on purpose. Right. Don't let it look
like you did it on accident. In this, we just had the
pictures of the three kids. The three of them are being
excellent, excellent kids. And they're just
staying there, holding their sister, taking the photo, having them in focus with the
parents in the background, out of focus on purpose. Right. So I think
that, I don't know, in 20 or 30 years this photo is going to
show up at a wedding or a graduation and we're going to see just the kids with the
parents in the background. And there is a little bit more emotion and creativity in it. Now to me this photo is kind of like a wine
that's going to age right When you look back at this
photo in more times it'll have more depth in emotion because everyone will be much older and they'll
look differently. And you can see how
happy you feel. Isabel are in the
background looking at how beautifully behaved their
kids are at this moment. So another thing to think about outside opposing is
giving them action. How would you do that? I like to have parents run up
and give them hugs. I like to make silly faces. I like to make noises
or play games. Again, they don't all need to be looking into
camera at the time. You want to create that emotion in between
those posed shots. Again, this is just
something that I do as my advanced photography
and my style. But I think it
really, really adds a lot and I've gotten a lot of positive feedback from
these action photos. So here are four examples
of action in photos. The one on the left here, I had the daughter stand there and I told her
to keep looking at me, and I had the two
parents, I said, come run up and
give her a big hug. And I think it surprised her. I think they did it without
me telling him when to do it. And it created all these
wonderful little laughs. And while you don't
see the dad's face or the mom's face full, you're getting this
nice, beautiful emotion. It's really, really,
really great. Again, in the middle, I think we had dad stay in the middle, and we had all the kids
and mom pile onto Dad. And that created this, you
know, laughing down below. I had them just walk away. I was like, oh, we're
done. Maybe you can swing your hold
your hand a little bit. And I was able to
snap that photo. I know that's a really,
really good one. And then again, on the
right, we were creating silly faces because daughter didn't necessarily want
to be taking photos at the time. That's really great. Again, mom's a
little out of focus, but we get this emotion. It's super fun and silly, and I really like the faces
that they're making it. Look at these four photos,
what else do you notice? Go back to the other things
we were talking about. Right? They're all in the shade, the sun is behind them. For all of them,
most of the time, all their faces, other than the shot of them walking
away, are on the same plane. I'm doing all three
things here, right? All on the same plane.
All in the shade with the sun behind
them. And action. Yeah, Even in this one, not all kids faces are in focus. And they're not all
looking over here on the right with just
Phil and his daughter. She's just laughing and smiling. And their faces are close
enough that they can be in the same plane and be in focus. There's also that
nice sunlight that I let actually peek into
the lens this time. That allowed some flare and that's what's
so great When you put these families in the
shade and the sun behind them, you can find little spots
where maybe you let the sun come in and it
creates this nice glow. And look again, that's more
of a specific style, right? But by putting them in the shade and putting the sun behind them, you have the choice to do that. Gives you a little
bit more versatility in using the image. And so that's the best
thing about taking family portraits is you kind of have to adapt
and run with it. It's very similar to taking head shots in the sense where
you could be using primes, you could be using
strobes if you want. I find that taking families
outdoors later in the day, having patience with the kids, putting them in the shade, giving them actions to
do, is going to set you up to take the best
family photos you can do. Because you can't
control the kids. You can't always control,
you know, the weather, but you can control
your sort of little, you know, style of shooting and posing in action
and stuff like that.
7. Advance Your Creative Portraits: Let's talk about
creative portraits. These aren't going
to be too dissimilar from head shots in the
way you like them, but they are going
to be a little bit more specific to
your subject, right? Most of the time,
creative portraits are going to be a portrait, an example of like an artist or someone who wants to
portrait themselves, doing the thing that they do, or being in the place that
they do, for whatever reason. So let's go through five
tips that I can give you to up your game and
creative portraits, right? Get to know your subject, understand the location,
the location, the location. We want that to be
specific to your subject. That's going to add a lot. We want to tell a story, right? We want to be able to show what this person's doing
and what it means to them. We want to think about changing
your composition to not necessarily be that basic
head shot photo, right? Change the composition
to add emotion. And I always say you can never get close enough with
any type of photography. But I think especially when you're taking
photos of people, the closer you get, the
more intimate you are, the more that person
will come out. So let's talk about getting
to know your subject. Here are three photos of me getting to know my
subject, right? The first photo on the left was we definitely did
some actor head shots, but then she had a little bit of attitude and some as to her, she wanted to add
some more to it. So we talked and we
were sitting there and, you know, I would just really get to know her and see
where she was going. And she kind of just had that
pose while she was talking to me about an attitude
she had about something, and it came across
really, really well. I know she loves that photo. Same with the guy in
the middle, right? He's a very somber, quiet boxer who was
getting into modeling, but he also was like a
very quiet, stoic person. And I would just let him
stand and I would just let him be quiet and
we would take photos. And that came across
really well in that photo. It allowed me to light
him in that way as well. On the right, we have
my friend Bonage, who I've taken photos
of quite a bit. I just know what
makes him laugh. And I've gotten to know him
really well in a sense that I can crack him up and I know when to take the photo
of him right away. He has a wonderful smile, but it only comes out when he's laughing and we're joking
and stuff like that, right? I'm not just going
to sit around and just snap away and
be quiet, right? I'm going to get to know him, find out where his personality is physically and then take the photo and that's
how these really come out and come alive again
with Bonaja on the left. He's making him laugh. We have my Dr. friend
here that we took some photos of and those are a little bit
more headshoddy. I snapped away when she was
laughing, when I told a joke. These other two on
the right, Blake, That's just his look, I think
when he was telling a joke, he's a stand up comedian, and
a director, and a producer. It's that black and
white in the middle. And that just seemed like
very him in the moment. And you can see
that coming across. Same with Anthony on the right, he's an artist and a musician. And we were just walking
around and I really, in all these photos,
was talking to them. I was getting to know them. Talking about what they
love, what they don't like, what makes them laugh, what
their hopes and dreams are. All that conversation
creates these looks, right? I'm not telling them
to do these looks. I'm not telling them to
look down and smile. I'm having a
conversation with them and snapping away
at the same time. The more you get to
know your subject, the more you talk to them, the more you interact with them, the better the photos
are going to come out. Their motion is
going to come across in your lens, Talk
about location. Here is a girl she wanted
to take photos of her and her purple motorcycle in like a really
interesting way. The best place I
thought was like, okay, we're taking
motorcycles machines. We want to make it
look like really cool. I waited later in the
day during the fall and we rode out and took photos
of her in an industrial area. And I was able to find
these two different looks. There's a bunch more series
of photos in her session, but we found this really
cool mural on this wall. I was able to find a spot where this light was coming
through behind her. But then I was reflecting off
some glass in front of her and I was able to
put her there and it really like highlighted
her tattoos, the color going on in her bike, the color going on in her hair, but then it also back litter. And then the background
was industrial, which looked really cool
with the motorcycle. If it weren't for this location, these photos would not
have come out I think the way I thought they would and it was really
just finding about the vibe of her
and the location. I think her skin tone, what she's wearing pops on the cooler background with her purple motorcycle in
between those two things. The background of the mural
between the two eyes and her looking up adds this sort of
like cool, artsy vibe to it. Now she uses this, she's
a motorcycle salesman, and she uses these
as her profiles to sell Harleys, which
is really great. I think the location adds a lot to this creative portrait. Again, more location stuff. Right here on the left we
have a musical artist. Her name is Kylee Morgan, and she was shooting
a music video, but we found this room
and I was able to set up a hard light that
the music video guys were using and use this location to pop
out her personality. I think if we had
taken the same photo, just in her bedroom or in a
room or in a living room, it would not be the
same as actually going in and taking portraits in a specific cool looking
location that adds to her personality
and the vibe that she has in this specific song, an album that she's doing. Over here on the right
is, as you've seen, Sam, there's a really cool location in LA that I always try to shoot at over the 110 Freeway
in Los Angeles. It's a bridge and it
has that center light that goes right down the middle, That is Sam right there. And I had him hold
up his camera and take this more harsh light. I added some sharpness to
it, made it black and white. But this location is
like making him pop. You can see I also composed
a little bit higher, which we'll talk
about in a second. But having him be in this
nice well lit depth of field, lines coming, it feels like
a photographer's location. For some reason, I think it just adds a lot to the
portrait itself. So thinking about
where your subject is is really great, right? You want it to add to the
personality of the photo. So when you're taking
a creative portrait, or you're going to do something
specific to that person, think about what's around them. Think about how it will add to the emotion of that
person in general. Let's take out the location and go back to a white backdrop. Right? We also want
to tell a story. Here's a story of
my cousin Jackie. She was also in a charity
fight a couple years ago. While I needed to take
portraits of her. She was, that was the morning of her fight. She
was getting ready. She got her hair done. We
wanted to take photos of her, and instead of just going
out into the backyard, we just put her on
the white wall. And I had her just a
couple poses and I had her punch and made her laugh a little bit because she
was feeling silly. But this tells a story, right? We snapped at the right time. We snapped at a portrait of
her just on the upper left. We snapped at her
getting ready to punch. She can see her tongues
out a little bit. We snapped at the right
moment we had her punch, so we can just see her eyes. We still want to see her eyes. And then I got really,
really close and I shot her laughing
because she was, we were talking were joking
around making a joke. But when you put these four photos
together in a sequence, it's telling her story, right? For her it's really great. Because I think she can
look back on these and see how fun it was to do that, but also look at this moment in time and look at her emotions that she
was having that day. We're able to capture all
that in a creative portrait. One photo is great, but four photos as a series
can also be really, really good in telling a story, especially for something
active like this. Let's talk about changing
the composition. I say this because I use a lot of headroom
a lot of times to create a isolation
with the subject. Or maybe just to emphasize something specifically about
how awkward this may be. In this photo above, here we have Sarah who's
graduating from college. It was just so windy that her tassel kept
hitting her face. And she finally just gave
up and just stood there. And I added some room on
the top because it just felt like an awkward
side moment. And I think that that
composition itself gives a lot more emotion
than it would just be if I just framed it
up normally, right? If she was just centered on top, bottom, left, and
right, it's fine. But look at how much
more awkwardness the space allows
for us to be there. Down below Anthony,
who's this artist, He's a country artist
and we're taking this photo in the
middle of Tennessee with all these like
trees and stuff. I did get one of him just centered and framed
and full and frame. But when I stepped back and allowed their head room to be, you can see how small he is in the back country
of Tennessee. And I think that
that adds a lot for maybe an album cover or something that he
can use on his website. It also leaves room
for text, right? If you're thinking about
doing a portrait for someone's website or doing
a portrait for someone's, I don't know, social
media or something. You can allow room for
text and for copy, and for other graphics, or for a Youtube thumbnail. So, thinking about what your subject may be using
this for is good to know. And you might need to change your composition to help
add to that portrait. You can never get close enough. Both these artists
are artists are musicians and I feel like they had already
a lot of personality. The one on the
right, Caroline Sky, we saw at the beginning for
the creative portraits. And we did some photos
like that where we had some color and it
matched her music video. But then also we did, we did a creative
shoot where we had a bathtub full of white milk. And we got close because
they wanted to get the closeness of her eyes and
get the emotion out of her. Right? You can get
really close and they don't even
need to be looking a camera here on the left. My friend's name
is Danielle here. She is a musical artist, but it goes by the
name of Williams. Again, we did like a
photo session of her just hanging out and practicing
and doing some art. And I got really,
really close and you can see the emotion in her eyes. You can see the emotion in just her compiness in this
sort of like nice warm jacket. The closer you get to someone, the more intimate you are, the more you can
connect that person. I think I like getting really, really close in those
intimate sessions because it adds that
level of connectivity. Don't be afraid to get close
even if it doesn't work out. Just try, see if
you can get close. I think if you
start with getting to know your subject
and you work your way up through
all those things and to getting close and
creative portraits, right? Get to know your subject, put them in the right location, compose in a nice, fun way and get close
their personality, the essence that they're
trying to share, will come across in
your photography. And you will up your game. If anything, just be present and be creative and
get to know that person.
8. Advance Your Street Photography: Now, I'm not a huge
street photographer. I don't do it all the time, but I have been doing
it a lot more lately. And it's actually very similar
to travel photography. So let's get into street
photography a little bit. There are definitely some
things that you can be doing to advance your skills here in street photography
aside from practicing. The first thing is
being incognito, right. Again, this goes back to using a small camera or something that you can
look down at and shoe. I know Sam is like a big
proprietor of looking down at his camera and it pops up and just
shooting from your hip. So people don't know
that you're doing that. If taking photos of people in street photography is the
thing that you're trying to do versus like just things and ambience and
stuff like that. The other thing is a long
lens versus a prime lens. Prime lenses are really
great because they're fast, right? And they're small, right? You can make them smaller and they can be on a
camera and you can really just kind of go around
and snap them real quick. But a long zoom lens
can also go a long way. You're off in the corner. And having a very long zoom, you'd be able to
basically like sit back and people wouldn't notice that you're taking
photos of them. Again, if you're taking
photos of people, those would be
incognito long lenses and versus prime lenses and how that would
work out for you. Those are really quick ways to get in there with
gear and be quiet. But what are we trying to achieve with street photography? I would say we're trying
to get some emotion. We're trying to show reality. We're photo journalistic in a way which is at the end
of the day in my style, I'm very photo journalistic
viewer vibe that I'm doing. You want to look for
emotions with people, right? And I know I've
said this before, but specifically
you want to look for what's happening
in that scene, at that particular moment. So I know those two
things are connected. And when I say
look for emotions, you want to snap away before people are knowing that you're taking a photo of them, right? We talked earlier about when you're taking
a photo of someone, people tend to
clam up or they're not sure or they change or, you know, they don't
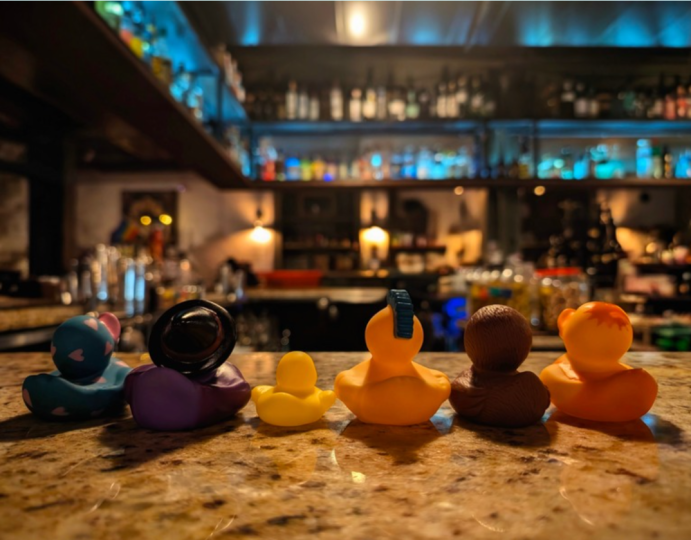
show the true emotion. That's happening, Judge, and
these two photos right here, I caught a couple
touching each other. This was over in Sicily
and they were just sitting outside a bench and I just snapped a quick photo
without them knowing. Their hands are unknowingly
making a heart. And that's the kind of emotion
I'm talking about, right? Like I will have never been able to get
them to pose like that in that specific place at that specific time with those specific eyes
looking into each other. That is a pure emotive moment that they're having on their
own that I snuck away with. Which is, you know, also something to think about and talk about as being
a little sneaky when you're a street
photographer and the ethics behind taking people's photos
and emotions and moments. But I'm not selling this print, I'm not trying to exploit them. I just was passing by and
thought it was a nice photo. This photo on the
right, which you've seen before, I've
shown you earlier, I snapped away and these
were two wranglers at a ranch that I
go to as a guest, but also go to to work at. Again, it really shows
their attitude in the moment they would not
have had those faces, I think had I picked
up the camera. In fact, I know for
a fact that both of them would turn away if they knew I was taking
a photo of them. But instead, I have this very modern cowgirl look of them talking to their
mom who was behind me. And I just quickly snapped away. But I found this emotion in their attitudes towards what was happening in that moment. And that is that
street photography that I was able to get with a small camera and a prime
down below very quick. And that's what makes street
photography really good. And it will make your
street photography pop. Look for what's around you, how people are feeling, what the emotion is
going on in that moment, and snap that again
moment in time, right? The emotion here, I
mentioned earlier earlier in this whole class was like I can feel how cold that
water going to be or how, or how nice it's going to
feel in jumping it off, This is also a single
moment in time, and that's what's so great
about street photography too, is because you find yourself in a very specific moment in time. Philosophically,
the only way to get that is through stills, right? Or video I suppose. But like you're capturing this very specific
moment in time. And that is what makes
street photography and photography so cool. It's like time travel, right? This will never, ever happen
again in this moment, In this time at this
place with these people. I caught him in mid air. I saw him about to jump, and I quickly turned my
camera and snapped away. The camera focused
out on his friend, watching him jump in the water. You can feel it,
right? You understand that he's about to get
consumed by water. He's caught in mid air. It's somewhere between standing, getting, anticipating jump,
and landing in the water. Or already floating
around in his friend. It's, this was a
fraction of a second, a second in time
when this happened. And I was able to snag it. And if you can look
for these moments, if you can look for these
specific moments in time that only happen
in an instance, in a moment and you
can capture them. It's going to make your
street photography look and feel even more impactful. So when you're walking
the street next, keep an idea of emotion
of a moment in time. Do you see something that
only happens once in a while? Maybe hang out and wait and be patient and take
a photo of that. Or maybe you look for
what's going on around. You look to see if
someone's angry waiting in line at like a taco
shop in downtown area. Look and see if there's
someone alone on a park bench. Look and see if these birds
are about to fly away. You know, look for these moments and I can guarantee
you that this is what's going to advance your street photography is
capturing these moments, paying attention to
what's you're earning, and paying attention to emotion and a single moment in time. Now, let's talk about other
things, right? Snapping away. I try not to be
super trigger happy, especially when I'm
doing weddings and stuff because you're just making
more work for yourself. But there's something
to be said about taking a ton of photos
constantly, all the time. The more photos you take,
like I said earlier, the more practice you'll get. But with street photography, you can be snapping away and you may find something
later when you're looking at those like a
diamond in the rough, right? If you're taking a bunch
of photos and you're paying attention to the moment
in time and the emotion, something will be in
there somewhere, right? It's sort of like an
interesting way to think about art and creativity is
looking at those moments. Snapping away, taking
a ton of photos, and then going back and looking to see what you sort
of had in that moment. Because sometimes
those moments are so fast that we don't notice
them in the moment. We don't notice them until later when we've been taking
a ton of photos. That goes along with getting used to taking your
camera everywhere. And I mentioned this
in the beginning in the sense that you, you should think about getting used to taking your
camera everywhere. And that will make you
a better photographer. It will make you an even
better street photographer. Because even if you're going out for a Taco at a food truck, or you're going out to
get gas or something, and you bring your
camera with you. You never know what moment might pop up that you
can take a photo. You never know when
creativity will strike. You never know when you know an ambulance will be flying down the street or
whatever, right? If you take your camera with
you and you're prepared and you're used to shooting and
you've gotten good at it, and you know your settings, you will get really,
really great photos. So I'm always going to say get used to taking your
camera with you everywhere. I know it can be a
burden sometimes. I know you can struggle. Any time I sit and
I ask myself, go, should I take my camera or
shouldn't I take my camera? That is a sign that you
should take your camera. And I tell myself that every time and when I don't
take my camera, I usually I'd say
more than that. I regret not taking it
every time I've taken it. I've never really regretted
taking it with me. I mean, unless you're doing
like going on roller coasters or doing something
superactive where you're afraid of it or you're going to leave it somewhere. I'd say nine times out of
ten. I'm happy I took it. Even if I didn't
take any photos. I know that if
something happened, I will have been prepared and I will have
taken a good photo. So get used to taking
a camera with you. It will make you a better
photographer all around. Not just street
photography, right? Thinking about incognito gear, you know, not making
a big scene of yourself but just kind
of snapping away. I think a lot of dark gear
helps out a lot with that. Thinking about a
long lens versus a prime or a zoom if you
want to be versatile. Everyone kind of
has their own style of street photography. Looking for that emotion in people very important,
anticipating it, being patient with it,
even the people that you're walking around with
or on the street with, looking for a single
moment in time. I think that one's the
most important thing that's really going to up the way all your street
photography looks like. Take a walk around a block
and just go a walk, right? Take photos, don't
think about it. Do a walk at the same
time the next day. And think about single
moments in time. And take photos of
those that apply to it and see how
much better they are. I'm telling you it
will change the way your photography looks in
a good way. Snap away. Take as many photos as you can. Digital stuff doesn't cost money. You can always
throw it away. As long as you're cool,
sitting there with a cup of coffee,
going through it all, you never know what moments
you may have missed or gotten and get used to taking your camera
with you everywhere. I still try to take mine with me everywhere I
go, anytime I can. And if not again, your mobile
camera can take photos, but you know you want to
take away the looking like you're taking
a photo when you're talking about
street photography.
9. Advance Your Travel Photography: Travel photography, I don't
really see it being that much different than street
photography other than you trying to tell a story when
you're out in traveling. So travel photography
will really be more about telling a full story
about your whole traveling, right, Versus like moments
in time just on the street. That doesn't mean you
don't want to get moments in time in
travel photography. I think when you're thinking
about travel photography, you should apply everything
that you would be doing in street photography
to travel photography. You want to apply landscapes to what you'd be doing
in travel photography. You want to maybe apply events to what you'd be doing
in travel photography. Travel photography is more about being present
and capturing those moments that you are experiencing while
you're traveling. Mostly so you have time to
look back on them if you want, unless you're working for a
client and you're trying to showcase the travel
for a specific client. Travel photography ends up really just being for yourself, so it's a really
important thing to get good at if you
want to make sure that you want to look back at the good times that you've
had traveling and whatnot. So let's go through
some quick tips. First one of course, take all your street
photography knowledge and apply it to your
travel photography. It just means you're kind of
taking more photos and it's a little more versatile
small camera. I would say that that
more than that has been the best way that I've
gotten better travel photos. I have taken my bigger camera when I travel for fun,
But at the same time, like I feel like taking a
bigger camera starts to take away from what you're doing
and what you're doing. The most important thing
is the traveling, right? Having a smaller point and shoot camera is like really,
really beneficial. I think for travel, especially with photography, especially when you're
moving around a lot. You just have to
decide like what kind of smaller camera you feel like comfortable with doing and the versatility
of it, right? Like if you took a
small camera and you only took an 85 millimeter, you wouldn't be able
to get the nice big, wide landscapes if you're going to like somewhere that
has a lot of landscapes. Unless you're going
to like, you know, maybe you're going
to India to shoot the Festival of Colors and you want to get portraits of people. You might want to take the 85 and have it be big and bulky. But, you know, typically
I travel with, I have a little point
and shoot camera with a 28 millimeter fixed lens
and that's all I need. It's a high megapixel camera
so I can crop in later. And that has been the
best travel camera I would ever recommend. And take small enough light
enough wall expensive. Having the small camera
allows me to enjoy travel and still take both landscape and
portraits when I need to. Don't be afraid to use
your mobile phone, right? Like I'm like a
big proprietor of wanting to use your
mobile camera, especially in travel aspects. If you don't have
room for a camera, use your phone 100% The only thing that
worries me about using your phone as a camera
is you start to think about battery life, right
when you're traveling. You may need to use maps, You may need to use translators. You may need to
get to e mails and confirmation codes and
transit and all that stuff. If you start to use your
mobile phone as a camera, you're taking away your
battery quite a bit. And then it also becomes
a duality of something. So don't be afraid
to use it, but also think about
separating them. I think that's more
what I would try to be thinking about
when thinking about mobile photography as you're traveling taking lots of wides. Don't forget to
establish where you are when you look out through
your eyeballs right now. Right, it's pretty wide, right? You can see like a
pretty vast area through your eyes while you're focusing around moving your pupils. Having a nice wide shot with your camera is really going
to ground your travel, you know, when you look back at your albums and ground them. So I think it's really
good to always do wides. I'd say more often than not, my travel photos and usually
I'm traveling for work. Right. I already have 1
million cameras with me, but I try to never
forget to get a wide because that's going to
be the best cool thing. Something to go back on. The mobile phone too, is a lot of mobile
phones these days, when you take photos
with your mobile phones, it puts a pin where you are. And I think that that's a
really fun way to go back and look at your
travels through that. Here's a quick photo I took. This is down in the Amazon. I was down there working
on a project for NBC. And this is actually
take my Fuji Xt one, I want to say with
a 56 millimeter, so that's an 85 on a
full frame camera. And we were down there showing some indigenous people And I just happened to see
this on the corner, very street photography
sort of vibe. But I happen to have the
camera in the right spot, the right time to
nail this photo. And it wouldn't happen if I wasn't paying attention and have the right small camera to where they didn't notice I
was taking the photo of them. It's a really beautiful photo
and I believe he was making some headdress from
they had dressed up in their fancy wear
for us being there. Here's another
photo from Sicily. If you remember the street
photography shot in the back. This photo complements
the street photo of the man jumping in the water. Right? There's a nice big wide, I actually used this on my desktop a lot because I
think it's just a really nice, refreshing photo on my computer to remember being in that nice, cool air in the summer. Here's a nice big wide from
Guatemala at Lake Atitlan. Sam and I had a project
down there and then we stayed at this resort
that had Doc out. And that's a very sort of
typical travel photo, right? Is Lake Atitlan and
Guateimala with a volcano in the background and Doc
going out to the water. There's a famous music video by Z and there's a kid running out and jumping into the
water at this lake. So, but again, this is
like a wide, right? I'll always remember
this feeling because I took this wide. I think if I had just
taken a close up zoomed in of the volcano or a close
up zoomed in of the doc, I wouldn't get the same feeling. And I remember sitting
there and taking this wide and taking it
in and remembering, and now I have this image that
sparks that same feeling. Because that's really
what you're trying to do. Trying to take these wides to
help spark that travel bug, to remember how you were
feeling during this whole, you know, travel episode. These are my quick travel tips. It's funny, because
I haven't really traveled a ton outside of work. And so I'm already going
to have cameras with me. So the biggest thing I
can really emphasize is like remember to use your
phone. Remember to be present. Remember to take wides
where you can and try to encapsulate the feeling that you would have when
you're being there. The whole point of taking travel photos is to
remember the smells. Remember the feeling you
got from being there. Remember the light. Remember the people
you're with, right? This photo over here is me
taking a photo of Phil. Phil taking a photo of me. And that trip was all about
the three of us out hiking, talking about photography, and pushing ourselves
as photographers. And I really like
this photo that Phil picked out of me because, you know, it's just so us. And it reminds me of that
moment and I remember exactly how cold it
was right there. And then it would rain.
It would not rain and get hot from hiking. And that's all travel
photography really is, is encapsulating the feeling that you have when you're
taking those photos. So if I were to leave you
with any advanced tip with travel photography, it would be that
whatever camera you have when you're
there in the moment, take a moment to be present
and breathe in and understand the area that you're
around and see how you can translate that
into taking a photo.
10. Advance Your Landscape Photography: Oh boy, landscape photography. We have a whole course on
landscape photography, if you want to check
that out where we go deeper into this, but let me give you some tips on how I advanced my
landscape photography. I didn't used to do a lot of landscapes and I think
as I've gotten older, I found more patients for it. And I think that
that's going to be one of the things I
talk about later on. But landscape photography
can really be complex, but it can also be very simple. And if you set yourself
up for the right things, your landscape
photography can be epic. Let's talk about
some of those things that I set myself up for. First of all, the
location, right? You can just go out the door and shoot whatever
landscape you have. But like if you
want it to be epic, if you want it to be advanced, if you want it to look good,
go to a good location, go get that shot that you've been wanting to get
landscape wise, Go to a national
park, go on vacation. If you're on vacation, go hike
somewhere that you know is going to be an epic location that you wouldn't
normally be at. Those are what's
going to look the best and the most epic. And it's going to push
your photography, right? If you're just going
around your neighborhood, you're never going to get
the best looking locations and the best looking landscapes. You have to go get them. They're out there and they will look good once you get there. And you apply these
other things to them. The other things we
want to look at, I'm going to talk
about the time of day, the composition, the gear you may want
specifically for this. And again, the patience that you need especially for
landscape photography. So let's talk about
the time of day. I mean, we talked
about location. If once you have the location, you have to understand
that your time of day is going to be just
as important, right? A landscape is a big,
vast area, right? It's not like I can throw up a strobe light and shoot
it in the way I want to, or control the light, by controlling and
dimming and stuff. When you're out
shooting a landscape, you adhere to the sun, right? You adhere to the
land in front of you, adhere to the weather. So have a plan, right? First of all, know
your location. Find it, right? You're
going to go somewhere. Pick a time of day that
you're going to shoot. When does it look good? What direction are you
facing at that time of day? Where's the sun going to
be at that time of day? Have a plan for this, right? If you just go
somewhere, you wake up, you have breakfast, you're
already at your location, You walk out, you saunter out. It's 11:00 in the morning,
10:00 in the morning. The sun's right
overhead and you're looking at some
beautiful desert scene. It's just going to be fully lit. That can look really beautiful 100% especially if there's
clouds and the weather's good. But what if it rained that day? Did you look up and see what the weather was
going to be like? What if you had gotten
up right when the sun is caressing over the hills
from the other side. And it's just hitting one
corner of that giant butte, which I'm about to show you. What if you waited
throughout the day? What if you just took
a nap during the day, waited for the sun to go down, and you went back
to the same spot. And right when the
sun was setting, you snapped a series
of photos and you let the sun just kiss the corner of that butte and you got the blowing up colors of
the sky in the background. Like this is right here. That's exactly what
I did here. Right? I knew exactly where I wanted
to be for this photo and I waited all day for the sun to set in that moment.
I'm not going to lie. I didn't know the
colors were going to look that good in
the background. And this has a little bit
of editing post help. But I did know the
sun was going to slowly sweep across
the butte like that. And I have some other
photos where it's lit up more, But I love that, like nice, warm sun coming across the red desert onto Monument Valley
onto this butte. Time of day is very, very important when talking
about landscape photos. Here is not something
I had planned, right? This is at the end of
working on this ranch. We were on a cattle drive. This was the last moments of the cattle going into
their final pin, after a whole week of
driving 300 cattle across state lines and
it just it blew up. Right. I was waiting and
taking photos all day, and as I was riding my horse
there, I had a camera. While I was on horseback, I just waited and
waited for the sun to get to that right moment
and took a photo. I didn't take any photos before this and I didn't take
any photos after this. This was the perfect time
for me to take this photo. Time of day, right?
Very important to the way landscape looks. If everything was lit up, it just wouldn't
have that contrast, that like really
professional colorful look later in the day. Earlier in the day,
the sun is going to be your friend to make it
look really, really. And again, this is like a
quick advanced tip, right? This is just the
minimal thing you can do to make this
look even better. Planning out, waiting
for the time of day. You can start to add filters. You can start to have
longer exposures. You can do all these things. But this is just a really quick, advanced thing
that you should be thinking about as
a photographer. As you go from
beginner to advance, knowing where the sun is, knowing that you have a plan, knowing what time of
day you're shooting, anything but specifically
landscapes is really how you start
to be a professional. Here's another one, right? I got there and I waited for
the sun to dip below. I think I spent maybe
an hour or two just hanging out at the spot
in Monument Valley. This is on a different trip.
This is a motorcycle trip. And I remember it was so
cold because I was there in February and I just parked and just waited as cars
went by and waited for the sunset to get that
iconic shot, right? That brings me to composition. When thinking about
compositional landscapes, there's a lot of
things you can do. There's a very famous story
that an old director, John Ford, told Spielberg
about horizon lines, right? If horizons are in the
middle, it's boring, right? If you put it at the top or
you put it at the bottom, it's going to express more.
It's going to say more. I think that's true, but I
think it also depends on what you're photographing
in film and video. It's a little different
because you have someone walking across frame
or going into frame. So you have that
dynamic with stills. Think about the overall image and the balance of the image. What are you trying to
show and how are you trying to balance that out per like your style
and your emotion. So let's look at
these two photos. They're very similarly
composed, right? The horizon line
is in the middle. On both of them, right?
They're down the center. But why did I allow
that to be right? I think a lot of
people say put it in the upper or
lower third, right? But in both of these shots, I wanted the foreground to be coming into you and I wanted you to see the vastness
of the space above, right in the shot on the left, this is at Death
Valley in California. The foreground of
the desert floor, it's the lowest spot in North America,
really close to you. And then you just see how
empty it is in the back. I let there be negative
space in the sky. Maybe a more interesting photo would be completely tilted down, just looking at
the floor itself. But I didn't want the floor
to be the main focus. I wanted the entire area
to be the main focus. I wanted to add in floor
with Sky photo on the right. Also the same amount of
like composition, right? I like the center because
we see downtown LA. In the middle, but we also see sky in the top in the contrast. And we see the foreground coming with the houses
in the Hollywood Hills. The cool thing about
this photo, I think, is that there is like a balance between the sky and
there's a balance. The sky and the homes inside the horizon doesn't
necessarily need to be at the top or bottom
to be interesting. It's more about
having a balance and a symmetrical shot in
these compositions. Specifically opposite
in this right, in this photo, this is
out in the Alabama Hills, again, more California as I framed it up at
the very bottom, right, the horizon
at the very bottom. And there's a ton of
negative space in the sky. What idea is I think honestly, because there really
wasn't a ton of interesting things going
on in these hills, right? It's a beautiful mountain.
The sun is setting. I only have the option
to shoot into the sun. And how do I make this
photo more interesting? I'm going to add a ton of negative space and
tell a story with it being at the bottom
in this shot. This is monument value
and this is done on film. Same thing as the
last shot, right? If we just taken a photo in the middle of the day
with these long shadows, with the horizon at the middle, like our first two photos, there really wouldn't be
much going on, right? Because there's nothing down below and there's nothing above. There's no sky, there's no
anything like the last photo. By putting the frame and
the horizon at the bottom, we're leaving all this
negative space to show you how vast the desert and
Monument Valley is. You can see how tall these
buttes reach into the sky. If we had center,
if we had tilted down and the image
was more facing down, it wouldn't be as interesting. It would also just be like you looking at it from your eye. Remember I mentioned
that earlier? It's just kind of there.
We're curating and deciding how our viewer
looks at our photo. We want to frame it in this sky. It's not just open or
just there, right? We're showing exactly how big
these things are with how big the sky is and that's what creates the feeling in
this landscape photo. Let's talk about
gear when you're doing landscape
photography, right? Having a high megapixel camera
is super helpful, right? Because you can print these out real big or you can
zoom in if you want. And you're getting
all those details and those sharp
things like that. So if you really are getting
into landscape photos, I would really highly recommend a higher megapixel camera o
wide lens versus a zoom lens. This is really specific to your style and
what you're doing. My friend Sam, he loves to shoot landscapes on zoom lenses, he'll get really,
really far away and he'll zoom in really far. Mountain range, really far away. And you'll see the compression
because of the zoom lens. You'll see the mountains
looking like stacked up. Or if you've ever
seen a photo of like a city skyline
with the mountains right behind or something
like that's because they're shooting on
a very long lens. Typically, I shoot a
lot with a wide lens, a lot of landscapes, because
we want to see everything. You're going to need a tripod, absolutely need a tripod mostly, and specifically because you want to be able to
frame stuff up, you can do it without a
tripod and just hand held. But having sticks, having a tripod will really let
you fine tune everything. On top of that, you can
always screw in filters. You'll be able to really
dial in everything. Highly recommend a tripod, especially like a travel one. And then filters, right? You can start to learn as you advance. You can start to use
gradient filters. Use ND filters to have
longer exposures. There's all these
things that you can do, filter wise to
really up your game. It's something you should think about and start getting into. I don't do a lot of that because I do a lot of in post now. But if you're really
getting in the landscapes, it's worth looking at gradient
filters ND filters and polarizing filters which will allow to get more blues
out of the skies, more deep looks into water. If you're doing water,
landscapes and water skepes, those are really important. So I would start to
look into those. And then just using
your mobile phone, right, If you don't
have your camera. Again, I always go back to this. I actually think mobile phones
doing landscapes are much, much better than taking
photos of people. It's able to give like high HDR. You can see into the shadows really deeply and it can pull down those highlights
really well to create really beautiful, not only like landscape photos, but panoramas of landscapes. I think mobile
phones just excel at that more than taking
photos of people, honestly. And then finally, we've
talked about this is just having the patients
right in this photo. I was waiting for
the sun to be at the right place but for
cars to coming through. At the same time, I
used an ND filter, which we talked about later,
to get a longer exposure. So I was able to see cars, their lights go through
this long exposure. But understanding that
like you must wait or you must not miss when the sun is going to be
in the right place, when the physical objects of these big large landscapes are going to be in
the right place. We are all moving
through space and time and you have to allow yourself to wait for
that kind of stuff. Don't just be done right. Also, I think when the sun
is behind the horizon, it doesn't mean that you
should stop taking photos. There is a patience level to
where the sun will then skip off and get even more colorful once it's
behind the horizon line. Thinking about waiting
and understanding that like if there's not a new moon this weekend and
you want to shoot at night, maybe you should be patient and wait for the following
cycle of the moon. Or you want a Full Moon. Be patient, and wait for it to show up next month
before you go. The name of the
game is Patience. And being present there and understanding that
you don't need to do everything so quickly. Because you may be able
to get a better shot if you wait it out, especially
with landscapes.
11. Advance Your Wedding Photography: Let's talk about
wedding photography. This is one of the
bigger ones, right? Especially because I
have been shooting weddings for 15 plus years. I had my own wedding
photography company for a few years while I was
going through grad school, and I still shoot weddings. The cool thing about wedding photography is when you learn wedding photography and you design how to shoot
wedding photography, you can apply this
to pretty much any event style
photography, even concerts. Even though we have our own section on
concerts and music, wedding photography
really applies itself to any event where you're taking photos
and there's a thing going on and there's guests
and all sorts of things. Wedding photography
is big, right? There's a lot that goes
into wedding photography. It is so big that we have our own wedding
photography course where I go way deep into every single aspect of
wedding photography, including doing demos and
editing and all that stuff. But for now, I'm going to
give you some basic ideas on how to take wedding photography and push
to the next level, right? First of all, wedding
photography, you need a style. Your specific wedding
photography style is what makes you unique. It's what will separate
you from other people. Especially when it comes
to when you're pitted against another
wedding photographer and you're trying
to get that job. So let's talk about style. We're going to talk
about gear that helps you become a
wedding photographer. We're also going to
talk about how you can connect to your couples and the people that
you're taking photos of. And this is kind
of also where this applies to other event
photography, right? Connecting with the
people that you're taking photos of at an event. And then finally, we'll go
into a really quick thing, which I just kind of
briefly mentioned in how hard wedding photography
is and how worth it it is. So let's start off with
talking about my style. My style is a very
non participant. I mean, I do participate
obviously when I have to, when we do formal photos and when I'm trying
to pose the couple. But often my style
is as a viewer. And this gets talked about a lot with a lot of other
advanced photographers. There's a photographer that I
follow that he always talks about being a viewer or
being a participant. And I've sort of
adapted that and I've learned to do
that over years. Is my style specifically is very photo journalistic, which
means I'm a viewer, which means I'm not
really like, you know, positioning and I'm not really
like posing all that much. I do do that and you have to
do that at a certain point. But in general, a lot of
my photography is going to be like stepping back
view and taking the picture. Finding the right moment, right, and finding the emotion through my compositions
and whatnot. You can see in these
two photos right away. They're both the same
vibe, the same thing. And I didn't ask either
of these couples to kiss, I just put myself in the
situation and they did. I got into the car with
them, they kissed. I put the veil over my head,
they kissed automatically. That sort of viewership, and knowing when to take the right photo is something that I have learned in my style. It's taken time to understand. So first, when you're
trying to find your style, think about my style and look
at my photos and decide, are you a viewer or
you are a participant, that's the fastest way that you're going
to find your style. Think about how you
interact with your couple. Think about the colors that you like that you
gravitate towards. Pay attention to what you're paying attention to when
you look at Pinterest. Like go through
wedding photographers on Pinterest and see what
sparks your interest. See what you like. Go back and look at the
photos that you've taken at a wedding or of your friends and see
what you're doing. Try to notice the little
compositions that you're doing. Notice what color
you're editing with, what things are in focus,
what things are not in focus. Start to look at what you like
doing and do more of that. That's the fastest way
to get to your style. Don't think too hard about this. I think sometimes we can get caught up in like who
we are as artists and what we're
doing and not doing just it sounds as
cheesy as it sounds. Take photos that come from your heart that you
feel look nice, that you think look cool,
that have expression. And you'll start to notice, certain couples will gravitate towards you and towards that. You can't be the
photographer for everybody. There's plenty of couples that would not want to hire me as a photographer based on the way that I take
photos, which is fine. There's space and there's room for everybody to take pictures. Just like any other art, your art is very
unique and specific to you and you should
be proud of it and work on it as
much as you can. And it's okay if a couple wants to go with
another photographer who is also unique and has their own style and
shoots their own way. It's a game of art and life, and creativity and
evolution of you as an artist and not
just a business person. So work on developing your
style and know it so that when you do get to sit in front of a couple and
present yourself, you have a good grasp on it. And then when you get to the
wedding, just do your thing. You don't have to think
about, am I doing this right? Am I getting these right shots? You just be yourself and do the thing that you
know you're good at. And that will come across in
emotion in moments of time. And the couple will really, really love you for
it and love it. And your portfolio will show it. So let's look back at my photos. Like I like to talk about
this finding yourself, 'cause I feel like this is a
really good place to start. And you can look
at my photographs specifically in
these three, right? Are you a participant
in a viewer? Now, I look at the
three of these photos across the board here
and on the left. I was sort of a participant
because I had her go sit near a window that knew
she was gonna put her shot. I was like, are you
gonna put your shoes on? Maybe you should go do
that near the window so I can have some light and
she's like or whatever. I was participating
in the sense where I told her where to
be in the light, but I wasn't telling her how to do her shoes, what to do them. And I was able to snap this
really beautiful photo of detail of her
dress and her shoes. Adversely in the center, we have the shot of this man in the vineyards of Napa Valley. And I had him just stand there. I had him look off towards the sun and put his
hands in his pocket. And very much I'm a participant,
right at this point, I'm telling him what I
want him to do and look, and I took some photos
and then I stood back and let him do his own
thing to the right. Actually, it's from
the same wedding. This is his bride on
the right, Rachel. She was getting ready in a room. They're putting her shoes on. And I was definitely
just more of a voyeur viewer snapping
photos of the moment, not engaging in the
wild life, right? I'm not telling
them where to be, what to do, I'm just quietly off in the
corner taking them. They knew I was there.
But you're still there taking photos and
capturing the moment. So you see the difference in participating or viewing, right? What kind of style
are you doing? What kind of interaction are
you doing with your guests? Let's look at these
three photos. Can you tell if I'm a
participant or a viewer? And would you be a participant or a viewer in these photos? What do you think? The
first one on the left, they're posing in front of this, you know, garage thing. The one in the
middle, They're all holding up the bouquets. And on the right, she's
throwing a bouquet. Well, of course, I'm probably participating in the ones
where they're posed, right? I'm asking them to pose
and look at the wedding. At the wedding photographer. Right. So you are
participating in your creating and
designing a shot, which is perfectly fine. And in the last one
I'm viewing, right, she just happened to stand
there and she happened to hold the little girl up,
throwing the bouquet. And I knew where I
wanted to be and I was able to take the
photo as a viewer. And these both work
for my style, right? Because you do have to
have somewhat of a mix of portraits and viewer
or not up to you. I guess I shouldn't
tell you what you have or haven't need to do or not need to do because you
can make your own style. That's the whole point.
What do you think? Am I a participant or a
reviewer in this photo? Definitely a viewer, right? I happened to catch the picture of the groom shooting
eight millimeter of his bride out in the woods and there's an
emotion there, right? I'm not setting this up. This is a total organic
thing and it feels that way. Again, participant or viewer, viewer again just hanging
out while they get ready. I just got in the right spot
and took the right picture. They were all talking and had their emotion and I was able
to take a really nice photo. This is one of my
favorite photos because I feel like she's like
actually laughing and it's very organic and it's right before she's
going out to get married, which I think is really fun
participant or reviewer. This one's a little
tougher participant. I picked that very
specific spot. I had them stand in a
very specific place. I had them put their hands
in a very specific place. I made them be the way they
are positioned and are. And then I took the photo. While it looks
natural and stuff, I definitely participated
in the vibe of the photo. Um, and sometimes I do
that right because I and I have an idea and
it's creative and I need them to be
in a specific spot. Let's talk about
gear real quick. We talked about
earlier about when to get gear, when
non to get gear. There are certain things with weddings that things will
definitely help out. I'd say at the base level, if you're a beginner
or photographer having a camera in a 24, 70, that's all you kind of really need
to cover a wedding. I could probably get
away with doing that. But what will make it easier and better for me are smaller, lighter weight quiet cameras, lighter weight lenses
on mirrorless cameras, long lenses, and
honestly the gear that helps me dress
like a guest. And why is All right, well, let's start the small
cameras and lenses. Right. Chances are you could be shooting a wedding for
3 hours, for 6 hours. I've shot weddings for
up to 12 to 15 hours. And when you start to carry those big DSLRs and you're
carrying two of them, that weighs on you
like literally it's very heavy and your
back starts to hurt. You're on your feet all day. Having smaller mirrorless
cameras has really, really changed my
game and my body, as I've gotten older has
been able to help take that. More stretching out, you
know, small cameras. That also comes with
smaller lenses, right? I remember shooting
those crop sensor, mirrorless cameras, the Fuji's, which are getting faster
and better every day. And the first wedding I shot with two of them
after shooting a wedding the weekend before on bigger D 800 changed everything for me. Now the mirrorless cameras
are starting to get bigger and getting back up
to the weight of DSLRs, but they're still
going to be smaller than those older DSLRs. And I think that
that's huge gear wise. You want to be comfortable, you want to be speedy, and you don't want your gear and everything to weigh you down in when you're trying to find the exact moment during
weddings to take photos. Having a long lens helps a lot. I have specifically a 70 to 200, and I really own that
lens specifically for taking long shots
at weddings and events. Usually you can't get right
up in front of the speaker at an event or you
can't get right up when they're doing
their vows or anything. But you can be standing
over the crowd on a 200 millimeter lens
and shoot from there. And without that lens, I don't think I'd
be able to shoot a lot of the ceremonies
that I'm shooting, there's been times
where I've been at churches where
you're not even allowed past like the back pew. So I'm going to need
that 70 to 200 lens. That's how you can really up your game in
wedding photography. Get a longer lens, the 70 to 202.8 that's
pretty much across all camera systems will be your best friend if
you get a faster. If you get a longer lens like something
like a 150 to 300, typically those end up
being like F four or 56. They may not have
enough light for you. If you can pair a 70 to
200 millimeter lens, that's a 2.8 on a camera that has a
higher megapixel camera, you can shoot at 200
millimeters from far away. And then if you need to,
you can crop even more. So this means that
I don't need to have that 300 millimeter lens. That's giant and heavy, and expensive, and
you carry it around. All I need is the 200. It's smaller, lightweight,
and I can crop in later. I only use my 70 to 200 when the ceremony
is about to start. When the ceremony is over,
I don't use my 7,200 for pretty much anything
else outside of maybe speeches if I can't get up close enough when
they're doing the speech. So it's kind of odd to just
own a lens for like what is maybe like an hour of
an entire day of wedding. But that's what it takes
to be advanced, right? So when the ceremony starts, I flip on the 7,200, on one camera, and then I have a wider angle on
my other camera. Or the 24, 70,
which means now I'm able to have 24 to 200, right? I can cover that much range on two cameras on my body
during the ceremony. When the ceremony is
over and I'm doing portraits and just hanging out, I go back to my 24, 70 and maybe an 85 or 28 or a prime to take
those pretty photos. So having a long lens in your
arsenal goes a long way, even though you may
not think it would. Quiet cameras, right? Those mirrorless cameras,
again, same situation. I've been in a church where
I'll have had a DSLR and it'll be very quiet
and there'll be a moment that's very
nice and subtle. And it'll be up on the ceremony
and it'll get all quiet, and then all of a sudden
you'll hear my DSR go C, C, and you just see people's
heads turning around. It's the most
embarrassing thing, but you know you need to
take the photo, right? So having the quiet, mirrorless cameras with modes that you can actually
put on silent, you can have it so it
doesn't make a sound at all. No one will know
you're taking photos. In fact, when you're
in a quiet room and maybe there's
a prayer going on, the respectful thing is
to not be taking photos, but you still can take photos 'cause images are
going to beautiful. You just don't want
to disturb them or be active or a
participant, right? So having a quiet camera that'll be dead
quiet while taking photos is another
very sneaky way to take some really
intimate photos. And I think, you
know, it doesn't sound like it's like a big
deal to a lot of people. But trust me, when
you've been in those situations and
you have a loud camera, if you don't see people changing their attitude towards you, they are internally and that will come across in your photos. This is something people
don't think about. Right. Trying to make yourself
just be a fly on the wall getting those
moments I think are the best wedding photos
that I've taken at least. And finally, dressing
like a guest has been one of my
favorite things to do as a wedding photographer. And a part of that is because when you're in the mingle
and you're out there, people don't necessarily know you're the wedding photographer, so they don't have
that guard up. We talked earlier about street photography and when
we bring the camera out, people start to freak
out and they worry. Same thing goes for
weddings, right? If you have a big camera
up in their face, people are going to clam up
and be very not themselves. It's just what happens. I do the same thing if
you're dressed like a guest. If you have, you know, nice clothes on, it looks
like you're there as a guest. Part of the reason I use the
leather dual camera strap is because they kind of
just look like suspenders. They don't look like I'm
carrying around a camera, so I can walk
around and it looks nice and I can pull up a
camera and take a photo. And no one's none, the
wiser people's guards are down and you get a lot of really intimate,
wonderful photos. That way along those lines is connecting
with your couple. I love, this is one of
my favorite photos. I always try to take a mere shot of myself with the
bride and the groom, or just the bride typically, Or just the groom, just to
like, encapsulate that moment. And then I like to show them, I'm part of the wedding, right? I'm part of the whole
entourage of what's going on. And if you do that throughout the day and you connect
with your couple, they're going to be
happy that you're there. You are spending more time with that couple than anybody else. That day I'm talking about
like aside from each other, you're spending
time with both of them from beginning to end. That means like parents,
kids, whatever. You're in their face as soon as they're putting
their clothes on, you're with them when
they're waiting. You're with them when
they walk down the aisle. You're with them when
they're up there. You're with them after
their first kiss as they're walking away. You're the first person
they see after they've officially been married and they have all that
adrenaline going. You go with them to wait
before the cocktails. You're with them
when they're taking photos of all their family. We're trying to figure out where grandfather is to get them
over to take the photo. You're with them
during the speeches. You're with them when
they're cutting their cake. You're with them all day. The more you can connect
with your couple, the better your photos
are going to come out. I'm telling you if
they trust you, if they feel good, if they know, they don't have to worry about you interacting
with their guests. Their happiness,
their confidence, their love is all going to come across in every
photo you take, so I can't stress enough, connect with your couple. Text them a couple days before. Text them the day after. Tell them during the day
that they look great, that you're so
happy to be there. You don't have to
overdo it, but just be friends with them
because that's really, really important when it comes to taking photos of people. Wedding photography is hard. I get this all the time
where people are like, I don't know how you do it, man. Like wedding photography is so hard. What if you miss this? What if you miss
that and I get it, I know that there's
a lot of stigma behind making sure you
nail it the right way. Here's the thing though.
The more you do it, the better you'll get at it. The more you practice at
it, the easier it is. I don't even think
about it anymore. The hardest thing
for me when I shoot weddings nowadays is
just the long hours, honestly, and being
on my feet all day. Now that I have shoes
with, you know, I wear comfortable shoes, things have gotten a lot better. I've been doing
this for 15 years, so that's part of the thing. Thinking about wedding
photographer and being hard is because it's worth it. I don't know, I
think that's what lets you push
yourself through it. And when you think about
being a photographer, especially when
you're starting out, photography already is like
pretty difficult, right? There's a lot of math, there's
a lot of art involved. There's what to buy,
what not to buy. There's like comparing
yourself to others. And then you enter
into this world of being the one
person that's taking photos of the most important
day to a lot of people. And you can get in
your head about it. But to be an advanced
photographer, you have to let that go. You have to push through
and you have to like practice and take photos and
have confidence in yourself. The more and more you do, the better and better
you'll get at it. Knock one down, and get
ready for the next one. Understand from your mistakes, see what you're doing right. See what you're doing wrong. And honestly like revel in when your couples
see your photos, they will love
them and trust me, that is the best part
I think about being a wedding photographer
is capturing those moments and showing
those things to the couple. Because on that day, they're
all over the place, right? They're not going to
remember a thing. And it's your job to encapsulate all those little moments into these one little
photos from the day. So don't give up. If you're trying to be
a wedding photographer, don't get discouraged because
you will get discouraged. And it will be hard
and your feet will hurt and your hands will hurt
from gripping the camera. And you'll get tired of
going through photos days and editing them and finishing them and dealing
with drunk guests. It is not the
easiest thing to do, but man, when you get the
hang of it, it is fun. You can make a living doing
it, and I don't know, it's just artistic and there's just something about being there and taking photos on such an important day
to so many people.
12. Advance Your Concert & Music Photography: Concert music photography.
This is a really, really fun topic for me
that I've gotten more deep into in the last
two or three years since I moved to Nashville. And now back in LA, I've shot a decent amount
of concerts for both some friends and
some bigger artists that I'm going to take
you through here. You can really get into
this quickly, right? Because there's a lot
of musicians from like people starting out to
big time musicians. But there are a few
things that you can get going to really push that up. Because in a lot of ways
you can just kind of, you can just kind of start and just go right.
Things are lit up. Unless you're shooting
in like a studio and you're doing music
portraits or whatever. Just a few things that
you can do to just pump up your skill level
very quickly. Let's talk about concerts and just shooting
musicians in general. First of all, know what
you need to photograph, and that means like what
instruments they're doing. If you're shooting a concert, like the story of the
concert, what's going on? Think about having the
right gear also getting into the right place during when you're shooting a musician. And that either means
like in concert, getting into a good
place or getting into a good place while they're
recording in a studio. Then how to shot in
concert photography. There's a couple different
ways we're going to talk about on how to take photos at a concert as far as
like technical settings that I think will
really get you good. Then finally getting close. You can't get close enough in anything but
especially musicians. So let's go into
the first thing, knowing the story
that you want to tell when you're taking
photos of a musician. This shot has been one of my
favorites for a long time. We were actually on
a music video set and I was directing
a music video. And this bass player happened
to be standing in front of this LED board and he was very focused and he just
had this vibe. And I was like, I really want to take
a good photo of him At some point Finally it
just dawned and me, I was waiting for the light
board to go completely white so I can have
this nice contrast. You photo of him
on this backdrop, That's his story, right? He's there, He's on a
music video set and you sort of the lone
bass player next to a big drum kit and horn set
is really, really beautiful. So knowing what story you want to get is really
important, right? It's kind of like we
talked about with getting to know your couple
and wedding photography, or getting to know your subject when you're doing
creative portraits. Know the story of the
musicians that you're shooting and where you'd want
to be to tell that story. Often when there's a concert
going on that musician, those musicians, that band, they've put a ton of
time and energy to telling their own story through their music, through
their artistry. Whether it's the songs
they're singing, the lyrics they've written, the drums they're playing, or simply the lights
they've chosen for their concert or their
playlists themselves. They're telling a story through their music and through the order of songs
that they're playing. So it's your job to sort of
tell that story in a fun way. This is one concert
that I got to shoot recently with
a mentor of mine. And it was through
one of his workshops. And oddly enough,
like my buddy is the piano player for the
Luke Combs traveling band. And so my whole goal here was
to tell the story of this. Right? This isn't Indianapolis. It's a giant football stadium. There's tons of people there. Right? Luke Holmes has
a song about beer, so I took some close
up shots of some beer. He likes to carry out a solo
cup with some whiskey or some beer while he's singing and he moves around
with it a lot. These four images alone are telling the story
of the night, right? This giant, just
Indianapolis has the Colts, the NFL team play here. And he basically filled this entire stadium like
20 to 30,000 people. And you can see the skyline in Indianapolis threw
over the stage. We cut to Luke here, he was right over me
and I'm inside the pit. Taking a photo was trying
to get the Lucas Oil in the background to like
show where he was. And you can see the levels
of sweets behind him. So here are the beers
that Luke sings about. In fact, he has a song
specifically about beer. And like I said, he walks
around stage with the beer. So I wanted to make sure I got the show beers that
he's going to grab out. I was able to go
onstage beforehand, and that's when I
got those photos. Again, I had access, right? It's a little different if you're just going
as a casual viewer. This is one of my
favorite shots. I got him just
walking across stage. I thought it was
okay to actually shoot up into the scaffolding. I know normally that's
like a no, no, right. Doesn't look very
good. But again, I added some head room to show
you how vast the space is. He's looking down
on his microphone and he's got a beer in his hand. It's very Luke Combs, again, telling the story of
the man, of how he feels. Finding that emotion goes
across all photography. But seeing it here with the
lights while he's onstage with anyone else onstage I
think is really important. Again, how do these four things fit together? It's
really cool, right? You can see the place, the big wide insert of
what he's all about. Close up of him singing and
then him walking offstage. There are a ton more photos
that I took obviously, but just to be condensed, I can tell this story
in four images. You can tell a story
in like 15, 21 maybe. But the idea is that you're able to take a look
at the concert, figure out the story, and tell
the story through images. Let's talk about the right gear. Having a camera that can
handle ISO is really helpful. We'll talk about more on
manual control and stuff. But it does make sense that most concerts have big
bright lights, right? Because it's going to
be changing a lot. But having a good ISO allows you to look deeper in the
shadows when you need to, and you can handle the
highlights when you have to. Having a long lens is, I think, probably one of the more crucial things of shooting a concert. Because one, you never know
where you're going to be put, and two, you want to get close. So actually because I'm
shooting a stadium, I had a 600 millimeter
lens for this. It was like a 300 to 600 or 150 to 300 or 100 to
600 or something like that. It was a long, long lens. And I'll show you some
close ups later on, but that really,
really helped a lot. Making sure you have
enough card space. You don't want to
be having to change cards when things are
happening very quickly. So having enough cards
to go in your camera, whether you have a dual slot for your cards or you just have cards on your body that you can get in and change very quickly, Having everything on
you is also important. And then finally,
if you're shooting a small venue or you're shooting something like a
friend or something, making sure that the
lights are up and there. If the venue doesn't
have good lights, make your own lights right. Get remote flash heads and put
them in spots, underlight, overlight light from
behind the crowd so that at least your
photos will come out great. They don't need
to just be lit by the venue themselves,
Nowhere to be at the venue. I think scouting a concert venue is one of the best things
you can possibly do. But just not just
a concert venue, but like if you're shooting a
recording in like a studio, scouted out, know
where you can be, know where they're going to be. The images that are
going to look the best are the ones that
aren't normal, right? So being somewhere where
the audience is not right. You're not just a casual viewer. You are out there taking
really epic photos and telling the story from
a really interesting way. Some of the best
concert photography obviously comes
from being onstage. We're talking about advanced
photography here, right? So we need to get access. We want to get up there, we
want to talk to someone. I'm not telling you to
do anything illegal, talk to the stage manners, get involved with the
band, shoot them, your Instagram, get in there and get involved
so that you can get that access so you can
get that cool photo, right? It's not all about just shooting from the crowd or
shooting from behind. Some of the best
photos I've taken have been onstage right at the pit or inside the little space between the band and the
stage and the audience. Like in that little area, been some of the better
photos that I've taken when I'm shooting
a band in the studio. Getting in the booth with
them is huge, right? So here's two shots that I got. One on the left at the Luks was kind of like
not really onstage, but it was kind of like in
the back or not in the back, I guess he had a long walkway, so I was at the base
of the walkway. I could sneak around
away from the crowd. I got behind the spotlight
and so now you can see all the people
with their cellphones lining up in the background. You can see the
spotlight that is spotting Luke Combs himself
and it's giving him a halo. And you see the few
people that are in front of the stage. In fact, there's a
guy down there that has a whiskey jam
hat that actually comes from a little
tiny concert venue that I also shoot in Nashville, which has been pretty cool. You've seen some
photos from there too. There's some photos later. So that was a story for me and I'm getting the Lucas Oil
Stadium logo up in the back. There's an entire
story in this photo, just because I'm
in a place where most audience members are not. Here's a good shot
of my friend Oscar, who's an amazing guitar player, and I've been doing a lot of music videos for their bands. But when they're
recording, I'll go into the booth with
him and take a photo. How often are you getting to see an artist record
live in a booth? As long as they're okay with it. Helped out here is have a small camera and it's a quiet camera. Remember There's no
clack, Clack, Clack. It's a quiet, mirrorless digital camera. You
don't hear anything. All you maybe here
is the auto focus, and when you hear that,
I would turn it down. It only takes a few seconds to get a couple of good shots. Obviously, you can be
patient and wait for them to be in that moment
or that vibe. But I think it really got an amazing shot here just by getting in
the booth with them. Let's talk about how to shoot a concert from a
technical setting. There are two ways that I have learned to take
concert photography, and there's two ways that
you can do it as well. The first way is
manual shooting, and that's a typical of most professionals,
Is shooting manual. I think this is like a
pretty fun way to shoot. It's a good way to do it as a beginner because you
have full control. I know a lot of older, seasoned photographers
that still shoot this way because they have complete
and full control. This is not the way that
I shoot all the time, but I think this is
a very valid way of shooting and it assumes some things about what you could be doing
with your photographs. Again, you need to
have a base knowledge here because I'm going to be flying through some terms, but Manual shooting.
This requires you to one pick your F stop
that you're shooting. Typically you're
probably going to want to be shooting wide open, right? If your lens goes to a 28, you probably want
to shoot at 28. If your lens on a prime,
you're open to 14. Maybe you might want to shoot
it at 14 or two, or 28. Because you want very little in focus and
a lot out of focus. That gives us that professional
looking aesthetic. Number two, you want
to pick your ISO, very similar to
film days, right? Just locked in with the films ISO and then
you're stuck there. This is one I'm talking about, assuming most
photography these days are going to be gone
within seconds, right? A lot of people are showing
them on social media online. If you want to have this
long lasting on a print, maybe we ISO down a
little bit, right? Because we don't want to
necessarily see all that. Grain cameras today are amazing. You can shoot at a very, very high ISO and not
worry about changing it. In fact, you could
shoot, I don't know, up to like 10,000 and
you'd probably be okay showing this print
or showing a photo of this on your social
media or on your website, especially after you ran
it through a Noiser. Picking your ISO is kind
of like a fun thing nowadays to throw back to film, but also pick a high ISO, be okay with the grain. Sometimes people like it,
I think I'm okay with it, especially when it's
on a small screen. Picking a high ISO is fine. I know everyone tells you
to stay away from that, but there's a method to
this madness, right? So, let's pick a high ISO now. We've picked our F stop,
we've picked our ISO, right? Those are our, two of
our three variables. Now, because there's
lights going everywhere, there's spot lights,
it goes dark. Now is when you ride
your shutter, right? So now I can use my thumb to go up and down
on the shutter. I probably wouldn't go
below a 60th, right? Because we'll start
to get motion. But sometimes because I have this high ISO and
this open F stop, I'll need to go up
to 1,000 or 2000. I'll adjust the shutter so
that I can quickly adjust my exposure while these lights are changing quickly and fast. And that's how you kind of
ride a manual sort of setting. I'm only adjusting the shutter. If the ISO seems too
crazy, I might come down. But you never know what concert lights are
going to be like, unless you've actually
seen the show before. In which case, you'll
already have an edge up. You'll know what ISO to run, and you'll know what
shutter to run. So, that's the way you would shoot a concert
manually, right? Pick your F stop, pick your ISO, ride the shutter
priority shooting. This is actually what I
shoot for weddings and probably what I shoot mostly
for concerts as well. And that means I'm going
to let the camera pick a lot of stuff and I'm going
to set parameters, right? So I'm still going
to pick my F stop, because I like to shoot
an aperture priority. That means the camera
is going to make the F stop a priority,
or the aperture. And the camera will then pick the shutter and pick the ISO. Now, I'll let it do that,
but I will go in beforehand, and I will set the parameters for the shutter and for the ISO, depending on what
camera I'm shooting at. So, I'll tell the camera, I don't want you to pick
a shutter below one 60th. I don't want you to pick
a shutter above whatever, which is usually it can pick however high
shutter it wants. I just don't want it to
go low because that's when I'll start to
get vibration, right. Same goes for the ISO,
but maybe opposite. You can go as low
as you want ISO, but I don't want
you to pick an ISO higher than this number. That means the camera is
going to pick everything. The thing here though, is
because lights are changing, you have spotlights
coming in and out, you have fireworks. Whatever your exposures
are going to be, all over the place
from China concert, this is when you ride your
exposure compensation. This is when you're
telling the camera, I want things to be
overexposed by a stop, underexposed by a stop, whatever, however you
want to adjust it. In this sense, instead of riding the shutter on your
thumb like we did before, you're riding the
exposure compensation and the camera is acting accordingly and picking
everything else. These are two similar
ways to do it. I think the advantage of the manual shooting
is that you have a little bit more
control over everything. However, you're sacrificing that ISO to ride your shutter, unless you feel
like riding both, there's just no way you'll
have time to do both. The advantage of doing
priority shooting is that you can really not think about it other than the exposure and let the camera do
everything else. And you'll probably get
some of those really, really low ISO's when the
lights are huge and bright, and those will look a
little bit cleaner. I don't mind the
new digital grain that all of these
cameras are doing. I think it's actually fine as long as you're not going nuts, just like everything else. Practice, practice, practice, practice, practice, practice. Even if you're out and there's a concert going on in
the weekend in the park, go take photos, you
talk to the band. The more and more you take
photos of music and musicians, the better you'll get at it, the better you'll feel at framing. Like guitars shooting
through drum sets, knowing where lights
are going to be, getting the vibe of specific types of musicians
that you're taking photos of. You've heard me say it before, but I can't tell you
enough to go and practice. Even if you have
musician friends, have them play live in your
living room, take photos. See what that framing is like, feel the emotion of the music, and see if you can
translate that to a photo. You can't get close enough. This is like one of
my favorite photos I took at this concert lane. Wilson was actually opening for Luke Combs and she has
a song called Like a Truck. And it was like one
of her bigger songs. And she has it burned into the bottom of her hat,
the brim of her hat. And so I was trying to
get that shot all night. I was looking for a good
shot and I finally got one. You cannot get close enough. I employ you if you're taking photos of musicians
onstage, try to get close. The amount of emotion that
they are giving to the song is just going to come oozing out of them when you get
these close shots, which is why I think
you need to have a long lens when you're
taking concert photography. Look at these three images are as close as I could get
in those positions. And you can see, you can see how focused both of them are
in what they're doing. And like how they're singing these songs mean
the world to them and they're just
prolificating them. If you can get close and you
can capture that emotion, that emotion will come out
in your photographs tenfold. I've got some even
closer images that I got of them that I think
are even bigger and better. It's just the more you can get close to
something like this, I think the more your images
will really be impactful.
13. Advance Your Night Photography: Let's talk about night
and astrophotography. Most of my night and
astrophotography has been completely and
totally for fun, right? This is something that I do go camping a lot and I am
out in the wild a lot. And so getting to do the
night astrophotography is much more of like
a labor of love. I love doing it more so than I've ever done
it for a client. So there are a lot of
things that go into it. One being planning. So let's talk about
these five things that I want to make sure that, you know, going into this, because it is also hard and you need to plan
for stuff, right? Having a plan, having patience, not being afraid to push your
ISO shooting for the edit. When you think about
it and then there's a lot of math involved, right? Astrophotography is an
advanced, I think, skill. It's not like you can just
go out there and take photos and hope and
pray. You can get lucky. And I have been lucky, and I've seen people that
have gotten lucky. But you need to be able to do
these five things in order to take really, really
good astrophotography. Let's start with having a plan. Having a plan actually
bleeds into the next one, which is having patience. But understanding
when you're going to do astrophotography, right? Like if you want to go take
pictures of all the stars, you probably need to make
sure you're going to a place where you
can see all stars. So having a plan on where
you're going to go, right, you need to pick a spot where you know you'll be
able to see the stars. You need to pick a time of year where you know the
weather's going to be okay. We don't want to see any clouds. And you need to pick a time when there's not going to be a
big giant moon in the sky. And you can do
this by using apps on your phone. There's
a ton of apps. The app that I use is
called photo pills, but you can look up when
there's going to be a new moon. You can look up when the
sunset is going to be, when the Galactic
center will be visible. Where you are specifically, typically that's
mostly the thing you're going to
want to be shooting is probably the Milky Way. You're not going to
see those in a park. In Central Park,
right, Because there's too much light pollution
from New York City. You're not going to see
those right outside of Los Angeles because
there's too much light Even often a national park like Joshua Tree compared
to Los Angeles, it's close enough that
where the light pollution coming from LA is big. If you add a moon into that, you won't be able
to see anything knowing where
you're going to go, knowing that there's
not a lot of light pollution, knowing
the time of year, knowing the time
of the moon cycle, all these things go
into making a plan. I really think if you
want a beautiful, beautiful night photograph,
you need to make that plan. And it may take time and
it may take patience. You may need to
wait a week to go. You may need to wait a month. You may need to
wait an entire year if the weather is
gone and you want to be on the specific spot
we are on a moving planet, which means there are so
many variables that you can time out with taking photos of the stars that
are also all moving, um, in conjunction with where you are and the
time of year it is. Plan and patience will
go a very long way. Before you even think about taking out your
camera, push your ISO. I think I said this earlier,
in concert photography, these cameras can handle a lot more ISO than
you think they can. Honestly, like I
think if you push your ISO when tuking night
photos, I don't know, Sometimes you can get
away with a little bit more digital noise when
taking pictures of stars because you're looking at the really bright
spots everywhere. Denoisers these days
are also super helpful. But at the same time, you also want to be able to do
the right shutter, which we'll talk about later towards the end of this lesson. But feel free to push
your ISO, right? Don't be afraid to
shoot up to like whatever highest ISO your
specific camera can handle. Test it out again, this is going back
to patients, right? Get out there, do a bunch of different pictures with
different high level ISO's. I think you'll be
surprised at how much you'll be able to see with a higher ISO that
you're shooting. Shoot for the edit. This is something I think that it took
me a while to understand. I used to think that these astro photographers
would go out there, set up their camera and do all the math and the
settings, take a photo, and it was this beautiful, epic avatar looking universal
Star Wars, Star Trek photo. And that's just not the case. Most astrophotography
that you're googling and eying over that you may
see on social media and other places have been
heavily edited or have had at least a decent
amount of editing involved or people have
taken time to edit them. So don't be afraid to learn
how to edit your photos. And I'm so heartily
believe this that I'm going to take you through two very specific
photos that I've taken. I'm going to show
you the original. I'm going to show you
the edit that I've done that I've actually
gone and shared. Again, this photo actually is in Joshua Tree and that big giant
light in the background. Yeah, that's LA putting
off all this light. This is at like one
in the morning. You can see some streaks
from some satellites. It looks like daytime. I also push, this is a
little bit too hard. And you know what else I didn't posts that I really
don't like about this photo is that I put too
much noise in and to me. Now this photo
looks a little too soft and milky to
me and it's not. One of my favorite. In fact, it's probably my least favorite astrophotography
photo I've taken. But I wanted to
show it to you guys because people have
liked it and I get it. I understand why it's still
pretty, but as an artist, I'm bummed about it, especially when I've gone and taken other photos
at this point. This one is a little
bit more fun for me. This was also in Joshua Tree, but it was facing in a
different direction. It was also on a
much darker night. The moon was far gone
Beyond this point. I do like this photo, but again, I held myself back with my ISO and you can see how many stars their heart.
It's pretty crazy. But I remember being
out there and being so cold because it was
during the winter. Couldn't and didn't want to take any more effort to make
this a better photo. That's my lacking in patience. I wasn't patient enough to wait later in the night for
there to be less light. The Milky Way looks
a little hazy because there's still
smog coming from LA. You can see a streak of a satellite. And
this photo is great. Again, I've shown this
people, people love it. It was fun taking a photo of it, but I'm not over the moon about it as I am about
these other photos. This photo I am over the mot about and I've been trying to get this
photo for years. I go to the same rancher every year as you've seen
in other photos. I finally waited till
two in the morning. I got up at two in the
morning to take this photo, and I knew the Milky Way would
be over that barn there. But look on the left,
That's my original photo. It's cool, but it
doesn't look epic. You've seen all these
other epic photos. The edit on the right
may look a little over process to your eye or to
someone, but I love it. I think it looks
great Understanding that you can take this original
photo on the left and you can push it into
these nice colors and contrasts and you can pull out those clouds
in the Milky Way. Just, I think just so epic, you are capable of doing this. And this is from a small
little fixed point and shoot camera with not the highest ISO. There's still some
noise in there, but it plays fine
especially with the sky. And I've printed this photo
and it looks amazing. Here's the original, right, a little muddy, a little
out of focus on the bottom. The stars are there. It's a
little gray, but not a ton. I don't know if you
notice a little outhouse on the bottom left. But look, I took that out too. See the processing here, I was able to bring up all
the colors in the milky way. I softened it a little bit to get rid of the
noise a little bit. I brought up the shadows
would cause more noise. I added a gradient filter to bring out the saturation
in the colors. And I think it just looks more epic and more what I was trying to do as a photographer.
Same for this one, right? This is a little bit even more dramatic. Here's the original. There's a little streaky
satellite in the bottom left. There's a small light
hitting the wagons. You can tell what it is, the Milky Ways in
the way background. And then bam, we isolated, I isolated, impost the sky. The Milky Way brought
up the colors, brought up the saturation, brought up the shadows, raised the highlights
in the bottom, so we can see the wagon
in the bottom left. But again, right, I shot
that and I was okay with it because I knew that this is what I was going to be doing. And that's what I mean.
Shoot for the edit, right. Be okay under exposing it
a little bit because you can mess with it a
lot more in post. I'm so excited to talk
to you about this. I feel like when I
was a kid I was like, I'm never going to use math
in my job And this is like a very specific time when
you need very basic math. And photography does involve
a lot of math already. But for some reason this rule is something that I'm so excited about because I feel like it, it connects me as
a human to like earth and the rotation
and science and art. I don't know. It's
called the rule of 500. And what the rule of 500 is, is it allows you to use this very simple
division equation of 500 to figure out how long your shutter can be
on your camera before you start to see the
streaks of the stars. Now going back to our
basic photography, remember the shutter is open for a long time and
allows light to come in. Because we're on the Earth
and we're moving the stars, these points of
light are moving. So we don't want to have the
shutter open long enough so that we see the streak
of the star moving, right. We want the stars to be sharp. Now, the reason we do this, the reason we need
to use this math, is because of, I'm
going to do this wrong. The shape of the Earth and the shape of our
optics in our lenses. If we're using a wide lens, like a 18, 12
millimeter fish eye, it's going to take
longer, right? For a start across
that wide lens, right? Versus using like a
50 mill millimeter or an 85 millimeter. Because of the way
the optics are, it's going to pass by shorter. We'll see the streak sooner or later in order to deflect that. There's been this
math equation that works across and it
works pretty well. That is, you take the
number 500 and you divide the number of the lens of the focal link
that you're using. The answer will give you amount of time you
can have the shutter open before you start to see the streaks of the stars.
Let's take an example. Let's say we have a
20 millimeter lens. Then our equation would be
500/20 which gives us 25. That means that our
max shutter length is 25 seconds that we can have it open before we'll start seeing star trails. Right? I think that's just so
wild because here we have these optics that no matter
what length they are, this will work by just
dividing from this one number. Now this is full frame,
standard millimeters, right? That 20 millimeter
on a full frame is actually probably more like the 12 meter on a crop sensor. You have to remember to
do that math as well. Like remember we talked about
earlier doing head shots. 85 millimeter on a
full frame camera, we'd be closer to a 56
millimeter on a crop sensor. Which means remember to
do the math right at the full frame focal length, not the crop sensor
focal length. This is huge, right? We don't
want to see those streaks. We want to see
sharp, sharp stars. Keep this equation in mind
and make sure you lock that in so you're not
going over 25 seconds when you're soot in
a 20 millimeter.
14. Conclusion: Thanks for taking this course. It was great telling you about all my advanced techniques. I know it's lecture based, but we kind of split this up into sections so that
you can always go back and look at what you're trying to take
photos of specifically. Again, we didn't go
into like a ton of technical aspects of everything. If you want to get more technical information
and you're interested, we have a ton more classes that we offer through
my buddy Phil and Sam. We have the big master
photography class and then we have other
specific classes. The biggest one
that I also have is the wedding photography class of course, so check those out. Don't forget to check out our photo and friends community. It's always better when you're
learning with friends and get out there and practice
and make sure to have fun.
 Phil Ebiner, Video | Photo | Design