Transcripts
1. Introduction: Hello, and welcome
to a detailed step by step blender
landscape tutorial. In this almost five
hour long tutorial, divided into 16 parts, we will go through the entire process of creating this scene. The tutorial is also
intended for beginners, so we will start with
the blender layout. After that, we will
do sen blocking so we can choose the right camera and make the process easier later. I will show you how to work with large scale scenes
in blender so that everything is in real
world dimensions and at the same time,
easy to work with. We will cover the hells with low pol trees using
the low poltrees, geometry nodes, scutter that I created for scenes like this. After the low poly trees, we will focus on
the trees closer to the camera using the
smart trees as tech. I will share both
products as well as other resources and links used
in the tutorial with you. After the risk, we
will create the snow. The whole part with the snow is divided into three
chapters and list 1 hour and 10 minutes in which I explain in detail where
to find who shaders, how to mix shaders, how to create real mesh
with a displacement map, how to use the photoscan element to get more details and more. Also, we will mention a few free addons
that may be useful. We will talk about lighting, volumetric effects, and more. The entire scene will be
completely created in blender, including compositing, which is the last part of the
tutorial least 1 hour. In the compositor, we will
significantly transform the final result and
try out many options. The final blender file is
also available for download.
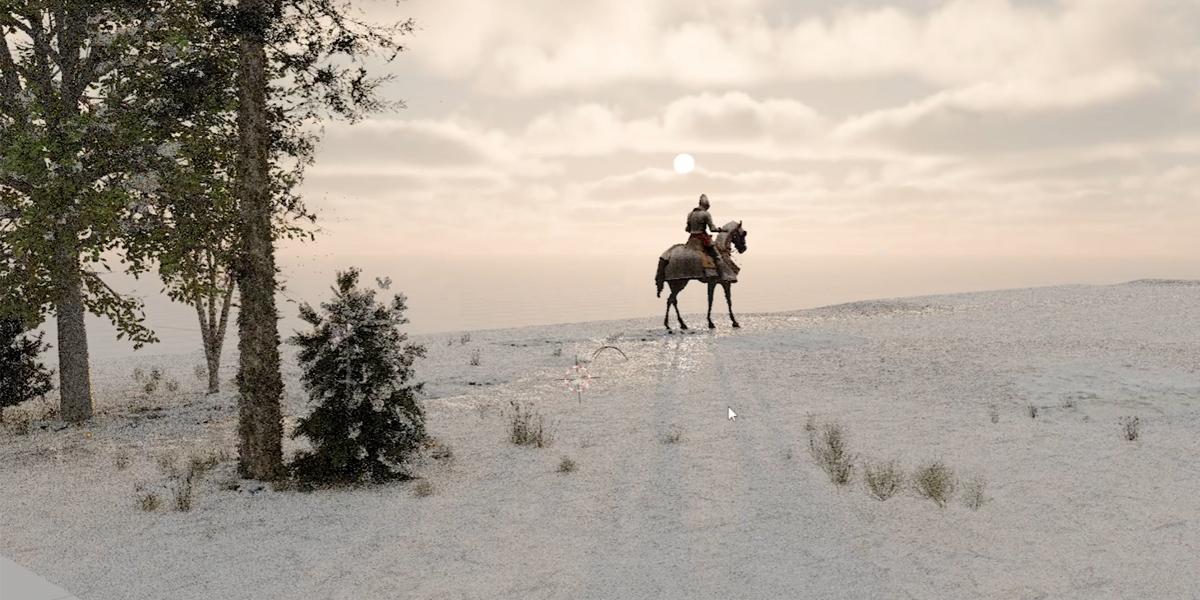
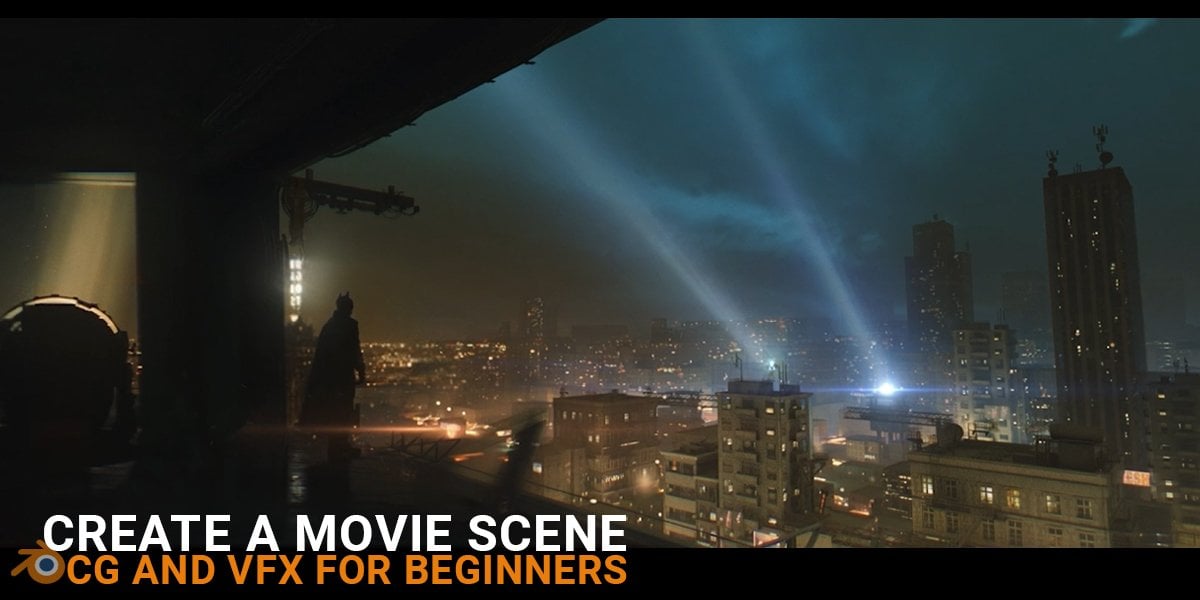
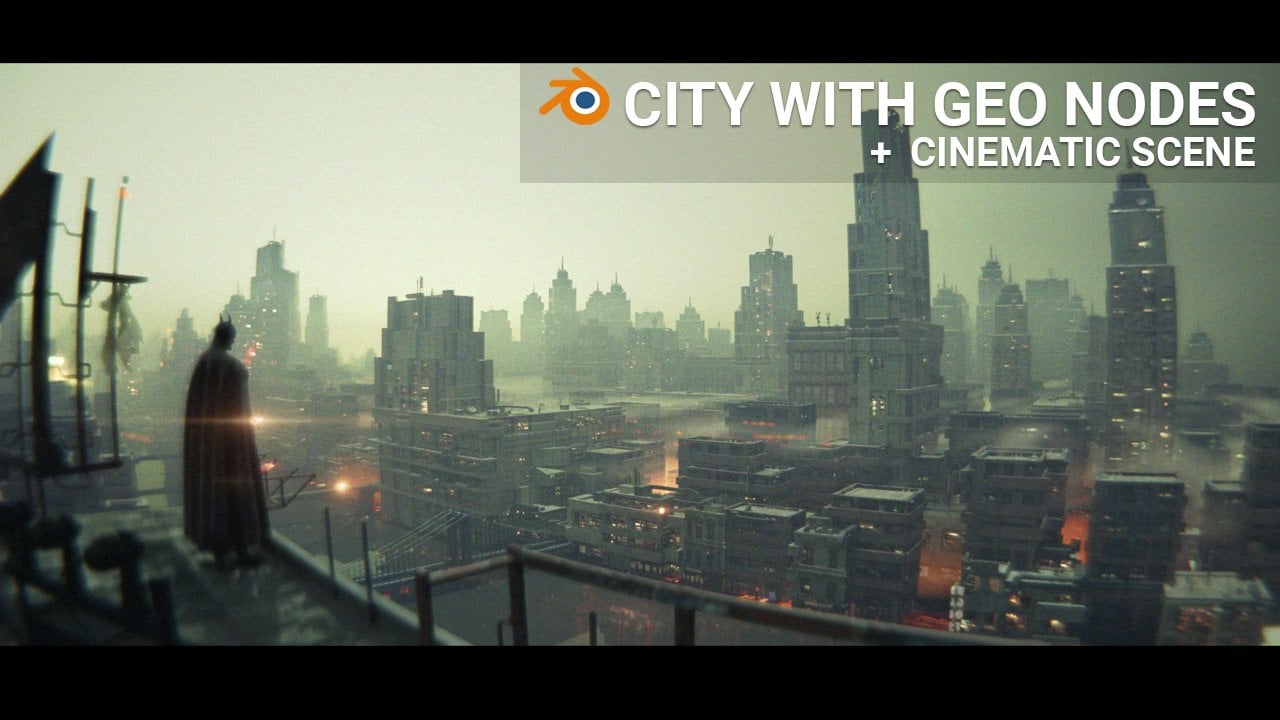
2. What will we do: Hello, and welcome to
new Blender tutorial. So this will be step by step
blender tutorial in which we will recreate this artwork
from start to finish. If you follow my channel, you know that I do
some post processing in after effects for this work. But because after
effects is not free, and this is blender tutorial, this tutorial, we will do all compositing and post
processing in Blender. I also try recreate this again yesterday to remember all steps and to be easier to
record this tutorial, and this is what
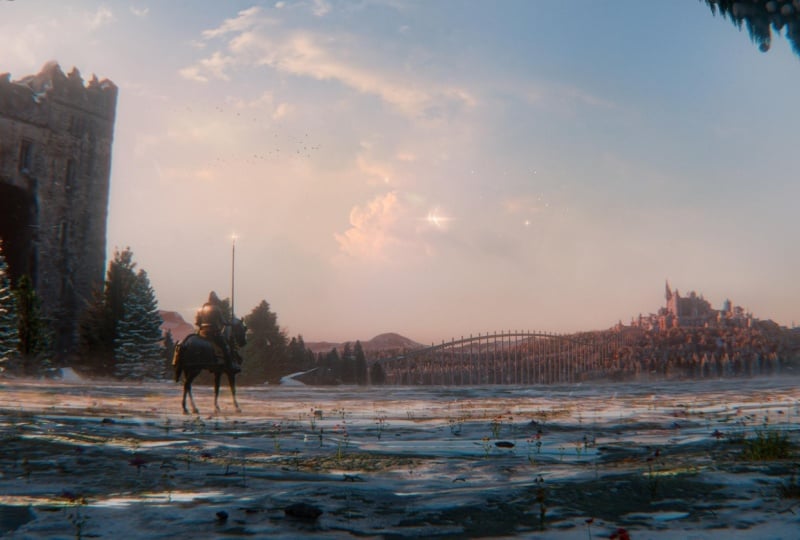
I get yesterday. But if you go to composite tab, you can also see that I do all post processing in Blender. So this is render result, and this is if I go to er
Nodes not completely done, but you can see that
in this tutorial, we will completely transform this render result to
something like this. So this is how this look
in Broder compositor. You can see that
we have a lot of things happen here
from color grading to masking and adding
some overlays. So here I add this image on top of this
render to get better sky. I also add here a
little warm color and glow to this castle. So we add another mask here. And we also add some
overlays from Internet. This is a grain overlay. I also create one texture inside the blender and
then we have a lot of again, color grading tools. I think it is not point in comparing these two renders,
which one is better? Because if you
just slightly move any of these points or tools, you can see how this
drastically affect our render. I think it is point in learning how to use
these tools so you can later play with all these values and these values until you
get the result you like. At the end, we also add some snow overlay so you
can see how this look. And if we just move
some of these sliders, we can add more snow Okay, I add another snow over here
and you can see that you can drastically affect your render with
Imblnder compositor. So this will be at the
end of this tutorial, and we can now
start building our C. And this thing here
is maybe most important. So I add this guy. So if we move, you can see that we basically
move this image. We will download
from unsplash.com. This is before,
and this is after. And here is how our thing
look in three d space. One thing which is important, you will also get this
low poly tree scatter and this smart tree. So you can create a high detached tree
with this smart tree. And you can add as
many details you want to your tree so you
can shape the tree. So let's add some maybe ivy.
You can see how this look. Or we can add some more twigs here with just these sliders. And this part is not visible, so I leave this empty, but you can also add
some leaves here. But we will talk about all
this later in tutorial. And this is how these
low poli trees look. We can also control
this very easy. If we go to render preview, we can scatter millions of
these low police trees. You can choose a lot of types. So this is, for
example, snow category, we get a lot of these trees
covered with snow and all this is very fast and low but look good from distance. Just one final note, if you like more this result, you will also go through my after effects file to
see what I do last time. So if you use after effects
or DaVinci Resolve, we will also go through all these layers so you can maybe learn
something new from here.
3. Layout and workspaces in blender: Have a lot of things to do
here and we can now start. First, my recommendation
is to create folder where you want to
save all these files. I already create inside my project folder
landscape tutorial folder. So I will just copy this and let's now
start with blender. I can go with right click
and this is Blender 4.3. Now I will first save this file. So file save, and I will paste
this folder here and let's now call this
landscape tutorial. First, we need shape our
workspace or layout here. What I usually do, I like
to split this window, and on left I go with Nape zero to go to camera
view or you can go with. Viewport and camera. But because this
surrender is horizontal, we lose a lot of
space here and here. And in this case, I will
go with right click here and join right
and I will open. So we already have this
timeline here we don't need, so we can just move this up, and I will just when you see this cross here,
I will just move on right. And we have here nice
horizontal space, so we can place our camera here. So I will go again
to three view port, and I will press
number zero here. And now we can use this space. We have here, for example, for shader or UVEditor or
what we need, for example, for Asset browser and we can work here and we can look
what we have here on left. Let's now shape this
part here a little more. So we have this
transparent part here, but I want focus only what
we have inside camera, so we can go to camera settings. But before I do this, I want set resolution, and I will first set these two cycles
because we will use cycles, GPU and let's set this
maybe 50 and this here also to 50 to speed up
viewport maybe even less. And now I will set resolution. So I will keep this value here and I will set this to 800. And I copy this aspect ratio
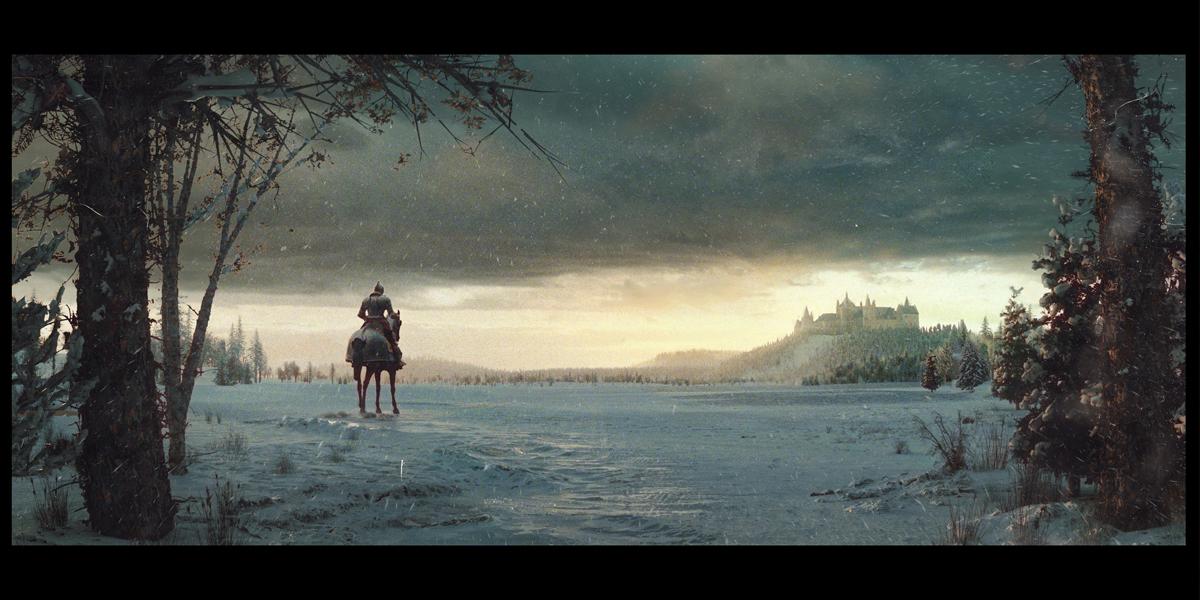
from this artwork here. So this is my inspiration. If you watch my YouTube video, you can know that I mentioned
this render inspiration. So I start from this
point because we have these trees closer to camera and a lot of
trees in background. And because I want to
promote and share my assets, which I create
before this render, I decide to recreate this
render, this composition. So I use trees closer to
camera and on ground. And with this tutorial, I also can share all
these assets with you. But this is not important. For now, I copy this like cinematic aspect ratio
from this render here, and that's how I get
these values here. But you can always change this
aspect ratio if you want, and this is what we
will go for now. We don't need this overlay, so you can maybe hide these overlays with
this clicking here, and we can also hide this
Gizmo and these tools. By clicking here and here we need to switch
to render preview. So here will be render preview. And if you don't see
these icons here, you can with middle
mouse button, just click and this here. Okay, so now we have
much more clean space. But I think you will
see this part here. So you can I think
press T for toolbar. So if you press
on your keyboard, T, you will hind this menu. And if you, for example,
see this menu here, you can press to
find this menu here. Okay, so now we have a very
clean word space here. I think you will see
even more of this. So you can just go with right
click, maybe here, okay. And you will see
these settings here, and this is not so important, but you can also just know
that you can also click here, right click and hide
all these menus. We need this menu
on top so you can, for example, hide this
show two settings. And you can also hide
this header here and you can make this
with clicking here. Okay. And now I want
to make this part. So if you click here, you can see that we can
see some parts here, which is little destructive, so we can always go
under camera settings, and we can go down Por display. And we can just move
this to right to hind this part or make
this completely black. And now we have
very clean preview of what we are
doing here online. So if this is small preview you want maybe bigger preview, you can go with control space, and you can make this full
window control Ospace again, to back to our s. I will now try install screencast keys so
you can see what I'm typing. So I will try go to
edit preferences, and I think we need first get
extension to install d on. So screencast keys. So I will try now install this and let's now
try activate this. Okay. And if I now press N, it should be
somewhere here. Okay. Okay, let's see if
something happened. Yes. Okay. So let's font size, just make this bigger. Okay, so now you can see
what I'm typing here. And you know also how
to activate this addon. So all this is
inside blender you just need to go install
this from extensions. Okay, so I will hide
this tab here with N.
4. Camera settings: Now I will play with
camera settings. The first thing
here, I like to do. I like to move with this Gizmotur you can
just press G to grab camera and X. I will go with Numpet seven to top orthographic view
and you can go with. Viewport and top. For example, if you are here, you can
go with viewport and top, but shortcut is numb at seven, and we can now move
this on this YXs. And now I will press N
and I will now back. So if you see
something like this, you just need with middle
mouse button, scroll to item. First, I want to
line up this camera and I will type here, zero. But this X axis should
be to about 90 degrees. Now in this point, I will okay, so this camera is in the age, so I will go here
with maybe 1 meter. So now we can see this cube. But last time I go with 0.6, so I want also go
closer to ground. But let's first create ground. I will go with Shift A. Plane. So we can now get better perspective
with this ground. And let's make this
big maybe 100 meters. I don't want this
part behind camera, so I will move to about here. So we can now see
our ground here. And if you go to our
reference image, you can see that this camera
is pretty close to ground. So this is not even 1 meter. We are almost maybe
half meter from ground. And I also want to
get this perspective. And if you look my render, you can also know that I'm
pretty close to ground. And the last time
I type here 0.6, so 0.6 meter from ground. And you can see on
left what we do. So 0.6 here. And next thing we can learn
from this render here is that mostly when
you do landscape, renders you want
white angle camera. You can see that this guy who create this
render catch a lot of this landscape so we need
very low focal length, for example, this focal
length is practically Zoom. So if you go with this value up, you zoom this object here, but to catch more area, we need to go to left and I will go with value of 25 here to catch more
this landscape here. You can go even with
lower value here, but I think this
will be too much. So this object here or this main character will
be if you go to left, it will be like distorted. I will go with very
low focal length here but not too crazy,
about 5 millimeters. And now we have this
camera setting. So this is perspective,
which is default. But for landscape or panorama, we have this panoramic
camera here. So you can know that when
we change this camera, we also get default length here, so we need the two s five. Explain better difference
between this camera, I think we need to
create fake tree. So we can see all
the distortion and difference between camera only if I have some
elements in scene. So I will go with
shift and right click, you can place your
origin where you want, so shift right click, and I will just go with Shift A. So Shift A to create fake tree. So I will go with cylinder
and I will type here 0.3. So if you just click
and drag this down, you can change both values, maybe 0.3 and maybe
5 meters here. So we have three we
will replace later. And I will go with Shift D X, and I will place one on right. Again, in this render, I know that this tree is
very close to the camera. So I will just move this will shift select both of these trees and I will move
this close to the camera. Mm hm. We get similar
perspective in this render. Let's now create our
main character here. So for this just create
cube about here, and I will go with mesh Shift A, mesh cube and maybe on X axis. I will try create similar shape, like similar dimensions like this horseman maybe one, two, and maybe on Z axis little more, maybe 2.5, and let's
just place this here. Air Z maybe rotate
this a little. If you want to get similar
or same perspective, like in my last render, you can just quickly
see where I place this. I just want see distance. So about 15 meters and here
we have about 4 meters. So we can now go
with P seven and we can go with Shift A in middle
and we can just type here. Maybe 14 meters from camera
and OX is about 4 meters. I want to place this horseman
in about this corner here. This is not so important, but I want to get similar composition like
in my last Brander. One tool, you can also use for measuring in Brander
is this measure tool. If you use this,
you want to go with Numb seven and maybe
we can now just click and press Y
to stick on Y axis. We have about 15 meters here and now I want press six
and about 4 meters here. One thing you can also use for measuring is these
increments here. If we go here to remote, you can see that
this is 1 meter. So this part here is 1 meter, so we have one, two,
three, 4 meters. You know that this
is 4 meters and we have 15 of this here. And this tool I use
here is annotation, so you can use this for
drabing in your scene, but this is not
visible in render. And to delete this,
you can press N, and I think under view, you get this tab, and now
you can just remove this. So if you want to just drop
something in your scene, you can just quickly delete
this or remove this here. And when we have now
these elements in scene, we can now clearly
see difference between perspective camera, which will completely line up with our camera and with panoramic where we
get all the distortion. But we also catch more
of this panorama here. So you can see in this case, we see completely this
tree and with panorama, we get this and in this render, I'm a little confused. So I think this is also
something like panoramic camera, but this tree is not
distorted too much, but I think this can be done
post processing program. So I think this guy maybe
use something like this. Maybe he use panoramic
camera and later in post just disort this and
line up these trees. In my case, I think panoramic camera is
better choice for this. We also have one option here, which is called fishy lens, polynomial, and this is something like we can shape
any of this corner of camera. So if you want, you can play with these values here and you can also get
similar results. So you have more control
with this in Blender, if you press Shift, you
can move this slightly. You can be more precise. But I don't want complicated
too much with this, so I will go with
regular fishy camera. One thing which is
also important here, you can see that when
we select this object, we need to enable this overlays. When we select this object, we have small offset between this object and this
selection here. In Viewport this don't use
panoramic disuse perspective. So if we select
this object here, it will select in perspective, even if we use panoramic camera and we
get this small offset. Offset is small because
we change this to 25. But a lot of people
don't change this value. For example, this will
be by default, 50, and you open Blender and
you just skip to panoramic. And then you try
select this object, and you don't know why you
cannot select this object. True is that you can
select this object, but this object is not
here. It is about here. When you use panoramic camera, you need also in perspective, make these two, same
value as in panoramic. Okay, so now it is okay, let's now get to panoramic. Now, it is not perfect, but it is much easier
to select objects here. Closer to camera, we
have bigger offset. So this tree is not
here, it is here. And that's because
viewport preview is not the same like
render preview, but we get pretty close
with changing these values.
5. Sky texture and viewport navigation: And before we start adding
hills in background, I just want change lighting. So now, this point lamp is
only light source here. So if I delete this, we
still can see something, but that's because
in world setting, this color is not
completely black. It is a little gray, but later we will change lighting with
maybe DRI or something. But for now, just
for quick preview, we have inside
blender kitecture. So this is HDRI, but build inside blender. We don't need any external file. We can now just click here and choose tecture here and
we get better lighting. By default, I think
this is too much, so we can change here this 2.1. I will present to
close this tab. You can also. We are here
inside the shader editor. So this object is when
we select any object, we can change shader here, but this is not
object. This is world. So we need to change the world. And you can also here. You can see that everything
we have here is also here, but this is extended version. We also get a lot of we can also play with a
lot of nodes here. So I will type here one. And this is not
important for now, but you can also play with
all these values here. So this is elevation. So it goes from
sunset to sunrise. This is also intensity. You can also add
more a dust also. And also some rotation. So with this, we
change shadows here. Okay, but we will
change all this later, and this is now just for little better
preview than before. And because I start talking
about this sky texture, just to know that you have also another two types
of sky texture here, but this is not so important
for this tutorial. But you can also play
with these settings here, and I will now back
to this sheet. Now we have horsemen. We have trees close to camera, and next is these
hills in background. And one thing which
is important here, we need to be about
real world scale. So we need to estimate
where these hills are, and I think it is maybe 1
kilometer from our horsemen. So I will try in
real world scale, and I will now
back to our scene. And I will go with
Shift A and cube. We can use this for measure, and now I will press N, and I will type here on Yaxs. So we have here Yaxs. I will type here thousand
for about 1 kilometer. We can also type here maybe
200 to see this better and I want place our heels here. So we can maybe just make or
we can just go with Shift click to put cursor here and I don't need
to delete this object. So now we need to estimate
how big this hell is. And for this, I can
just quickly go. And I can see that last time I make this big about
two kilometer on X axis on YAxis and about
200 meters on Z axis. I will type here. 2000 and here, we have
about 1,000 and we can now. But you will get this problem. This problem is
clipping problem. So you can see that
if we now go to view. So this here is viewport. If we now go to
view, you can see that clip end is set by
default to 1,000 meters. And we need to increase this. I will add two zeros here. So I don't care
later about this. And now we can see bigger
perspective in our viewport. Maybe you think that you
don't see this because this is completely on ground
like this. And this is true. But if, for example,
rotate this, if I go with RX, you still don't see
this plane because this viewport clipping is not the same like
camera clipping. So we need to select camera. Our camera is here and now
this is very complicated to select because we now work
in a big scale viewport. But you can always click here. Okay, I need this overlay and you can click here and you can see that
you select camera. And now I will set this
clip and also too. I will also add two zeros here. And we finally can
see our hell here. When we work with
this very big scale, it is very complicated
to select camera. So you need to be very precise
to select this camera. And when you zoom,
you get this problem, you always zoom in
middle of the two space. And you can move with this tool, but this is not practical. We can go close to camera
and next time when we zoom, we miss this camera. There is one option in Blender which is very useful
for these things. So we need, again,
press N under view, we have one option here, which is view lock. So we want if you want, you can use this lo to object, but I want use this
option lo to read cursor. I will now click here and
you can immediately note this zoom to this cursor
and now for example, if you want like this camera, we just need to go with
shift right click. And we now place this
cursor here and we can now easy Zoom to this camera. So if you want to be even more precise, you
can play this here. So if, for example, want to play with this here, we can just go with shift
click, Zoom to here. And if you now want
back to our camera, just shift click and now we
can easy zoom to this object. And if you want, for
example, select horseman, we can just shift
click, Zoom to here. And this is very
useful when you work with large scale Ciblnder.
6. Creating hills: Press and let's now go to item
and line up this to zero. We now need the shape, this hell here and you can
see how this look render. So we get something like hell
here I will scale to one. So I can go with Ship
A and apply scale. And because this is
two by one ratio, and I want to add a lot of subdivision here
to get more mesh. We can work I will
now go to Edit mode. So you can go from object
mode to Edit mode or you can just press tap on your keyboard
and you go to Edit Mode, and I will go with Control
R. With Control R, you add one loop cut, and I want to add this in middle to get perfect
squares here. It is important to keep these squares because
when we add subdivision, we don't want
stretch parts here. For example, if I
go with Control Z, and if I now add subdivisions, you can see that we
always get this stretch. We get double length on
X axis and on Y axis. And to prevent this, we just need to add
one loop cut here and now we can get
perfect squares here. Okay, now I will add maybe
four or five subdivision here. For this, I need to edit mode, so you can press them to
get back to edit mode. Let's now maybe place
these two about here, and we can now start
shaping our here. For this, we need
back to edit mode, and we enable one tool, which is proportional editing, you can enable this with O. Also to enable this
proportional editing and with clicking here, you have different brush types. So we can keep the fourth one, and now we can maybe select few. I think I will switch now to phase selection to
see this better. And now, if you press select
some of these objects, we can now press G
and move this up. But you can see that
this is pretty sharp. That's because our
brush is small. After pressing G, we can
scroll mouse up or down, down to make this brush bigger and up to make
this brush smaller. Now we can start
shaping our heel here. Okay, I think I select
too much area here, and I will select
maybe this part. Okay, let's add just small hills here to see perspective
of this plane here. And I will now make
this bigger hill here. Let's look our reference image. So I want to make
bigger hill here. And if you want, this depend on your computer
and your system, but I think I will add
one subdivision more, so I will get just more
details to work with. But if you want to
keep this low poly, you can you don't even need to do this because you
have enough information, especially if you go with shift with right click
and Shade Smooth. Okay, we have now in
new blender version, this shade out of smooth. And I think now this is like modifier so you
can change this angle. So everything which is bigger than this
angle will be smooth. We can now continue playing
with this kill here. Okay, I think if you
select bigger area here, If I go with S to scale
this and Z for Z axis, I can smooth this. This brush size also affect
this so we can make this smaller than maybe a Z to
smooth this part here. I want to make a
little flat zone where I can place
our castle later. And we can always go to
camera to see what we select. You can see this
empty space here. That's because let's go
with shift like here. This plane is a
little too small, only 100 by 100, but you can also move
this little down. So I will press G Z to
move this little down. Okay, now we fill this gap here. One thing I forget
to mention here, we can also import our
reference because this is similar aspect ratio
like our reference image, you know, for this
option, you can import this image background and
compare with your renders. So this is if you want get
similar perspective in render, copy or image you copy, you can just go here and we have here option for
background image, and we can add this image. So you can skip this part,
but I will show you. I have this reference here and now I think if
we said this in front and we can
now make comparison between these two render and I now see that I forget
to do one thing. So because in this
render, camera is, like, closer to ground, you usually want like
look little in sky. And I forget to do this before. So we can now fix this and this render help me to
see this problem. So if I now move this right, I can see where this render is. So we can drop this here. And if I now back to our render, we can see our
render where it is. Okay, so we can now fix this. I will select our
camera and I will press N. And we can now just
change rotation on X axis. So I will zoom to our
camera so you can see this. So if I now change this, we look down and up
and last time I go with value so by default was 90 and I go
with value of 96. And now you can see that this match completely
our reference image. Not completely, but it's pretty it's much
closer than before. So this annotation here are
stick in three D space. So this is not good, and
I want to remove this, so I will press and
view and annotation, and I will delete this. And we can also move
these trees on place. So in this render, we can see where this tree
connect with the ground, and I also want to make
this visible in my render. Okay, let's now
add another hill. So you can note this
hill in background, which is further from
camera than this hill here and also something
similar here. So let's just copy, duplicate this
object, Shield D Y, and let's move this
further from camera. And let's now go with
Edit mode again and Okay, I will try and subdivide this. Okay. So I don't need too
much detail from background. So I delete some of this mesh, and I can now play
with this hell here. You want make this brush bigger, something like this, and you get smoother mesh when
you make this bigger. But we will cover
all these hills later with low poli trees. And I can make this bigger, so I can place this
press S to scale this to make this bigger and we have some
hills in background. And if you want to make these
hills bigger on the axis, you can press SZ to
stretch this on the axis. And to fill this gap here, I want to move this down. So G, Z move this slightly down. And if this is not so visible, you can always go with SZ. If you do this in edit mode, if you press A to
select Tl and as Z, you can also flatten this. So as SZ zero, it make flat plane again.
7. Importing models from the internet: Have first layer of
s, second layer. And in this render, we also have third
layer of hells, which is not so
visible here because I destroy this in
post processing. But in this test render, you can see the nice hells. For this, I didn't use proportional editing because
I found this for free, the els on ambiencg.com. We can do say now. I think I click here to three D and you can click
here or you can find this here and you can download
this nice three model. And you can download any
of these resolutions, I will check now,
but I download. I download four K, but for this case where
this is background, my suggestion is maybe two k. So you can just click
here to download OBJ. So you need download
the maps here. So this is height
and additional maps. I'm not sure what is here, but this is how this look when
I download this last time. So you will get this OBJ
file and the texture. So I have here color
details and snowfall. And what I do last time I create new Brander file which is here. But let's do this from scratch. So I will open new Brander file. And the file save. I will navigate to this, and I will just create
the second version of this lender file. And now we can just
delete all this with A, selectl and now I will
load this OBJ file. I think we can just
bring this here. Okay. And it will appear. And we have same problem, so we need Chris
clipping to see this. And this look bad, so I will scale this on Zaxs as Z let's do something like this. And let's now check
mesh density. So for this, what we need, this is too intense. And I will go with
tab to edit mode A and mesh cleanup that's
my geometry, maybe 0.1. Then this can take
some time to process, but this is too much still. So I will go 0.03. Okay. And we can go also with maybe F three and
merge by distance. So this is a little different
than that's me geometry. It will merge any vertices
that are closer to this between this volume. So this is maybe
this is maybe $0.01. I think this is 1 centimeter, we can increase this value. We work with large scale object, so that's the reason why we need to increase
this value a lot. Okay. When we increase
these two 50 meters, we get we delete 4,000 vertices. I will keep this for now and let's scale
this on the axis. And now we can add
shader to this. Okay. So I will switch
to material preview. And we can go to Shader Editor. We can create new material. Okay, now I will just bring these two
materials inside blend. So this is color map and
now this should work. This map here we can use for displacement or maybe roughness. I'm not sure. Usually
we get a name with map, but this is just call details. But let's see how this look, and I will go for
roughness with color. And the white value will be pretty rough and black
value will be more shiny. And I think because
here is snow, I think this can go
in roughness value. So this part here will be a little more shiny
than this part up. And if you want add more like
glossy part to the snow, you can just move this value
but this have no sense. So let's use this
for this place. So I will go with displacement and usually you need
say this to non color. But because this go
from color ramp, which is black and white, this is still non color. So we can raise this to height and these
two displacement. And we can always go to preview
to see before and after. So if I press M to mute this you can see before
and you can see here after. Or we can load some
HDRI to see difference. But I think this displacement
is good but to intense. So maybe 0.1 and maybe here
0.1 or down maybe 0.05. And we can also
use this for bomb. Same up, so maybe to
height and this to normal. So this is maybe too much
low poly. For my opinion. I will delete this
new blender file because I have
this blender file. And the reason I save this in another blender file is because next time when
I need these assets, I can reuse this blender file. But you can also import this
inside this blender file, but this is not
my recommendation because maybe you will
need this for next time. So I have this asset
folder and every time I download something I say in this folder and I can
use this next time. And I will show you
correct way to import this new blender
file, in my opinion. So if we go to Edit mode, then here under statistics, we can see that this here
like 50,000 vertices, which is not like small value. And I don't want to import all these vertices
inside our blender file. I just want this mountain
to appear in our scene. If you can skip this part, but if you go with copy object and paste this in our scene, you have full object here, but our scene is now a little slower because we import
a lot of vertices here, 50,000, so you can see this
all these values here down. If you don't see this, I'm
not sure which is shortcut, but I think I just
move this down. No, I figure out
you just need right click and sin statistic. What I talked before, we just import a lot of
vertices in our scene, which is not necessary
because we just need object we will not edit
or do anything with this. I will just appear in our scene. So I will delete this and I will now copy address
of this folder. And I want to import
this object as link. That means that this
object will still be only stored in
this blender file, but in our scene will
be just visible. So it will just appear here, but all data from this object will be still
stored in this blender file. We will not duplicate this
to another blender file. We can do this easy if
you go with file Link, so if you go with Append, you will append
this blender file inside this new blender file, but we just want link this. Link place this address here and select
this blender file. Now Blender asks us what
we want append or Link. You can choose materials
so you can see that we have three
materials we use. For this, you can
import only mesh. For example, light,
so we have sun in this scene so we can
paint the sun link. And what we want to paint, we want a paint object. Okay, so we have two objects, and this is Sun,
so we need a pen. I again to append
but we want link. And you can see this
icon link icon here. That means that this
object is link. But now you will get another problem because this is link. You can see that this
moveTol don't work, so we have move tool
for everything, but not for this object. So move tool don't work. If we go to Edit
mode, don't work. If you press G to
move, don't work. So nothing work with this
object because this object here copy everything from this main blender
file, even location. So if you press SN, you
can see location is zero, and here is also location zero. And if we move this blender
file, for example, here, and I will do this for now, just to show you.
Let's say this. And if you now save this
and revert or reload, you can see that this also move. So we can control this object
only from this object here. But this is not
completely correct. We can still control this
blender file object from this blender file
because we have one tool which is called
Library override. So if I go with right
click and select here Library override and
make selected the content, you can see that we
get this move tool, so we can now control this object inside
this blender file. And you can see what this does. So we have here
these blue values. So if we move this
if, for example, rotate this, we change rotation and you can see this blue value. So these blue values
are overt data. So still in this blender file
are all data such as mesh, textures, UV maps,
and everything. But Blender give us option to overwrite some
data such as location, rotation and you can also, I think, change modifiers
if you have modifiers. So we can do a lot
of things with this. But for this example, we just need transform data. We can just maybe
you can scale this and we can just move this
inside this blender file. Let's now turn
this lender review and we can place
this in position. You can now use G and Z. Okay. And I place this
more in distance. So we have layers of kills. And this is now not so visible. It looks like everything is same distance because we don't
have any volumetric here. I will close this terrane
Blender file just one thing. If you want even more, make this useful for next time, you can also add this as mark as asset and
then you just need like copy this address and go to edit preferences and
add this new library here. But I will not do this for now, so I will just click here save.
8. Volumetrics: Now on volumetric to see to
fill depth in this scene. But I will now make first render so we can compare
before and after. So what I like to do with
F Lleven you can open this render or image
this is image editor. And we are now in slot one, so this is by default if
you don't change this, and we can now press Ftelve but I will first
check render settings. 50 samples is okay for test, and I will now press Ftwel. Okay, and this is very fast because we don't
have any volumetric. We have very simple lighting. This take only 3 seconds. This is my system. And I have 64 gigabytes of rams. Now what I will do, I
will switch these to slot two because we will now add volumetrics and we can
compare this later. And this is very simple. So we just need to
add one cube here and I will type here
maybe 5,000 meters. I just want to cover most
of this and maybe here 200. I just want cover wholes. I'm not sure if I want cover this part,
we will see later. Let's increase this
maybe to 500 on Z axis. And now I need apply scale, Control A, and apply scale. And now this is just cube and I don't want this
visible in viewport, so I will go here under
object properties, viewport display, and I
will say this two bounds. So we can just see
this bounds here. Okay, and just be sure
to bring this down. So numpad one is for
front orthographic view. And now we can switch
to object because this is object and we can
create new material, and I will call this volumetric. And I will also rename this
cube to volumetric cube. So just double click and you can change. You
can rename this. And let's now delete
this principle, BSDF and I will go with I think I will go
with volume scatter. And I will plug this to volume. And in new version, you have a few of these options. One of these is for water, and one of this is, I'm not sure maybe for
smoke or something, but I think we need to
keep this first option. If you now bring
this value down, you will start see something, but this is still too dense. So if you go with 0.01, we start see something
but not too much because we have now too much
mist or fog in our scene. So we need I think last
time I go with 0.002. No, 0.00, zero, two,
three, zero and two. And this anaotropy is like it will add more glow
around light source. We can make another test later. So I will now press F 11
to open image editor, slot two and F 12 to render. So still 3 seconds before we have Maybe just
half second here. Let's now do another test
so you can play with this sotropy let's
see how this book. Now you can go with J. If you go with J
on your keyboard, you can switch run
between these slots. This is before and up. But this also depend on let's
bring this later on left. This depends on lighting, so we can go to world and we can change maybe
some rotation here. Depends where is some direction. But I think I want some
direction behind this. So here will be
castle and I want, put focus on this castle. So maybe something
like this and we can maybe bring this elevation down. And you can clearly see these
layers of these hills here. And you can note that whole this cube have
same amount of this fog. So it is completely flat. Each of these pixels
have same amount of fog, and I think we can try
improve this a little. So I will back to object. And this value here,
density is important. So, each of these points
have same density of 0.002. And we can maybe copy
this value and we can plug here noise texture. Now it is completely black because if you go
with color ramp, you will see that we have
very intense value here. I will apply skill, so I'm not sure why okay this is stretched because if
you go with Control T, this use generate, maybe we
can change this to object. I'm not sure for now, but we can now Try preview this if we make
more contrast here. I will back this to
generate it because I think these parts on side
are not so important. And you can now
preview how this look. And I now, go to this last node. Usually, when I click here, I get viewer node and then
I just remove viewer node. But I think this is
a little different with this volume scatter. Plug plug this last
node to surface. To remove this preview, you can just go
with Cold control and right click on
mouse. Just cut this. Okay. And now you can see that this volumetric is not
evenly distributed to this. We have some parts with more fog and some
with almost no fog. So if you move this white value, you will add less fog
or this black value. So we get something
similar like clouds. And now you can play
with these values here. Okay, but I don't want to make this very high contrast
between these two areas. So what I will do here, I will paste the same value as I paste before I have
in this density. So I will plug this again here. So now this density value is
between these values here. So first value is zero, completely zero, and second
value is completely one. So we have areas 0-1, and I want something very
close to this value here. So let's plug this to density. And now I will just play a little more with these sliders. Okay. And what I will do
now, I will click here. And if I now click
on this color, so we have huge aeration
and value node. So this value it is same
value we have here. So now if we now
move this slider, you can see that we
change this value, and I will now pace here
this value of 0.30 and two. And here I will also.
Pace this value. But now I will go here
with maybe 0.0 001, and I will just slightly
move this value, maybe a little up to
maybe zero point, maybe six. I'm not sure. And you can now see what we get. We get something
similar like before, but just small variation in area where we have more
fog and less fog. And if you now press F 12, we change lighting, so this is we cannot compare
before and after, but so this is before and
this is after we increase little this value because
we add here 0.6, maybe 0.5. But you can maybe note small areas with less fog
and with more fog here. Not completely flat
like we do here. And let's just for test, maybe some crazy values. I will maybe delete 10 here. Okay. And you can note
this effect here. So this is up to you. You can play with these values even more and you can
play with these sliders. Maybe we can try
invert this like
9. Work with .obj and .glTF format: Think in this point,
we can import our models models in our scene. So I will shift tricliq to Zoom to this horsemen and we can now place our
horsemen model here. So I will share
this all links from this tutorial in one
Link Bender file, so I will create Link TXT, and I will share
all links with you. Let's see how I do
this last time. So I think you need
to make free profile. Here, and I go to download, and I think I download
this Blender file, GLTF and after downloading, you will get these
textures and this pile. And let's now try. I'm not sure how I do this
last time, but let's try, is this work if you just move this inside our
new blender file. Okay. Click Okay. And I think because
we use this GLTFfle, this should also create
materials inside Blender. I will now go to
material preview. And yes, it looks
like this works, so we can now go to shade the editor
and see how this look. So we have base color
here, which is good. We have this roughness. And one go to Metallic, I think this should
also be good. And we can also click
Preview. This not so visible. And we have here normal
map which is nor color which is plug to normal. I think all this looks good, and I think this is advantage
of this file, this format. So we get everything
and the inside blender. And I will not say this in
ASEL browser or anything. I will just go.
Let's first go too. But I think my computer can
handle this amount of mesh. I will just go with F three
and merge by distance. So F three merge by
distance because it is not problem if we delete vertices that are
too close to each other. I will go here with
2 centimeters. So we delete almost
6,000 vertices, maybe again, we delete a lot of this we can go with I think
this is now 1 centimeter. So we delete a lot of mesh also, but we don't lose
any details here. When you see that you start
losing details, it is enough. We can again, import
this as link. So I will copy address of this folder and I will
save this file save. And now I can again
do what I do before. So file, link. Let's find this
horseman brand file. Object. Okay, I need to check. Looks like I have more
objects here. Let's see. What is this. Okay, and Okay, so we need to join this
together. Control J. Now this is one object
which is called Object two, we can just rename
these two horsemen. Let's now file
save and let's now again go with file link. Navigate to this
Blender file object and we have this object here. It is here and again, we cannot move this
or do anything. We need again make
this library overa make selected the content. And there is one note which just to know that
this can happen here. So sometimes can happen
that this object just disappear to get just one
point, but not object. In this case, just go with file, save and file revert because this object can sometimes lose connection with
this blender file, and I know that this
sometimes happen. Let's now place
this to position. We can now use Z to
rotate this on Z axis. We can now move this and
do everything we want. We can just go to Edit
mode and edit this mesh, but we don't want this. Okay, now you can see
that size is similar. So this is about
real world scale, and now I will just
mode this here. Delete this cube, and we
have our horseman here. Next object we want to
port is Castle Object, and this is object. I used last time, so this
is PhotoScan again from sketch Fub and you can
see here how this looks. And when you go to Sketch
Fub and search for Castle, you really get, like, a lot of nice models and a lot of photo scans so you can
choose any of these you like. And last time I
download a lot of this, and I make a lot of tests to
see which is best for me. And I decide for this La Custer. So let's try search for this. I think I download this. This
one is also not download, but you can see that we
don't care this icon. For this, I download OBJ
five because I note when I download this format
which come with texture. When I decimate
this object here, when I use this file, I get a lot of black
spots in this area because I think I lose
information in UV maps. For this, I just
go with OBJ file. I download OBJ file and you
get you get just color map. So diffuse is like color map. I download a lot of these castles here and you
can see how this looks. So this is with
this blender file I to before, when I decimate, it is okay when I import whole pash but this
mesh is pretty dense, like millions of polygons. And when I start
desipate with this, I get these black holes and all these spots like you
can see in this example. If I go with 0.1, you will see that I will get a
lot of holes here. And I think this model looks
good from silhouettes. You can see that I did see my d, but I will not do this
again because I show you in previous examples. So I can now just go
with copy objects. And let's now just paste
this in our vender file. So paste object. And now we can see
this vendor file here, this castle here, this object. And let's now go with Shift click here because I want
to place this object here. And now I can go with Numpad
seven to top orthographic. And I can place this
close to this origin. Numpad one to front orthographic and let's
place this here. Now we can just scale this I will just check in my last blender
file. How big is this? So this is big, about 200
by 80 meters on Z axis. So about 200. Let's just quickly
delete this water. You can go with C for brush and just select everything
you don't need. Bring this down. I
duplicate this but not with Shiv D with Alt D to make instance of the
objects Alt D Y, place another one here and
rotate this maybe on the axis. Let's disable this overlay
so we can focus only on castle and let's
place this here. We can bring this down
or what we can do, we can make this hole here. We can just go edit mode and just with
proportional editing, bring this little up. And if we now go with J, we can see before and After oh
10. Low-poly trees part 1: Now we can import some low
poly trees in our seene. And this is how this
looks. So this is before. And when I enable this
low poly gonode scatter. So this is after. So this is my old blender
file. You can skip this. You can see how this
looks so we can scatter trees in our scene
with simple sliders. And this is Blender file.
I will share with you. So here you have here
instruction or video, so you can also
watch this video, but you even don't need because I will show
you how this works. So you just need to
open this blender file. Here you get one plane with
all these low pol trees, and we can now just
go with copy objects. Or you can also go with a pen, but we can also just go with copy objects and we can
now go to our scene. I will just go
with paste object, and I just want place somewhere
where it's not visible, but I still want to
keep this object here. You can note that we import
all these three models. You can see this here. We import all these low poly models. Okay, I will just select one, maybe a few of these models
to show you how this looks. If you now go to
material preview, you can see how this looks
so this is basically just a plane rotated
few times with Alpha value and also we have
also here, normal value. It's a little more
complex shader. So we have this it will look more like three D
object with this normal map. We have here translucent effect, light go through
these leaves here. All this is not so
important for you. You can just scatter these
objects on your model. I will go again with key to our scene and
how to use this. When we import
this in our scene, we don't import only, I will now back the volumetrics. We don't import only
these three models. Imported scatter
geode group. Okay. And now, what I can do, I will select this
castle and this object here because we will scatter
these models first here. And I will now go with nape key to isolate only this object, but just be sure to br
this course or here with shift right click
because we still have enabled this
log to three course. Okay. What we can do now, we can select this object. I want first check scale. Scale must be one.
This is important. And now I can just add
geometry node group here. Okay, we can maybe apply
this shade smooth. So I will apply so I
don't need this anymore. And now you can go with
geometry node group and just load low
poly trees here. This is practically all
you need to do to use this addon or this
gonode group I created. Now, next thing you need to
do is scatter the trees. So all these you sit down. First, I said these
two categories. So we have more like spring, more like autumn
trees with snow. So we have these three
categories here. And inside of each category, we have a lot of trees. So I think we have
like 50 trees here. And now, if you just
move this slider, you can see that we scatter
a lot of trees here. And if you go to render preview, you can
see how this look. And okay, this one is
maybe a little too green, so let's Okay, if I now add let's
add small pine here, we can see that we add
more of these trees. But one thing which
is important here. So we have here density max, and this is like
overall density. If we set maybe what you can do, you can just drag this
and set this 0.1. So we have trees
with same density. But we can change the overall density or density
max to smaller numbers. So these sliders here
will not be so intense. And I will reduce this
maybe even to 0.02. And what you can do now, if you now, just move this
this is now less intense. And one thing I need to do here, I think you can note
some black spots here. And that's because these trees use transparent values
here, Alpha value. And we need increase
under light PAT. So under render settings
and light path, we need to increase this
transparent value to maybe 100. And now we can play with
this geometry node setup. So I will again back to this, and all this is too intense. Okay, so what I want to do, I will go with maybe 0.01 to add some trees here,
but not too much. I want more more, use this snow category. If I type here, 0.02. Okay, this is very
small value so 0.2. I will now switch to
material preview, and you can see that
we import mostly these trees which are
covered with snow. But I also want some autumn
trees because this will add some yellowish and brown color to this it will add
some variations. And I also want more
the pine trees. So I think I will bring
all these to zero, and I will focus on this pine. So we have pine categories here. Maybe 0.2. So we get
more these pins, and I think we have pine big to get more
variation in size, 8.2. We get these big pins here. But we have the same
problem with volumetric, everything is evenly distributed here and how we can fix this. So I will switch to solid
preview to speed this little up and I will for now
disable this modifier here. And now I will go
to weight pain. I want to create this I want
create path to this castle. We have less know here because here is path
to this castle. And we can do this
with weight pain. We don't I think problem is that we don't before
we click anywhere, we don't have any vertex
group or weight pain. So I will I will make one part here and
maybe another one here. And now, I know that because this red color is cheese will
be scattered on red color. So I want invert this so I will go with weights and invert. So now cheese will be
scattered on this part and this blue part will be of red
color means value of one. So I want to make
some variations here. I will just make
this brush bigger and I will just reduce this. More you go to write, this
will be less intense. Okay, we just want
some variation. And one thing which
is important here, I don't want any of these trees here where it's
not visible in camera, so I will increase this
brush I will add more. I want to add more
like bluish color here where these trees
will not be visible. Before, here was like add or
remove brush, I'm not sure. But I think they move this
now, and if you want, opposite effect, you
need to change this from mix to maybe subtract. I'm not sure. Okay, this
is opposite effect. If I now change
this to subtract, I will remote what
I want for now. Okay, let's make this
even more intense. Even more blue to make
this road more visible. And if you add more subdivision, it will be easier to paint here. So this depends on residence. Okay. Now when we have
this way paint here, this create this group, we can, if you want, you can rename this to be
easier for you, maybe too, but if you now go to
our low poligscutter, we need this cutter
here or enable. And now, instead,
this value of 0.1, we can just use this vertex group and you
can see what happened. Because we have a lot of red, reddish color here, we get
a lot of the trees here. So we need to play with
this density max because I see now that this will be too
heavy or too much cheese. 0.0 for now. And let's now change
this to put also. We can keep maybe some of these to keep some
trees on this pot. You don't need change
for each of these, but I mostly want to put all
these trees to this area. So instead of this value
of 0.2, render will now, calculate these colors and
put cheese on this reddish, very small reddish color. Okay. And if you now
go to render review.
11. Low-poly trees part 2: Now, if you want, more
these trees here, you can add another another maybe more of these trees
included in this scatter, or you can just play
with this value here. So this is overall density, maybe 0.06 to add more
of each of these trees. Okay, this look good for now, but I will now disable this and I will back to weight pain. I want to remove paint
these trees from this area, which is not visible in camera. We don't need any trees here. We have one path here
and I'm not happy with this part because
it is not visible here. So I will try fix this. Let's increase this value all to one let's
create another path. I think you can also
scatter this in real time. It will also work. You
can see this effect. I will try, remove
this pot here, so I will change from
subtract to odd. Let's see how this work.
Okay. I said before, if you want to be more
precise with this, you need to subdivide this mesh. Again, I can try do this now, so I will go with subdivide. Let's now go to paint, and you can see that
this now much smoother. Okay, Let's enable
this scatter again. Okay, so we can clearly
see this effect. I want to add more cheese here. And we need, add mix or add. I think add will
also be same effect. Add some cheese here. And this will now become a
little more slower because we have thousands
of particles here. But it's not it will
be about 20 seconds. I want to enable this
volumetric in render. So you don't need to
enable this in viewport, but you want to enable
this in render. I increase this sky
texture a lot before, so we can maybe reduce this. We can also make this in render preview.
So I can see here. And now when you are
happy with this hill, I will my recommendation is to just disable
this in viewport. So when you press F 12 and
render this next time, it will be still here, but just disable
this in viewport. And now we can add go
to another here here. So let's go with Napa Key and go shift right click
to place origin here, and we can make this quickly because we will not use
any weight paint here. So I will again apply
this modifier ondePlres. Now I know that this
density max is too intense. Let's go all 2.1, and let's now just
type here maybe. Let's check scale. Control A, apply scale. We can just add this
big like pine big maybe 0.1 to get
more variation here. And I think this is maybe
even 210 or 0.07 or six. Before and after. So we get a lot of details on
these hills in background. And now I will disable this in viewport in order to not slow
down our viewport preview. And now we can just add a few planes with this low
poly cutter closer to camera. I will go with shift
right click here, and I will create
maybe 100 by 200 play. So maybe 100 X and 200 Y
axis Control A apply scale. We can bring this down. And now we can again,
add geometry node, low poly trees, and let's
bring this density all down. Maybe 0.1 here and a
few of the big pine. 0.1. And you can see
effect we get here. Now we can just position this
in a few places in our C. I will go with GZ and shift
to move this slightly up. Okay, but I don't want
to hide the hills here. I will duplicate this shift X. So we have one we can place
here but I will go with x, scale this on X axis, and you can see that
we stretch this tree, so I will go with Control
A and apply scale. And now we can go
with Control Z. I don't want to hide this here. I will rotate like this. And we can go with three BX
maybe place on another side. I will rotate this like this and maybe place closer
to this castle. And you can adjust this here so you can add more of these trees. And this will not
affect this one left. And when you scale this play, we basically scatter more
of these objects here, so you can always bring
this to 0.7 maybe. So you just need to watch left what happened and play with this because these hills are
now not so visible, I will go with SZ to scale this little Z axis to
make this more visible. And this one maybe move on left or just move this
little on side. So this is before.
And this is after. I think these trees here
are pretty close to camera, and we need maybe hide
this with better assets. This is what we have for now, but I will not lose too much time with this
because we can always back to this later
and we can always change when we have
final composition.
12. Close-up trees part 1: Will play also with
lighting later, so we will change
completely lighting. But let's now change these trees in foreground with real or high
quality objects. And for this, I will also
share with you one of my asset package
or geoode setup, which is called a smart. So after downloading, you
have a lot of instruction, I think, three videos. My recommendation is
to watch these videos, but if you don't want
to watch these videos, you can follow this tutorial, and I think it will be enough. So you will get this and you just need to open
one of these blender files. And now we will set
this in Asset browser. So when you save this
in your computer, just save somewhere where
you save your assets, and we need to
copy this address. And now inside, you will
not get this tree here. This is I made some
tests with this. But you will see here if you go up that we
have five trees here. So we have 38 trees, but I divided this into
these blender files, but you don't need even open these blender files because when we add these
to asset browser, it will add all 38 trees. So you can note that
these are mark as assets, so you just need to
edit preferences. Why but copy, click plus here. And paste this address here. So inside this folder is
blender files where trees. So add to Asset Library, and my recommendation
is send this to Link. Okay, you can save
preferences for next time. And next time when you
close this blender file, so you can now close this save and you need reload this Blender file or just
close this and reopen. So file revert to reload this Blender file to
load the changes. Now, when we add these
trees to ASEL browser, you can click here and
go to ASEL Browser, and here you just need
select Smarthis collection. And I think last time, I used this last three, but you can use any of these, we have a lot of these
punch trees here. But let's now start
with this one. So I will just bring this here. One thing here is important. So because we said
this follow preference when we create this catalog, we said this as link,
so important method. So that means that when we
use this follow preference, it is same like we use Link. And we talked before
about link option. We need to convert this
to library override. So you can see that one
thing I want to show you. So if you cannot find this
object because we have a lot of these objects here, you can just select and click press full stop on NMPDblender will
navigate to this object. And now to be able to
control this tree, we just need to convert
this to library override, make selected and content. And now we can
control this tree. Okay, I think this
tree is pretty big, so I will scale this little down maybe and place stend
of this tree here. So we can now delete this Okay, so now we have much
quality three than this. But this is just
start because we have this geometry node set up we
can use to add more details. So the first three
are for animation. And because we will
not do any animation, if you are interested
in animation, you can just watch my videos. You will get with this ase pack. But for now, I will just enable this smart tree node group. And I will go with NAPE K
to isolate only this tree. So we can just put focus
on this tree here. And I will go to render preview. So I will remove these leaves. I like more this
option without leaves, and let's now add snow, but snow will
appear only on top. So this is also not option.
We will do this later. This season is connected
with these leaves. So if you set this to one, you will get like autumn season. So because we don't
use these leaves, I don't need also this season. And this subdivision level is
we will use this maybe one, but I will show you
later how this works. So you can see that we
have pretty low polymesh and if you add this to one, it is much better. Leaf color is also
connected to these leaves, so I will not use this for now. So think we will use here
are these particles. So if you move
this, for example, to one, we scatter these
particles on this tree. And you don't need
move this to one. You can just slide this here. And you can also use
multiple layers of this. You can, for example,
type here like 0.2 to add a lot of
layers of this bark. So all these small elements are actually photoscan
part of three. So you can see this bark here. I will say this to zero. So we can add maybe
this type of bark. Okay, I think I like
this one. Maybe 0.5. Let's add this one and I think
we have one yellow here. If I add this all to one, we get also this
yellow like moss here. But create this nice
effect, but maybe 0.1. Let's see how this
look. I combine bark from different
type of trees, which is maybe not good,
but I don't care about it. I just want get as
much details I can. And now we are finished
with these barks, so we are now on moss. So you can also add some mose so you can see this
green small green. Let's see how this one look. Maybe 0.1 of this
maybe this last one. We add some moss
here, maybe 0.1. And you can take more time to
play with all these values. Now, this is trunk, so this will be still
applied to this trunk, but this is twigs. So if you said this maybe 0.2, we get a lot of small
twigs on trunk. But my recommendation is
to play with each one. I think we have here 77, these particles, which is a lot. You can shape any type
of tree you want. And next is mushrooms. So if you set this to
one, you will, like, cut a lot of mushrooms
here and maybe 0.1 here. And now we have this ivy. And this ivy is pretty intense. So if you like, bring this, we get a lot this is old. If we move this old ivy, so like brown ivy. So maybe 0.10 0.2. And now we have a green ivy. If you said this 2.6, you can see what
we get maybe 0.1.
13. Close-up trees part 2: Now we have twigs, but now we switch to branch. So this will be distributed
on these branches up. So if I set all these to one, you will see what this does. So this creates a lot of
details on these branches. We can keep this 0.1, and maybe we can scale this tree even down
to see this better. Now we have leaves on branches. So if I set this to one, you will see what we
get maybe 0.1 0.2. But in camera, it's visible
only this part here. So 0.1, and let's see, this type of this is like
let's zoom this out. So this is visible only here, so I will not play
too much with this. And you also have
down like fruits. So if you want to add pine cone, this is still too intense. If you want a pine cone, you can type here 0.2, and you get also a lot
of these pine cones. And all these are high
detail photoscan objects, you can see how this you
also have fruits like apple, tangerine and like a
lot of these fruits. You can play with this. I decide to remove the
snow. We don't need this. Okay. And now, when you
are happy with this, you can my recommendation is
to disable this in viewport. So we still keep
this viewport fast, but we will get all this
information in render preview. And we get back these leaves, but this is not important. This will not be
visible in render. We also want to disable this in viewport
to speed this up. And I don't have before vender, but this is how this look after. And I'm not so happy
with this result. I can always back
to this and try another type of bark
and all these details. And we can now continue
with another tree here, and later when I have more time, I will maybe replace
some of these assets. This is the result
I get last time. You can still see all
these details and also this tree is also SmartT and
this one is also SmartT. Scale this even down to catch more detail
on this up part. Let's now continue with
another tree here, and I will for this
use another model. I think I like this
one because we have a big trunk and
not too much leaves. So I will use this tree 22. And again, I will go with right click Library Override
make selected content. And now I think this is too big, so we can scale this down. And we can go with GX, GY, and GZ, and I will
scale this even more. And let's now delete
this tree here and let's of this dump. Okay. And now we can enable
this in viewport and render. And one thing I forget to
show you with this tree here. So I will enable
this in viewport. So you can always add one subdivision level
to smooth this. So you can see before and after. So we basically add one
subdivision to base mesh. So you can also see
with this example here. If I add one subdivision, it will just smooth
everything out. So one subdivision is okay
but don't go too much. So if you go even
crazy with this, you get this bark shape, but the add too much
mesh to this object. So my recommendation
is to use this bark. Photoscan object
is tend of this, but one subdivision
is also okay. And let's now disable
these leaves. And now again, we can just play with this and
see what we like. I will isolate this tree
and with Shift try click, I will place origin
here so we can zoom, easy to here and let's
now go to render preview. This lighting is not
ideal for this example, but let's see how this look. This is pink note. This is limited to some
numbers and it will not cover whole tree because
these don't have sense, but we can add some pike notes.
14. Close-up trees part 3: Now we have twigs, but now we switch to branch. So this will be distributed
on these branches up. So if I set all these to one, you will see what this does. So this creates a lot of
details on these branches. We can keep this 0.1, and maybe we can scale this tree even down
to see this better. Now we have leaves on branches. So if I set this to one, you will see what we
get maybe 0.1 0.2. But in camera, it's visible
only this part here. So 0.1, and let's see, this type of this is like
let's zoom this out. So this is visible only here, so I will not play
too much with this. And you also have
down like fruits. So if you want to add pine cone, this is still too intense. If you want a pine cone, you can type here 0.2, and you get also a lot
of these pine cones. And all these are high
detail photoscan objects, you can see how this you
also have fruits like apple, tangerine and like a
lot of these fruits. You can play with this. I decide to remove the
snow. We don't need this. Okay. And now, when you
are happy with this, you can my recommendation is
to disable this in viewport. So we still keep
this viewport fast, but we will get all this
information in render preview. And we get back these leaves, but this is not important. This will not be
visible in render. We also want to disable this in viewport
to speed this up. And I don't have before vender, but this is how this look after. And I'm not so happy
with this result. I can always back
to this and try another type of bark
and all these details. And we can now continue
with another tree here, and later when I have more time, I will maybe replace
some of these assets. This is the result
I get last time. You can still see all
these details and also this tree is also SmartT and
this one is also SmartT. Scale this even down to catch more detail
on this up part. Let's now continue with
another tree here, and I will for this
use another model. I think I like this
one because we have a big trunk and
not too much leaves. So I will use this tree 22. And again, I will go with right click Library Override
make selected content. And now I think this is too big, so we can scale this down. And we can go with GX, GY, and GZ, and I will
scale this even more. And let's now delete
this tree here and let's of this dump. Okay. And now we can enable
this in viewport and render. And one thing I forget to
show you with this tree here. So I will enable
this in viewport. So you can always add one subdivision level
to smooth this. So you can see before and after. So we basically add one
subdivision to base mesh. So you can also see
with this example here. If I add one subdivision, it will just smooth
everything out. So one subdivision is okay
but don't go too much. So if you go even
crazy with this, you get this bark shape, but the add too much
mesh to this object. So my recommendation
is to use this bark. Photoscan object
is tend of this, but one subdivision
is also okay. And let's now disable
these leaves. And now again, we can just play with this and
see what we like. I will isolate this tree
and with Shift try click, I will place origin
here so we can zoom, easy to here and let's
now go to render preview. This lighting is not
ideal for this example, but let's see how this look. This is pink note. This is limited to some
numbers and it will not cover whole tree because
these don't have sense, but we can add some pike notes.
15. Snow shaders part 1: And for snow shaders, I use shaders for
QuickSl Bridge. But because I'm not
sure what happened with Quill Bridge now because
they move to fab.com. But for me, still works. I will also, if you cannot download assets
from Quixll Bridge, you don't need to give
up from this project. You can always maybe find free snow shaders on ambncg.com, so you can just you
can download any of these shaders and make test
and choose what you like. So here is Quicklbridge, and I now get message
that they move to fab.com and you can find all
these assets to fab.com. But I will click to
this button, stay here. So this is application. You can download this app. You can just Google Quixlbridge
and download this app. And this app also have
add on for blender, but I don't use this add on. I use that addon, but I have problems
with that add on. Sometimes when I click download, just nothing happened
and I decide to save some assets
to my asset browser, and I will show
you how this look. Now, if I go here
to Quixel Bridge, you can see all these assets. And you can also note that I download a lot of snow shaders. So in my case, I can just drag some
of these assets here. Okay, here is the assets. Let's set origin. Okay. I think
this is also set us link. So for this, I will
just append this. Now we can choose where
to place these assets, and you can see that
I just can drag this and move here and I
have nice snow shader. But I will now explain how I
add this to Asset browser. And one recommendation which I forget to tell you when you
log in to this software, my recommendation is to
create epic game account. So this program
will ask you if you want login with Google
or sign up with Google, Facebook but my recommendation
is to sign up with Epi game because this Quixel
bridges from Epi game. And this is reason I
get all this for free. First time when I login with
Gmail, it was not free. But when next time
login with Epi game, it was free for me. If you can enter to this
Quicklebidge or fab.com, you can search, or you
can just go here under surfaces and search
look for snow. Okay. When you install this program, this program will ask you where you want to
save this file. So let's see where
is this information. Okay, here under edit settings. When you click here, this is where this program will
download your files. So we can open this path here, Control V, I think, download it. And because we download surface, it should download here. So let's just test this now. So I will back to Quixel Bridge and I will download
any of these shaders. Let's try maybe this one. So we can click here, and now we have option to
choose resolution. And I think four K is okay. For me, this also depends
on your computer. You can also go with two K, but I will try, This
is already downloaded, so I download this
already before. Let's try find one which
is not downloaded. Okay, so this, no,
I didn't download. But don't download this
download any of this you like. With four K selected, I will just go to download. And you can see that
now we're downloading this and this
should appear here. So this one which I download
last time for test. And now let's see
this finish, yes. Now we download
this texture here. Okay, so this is just previous. This is also like, Okay, we also get smaller versions, but I will delete this. And I'm not sure what is this. So this is Albedo is like color. Let's delete this. This is ambient occlusion. This is displacement,
but in EXR version, I will also use this. So we have displacement, normal roughness
and transmission. And now we can just
copy address of this. I will show you how
you can save this in your asset browser or
how I do this last time. So all assets I keep
in Asset browser, I save for Asset browser, I save in this
folder which I call. Assets and I keep
this on desktop. I will go here under
QixLbidg Mega Scan assets, and you can see that I have
a lot of Blender files here. And this is also
my recommendation. Create folder and subfolder. So I know this is
QuixL Bridge and now I can save I can create
new blender file here. So I will go with new
blender file here, and I will delete all this, and I will go with file, save. Let's copy address
of this folder. And I will save here,
and I can call this maybe snow snow 2025. Okay, now we have
weather file here, and we can import
here our shader. So in Asset browser you
can save only shader. But I don't want
to save on shader. I think it is more
practical if we save like in this example,
plane with shader. We can also import this plane
and we can array this and we can get correct UV
map with this plane. So later we don't need
mess with UV maps because if I now, what I can do, I can select this object and I can copy this material
here to this plane here. But then we fix this UV map. You can see that all
this is stretched and this is not
what I like to do. So my recommendation is
just import plane with correct dimensions and you
can later use array modifier. With array modifier,
we just array this and we get correct UV maps. So I will delete this
for now and let's now finish saving
this in ASEL browser. I will now back
to Quickl bridge, and I have one very
important information here. So this is two by two, and I want to create the
same dimension plane, so Shift A mesh plane. And by default,
Blender two by two, plain and now we can
just add shader to this. So I will switch to
material preview. I will go to Shader Editor New, and I will call this
maybe again Snow 2025. And one thing I like to
do later I can find this. If I rename this, I can later find this in
Asset browser so I will also rename
this to Snow 2025. Okay, so we can say this and now we just need to import
these maps into our shader. I will go with Control Shift. So you need node Wrangler. So if you go to addons, just enable Node Wrangler. No Wrangler, or if
you don't see this, you need first
install Node Wrangler here and enable this. So I will go with Control
Shift T. And we can. With this, we can load
all these maps in once. So if I select all the Blender now try connect based
on these names. So if you move this here, you can see that this is Albedo and Blender connect Albedo, which is like Blender, connect color map to
roughness to roughness. And we get this. And
these don't look good. So let's see what we
need to fix this.
16. Snow shaders part 2: We can also se like this and material and
make open preview here. Sometimes this preview is
more real than this one. So let's now see. Let's first
use this ambient occlusion. So when you get
ambient occlusion, you can just multiply
this with color map. So you can go with shift
right click and mix this. And for this, I
will use multiply. And let's now preview how this. We don't have too much
information here. It's almost completely white, but we get some ambient
occlusion here. So if you now let's
make this material. If we now move this all to one, we will get some little more ambient occlusion
here with this. But this is not a
big difference, and let's now go to roughness. I will go with Control Shift, and I think this is okay. Let's now go with normal map. So we have here normal
map and let's now press So if you press, you can mute this node
and see how this look. But for now, I will just
disconnect this displacement. So control right click. So we can now focus
only on normal map. So if I now press to mute this, we can see before and after. So we get some information with this normal map But this is not too much. So let's now see what we
get with displacement. Okay, so with displacement, we get much more information
and we can bring this maybe. This is too intense,
so I will go or 2.1. But I think this transmission
here is problem. So this snow look
like it's black, and let's see what
we get transition. Okay, so this is
definitely problem because value so white
color means value of one. That means that
we have the value of transmission almost to one. So if I cut this, let's
now make this material. So you can see that
now this look correct. But if we move
this all to right, it looks like we
get with this map. So I will now be this to here. And I think I know
what is problem. This Quixel bridge is
not designed only for blender than for all
three D software. And in some of three D software, this value sun are inverted. So I think in three
D Max or Maya, this black color mean value of one and white color
mean value of zero, which is completely
inverted then in blender. So we can go with invert, no. Or invert color. So if we now click here, we can see that we
get something which look much more what we want. I will just bring this to 0.05. I think in most cases, you want to just keep normal map without this displacement. But I will now show you for what this displacement map is useful. I will duplicate this with ship DX because I don't want
destroy this shader here, I will just create
new variation. I will click here two plus, and I will call this
but displacement. But this displacement map
usually need more mesh, and you can see if
you go with tab, we have only four vertices here, and we basically get
fake displacement map. But now change if you now go to material properties
and change these two from bump only
so under settings. Here, from bump only to
displacement and bump, we will get much
more information, but only after we add more mesh. So I will go with
Tab and you can see that we start getting more information with
this shader here. But this is not visible here, I think, because we need
switch to render preview. So I will go to GPU. Let's bring these
values down so we don't crash our computer
and now I will go to Shader tab and I will
add some maybe sunlight. Or we can also add sky
texture like before. Let's bring this
intensity to 0.1, and we can now add maybe also light maybe some lamp
here to get some shadows. Okay, so let's see
what we get now. If I now let's try increase. Yes. When we increase
this displacement map, we get, it looks like it's
real geometry, but it is not. So if you go to edit mode to object mode then
solid preview, you can see that this
is still like a plane. But because we already
add a lot of mesh here, this is a little annoying. So I will not use this method. I will convert
this to real mesh. This is bad because
if I, for example, add this on top of this, we can see that we just
get overlap faces, and I want real
mesh here so I can, overlap to get this, I will just make adjustment
with this shader, so I will not use any
displacement map here. I just I just
disconnect this here. And let's see how this look now. So this is before, let's
increase this value, maybe 2.3. Okay, so I will remove
this from here, and I will add same in modifier. So we have here
displace modifier, so we can select
this and this go up because if you want
this to same position, you can just place this to one. And now I will
create new texture. So we create new
texture for this. Okay, I think the
default is zero. And when you click to
create new texture, here is our new texture. Or you can just click
here and it will be same. And for this, now Blender asks us to
load this new texture. And for this, I will use this
displacement texture here. No, this is
displacement texture. So I will just click here and paste this name here and I
will load this texture here. And now we can back to
displacement modifier. So first, we need to
change from local to UV because we use UV for this. And now we need load our UV map, and we have only one UV map. You can see it's called UV Map. So we need load this UV map. And now we can just play. I think it's not zero and one, it is 0.5, default value. Now we can just play
with this strength. This is, I think,
same value here. Let's drive it 0.3. And one thing I
will also do here, I will add subdivision modifier
here to add more mesh. But before this modifier, let's drive it maybe 0.5. Right and I think I will
try and go with Sha Smooth. I think this is
now correct way to get this snow with real mesh. So we can now control how
intense we want this. Now when we move this here, we can see the overlap parts, it is not the same
before when we just get two planes
in same position. And now we can use this
part like real mesh in front close to camera and we can use this mesh
for snow in background. Okay, I will try add
more details here. Maybe 0.3 is right value, and maybe I overkill
with this maybe 0.5. Just be careful because this is, like, I think one is
okay also for me. But this also depends
on your computer. And let's now see. I will rename this
two. Real mesh. So this is just a plane, and this is same shader,
but with real mesh. So when I move this here, and if I scale this a little, you can see that we have some
of these edges floating, which is not good, so I
will go with Control Z. And what I like to do with PhotoScan and object like this, which I want merge
with the ground I want select these edges, so you can select first
one and with control. With colding control, you can select all these edges here. And now I can with enable
this proportional editing, I can just make
this brush smaller and move this down,
something like this. Okay. And now, when
we place this here, it will be much easier
to merge this with ground because we don't
have any edges go up. Okay. Now we can save
this in as a browser. So I will save this. We need or mark
this right click, mark this as assets and
mark this as assets. And we need copy address of this folder where
this file is saved and you just need to go
to edit preferences. File pats and click here two plus paste this part
here and add Asset library. Now Blender will find
this blender file in this folder and
Blender will find these assets inside
these blender files. But because I do this
before, I will remove this. Now I can close this blender file and I
come back to our scene. But we need reopen. It will not automatically
refresh here, so just go with File, Save and file revert. Okay. And now I will it
should be somewhere here. So I will now search for 25. Okay, I'm not sure why I
get double, but it is here. Let's first try it like real reel no shader
with geometry. And let's place this here so
you can see that this works. And I will now also
import this shader here. Okay. I think this is
already with array modifier. But if you get this
without array modifier, just go here array. And now we can arraign
this on X axis, but we need one for YAxis. And now we need to say
this X to 00 and Y to one. Now we can also arragn
these two YAxs. One thing you can also do, you can select this
material and go with viewport display and
maybe change this to bluish color so we can see
in viewport difference. I will go somewhere here
to cover all this area, and now this RonXxs
just increase. Okay, so we can now maybe place this real mesh about here. You can always play with these
values here, so maybe 0.3. Let's go with D. Y, maybe place one here. You can always go with Z
to rotate this sold the X. And I now get an idea. You can just go with SZ. You will get similar with this displacement,
but more intense. AZ, you can also scale
this a little if you want. And let's go with D. Why, again, maybe place one here, but I will now go with S, Z, scale this down. So what I do to get
all these shaders, I basically just
repeat this process. I just go to another shader,
click download, download. And when I download
a lot of this, I download maybe 20 or 30
of these snow shaders. I just go to this blender file. Snow 2025. And I just duplicate
this shift DX. And now just make
another shader. Variation of shader, you can rename this or
you don't need, and you just replace
this with another. Okay, so this is first
one with second one. Just replace these maps and
you get another shader. And later just
rename this and say, mark this as ases. And instead of only one, you get a lot of shaders. So that's what I do. And then I have this
and then I have all this inside my
asset browser and I don't need this Vixel
Bridge application, and I don't need download and any add on any port
this from Internet. But just be careful. You need to adapt this plane. So this is only half meter. So in this case, you will
need if you download this sder you will
need adapt this 2.5. 0.5, and you need apply scale, Control A, and apply scale. Okay, so let's see
what we have for now. But this shader I download
just for practice. I think I last time
used this one. So I will just replace this shader because I don't
make a lot of tests now, so I will just use what
do I use last time. So this is before
and this is after. It's not so big difference, but I will keep this one. And usually when you
do things like this, one mistake you can do here is like test first one and tell, Okay, this one is good, I will not test anymore. But if you don't
test more than one, you will not know that
maybe you have better one. So my advice is to test
everything you have, and later just with J, you can compare what you like. So at least you can fill these eight slots and see
which one you like more. I will just add this
shader to this big. I will select this and I
will just add this shader to this hill here because
this is visible. I will not care too much about UV because we will not
see these details, but at least we will
get a similar tone.
17. Mixing shaders part 1: But this is not all. Now we have repetitive one snow texture, and we need make variation
to make this better. And I think I didn't
do this last time, but let's try just combine
two snow texture here. So I will maybe bring this one, and I will go to shader editor, and now I will go to
Object because this is object let's copy all this. So copy, and now I
will select this one. So this is our main shader and let's now go
with paste here. And because this is
in same position, you don't see difference, but before you click anywhere, just press G to grab, and now this second
shader we can move down. And we can organize
this little better. So if I go with layout frame, we can put this second
shader inside this frame. And this material
output don't work, so we can only have
one material output. So I will delete
this. So this is shader two and the layout frame. So this is not now inside. So we need select this and Okay, I will move this left. Select this and with G, just put this here. Now we can move all
this container here. Okay, so this is
material output, and let's see what we can do. So I think we can plug this second displacement
into first one, and now we combine
both displacement. And one thing I will also check here is resolution
of this texture. So this is four by four, and this one is if I remove modifiers,
this one is two by two. Okay. So this one is
double than this one. So we need to keep this in mind, and I think we can fix this now. So we need to scale this by two. So I will type here, two,
and now we have correct UV. And let's now see
how we can mix this. So for this, I will just
use simple noise texture. So now it's texture and let's now go with Control
Shift and click here. And now I will play
with this scale. And I will go with color to make more
intense contrast so we can see what we do. I want to make a big
area of one and another. So I think I need work
with very small values here. Maybe like this. Okay, I will for now
take this and you can always add more
one shader or another. I will see what I like. So we can now mix these two
shaders and we can do this easy if we grab this
last output here, which is principle BSDF
control shift and right click. We get this mix shader, and now I will use this factor. W is white area, it will be first
one and where is black area, it will
be second one. But I invert this. Let's just change position here. Let's just repeat
this white area will be this shader and black area
will be this second shader. We can make test,
but I think I want this first shader maybe
more visible in foreground. So this is before this one is
before, and this is after. It's not big different because these two shaders
are very similar. Maybe I need use
like one shader, which is not similar
like these two ones. So blender use by default
generated object coordinates, but I think it is little hard
playing with this scale, so I will try with objects. And let's now see how this look. But we still need to
play with small values. I think it is better if you
play with this color ramp, about half value will be first shader and
half second shader. I want to add one effect which
is visible in this render. So you can maybe
feel this pot here. I want to create p leading to this castle and for this shader, I want lower roughness
value to make this little more shiny like this
absorb little more light. You can feel this effect here. For this, we need first
make mask to this castle, and I will now do this. For this, we need. First, I will make also this
in layout in frame. So we can just grab this
and with G, insert here. Okay, I will I think
there is shortcut if you select this and just
with one shortcut, you can put this
inside the frame, but I'm not sure
which is shortcut. And let's now create mask
to this castle. Okay. To create mask, we need new texture and now we
need to create texture. So to create texture,
we can just click here new and we can
rename these too. But you can I now need
resolution of this texture. So this is very
small resolution. I want about four
k. And I will now press this small star by
four, multiply by four. Or if you cannot
find this shortcut, you can just type here
this value and it is same. Now I will click
here, new image, and now we create basically
new image inside blender. And now if I go with Control
Shift and click here, we can preview this image. And next I will do I will take this trees here and this
horseman and this ground. And the reason I
want select all this is to know where I want
to create this path here. And next, I will go to material preview because we
should see our material, we create new material
or new texture, and now we can go
to texture paint, and we can just
start driving here. But there is one problem. We still have this RA modifier, so I will go with Control Z. And I will now try
applying this modifier. So I will go with you
can just click here, apply or to apply
multiple modifiers, you can convert to mesh. Now this is one mesh. Let's now go to texture paint. Let's see what we
get. Okay, we still get we still paint this as separate objects,
not as one object. I think that's because we
already have this UV map, and we don't want to
destroy this UV map. So this is UV map
which we use for snow. So I think we need to
create new UV map. So I will call this pot and we don't need to change anything
here because by default, when you set this UV, Brander use first one, and we just need to be sure
that this one is first. But for this one, we
want to change this. And I will now go with UV map. And I will place this here and I will select the second UVM. Let's now see what we get if
we go with texture paint. Okay, we still have problem, but I think this is
because we need to unwrap this again. So Control Z. And let's see. So if I select this and if
I go to UV Editor, And if I go to Edit mode,
we can see this problem. So we have one plane repeated
for each of this phase, and we need to unwrap this. So be sure to select this UVU
rap and maybe Q projection, but I just want to check scale, scale must be one. So U Q projection. Okay, this look good now. And I think we can
now drab here. So I will back to
shade the editor and I will go to texture paint, and I will change this
color from red to white. We need black and white mask, and this should work now. Okay, this work now. But this brush is hard brush. So we need we want
smooth brush here. And now we need
again change color. Now we can start drawing p.
So I want this pt between these two trees and I think I will move
this little on right. And castle is about, and castle is in this direction. So this is not so important. We can so this is texture paint. White colours more radioc and this brush and we
can now start painting. Okay, and this should be
material preview here. But if I now click
material preview, it will load all
materials we have here. So maybe it's better
if I for a second, select just to trees and this. And if I go with Napa Key now I can focus only
on this object here, but I need to go to
material preview. We need to go to render
preview because of this distortion to
see better. Okay. And let's now go
to texture paint. Again, this part here look good, but I paint maybe a
lot of in this Okay, so I will now paint
this little better. But this is we have one problem. If you, for example,
start here and zoom in, you get bigger brush. So basically, we want
to make this just once. This part here is good. It will not be so visible, maybe we can add some white
color here and now I will switch to black color
because I don't want I want but going from here, not here, where is this tree. So I will just remove this part. Okay, I'm not sure why
this is not updated, but I will just I
will not care too much about this because we will also mix this with
noise texture and we will make a lot of
imperfections here. Okay, so let's see how
this look from here. I think this look good. And I will go with
Napelask twice to back all elements in our s.
18. Mixing shaders part 2: So now we have this mask. This down is not updated. I'm not sure why, but this is not important. For now, we can take look up. So if I go in render
preview here, it is updated, but not down. Maybe we can go, again, we texture paint and maybe
paint this part here. And now, this is perfect,
black and white map. I want to destroy this a little, so I will go again
with noise texture. Control Shift, mix
these two shaders. And I want multiply this with
these noise textures here. And now, I will go with color m because this noise
texture is not so visible. Let's see how this look. So we need much more
details than before. And let's make more
contrast here. Okay, now if we go with
control shift thank here, we can see result. So we basically
smooth all these and make some imperfections here. Let's I think this
roughness will help a lot. I want to keep this mostly
white to place here. New texture, but I also want to blend this with this texture, which we create this one down. So let's add a little
more imperfections here. Okay, so this look good. I just don't like
this part here. So I will again try select this texture and try
go with texture paint. I'm not sure if this
will be updated later, but this is not so important. So now we have another mask. So this is another mask and we can If you select all
this and if you press S, you can scale this, and I will again go
with layout frame. If you press N, you can
rename this to put mask. Again, and now we have
very nice mask and we just decide which shader
we will use here. But I will now go with Control Shift and
back this material, and now we can go to
HSL browser I want to find some dirt snow maybe with maybe steps or
something, something like this. I'm not sure if
this good example, but I will try with this one. And this is two by 2 meters. So this will match with
this first shader. Okay. So let's go
with Shader Editor, select all this and copy, select this shader and
paste this somewhere here. So paste now just
bring this down. And now I will delete again
this material output. And now I will go with frame. So again, I will
call this dirt snow. So we want to place this dirt snow on
this white area here. So for this, we need
mix two shaders. So we have like mix of these
two shaders, which is this, and we now need
another mixed shader Shiv D. So this is shader one. And now I want to place
this in first place. And now we have this mix factor. So if I move on right,
if I move on left, I get this second shader, and if I move right, I get this first shader. But I want to use this mask
I created, not this slider. So we can just plug these two. And now it is
little hard to see, but I think it is opposite. So I think I invert this
and how we can test this. So for second with control
click, I will remove this. And now I will go with
simple diffuse shader. So this is just color
with roughness. So I will now place this red color here
and let's plug this here. Okay, so now we are sure that this second input should be this dirt shader
which go down. So let's plug this here. And if I plug this here, you can see that
all rest is red. So this should be this shader. We see with this red
color that this is not so intense as we expect. So we can make more
contrast here. To make this more intense. Because in fact,
these shaders are very similar and this
effect is not visible, but we can feel this pot here. Okay. And another thing
I know that I want to do is play with this color ramp. And I want to make
this more shine, melted snow effect here. Okay, so I will try. Let's see. Let's preview this. So more black colors we add, it will create
more rough part or shiny part, maybe
something like this. And I will also bring this
completely white color, maybe little to black. Let's now make test ran. So this is effect we get. I'm not so happy with this. Let's try make this
little better. So I will bring these
photo skins with GX. I don't want them
on this pot here. This don't have sense. And I want to make
this, like, more dirt. I can go with maybe hue saturation value and
maybe make this more black. Or we can also go
with maybe mix color and mix this with
maybe brownish color. So I want to bring
saturation down, make this value down. No Alpha value. And now I think I will choose
here, color, blending mode. This roughness is
pretty intense, so this is too much. So let's I want make
more contrast here. So this is before
and this is after. Now this is much more intense, but if this is too intense
for you, you can just play. You don't need to
adjust this shader. You can just play
with this mask here. So you can play with this
black and white color. So if you make this white
color closer to black, you will just add this
shader to this part here. Or you will just make
this less intense. So let's now again, control shift and click here. So this is before
and this is after. Okay, I think I put too
much black color here, but with this, you can
now you can see that now you can control how
much you want this effect. But basically, you can mix as much textures you
want or shaders. So you can maybe add the fourth one and mix
with all this. And I will not play
with this anymore. And now I just want to
add more real geometry, like you can see this example.
19. Snow photoscans part 1: I will now show you how
I create more details. This thing, you can
see here is MD, photo scan from Sketchfab. So I'm not sure if I
can find this now, but I think I just type here MD. And you can find a lot
of similar things. I think I download this one. So you can just type this name and you can download
this for free. And we talked about this before about importing OBJ objects
and connecting textures. So I will not repeat this now. And you can also find so
this one is not free, but a lot of similar photo scans you can use for this purpose. And let's now see
what I do last time. So this mud shader
is what you get this color texture when you
download this, this object. And I just plug this to
base color and create some roughness from same texture and also some bump to
create more details. And now, what I do, I copy
one of snow shaders here. So I can delete this. And I just copy one of these shaders. I don't need three
shaders for this. I just want one snow shader. And now I need
these two shaders. And what I do, I will go with mixed shader not mixed shader. But you can just again go
let's bring this here. Control Shift and right click
to mix these two shaders. Okay, now, if we move on left, we get this mud, and if we move on right,
we get this snow. So we can now choose
between snow or mud, but I want create sk. So I want mostly snow, but I want to keep some
mud on some places. And what I do last time, I just go with colorRamp. You can for this, again, use noise texture or
something similar, but why not use this mud shader. So now, I see before
that I inverted this. If I now tweak this texture, I get real nice mask. And let's now plug
this here. Infector. Okay, I think I want opposite. Okay, something like this. And that's basically
all I do last time, and now I have nice
detail you can see here. If you go to edit mode, I keep a lot of mesh here
and now we can go with copy objects and we can
paste this in our seal. Shift click to place origin here and now we can
paste this object. Okay, it is here. Now we can look down and place
this in position. So this is before, and this is after. And I'm a little confused. When I reload this file, I lose this path texture heap, so I need to draft this again, and I will show you what
is my recommendation. I just want to finish
this path here. What you can do to avoid this, I'm not sure why this happened. You can just load this path two, and you can see that we
have unsaved changes here. So I can just go with Save, but you can go with Ss and you can just save
this in your folder. And if something similar happen, you can just replace this
image with this image too. But this vendor should
save automatically, and I'm not sure why
this happened to me. So I will now make
another test render. I see that these photo
scans doesn't look good. First, we have a lot of
mud here, and second, this snow shader doesn't
match with this one. So this one is more
like yellowish and it's more dark, so
this is too bright. Let's try tweak these settings. So I will go with Napelask
to back this object. So basically, we want to
adjust both. This factor. I want more snow here. Let's go to material preview. It will be a little faster. So I don't want
too much mud here, and I want to adjust
this snow texture. So I will bring this value 0.8. Let's see how we can mix
this with yellowish color. So mix. We can go
with mixed color. Second input will be like
slightly yellowish, maybe. It's all about taking
these settings, and this is basically how
I get these details here. And if you watch
my YouTube video, you can see that like here, I photo scan this
object, this mod, here. But in reality for this render, because first I made this render and then
I record this video, I just use PhotoScans from sketch fub and this
is just for purpose of promotional
video because I get sponsorship from reality
and I do this manually. So I take this piece of mud and I actually photoscan this. But of course, you don't
need photoscan this. You can just download this from Sketchfab or similar sites. So here I also mix these shaders and snow
shader with this. And this is result I get. I think at the end, it was real nice result. And maybe I will share this
photo scan also with you because I think I will also hold this blender
file with you. Final blender file because
most of this is mine. So trees are mine. This is free. This castle is also from I think from
museum or something. So I think I can share this blender file with
you. Final result. So here is with my photoscan what I do
with reality raptor.
20. Snow photoscans part 2: So this is with
these photo scans, and my recommendation is to
maybe download more of this, not just one, not just one. And let's now do what I
do in this YouTube video, which I didn't do last
time for this render here. So if you have activated
real snow add on, so again, go to edit
preferences, get extension real. Real Snow, install this now
in addon activate this, and then you get
this nice add on. And what this does, so if you just select one of these object, you have only two sliders, coverage and the height. So how much you want the
snow and height of snow. So if I now click At Snow
This create these errors, but this works, actually. So you can see this
snow patch here. And let's try create
maybe another one here. So I create another
snow patch here. It is little maybe too big, but we can blend
this here and we can also maybe bring this down. And just check mesh
density, this is good. It's not too intense. Let's create one here. So add snow. Okay, we can
also play with these values, maybe bring this down. Select this object,
add snow here, and we get another snow here. And let's see before and after. You can also add maybe
the snow to these trees. Let's see what happen
if I click here. Add snow. Okay, this add snow on these leaves and up because this use normal or
Zaxs only to add snow. But one thing you can do,
maybe you can rotate this tree like this and apply transform
data and add snow here. Stored in another Blender file. But if you want to
play with this, you can maybe add. Let's try and do this now
to show you what I think. So Eric 90, scale
this down and SY. SY, apply scale. Apply all transform, maybe set origin to geometry, and if I now go with real snow just maybe a
small amount of snow. Okay, I select wrong object. Let's now do this
with this object. Add. Okay, I see something
here, but very small. So let's bring these values up. It's like this object, add snow. Okay, much more, but
now it's too intense. Add snow. Okay, this is still
I still want more add snow. Okay, I can keep this
and let's now try delete this Napki to back this to our scene and Ex
minus night. No, Eric night. Let's now try place
this in this tree here. I'm not sure if this will work. So this is before
and this is after. And we get this snow. So with J, I will go. And you can see that we now get small amount of snow here. This snow here is,
like, too bright. And what I will do, I will just select
this snow here, this snow shader and
I will just apply this material to this Okay, so this is without material, so we don't have
any material here. So just apply this
snow shiler here. Okay, we have another one here. Just apply this material. And I'm not sure about map, but let's go with you. Just projection. So before we can see these white areas here after
this blend much better. This is all about snow. I think I will not
play with this snow. Maybe I will just play
with these ground photo scans to add
some details here. But basically, this is how
I created this snow effect. One thing we can also do
if we go to Edit mode, we can make some
imperfections on the ground. This ground is almost
completely flat. So G, scroll mouse down
to get this brush. Just add like small
hills or something here. And without recording, I
just duplicate this piece of real snow and I
just go with D Y, and I just scale this a little S Z to scale
this on Z axis, and I just place in some places to make some
imperfections also in background because I will
delete this and if you go here you can see this
small gaps, small holes. So this is before
and this is after. And you can also know that
I brighten this a little, so this is before
and this is after. What I do, I just select
all of the snow shader, and I just go with hue saturation
and bring this to 1.2. You can see you can out
here this small grass, and this is again,
from Quixel Bridge. So you need to go to
three D plains maybe, or you can just
search for grass. Three D assets or I
think three D plans. So it's all up to you. You can download any
of these you like. So these are categories
so you can just enter here and you can download
any of these you like. And for this example, I don't want too
much green color, so I download this. And I also have this. I also put this in asset
browser so you can see how this And what I do if I just bring some of
this example here, I didn't. So let's go with
the Shift T click. This here are models. So when you download
one of these, you actually download all
of these pieces of grass. So in this example four, and what I do, I don't want, save these four
different assets. So I just bring plane and
it put this in collection. So I will, for
example, call this. With you, you can just
press M and create, for example, grass collection. And now you just need select
plane, go to particles, new hair, and I don't want
to so this is too intense. So let's bring this maybe to 50. So we have only 50 particles, and now you need to go to
advance render us collection. So we want to render collection, and collection is grass. Okay. And now we have
this is too small, so we need to bring
this scale to one. Okay, not to one. Or let's just see if
this scale correct. No. This is problem. So if you apply scale
Control A and control A and apply scale to all of this We should now
bring this to one, and this should be correct. Okay, but or you can just bring this until you see that this is about
the real world size. And now, what I will do, let's go with full stop
dumpet to find this object. You can call this
Grassld or something, and you can now save this
in your asset browser. So right click Markus assets and then you can save
this in asset browser. Okay. But I will
delete all these now. I will just copy
what I do last time. So this is my old file. And because I know that
taus instances for this, I will try I select link
select linked object data. Okay. This selects some of this, but not all because maybe I
press ShivD at some point, but I will now copy this
and paste this here. Before and after. I see some ground here. That's because these
grasses comes with ground. So let's just fix this quickly. And you can always increase
value of this particle here to bring more
assets before and after. So we have more of these pieces
and we fix this problem.
21. Lighting: And let's now talk
about lighting. So because we will change complete appearance
later in compositor, I don't care too much
about lighting here, so I will just test a few HDRIs and I will choose what
is closer to look I want achieve and look I want achieve is still an orange vibe,
cinematic, dramatic. And for this, I want
sunset or sunrise effect. So something like this,
I want orange color on sky and most this
part in foreground, it will be more darken
and it will be bluish. So I want sky,
something like this. And because I will add sky
later in post processing, I will now focus only to add the sun behind this castle
to make this area bright. And you don't need copy exam
exactly what I do here, you can choose HDRI you like. And this is always
the same process, you go to polyhavn
and click here two assets assets and
HDRIs and then you go. You search for HDRI you like, and you want to download more
of this not only this one. So we have nice sunset here. Maybe this should work. So you just need click here. And because this
will not be visible, like this sky in background
will not be visible. We will cover this later. My recommendation is
one or two K maximum. So just now select two K, download this and I have
folder where I say my HDRIs. Okay, this is our blender file, and now we can just go with environment texture
like this to color, and let's now open. Open and now we can
load this HGRI. I like this loop. So we can now go with Control T. So when you select this
and with Control T, we can bring this mapping
and texture coordinate. And now we can rotate this HDRI until we get
something we like. And I will go with Try
fine volumetric here, and I will just for
second disable this so we can see where our sun is, okay. So here is our sun, and we can now rotate and place our sun
behind this castle. One thing you can also do, you can see this horizon
here, we don't want this. And in this example, you can always with holding shift,
move this slightly. So now this go up and we
want to go, this go down. But I will not recommend
to go more than 3% here, because this we rotate, whole world which
don't have sense. But we can always
do this slightly, for example, like this. Let's now bring this volumetric and one thing you can also do, okay, this background
is just 0.3, which is not too much. We can always bring
this value here. But we can always separate lighting which
affect the objects and what is visible
in background. And how to do this, we can go with shield to duplicate this. And now we can go with Shift click to mix these two shaders. And now, if I sent this to two, and this is point A, you can see that
when we move right, we get more light. But in our three D models
and also in background. But if you go with Shift
A and light but so light, but we can now use this in
camera array for factor. And you can see difference now. So this is what light our scene. So if we now bring this all 2.1, we get much darker scene here, but our sky still stay same. So if I type here, then, we can see that we
bright our sky here. And we can use this
but not as much. So we can maybe type here 0.4 to avoid too much light here and we can
maybe type here 0.7. This is, for example,
two. This is 0.1. This is just first example of RDRI and let's
now make more test. So I have one RDRI folder in my computer and let's
here to see what we do. And my recommendation is to
let's bring this values up. To make test render. Fleven. So this is lot one. And because
this will be only test, I bring this value all
down to make this faster. So just make first test. Now we have example one,
which I don't like, but we didn't play with
some rotation. Let's see. Let's try this one
and maybe rotate this But we have this part here,
which is problem. If I place, now this
is not visible. Maybe we can make test here. Let's enable volumetric. And now you just make another
test and go to slot two. And now we can go
with J to compare these two HDRIs and now I
will go with another one. And I made eight slots
of different HDRI. So this is how this look. So with J, we can just see how appearance of this
change just with HDRI. And this is all up to you. You can choose everything
you like here. And I think we need more
trees here in background, so you can fix this easy. If you remember we use this smart smart
low poli trees act. So if you just
bring this to 0.08, it will add more
these trees here. I will bring this all to 0.0 50. And just to show you
before and after. So this is lot seven
and let's make. So before and after, now it's much better. And I will now just
show you what I do last time when I make practice
for this tutorial. So I just use this
Coppenheim 04, and with these values, I will copy this. And
with value of one. So let's just copy
this very quickly. I will remove this mix shader because I didn't
use this last time. So let's plug this to
surface so value of one. Let's find this
CopenhimKlopenhim. Okay, so just copy this name in polyhn and
you can find this one. Okay. And this rotation
is this one and here. I use on x 2.7. Because if I disable
volumetric probably, if I said this to zero,
we see some trees, so I bring this down. Okay, so this is what
I use last time. I'm happy to make
these two renders. So this is our render, and this is what I do last time. I add more resolution here, so I bring resolution. Let's just quickly check. 200, so we get much
cleaner image, which is not a problem. Problem is lighting. And now I figure out that
I also use Sun lamp here, which is here and we can
now just check setting. I go with value of two. So I place sun here
and in this direction. So let's now try make
something similar. So this is our render file, and let's now ing render preview here
and let's try place. Sun somewhere here.
So light sun. And I just go with RX, I think, rotate somewhere
in this direction, and I go with value of two. And one thing I also
do, I go to object, and if you click use nodes here, we get more option
that we have here. And you can change here, a color of sun but this
is not correct way. My recommendation is go
with black body node, and we get this calvin
color temperature. So if you plug this here, we start with completely
reddish color. So if you go to Google and not
Kelvin, kelvinelvin color. Temperature, we
get this map here. So we start from completely red, which is mostly for
candle, light, or fire. And if we go to 10,000, we get completely bluish color. So we want something
about 3,000 here. Which is a value I
use also last time. So let's type here 3,000. Okay. So we get this effect, but I'm not sure
only about rotation. So rotation also affect a lot. You also get some shadows here. And because I don't want
mess too much with this, I will just copy which
I use last time. So I will go copy objects and I will paste
this object here. And if you want to
get same effect, you can just copy
these values here. But this is not something
you must do. You can always. Maybe we can remove
these volumetrics and I know why I do this to
get these highlights here. So if you now rotate
this on Z axis, we lose these highlights here. This is the reason I rotate
the sun in this direction. But now we get some shadows, which is also nice, so you can do everything
you like here. Okay, so we get
this nice effect. So we highlight this glossy part we do when we make texture. Then we shape texture with
all these masks here. Okay, so I will save this. But I think this is not all. So if we now go down
to color management, we get some options,
and let's see. So if we now change this
from filming to AGX. So this is now color transform which
most blender users use. So in your blender version, they update this film to AGX. So let's now use this AGX. And if you want,
you can play with this exposure and Gamma values. So let's see how this
affects. So we add more. Right here, let's
go maybe with 0.1. And I will not play
with this gamma. And I think last
time I play with this white balance.
So let's check. Yes, I changed this to
8,600 and this is ten, I think, default value. So let's type here maybe 850. So when we go up, we get
more temperature here. If we go on left, we get more bluish
and cold colors here. And this is also up to you. So you can play with these values and
choose what you like. So we tint, if we go on left, we get more like greenish tint, and if we go more up, we get more magenta colors. This is similar, like in
all image editing software. So like in Photoshop
and similar. So but let's just tick
what I do last time. So this is ten, and I go
here with 80668010600. Okay, something like
this. Now, this should be more similar
like what I do last time. I still see a big difference
with these two renders, and maybe I found
what I do wrong. So here, we have
this volume scatter, so we need to select
this box and in object. So change from word to object. I said this 2.7. And let's
try do this also here. Okay, this will add more glow
around these highlights. So let's also keep
this. Let's see. Okay, so this is
now pretty similar. So this is what we do now. This is what I do
last time, and, like, it is almost completely the same when we
talk about light.
22. Render settings: Now talk about
rendering and we can now basically render this
because we are almost finished, we only need to do
post processing later. So for samples, my recommendation is
maybe about 500 or 1,000. This is all up to you
for export settings. If you are happy
with this result and you just want to render this and paste
somewhere on Internet, you just need JPEG. This is again, this
is all blender five. So this is what we do now. So let's again, set this to maybe 500 and what
is important here. So I bring resolution. I keep for testing
this resolution, but for final render, I want double of these values. Okay, so let's now go with
talk about import options. So if you just want
share this render, you just render this in JPEG. With JPEG, you get
very small file size less than 1 megabyte maybe, but you still get all colors
you can display or Internet. But if you need to do
some post processing and like we will
do in compositor, or you need to switch
to another program like After Effects
or DaVinci Resolve, best option is this open EXR. And if you have multi layer, so if, for example, want say Miss Pass or similar, you need to go with multi layer. So let's click here. And my recommendation is this float because you
will lose some colors, but not too much some
information, but not too much. And I think we need
choose this one. So this is best settings to keep as much information you can and also to make this
file not so big. And I will share one video or
I will show you one video. You can watch where one guy explain make all tests and
explain why to use this. This video here is video
where you can find all information about what
format you need to export. And here he made
all these tests, and I think this one is winner. One thing before we go to compositing is
we need miss past. So to enable miss past, you need to go here under
U and enable miss past. And now we have settings here. So if I go with number
zero to material preview, this can take some time to
load all these textures here and from combined
switch to miss pass. We can see how these
miss pass look, and this is not good because we have only this range here, which we can check here
under world miss pass, which go from five
meter to 25 meters. But when we change this value, we can now maybe
affect our castle. So we need affect our castle and we can always add maybe
one cube just to measure. So from start from
our camera to castle is 1,000 more than 1,000 meter. But I will just copy value
which I pace here last time. So last time I use 3,000 meters because we still have hills behind this
castle, which are here. So 3,000 meters and
if we go to material, you can see that we
affect this castle, and I think we also have some
information behind here. Let's now make
these two combined. And now we are ready
to render, I think. So samples is 500, we make this double
of resolution. We enable miss pass we need. Let's now go with render image. And because I have
a little more time, I will maybe send this
to 1,000. Render image.
23. Compositing in blender part 1: Compositor is a place where
we can add different effects. We can add color grading or we can combine
multiple photos. For example, we
combine this sky, we download from Internet
with our render. We also add some overlays
like this ns dirt, film grain or for
example, the snow. And here we can find a lot of options which exist
only in compositor. Let's now start
with compositing. So first, we need to
click here to compositing and if you click Use Notes and with Control
Shift and click here, we can bring this UR node here. And then we can close
this tab and we can zoom this out or
t to zoom this scene. First, I will press N, and I think under options, I will change from CPU to GPU. And I think this now
should be faster. We have this backdrop, but we always have these
notes over this backdrop, and this is not what I recommend my recommendation is to
open here image editor. And now we can just search
for viewer node here. And now we have clean
preview here, always. And we can now change this to composite. And we have here. We don't need this backdrop here because we have
nice preview here, and here we can just
focus on nodes. So I will disable this. And I will close
this timeline here. I mentioned earlier that I get this result
in after effects, so I do post processing
in after effects, but because this is
blender tutorial, we will try recreate
all the inside blender, but I will also keep
after effects open so we can disable
all these layers. And we can try to copy
all these layers and effects from after effects to Blender compositor
one by one. And I note now that this
render is different than this we do now or
lighting is different, but we will not care
too much about this. And let's see what
I do last time. First thing I will do here, I will try soft and
little this image because renders are
usually pretty sharp, and I think if you
go with filter, So first one is soft ten, and let's just compare
before and after. And we can compare this if we go if we press M, so
we can we to this. So this is before and after. This is too much, so maybe 0.2. Then I will enable this
with M. And let's see what I do last time
in after effects. So first thing I do here, I just add blur. I use for this Gaussian blur, and if I press T, I can see opacity only 10%
with normal blending mode, Shift A and blur. In after effects,
I go with value of 300 and now I will
go with mixed color. And now here, this will
be like second result. And first result will
be this soften image. So if we go all to left, we don't take any
of this blue node, and if we go to right, we take this blue node here. After effects, I go
with value of 0.1. And if I now press M, this is before and
this is after. So we basically add bloom or globe effect
over whole image. Actually, in this example, I just blur this in
background, this castle. So we can also replicate
this very easy. With this, we blurre everything. So this is before and after, and now we can blu just a
little more this castle. So what I will do now I need
for this our miss pass. And I will just take this color. And let's go with Control
Shift here to preview this. And I think this
is already good. So we will blue
only white parts. I don't want blur this
horseman foreground. And because we have a lot
of black colors here, it will not affect
this part here. So let's now go with
Shift D. Again, let's plug this to first
input and this one to second. Okay. And now, if I go
with Control Shift, I can back this preview. If I move this right, you can see that we
add more blur here, but I just want to use
this factor or this color, and you can see result. So this is before and after. We only add blur where we
have these white colors. How we can control this, we can just control with
this white color here. If I move this
completely to black, we don't have any of
these effects here, so we can just add maybe slight effect here with increasing
this white color. And let's just add small
value of this effect. So with before and
after not so visible. So let's increase this little
more before and after. One thing which is important, you don't want overkill with all these effects
because we will add a lot of layers here. And if you add just small
value of each effect, later, it will be too much. So we can mute all nodes if you select all this
and if you press, this is before and
this is after. I will bring this event to 0.08, and this is before and after. We can now start
organize this better because we will have
a lot of these nodes. So this composite node is
actually our render result. And we just need this. At the end, when we are
happy with all these nodes, we can just plug
this to composite, and this will be our end result. And you will know this
our preview node. So we can preview this here. For now, we don't need
this composite node, so I can place this here. I will now just place all
these nodes in frame, and I will call this maybe
blue or haze or something. If you select all these notes, you can also press
S to scale this. If I now, press Control J, I think, we create frame. Now I can press, and I can call this B. Okay, now we can move
a whole frame here. And one thing we can also do, we can make reroute, same input, use this one
and also this one down. You can search for re route. And you get this
dot here and you can plug this dot here
and then this one. And then from here, go to here, but there is also shortcut
for this in blender. Shortcut is shift right click. But when you already have
two nodes from one input, you can go with
shift, holding shift, and you can just connect
these two together. So we can now bring this here, and now this will be our. Okay. I don't want to place
this inside this frame. So we now know that
this is our image, and we can always take this
and plug in another input. And let's now see what is next what I do
in after effects. So we have three color
correction tools. And if I now enable first one, this like bluish tint and
I usually have a lot of lots on my computer
and instead of playing with color
correction tool, like like lumetri color, I just like to import
lots from my computer. And now I just like import this here and then I test
before and after. So instead, losing time
with these color tools, I'll just see what I like. And because we cannot
use this in blender. And because we want to
achieve similar effect, I get last time I will just try add bluish
color to this snow. I will not care too much about all these details I
get in after effects. So this is before
and this is after. Inside blender, if
we go with Shift A, color adjustment, we
have this color balance. So in this step, I will just try get some
bluish color on this snow. Okay, first one
affect more shadows. So this one should be
for, like, highlights. But this also add
thin to everything. So I will let's try playing
with these mid tones here. Okay. So in this point, I'm not sure if this
is good or bad. So if we press them, we
can see before and after. But we can always
back to this later. Next thing I do in after effects is try and get better sky. So if I start enable
these layers, you can see that we add
some layers of sky here. And how I do this. I go to unsplash.com and I
download a lot of these guys. Finally, I use this one. This one here. But we can maybe for this
example, test this one. So what I do, I just bring this here. And now I can go in after effects with Shift plus
what does this change, the blending modes here. For this, I need to use miss pass because I want
this effect only on sky. So with this isolate this sky. I will apply this sky mask
here and let's enable this. Now we can see this
effect only here, where sky now I can continue playing with changing blending
modes with shed plus. We will also, of course, replicate this in blender later. Maybe this one so
screen blending mode. Maybe we can try with this
luminous blending mode. And what I do now, I just place this on position. So this is not
obviously good result. Let's try it screen. Okay, now I just add mask
where I want this effect. For example, here and,
of course, feathers. So with MM, we can add to
this mask feather, maybe 400. Okay, so we get this effect. So this is not good example, but just to understand
what I do last time. And what I do here, I just test a lot
of these skies. Mostly I search for
this sunset or sunrise. Now we can also try make
these to luminosity. Okay, I need maybe
sharpen this mask here. And now we can also press
T and bring opacity down. Let's make more space here
with G, we can move this here. And now I will import this image from splash
and I will try find this. I think I will also put Link in Links file or description. So let's bring this inside
blender compositor. And if you go with Control
Shift and right click, you can see that
this aspect ratio don't match from our render. So I need to go with scale. Fed these to render size. But now this is stretch. I think I want fit
is also not good. I think we want crop this. Now, this part match our render. So let's see this case, yes. This XX is matched with our render and we will also
take only this part here. Now I will go with Control Shift click here
to get this viewer node, and now we can mix
this with our render. I will go with Control Shift and mix these two nodes here. Okay, so if we go to left, we get our render and
if we go to right, we get our sky. And I note that my
horizon is about here. So we need to bring
this horizon also up. So we need another
transform node. But now I will just bring
this X axis up or down. So not X axis or Y axis. So bring this up. I don't want to see this sky
over these hills. But and so this is our
render and this is our sky. And now we need miss pass
for this vector here. So what I will do here, I will go with miss pass
here through color ramp, and we can go with Control
Shift to see how this look. So we want isolate this. Everything we just want. Okay, I think this color ramp is not good because we cannot see these
skills in background, so I think we need adjust this value here and maybe
place here for 1,000. But I will not care
about this for now because I will keep sky
maybe over this part here, and I will show you later
what I think for now, I will just plug
this here as factor. And now you can see
that this texture here is only on our sky. So I combine multiple of this, and I use screen and luminosity, and we can also try
maybe screen here. Okay, screen is not like you can see a big difference
between two softwares. So for this example, screen just don't
work in blender. We don't even have
luminosity here, but luminosity is, I
think, same like volume. And now I need to fix this. I lose all these
heels in background. And because I don't need these
details are very similar. I don't get anything here. I will just make mask here. So I will now bring this up. Let's make space for
mask to create mask. So horizontal split, and I think shortcut for creating
mask is under image editor. And I will now load
render result here. And here, if we click
under this view, we can find mask here. We can create click plus
to create new mask. And I will call this
maybe sky mask, so it is not important. But now we can go with Shift A and I will
create circle mask. Let's now press and now, I just want to protect
these hills here. So I will create mask like this. So if I press G, I will start with
something like this. Now when we create this mask, we can bring this
down. And let's see. So this is factor we for
this texture here down. And let's now go with mask. So we have this
mask and if you go with control sheet than here, we can preview this mask, but we need to select
our mask here. First, I invert this mask, so I want black color here where our sky will not
be visible. So invert. And now we need also blur this, so I will go with blue
because we don't want sharp mask and let's go
with maybe 100 for now. Okay. And now we need
combine these two mask. So I will press S to scale this, and let's place this one over. If we go with Control
Shift, right click, we can now press Control Shift and left click to
preview this node. So we have basically one
mask and another one. And now we need to
multiply this to take only black color from
both of this mask. Let's now see what we
get result we get. So we now back these kills because we protect this
with this black color here. And now with this white color, you can control how much
you want this effect. So if you bring all these down, we lose all the sky. We can it type maybe 95. Or 98. This is pretty sensitive. I see this sharp mask here, we can try play with this color m here to
see if we can fix this. For example, if you
are not sure if this color correction
here good or bad, you can always go
with mixed color. This results is
result after this. Now we can just play
with these sliders. Maybe we can choose
just 0.5 of this. And you can always
select all this and press to see before and after. So this is this blue effect. I think this blue effect
is a little too tense. So we can make more space here. So this blue effect
is too tense. So we can always go
again, with mixed color. So this will be second input and this image input is
before this Blur effect. Now we can choose how
much we want this effect. Maybe just 0.5. So this is before and after. And we can rename this. For example, if we go
within, Control J, we can press and
rename this too. Blur effect. Blur
effect controller. So this is color
correction controller, so you can go with Control J. Next, you can see that I also use different
blending modes. So this is Alpha odd, and this is colors. So you can also know that all these create a
little different effect. I will go with G to
make more space, and let's again go with Shiv D, and let's now try
over this image, add color blending mode. So let's set this to color
and let's see effect we get. So this create this reddish
color, which I like. So I can put this only
over castle here. For factor, we can again
use this mask here. Let's press to scale
this and Control J. Control J and create mask here. Okay. So this is mask
and or we can just go with re route here and we
can use this as mask again. So we get effect on whole sky. So this is our mask, so we get this effect
on whole this area. But I want maybe just on this
area where it is castle. So how we can do this? We need to combine two mask and let's now
create second mask. To create new mask, we need
to click here, I think. Let's call this castle. Okay, and we can again
go with Shift A and New. Let's press this to
scale and maybe. So I want this effect only
over this castle here. Okay, something like this, and now I will bring this down. And so we have this
mask here and let's now multiply this
with this new mask. So mask. Let's select this castle mask. And now we can go
with mixed color. So this will be our old mask we create before and this
will be second mask. Which look like this. Okay. Now if we send this to multiply and sent this
to one, we get this. But we need Blur, this
sharp edge here and a lot. So I will go with Blur. Let's type here maybe 500. But we want to keep
this very soft. But I also want to
update this mask. This is too dense. You can see all these
updates real time. So we have nice mask here, and now we can reuse
this four factor. I will first select all this
as to scale and Control J. Then mask to mask over cast. Okay. Now we can
use this as factor. Control shift back to last
node to see everything. And if we now plug this here, we should get this effect
only on this part. This is very subtle effect. So if I go with M, I get
something here but very subtle. So let's see where is problem. So this is our mask, and this look like we have
a lot of white colors here, but it is mostly gray. So let's bring this down. I like to do this in real time, so I will make this last note here and
now we can see change. Okay, now we get more
this reddish color here. If you want this reddish
color on this area, we can bring this here,
but I don't want. Okay. You can see
how this effect and which effect we get with
this before and after. And this is a
little too intense. So we can control this again. I will go with mixed node again. So mix color and I will plug in second input this last node we
have before this one. So we can bring this here and
let's now plug this here. And if we now move to left, we can basically choose
how much we want this effect. Maybe just 0.5. So this is before and this
is a 0.2, four, and after. I will select all this
Control J. I will call this red sky O castle. This add a little orange
color on this castle. So this is this orange tint and let's see how we can
do this inside blender. For this, we need another mask, so I will quickly
create another mask. Shift a circle. Let's bring this over
castle this to scale, and I just want make
mask over this castle. Okay, something like
this, and we can call this castle two
because we have castle one. I think mas Let's
now bring this down. And now I will go again,
with color balance. Now I will add a lot
of reddish color here. I think I will just go with maybe mid tones and
maybe highlights. So I will bring this down and I will go again
with mixed node. Let's make this effect
very intense for now. So I will plug this in
first with this in second. Now what we have,
if we go to left, we get this and if
we go to right, we get this reddish color. And if I now import our mask, I will select this castle too. Let's see what we get. And now I will go
with blur effect. And increase this
maybe 200 or 400. But we now get this
go also on sky, and we don't want that. We want this only on castle. Affect something like sun
is going to this hill. And to get this, we need multiply this mask
with miss pass. So we can go with
shift likely and make another reroute here
and this is missed pass. So we can now take this input. So this is miss pass
and go with color. And now I will bring this over. Let's place this here,
Shift, try click. So we want opposite. So we want black sky
and this here visible. So let's go in opposite
direction or invert this. Okay. I think this is good, and now I will go with Shift try click to mix these two nodes. And now let's see what we get. Now we need to change the
blending mode to multiply. Now we remove our
sky and we can now only take this hill
and this castle. And to do this, we can
maybe bring this 200. And let's now play
with this mask. And let's now see what we get
when we use the SAS mask. So this is before we get a lot of this reddish
color on this sky, and now we only remove this sky and get
this only on this castle. Okay. But I move this a lot to show you this effect and let's now make this to
some normal values. Before and after. For this, I just use one color
lot from Internet, which create more details than this color correction tool. So this is before and after. And I also use another one, which is again, combination
of selective colors. I move this left to
remove magenta to get more orange tint and I
use another color lot. I also for this
lumetri color change, bring saturation down. And if I now bring this, you can see this tone is
more natural than this one, we get with these color
wheels here, color balance. And you can also see how
I draw this mask here, which is much easier
after effects. So if I press the twice, I can remove this
mask and now I can quickly because I also want
some effect on these heels. So this is before and after, and then I reduce, so this is only 15%.
Let's bring this down. Okay, this tint is not so good, but with combination in combination with
this one and when we bring this maybe 30
is also too much, but just for this
case to show you, you can see before and after. We put some focus on this
castle before and after. And the blender is not so easy
to replicate this effect, but I just want to dry replicate everything
from this file here. Okay. So if I, for example, bring this to
opposite direction, you can see that we
add bluish tint here. But I want other
reddish tint here. Maybe more to yellowish or green color than
on this magenta side. So this is before,
this is after. And again, we can
control intensity of this effect let's see, with this white color here. So if I bring this white
color more to black, we lose this effect. Let's keep just
subtle effect here. And let's now put this in frame. Control J, mask for castle. Control J, reddish
color on castle. Let's now again try play
with this color balance. I think I can bring these
highlights a little up.
24. Compositing in blender part 2: Next I do here is
this calation effect. So let's go with T
to increase this. It's already intense. You can see this red glow
over highlights here. This is before and after. You can see now,
it's very intense, but we need to bring
this down maybe to 50. And what I do in after effects, let's now just put this to
normal to see this effect. I start with one effect
effect in after effects, which is called find edges, so we basically
find these edges, and then I tint
these edges to red. And with levels, I
remove some edges, and on left, if you go left,
we get too much of this. So I remove this on right. And then I go with fast box
blur to blur, everything. If I now said this to
remove black colors, when I said this to
screen blending mode. We keep only this reddish
color and remove everything. I will for now skip
this in blender. We can do this, but
we need a few masks, and it will take some time. So let's see what
is next lens dirt. So this is overlay, I download from Internet. And these overlays
are from action, VFX. You can find this for free. I download this for free. So if I forget share
link with you, just search for this name and
you will find this overlay. Let's see which one
I use number 30, so we can bring this
in side blender. I want more space here, and let's now mix this again with Control
Shift and right click. Again, this overlay
is so this is slice of how render this
overlay is big. And we need to fix this we need to go with
let's make more space here, scale scale to render size. And I will try to go with fit. Okay, we need to go with
Control Shift and click here. So this is size of
our render and if I go to stretch this stretch crop, Let's go with Control
Shift click here again, we transform search
for transform. And now we can move
this y axis is okay. We need to move this on X axis. And I just want make
one testify try do this with CPU.
Let's see difference. Okay, so you can see how
much slower is CPU here. We need to wait like 5 seconds. So with GPU is real
time for me almost. Okay, last time I placed
this here over this tree, but you can place this
lens over where you want. And of course, you can choose
any of these you like. And now we need to change this maybe to screen bending mode, screen or we can play with
light and cool or Dodge. Odd. We can keep this screen, and let's bring this
even more right. And we can now just fade
this effect maybe 0.3, not too much, but
it is still here. Control J and call
this ans dart. So A, and now we can maybe compare the result with er node again,
before and after. Next I do in after effects
is this glare effect. First, we have this no over. We will also create
this later and we have here this glow
and glare effect, which is pretty intense. And for this, I use effect
from after effects. We have built this glare or
globe effecting blender, so we can just search for glare. And we have a lot of
options here. Let's see. So Bloom is for this
case, very nice. Effect. Let's just
play with this. So If you want, fade this effect, you
need to go to minus, for example, -0.8 or something. Okay. And if we go -0.9. Okay, we can do this, but I have a better idea, so we can just add
another mixed node. So this is size. You can
see effect of this size. We just spread area where
this effect is visible. Let's first press them
to see before and after. I like this effect, and we
can go with mixed color. So this will be after and this will be what we have before. And now we can choose how
much we want this effect. This is too much,
maybe 0.3 or even 0.4. And what I will do now, I will combine more of this. I will go again with glare. And now I will change this
all to eight or something. And now I will again go with this will be after
and this will be before. Now again, have this slider, where we choose how much we
want this effect. Maybe 0.2. So we have effect
with small size, which affect only this area. This is before and after, and we have this which
affect a lot of this. And I think both
are too intense, so let's bring this 2.1. But this is only bloom effect. Let's now go with Shiv D. Let's see what we
have here Ghost effect. I will skip this one streaks. This add this more like stars. So I will go with G, and I will again go with Shiv D. This will be second input
and this one, first input. And now we can choose
how much we want. We can keep 0.1 maybe. And let's duplicate
this one more time. Streaks, folk glow. Let's see how this affect. So this is before and after. Let's play with size. And in this example, low is actually with low, we will get more of this effect. So I will choose this high, and let's press to see before and after is
still a little too intense, so we can again go with Chi D. This is first
result. This is second. And let's see how much
we want this effect. Maybe again 0.2. And now all this is
globe and glare effect. So I will press S to
scale this Control J. And N, I will call
this glare and globe. Okay. Now, if I select
all this and if I press, this is before and
this is after. Now, if I add
another mixed node, so this will be input two and we can make reroute here
and this will be input one. So if we fade, complete this glow effect, we can play with this. I like this part here. Maybe I can go to my
scene and with color, adjust this option,
this roughness here. So if I let's go to
material preview. It is about these two masks, so I can maybe add more area, more white area to get
more rough part here. But I will not re render this. For now, I will
maybe do this later. Let's now add some
noise texture. And for this, I will also
use overlay from Internet. And I have a lot
of similar things, but I think this one is free. So if you search for
free film grain overlay, Shutterstock, you
can find this map. And this is video texture, but this is not important. We need only one frame. But I think we can
also try to create this inside blender to create noise texture
inside blender, we can go with Shift A
and search for texture, and I think we can here to
you and can call this noise. And now we have some pre
definited options here, procedural options here, and
I will choose here noise. Okay, here, we have noise, and you can see how this look. So this is not the
best solution because film gray noise is
something different than just black and white pixels. But let's use just
a little of this. So we can go with
Shift try click. Mix. For this, I will use
overlay blending mode. Now let's try different
blending modes, but I think it will not work. So screen brighten
everything up, multiply, darken and overlay. Should be best
solution for this, but let's just go
with maybe 0.1. If we go with 0.5, you get this. So maybe 0.2. And I think we can
improve this if we add little blur here. Let's go again with blur. Maybe one pixel,
just a little blur, and let's maybe go with 0.2. So this is before and after. As to scale, bring
this about here. I think I will try to use screen blending mode because I don't want to
darken whole image. This look a little better. I look little like noise, but also maybe tiny
snow or something. So let's just use 0.05, and let's now do
what we should do. So I will use this overlay from Internet Let's now review. This is big, but I think
this is also okay. Again, with mixed node. Mixed color, and this
will be second input. Let's now set also
this as overlay. This also darken image a lot. So let's use maybe 0.3 here. So this is before and after. And you can see how overlay
filmy overlay looks. It's a different than this
one we get from lender. But this one is more intense, so we can also keep
small value of this one. And I also look in
my folders what, what I download from before, and maybe we can if you want
to make all the film look, you can maybe try something
similar like this one. Or maybe something like this. I didn't use this last time, but let's see how this look. Let's try with this one. So this is something similar. This is more like scratch
and film dust than grain. Problem with this is
that this is so small. Okay. Now when I import
this, I also can try different things here. I think I will choose
later this one, but let's see this
light leaking. So you can also get this effect. But not sure if this is over the best blending
mode for this, you can maybe try
screen multiply. Let's try maybe this one. Screen. This folder here is
useful if you want, get retro camera look. Let's see this scratches here, and for this, I think I should
use screen blending mode. We get with this scratches,
old camera imperfections. So let's try fit, stretch. But I will back here and
use this thrain overlay. We can bring this 0.1, and I think we are
done with this grain. So if I now scale this
and if I press M to mute, so this is before and after. So before, after. And inside after effects, we have this grain
effect which I like. So we have redefinited
options here. So we just need select
this and if I type here, maybe 1.2, we need
a nigh for this. We get really nice
noise texture here. And we can easy change this
to something different. All this is maybe too intense, and I will go again, with Control J, and I
will call this grain. And now we can go again
with mixed color, and now we can plug this
last note before this grain. So let's plug this here
and then this down, and now we can choose how
much of this we want. I want a lot of this maybe 0.8. Next is snow. And let's just quickly jump
to after effect. So we have here snow overlay, but I have this peck from okay, if I go here, AI juice is all this is real snow
footage, but this is not free. So you can always go splash and just search
for snow overlays. And you need black
and white texture like this so we
can easy isolate. Remove these blacks and keep
only snow. And I'm not sure. Which one I download, but I download these two. And I think you can maybe type this name and you will
find this texture here. So let's see how this look. I also find this somewhere on
Internet, and I'm not sure. Well, not so realistic, but we can use only small value. Bring this inside Blender. And now we can go again let's
go with Control click here. Scale fit to render
size. Let's see. So I think in this case, I will use this stretch or now I will bring this here,
shift try, click. And now we can screen
use screen bending mode. Now we can just choose how
much we want this effect. And now we get another overlay. So this is before,
this is after. Let's again go with maybe 0.2. Now I will again select all this as to
scale, control ray. And I will call this Snow. Mix color, and now again, we can use this as
first input this as second we can choose how
much we want this snow. I will use all I will go 2.9. Now we can add some
sharpening here, and I will show you how you
can create this effect. So I will go first
with Map range. And this will make whole
image black and white, similar like colorm and
now I will go with blue. So I want blue, all this, and let's plug this here, and I will go with value of 20. And now I will go with mix. Color, and I will divide this. I will choose here, divide. And now let's see how this go. I think I want click here claim. Okay. And now we can
use this as overlay. So I will again go with Shiv D. So let's use this as
overlay blending mode. So this should be first input and this
overlay should be second. Now you can see this effect. So we get this sharpening
effect here and let's go with Bring this down. So
if I go to left, this is before,
and this is after. This is also effect
which you can find mostly on old cameras, VHS camera or similar, but we can use small
value of this, maybe 0.3. So if I now press M, this is before and this is a. This is still too intense, so maybe 0.2 Control
J. Sharp pen. And here I will check
my white balance. And what is white balance?
I just go to Google. So white balance refers
to the color temperature at which white objects on
film actually look white. And I see in one tutorial, so if you need object in your scene for which
you know that it is white. And for this, you can
actually, add cube. So cube is white. But I don't want to render this because I'm
pretty sure that this snow here is snow shader
here is actually white. So we can back to compositor, and we can try fix this easy. So I will go with mixed color, and I will go to divide. So we actually want to divide color from
this white object. And I'm sure that
this object here, this snow here is white. So I will sample this pixel and you can
see what this does. This actually remove
this color from white. So we know that this
snow should be white. But in this example, this
snow is actually blue. And now we basically remove
this color from our scene. But this is too intense, and you can play
with this value. But we actually don't want though this maybe
just small value. So I think technically
this will be more correct, but this is art, so you
can do what you want. But let's just remove some of these color with
this slider here. We get a lot of bright parts
on these highlights here. But I say before
that in beginning of this video that we should back to all these
notes and play again, all these effects later. I think we need
more contrast here, so I will go with curves. So RGB curves. Let's now bring this here. Now what we can do, we can move this all about
here and now we can play with. And we can now play with
this factor maybe 0.1. Now, I think we are done, but let's just go with Control J and rename
these to wide balance. But we need now back
to all these settings, and we need adjust this because this
doesn't look so good, so I will go with joining down. So basically in this tutorial, I just show you all options. You have if you change
any of these values here, this drastically
affect our renders. So if I click here, you can see, we get completely
different result. And if I move this.
So basically, you just need to take a lot of time and play with
all these values. And I do same in after effects. So I spend two days just tweaking all these settings
until I'm happy with result. But I think it is a little harder to do this
in side blender compositor. All this is pretty sensitive, and we have less options
than in after effects. For example, this film Convert
don is not free addon, but you can see
with one click that this affect a lot
of these renders. So I have a lot of This is
like professional addon. It cost, I think,
about 150 euros. But with this, you can easily, choose change film book, and with one click, you can do a lot of things. And you don't need to tweak and spend hours inside blender. So this is difference
between like programs there just for
compositing and blender. But I think we can
also this example, we see that we can also improve a lot our renders inside
Blender compositor. Okay, I think I will
now take some time and try tweaking all these settings until I get better result. So I can always select
all this and I can press M to mute this to see how
this affect my render. And when I beg this, I can see if I like this or not. Now, I think I will bring
this down maybe 2.3. And one thing we can also
do, at the end of this. I think we should do
correction at the end, so we can go with color,
maybe hue correct. In this point, you can play
with all these values here. So if I move this up, I get more like
these orange tones, and I think with just one move, we make this render better. So let's this is all
for this tutorial. And now I will take some time and try to
make this better, and I think I will show
you my final result. I hope you enjoying this tutorial and learn
something new. So you can also check my other tutorials and
see you next time.
 šime Bugarija