Transcripts
1. About the Class: Welcome to my new class crafted specifically
for the beginners. In this class, we will paint a simple yet stunning landscape
with a sky and a city. I will guide you
through every step. We will start with
materials and color mixes. Then we will move to draw
in a sketch and finally, we'll create our
watercolor masterpiece. This class is perfect if you want to paint
something relaxing. I will use only four
colors so you can paint even with a
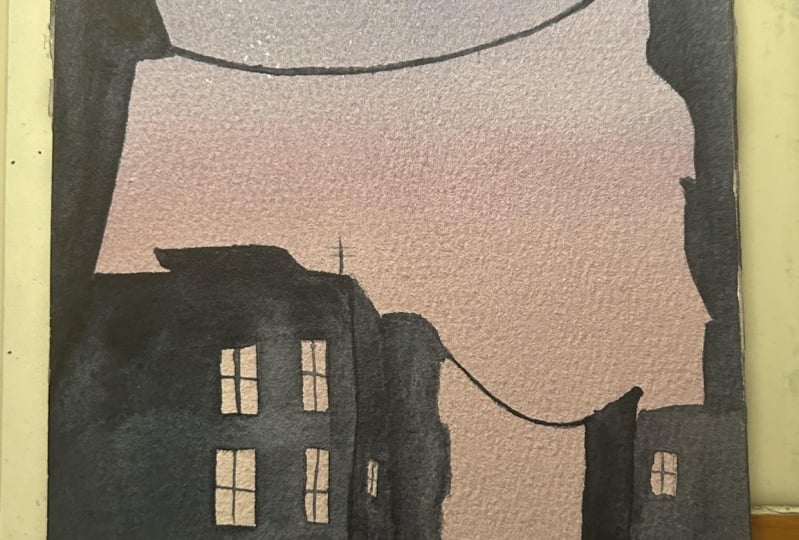
small water color set. As a class project, you will paint a landscape with the night sky and
silhouettes of the city. Hope to see you in the class.
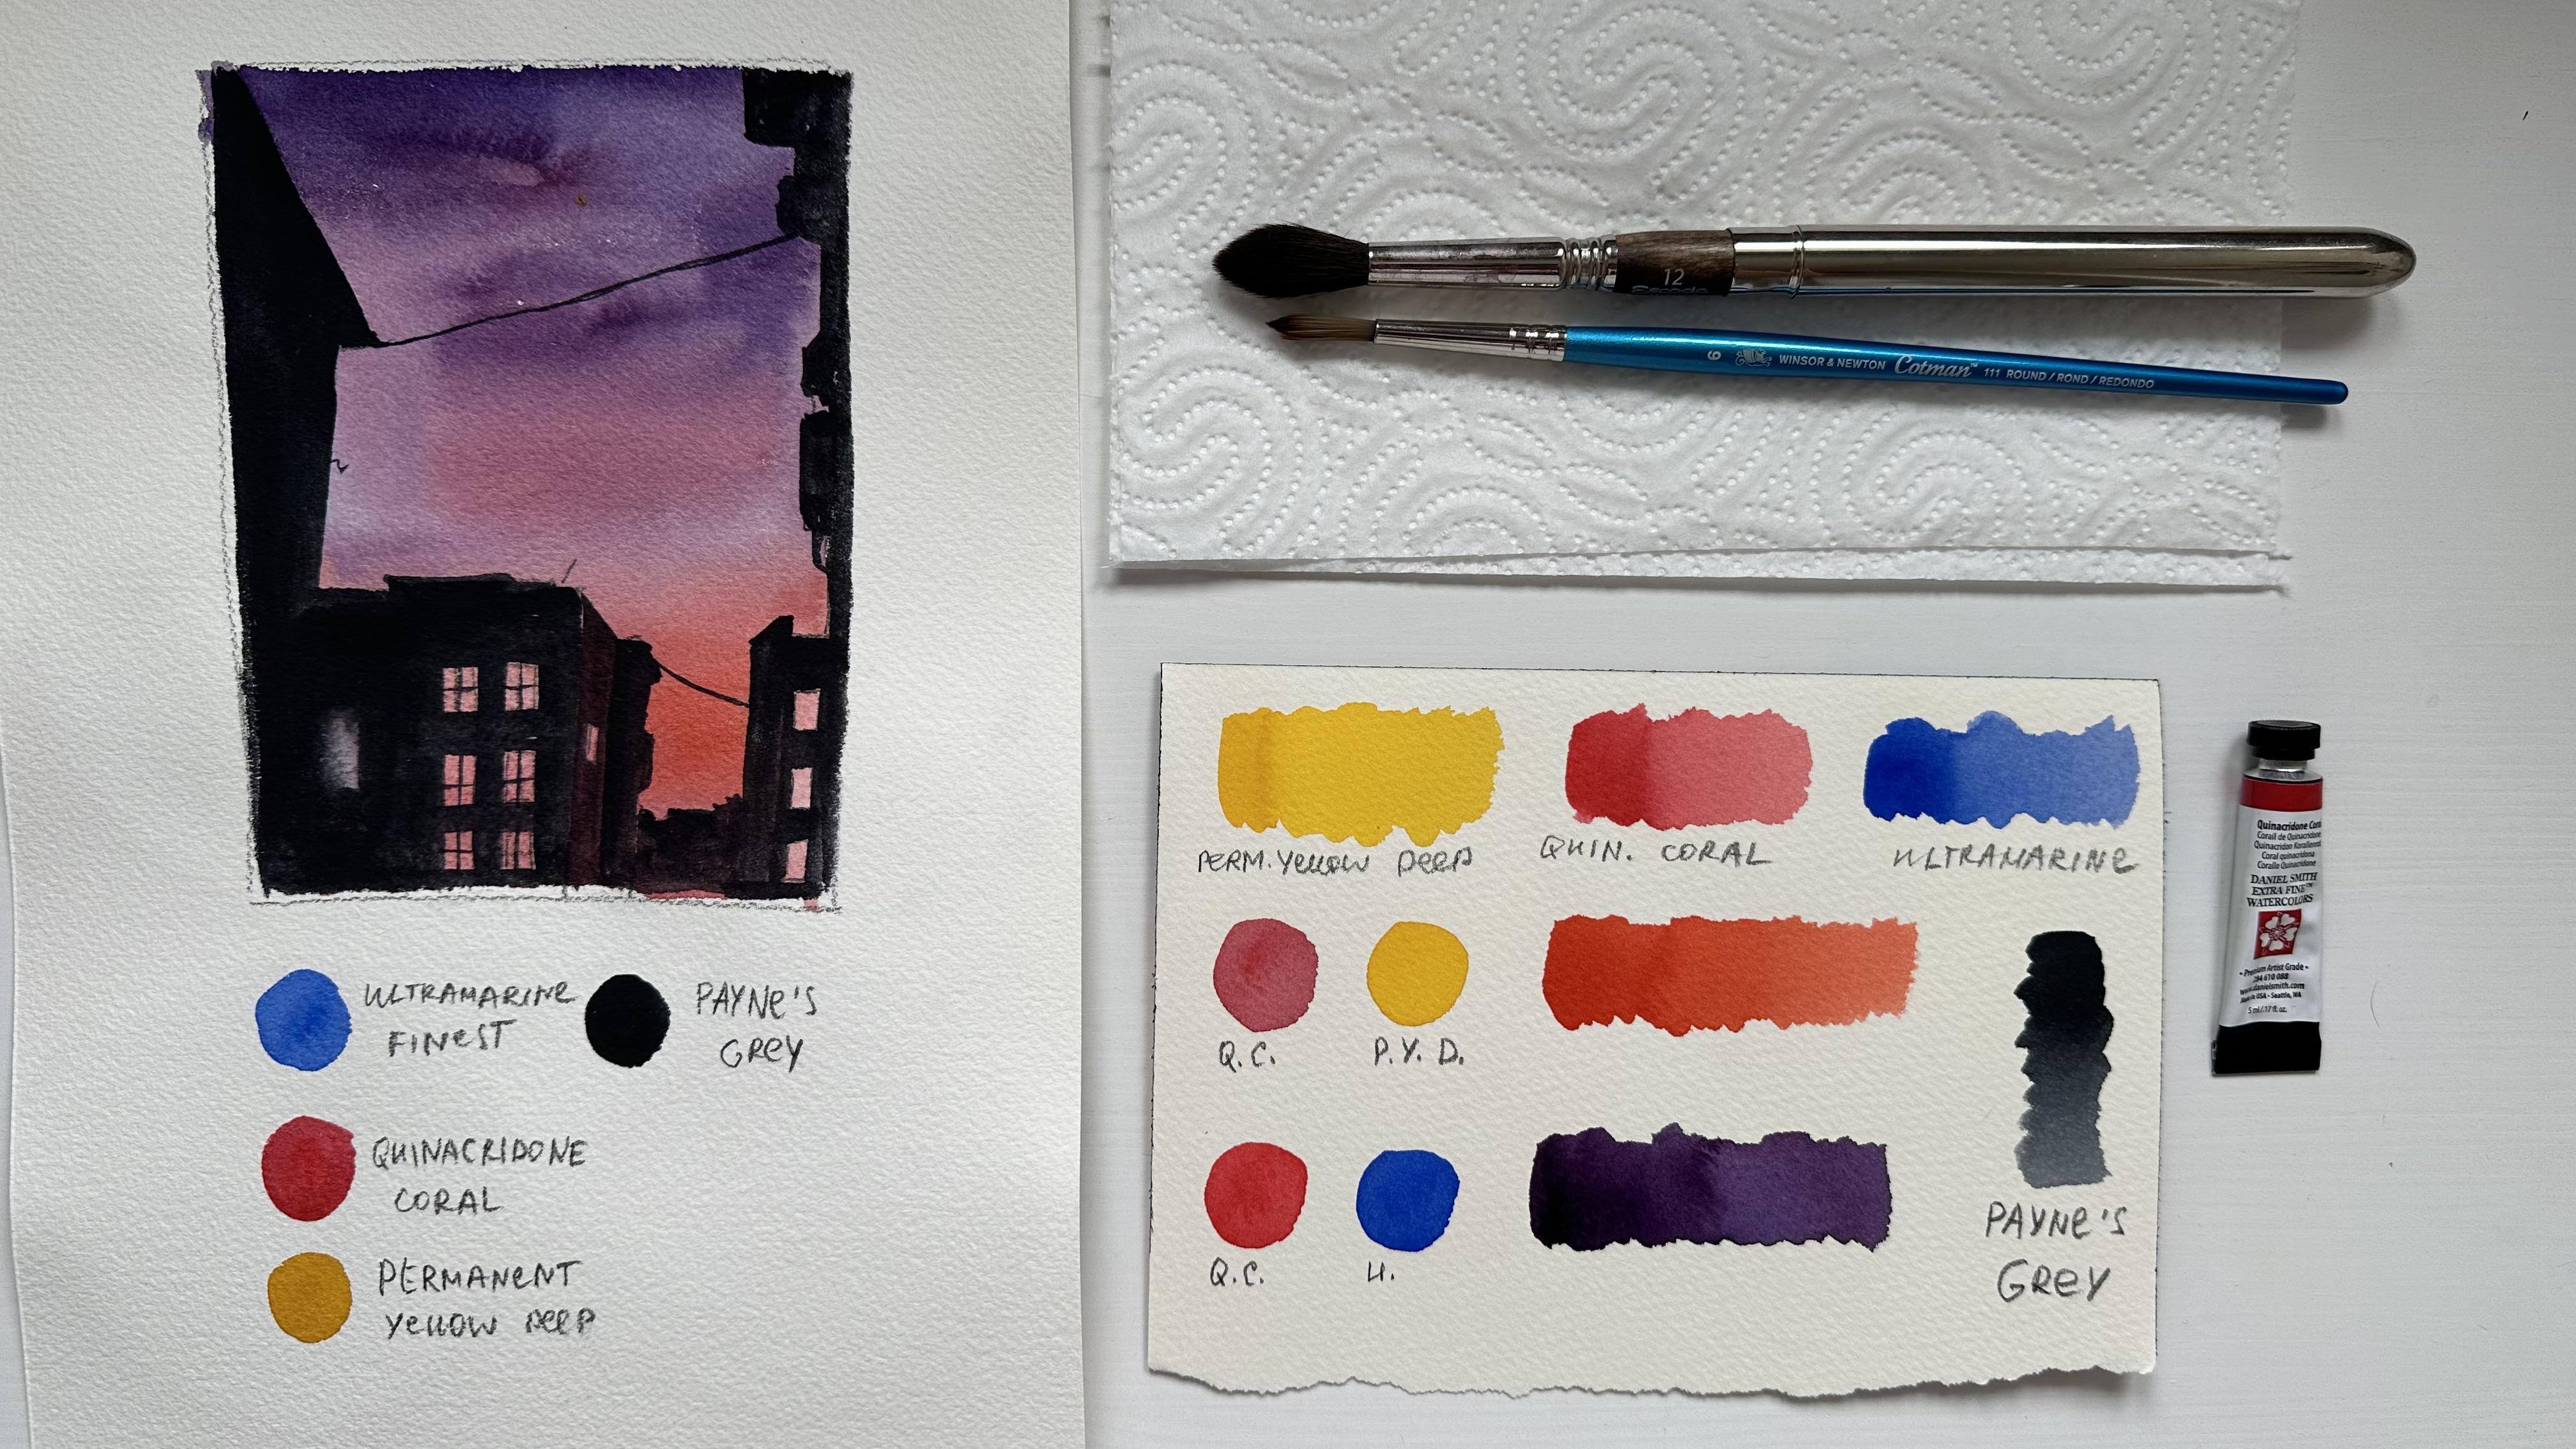
2. Materials and Color Mixes: Hello again, and
let's start with art materials you will
need for this painting. I will use four colors
permanent yellow deep, in credon coral, ultramarine
finest, and paints gray. I will use two brushes, synthetic brush number
six by Winsor and Newton and number 12 by squama. I'm using mechanical
pencil by pencil, 0.3 millimeters
and needle eraser. If you don't have it,
the ordinary eraser will do just fine. I always use 100% cotton
paper for landscapes, and this time, I decided
to try paper by bah. I already painted some
landscapes in this pad, and I think it will work fine. I will take some scrap
paper to show you the color mixes I will
use for this painting. I will start by
swatching my colors. If you don't have these colors, you can try to find some similar colors from
your pallet to replace them. For this type of sky, I normally use a lizard in crimson for the
red, but this time, I decided to use kinocrdon
coral because it creates more bright orange
color in mixes with yellow. Our first mix is kinocrdon coral and
permanent yellow deep. Which creates a very
nice orange color. Even if you have orange
color in your palette, I suggest you to use pink and yellow color instead
because we will need to create a smooth gradient on the paper from the purple
color to the bright orange, and it will be possible
to create only with these colors because if you will add orange color
to this palette, it might look muddy. Our next mix is inacrdon Coral
and Ultra Marine finest. And pure paints gray, I will use for painting the
silhouettes of the buildings, and you can use any black that
you have in your palette. That's it for the mixes. Let's move to the next sketch.
3. Sketch: In this lesson, we
will draw a sketch. I don't use the ruler to
create these straight lines, but I'm using site
and method and to measure the proportions
of the objects, I'm using my pencil, and also you can
measure the angle of the lines because they are not
straight with your pencil. You can split the image in two halves horizontally
and vertically to understand where the objects are towards this middle line. My sketch is done. I will remove the pencil
lines with a needle eraser. I'm usually using needle eraser
to not damage the paper, and I will see you
in the next lesson where we will start
painting with watercolor.
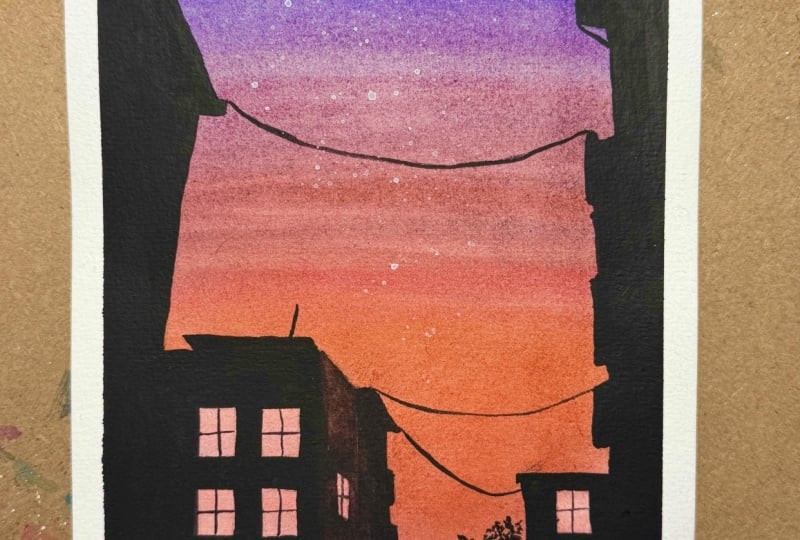
4. Painting the Sky: In this lesson, we will paint this landscape with water color, and we will start by preparing our colors on the palette
if you haven't done it yet. I'm always using
a ceramic palette because I like how the
colors are mixing on it. But if you don't have
the ceramic one, you can use plastic co metallic one or even a simple plate. We will need a pretty
dense purple color, so don't create two watery mixes and try to create a very
color on the palette. We will start by covering the surface of the
paper with clean water. I'm using another mop brush, but it's not necessary
if you don't have it. You can just use your mop brush. I just have it loaded
with the color, and I didn't want to rinse
it off from the brush, so I decided to use another one. I will start by applying very dark purple color
on the top of the paper. You can cover the whole
paper with the color, not avoiding the buildings because the buildings
will be black and we will paint them on
top of the color of the sky. As we move to the
bottom of the paper, I will add some more pink color to create this nice gradient. Basically, we are moving from a very dark purple color
to the orange one, and we need to create
a smooth transition. Mm. We are covering the
paper with color, but I think we can create even darker shade for
the top of the paper. While the paper is still wet, we can work with wet
on wet technique. Because the cotton paper
will absorb a lot of color and the colors will be
not so bright in the end. Now I will clean
my brush and dab it on the paper to remove some color from the surface of the windows because the windows will be pretty light pink. And we are done with
our first layer. Now let the paper dry and I will see you
in the next lesson.
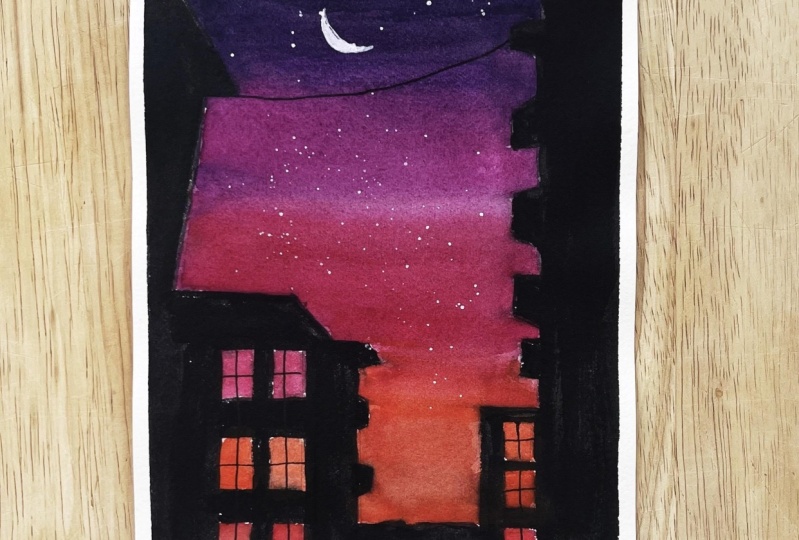
5. Painting the Buildings : Welcome to the final
lesson where we will paint the silhouettes of the buildings
and some final details. I will use Pure
paints gray color and the brush number six. This part of the
painting is pretty relaxing because you need to use only one pure color and to cover the whole surface
consistently with one color. This synthetic brush that I'm
using has very pointy and which allow me to paint even a small details and thin lines in the
end of the painting. If you don't have such brush, you might need a
smaller brush later. When we're painting this
building on the left, don't forget to avoid
painting the windows because we need to leave
these areas light. If you will look closer
to the reference photo, you will see that
this side wall of the building has slightly
different shade, not so dark and not so black. That's why I want
to add a little bit of kinocrdoncorl,
two pins green. It will be still pretty
dark color and maybe you even can tell the difference when you're
watching the video. But I suggest you used this
slightly different shade. Because this different shades, they will create more
realistic appearance of our buildings and
not just flat color. It looks like between these two buildings on the
left and on the right. There is a tree or some forest, I don't know, and the
building further away. So I will have to paint some more interesting elutes
than just straight lines. But you can create your own elutes that you
want to paint over there, maybe even just a tree
instead of the building. When we are painting this
building on the right, we also remember to avoid
painting over windows. And now I'm moving
to the final part of this black buildings painting, and I will just paint the
balconies on the right. To be honest, I just repeated the shape that I
saw on the photo. I didn't analyze wh part of the balcony so be logically
there or somewhere else. I just repeated this shape. And it's not very important
because the Focus of this painting is on
the light windows and contrasts between the black
building and light windows. So these dark buildings
on the edges, they just create some
nice framing for our sky. I'm done with the balconies, and now I want to create
some small details. I'm holding my brush vertically and barely
touching the paper. I'm creating this
very simple lines that are representing wires and some elements of the city. I will also add some thin
lines on the windows. And again, as I told you, my brush has very
pointy and sharp end. And if you don't
have such brush, you probably can use a smaller brush like
number zero or number one. And we are almost done
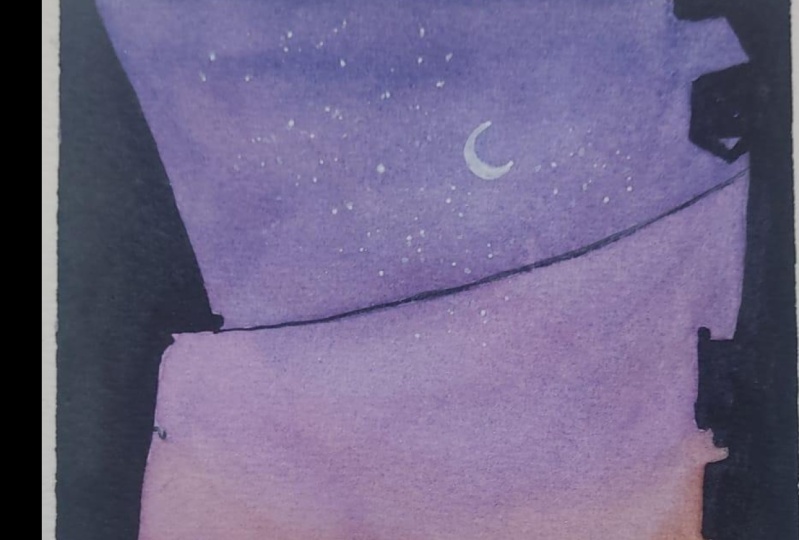
with our landscape. I will just add some
final details with a zinc white color that I
will put on my palette first. I want to paint some moon and stars on this dark purple sky. Okay, I decided to switch to my smaller brush for
painting the moon. I will use brush number
zero, also synthetic one. The watercolor is not
pretty dense medium, so you probably will
have to go over a few times to make the
color look very white. And I will add some small
dots representing the stars. But also, I want to add some white splatters
because its very artistic. First, I need to cover the
areas that I don't want to be splattered with the paper
towels or some scrap paper. Anything will work. So just keep the
area that you want to cover with white splatters. Once your brush is
loaded with the color, you need to hit the brush against the finger of
your opposite hand. It will create these
nice splatters. Now we can remove
the paper towel and our painting is done. Thank you for joining
in this class. Please don't forget to leave review and submit
a class project. I would love to
see your painting, and I hope to see you
in my other classes.
 Aleksandryna Gromyko, Watercolor tutorials for everyone