Transcripts
1. Introduction: Hello everyone and welcome to this Skillshare exclusive class. Or I'm gonna be taking you step-by-step through how
to knit a pair of socks that this class is perfect for anyone who has ever
struggled to knit socks, couldn't find a sock pattern
that fit them perfectly. Or wanted to notice OK, pattern out of a
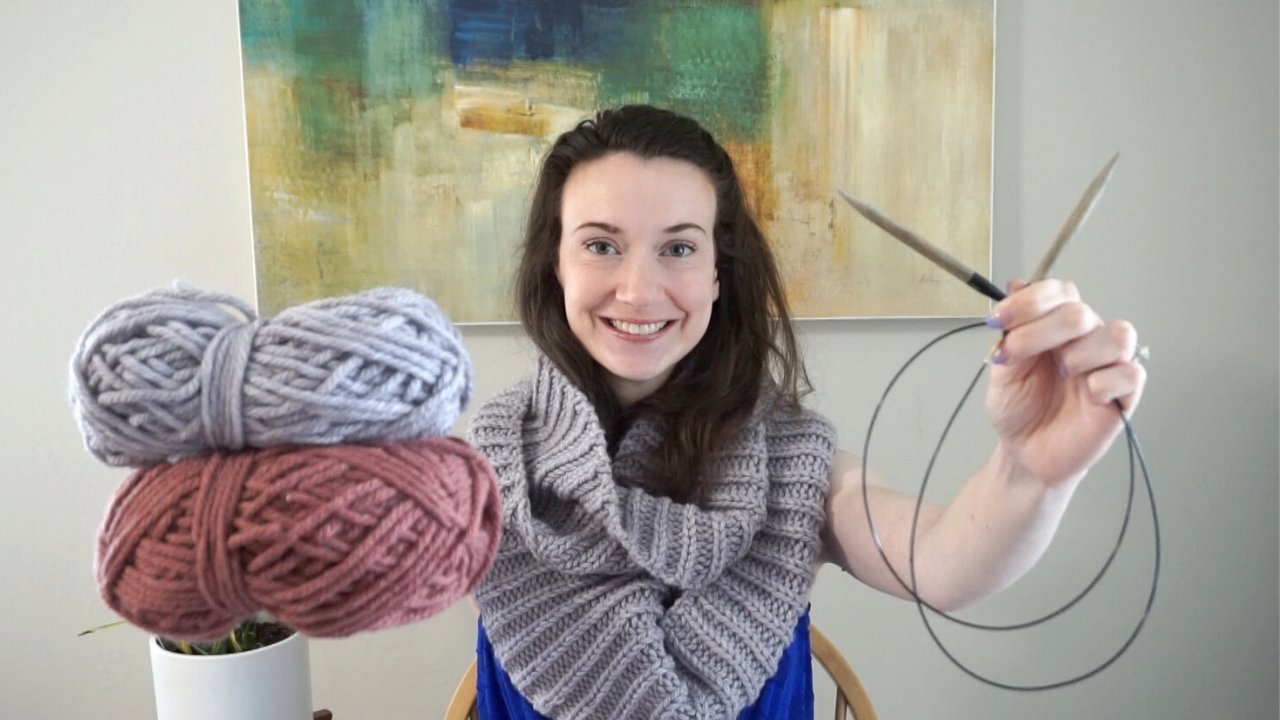
different weight of yarn. This is the class for you. So my name is Madeline
for meeting house square, and I create classes
here on Skillshare, on my website and
anyhow squared.com, and also on my YouTube channel. In this Skillshare
explicit glass, I'm gonna be taking you through a deep dive into
how to knit socks. So it's really cool
about this class, is you can select any weight of yarn you'd like
to start with. And we're going to
customize a pair of socks to perfectly fit you. So what we're going to start off with is we're gonna
take our yarn, whatever your army select. In this class. I didn't my sample
using a DK weight yarn. We're going to
start by swatching. We're going to figure out the perfect knitting needle size to get the gauge that you'd
like for your pair of socks. Once we determined the gauge, we're going to take some
measurements of our foot. And we're gonna determine
the perfect number of stitches to cast on
up here at the cuff. So these socks, Arnett
cuff down to the toe. We're going to determine
how far we need to knit up through the heel. Then for the heel,
I'm actually going to need two options and that's the S. So you can do a heel slab in turn as shown
in the sac here. Or you can do a short roadkill. So I'll put a picture of
that appear on the screen. Now, each one of those heels AND full instructions
on how to customize that heel for the
number of socks you decided to cast
on for your sock. Then we're in a knit all the
way up for the foot portion. Then lastly, we're each
going to design our own tow, decreases it perfectly with the number of stitches we have. Lastly, just a quick
kitchens to find out. Now in terms of the skill
level for this project, this project is intended for an editor who hasn't
it and around before. So if you're a newer
Knitter and aren't familiar with knitting
in the round, I would recommend you hop over to one of my
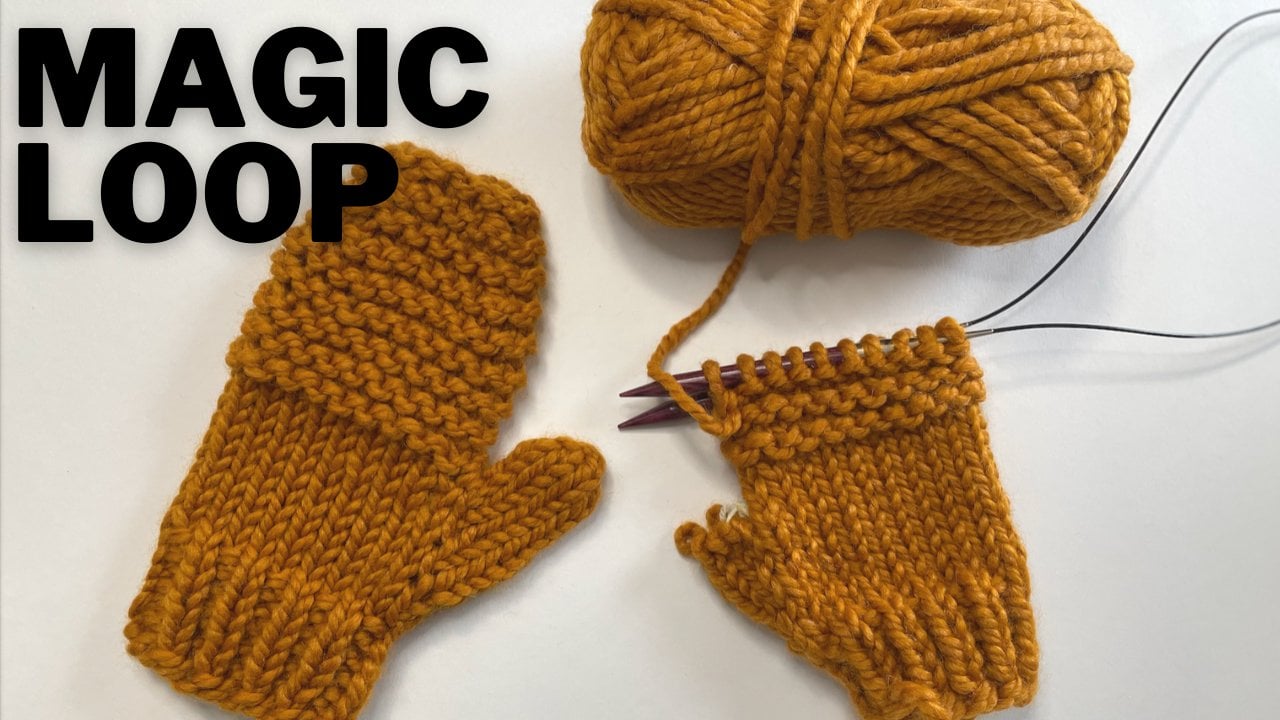
previous classes, such as the Houghton it magic
loop class where I had, where we need a pair
of mittens and around. That way you have a good base to start with for getting around Before you move on to a more advanced project, like Zach's. Last thing I want to
mention before we get started is down in the
resources tab below, you're going to find a PDF
version of the pattern where you can fill in all
the measurements you're taking
throughout this class, as well as what your age is, and follow through the pattern adjusting to exactly your size. Now that I've gone
through an overview of the class, Let's get started. We're going to go
through the materials and the measurements
we need first.
2. Materials & Measurements: First up, let's go
over the materials. So let's start off
with a yarn so you can select any weight of
yarn for this project. I do recommend that it has some sort of nylon
content in it. I'll add the yarn I used in this class, LinkedIn,
the pattern. I would recommend
everyone started off with 100 g gain of yarn. You can get most ox at
100 grand scheme of yarn. If you make your cuff
to be a lot longer, that total foot length
of the sock to be a lot longer than you may need an additional amount to
about 100 g. Next step, of course, we need
some knitting needles. So I named my socks
using magic loop. So I need one circular
knitting needle that has a fairly long chord. So afford anywhere
30-40 " in size, I'm going to recommend
you start with is two sizes below what
the yarn recommend. I go through more of that in swatching video that that
is a knitting needle size, I would recommend
you start with, and you may need to move
above or below that in size depending on your gauge. Next up we need a
tapestry needle, a ruler, and or a
soft tape measure. If you have one of
those available, it makes taking the measurements
a little bit easier. A pair of scissors. And then also one stitch marker to make knitting the heel
a little bit easier. Now next step, we're
going to determine the measurements we
need to create these custom Zach's urinate need
to take three measurements. And the three measurements I'll go through in just a second, how I measure each one of them. But a quick overview is the total length of
your foot, right? To determine how long
have abortion should be. You're going to need
their circumference of your foot right
around the ball portion. Then lastly, we're going
to figure out how long they want this whole leg
portion of this activity. So that one's really up
to personal preference, not necessarily measurement. So let me show you how to
measure each one of those. First step, you want to find the total length of your foot. I find it easiest to measure by stepping on a ruler
that is laying flat on the ground and
eyeline the back of my foot up with the zero
location on the ruler. Then I find that
maximum length point. Next you want to measure the circumference around
the ball of your foot. Next you want to measure
the circumference around the ball of your foot, so right where your toes
meet the rest of your foot. Lastly, you want to
figure out the height of a sock that you would like. And what I mean by height
is from the bottom of the heel up until
the top of the cuff. So this OK, then I'm
going to be meeting here in this tutorial has a height of it's like just
about four-and-a-half inches. And typically socks I
knit go anywhere from about four-and-a-half
inches is the shortest up to you
anywhere around 7 ". If you do it too long of a
cuff though, be careful, you may need a second
100 g gain of yarn.
3. Swatching: Swatching is the
most important part of this whole process. Now to start here, I have a yarn and
this is one that's similar to what I used
in this tutorial. This is a DK weight yarn
and what I'm looking for is the knitting needle
size that this recommends. This recommends anywhere
5-7 knitting needle. Now if yours recommends a range
of knitting needle sizes, you want to pick the midpoint. So I would pick a size six. Now if it just says one
knitting needle size, so if it just said us six, I would select that
as my starting point. With socks. We want them to be
really durable, long wearing and not
stretched too much. So what that means is we don't
really want to start with are starting hitting
our swatches on that recommended size. We actually want to
go down a few sizes. So I'm gonna take that
starting reference point and I'm gonna go down to
knitting needle sizes. So I would start
with a US for now, but I have the
knitting needle size that I want to begin with. So for me a US for
what I'm gonna do is I'm going to knit the swatch using that knitting needle size. So what I have here is the
first swatch that I knit. So I cast on 40 stitches. I joined in the round. And then I knit for about probably almost valid
an inch and a half 2 " here. Once I knit this side on the US for or my
swatch on the US for. I decided that this watch was
too loose for the fabric. I would like. I repeated the same
process again, going down one did
a needle size. So this was a US three. And I found that when
I used to use three, this fabric texture was much closer to what
I was looking for. Now if you've opposite thing happen where when you knit
your starting swatch, you find that the
fabric is too tight. Instead of going down one
knitting needle size, you want to go up one
knitting needle size. Now, once you've determined a size knitting needle at you
like you're going to take your swatch and measure how many rows are in an inch and how many
stitches are in an inch. This is easiest
to do if you pick somewhere in the
center of your swatch. And first to do my row gauge, I actually like to
count across 2 ". So if your fabric is 2 " wide, at least, then you could
do it over two edges. If you only have 1 " work
and perfectly lay flat, then just go with 1 ". Instead. I'm going to line my zero location over here on the side with
the start of a V. And now as I count across, I'm counting each
V as one stitch. So I have 1234. So I ended up with 13 in 2 "
to scale that down to 1 ", I'm just going to
divide 13 by two. Now for my number of rows, I'm going to turn my
work to the side. And I only did my
swatch for about 2 ". So I'm going to
pick somewhere in the center of my swatch, line up my ruler with one of the diagonal
bars of half a stitch. Now I'm going to count across how many rows or how many of these diagonal bars make up 1 ". So I end up with 8.5. Now those two numbers you're going to want to write
down on the first page of your pattern that
way when we get to the next step and also
knitting the foot, you know exactly how
many stitches to cast on and how
many rows to MIT.
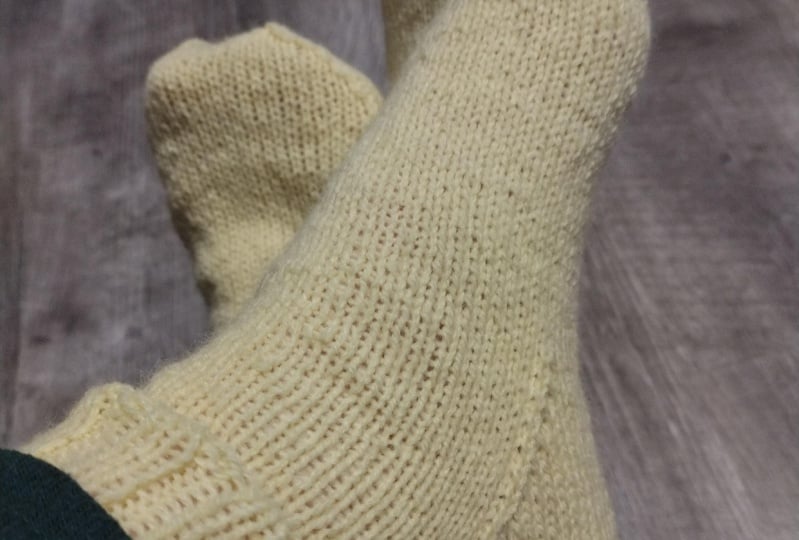
4. Cast On, Ribbing and the Sock Leg: Now this x we're going
to be knitting today are gonna be knit cuff
down to the toe. So first step we needed to
determine from our swatch how many stitches we need to
cast on up here at the cuff. So first, let's
break down the mat. So the first number
we need to start off with is the number we just
got from our swatching video, which is using the
knitting needle size that you'd like to
knit your nerd with. How many stitches did
you have per 1 "? So for me, I had six
and-a-half stitches for 1 ". Now the next thing you need is one of the measurements
we've taken. We need the circumference
of our foot. And my circumference
of my foot was 9 ". Now socks are actually knit with what's called negative eaves. So what that means is
we don't actually need our socks to be exactly
9 " in circumference. For my example, we knit
them smaller than that. That way they'll stretch
and fit or foot perfectly. So what I'm actually going
to do here is I'm going to take 1 " off of
that circumference. So 8 " is the value I'm
actually going to be using. And now I'm going to take 8 " times the number of
stitches and every inch. And that gives me 52 stitches. So you want to take your sit, compensate for your affiliate, subtract off one, then multiply it by your number
of stitches per inch. Now the last thing
you wanna do is you want to make sure this
number is divisible by four. That's because the
way I've written out the heel and
the toe portion, it's only allowed in
multiples of four. So depending on the number
of stitches you have, this number I came
out with is divisible by four. No remainder. But let's say you had
a different number, so let me just write up
a range of numbers here. 48 would be totally fine
because it is divisible by 452, also divisible by four. If I ended up with 49
for my calculation, what I would do is I would
round that down to 48. If I ended up with 51, I'd round that up to 52. And then if you end up
right in the middle there. So let's say I had
the stitch count. I typically like to round it up. So I would round that
up to 52 stitches. So now that you've determined the number of stitches
that you need, if you've made it to his life for we're all ready to
start with the cast on. Now that we've determined
how many stitches we need to cast on up
here at the cuff. That's exactly what
we're gonna do. So I'm going to grab the knitting needle
that I decided on, welded in my gauge
swatches, my yarn. I'm going to cast on
that number of stitches. So I decided on 52 stitches
for the socks I'm knitting. Not a cast on here. You can use any stretchy cast on method that you'd like today. I'm just going to be using
a simple backward loop cast on starting with the slipknot. Okay, now that I've double
counted to verify I do have the correct numbers such as I'm going to join in the round. So in this tutorial, I will be showing everything I'm doing it using magic loop
because that's my preferred way to
do it and around. Yeah, I wanted to
take a quick pause real quick to mention that if you're interested in
how to knit with magic loop, I do have a Skillshare exclusive course
where you can learn magic loop by knitting a pair
of super bulky medicines. So here interests in that class. Click on my image above this video that'll take
you to my class page. And there you can
see the Houghton it with magic loop video. You can of course
knit on using double pointed needles as
well if you prefer. I'll just mention where
to divide your stitches equally in half for things
like the kitchen or stitch. In this case though,
all we have to do to start is joined in the round. So first I'm going to
find the midpoint for my stitches and then set it up so I have
half on each one. Now next up, I'm going to
knit the cuff ribbing. For my cuff ribbing, I like to knit about an
inch and a half or so of the ripping and I like it to be a knit to Perl, to rubbing. Now there are a couple
of different ways you can modify this. First, you can make the
ribbing shorter or longer. And you can also switch it to being a different
ribbing repeats. So instead of doing
knit to Perl to, you could also do knit one
per one. That my socks match. I'm gonna do the exact same
thing here on the second one. So I'm going to work round
after round of knit to Perl, to ribbing until I reached
the length that I like. Now I've just completed
my ribbing and I'm ready to begin knitting the
leg portion of my sock. So to determine the portion or the length you want to knit in the center portion in
between the cuff and the heel, start with the total length
of a sock that you'd like. So e.g. this one that I
have showing you going from the base of the heel is just around
four-and-a-half inches. So if I want my total height of the sock to be
four-and-a-half inches. Part of that is gonna
be the ribbing. And that length do you can decide however long
you like it to be? The other portion is
going to be the heel. Now there are two
different variations of hills that I'm
going to show you. So this is the
heel slab in turn. Then there is the short row heal instead both
of these heels, if you go down to the base
of where the heel ends, is approximately 2 ". So it was a rough estimate. We're going to account for
the heel as being 2 ". So you take your
four-and-a-half inches, subtract off 2 " for the heel, then subtract off
whatever distance you already have
for the ribbing. And that amount that's
left over is going to be the portion that you want
to knit here in the center. So I'm just going to work round after round of planes dock in it until I reached that distance that's needed for
the leg portion. Then I'll come back and I'll show you how to put in the heel. And there are two options for the heel provided
in this tutorial.
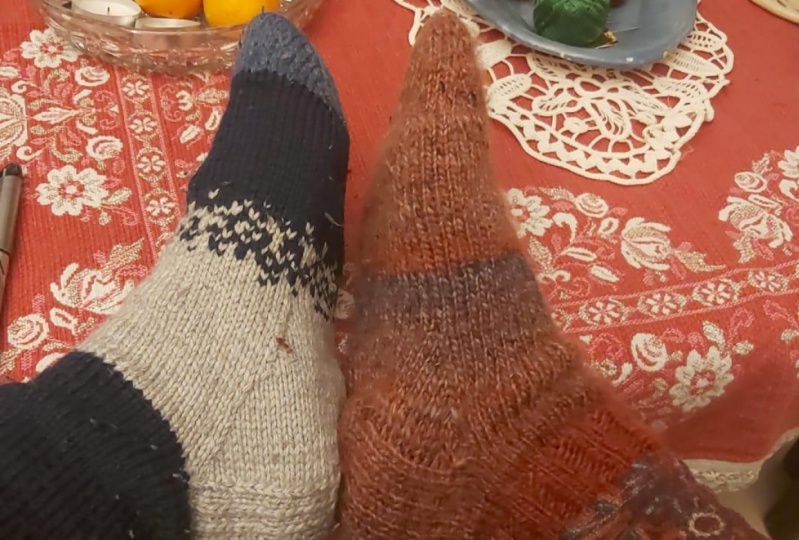
5. Heel Option 1: Heel Flap and Turn: Now there are two
heels that you can select from in this class. The one that we're showing
you in this video is this. He'll flap and turn method. So first we worker, he'll flap. Then we create a
short he'll turn, pickup the stitches
on either side of the heel flap and then
decrease in words. You'll see this is a
fairly large heal. It essentially takes up this
whole portion of this OK. It is a bit more time-consuming, but it creates a really nice, high-quality heal that I would
say it's fairly durable. It also is great if
you need a lot of space in this region
of your sock, if you just look space wives, these were both knit for me. So the short road heel, which is the next option. This is a really nice,
quick and easy heal. It is symmetric. It doesn't create
much space though. So I would say the
benefits to this one over the short row heel
is this heel method. It's pretty durable because of the slip stitches and it
also creates a lot of space. This method though, is much quicker and a bit
easier, I'd say. So depending on what
your preference is. Let's get started with this version of the
heel flapping turn. Now I'm going to be
knitting my he'll flap and turn on this arc right here. The number I'm going to
start out with here, my total number of stitches
for the full sock, which for me is 52 stitches. Now I'm going to take
that in half, 26 digits. So that is the
number of switches since I've knit and magic loop that's on either one
of my knitting needles. Now for the total number
of rows you want to knit, you want to knit 26, or the number of stitches
you have in half your sock, that now becomes your number
of rows for the heel flap. Now that's number of rows. Now we want to think about the knit side and the
pearl side, right? Essentially we're going
to be knitting this flat going back and forth
over and over again. So you're going to have
that number divided by two. So I'm going to have 13
front side or right side. And 13 wrong side rows. Total to make up my 26. Now again, if you had
a different number, so if you had 48 stitches total, you would have 24 stitches
here, 12 and 12th. So first, I'm going to
show you a right side row. The way it works is your first
stitch is always slipped. We're always going to slip the first stitch
no matter if we're on the right side or
the wrong side of her work and we're gonna
be working back and forth across just
these 26 ditches. So I'm going to work across
the front, term my work, and then work across
the inside of my sock, this Pearl side of the
exact same set of stitches. So first up I'm going to slip the first stitch per lives
without twisting it. Then I'm going to knit one. Now I'm actually
going to repeat that all the way across this row. So I'm going to slip one
with the urine and back. Knit one, slip, one. Knit one, slip, one, knit one all the way across
the number of paths, ditches that you have. So 26, in my case, you should finish
with a knit one. And now we're going
to turn our work. I'm just working right across the backside of the
same set of stitches. So first up, I'm going to slip the first stitch per lives. And now I'm going to Pearl across the rest of the stitches here back to
the beginning of the round. So purlin each one, regardless of whether it was slipped or knit on
the previous side. Now I'm going to
turn my work again. And I'm going to repeat
those two rows over and over again for the number
of repeats that we decided. So I'm going to
repeat the two rows, a total of 13 times
or 26 rows total. I have now finished
the heel flat portion. So next up, what
we have to do is we have to do a little
tiny, he'll turn. So this is just
this small portion of our SOC where we're basically trying to switch
the stitches from going vertical to horizontal. The way we're gonna do
this is first step, we should do some math. And what our goal is
to do is to divide the SOC heel into three portions that are as
even as we can get them. So what I'm gonna do
first is I'm gonna take my 26 stitches and
divide it by three. Now when I do that, it doesn't work out evenly. So I end up with eight
and a remainder of two. How I'm going to distribute
through this between the three sections
is I'm going to put eight on either side. And then eight and
that remainder, or ten stitches in the center. Now, as I turn,
those ten centers, ditches or the portion
in the middle than the eight are essentially the portion
that's actually turn it. Now if you have a
different number, so if you had 24/3, you just ate, ate, ate, whatever your
specific number is. Now, first up, what we
need to do is we want to knit over to just where the third
portion is beginning. So I'm going to knit
eight, then knit ten. First thing is I
actually want to slip the first stitch per wise. So I'm gonna slip the
first stitch that counts as my first stitch in
that series of eight. So now I'm going to
knit 17 essentially. So first I'm going
in this direction, slipping the first one, then I'm knitting 17, then I'm going to work a slip, slip knit, and then
I'm going to knit one. Now I'm writing this in reverse order as we're
going across the row. So next up, I have my slip, slip knit, so I'm going
to slip the first stitch. Midwives slip the
next ich nicht Weiss. Now take my left knitting
needle point into the front base of both of those two stitches
at the same time. Now I'm gonna wrap
my yarn around the back knitting needle
and pull through. So that is a
left-leaning decrease. Now I want to nip
one more stitch. And now I'm going
to turn my work. When I turned my work, the first thing I'm
gonna do is I'm going to slip the
first stitch per wise and then I'm
going to Perl one. So when I just did that, now I've just gone back
across these two stitches. So now I need to go
back across the center. So next up, I'm
going to Pearl ten. Now, just like I did
on the opposite side. Now I'm going to decrease. So I'm going to work
a pearl two together. So right knitting needle point into the next two stitches on the left knitting
needle parawise wrapped my yard
around, pull through. Then Perl, one more stitch. Now I'm going to turn my work. What I should now have is
you can kinda see where my work stretches out here and there's a gap on either side, are really where my two knitting needles
are separated here. I should have the exact
same number of stitches, so I have five and then
five over here as well. Now for the next row, I'm going to slip my
first inch Pro wise. And then I'm going
to knit over to one stitch before
where that gap is. So this is my gap. So I'm going to
get all the way up until one stitch before that gap. Now that I'm there. And you can tell where
it's going to be because the stitches really
widened out a bit in-between the one
that you slipped on the previous round
and the next stitch. I'm going to work a
slip, slip nit of those two stitches together. So I'm going to
select the first one. The second one, left knitting
needle into the front base. Wrap my arms around, pull through, then
knit one more stitch. Now I'm going to turn my work
the first stitch per Elias. And now I'm going to
pull across until one stitch before where
the gap is on this side. And again, define the gap each time I'm just
stretching out my work. And it's where
there's an opening in the stitches over here
on the other side. Now I'm going to Perl those
two stitches together. Perl one more. Turn my work. And I'm going to
repeat that again. I'm gonna keep on repeating those two rows over
and over again. Until when I'm working
across this knit side, I'm not gonna be able
to fit in anymore slip, slip knits beyond that point. So you're either
going to end up with a slip slip knit and then a knit one or when he finished with the slip slip knit, stop there. And once you've
gotten to that point, we're going to begin picking
up the hill flap stitches. So one other thing I mentioned, if you ended here within if you've even number of
stitches on either side, you're going to finish
with the slip, slip knit. If you have an odd number
of stitches on either side, you're going to end with a slip, slip knit than a knit one. I still have a few
more rows to go. But once I get there, I'll show you how to pick up
those heels lab stitches. I'm going across my final
side that he'll turn. And I'm going to end
with a slip slip knit. And I'm not going to turn my
work at go across the back. I do still need to do one more decrease over
here on the other side. But I'm going to pick that
up on the next round. So now I'm going to rotate my
work 90 degrees clockwise. So I'm looking at the
side of that heel. The right side of the
SOC is still facing me, so I didn't turn it to the
inside or anything like that. Now what I wanna do is I want
to go down this edge and pick up each one of those Ed's stitches that
we're slipping along the way. So first, I skip over the top set of stitches here
that I just worked through. And I'm looking for the
first full set of v's. So that would be mine
along that edge. And I'm going to take my
left knitting needle point, go into the base of those
V's than knit them together. Now again, I'm going to look for the next set of views down. Put my leg knitting needle
point into both sides of it. They didn't do it. And I'm going to keep on going all the way down this edge, getting into each
set of the b's. Now lastly, when you get
down to this inner corner after you finished picking
up all the edge stitches. I recommend picking up one
extra stitch or bar down in this location just
to help tighten up any holes that may
be tempted to form. So I'm going to pick up
this top-most bar here. And I'm going to knit it
through the back loop. Now I'm going to
turn my work and now we're going to be in
working in the round again. So first step, I'm
going to work across the front portion of my sock
or like the top of the foot. Now I'm going to pick
up again one stitch or 1 bar connecting the front
and the back of my work. We're going to get
through the back loop. And now I'm gonna go up the
second half of my heel. And I'm going to
pick up each side of the sets of v's
and it into them. Now that I finished going
all the way up that side, I'm going to turn my work. And at the beginning
of this first round is where I have to finish doing
that last he'll turn step. So it depends if your number
of stitches was even or odd. So mine was even. So I'm gonna begin with
a knit two together. If yours was odd, you're going to work knit one, then knit two together. So now that I've
finished that decrease, I'm gonna continue knitting
across the bottom of my foot. Then up the side of the first
he'll flap until there's three stitches remaining on this first half of
the stitches or the first side of the heel flap. Now there's three stitches remaining going up that
first side of the hill flap. I'm going to work a
knit two together. Then knit the final stitch. Now I'm going to turn my work. Now on my second
knitting needle, I have the top portion
of the foot and then I have the other side
of my heel flip. So on this side, I
actually find it's really helpful to add in
a stitch marker. So first let me grab
a stitch marker. Now first step,
I'm just going to knit across the top
portion of the foot. So half of my total number of original stitches for the size
I'm knitting that was 26. Now I'm going to place
that stitch marker. And now directly after that stitch marker where this other side of
the heel slab starts, I'm going to knit one. And then I'm going to
work as slip, slip knit. Now I'm going to knit
across the remaining. He'll flap stitches. Now I'm going to turn my work and I'm ready to
work the next round. So after each decrease round, we're going to knit
one full round. So across both
knitting needles here. And just to go over
again real quick how my knitting
needles are set up. On my first knitting needle, I have the bottom of the foot are kind of where
that he'll turn just ended up the first
side of the heel slab. Then when I turned my work, I have the top of the foot and then the second side
of that heel flop. Knit one round real quick. Now I've just finished
knitting that next round. So I'm going to
continue repeating the two rounds over
and over again until I end up back
at the number of stitches total for my
sock that I should have. That original number
for me was 52. So to briefly repeat
with those two rounds were first I'm going
to knit all the way up until three stitches remain on the first
half of my stitches, I'm going to do it all the
way up that first side of the heel slab until
three sisters remain. Work in knit two
together, knit one. Then I'm going to turn
my work work across the top portion of the foot up until where my
stitch marker is. Knit one, work a slip slip knit, and then knit across
the rows of remaining. He'll flap stitches. When I turned my work again, I'm going to knit
one full round. So continue repeating
the decrease round, then the knit round over and over again until
your total number of stitches returns to what you originally had
for your sock. Back down to the number of
stitches I started with. And all I'm gonna do in this last round is I'm
going to rearrange them once I finish all the
decreases each round after that is just a
regular knitting round. Rearrange my stitches. First, I'm going to knit
across the bottom foot portion and what was previously at the first side of the heel slab. On this side, I'm going to
knit all the way across the top of the foot up
until the stitch marker. Good to remove the
stitch marker. And then rather than
keep on getting across these so they end up
on this knitting needle. What I'm gonna do is
I'm going to grab onto my left knitting needle, pull it until those stitches
from the other side of the heel slab end up on my
second knitting needle. Now the way I have them arranged is this is my beginning of
the round because my tail is over here on
the right-hand side. I have the first few stitches remaining for my one
side of the heel, slap the bottom
portion of the foot, and then the stitches remaining from the other side
of my heel slab. Then when I turned my work, just the top portion of this. Ok. I'm back to having
exactly the same number of stitches on each
knitting needle. And this position is my new
beginning of the amount. Now in the next video, I'm gonna be showing
you how to work the foot portion and the
length, intended it to.
6. Heel Option 2: Short Row: Now the next heel
option I'm going to show you is this short row heal. So this is a really nice
quick, easy alternative. If you don't wanna do the full, he'll flap and turn
the short row heal. It does create a bit
of a smaller heel. So you can see just
size comparison. These are both
socks that fit me. The short Rocchio. Essentially it's
a symmetric heal, so the same meltdown
as it is over. Whereas this heel,
you can see there's a lot more depth that's created and the
heel flap and turn, in terms of my preferences, I prefer a heel flap in turn, I find that this is a
bit more durable of a hill in addition to the
extra space it provides. But this, I have gone back
to time and time again, especially if I'm knitting
socks as a gift for someone and I don't know
which he'll they prefer. This one always creates a nice, quick, easy, simple heal. So in terms of how we do all the calculations
for this heel, I'm going to show you
on this smaller sample. The first thing
you have to start with is what is half of
your total stitch count? My stitch count for this pair
of socks I was getting for my gauge ended up being
48 stitches total. Dividing that by two. So I have 24 stitches on each one of my
knitting needles because I did it
using magic loop. So one-half of my
sock is 24 stitches. Now what I wanna do is so we can create this math
customizable to the SOC urinating is I need to take this number and
divide it by three. So if I take 24 and
now divided by three, I end up with eight. So thinking about this heel in terms of different sections, I want to divide it
into three sections. And I'm going to have eight stitches on either
side, eight in the center. Now what that actually means is if I look at this heel
as I'd actually did it, I'm gonna decrease in aids. Ditches are kinda create short rows with those eight
stitches on either side. Then I'm going to have eight
stitches in the middle. Then I'm going to
expand back out words, pick up again those
eighth ditches and end up back at my full 24. Mine ended up being nice and divisible by three
with no remainder. But let's think about
what would happen if it wasn't divisible
by three nicely. So let's say instead I had, let's go with 52 stitches Total. Going to divide it by two. That gives me 26 stitches
per knitting needle. Now again, I'm going
to divide that by three and I end up with eight
and a remainder of two. So what I wanna do is again, draw my three
sections of my sock. I'm gonna put 8.8
on either side, then eight plus
that remainder of two or ten stitches
in the middle. So those extra stitches are
going to the middle portion. Now first thing to start out, all of these help stitches
are gonna be knit just across one-half
of the sock. I'm going to be
knitting back and forth across one of my magic
loop knitting needles. So I'm going to knit
across the front. Then I'm going to turn my work and I'm
going to knit across the inside or cross that pearl side of those
same stitches. Now to begin, firstly,
I'm gonna do, is I'm going to knit over until one stitch before my
halfway point for this. Ok. So I just need across and
there's one stitch remaining. So essentially thinking
back about my numbers, I just knit 23 stitches and that one over
there would be my 24th. Now I'm going to turn my work. And the first thing I'm gonna do is I'm going to create a wrap. The way I create this graph
is I'm going to slide that first stitch from my left to right knitting
needle, just parole y. So I'm going into the
base from right to left. Now I'm going to pull
that working yarn back behind my knitting needle. Then in-between the two noodles
to the front of my work. So essentially I just turn that one stitch into now two loops. Now I'm going to pull across until one stitch
remains on the side. Now that I have that ones to true meaning I'm going
to turn my work. And again, I want
to create a wrap. So the way I'm gonna do it
on this side of my work is first I'm going to
bring my working hard in-between my tuning. It goes to the front.
Then I'm going to slip that first stitch for
my right or sorry, from left to right
knitting needle per wise. And now I'm going to pull that
working yarn back behind. And you can see that one
stitch just stretch, bringing up the loops into two. Now that I finished
that first step, I have one wrap
stitch over here on the left and my first rep
stitch over here on the right. Now I'm going to repeat
those two rows again. But where I'm going to stop now is I'm going to
knit all the way up until that stitch before
my wrapped stitch. I'm going all the way up to that wrap stitch
stopping right before it. So the next stitch I would've
met would be my rapped one. I'm not gonna do that though. I want to leave the
rap stitch there. Now I'm going to turn my work and I'm going to create
another rap stitch. So I'm going to slip that first stitch from my left
to right knitting needle, pull my working
yarn back behind, then in-between the two
knitting needles to the front. Now you'll see I've to
wrap stitches in a row. Now I'm going to Pearl across all the stitches up until that next wrap
stitch on this side. So now that my next stitch
here is my rap stitch, I'm not going to work that one. I'm going to turn my work. And now I'm going to
create another rib stitch. I'm going to bring my
working onto the front. Slip. The first stitch per lives, pulled out working yarn
back over to the back. Now again, I'm going to repeat those exact same steps again. So I'm going to knit across
up until my next stitch, turn my work, create a ramp. Then I'm going to
pull all the way across until I've reached my
raps dishes on this side, turn my work, create a wrap. I want to continue doing
that over and over again until I have eight stitches. Include the wraps on either side and eight centers digits. So when I'm counting
the rap stitches, I also want to include
that first stitch that I haven't wrapped
yet on either side. So currently I have
123 on each side. Again over here at the first
ich than the two graphs. So once each side reaches eight, then I'm going to come back and I'm going to show
you those center rose again for that last rap. You're going to finish by just pulling the yarn up and back. Don't actually knit across. So once you get to
the point where you pull that yarn up and back, and it creates the
number that you need. Don't work across
that next set yet that is included in part
of the center rows. I just created my
last rapid turn. So now I'm ready
for my center rows. The way the center rose work is first we're going to knit
all the way across and then continue across each
one of those stitches that we've previously wrapped all the way up until
this final stitch. So first I'll knit
across as I'm working, each one of these rap stitches working both halves
of it together. So similar to what a knit two
together would look like, just it's the two loops
of the same stitch. Now I am going to knit
that final stitch. And when I turn my work, now, I'm going to
wrap that stitch. So first I'm going to slip it. Then I'm going to pull
the working yarn back behind that in-between the two knitting
needles to the front. Now, for the second center row, I'm just going to
throw one more just to make sure it doesn't slide
off my knitting needle. I'm going to Pearl
all the way across. Continue purlin each one of the rap stitches all the way
through this final stitch. For each one of these
stitches, again, I want to Pearl both
sides of it together. Both of those loops. Going to Perl that final stitch. Now I'm going to turn my work and I'm going to
wrap that first stitch. So I bring my working
yarn to the front, slip it prolines, wrap my
working yarn to the back. So now I just have one wrap
stitch on either side. Now this next row is where
we're going to begin. Starting small and expanding outwards for the second
part of the heel. So this is actually the most
difficult row I would say, of the Full Heal to set up. The thing you want to keep in
mind again is your numbers. So I want to work across until essentially this
point in my stitch count. Then work across to the
other side of the center. And then I'm going to
start expanding outwards. So it's really that
initial setup of the first rap stitch and
the second wrap stitch. And then it just becomes
a repeat after that. The first rap stitch
where I want to place it. I'm going to count
across the first third, the second, third, and
then plus one more stitch. So I'm going to have
16 and then 17. That's 17th. Stitch is the one I'm
going to run a wrap. I already have one over here on my right hand
knitting needle. So I'm going to continue working until I get up to 172345. Now once I get to
that 17 stitch, I knit it and I'm
going to turn my work, create a rap stitch. So I'm going to slip it, pull my working yarn back
behind them to the front. And now I'm going
to Pearl eight. So the number of stitches
in my center plus one more. So I'm going to Pearl nine. Now I'm going to turn my work. I'm going to wrap
that first stitch working onto the front, slip it, pull the working
yarn back to the back. Now when I look at my work, I should be able to
count the number of stitches in-between those two
wraps that I just created. And it should match
the number of stitches I have in
my center portion. So I should have eight. And I do. And now I can verify the number of stitches on either side. So including the first and
that wrap that I just created, I should have eight
stitches total. Perfect. And then on the other side, in between my two graphs, ditches and including
those two graphs, I should also have
eight stitches. And I do. So that is how I can ensure that I set up this heal properly. Now I want to begin working
one stitch further each row, I go back and forth. The way you do this is I pay attention to where
that wrap stitches. So first I'm going
to knit across up until that wraps ditch and work that wrap
stitch together. So knitting both sides of
that wrap stitch together. Then I'm going to knit one more. Now I'm going to turn my work, create a new wrap. And now when I Perla cross, I'm going to Pearl all the way up until that wraps
ditch on this side. Work that rat stitch together than Perl, one
additional stitch. I'm curling the two sides of
that rapped one together, rolling one more,
turning my work. And I'm going to create
a new wrap stitch. Now again, I'm going to repeat
those exact same steps. So I'm going to knit
across all the way up to and including
that wrap stitch. Knit one more. Turn my work, create a new wrap, parole all the way across until the where the rap
stitches are worth the rap stitches together per one more turn my
work, create a rat. So I'm just moving where
those raps ditches are. One stitch out each row,
I go back-and-forth. Now, I'm going to continue
doing this over and over again until my final wrap stitch I create is where I
turned my work. So I have the right side
of my sock facing out and I create a rap stitch right
before my final wrap stitch. So basically an end up with two rap stitches on either side. Once they arrive
at that location, I'll come back and
I'll show you how I rejoined in the round. Now I just created my
final wrap stitch, so I have to grab stitches over here on the right-hand side. And my final two
stitches over here on the left-hand side are
also perhaps digits. So the way I rejoined
in the round, first, I'm just going to knit all the
way across these stitches. When I get to those
final wrap stitches, I'm going to work them together
each half of the loop. Once I get to those final
two rough stitches, I'm going to work each loop
for each one together. Then I'm going to turn my work. And now I'm actually
going to begin working in the round again for
the foot portion. Now I'm just knitting
across the top portion of the sock so I can get back over to the beginning
of the ground. When I turned my work again
to start my new round. I do still have those
to wrap stitches there. So for each one of them, I'm going to work the two loops together to turn them back
into individual stitches. My first one, then my
second rib stitch. And now I can just
work the third portion of my sock as shown
in the next video.
7. Foot: Now the next thing I wanna
do is I want to figure out how far I need to
knit this foot portion. So the measurement
we need here is the total length of our foot. And I find the easiest
way to do this is to step on a ruler, line my heel with
where the zero would be and get that total length. When I measure the total
length of my foot, I end up with about 10.5 ". Now, I don't actually
want to knit my sock to be 10.5 " long. The reason for that is because the socks stretch lengthwise. I need to knit smaller than 10.5 " to accommodate the fact that the SOC is
going to stretch, so that still fits
my foot snuggly. So the way I do this is I take the actual
measurement of my foot and I multiply it by 0.9 or 90%. So when I do that, I end up with, it's like 9.45. I'm just going to
round that to 9.5 ". That's the length I
actually want to knit two. Now when measuring, I'm actually going to be knitting this center
portion, right? So I've everything that
comes from the heel. Then this whole
middle portion is knit and then I have
my toe decreases. So the way I'm going to
show you tow decreases in this video is the tow decreases
are going to take up 2 ". So the other portion
of our SOC needs to be the total length that
you wanted to get four -2 ". So for me 7.5 ". So the way I'm going
to measure this on my sock is first I'm going to
look for where the heel is. I'm going to look for
where the heel turn is. I finished my sock there.
And now I want to measure from the back of that heel all the way up
until mandating needle. And when that distance reaches my length
excluding the toe. So 7.5 " for me, I'll be ready to
put it in the toe. And for the sock I'm showing
you in this tutorial, each one of these Center
Rounds is just an IT round, so we're just knitting
round after round, all the way up until
you reach your length.
8. Toe Decreases and Kitchener Stitch: Now I have reached the length
I need excluding my toe. So now the next thing
I need to do is I need a setup where I'm going to place each one of
these decrease rounds. So the top portion should
take up a total of 2 ". And what we need to do
first is we need to look at our row gauge to figure out
how many rows equals 2 ". Now you may have
this measurement from your swatch
to the beginning. If you don't. But you can do is you can take a ruler and an earlier
location on your socks, so don't go too close
to the knitting needle. So what I'm gonna do here
is I'm going to line up my zero marker
with a bottom of a V. And then I'm going to count
how many rows are in 2 ". So I have 1234. I have 17 rows. Now with that number, what I need to do is again, just like I did for my heel, I'm going to divide half of my stitch count into
three sections. So when I did that, I have 52 stitches total or 26th on
either knitting needle. When I divide that by three, I end up with eight and
a remainder of two. So I end up with eight on either side and
ten in the center. So now what I'm working, my toe, I want to end up with
the ten centers ditches. Those are what's going
to be remaining. On either side. I'm going to decrease
eight stitches. Now, I need to do all of this
over a series of 17 rows. Now, what I'm going
to start by doing is I'm gonna take this
number of rows that I need, the 17 rose, and I'm
just going to write out numbers going up through 17. Now the way they're written out, this is what we're
starting with. Then we're ending on row 17. So essentially if
I look at this OK, I've already done row one would be down
here at the bottom of the tail than working
up all the way until that final row up there
at the top would be 17. I'm ending was 17. And I'm going to reserve
that last row that I have for the Kitchener stitch. Now the number of decreases I need or the number of
decreased rows I have to add in will correspond to the number that I have on
either side of the center. So I need to add in a total
of eight decrease rounds, and that will allow me to end up with those tens
digits remaining. Now the way I like to do this and this can take some trial and error to get your rows
spaced out properly. Is I'm typically going to start early finish down here
at my later numbers. And I'm going to put in three
decreased rounds in a row. Then I start alternating. Every other row is a decrease. So I'm going to skip a row, decrease, skip a row. Decrease in total at
12345 decreases already. So I need three more. I want to spread out the other three among these
rows that I have. So now let's say I switch to two skips in a row than
a decrease to skips, decrease the 1234567
than a decrease. So that worked out
that now I have a total of eight
decrease rounds. So when I finish this, I'll end up with
after the 16th row, ten stitches remaining on either knitting needle
or 20 stitches total. The key here, when
you're writing out your rows is you
want to start with your decreases wider and then the decreases
become faster. That way when you taper
into the toe, right? You don't want the
really fast decreases to happen at the beginning and
then for them to get slower. Because you'll end up
with a weird TO shape. You want slower than faster
as you get closer to the top. Also, I want to
mention real quick, if you don't need all of the rows to complete
your decreases, you can also just continue
a few nit rounds at the beginning and then start
working here decreases. Now to show real quick what those decrease Rho is going
to look like for the tow. How I have my knitting
needle set up here is I have half
my stitches on my front knitting needle and half my stitches on my
back knitting needle. And as I go around
a decrease round, I'm gonna decrease at the beginning of the
first knitting needle, the end of the first
knitting needle, beginning of the second
knitting needle, ended the second
knitting needle. So in total, each
decrease round. I'm reducing by four
stitches total. The way decrease round works is I'm going to knit
my first stitch. Then I need to work a
left-leaning decrease. So a left-leaning decrease
is a slip slip knit. So I'm going to put my first
stitch as if to knit it. My second stitches
if done it past them both back over to my
left knitting needle, knit them together
through the back. Now I'm going to knit until three stitches remain on this front knitting needle. Or if you aren't
using magic loop, three stitches remain before you're halfway point
in your round. And now I need to do a
right-leaning decrease. So I'm going to work
a knit two together. Knit that stitch before
the halfway point. Turn my work and do the exact same thing on the
second set of stitches. So first I'm going to
knit the first stitch. Work a slip, slip knit, knit until three
stitches remain. Now before my beginning
of the round. We're going knit two together. Knit the final stitch. That is one, full
decrease round. So if decreased for
stitches total. Now I'm gonna go back to my layout of where each one of the decrease
rounds is gonna go. So I just worked for me. I like to cross
them off as I go. I just worked that
first decrease round. So now I'm going to knit two full rounds right
across the front, across the back, then across the front, across
the back again. Then I'll work another decrease round and I'm going
to keep on following all the way up through where I get to the
Kitchener stitch. Then I'll come back and I'll
show you that Kitchener sits real quick to
finish off this, OK. Now my final step
here at the top of the tail is the Kitchener
stitch bind off. So what I'm gonna do
here is first step. I always leave about, I'd say 2 ft of yarn
somewhere around there. And I'm going to cut the
yarn at that location. Now I'm going to take a tapestry
needle and I'm going to thread the yarn tail that I just cut through my
tapestry needle. When I work the Kitchener
stitch bind off, I want my stitches
divided equally in half. So I have half the stitches
on my front knitting needle, half the stitches on my
back knitting needle. The way Kitchener
stitch works is there's a two stitch setup and
then a force ditch repeat. Or really you can
think of them more as movements rather than stitches. So first step, the two stitch
setup is I'm going to take my tapestry needle through the first stitch on my
front knitting needle, or the one closest
to me, pearl lies. And I'm going to pull
the yarn through, making sure it doesn't wrap around that back
knitting needle at all. Or the front ending. And I'm going to leave that stitch on
that front knitting needle. Now the second setup stitch is I'm going to go under
the front knitting needle, then go into the first stitch on the back knitting
needle knit wise. And I'm going to pull
the yarn through, leaving that stitch on
my back knitting needle. Now we can begin the
forced edge repeat. So first step, first stitch on the front
knitting needle, knit wise. Slide that first stitch off
of the front knitting needle. Second step knew first stitch on the front
knitting needle. Go pearl eyes through it. Leave that stitch on the front knitting
needle. Third stitch. First stitch on the
back knitting needle. Parole lives. Slide that stitch off of
the back knitting needle. Last step here, new first stitch on the
back knitting needle. Go through it and bitwise and make sure you're going under that front knitting
needle so you're not actually wrap the
Earth around it. Go through knit wise. Leave that stitch on the
back knitting needle. Now as I'm going along, I am gently pulling on this yarn to try and
tighten it up and make sure I end up with a
really nice border along this top edge and
nothing's too loose. So to show it one more time, first step knit wise for the first stitch on
the front knitting needle. Slide that stitch off the
front knitting needle. Next step parawise through
the new first stitch. Leave that stitch on. Third step parawise through the first stitch on the
back knitting needle. Slide that stitch off. Knit wise through the new
first stitch on the back. Leave that stitch on the
back knitting needle. And now you can start to
see that Kitcher stitch. It should just look
like this to just continue up over the top of the sock to the other
side along this top edge. So now I'm going to
continue working that Kitchener stitch
all the way across. Once I get to the end, I essentially just keep on completing as many of the steps as I can until I only have
one more stitch for meaning. Now for this last, where I have a single stitches
on each knitting needle, I just go through
the first stitch on the front end and
needle knit wise, slide it off, then go through that last remaining
stitch parole wise. Slide it off. Now I want to thread this to
the inside of my sock. I try and pick somewhere
that's going to make that top edge hidden. So usually I'll go
like just next to it. The inside of this. Ok. Now I've completed that Kitchener stitch
across the top edge. All that's left to
do now is we've in my cast on edge and
my cast-off edge.
9. Conclusion: I hope you enjoyed
getting a pair of custom socks with me
here on Skillshare. If you enjoyed this
video and like to see more classes that I teach, click on the Follow button up right above this video
next to my picture. That way you stay up-to-date whenever I release a new class. Also, I'd love to see
everyone's going to projects. So doubtless video or
see your projects tab. Click on that tab and upload a photo of your
finished SOC work, Eric Sachs that
you've completed. I had a great time teaching and I hope to see you
in my next class. Bye.
 KnittingHouseSquare, Knit / Craft / Sew