Transcripts
1. Class Introduction: When was the last time you look through your family photos? Not the perfectly pose ones where everyone is stiffly
smiling at the camera, but the ones that actually
make you feel something. Maybe it's a photo of your little one
laughing mid tickle, your partner sneaking
a loving glance or a blurry but beautiful moment of pure joy with your family. These are the moments
we want to hold onto. And in this class,
I am going to help you capture them in a way
that feels effortless, natural, and full of heart. Hi, I'm Rose. I'm a mom, creative entrepreneur, and
Skillshare top teacher. And if you're anything like me, you know how fast time flies, especially when it comes
to the people we love. One moment your little
one is learning to walk, and before you know it,
they're running ahead, growing up way too fast. Or maybe for you,
it's about capturing memories with your
niece and nephew, your best friends or your parents because
let's be honest, they're not getting
any younger either. That is why I started
documenting everyday moments, not just birthdays and holidays, but the little things too, the cuddles on the couch, the uncontrollable
laughter, the beautiful, messy chaos of real life. But for the longest
time, my photos didn't feel like these moments. They looked stiff, dull, overly posed, and just
missing something. I thought the solution
was a better camera, so I got a more professional,
mirror less camera. Expecting it to magically
fix everything. But to my surprise, my photos still felt
a little staged, and that's when I realized that the problem
wasn't my camera. It was how I was
capturing the moment, and that's exactly what
this class is all about. Not taking perfect photos,
but meaningful ones. You don't need
professional gear, and you don't need to be a
professional photographer. You just need your iPhone,
a little guidance, and a desire to capture your family's story in a way that feels
real and beautiful. In this class, I'll
show you simple, easy to follow poses that
bring out natural emotions, how to create moments
instead of forcing them, tips to capture
genuine connection, so your photos feel alive. The best part, you'll
be capturing moments in a way that feels natural
and fun for your family. No awkward posing,
no forced smiles, just real heartfelt
memories frozen in time. But before we get started, let me introduce you to two of the most important
people in my life. Reason why I love
taking photos and my biggest and most adorable
helpers for this class. My husband, Paul, and
our 5-year-old son Tim. You'll see them
throughout the lessons, whether it's in the
photo examples, behind the scenes moments, or even helping me
demonstrate poses. So yes, this isn't just
your ordinary class. It's a family class, and I hope you feel
like part of it, too. So grab your phone, gather
your favorite people, and let's get started.
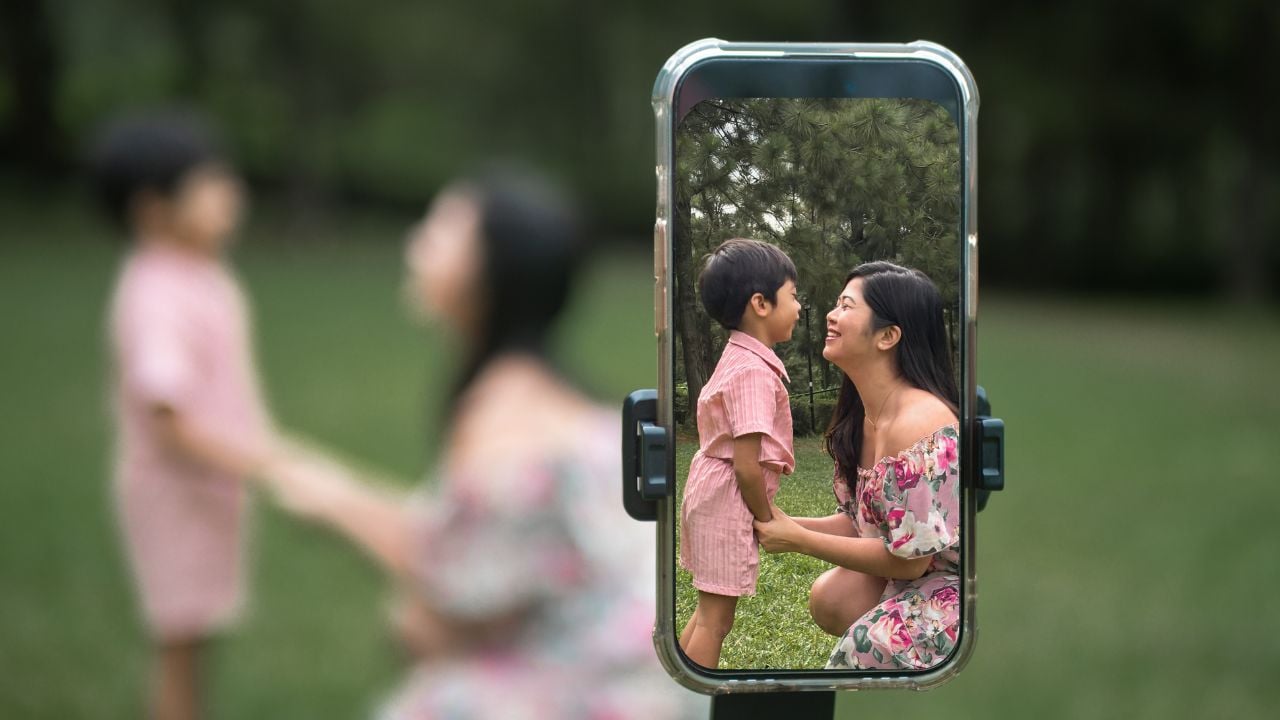
2. The Secret to Natural Family Photos: Welcome to class.
I know everyone taking this class has their
own reasons for being here. Maybe you want to capture
your family's moments, your time with your partner, best friends, parents,
or even your pets. I totally get it. Sometimes the most
precious moments in life, the ones we wish we
could hold onto forever, slip away simply because they were not captured
the right way. Think about it. A
simple afternoon with loved ones can turn into a cherished memory
in just a blink. The traditions
you've always taken for granted like Sunday dinners, road trips, inside jokes. One day, they'll become
stories you look back on. The people you love most, they won't always be right next to you the way they are now. That's why capturing
these moments matters. The good news is we have a tiny but mighty
device in our pockets, always ready to preserve
these memories. But here's the thing. As soon
as you point the camera, the kids start running, the grown up suddenly
don't know where to place their hands and
before you know it, everyone feels a
little uncomfortable. Let's be real. Family
photos can feel awkward. You've probably
been there before. You get your family together, tell them to smile, and what do you
get forced grins, stiff poses and someone or everyone looking
anywhere but the camera. And the truth, it's
not their fault. We've been trained to think that a good photo is one where everyone stands perfectly
still smiling on command. But the photos that truly
make your heart swell, the ones that make
you feel something, they're not stiff, they're
not staged, they're alive. And that's exactly what I'm
going to help you capture. When I first started
taking family photos, I thought I had to
direct everything. Okay, everyone, stand still, arms at your sides, look at me, smile. Hold it. But instead of joy
filled moments, I got something that looked
like a school yearbook photo, stiff, lifeless, and
completely forgettable. Then one day something changed. I was trying to take a cute
family picture when my son, Tim, as usual, refused to pose. Instead, he ran back and forth
and started being silly. So I went along with it while my husband, Paul, took photos. I didn't know he was taking
photos for the most part, but I am so glad he did because when I looked at it
later, I felt something. It wasn't just a
photo or a picture. It was a memory. And that was my
light bulb moment. Family photo should feel like
the moment they were taken, not staged, but real
and the secret. Instead of posing,
you guide the moment. How do we guide the moment? Instead of saying, Okay,
smile at the camera, try saying, Hey,
whisper something funny in Mommy's
ear or vice versa. Instead of stand still and
say cheese, how about try? Let's walk toward
the camera together, talk about what you're
most excited for today. See the difference. You're
not forcing a moment. You are creating one. When your family is
doing something, they forget about the camera. That's when the real
expressions come out. That's when the joy,
the connection, and the love shines through. That's when you get
photos that don't just look good, they feel good. Here's a challenge for you. The next time you
take a family photo, instead of posing,
try a guided moment. Ask kids or pets to run
toward you for a big hug. Have your partner gently brush a strand of
your hair away from your face and capture the moment before they realize
you're taking a picture. Let kids be silly,
tickle fights, piggyback rides, whatever
brings out those real smiles. When you do this, you'll start
to see a huge difference. Your photos will
look more alive, more connected,
and more like you. And trust me, years from now, when you look back
at these photos, you won't remember
the perfect poses. You'll remember the feeling, and that's what makes a
family photo truly priceless. In the next lesson,
I am going to share five must try family
poses that make it easy to capture natural connected
moments without feeling stiff or forced. I hope to see you there.
3. The 5 Must-Try Family Poses: Before we dive into the poses, let's review my number
one rule and top tip. Instead of forcing a pose, focus on creating a moment. That means give your
family something to do, capture movement and
real connection, and keep things
playful and natural. When you do this, the
poses happen organically, resulting in photos that actually feel like
you and your family. Now, let's get into the poses. Let's start with one of my
favorites, the walk and Talk. This is the easiest way to get natural expressions
because instead of worrying about the camera, you're simply focused
on each other. Here's how to do it. Hold hands
and walk together slowly. Ask your kids simple
questions like, what was the funniest thing
that happened that day? Capture the moment mid laughter or when they turn
to look at you. Now, here's an example and
a side by side comparison, a standard family photo of us where we're standing
still posing and looking at the camera versus a relaxed walk and talk shot. Big difference, right?
And here's a pro tip. Have your photographer or use
a tripod and camera timer. Take multiple shots as you walk to catch the best
natural expressions. You can also shoot
inverse mode so you don't miss the
best expressions. If you want to add even
more magic to your shot, try playing with angles. For example, when
my husband took a walk and talk photo
of me and my son, he didn't just
stand at eye level. He squatted down and framed us with beautiful flowers
in the foreground. That small creative touch made the shot feel even more special. Next up the snuggle stack. This one is perfect for
capturing those warm, cozy and affectionate
moments that make family photos feel extra
special. So here's how to do it. Sit or kneel close together. H one person hug from behind while everyone
else leans in. Whisper something silly or funny to get those
natural giggles. You can even take
turns whispering funny things or let
your kids tell you what they want to eat or buy as a reward after
the photo shoot. That's exactly what
I did in this photo. And we ended up with so many
genuine smiles and giggles. Plus plenty of shots
to choose from. And here's a comparison, a standard traditional
sitting on a bench pose versus my son whispering his
snackuish list in my ear. Such a big difference, right? The second one feels
so much more natural, fun, and full of personality. And here's a pro tip. Keep a mental list or a note
on your phone of jokes, silly questions, or
things your kids love. Then when it's time for your
next snuggle stack pose, you'll have the perfect
little prompts to spark those big genuine smiles. This one is for all
the playful moms out there or aunts or uncles. If your kids won't sit still, because let's be
real, they never do. Lean into the
movement and make it fun with lifts and twirls. Instead of trying to keep them still, embrace their energy. It makes for the best,
most joyful photos. To do this, lift
your child up in the air for a fun candid shot, spin them around,
toss them up gently, or let them sit on
your shoulders. Let them giggle,
kick their feet, and just enjoy the moment. Those little reactions
make the best photos. Now, here's a side
by side comparison. My son looking bored with a
traditional standing pose versus us absolutely loving
the playful lips and swirls. Well, mostly me. Big
difference, right? The second one feels so much
more alive and full of joy. Of course, a pro tip. Use first mode or live photo to capture the
movement perfectly. This way, you won't
have to worry about missing the best moment. You'll have a series of
frames to choose from. This one is so simple
but so powerful. Instead of the classic
standstill and smile, let's make your photos feel more alive by adding
movement and laughter. Hugs naturally create
warmth and connection. But when you add a
little playful tickling, you get instant
genuine giggles that make your photos so
much more natural. Kids won't feel like
they're posing. They'll just be having fun and that's when
the magic happens. Here's how to do it. First,
get in close side by side, arms around each other, or even a big group hug. You can also try a
hug from behind pose. It's perfect for toddlers who
love to be held or carried. Next is to tickle gently. A little squeeze on the sides or a playful nudge
will do the trick. Lastly, let them wiggle. Don't force anyone
to stay still. Movement makes the
moment feel real. Last but definitely
not the least, the classic over
the shoulder look. This pose is timeless and
works beautifully with babies, toddlers, or even older kids
hugging you from behind. It's effortless, sweet
and captures that beautiful bond between
you and your little one. So here's how to do it. Hold your child on
your hip or your back. Look back at the
camera naturally, you just turned around to
catch a glimpse and a bonus. You can also have your child
kiss your cheek or whisper something in your ear for that extra heart melting moment. Now, here's my side
by side comparison. Again, a standard post
shot versus our playful, natural over the shoulder shot. See how simple yet
powerful these poses are. No stiff posing, no awkwardness, just natural heartfelt moments. In the next lesson,
we'll dive even deeper into making your
photos truly stand out. I am going to share
composition tricks that instantly
elevate your images so you can capture stunning
professional looking photos every time. See you there.
4. Composition Tricks That Make Photos Instantly Better: Have you ever looked at a photo and thought,
something feels off, but I can't figure out why
maybe it felt too cluttered, unbalanced or just
not as polished as the ones you see from
professional photographers. The good news is, it's not about having a fancy or
professional camera. Most of the time, the difference comes down to composition. Composition is what makes
a photo feel intentional, beautiful, and
visually striking. The best part, you don't need complicated rules
to get started. Just a few simple
techniques can completely change how your family
photos look and feel. In this lesson, I
am going to share three easy but powerful
composition techniques that will instantly
elevate your photos, starting with layering. Have you ever seen a photo
that just feels flat? That's because there's
no sense of depth. Layering fixes that by making your image feel more
dynamic and immersive. So instead of just
focusing on your subject, pay attention to what's
in front and behind them. A strong foreground
and background create a richer, more
dimensional shot. So here's how to do it.
Find a great background, a nice wall, a scenic view, or even a simple doorway. Then position your subject
in the middle ground. Then look for foreground
elements to add that extra layer of
depth like flowers, leaves or even a fence. For example, in our walk
and talk post earlier, when Paul took these photos, he didn't just
stand at eye level. He squatted down
and framed us with beautiful flowers
in the foreground. That small creative touch made the shot feel even more special. Leading lines are
natural or man made elements that direct the viewers eyes toward your subject. They create a sense of movement and make your photo
feel effortless, yet intentional. Here's
how to use them. Look for roads, fences, staircases, railings
or pathways. Even a row of trees works. Then position your family where
the lines naturally lead, so they become the main focus. Why does this work? Our eyes
naturally fallow lines. By using them in
your composition, you're subconsciously guiding
the viewers attention exactly where you want it. So the next time you're out
for a walk or for a run, start noticing leading lines. A sidewalk, a bridge, or even a row of parked cars can suddenly enhance your photo. Last but not the least
framing within a frame. This technique is exactly
what it sounds like using natural or structural
elements to frame your subject
within the shot. This not only adds
depth but also focuses attention on your subject
in a really creative way, and here's how to do it. Have your family stand inside
a doorway or under an arch. Use windows, tree branches,
overhanging trees, or even hands to create a
frame around your subject. If you're indoors, try shooting through a doorway or
between furniture. Framing draws the viewer's eye exactly where you want it to go while also adding a storytelling element
to your photo. These three techniques,
layering, leading lines, and frame within a
frame are super simple, but they make a huge difference in how your photos
look and feel. Here's a composition top tip. Simplify or declutter
your background. This is one of the easiest ways to instantly improve
your photos. A busy or messy
background can take attention away from what
really matters, your family. If you've ever taken a photo that felt a little too chaotic, it's probably because there was too much happening
in the background. So here's how to fix it. First is to move to
a simpler location. If the background
feels overwhelming, take a step to the side, find a cleaner spot or use an open space with
fewer distractions, just like what we did in our over the shoulder post photos. This was our first attempt, but Paul noticed that the background looks
a little distracting. He told us to move
to the other side where the background is
simpler and beautiful. Next is to use portrait mode. This will suddenly
blur the background, creating that beautiful,
soft depth of field effect. Your subject will stand
out while the background still adds to the
atmosphere in a dreamy way. Lastly, change your angle. Sometimes shifting
just a little, crouching lower or
moving slightly to the left or
right can instantly clean up a composition and make the photo
feel more intentional. Remember, less is more. A clean, simple background
allows the moment to shine. Now that you've learned these
composition techniques, let's put them into action. Pick one technique, whether it's layering leading lines
or frame within a frame, and try it out in your
next family photo. See how small changes can
make a big difference. In the next lesson, we're
taking things even further. I'll show you how
to make the most of natural light to create soft glowing beautiful family
photos every single time. No expensive lighting
gear needed. Just a few tricks
that will completely transform your photos.
See you there.
5. Mastering Natural Light for Stunning Family Photos: If I could give you just
one piece of advice to instantly level up your family
photos, it would be this. Learn to use natural light. I know you've probably heard it 1 million times.
But hear me out. There's a reason for that. It's a cliche because it's true. Lighting can make
or break a photo. You can have the latest iPhone, even the Pro Max model. But if the lighting is off, even the most precious
family moment can look dull, harsh,
or unflattering. I say this from experience because I learned this
lesson the hard way. Almost a decade ago, Paul and I bought our very first
professional camera. We saved for months, cutting back on little luxuries, eating cheap food,
skipping fancy coffees, because I was
convinced, actually, we were convinced that this
camera would automatically give me or give us
magazine worthy photos. Spoiler alert, it
didn't Tim was born, I thought it was finally time to put our fancy
camera to good use. Paul and I were over the moon, caught up in the
magic of the moment, so we started taking
photos right away. Don't get me wrong.
They were precious. We captured the emotions, the excitement, the love. But also why were we so orange. At first, we didn't
think much of it and just kept taking photos. But then one day we wanted
a proper family photo. So we got ready to Kabath dressed up a little,
set up the tripod, and used the timer to take our first official
family portraits, and they were okay. But something still fell off. The magic of the moment
just wasn't there. Looking back, I know exactly what went
wrong. Bad lighting. Our room lights were
throwing off weird colors, creating uneven tones and giving everything a
flat, artificial look. The warmth, the softness, the raw emotion of that moment, it wasn't captured the way
I saw it in real life. Here's the embarrassing part. It took a lot more
disappointing photos before I finally figured it out. Good photography isn't just
about capturing a moment, it's about capturing it in
the best light possible. But here's the good
news. You don't need expensive
equipment to fix this. You just need to understand how to work with the
light you already have and that's exactly what we're going to do
in this lesson. By the end of this,
you'll know how to use natural light to make your
family photos look soft, warm, and full of life. No extra gear required. Light is the foundation
of every great photo. It shapes the image,
affects the mood, and even influences how
emotions are conveyed. Have you ever taken a photo where someone's face
was too bright, too dark or covered
in weird shadows? That's because lighting
isn't just about brightness. It's about direction,
intensity, and softness. The best part is
that you don't need fancy equipment to
master lighting. In this lesson, I'll break it down into three simple steps to help you find
the best light for your family photos every time. One of the biggest mistakes I used to make and something I see all the time is shooting
in harsh direct sunlight. It may seem like bright
light equals better photos, but midday sun creates
harsh shadows, squinting eyes and
unflattering contrast. Instead, look for
soft indirect light. The gente wraps
around your subject, creating a natural warm glow. The best time for this early
morning and late afternoon, also known as the golden hour. This is when the sun
is lower in the sky, casting a soft diffused
light that flatters skin tones and makes your photos look
effortlessly beautiful. Try this experiment. Take a quick photo outside at noon when the sun
is high in the sky. Then take the same photo in late afternoon at the same spot. Notice how much softer and more flattering the
second one looks. Natural light isn't just
for outdoor photography. It's just as powerful indoors. To make the most of it,
position your family near a window where soft natural
light is streaming in. And here's a few tips for
better indoor lighting. First is to turn off
overhead lights. They often cast harsh shadows and add natural color
tones to your photos. Next, let window
light do the work. It acts like a giant
soft box creating even flattering lighting that enhances skin tones and
the warmth of the moment. To test this out, take a quick photo in the middle of a room with no natural light. Then move near a window
and take the same shot. You'll instantly
see the difference, softer shadows, better color, and a more natural
polished look. Have you ever taken a
photo outside only to find harsh shadows under
the eyes and nose? That's because the sun
is directly overhead, creating strong shadows
that are not flattering. So here's how to fix it. Instead of standing
in direct sunlight, move to open shade, like under a tree or
beside a building. This softens the light, making skin tones look more natural. If you can't find
shade, position your family within the sun behind them or at an angle where the
light isn't too harsh. To test it out, step into direct sunlight
and take a photo. Then step into the shade
and take another one. You'll see an
instant improvement. The light will look softer, your family's faces
will be evenly lit and your photos will feel more
polished and professional. By following these three
steps, finding soft lighting, using window light indoors and avoiding harsh overhead shadows, you'll instantly
transform the way your photos look and feel. And here's a top tip. Use back lighting
for a dreamy look. If you love those magical, glowing family photos where
everything feels warm, magical and straight
out of a storybook, B lighting is the secret. Instead of positioning your
family facing the sun, place the sun behind them. This creates a beautiful
halo effect around their hair and softens
the entire scene, making the moment feel
warm and ethereal. You can try it out for yourself. During sunset, have your family stand with the sun behind them. Take a few shots and watch how the golden light
wraps around them, creating that soft
dreamy effect. Lighting is what gives
your photos life. It's the difference between an okay shot and one
that steers emotion, brings back memories and
takes your breath away. Now that you've
mastered lighting, it's time to bring
everything together. In the next lesson, we'll
combine posing, composition, and lighting so you can confidently capture the
perfect family photo, one that feels as beautiful as the moment itself.
See you there.
6. Bringing It All Together: My Class Project: We've covered a
lot in this class, posing, composition, lighting, but now it's time to bring
everything together to capture that beautiful,
meaningful family photo. Here's the truth. It's never
been about perfection. The best family photos, the ones that make you
smile years from now, aren't the ones with
flawless poses, high end cameras or
carefully staged backdrops. They are the ones that capture
connection, the laughter, the love, the little in between moments that make up your story. So in this lesson, I'm inviting you to come
along with me as a document, my very own class project. So for my class project, I am keeping things simple, my family, a peaceful afternoon
in a park near our house. No elaborate setups,
no pressure, just real everyday moments that I know I'll
treasure forever. This is actually one
of my favorite things about teaching and making
Skillshare classes. My family, especially Tim loves
being part of my classes. He gets so excited
when it's time for me to film because he
gets to be involved, and I get to capture his j curiosity and personality exactly
as he is right now. Through this lesson,
I'll take you behind the scenes
and walk you through my entire process from setting up the shot to
directing naturally, or keeping the experience fun, effortless, and stress
free for everyone. By the end of this, my hope is that you'll feel confident, knowing that you
can set up a shot, guide your family with ease and capture moments
that feel raw, heartfelt, and truly yours. Grab your phone,
embrace the moment, and let's create something
beautiful together. Before you even reach
for your iPhone, whether it's in your pocket
or buried deep in your bag, like mine always is, take a second to look around. Ask yourself, does
the background add to the story or
is it distracting? Is the lighting soft
and flattering? Does the setting reflect the feeling I want
in this photo? Our goal here is
to keep it simple. A clattered background can
take away from the moment, find a spot that feels
calm and intentional. Sometimes that just means
stepping a few feet to the side or shifting your angle slightly to remove distractions. For us, picking a
location was easy. I chose this park because
no matter where you look, it's absolutely
breathtaking. As we explored, we tried out
different areas of the park, looking for unique spots
to capture our moments. We even stumbled upon
this cute vintage van a perfect opportunity for a
frame within a frame shot. It was actually Tim's idea. The moment he spotted the van, he couldn't wait
to check it out. Honestly, it made for such
creative and playful photos. But in the end,
this little table and chairs became
our favorite spot. Maybe it was a chance
to sit, relax, and soak in the moment together, but something about
it just felt right. Sometimes the best locations aren't just about how they look. They're about how
they make you feel. This is where a lot
of people get stuck. They overthink the posing, trying so hard to get
everything just right. The result stiff awkward photos that don't really capture
the heart of the moment. But remember what we talked
about in the first lesson, the secret to natural
family photos, it's not about forcing a pose. It's about guiding the moment. When you shift your
focus from getting the perfect shot to simply
creating space for connection, that's when the magic
really happens. A great way to do this
is by using one of the five poses we covered
earlier in the class. But if you want to take
it a step further, try giving a fun
prompt instead of strict instructions,
instead of saying, let's sit here and
smile for the camera, try something that
sparks genuine emotion like whisper a secret
to Mom or vice versa, or walk toward me and hug. We use these exact prompts and just look at the
adorable shots we got. Another tip, embrace movement. Some of the best
photos happen in between the moments when
your child suddenly burst into laughter when you catch your
partner giving you that loving glance or when your mid spin
during a playful lift. These tiny unscripted
moments hold so much life and they make
your photos feel real. And because you can always
predict the perfect moment, here's my last and most
important tip for this step. Take multiple shots. Make sure to use your
iPhone live photo or burst mode to capture
a sequence of images. This way, you're not
just getting one frame, you're capturing the before, the during, and the after. Oftentimes, the best shot
is hidden somewhere in those transitions
like what happened during Paul's playful
lifts and twirls with Tim. Not every frame was perfect. So were blurry, some were funny, but because I took
multiple shots, I was able to capture the
one that truly melted my heart and that's
the magic we're after. Now that everyone's comfortable and genuinely
enjoying themselves, let's take it a step
further and make the shot as visually
stunning as possible. Here are a few
composition tricks I use to elevate my shots. First up layering,
adding depth with foreground and background
elements instantly makes photos feel richer
and more immersive. In this example, the sky and trees create a
beautiful background. While Paul and Tim are positioned using
the rule of thirds. I also added a few leaves and flowers in the foreground
to enhance the depth. To take it even further, I turned on portrait
mode before editing it in light room to get that soft
blurred background effect. Next, leading lines. This is a simple yet powerful
technique where pads, doorways, fences, or even outstretched
arms naturally guide the viewer's eye to
the heart of the photo. We use this in several shots. In one, I framed Paul and Tim using a painted gutter
as a leading line. In another, Paul
used the table and chairs to leave the eyes
straight to me and Tim. These small adjustments help direct focus and make the
image feel more intentional. Finally, frame within a frame. Using natural elements
like doorways, windows or tree
branches to create a frame inside the shot adds an artistic
storytelling touch. You already saw our
van photos earlier. But the moment I
spotted that van, I knew a frame within a frame would be the perfect
composition to try. And just look at the results. Since this park is famous for its thousands of pine trees, we also use them in some shots
to subtly frame the scene, adding even more depth
and visual interest. Amazing. Just imagine if we had taken these photos
without intention, without thinking
about composition, the results would have
been completely different. A few small tweaks in
composition can turn an ordinary snapshot or photo
into something intentional, immersive, and
visually stunning. At the end of the day,
this is what matters most. We didn't come to this park
to take 1 million photos. Yes, it's wonderful to
capture these moments, so we can look back on them, especially when Tim is older. Having these heartwarming photos means we froze in
a piece of time, immortalizing the
love, the laughter, and the little details that
we might otherwise forget. That to me is the true
gift of photography. The fact that we can do all of this with a tiny
handheld device, that's just an incredible bonus. So again, forget about
getting the perfect shot instead focus on how
does the moment feel? What makes this moment special? What emotion do I want to
remember years from now? I know I say this a
lot in my classes, but I am deeply sentimental, a hopeless romantic at heart. When I look back at these
photos, years from now, when I am gray and old and no longer able to lift and
swirl the way I used to, I don't just want to
remember what we did. I want to remember how it felt. The love, the laughter, the simple fleeting moments that made our life together
so beautiful. Yes, we took photos, but we prioritized
being present. Instead of staging stiff poses, we let our family talk, play, cuddle, and just be. My job and my husband's, since we take turns
behind the camera, was to step back and
quietly capture the love, the joy, and the little moments that might have
otherwise slipped away. Because in the end, we weren't
just capturing a memory. We were living it. I'm sure you've noticed this phone
tripod in my process, and let me tell you it's
a total game changer. Once we set it up,
we could simply sit, bun, and be in the moment. No need to constantly hold the phone or step away
to press the shutter, you might be wondering,
how did they take photos while being meters
away from my phone? This tripod comes with
a tiny remote that connects to my iPhone
via Bluetooth. It has separate buttons
for photos and videos. So while my family and I
are laughing, talking, and making memories,
I can simply press the remote to take a picture without disrupting the moment. Of course, sometimes the
angle isn't perfect, but honestly, that
doesn't matter as much. As long as we capture the
emotion, it's all good. Besides, cropping
and editing can always fine tune the
composition later. Just like that, we
captured some of the sweetest family photos without stress,
without overthinking, and without taking up
our entire afternoon because Paul and I were simply guiding the moment
rather than forcing it. Was no pressure, just laughter, connection, and pure enjoyment. For me, that's exactly what shines through in these photos. It took us 30 minutes or maybe even less to
get these shots, and then we spend the rest of our time at the
park just bonding, playing, and enjoying
each other's company. Of course, we wrapped it up with a little Marenda
because after all, my assistant photographer,
AKA, my husband, Paul, and my little model, AKA, my handsome son, Tim, definitely deserve a treat for helping me out with
this class project. If there's one
takeaway I want you to remember from all
of this, it's this. You don't have to choose between capturing the moment
and weaving in it. You can do both. Take
few intentional shots and then put the phone down, be present, soak in the moment. The best memories aren't
just the ones you capture. They're the ones you
truly experience, and that's my goal for
you in this class. Not just to give you
techniques and tools so you feel confident
when the time comes, but also to remind you that the most important part
isn't the lighting, the composition, or
the perfect shot. It's the love, the laughter, and the feeling behind the
photo. Now it's your turn. In the next lesson,
we'll dive into your class project
where you'll get to put everything you've
learned into action. I can't wait to see what
you create. See you there.
7. Your Turn: Capture a Meaningful Photo with Loved Ones: We've covered all the
techniques, strategies, and little tricks to capturing natural and meaningful family
photos. Now it's your turn. For your class project, you just need to
capture a family photo that feels special to you. It doesn't have to be
a perfectly posed shot or even the prettiest setting. What matters is the
feeling behind it. Choose a setting where your
family naturally connects, maybe at home, a park or
a favorite cozy spot. Use one or more of the
techniques we've learned. It could be posing, composition or lighting to
enhance the moment. Capture the shot and upload it in the class project
gallery section. I also encourage you to share the story
behind your photo. What made this
moment meaningful? What emotions do you feel
when you look at it? To submit your photo or photos, just click on the Projects
and Resources tab. Then click on create a project, upload your family photo and share a few
thoughts about it. Don't forget to add
your favorite photo as your project cover, so it appears like this
and not like this. This isn't just about
submitting a project. It's about building confidence. By taking this small step, you're proving to yourself
that you can do this. You're learning to see and
capture moments differently, and most importantly,
you're preserving a memory that will only become
more valuable over time. So don't overthink it. Just take the shot, upload it, and share your beautiful
moment with us. I can't wait to see
what you create.
8. Final Thoughts: Before we wrap up, I
just want to say this. The moments you capture today will mean
everything tomorrow. Years from now, you
won't care about whether the lighting was perfect or if you nailed the composition. You'll care that you have
these moments documented, that you have
something to hold onto a tangible piece of
your family's story. And that's why I'm so
glad you took this class. You now have the skills and confidence to capture beautiful, natural and emotional
family photos. But don't stop here. Keep practicing,
keep experimenting. The more you shoot, the
more you'll develop your style and eye for
meaningful moments. Here are a few ideas
to keep going. Start a photo journal
of your family moments. Take one meaningful
photo each week, experiment with different
lighting and poses, see what feels most like you. Try capturing tiny
everyday moments, the quiet in between times
that tell the best stories. Most importantly, keep
capturing with heart. If you'd love more guidance
on photo editing to polish your beautiful family photos
like I did in my examples, I have an iPhone photo
editing class coming soon, be sure to follow me here
on Skillshare so you don't miss it or any
of my fun giveaways. I'd also love to see your
progress beyond this class. If you share your family
photos on Instagram, please tag me and Skillshare. I'd love to cheer you on and celebrate your moments with you. If you enjoy this class, it would mean the world if
you could leave a review. Your feedback helps me
create even better classes for you and encourage others
to start their own journey. If you ever have any questions, feel free to drop them in
the discussion section. I am always happy to help. And one last thing, before
you go, just remember this. The ordinary moments
of today will be the memories you
cherish most tomorrow. So don't wait for
the perfect shot. Just pick up your phone, capture what you love, and keep telling your
story through photos. Thank you so much for being here and for
trusting me to guide you and for letting
me be part of your journey. Happy capturing.
 Rose Nene, Photographer & Videographer