Transcripts
1. Mobile filmmaking Intro: What's up, everybody? My name is Bill, and I'm really excited to bring you this course on mobile filmmaking. It's primarily based on the iPhone, presumably applies to Android as well. It covers everything from mastering cinematic video. Using this amazing camera. We all carry around with us in our pockets every day. We'll be using the filmic pro app, not cover every single button and menu so that you can master mobile filmmaking. As a filmmaker, I'm tired of carrying around all the heavy equipment, tripods, lenses, Gimbels, and gear everywhere I go. Today's phones have amazing quality cameras and can produce cinematic footage that is beyond incredible. I'll explain how to use this powerful tool and it's so light and portable, you can shoot anywhere. The filming app also allows you to have full manual control. That's exactly the same as a mirrorless or DLSR camera will also teach you how to get smooth handheld footage so they don't get all the jitters when you do slide and shots like this. Even though you're not using a gimbal. We have a bunch of theory sessions for you, such as frame rates. And what's the difference between them and which ones you should use. For what type of look you're going for. We have sections and what is ISO and how it interacts with the shutter speed, and how to use ISO so you don't get grainy images. There's a full section on how to nail your exposure. Also, we're going to go through all the options for exposure and focus. In the app. We'll take a look at live analytics so that you can nail your exposure and focus. For each shot. Would also take a look at frame rates and playback speeds for motion blur, whether it's from the cinematic footage or time lapses. We're also going to take a look at audio and the importance of audio from internal microphones had a connect up an external microphone tier phone. There's a section on understanding the Kelvin range, what it is and how to use it. We also have a section on white balance so that you make sure that your whites look white and your images don't look orange or blue. There's a whole section on using Gimbels. She can get that added smoothness in your shots. And we're all looking for, for cinematic movement. Whether it's using the app for the gambles, or you're just using your native app and running it on a standard gimbal. You'll get the shots you're looking for and they'll come out looking great. So I really think you'll get a lot out of this course. So let's jump in and learn mobile filmmaking.
2. Intro to filming: So if you look into make cinematic videos using a phone, how did you do it? Well, in this course, I'm going to show you how to do this. I'm going to walk you through it step-by-step plus the next lessons we will cover every setting in the filmic pro app to help your footage standard from the crowd. You can general the app in the Apple Store for iOS or in Google Play for Android. Modern phones have great cameras and stabilization built in nowadays, the videos that have been made narrower, amazing little tool allows you to create amazing videos. And you don't always have to have the latest and greatest phone. The first challenge is light. Shoot your videos whenever possible when you're lighting conditions are good, such as early morning or late afternoon if you can. The secret to this course is practice. Stop binge watching YouTube videos. We all get hooked on YouTube creators promoting the latest tech and gadgets. The problem with this is you constantly watched the videos, but never go out and practice the techniques yourself enough. For every chapter that we cover. Take your phone out in practice that technique so that you get proficient at it and feel more comfortable when doing it in real life. Here's an example how to shoot an everyday scene. In this case, it's a landscaper cutting some palm trees. And you can turn that simple footage into something cinematic. Just using your phone. No tripods, gambles, know, mirrorless cameras or anything other than just holding your phone handheld. Hello? Hello. Okay. Okay. So now you have everything you need right here with the phone. Doesn't matter whether you have the latest and greatest Android or iPhone. Just use whatever you have. And as I said previously, just practice. Watch a section. Don't just binge-watch everything. Take a section and go ahead and practice it. This is the most important step. It'll make you learn a lot better and practice and understand what you're trying to do. Because trust me, when you're trying to do it on the fly, you're on vacation, or you're trying to capture something you bring out your phone, and then you'll stumble around with the settings. So the only thing to do to get good video for Edge is the practice. So that becomes second nature. So that's a key 0.2 thing to do is no matter what you're doing, give you some basics. Coming up here is lock your white balance and your exposure. Always do this and we're going to show you this in your native app as well as in the filmic pro app. Now we chose filmic pro because it's widely used around the world. It's the number one app for iPhone, an Android film making. It allows you to basically control all of your phone settings much more than the native app can, such as shutter speed, ISO, exposure, focus, and focus peaking. It has everything on there. And in the next video is we're going to take you through every single setting, whether it's time-lapse, focus, exposure, shutter speed, slow motion. We're going to take you through every setting that it has. After that, we're going to take you through basics of capturing video with your phone. Some do's and don'ts, such as panning around how to use your different lenses. And then how to get at cinematic look that you're all striving for. All right, so with all that said, let's get on with the course. And I'll see you in the next video.
3. Some quick basics: All right, so before we get started, even though this whole course is set up around the filmic pro app, will also touch base a little bit on your native app during this video and try to get the most of your camera settings. So you get better video even if you're just using the native app and not the filmic pro app. So let's jump in and don't worry about if you don't understand everything right now, we're gonna go through each setting step by step with the right, The next set of videos. So let's jump in and see how you can set up your camera on your phone for the best quality and just some tips and tricks. Let's jump into it. If you're using your native camera app, you want to get the highest quality editor cameras. You can go to Settings and choose the highest quality that's on your phone. In this case, we can choose for K at 60 frames per second. This will allow us to shoot at a higher frame rate. And then we can also have the ability to slow it down later on in post for that slow motion effect. For k also allows you to be able to zoom in and zoom out with their quality loss on the video. If you don't have four K, choose 10 ADP, and just choose the highest frame rate that you have. If you shoot in slow motion. We can see here in the settings that we can choose 10 ADP at a 120 frames per second, or 240 frames per second. Either one of these will do so that when we play it back, we'll get super smooth slow motion. In fact, shooting at 60 frames per second allows you to have great stone motion when he started back on a 24 frames per second timeline. We can also see in the native app that we have three focal lengths or three cameras. In this particular case, 0.5 is ultra-wide. One is wide, and normally the best quality camera on your phone. And two is the Italian or Zoom camera. Phone may have more or less cameras on this. But just when you film in, choose between these variety of cameras. So it mixes up your footage and makes it more interesting. Before we start the shoe video, we want to lock exposure. Pressing on the screen will bring up this yellow box or a similar one on an Android. You'll see that it also, it will say something like AE AF lock. This means that your exposure and focus and I locked. Also notice the sun slider on the right of the box. Press and drag this down to make the image darker. But drag it up to make the image lighter. Lock in the exposure on the sky, for example. We'll stop the video getting brighter or darker as you shoot the scene. Here's an example of not lock in the exposure. You can see the exposure changing in the background through the windows. So always remember that lock your exposure before pressing record. Even if you're in your native phone app. And filmic pro, you can choose the camera you want to use. This will depend on your device. We can then choose a resolution. We want the film in. Always choose the highest that you can for the best quality. In this case, for k and filmic extreme is the best we can choose. Next, we choose our resolution. We'll change this to 60 frames per second. Next, we can lock our exposure by moving this circle around. And normally we wanted to expose for the sky, tap it to lock it and it will turn red. You can move the square around to wherever you want to. Shoot focus, leaving it white like this means it's an auto-focus. So whatever you point your camera, it will autofocus. If you tap this also, once, it will go red and lock the focus. Finally, there's three circles on the bottom left of the screen. Red, green, and blue. This will open a menu. At the bottom right. There are three letters, ACWP, which stands for auto white balance. If you tap it, it turns from blue to orange to red. And we want red, which means it's locked. This means that as you move the camera around, the sky, for example, won't get brighter or darker, and the colors won't shift. So now we're ready to record through each one of these details are covered extensively in the videos coming up. So k, you have everything you need right here in your phone. And these are just some basics. I'm towards the end of the course, we're going to do a lot more in depths of this. But some general rules here is a lot of people, when they get their phone, they will just put it up at eye level, not just phones, but even mirrorless cameras. And then they'll just turn around like this and get a panoramic view of everything. Try not to do this because it doesn't look that good when you put it together. Later on. It just looks like all over the place. So if you want to get some images in different places, just keep the camera still. So do this like film this way. If you want to get something over their film this way here, or something over here. And what are the main things to do is use your lenses, this camera, but this phone has three lenses, and we'll use the mole. So if I want to get an ultra wide shot, I could do that for a few seconds, then change the camera to the wide shot, which is the best camera on this phone. And then the tele shot or the zoom shot. And then just mix up the different the different lenses that you have for the different shots. And this makes it much more interesting with the variety of shots. If you have an older phone that doesn't have many cameras, is this, then just move more towards your subject. So start off. Either really close to a subject, take a few seconds and then physically move further away. And that'll give you the widest shot. So you'll have to just physically move near or further away from the subject to try and to do. That's the first step. The second part of this as keeping your camera still. So if you have your camera at here like this or like this, and I'm trying to walk and move along to things. I'm going to be released the further away you have it from your body, the more shaky your camera's going to be, that modern phones have good stabilization in them. But another thing you can do is try to hold your phone a bit like this. It looks awkward initially, but have three points of contact. So it's two points where the hands and then the third is your elbows into your torso. And then as you walk, you can move heel to toe and try not to make that up and down movement. And if you do this quite slowly, you can get pretty smooth footage. The other thing is, if you're shooting at 24 frames per second and that's where you set your camera fall. Then if you're trying to move back and forth and get a pan shot. So by the way, a pan shot is simulating a slider. When you move back and forth, try not to move your body like this. Try to just spread your legs and just move back and slide back and forth. Now, if you're shooting at 24 frames per second, you have to be really slow and careful with this. If you change your resolution to hire, like for k 60 or 10 ADP 60 or 120. You can actually move quite fast. So you don't have to be quite as careful. Because when you slow it down, when you do slow motion, a lot of that jitter will be removed naturally. So keep those thoughts in mind. There are two other things, and the main thing which makes amateurish looking video is a lot of jitter a movement. So if you can take a very lightweight tripod with you, and then you can just use that and have that so the camera is still and then you can just turn it on and off to get nice shots. And then later on in post, you can actually zoom in. Zoom out was simulate some movement with the software like a post software, like Adobe Premiere or Final Cut, or one of these other softwares. The other thing that you can use is a gorilla pod. These come this as a little ball head on the top so we can move it around. These are great for doing time-lapse is then not as big as a tripod. So you can take them with you on a trip and basically set these up anywhere around the tree random render gate just on the floor. And this will keep your footage nice and steady. But also re low to the ground. If you don't prop them up somewhere, she can get nice sidewalk in shots where you just see people's feet and legs. And these can be set up there quite handy. These are used a lot by YouTubers. So keep this in mind as well. They're not that expensive. And then finally, you can use a gimbal. This is a three axis gimbal by DJI. There's many, many ones that you can do and your phone or go in here. And then as you're moving along with this, it'll naturally stabilize your your phone footage. Please have a lot of other purposes as well for getting cinematic video. We're going to have a little bit a look at this with some of these basics here towards the end of the course and how you can use them, and some tips and tricks on how to use these types of things. So keep all of those things in mind. Keep your camera steady. Don't forget to lock off your exposure and white balance and move really slowly when you're trying to do these dollies or tilt shots. And just think about it ahead of time. Just don't bring up your camera. And oh, there's something up there and then there's something over here. Then there's something over there. It's sort of chaotic. So try to think out a scene. So when you get some web, keep your phone in your pocket, and then you think that would be good. I want to get a picture of something here. So think about how it would look in the end. So maybe it's a boat on the river or something or of something in a beach scene. So you get a wide shot, an establishing shot first, and then maybe a close up of the boat and then something else even more close up like a macro shot. And try to mix up as much different variety of shots as you can. Again all the time, keeping your phone still and you can move like zoom, pan in and pan out for the a handheld. Um, but think about it. Try to keep your phone steady, keep three points of contact as you move. And this will make your footage look a lot more cinematic. So with all that said, let's move into the filmic app now so we can see how to use all these settings. And I'll see you in the next video.
4. What is a reticle: When you first opened filmic pro, and it looks similar to this. I can look slightly different if you've opened it on an Android. This was shot on an iPhone. The circle and the square that you see are known as radicals. You can think of radicals as targets, like you see on a rifle scope or a microscope. They're not on the video, but it allows you to see where your radicals on the video that's going to come out. If they open up and they're red, it means they're locked. So we need to unlock them. And the way to do this is tap this button twice down here. And then just touch them on the screen and they'll go to white. And this means that they're unlocked and can be moved around the screen. The circle is the exposure radical, and the square is for focus. To move the radicals around. So you want to move exposure, just drag it to wherever you want to. Move it on the screen. If there isn't much change in the lighting conditions, you won't see a lot of change. To just say I want to leave it here. Click on this now Locker in position. And it goes red. This means that the exposure won't change if I move the camera around. Same thing for the focus over the radical $21 here wanted on this front bed post. It's now locked. And that's the main focus position. But when I move it back to the RIA post, for example, just click on it once so it goes white. Move it to where you want the focus in your image. Click on it and make it goes red. And now here our exposure and our focus a lot. Now we can film on your normal camera app. You have one radical and it will lock auto focus and auto exposure. On this iPhone, for example, if you press and hold, you can move the slider up and down to change the exposure, but it's only at that 1. Filmic pro allows you to have a separate focus and a separate exposure position and your video capture. So now we understand how to move the exposure and focus radicals from around. What happens when we're trying to film in doors. And it's daytime and we have an open window. So that means had that high contrast bright light from the window for just blow the highlights out. So we either have to expose for the window or the inside of the room. You can't expose for highlights and shadows simultaneously. Swept by. Now, lock on the exposure for the bright window. But I move the camera around the room. You'll see that it's locked on for the exposure, the bright windows for everything else looks dark. So that's not good. Now if I bring the camera back down to the window, outside, the window looks okay because that's what we've exposed. Ports are locked down at that point. We take it off. And then we move the camera around the room. The exposure will automatically compensate and try to lighten up the rest of the room, whatever that radical is on. It's going to try to expose for. And the problem in doing this is if you're panning the camera around, every time you go on to a different light source, the light is going to change in your image. Here we have locked onto the room and we go back round to the, to the window and it's totally blown out. The cat really have both. If I take it off, it'll automatically expose for the outside. You can see if you have a lot of light source in the same area, if you are moving the camera when you do automatic change, so they're not locked, radicals and unlocked. It will change the light source. But you'll see that the when there will be blown out again when we go back around to it. So how do we fix that? This is always an issue. Videographers, such as real estate videographers, for example, are always dealing with this today when they're filming in a room to show this off for real estate, do they expose for the shadows, the cabinets, the kitchen. But at the end of the kitchen or maybe all around is some big windows or do they exposed for that? So one of the things they'll do is they'll shoot in a flat profile called NSLog. And we'll get into that later. But that's one of the things we might do that might help out. But generally speaking, you don't want to be panning across really bright light some right windows. Because your exposure will change if it's, if it's not locked down, it will change exposure and the camera as you go across each thing. And that just doesn't look good. So your voices people give is to lock it down for a specific setting like in the room. And then stick to that. If you're going to have to move and then go to a bright window, then set it separately for that and do a separate bit of footage. Alright, let's move on.
5. Exposure Dynamic tone mapping: So let's talk about expanded radicals. If you move the Exposure radical around and double-click on it, you get this expanded radical. And it uses dynamic Tone Mapping. So dynamic tone mapping is a computational process that uses an algorithm. So it mathematically looked at the image and pixelized as it in real time. And then we maps it, shift shadows, mid tones and highlights in specific areas. It doesn't mean that it's going to change everything in the image. Have you ever really bright area. It might look at the darker shadows or the midtones and try to increase them. What might try to reduce that high image area, the highlights. So it's going to look at different areas of the picture in real time and then automatically try to adjust that. So looking at this image will try to simulate what dynamic tome and images doing to imagine the exposure radical was looking at this particular spot on the image. And that's what it would adjust for. But another part of it would be looking down in this dark area. Now connected to the sky. Same up here. Because looking at all these different pixels dynamically as it's moving all the time. And then it's trying to adjust the contrast. The highs and lows, the midtones, the dark shadows and the highlights. On the go, like all the time Diamond dynamically. That's what dynamic toned image is trying to do. If we double-click on the small box, we get the larger one. Let's take a look at this next image here. This is a seti, turn a bright sky. Darker buildings like grays and brown mid tones. And then some really dark things like in the trees and the people's clothes or dark here. So there's dynamic Tone mapping. We'll look at different areas of the picture. As we said. It'll analyze it. And then it will try to adjust what it thinks is the best solution. By the bringing up the mid-tones, bring down the highlights. And it can do this in just a couple of areas. It doesn't have to do it for the entire image. So in iOS systems, you can turn it off. It's always on. So you might find that if you go down and move the Exposure radical to a dark part of the building, for example, the dynamic tone might try to adjust some of the other images. So for Android you can turn it off. And for iOS systems, it's always on. But just be aware that when you're using this mode.
6. Focus reticle: The focus radical is very similar to the exposure radical. You can move it around the screen to wherever you want to. Set focus to an Android, whoever, it's not on auto. So you have to move it. If I want to move to the tree, that's where it would focus for one and move it down to this chair. That's where it would focus. You have to move the radical around to where you want it to focus. Save this railing. In iOS systems zone, this isn't the case. It's on auto focus all the time. So if I move something near like this clock to the camera and I take it away, you can see it focus back on the tree, back on the clock, and now back on the tree. So it's an autofocus mode all the time in iOS. If I double-click on it, it'll make this bigger box. Now this is good for login and it's autofocus. You can see I'm in close up here with the, with the clock, and now it automatically focuses onto the tree. This works for iOS and Android. If I tap on the box, it will lock it. So we're focused on the tree here. And now if I bring the cloth backing closer, you can see it's not in focus. So it's fixed on the, on the tree itself. So the larger box acts jerks just like the smaller box. If I focus on the clock, the tree is out of focus. And if I click on it again, the tree goes back into focus because it sets autofocus. If I double tap it, it goes back to the original radical size. Pre double-tap on this again and expand the box. This stays in the middle of the screen. When the box that expanded, you can't move it around. But when you move the camera up and down or left and right, it is order focuses on all the time and it just stays in the center of the screen, which I said is good for like blogging and doing work like that. So if we move the camera around, we could say that the exposure is off because our exposure radical was set to auto. So we have to move it into the sky area, then we fix that on this guy. So now it looks bluer. If we move it back. Now, the autofocus is set to dynamic, so it's on autofocus all the time. And no matter where we move around now, it will keep everything in focus. This little white slider on the right is digital zoom this little white slider here. So if you slide it up, you'll see it goes from green to orange to red when you're fully Zoom then just like so for whatever reason, when I was in for k, this little slider wasn't available. But I reset it back in settings, the 10 ADP and then it showed up. So if you come down the other way, it'll go back the other way and go from red to orange to green. Let's move this subtle exposure radical ups and we get the sky blue again. And I think this is an optical zoom, which software Zoom? So being really careful. But you get into the red zone. It's great if you're looking at it on your phone, but on a bigger image, it might be pixelated or a bit blurry or noise greeny. So try to stay at the red. You can see here it's red. And then if you come back down, it shows that it's orange as you zoom out a little bit and green when you're fully zoomed out. So it might be a better option to move closer to the subject versus using software Zoom, but if you have to, it's a thing that's available to you. An example where we can use the focus radical is we're up close with these flowers here. You can see that background is blurry with bokeh effect. So we'll explain this in more detail in the lessons. But all we had to do to get this effect was focus on the flowers in front of us. Get the camera up-close. Use the focus radical, tap on the flowers that automatically made the phone focus on the flower nearest to us. And that gave us our poker or blurred effect in the background. And we'll get into doing more of that in later lessons.
7. Manual control wheels: In this section we're going to look at the manual control wheels. This is where people get confused all the time. And the open-up filmic pro. And they start playing around with the wheels and it's too bright or too dark or not in-focus. So we're going to go over it now. As an exposure we are and our focus wheel. The exposure controls the shutter speed. And ISO. Iso is how sensitive your camera lenses to, to light. So the sensor in the camera. And then we're going to work more and more on this as we get through the lessons. So don't worry if it seems a bit confusing right now, being worked through the lessons, we'll be coming back to these settings and use them in real life examples. Let's jump in. Open the manual sliders by hitting this button right here. The exposure manual control wheel is on the left-hand side. And the focus control wheel is on the right side. You can simply swipe them away to each side of the foam. Notice that the radicals are locked. Tap them to unlock them. Can swipe them in again on iOS systems. Pulled and then the radical will actually open the corresponding slider. So hold down the radical to bring out the corresponding slider. This is the focus one. We can now move the slider to change focus. And we drag this down. Because out-of-focus, we drag the slider up. We can change depending on what the camera sees. Either an object near to us or further away. Do you can do the same thing for the exposure. If we drag this slider down, it gets dark. If we drag this slider up, it gets brighter. Manual control wheels allow you to do an automated focus pull. Rack focus is used all the time in movies. It consists of focus in an object near to the camera and then racking or pull him focus to another object that makes the object in the scene standout. Or more interesting. Swipe in from the right to show the control wheel. Here we can see there's three markers. Here. We can see a center mark and an upper and lower. We're going to use these to set the points for the two focus positions. We can also use live analytics by clicking this a down at the bottom, and click on PHP. And whatever is in green is in focus. So as we move the focus wheel, we can see that the Langton is slightly green paint on the middle button, and that'll set 0.1. Then move to the other side. You can see that the lamp and the side cam that is done to go green. Around here, click on the middle button again. And that will set the second position. Now, click on the a to go back to normal view and just hit on either side of those targets. So you just made the upper and lower position. And the camera will move and focus from one position to the next. Racking focus, or showing a point of interest from the sign cabinet back to the Blanton and vice versa. The same thing can be done with the zoom on the same control, we'll just click on the word Zoom underfocus. And then the wheel will control the Zoom instead of focus on magnification. So all you have to do is move the wheel to where you want it. Let's say you want to zoom in to here. And then hit the middle button again and you can set the first and zoom back out to wherever you want it at the middle button and make the second, by Chapman, the top or the bottom set points. You can zoom in and out automatically and one touch. You could do exactly the same thing as you did for focus on the exposure, we'll just slide it in from the left. And we have the same sort of we'll feed, drag it down, it goes darker and drag it up. The image goes lighter. Here we can see the top number is moving dramatically, as well as the bottom number. So the bottom number is your shutter speed. This can be sad and fixed. And your top number is your ISO number. Basic rule of thumb here is the lower your ISO number, the better quality of your image. If your ISO number goes too high, you get a lighter, brighter image. Petal also be really grainy. So be really careful. Here. You might want to set your shutter speed to a value. Here it said at 148. So now when I move the wheel, only the ISO number is moving. So I can control how light or dark it looks for that effect in my shutter speed. Again, we can see here that you can set the racking of the exposure by hitting the middle number and then clicking on either side of that setting. Just like progress, it will rack exposure. As I said, I've never really done this and I don't really understand why you'd want to practically. So next what we have is ISO priority or bias. These three dots in the middle of the wheel here is ISO priority. So this is three different ranges, low, medium, and high. You can see here on the first startup I go down, it goes from 30 to the 686 at the highest point, back down and then move to the medium one, which is the center dot. It goes from 70 up to 2000 and 60. And then the high one will be moved to the highest dot. It goes from 165 up to 27, 48. Now, these ranges just allow you three different ranges to increase the bias on your ISO. But what we can see here is that if you take it too high, it gets very grainy. So if we look at this, this is what the highest ISO occur, the graininess of the cushions that you don't want that. So again, you should try to keep your ISO as low as possible. So normally under normal conditions, you'd be in the lowest ISO that you can be. I tried to fix my shutter and then I would just adjust the ISO. And you can see here even just going up a little bit, that lamp is way too bright, so I'll bring it down where it looks more natural, the lowest ISO I can get. And that is where we'll stop.
8. Understanding Shutter speed : All right, In this section
we're gonna talk about shutter speed and frame rates and their interaction
between the two. We're also going to talk about the 180 degrees shutter rule. And if you have to stick
to it all the time. So if you're looking
for that cinematic 2425 frames per second, we can try and look
for slow motion. Or when you can break that rule to give you
a bit more elbow room. Let's jump in and see
some examples and how to use shutter speed. In this section, we're gonna go over what is shutter speed. And to do that, let's
understand what video is. Video is nothing more than a
series of single pictures. If you shoot a video at
24 frames per second, that means there are
24 single pictures taken in 1 second the video, if you shoot in 60
frames per second, or 60 single pictures
in 1 second and so on. It, old school film, there was a physical
metal disc that would spin around in
front of the film. This, this mechanism is
semi-circular in shape, meaning half the
disk was missing. So when the open part of
the desk was over the film, it would be exposed. The metal part was
over the film. It would advance the
film to the next frame. If we speed this frame rate
up to 24 frames per second, we can see this effect. Back in the day it was decided
that the frame rate of 24 frames per second would give the correct amount of
motion blur so that the human eye would see
this as natural movement. If we set our shutter 21 fourth, 1 eighth of a second, then this will mean that
the shutter will open from 148 for a second, put 24 times over a period of 1 second if we use in
24 frames per second, this mathematically
informative that the shadow will be open for half the time and close for
the other half of the time. Spinning shadow effect was known as the 180 degrees shutter rule. The final solutions settled
for this general rule was you take your
frames per second, then you double it for
your shutter speed. So if you want 24
frames per second, you set your shutter
speed to 148. If you want to shoot in
60 frames per second, you set your shutter
speed to 120, etc. Note that on some cameras, like mirrorless cameras,
you're not able to set 48. It just goes to 50
maybe. And that's fine. As long as you're
near. Your phone has no mechanical shutter. So the sensor itself is electronically
being turned on and off to act as a shadow. Now we have Powell versus NTSC. The world is separated into
two mainly different areas. Powell for Europe,
Russia, Africa, Asia, and South America, uses
25 frames per second. And NTSC, which is
USA, Canada, Japan, Mexico, uses 2430
frames per seconds. Some general rules here. The slower the shutter speed, the more motion blur
you see as a sensor is exposed for longer
periods of the light. Here we can say if when I
wave my hands that they looked have a normal
they look normal because it has a normal
motion blur to it. If we change the shutter
speed to something higher, you will have less motion blur. So as a sense, it gets
less light than normal. The image gets a little
bit more sharper. So again, here's me
shaking my hands. But you'll notice it doesn't
quite look as natural. That's because the
motion blur is less, but doesn't look natural. It looks more statically. Hollywood movies use
this to this day. And if you're looking
for that cinematic look, then set your camera
to 24 or 25 frames per second with a shutter speed of one over 48 or one over 50th. Using the 180 degree
rule as a guide. Here's an example of
a travel video that I made using a phone
on a trip to Rome. Rome. There is definitely something
in chanting about this. Please. Take the time to walk through these ancient streets
and you'll come across, wonder around every corner. This setting that has
stood the test of time. It sends tastes, insights, will make your return
time after time. I mean, or at the detail
of every building designs, the architectural
details are amazing. The overwhelming
feeling of grand jury. Magnificent. The Pantheon. And then the gesture, the
vision and the color. Sit and watch as the
sun rises and sets. Prices. Ancient
cobblestone streets. The colors and the
details of the buildings. Ancient city was
established in 1753 BC, where it stood as a capital
of the Roman Empire. It still stands. Vibrant, exciting,
magnificent. So Rome, we have to leave it for now. But no. You left a very special place. For higher frame rates,
like 60 frames per seconds. It's not so important
to stick to the rule as the motion
blur is less than, it won't be as
noticeable once you pass above 30 frames per second. So for example, if you're shooting
outside a 60 frames per second and you set your
shutter to one over 120th. The image is still bright. You can increase
your shutter speed to darken the image
a little bit, and it should still be okay. So here I'm showing
you the phone. This is a ND filter that
we're going to use this as a phone case from a
company called Polar Pro. We're not sponsored
by these at all. They're about a
$150 for this case, and it's a variable ND
in a circular polarizer. So the ND filter fits over the three cameras
from the iPhone. And if it's on the case itself, this is what it looks like
when it's all put together. So here we're taking a
look at this image here. It's sort of getting
towards afternoon. The image doesn't
look too badly. And notice that
we're 1 384th year. The shutter is really high. So if I put that one over 48, you can see how bright it is. The sky is blown out. So what I wanna do is also
bring down the ISO, the 32. Then I'm going to
use the ND filter to move it into dark
in the image here. So now you can see
that I'm still at 32 and ISO one over 48 on my shutter speed to and get that normal motion blur and
cinematic look that we want. Then I've recorded a little bit. This is what the final thing came out using the ND filter. Just wanted to show you
that the ND filters, you can get cheaper versions. So I'm just an Amazon. I searched for variable
ND filter for an iPhone. And you can see here, you can get one clip on there,
like thirty-three dollars. You don't have to spend a
$150 with the Polar Pro. I just did because I know that
they're really good glass. But this might get you through anyway. You received
these are 60. And this one comes with a whole bunch for
the filters as well, for twenty-five dollars, as well as taking a
variable ND filters, they clip on just like this. They also have fixed ones. They go in different
ranges like MD4 and the eight and the 1632. And that just means
they're getting darker and darker the higher the number. So I just wanted to talk about what frame rate you
use, 2425 or 30. So as we said, 24
frames per second is using Hollywood cinematic look with that 180 shutter rule. So 2421 over 48 as
your shutter speed. If you're in Europe,
you use a power system. So that's your base. Footage is 25 frames per second if you're
doing a talking head. So this is a talking head video, someone talking to a camera, someone blogging on YouTube. Maybe 30 frames per
second would be. Better, It's a
little bit sharper. And a lot of people now
are arguing that it's actually smoother than 24 frames per second for everything, unless you really want that. Motion blur, movie image
blurriness of fact, there are some
people talking that they shoot at 30 frames
per second all the time. So coming up, we're
going to show you some examples real quick. I'm just standing on the side of a road and some vehicles going past their shot at 24 frames
and playback at 24 frames. And the other one's a film that 30 frames per second
played back at 30. You just have to experiment yourself and see
which works for you. And let's jump into it and
see what they look like. 24 frames. This is 30 frames per second. There are times
however that you might want to shoot or
higher frame rate. Let's say that you set your shutter speed to one
over 200th of a second, then we want to play it back
at 2425 frames per second. You have a four times faster
shutter speed, the normal. This will give you a more
dramatic action look and feel. This was done ethically in the movie called
Saving Private Ryan. Another type of action
that the opposite is true. If you set your shirt it to something like one
over an eighth, then you play it back at
24 frames per second. This will give you a lot of
motion blur and looked like someone is dizzy or spaced out. Is the same scene shot at a normal shutter
speed of one over 48. As you can see, it's a
totally different look. In summary, if you're looking
for a cinematic look, set your frames per second, the 2425, and your shutter
speed to double that of 4850. If you're shooting an interview, which is known as a torque
and head type interview. You may be want to
shoot at 30 frames per second with a shutter speed
of 11 over six years. So 60. If you want to
shoot slow motion, then shoot at 60 frames or 120 or higher depending on
what your camera can do. But note some cameras
may not let you to shoot for k and these
higher frame rates, so it'll knock you down to
ten ADP or something similar. So if you go to a much
higher frame rate like 60 or 124 frames and playback at 24 or 25 frames per second. This will slow down the image
2.5 to five times slower, giving you slow motion. So that's a quick look at what shutter speed is and frame rates and how they
interact with each other. So let's move on
to the next video.
9. What is ISO: In this section we're gonna talk about what is ISO. Iso basically is a sensitivity of light hitting the sensor, the camera sensor. The rule of thumb here is you want to get, Here's a low ISO value. So to get a low ISO value, you need a lot more light, whether it's outside or false lights inside a room with lamps and what have you. Because if you go very high with the ISOS, You get a lot of grain and image in Europe for each. So let's jump into it and see what ISO is. Shutter speed and aperture control the physical amount of the light hitting the sensor. On phone cameras, normally there is not any physical moving parts for the aperture. The aperture is fixed. We can see here these are some results of the camera aperture. Iso controls the amount of light the sensor needs and is a digital gain for the sensor. As the ISO increases, you might have shared a lighted needs decreases. For example, changing the ISO from 400 to 800 results and the camera need in half as much light to get the same exposure. This is why indoor photographers pump up the rice so values and no light, especially at low LET sporting events or shooting wildlife, but tried to capture fast movement action. They need a fast shutter. This in turn will lower the amount of light hit in the camera sensor. So in turn, they increase the ISO value. Some mirrorless DLSR cameras can have an high ISO value, but they are causing too much image grain. Phone cameras, sensors, on the other hand, are much smaller than mirrorless cameras, and usually they have a fixed aperture. So the physical size of the sensor is a lot smaller and lets in less light. Iso does come with drawbacks. However, take a microphone as an example. The microphone inputs audio waves, just like a camera gathers, light waves each convert the inputs into electrical signals. And I'll put in a case of a microphone, a SAM file, and an image for a camera. If you recorded a sound file that is really low, such as so much speaking, you'll pick up a lot of the background, will need to increase the amplitude of the recording. But along with the sand, you also increase the hes and the background noise. The same is true in the camera. Increase in the sensitivity, or the ISO increases everything else, from lighting out to facts, to electrical grain. And this is known as noise. This also affects dynamic range and color accuracy in the image. So it's always a good rule to the smallest ISO that you can to get the best image. Note that you have a small ISO value, means having more external ambient light to expose the scene or the right side. Or you have more lamps and overhead lighting and an indoor scene. Larger DLSR mirrorless cameras have a known bias or iso level for the sensors. So this means having the same iso is setting for different cameras will not produce the same image across them. Lower ISO values are suited for outside daylight videos. With this plenty of ambient light and also this can be used as faster shutter speeds and small apertures made range ISOS can be used in dough as long as there's enough lighting to light the scene, such as lamps, external lighting, et cetera, like that. If you subjects not moving in an indoor light scene, you can actually lower your shutter speed slightly, which means that the sensor will get more light. High range iso, you'll use in a dark lit room and outside night photography needs higher ISO values. This is where you'll need to experiment to see how far you can push your ISO value without degrading the image or the video footage.
10. Live analytics: Tap the button at the bottom to bring up the live Analytics menu. And it shows at the top of the screen. There the live analytics will show up only when he moved the focus wheel or the exposure wheel. So if we move the focus, we'll anything that's in-focus will show up as green. This is a great feature to make sure your subjects are in focus. In the live mode, however, now, notice that if you let go the wheel, the focus peaking, either green color will fade away. The idea of this is that you can quickly use the focus peaking to check your focus on the fly. Now if we move the Exposure, we'll, you'll see the zebras or zebra stripes. Areas that are blue are underexposed, and areas that are red are overexposed. Again. This will only show up when you move in the wheel. Once you let go, they'll fade away. Hence the term live analytics. If you want to keep overlays on all the time, pressing a button again on the bottom. Then you can select one of the four options on top of the page. Fps or focus peaking. Now we can move the focus wheel again, green shows areas that are in focus. But this time, if we let go, the green color stays so we can see the bottom focused on the screen. The zebra or zebra button is for underexposed or overexpose areas in the shot. The blue stripes show what areas and shadows are underexposed. And the red stripes show you what is overexposed. By moving the exposure wheel. We can see that the lab gets a lot more red stripe shown it's overexposed. And this is expected, It's a bright light. We can move the wheel back so the lamp is not so overexposed. And as a smaller red stripe area. So if we turn off the focus peaking and zebra stripes, we can see the image that we want to record. The Clipping icon will show you areas that are blown out or clipped, meaning highlights and whites, which will be tuned, right? And your final video, these show up as red color. The blue color will show you shadows and dark areas that are underexposed in the video. But be aware that they're not going to turn out to be black and totally wide. They're just showing you that you can adjust the exposure. We'll get a nice balance between the two. Your biggest thing I would say is try not to get the over-exposed things too blown out because it just comes out bright white. The false color is very similar to the Clipping icon function. Blown out highlights, so red and underexposed dark shadows, a bloom. However, there's a green overlay that represents correctly exposed area in a shot. So here we can see the lamp is very bright, so we can use the explosion wheel to adjust that. So he had everything on the back wall from the lamb. The windows over on the right are all overexposed. So let's bring down that ISO here. And the explosion, we'll try to get the lamp just is going to be harder than normal because it is quite bright. So once we've done that, this would be the final image that we'll use to shoot our video. So let's run through this. How are you going to do this? I'm gonna change this to 30 frames per second capture and playback. We don't need cinematic, there's nothing moving. So I said that first, the next thing we can do here is set up our white balance. And I'm just going to set that to fix so it doesn't move around. I put it on the cabinet because I want that to be you can see here if I move it to different parts is going to adjust. So I'm going to put it on the camera and the cabinet itself and make sure that it's the area is focusing on. Next and we're going to do is bring out our wheels. I'm going to make sure focus peaking is on. And I'm just going to focus in on the side unit, a lamp on the cabinet. And I'm going to set my shutter speed to 1 over 60 because I'm in 30 frames per second. I can use the zebras and perceive what we get in focus and underexposed, sorry, and overexposed. So just moving this time to see what's moving. All right. So it's not too bad if I take it up. You can see the lamp getting hotter and hotter. So I'm going to also then go to the clipping to see that. And the overlay here to see what's exposure is working for me in green. And this is the final image, except a lamp. When I look at this now, looks a little bit too bright. So I open the exposure, we'll again and go back to the overlay here. For the false color. I'm going to try that lamb down a little bit so that we don't get as much red there. So it's not so overexposed. So I'm pretty good there. And 174 ISO and 1 over 60. And this is where I think we can close on wheels. And there is some recording.
11. Recording and media management: To record, simply press the button. When it turns red it's recording. Press it again to stop the recording. It the video play button to display of captured videos in the video library view. Click the clip that you want to play and it will open up to play the video without this menu, just click on the video clip itself. To bring up the menu again. Just press on the video one small. This video gives you options to what you can do with the video. Ios systems have six icons, whereas Android has five. On the iOS systems, There's an, a, a play icon. This allows you to send the video clip to a TV or another iOS device. The trim icon always allows you to trim the footage down to what you actually want. This will also help with storage size. Just drag either side to the appropriate type position that you want, starting at the front and the back. Then press the trim text and confirm that you want to save a copy to the new size. The filmstrip icon is next. On iOS, this will save to your normal photo app area and Android systems. Here I will just save it to a folder of your choice. This icon will down-sample your clip. This multi-site function on iOS systems is not available on Androids. It will just lower the bit rate if you shouldn't for K, for example. And you have published into social media where it doesn't need for K, you can type in size that clip. This will reduce the overall file size before k is not needed. This next icon is if you want to share the video on other apps and contacts. The red trashcan is what it says, will ask you to confirm that you want to delete any files. The video file gives you the date and time of recording. The resolution in this case is four, okay? The frame rate is 30 frames per second. The WAV file, or WAV file is your audio format in hertz, and it's what value the sound was recorded in. Mb is a megabyte file size of the video. And the time length of the video clip itself is shown here. Here we can see the file name above is the trimmed clip that we did earlier. And it shows this in the name of the copy. The original file is below it. You can see the original was six seconds and the trim copy is four seconds. We can also see the original file size was a 109.9 megabytes and the trim down copy is 78.5 megabytes. As we scroll through, we can also see that it's clip takes on a dominant color of the clip. This just allows you to visually grouped the clips that were shot in similar conditions. Back to the library mode. The filter icon allows you to sort the clips by resolution, frame rate, or favorites. You can choose favorites by clicking on the stock on the lower right of the clip. Then we can select the favorites function, and these will be grouped for us. We can also sort by resolution or frame rate, or when the clip was created, by the date and the size of the file. The clip select icon allows you to select one or more clips for upload or to delete. Press this icon once. Now press each video clip that you want to add. I, you'll see a green bar up here on the left side of the video clip. Then we can delete the items, for example, that we selected, because like multiple clips for upload to the camera roll on iOS or to a folder on Android to deselect them all, just hit the clip, select the icon again. Once more. You can select one or multiple clips to share to another app. You can also select one or multiple clips that the leaf. To close the library, just click anywhere inside it. And we'll be out of the library app.
12. Transfer files from your phone: So in this section we're going to talk about how do you get the files off of your phone? And there's a lot of combinations here. Whether you're using an Android and you have an iMac computer or using Windows with an Android or an iPhone to Windows. So you can just the best way to do this, just Google it. And then it'll come up with lots of videos for you to watch on YouTube and also on Justin Google, whether using a drop, use an iOS systems as lots of different ways and the best way to do that, but they're trying to cover that here is to just Google it. And what some videos I'm going to show you how you can do it from an iPhone to a Windows. So what's the issue here? So if you use the Play button and we look at the filename itself, we can see that it gives it a time and date. So 731, 2021. And I was 650 eight in the morning. So that time and date stamp is if you have a lot of files, it makes it easy to find stuff. So if we click on the actual file and then save it to the camera roll on our iPhone. This will actually just put a random set of numbers and lead us to it. And it won't keep the same filename structure. So we can go onto our Windows, go into the folder. And then we can see here that this actually that same clip now has a filename of just THE 1650 eight. Nothing to do with the time and date. And again, if you have a lot of files, it makes it really difficult to see which one is shot in order for editing. So a simple method for this is to download iTunes on Windows. Just choose a correct version, 64 bit or 32 bit. It's an executable. You just double-click it and follow the instructions to install it. At certain points, it will ask you to plug in your phone or iOS device and give it permission. And then just choose whatever preferences you want. And we'll install again the B a few times when it asks for permission to connect to your phone. And once you do this here you can see your phone icon comes up. Click on this, then go to File Sharing. And all your applications will come up. Here's the filmic app, and you can see here's your movies with the date and timestamp. So that's good from here. And all you have to do is just select the files you want to remove or save. To just select them, go down to the bottom right and click Save. It. Last key way you want to save themselves. And at the top you'll see the progress bar as a copies each file. I can take a little time. There were 67 videos on this particular move. And then once that's done, you can go to wherever as you chose on your computer and see that you still have the same date and timestamp filename, which is perfect compared to when you directly in Windows 10. And here, when you save to camera roll, the iOS, the iPhone just renames it to a different set of letters and numbers. And that's it. That's all you have to do to keep your same file name and date stamp and get the files from your phone to your Windows computer.
13. What is aspect ratio and resolution: So what is aspect ratio? The aspect ratio is basically a frame size. The video was shot on. And we have a notice a black bars on top and bottom of a movie screen. When old movies or TV, the buzz around the left and right side. The aspect ratio is the portion of the width to the height of the image. Early standard television and computer monitors had an aspect ratio of four to three. If you calculate this, it's four divided by three is 1.33. So for every block horizontally of 1.33, we have one block vertically. This gives you an aspect ratio of four to three. That's why all the old TVs were square looking. Today, the standard aspect ratio is 16, 29, also known as widescreen. Since 2009, it has become most common aspect ratio for television and computer monitors. It's also the international format for digital television. Hdtv, full HD and SD TV. And it has replaced the 43 aspect ratio. All of your TVs and phone cameras are all in 16 to 9 aspect ratio. It's also the most common aspect ratio uploaded here to. The principle is the same. 16 units wide by nine units high. So if we do the math again, 16 divided by nine is 1.78. So every 1.78 units along the bottom is equal to 1 TO aspect ratio should not be confused with resolution. Resolution is the pixel size of the video. So the more pixels, the more digital information and the clearer the image will be. For example, 720 P is 1280 by 720 TO, which is known as HD. And it has a 129 thousand pixels, 1080 P, which is 1920. By 1080 TO is known as FH T, or full HD resolution. And has over 2 million pixels for K, which is 3840 by 2160, and is commonly known as four K, or ultra HD resolution. This has over 8 million pixels, is huge resolution is found on premium TVs and computer monitors. 2160 p is known as folk as its width is close to four K. And it has four times the amount of data or pixels than that 10 ADP resolution. 8 K of 4320 P has a resolution of 76, 80 by 4320 and has over 33 million pixels. And that's 16 times more information than a 10 ADP image. Currently, you can only see a K on really expensive TVs and monitors from people like Samsung and LG for example. Although I'm sure a k will become more common. In fact, some phones can record video and aka already, like Samsung, Xiaomi, and the red magic from Nubia with iPhones not far behind. 720, 1080 for k and a k all have aspect ratios of 16 to nine. So let's do the math. Ten ADP is 1920 by 1080. So 1920 divided by the 16 from the 16th, 19 ratio is 120. And we take the 120 and time's up by nine. And this gives you the other side of 1080. It's the same for fork. 340 divided by 16 is 240. 240 times 9 is 2160. And the same for eight K. So we also have 21 to nine aspect ratio. This is used to shoot ultra-wide movie formats, use inexpensive anamorphic lenses. This gives a very wide cinematic look to the video. These lenses capture a wide image and squeezes it into a four to three or 16 to 9 format. This can be then these squeezed and post to get a 21 to nine aspect ratio. A lot of YouTube has tried to simulate this look by adding black bars top and bottom to their 16th 19 ratio video to make it look cinematic, there's a lot of 21, 29 aspect monitors available now and gamers and video craters use them all the time. So what does all this look like? Here we have three monitors with a 21, 29 footage loaded onto them. We can see that the 21, 29 monitor shows a full footage for screen with an ultra wide ratio. The middle 16 to 9 monitor, which show black bars top and bottom. This is why when you watch a movie on your TV that were shot on an ultra wide format, now has black bars top and bottom on your TV. That's probably 16 to nine aspect ratio. The four to three monitor would show up with huge black bars top and bottom. And the next row we'll see the same thing. But now with 16 29 format for this loaded on them. We can see that on the 21, 29 monitor, we now have black bars on the left and right side. And the 43 monitor which show huge black bars top and bottom. On the bottom row. We've loaded four to three ratio footage into each monitor. The 21, 29 monitor would have huge black bars on the left and right sides. The 16 to 9 monitor would also have vertical bars, but to a less extent. So this is what your different video formats would look like on different TVs monitors with different aspect ratios. So in the filmic pro app, we're going to hit the cogwheel and go to resolution. You'll see we're in 16 to nine right now. But I'm going to choose 2.76. And you can see I've made it much. Why do it buys above and below? And that's a really wide screen to the same thing. And there's another one called two-point 39. He hit that one. To bars are not quite as 70 millimeter boats and aspect ratio of 2.7621. It's twice as larger than a standard 35 millimeter film. 17 millimeter was well put Ben Hur on the map in 1959. 70 millimeter is often combined with imax formats. The most common widescreen formats are 2.35212.3921 formats that movies used today. In the next section, let's take some of these video clips for different aspect ratios and see what we can do with them in post to get the effect that you want.
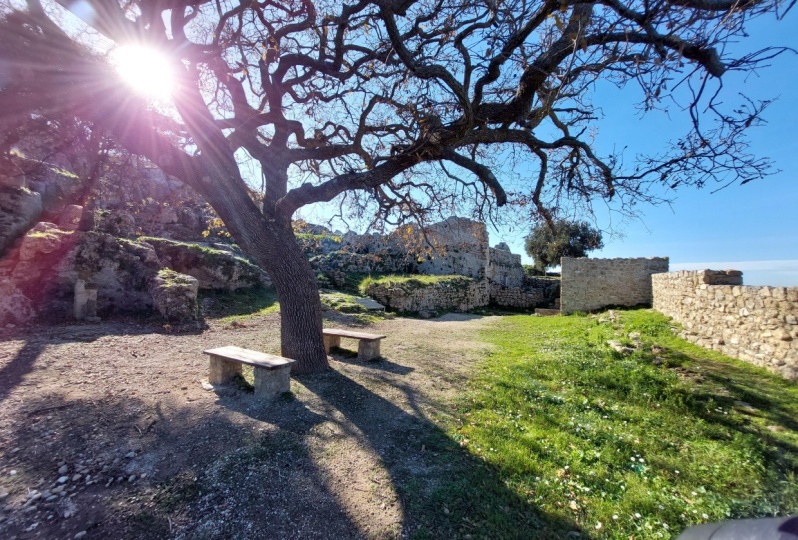
14. Aspect ratios in Post Production: In this section, we're going to take a look at aspect ratios and how they work out in post-production. We're going to be used in Adobe Premiere. But you can use whatever software you normally use. And the principles with the same. We're gonna take a look at 1080 P for k and 16 to 9 ratios and how you get that widescreen from your footage. And let's jump into Premiere now and see how it's done. Okay, I got Premiere Pro open. I'm going to use Premiere Pro. You can use any software that you're used to veto not use Premiere Pro. We have other courses that you can follow for this. Okay, so I'm going to go to my project panel, double-click. And similar in the resources, a project area, we have some practice files that have been included. Go look for the ones that say black bars. And Castle is the first thing, 10 ADP. So this isn't a drag these guys into this area. We have a castle, It's 10 ADP, and some black bile PNG files track the castle over. This will create a sequence. So if we look around here in this area, we drag this little slider over. We can see the castle is 10 ADP is 30 frames per second. That's sort of a shot at. And then we're looking for a video in part. Breyer info. We can see the castle is 1920 by 1080, and as always, we're clicked over here. We can go to sequence, sequence settings. We can see that it's 30 frames per second. It's aspect ratio is 16 to nine, and it's 1920 by 1080. And I'm a little preview over here is the same as the video. And that's fine. That's what we have. And what a lot of people do. To get that cinematic look. See you felt this on 10 ADP, deltaic letterbox or black bars picture. And they'll drag it over on top of here. And then what they have is bypass top and bottom. And when they run their very own. That's what they have. Sort of an artificial way of doing that cinematic look. The problem with doing this, if we remember other video lesson and aspect ratio. So what this means is our video aspect ratio. We know the tiny P is 16 to 9. If someone on a large wide screen monitor or TV looks at this, you can see here that it's going to put black bars on the side and then we just put out official Bart bars on top and bottom as well. So what they're going to see is they're going to say this if we have a 10 ADP or 16 by 9 video sequence, video clip. So if we go here we can see it's 16 to nine. If I export this out like this, and someone watches it on a wide screen monitor, we're going to get the bus on the side and they enjoy age. This also actually put artificial minds top and bottom. So just be aware of them. So let's get rid of the black bars here is delete them. So what would we have to do if we want to make this more widescreen so that if someone plays it on a wide screen monitor, it would, it would look its best. So if we normally just output it the way it is, don't put any black bars on. Now on a wide screen monitor or TV, it would look like this. On a 16 by 9 TV or monitor, it would look like this. This would be its full image. So just be aware of these two. For another ratio term that you'll hear a lot if you Google it is alter wide aspect ratio. And that's a ratio of 21 to nine. So again, there's nothing wrong with export in this circuit is a 16 to 9 aspect ratio. Perfectly fine. But if you wanted again, they call it cinematic. That, that movie Hollywood image look, you can export it out as 21 to nine aspect ratio. So how would we do that? So the first thing that we want to do is go to our sequence, appear for a sequence settings. We want to change this. So when you change these things, the width never changes. That is the width of the video. If you change this, you start getting bad powers either side. So 1921 stay the same. And we're going to put in a 23. So 1920 by 1823 is going to be aspect ratio for 21 to nine. And we get the same thing down here. So if I click OK on there, make sure these aspect ratio pixels and set the square and say, Okay, and then watch this box. And it's going to say that it's going to change. And now we have a 21 width by 9. And that will give us a cinematic look. So how do we get the numbers that we just worked out? So let's just do the math again. They go back up to when we're in here. We can go to sequence and sequence settings again. We can see our numbers here, sort of drag him over here. The 1920 by 1823. Well, our aspect ratio that we were trying to achieve is 21 to nine. So the math is 1920 divided by the 21 gives us 9143. Then we take 90, 143 times the nine. And that gives us the eight 23 for our vertical image. And that's how we get this image here. So going back to, so what does all this mean? We now took our image and stretch it out to a 21 to nine aspect ratio. So if someone has a normal TV, it's 16 to 19 and they play that back. It's kinda look like this. If they planted on an ultra wide TV or monitor, it's going to fill the screen is as he aspect ratio that we did. Now let's do the same thing for four K. So just double-click again. Let's go to where your practice files are. There's a file called roman, say, Okay, it will load it into here, drag it over this omega sequence. And we can look at the information again about this. If we go to sequence, sequence settings, it's 3840 by 2160. So it's a 16 by 9 aspect ratio. Again, it's 24 frames per second. And preview over here is set at 1920 by 1080, so that's still 16 to 9, so that's fine. So now we want to do the same thing. So we go back to sequence settings, open, open it up. We want to make this a 21 to nine alter wide aspect ratio. So let's do the math again. So we have 38, 40 divided by 20, one of the 21, 29. That gives us 183. Take the 180 three times nine, and that gives us 16, 45. And just say, Okay, now what we have here on Windows in Adobe Premiere, I don't think it happens on the Mac. This iframe only mpeg won't change the preview window to match this. So we have to change it then to go pro suny fall. And when I do this, just say no, that 3840 by 16, 45 matches the preview over here. And watch this. As I hit this, okay? It's going to tell us that it changes will be made to the preview. And we have ultra-wide for k, 21 by 9 aspect ratio. But our four K footage, again forages for k, so it has higher resolution, but it's 21. 29 is the aspect ratio we just made. So on ultra wide monitor would look like this. On a normal monitor of 16, 29, it would look like this and have naturally black bars top and bottom. So on for k, for a Jeju have a Libre play or wiggle room. You can move the y direction. You can't move in this direction because it's exactly where it shall be for him. Why you can just change. You gotta be careful if you come then too far, you're creating black bars, but you can change your, your view or your context here. Just maybe I want it to land there, or I might want those clouds to be a bit more in the, in the frame. So for k is done at 21 to nine, just like that as well. So why? But all the math right now, at the end of this, we'll have a summary screen up for you. So there's some other aspect ratios you need to know about the altar all also wide. So we will look in at 21, 29 aspect ratio. That's also ultra-wide. Maybe using an app like filmic pro. There's two others that you'll see when you go to resolutions. One is 2.76 to one and the other one is 2.39, so 1. So keep in mind too, and don't get confused by all this. But 2.39. And there's another one that gets thrown out there all the time is 2.35. They're all ultra-wide aspect ratios. So we're going to jump into Adobe Premiere, just take a look at what they look like in this aspect ratios. You can get familiar with it. Let's jump in. So inside a filmic pro, if we go to resolution 16 to 9 is normal PLC here, there's 2.76 to one. That's what this looks like. If we go back to the COG wheel to resolution is another one you'll see is 2.3921, both widescreen. And this is what this oxide look at, the black bars on the top and the bottom. Let's jump into Premiere now. So if we're in Premiere, we have a normal fork, 16 to 9 video clip. This is what it looks like. And if we go to the sequence and there's settings, we can see it's 380 by 2160. And it looks like this. So everything is normal. There's 2.39 or 2.35 is very similar. We can drag these in, and this is what it would look like in the same aspect ratio here. So we're in for K setting sequence. If I drag the other 2.39, this is what it's going to have. Silane naturally have black bars and it's a lot wider, possesses the 2.39.1. And if you'd look over at the actual clip itself and go to Video Info, it has 3840 by 1606 dimensions of the 23 nine to one ratio, we have one more that you can film, which is the 2.7621. So I come over here, that's where it's going to look like in a normal television. So it's going to normally have a lot bigger black bars. And if we look at the 2.76, we can see That's 3840 by 1392. Now if we get rid of all these, delete them from here. And if I drag that to point 76 over into this timeline, I'm going to change the sequence settings to this clip that we just put in. So this is what the ratio looks like for 2.7621. We want to see what that is. We go up to sequence, sequence settings, and we can see that it's 3840 by 1392 to exactly what the dimensions are down here for we set up the timeline to match this. So this will give us a widescreen look. And if you put this on a wide screen monitor or television and ultra-wide one, this would give us a full image looking like that. So remember this is what that film Ben-Hur was filmed in very ultra-wide. It takes a normal 35-millimeter film size and doubled it. So it's very, very wide and this is extreme. We go back and drag a normal for k clip in here. And then we're going to say change this. This is what a normal 16 to 19, 3840 by 2160 clip looks like. If I were to drag that 235 into here and I keep existing settings, you can see that this is what she 0.3921, that's white screen. This is what it would look like on a normal television. But if you put it on a ultra wide monitor, it would look like this. So culture-wide want to monitor would look like this because the sequence settings are set to 3840 by 1606. We can check that one small 3840 by 1606. So that's hopefully giving you an idea of the different aspect ratios. And now you get a normal film sequence 2 for k sequence to a wide aspect ratio.
15. Settings menu Resolution: From the main menu, click on the COG wheel to open the settings menu. There are 15 items in the settings menu. Let's start with the top left, which is resolution. Click on the square to open it. Now, do you have some understanding of aspect ratios? This top row of buttons allows you to pick the aspect ratio that you want to film in. Let's choose a 16 to 9 ratio to close the settings menu, click anywhere offered. This now shows what a 16 to 9 aspect ratio looks like and it's ready to record. Let's click on the color wheel one more time to bring up the menu, go to resolution, That's choose 729. Here is 117 to nine aspect ratio. Looks like it's come back in 32. This is what 3 to 2 looks like. One-to-one. One-to-one. Looks like she was a lot for Instagram to 0.2 to one. This is the beginning of our widescreen, 2.7621, which is ultra wide. Four to three, which is the old-school TV. And finally 239 to one, which is normal ultra-wide. On the next line down we have crop source to overlay on 679 ratio. This is not on, but if you change to any others, this switch is opened automatically. What that does is actually crop the image into the, into the video. So we'll put the black bars on the ratio in for you. You can manually turn it off like this so you can see these gray lines. So let's check that out again. If we choose four to three, for example, and turn this on, you can see we have black bars in the image here. And that's the way the video will come out a crop safe for you. You can turn this off and it'll just put guidelines on here which you can see as gray lines. So remember only the things inside of the gray lines will be in your finished video outside of the lines that we black bars. But any other aspect ratio rather than 16 to nine. Be careful this goes on automatically. If we're on 276 to one, it will put the image in that crop aspect ratio. If you don't want that and you want the full screen, click this off. But it'll give you a visual guide here. As with the gray lines as to where the black bars will be when you if you want to do that in post. So you have the option to do both. So here just to show you is a crop effect off. And then the same image for their crop effect on.
16. Bitrate and codecs V2: Both Android and iOS
systems that you choose a resolution from 540 P, 720, 1080, two k, three k for k. And you can also have AK depending on the
phone they using. Next we have the
bit rate setting. Depending on your phone, you may have 8-bit
setting as shown here, where you might have
a bit 10-bit progress and Dolby Vision for
more on this later. The higher the bit rate, the more data is gathered
for the particular clip. The lowest setting is economy, where the bit rate is lower, up to filmic extreme, which is the highest. However, this will also take up most of the file
size and storage needs. Apple standard and standard for Android will be the same as your phones native camera app. Progress has its own
video explanations that's coming up
after this video. We can see that filmic extreme has a 120 megabytes per second. Filmic quality, 75
megabytes per second, standard 50, economy 35. And progress for two to HQ is a massive 735
megabytes per second. Because of the huge file
sizes when shooting video, codecs are used to
manage them so they can be distributed across
different platforms. A codec is a software
that encodes or compresses the file and
can also decompress, but decode it so that
it can be played back. Almost video recordings
that we use. You'll use H.264 standard codec. This compression codec is widely used and you'll probably know
him more as an MP4 file. You can also use high efficiency video
codec, which is HEVC, which is supposed to deliver
higher video quality at the same time as
reducing the bit rate or keeping it the same
as an H.264 file, which means the font
sizes are a lot smaller. Note, though, not
all platforms and software support H.265 or HEVC, but it is becoming more common. From the iPhone 12 and above. It never support
10-bit Dolby Vision. And there's a selection
that turn that on. Dolby Vision is an
HDR video format that stands for
high dynamic range. That comes with a
lot of information more than the standard
dynamic range. Keep in mind for you to
watch 10-bit Dolby Vision. The device you're viewing
on must be able to play it. For Androids, they have ABC, which is H.264 codec, and HEVC, which is H.265. They'll also have a switch
for 10 bit HDR video. Up until the iPhone 12, or iPhone is the most, androids can only capture 8 bit color depth
and their videos. Bit depth is captured in
three different channels. Red, green, and
blue, known as RGB. Each capture and a
max color depth of 256 levels per channel. This means that a
bit can be displayed as 16.7 million colors. There are many phones
and cameras can capture color in 10 bit format. This means that this jumps up the amount of data
that's captured. So each channel, red, green, and blue are captured in 124. This means that a
10 bit image can display over 1 billion colors. Colorists like having
more bit depth to be able to calibrate
their movies. The one thing to
keep in mind here is even though you
record in ten big color, you need to be able to
play it through a monitor or that can display
it in 10 bed. So for example, if you
have a recording and ten big color and then
play it through a TV or monitor that can only
play it back at 8 bit. Then your 10-bit video will
be reduced to rape bit.
17. Apple ProRes Native iPhone App: If you have iPhone 13
Pro or 13 Pro Max, filming version
6.17 and above now supports progress video
capture. But what's all this? Who pleura surrounding
apple progress about? Apple ProRes video is a Kodak that's been
around for a while. On high-end
professional cameras. It's format is used for commercial projects
and feature films. And now Apple has
introduced it on the iPhone 13 Pro and 13 Pro Max with their
release of iOS 15, 0.1, and they upgrade to
the microprocessor chip. Note, it's not
available on the normal iPhone 13 or 13 many also, it's not available on any previous iPhone models
before the 13 Pro and Pro Max, normal codecs like H.264, ABC and H.265 HEVC heavily compressed the
video so that it's a smallest size and can easily
be uploaded to the web. It's small file size
means heavy compression, and that means a loss
in some quality. But this is what the
vast majority of people use for normal
video projects and upload into the web in places like YouTube and
social media sites. Apple progresses
advantage is that it compresses the
video less so that professional filmmakers can
have more information to work with in the video
post-production, like color correction
and special effects. But also able to slip in phone footage into their
higher end for edge if needed. It's also supposed to be easier on demanding editing
software like Final Cut and Adobe Premier to handle What's its stem side? That should be a
no brainer, right? Just use progress all the time. Well, the downside
is the file size. One minute of four
K ProRes video is about six gigabytes compared to one minute of normal for K, which is about 388 megabytes. So that means if you
shoot for K video using ProRes 422 HQ, which is high-quality, and that format on your iPhone 13 Pro, that has 256
gigabytes of storage. Your phone or fill up
within 45 minutes. So using programs will fill
up your phone very quickly. Also, getting it
off your phone is extremely tedious and slow. You have to use the
lightning cable because iPhones don't have a
USB-C port, for example. And that's USB 2. Or you can try AirDrop. But because the
files are so big, they take a really
long time to transfer price from 13 from models with a 128 gigabytes of storage. Progress is only available in 1080 P resolution up to
30 frames per second. To shoot ProRes video in 10 ADP and up to 60
frames per second. For, for k up to 30
frames per second, you're going to need
256 gigabyte storage. For the majority of you are
there, at least for now, I believe that you'll probably
be sticking around with the normal MP4 format, which is AVC or HEVC. But let's take a
look at how to use progresses features
on the native app, as well as the filmic pro app. So using your native
app on your iPhone, it has to be an
iPhone 13 Pro and Pro Max current settings camera. And you can go to formats. And then the bottom here, you can see Apple ProRes. We can also see that progress only supports
up to 30 frames per second, that for k and up to 60
frames per second at 10 ADP. The other thing that
we can turn on here is make sure that
h t video is on. So it's high dynamic range. And that is basically
go into make sure that your highlights and your shadows is captured with
more information. And then once you're here,
returned, progress on. We go to camera. You can go to video. And progress is on the top. And what you'll see here is
if I try to enable progress, it says progress
is not supported. And it's because. We're at four K, that's 60, 50 to 40 K 24. It tells me now that progress is enabled and I have a max
time of a 155 minutes. But at four K 24
frames per second, I can go to for k 33 if
I want to go to HD 30, for example, I 498 minutes
left in storage on my phone. So that's tried to grind
side now and take a look at doing some programs
video with the native app. So one thing to notice
here is that progress. You can see it up the
top of the screen on the bottom left here. It doesn't work in
cinematic mode. It's not available
in cinematics, so it's only available in video. So if I try to turn that on, you can see it gives me a
warning because I mean, for k at 60 frames per second. So I say, okay, and now I need to change this, maybe the Paul K to
fall. Just like cell. Setup him my video. I contend progress on now. I'm just in a lock, so my focus. And then we can shoot some video here. Once you're done. You can see that you
have a max time, a 155 minutes, uh, my particular phone, it's
a one terabyte version. And then if we go to photos, you can see it
actually says that it's progress in the
top-left corner, recognizes that and puts
it in our photo album. And this is the video
that we just captured. And we can see here that if we hit the Information button, we can see the information about the video
that we just took. And you can say that it
says it's in progress. And it lasted for 16 seconds. And it was 1.37
gigabytes HDR video. Okay, one other thing
you could do here too, is you can turn on and off
crores here and video. Bye on the little
progress label. Well, if you click on
this little marker here, you'll get your usual
extra commands here. And if you look at the top, you can click on Pro. And then you can turn
progress on a Progress off. Also here. As well as you can adjust your
exposure if you need to. And if you want to
just close that icon, that little mark again
and we're back here.
18. ProRes Part 2 Filmic V2: In the filmic pro app
to access Progress, click on the Settings.
We'll choose resolution. Scroll down and choose
either progress 709. For progress 2020. Progress captures in 10 bed. Vbr means it's captures
in a variable bit rate. The four to two and 10 bit. All talk about how
we capture color. The normal for k
capture is 8-bit that captures 256 shades of red, 256 shades of green, and 256 shades of blue. That's over 16 million
shades of color. 10-bit color capture means it captures a 1024 shades of red, a 1024 shades of green. There isn't 24 shades of blue, and that's over a
billion shades of color. Lot more information. If you're a
professional colorist, this is very beneficial to you. Or for example, if you're
using green screens, having more color
information is better. Be aware though, that your
monitor and places like YouTube may only
playback apec color, even though you've
recorded it at 10 bed. So what that means is if we
have file that's 10-bit, it goes into an 8-bit
player monitor TV. It's going to come
out as eight bed. Even though you recorded it. That higher bit rate. The iPhone 13 can play back
ten big color on its screen. Likewise, for 22 is also
talking about color sampling, known as chroma subsampling. Four to two means that for every four pixels
wide and two rows, we sample two pixels
of color from the top row and 28
pixels from the bottom. And that's enough color
information to create an image. Next we have Rec 709, 2020. What do these even mean? Color space is a mathematical
model that allows you to visualize all the
possible ways that the red, green, and blue can be mixed together to represent
different color spectrums. This color space then allows
different physical monitors. The show the same colors
across different devices. A color spaces where your
camera captures and represents. When playback on
monitors and TVs, they come in a few flavors. Srgb, which is red,
green, and blue, or the colors the camera captures a some form of
these mixed together. Adobe RGB covers the largest
spectrum of color for laptop displays and is used
for doing lots of print work, such as magazines,
things like that. It's also closely
resembles the CYA MK, which is cyan, yellow, magenta, and black fur video, we need two things. A color space which
interprets color, and a gamma, which interprets luminance or intensity of light. The most common color space
used today is called rec 709. And it's used in most TVs
and closely resembles sRGB, which is used in most monitors. On this diagram, D6, E5 represents the
standard white point use for most TVs and Rec 709. Here we can see the Rec
709 has a range of color in this triangle that's
visible to the naked eye. We can also see here the Rec 2020 is much
bigger than Rec 709, which means that there's
more color values available. If video was captured
and colored in Rec 2020, then he view it on
a Rec 709 monitor. It means that you won't see
the range of colors that were intended and some of the colors will not
be visible to you. So just keep this in mind when selecting the flavor
of progress you use. For example, people shooting in six K and AK, for example, could choose Rec 2020 as they're expecting
the video to be viewed on Rec 2020
certified TVs and monitors. For most people shoot him for k, they may choose Rec 709
because it's the most common on current TVs monitors
use for viewing video. However, if you're a colorist, you might think about using Rec 2020 because this will give you a broader
range of color. But you is when post editing. So you can use
progress 709 if you want maximum compatibility
across devices. When played back for
you is progress 2020. If a high dynamic range is your main concern
when played back. Remember HDR is arrange of contrast between
Whites for highlights, and darks are shadows. Once you've chosen either
progress 709 or progress 2020, you'll have four options. All attend bed for two to 42 to proxy will capture at a max bit rate of a 170
megabytes per second that fork. Notice on the top
left of the screen. You can see the time in minutes that you have before
your storage fills up. For two to light
or four to two LT will capture at a
max bit rate of 316 megabytes per second. At four K. 422 will capture at a
max bit rate of 540 megabytes per second. And for k, 42, HQ will capture at a max bit rate of 735
megabytes per second. That folk also note that
if progress is selected, you can't use the
cinematographer kid and film with pro at this point, maybe in the future. And although the
file sizes are huge, once you get them off your
phone and onto an NLP system, meaning non-linear editor like Final Cut or Adobe Premiere. They're supposed
to run smoother. And because of all the
10 bit information, you're able to have more
control over color grading, green screen, and
special effects. So that's set for
the filmic pro side. Will people use programs? Maybe if you're a serious
photographer, videographer. But the fire, the huge file sizes may
be a bit of a downside for most people just doing YouTube or sending
stuff on their phone. And that's a main,
the main use for it. So it's up to you. Check it out. Okay. So we are outside
and I am going to shoot this leg seen real
quick and with progress. So the first thing I'm
going to do is go into my settings and the cogwheel
here, go to resolution. So currently I'm
an 8-bit economy. So I'm going to click on that. And I'm going to go to progress, in this case 709.
Click off here. Now proxy is fine for its
lowest quality of progress. And you can see up at
the top left, yeah, It's PRX or proxy
and i've I have 845 minutes on this
particular phone. This is my Pro, iPhone 13 Pro Max with one
terabyte of storage. And I'm gonna go to 42 HQ. This is the highest
quality that you can get. And you can see I have
211 minutes at for K. So I'm fine with that. My frame rates and every
24 frames per second. And that's where I am now in
for K 24 frames per second. I'm in progress. So I can set my auto white balance
by clicking on it and setting to lock it
when it goes red. And then also here, the one thing we'll notice
here is that I can't do the 180 shutter rule because I don't have
an ND filter with me. It's a sunny day. So the ISO is low,
which is right here. But if I tried to make the 180 rule by dropping
this down the 1 over 48, I just can't do it because
it's just too bright. So the only option
that I have right now is to unlock the exposure. Focus, doesn't matter. I can lock that here and let the shutter actually
be a lot quicker. You can see it's actually
like one over 6 thousand. The ISO as low, which is good for noise. But the only option I
have because I don't have an ND filter to darken the lens to allow that
one over 48 shutter rule. So I'll just leave
it where it is. We see the cows on
the back or be a bit more the motion of them or be a bit more jittery because
of the high shutter speed. And then you're just
able to press record. Once you're done, you
can go to the preview. And we can see here that it
does say progress all the time and date and the
size of the file. So there we go. That's shared in progress
using the filmmaker.
19. Frame rates: At the top right we have two buttons, standard and time-lapse. Standard is the default. And whichever one you choose, it will turn white. Meaning, if it's gray, it's not selected. Let's start with the standard mode. The top row shows frame rates supported by your own device, 24, 25, and 30, and the most common around the world. Tapping one of these, we'll put a gray circle around what it's set to. I would also set the capture and playback to that value. But notice there are other frame rates such as 48, 50, and 60. And we also see that 120 and 240 and not selectable. The reason for this, it depends on the resolution you've selected. In resolution, you can see that we've selected for k. So this means my particular device, which is an iPhone 11, 120 and 240 frame rates and not available to me. However, if I set my resolution Loa say to 10 ADP, then the 120 and 240 frame rates are available to me. This it all depends on your phone's capabilities. The next thing we see is a bunch of dots with a line going through them. This is known in filmic Pro is the motion slider film x point of this is so you can see the effect of a higher or lower frame rate compared to your playback speed. If you choose a frame rate of 30 frames per second, both the capture on the playback set at 30. But if we press and drag the slider to the left, you'll see that the capture values increase. Press and drag it to the right. You see that the capture values get lower. So playback, those stays the same. It also noticed when the slider is moved to the right or the left, the circle for the frame rate turns red, telling you that the capture and playback and not equal in frame rates, or in other words, that are out of sync. When the slider is back in the middle, the frame rate will go back to gray and the capture I'm playback or equal. So let's try this. Set the frame rate to 30, drag the motion side all the way to the left. So now the capture is set to 60 frames per second and the playback is set to 30. Record waving your hands in front of the camera. When played back, you'll see that it has a slow motion or factor it. That's because we captured in 60 FPS and playing them back at 30. So half the speed that it was captured out there. Let's do the opposite. Move the slider all the way to the right. Now you'll see that we have three frames per second, and then playback and 30 frames per second. And then once again, record waving your hands in front of the camera. What strange here is that when you're recording, it looks like her hands are very blurry and in slow motion, almost trippy looking or like you're dizzy. However, when we play it back at 30 frames per second, It's super fast and jerky. This is because we only have three frames per second captured. And we're playing it back at 30 frames per second. So we don't have enough images captured the playback at that speed correctly. So this I guess gives you a way to see how higher or lower frame rates we'll look against the playback speed. So I am, would you want to do this anyway? What's the point? Well, one of the main features is if you want to shoot slow motion, for example, we can set our shutter speed, the 60 or 120 normally, and then play it back at a number that evenly divides into it. For example, capture at 60 frames, but playback at 30. So that's a 50 percent or half. The playbacks. Frame capture shouldn't be half the speed when it plays back. Or capture 120 frames per second. And you can play it back at 30. That's four times slower, while playback at 24. And that's five times slower. But the old divided equally into 120 or 60 frames. This is how you'll capture slow motion. Next, we have the auto shutter. We have a whole lesson coming up on this. However, you may have noticed that he's shot video in the past and any artificial light is around either indoors or I would, such as fluorescent bulbs, you might get a flicker in the video. This is because the electricity supply in the light is supplied by the 50 hertz for Europe and 60 hertz for the USA. This option allows you to change the camera to adapt to the local hertz value. If you see flickering lights, if you're in another country or just opened in a place where that fluorescent light is giving off a flicker that you notice. Try and change in this to the supplied hertz for the country you're in. So for example, as I said, 60 hertz and the US 50 Hertz in Europe. If you don't know, just try changing it from one to the other. But also there's an auto mode to try one of these three to see if it affects the flicker in and it goes away before you start filming. As I said, we have a full explanation on what causes this. In another chapter.
20. Time Lapse: In this lesson, we're going to take a look at time lapses. So there are a great addition to travel, travel videos or, you know, you want to stand in the middle of a train station and everybody else is fast moving around you or you just want to get a nice sunset or sunrise. There's a few tricks, so that'll different from daytime. The sunrise or sunset time lapses. And we're going to jump in and explain them. Now. You'll need your camera on some sort of tripod by finding a way to attach it to something to keep it steady. Also, it's a good idea to make sure that your phone is in airplane mode and any notifications are turned off. So this will stop pop-ups coming up on the screen when you're potentially recording video. The app can be placed in a time-lapse mode. This is an alternate foam, a frame rate system by which he Apple take video images based on seconds per frame rather than frames per second. So time-lapse his allow you to take a series of pictures over a long period of time. And then they stitched back together as a finished video or movie. He can capture a sunset or sunrise or a busy city scene. From the frame rate AP area, make sure standardized SAT. You can choose 24, 25, or 30. Set this as your playback speed. Note that the higher frame rate you choose means a longer time will be needed to create the finished time-lapse. So in resolution, let's choose for k and filmmaker extreme to get the highest quality that we can. Now let's set the time interval we want. We have 1, 2, 3, 5, 10, 30, 45 seconds, and a minute intervals. So which one do we choose? Remember if you choose a frame rate of 30 frames per seconds like we did, I need 30 pictures from 1 second of the finished time-lapse. So if I choose two, that means that the camera will take one picture every two seconds. So to get, say, 10 second clip that I'll need to do a time-lapse that's ten seconds times 30 frames per second. That's every 1 second. That's basically 300 pictures I need. So one picture every two seconds. There'll be 300 times 2. The second is equals 600 seconds. So for a 10 second time as labs of around two seconds on the unit, 10 minutes or 12 minutes. There's also apps you can find online to calculate this out. But actually the best way to do this is to experiment for yourself. And a good rule of thumb is take slow moving clouds, for example. The slower your subject is moving, the longer the interval you'll need. Conversely, if a subject is moving fast like people in the station or city street, you can use a shorter capture interval. A normal standard interval that won't take you too long is around two to four seconds. Let's close the settings menu. Notice I know there's a TL in the menu. This is showing you that it's in time-lapse mode, and the second values are now in red. Next, we need to set up a camera just like we would a normal video capture. However, there are a few exceptions here. Under normal circumstances and daylight, you can set your shutter value to double your playback frames per second. This will also allow for a nice motion blur. And our case, we have 30 frames per second. So a set our shutter to 1 over 60. I can then adjust our ISO as low as we can for the correct exposure. This is where an ND filter might be needed. Then this locks your exposure radical. We can also set and lock the focus radical. Next set and lock our white balance. All you have to do is click on the little WB and it'll turn red. This means that the white balance won't shift. If a cloud comes over and it gets slightly darker or slightly lighter, it will stay fixed for our time-lapse. Now we're ready to record. Just press the record button and sit back and watch your time-lapse. Basically, it will record until you hit stop. So as we said, if I want about a ten seconds, time-lapse its center, take about 10 to 12 minutes, uh, two frames per second. Once it's done, your time-lapse from B in the media library along with your other videos. What about sunrise and sunset time lapses? This is where I think we need to tweak the settings for a sunrise, for example. It'll be dark when you start and when the sun comes up it's bright. If you lock your settings when it's dark, when the sun rises, it'll just show up as a white bright blob in your video. In this case, I would say, don't lock your exposure radical or white balance. Let it change as the sun comes up and goes from dark to light. Sort of allow it to compensate for whatever it sees in the scene. The same is true for sunsets. Another note here is whenever you are in the world, the time it takes for a sunrise or sunset can be long or very quick. If it's quick, then set the interval to a quicker capture. If it's slow and takes a long time to do a sunset or sunrise, you can set it to a longer interval. So some practices needed here. Don't wait until the last day of your holiday and vacation to try to capture the first perfect sunrise. Only to find out that it doesn't come out. You need to practice with this. It can be tricky and you can't just redo it. You have to wait till the next day to try it again. So practice before. Let's take a look at some different capture rates. Here we can see a daytime time-lapse that was captured at two seconds to get some clouds. And the other one, exactly the same, same was set at 10 seconds. And he is a difference. In this sunrise reuse an interval of two seconds. The exposure and white balance for both just set to normal. They weren't locked at all. And no ND filter was used at all. This is just the camera itself. You can see this was quite light, even getting out to start this press the sun comes up, is not getting totally blasted. I would just with white light. You can also try using an ND filter. And soon as the sun rises and it gets brighter and brighter, it doesn't overexposure.
21. Audio explained: All right, In this section we're going to take a look at audio, how to set up an external microphone, for example, look through the settings so that you get the best audio that you can out of the phone. May not even be aware that there's different microphones on your phone in different locations. So let's jump in, take a look and see what it's all about. In this section, we'll take a look at how you can adjust your audio. Help you monitor your audio as it's recording. What are all the settings mean? Start by tapping the cartwheel icon and then choose your audio. At the top is the microphone selector. If you're using an iOS device such as an iPhone, this area was showing you which microphone you are choosing to want to choose the microphone that's near to the sound that we're trying to capture. So for example, the back Mike is the default and it sits physically next to the ultra wide lens. This is good for capturing what the rear camera sees and hears. If we tap the left arrow, we can select the front mic. This is good for capturing the audio and during selfie modes. Chapel left again, and you'll see it says bottom Mike is selected. This is good for any Sam's coming in from the side while the camera is in horizontal mode. And note there's two microphones on the bottom on the iPhone. Tapping the right arrow all the way on the iPhone gets to a stereo mode. Notice however, that on the bottom we sell it says back internal. This I believe is actually using the upper front and upper back mix together to create a stereo recording experience. Hello, we have PCM and AIF Kodak formats that can be used to get the highest quality audio. If however you want to compress file size for audio, you can choose AAC. On Android. This may not be available. Supported audio sample rates of 44.1 kilohertz and 48 kilohertz is done. A lot of difference between these two actually, and you probably won't be able to tell the difference. On iOS. It depends on what supported lightened external microphone you're using. But filmic pro says that it can capture also 96 kilohertz. Next and iOS, we can connect the Bluetooth microphone by selecting the switch. On Android, once you connect your Bluetooth, it will show up at the top display bars. If you don't want to record audio, you can select this toggle button for Video Only mode. Next, we have an auto gain correction on iOS. If you're connecting to an external mica, which suggests turning this off and setting the levels manually on the external mike. If this is on, then it assumes that the internal mic is being used. And it will use software to adjust the gain or loudness of the sound. Keep in mind that when it's off, you'll get a much lower sound. And then you have to amplify it later on in post. And by doing this, you might get more noise. And hence, this also assumes that even with an external mike attached, if this is off, it assumes that the mic itself has auto gain control on it. Android and iOS, both our voice processing, normally this is off if you're going to do some sort of post audio cleanup. This is a software, again, trying to adjust your voice capture. It targets audio frequencies in the range of human speech. And it will try to enhance it. If you're not, go into the post audios editing, then play around with these settings potassium effects, and use the one that works best for you. I enjoyed has a headphone monitoring switch. This allow you to monitor the recording level of your audio either through a Bluetooth headset but through a cable system. We'll go over more of this later. This is a task for the Audio Gain and voice processing off. This is a test for the Audio Gain and boyish processing of this as a test with the audio gain and voice processing on. This is a test with the audio gain and voice processing on. Next, let's talk about the external microphone attachments and monitoring the audio.
22. Adding an External Mic: Hey everyone. In this session we're going to take a look at hooking up an external microphone. We all know that the microphones and the phones are not that great. So having an external mic should make your sense and a lot better. And we're going to look at everything from external Mike's wire cables are used to level your mikes and a little bit more. So let's jump in and take a look at it. So external microphones will give you much better sand, but they can be a little bit tricky to set up depending on your cables. We have our phone in a rig, and this is a video road vireo micro Pro. It's a quite a good microphone and it's not too expensive at all, but it will give you much better sound and the phone itself. So let's take a look at how to hook this up. So the next thing we need to talk about is the two types of connectors you'll come across. If you look at these cables, you have one with three rings on it, these little three black stripes. So this is known as T, S. And then we have other ones which have two stripes on it. And this is known as TRS. So I'm not going to keep repeating TRS and TRS. It just makes it more confusing. I'll just call it three stripe and to strike. So the three strike one here is what we'll plug into the phone itself, whether it's an Android or an iPhone, it doesn't matter. The other side with the two stripes on it normally go into the microphone. And then we're going to talk a little bit about some other cables that you might come across. So this is, remember three stripes S, then this goes into the foam to Stripes comes out of the microphone itself. And this goes into the foam. We're going to pick up on this and look at some other cables. So in this first cable, this is a two stripe to, uh, to strike. This is normally used to command of the microphone itself. And this are normally plugged into a camera, like a mirrorless camera or DLSR. So they take two stripes and two stripes coming out of your microphone into a normal DLSR or mirrorless camera. In this cable, this is an adapter cable here, it has two stripes, so two rings on this side. This is what will come out of the microphone itself to a three ring or three stripe connector. And this will go directly into the phone. Some phones, such as a new Androids and iPhones, don't have a 3.5 millimeter jack anymore, especially the newer phones, you need some type of adapter to be able to plug this connector into the foam so your phone may or may not. Normally it's just all the phones will have a 3.5 millimeter port right here. So that means that the three ring connector will go in here and the other side, which is chewing connector, will go into the microphone as phones connected up with the three rings, connector goes into the phone directly into the port here, and the other side goes into the microphone is the tutoring. So this should work directly if your phone has a 3.5 millimeter pores right here, a lot of the older phones have it. Definitely the new phones don't. Android's have USB-C connections now to 3.5 millimeter ports. So the iPhones, IOS, iPads have the lightning port going from the lightning port on the iPhone 2. It's actually a t s connection, and we'll look at that next. Okay, for iOS systems, iPads, iPhones, we have the lightning connector, which plugs into the phone itself. And on the other side you have the 3.5 millimeter jack. This is actually t s connection. So that's why you can wear the headphones from the iPhone. It has a little microphone built into it. So that's what a three connector would go into this. It'll also take normal headphones which have a two rings to it, or they just have the headphone. They can listen to sound music, et cetera, coming out of the eye from high. So here we are. Now we've plugged in the connector for the iPhone, the gray connection here is the three ring going into this connection. You can see with the filmic pro app, we can see that we have a visual meter here, so that's good. And it says iPhone my bottom, that's actually being connected through here at the moment. And if I chop this, you can see that effect. So what we'll do next is take the connector, which has two rings on it. And we're going to connect that over to the back of the microphone. And now you'll see that the setting over here has said No says headset microphone instead of bottom. So if I'm quiet and I just scratched this microphone, we should see that on the mesa. And now you can see that that's the microphone is being used. So next on this one. I'm going to now try what happens if we put in the two pin each side. So this doesn't have the two pins to three pen over three ring the two rings. So if I plug this in normally to the back of a microphone, and this is now saying iPhone Mike bottom. Then I plug this into the iPhone. Remember it's just got to pen is not three. And nothing changes. So a cell says iPhone Mike bottom. So if I scratch on this and keep quiet, we don't have anything. But if I tap the bottom, so it's still recording with the bottom one. Because the microphone's not be insane. He must have a two ring, 23 rings going into, into this area here. So three rings of this side going into the iPhone or iPad, two rings going into the microphone again. So the next thing we want is how can we monitor the recording that the saying that we're recording maybe in real time and take a look at our levels. So what you could do is you can get a split. So this split pretty cheap on Amazon. It has a three ring here and we'll go into the camera on the phone. On the other side you have two other connections, ones labeled for a microphone, on the other ones labeled for a headset. So headphones. So again, these are two ring connectors, and this is a three-ring connected there, so go into the phone, but our cable coming from the microphone has to be when it comes into here also be a three ring one. So let's just demonstrate that. In this one. Let's hook this up here. We have our extension. So three, bring it in and go into the iPhones. Vectors in here itself, his iPhone, my bottom because nothing's connected. We're going to connect to ring, to the microphone itself. And then we're going to find the connector that says it's got written for a microphone. We're going to put the three prong connector, a three ring connector into here. And then we're going to then connect the headphone set to the headphones. So we can see here that nothing changed. So what went wrong? So we have this cable. This is a three ring cable and it's going into a two ring adapter. So that won't work. So the three ring is going into the phone correctly. But the other shoe ends that are here, they're actually true ring adapters. So nothing changed on there, so that didn't work. So what we've got to do is switch that out to the cable that has two rings on it for each side. So we have Turing is there as well. Now we plug that in. And then now we can see that it changed the headset microphone. Again if I scratch the microphone or even hearing it through the headset. So that's how you can listen to the recording sand as you're recording and set the levels. And you set the level is pointed away by just going and changing this slider along the front. To change the levels are really small. Or you can increase the gain just by dragging them up to where you want them. And that's how we can attach a headset so you can monitor your recording sound. Another thing you can do just so tip here is column wind socks or dead cats. When you're outside and you're recording, you can get these little foam or they can be Ferrari. And they just go right over the microphone. And this will help dramatically with high wind areas, although just a winch in general outside. So it's a good idea to put this on the microphone. So another thing you can try to use, if you have a Bluetooth headset, if you connect to your Bluetooth that has a microphone, you can just connect to it. If I can connect this headset here. And then you'll see that it connects. And it says, William is power beats. And it says, iPhone my bottom, but this is connected as a headset so I can try to listen to it. If I was connected at sellers and the microphone here in this case. But if you've got a microphone built into a Bluetooth headset, you can try that just to experiment. The only thing is with Bluetooth. There's a lag between when you hear what's being recorded to the time you hear it and your headset. So just be aware that it can be like a 2.5th difference. And personally, I don't like it. I rather hear real time. All right, next is work really well. Lavalier mics. This one is really popular and we have nothing to do with them, but it's from a company called Purple Panda. And it comes with all sorts in the bag. It comes with attachments or go pros and it's pretty cheap. But they got good reviews on Amazon. So check it out. You'll see here that it's an, a lovely I might take gets connected to assuredly you can put it under your shirt, under a tie. You can tape it to your skin, on your skin. And this gives really good sang because it's actually right next to your mouth. Even comes with a little wind sock. It comes a little for me when SOC as well, which works, but it's really windy. You can put this over the top of the mike and it's a three ring connector. So this will just go, we can see as his iPhone Mike bottom, we're just going to connect this guy directly into here. And this just changed directly to headset microphone. So now by just scratch this over here, that microphone's connected directly. And because it, it'll be really close to your source, which if you're talking is my oath. That gives a lot of high-quality sound recording. That's what you see in all the TV commercials or interviews. They have a lavalier mike attached to them. It's wired so it goes directly from you and there's an extension cable you can get so you can lead 20 feet away from this. And whatever. I have to sell the same good quality.
23. Device Menu: Next we have the device button is quite a few differences between iOS and Android versions. Here. In iOS we have save to camera roll filming say you should not save directory to your camera roll, but keep the videos in the filmic library. First of all, when you transfer a file from the FMCG library to your camera roll, it'll change your name when copy into the camera roll if there's any interruptions such as coal, low battery, given sufficient membrane or anything else or that they say that it can corrupt the file during the transfer. Also iCloud storage. If you have iCloud auto backup on for your photos menu, they suggests that this also could get corrupted during transfer, you can check this in your device settings in the app, and the your profile name under iCloud. And then photo is mine. You might want to just turn this off while you're recording so that it doesn't automatically goes straight through iCloud. You can turn this off in the menu also in filmic so that it doesn't do this automatically. Some of the issues that they say is if you have four K video and you're using a one-point 33 anamorphic moon dog lens, which gives you that aspect ratio for anamorphic lenses when using the Moon Dog adapter with four K, The result then clip will exceed the resolution limits for the camera roll. So in order to transfer this, the iPhone will re-size the file, resulting in quality loss. Be careful of high-speed frame rates in excess of 60 frames per second. Film acts as they should be avoided when Save and directly to the camera. A camera roll itself retain the frame rate correctly. However, sharing from the camera roll will often we map the footage to a different frame rate. We can check all this. I personally the CB and happens to you. I personally have this setting off and manually transfer the video clips I want from my camera roll as needed. For k footage from the filmic library to my camera roll and then import it into my PC. And so far I have not an issue. It does rename the file, but that's not an issue for me as I change the file names anyway, well, I'm editing in Premiere Pro or a post editing system. You can also rename them manually if you want. So they keep the same date and time that they did in the original filmic library. So that's just up to you. All of this is play around and see if you get these issues. I would actually not have the saved directly to camera roll turned on in the film a gap, and just transfer the files you want when you need them. Remote control can be switched on, but it's another filmic app that you need to purchase. This allows you to use a second device to control the first device. For example, once you switch this setting on, this will enable the remote preview only to also be switched on. This means that the second device cannot control the first device, but can only view it. This might be useful onset where other people want to view what's going on in the first device and they can review it remotely without interrupting anything. I'll take in control of the first device by watching it on the second orientation lock does exactly what it says. It locks the orientation so that if the phone is turned from horizontal to vertical, for example, they orientation doesn't switch. This is available on iOS and Android. The stitch record function on. It actually allows you to edit as you go along. So let's set up the scene here for a small and get a lot settings correct? Once we have them correctly, just going to press the record button. And it will start to record just like normal. But what we can't do now is press it again to pause the recording, to press 1 to pause. And I will pose that we can move the camera around if it's on a tripod like this one is set up our next scene, get everything ready. Set your white balance so your focus on what you need to do. I get it all setup and just press this pause button again and it will start to recall it. And then it continues to record. So seeing two or section two. So add it in as we go along. Once we're finished with this one, press it once more to pause again. And we're going to move the tripod for the third scene. Set it up, get everything ready. One small. Again, if you need to set up your white balance, focus here, area, you're, you're a manager, you're trying to look at a composition. So press it again to start recording one more time. And now when you're finally done, press and hold the head to stop recording, and the button will turn white. So here we can see the effect of the final video from a stitch in effect. So as I said, you can, it's almost like you're at a 10 as you go. Chickens setup C1 and C2 and C3 and C4, and it saves you doing it imposed. So it's a good way to do editing on the fly. And you're finished movie is stitched together as one video clip. Our next item in the device is preview active. You can toggle the switch off. The screen goes black. So why would you want to do this? Well, let's say you're in somewhere dark and the light from your phone is disturbing other people or whatever else is going on during filming. You can setup to your scene and then turn preview active off, and then your screen or Google Docs or doesn't serve other people. So next we have chapter hide interface. When should you this, you can hide radicals within the face also becomes available. And this is if you just want a clean image out, if you're projecting this out with an HDMI to record your screen may be, or sending it your video or something to a monitor or television. You can just get a cleaner look by Haydn the interface. Next we have, you can hide this Zoom rocker. So this is Zoom function here that zooms in and out. I don't use this at all. So it's easy to go and just switch this off to hide it. Next we have volume keys trigger recording. So you just using the pine trees on the Sadia phone to turn on the recording, I turn it off. The only bad thing with this is if you have this in a clamp of some sort, they might get in the way of you being able to press them. So just keep that in mind. Some other features only available on Android are GPS tag in so you can put location information in your metadata on your clips. Noise reduction and sharpness of the image. If you want to add these on or not add them as a toggle switch for each one to put on your video, perhaps.
24. Presets: You can save presets on conditions. I use it all the time. So we're going to presets. And then I'd say you're using a fork, maybe 30 frames per second. And we are going to always use this for the DJI Osmo Mobile. So we can choose S to be on. And then we go to Presets. And we can save out a file name that will load these settings for us every time without going into each individual setting just makes it a lot quicker for frequently used settings. And here you can see the final setting that you can just pull up. You can delete that by just swipe into the left and press Delete.
25. CMS: The CMS constant Management System Settings option is used to control the file name and properties of the app. The default behavior of the app is to encode files with the time and date stamp when the clip was recorded. A typical file names such as OSX. So for 2021, underscore OSX 32, 44, we're indicate a video file that was recorded on June 4th, 2020, one at 632. I am. So if we enter CMS, the first thing we see is timecode track. This is useful when multiple cameras and the time codes, as you can see here, saying 14, ten, and counting up, they'll all be sink at the same time. So it says to ten in the afternoon and basically each camera with multiple cameras and all precinct the same time. So it makes post-scarcity and easy to match them up later on. Next we have content management and the slave. It's like you see in the movies where they do the clapper board before a scene. This is done, choose synchronized sound and have all the relevant information on it for each clip. And it makes life a lot easier in post skeleton. So here on the slide we have production, which is actually the name of your movie. So wherever the movie is called, in our case is called movie. Waterfall is save that. And then you can see I had seen when a and take one. And then there's just random set of numbers after, which shall be an extension on the end. So now when we do a recording and we have multiple clips that are come up like this. So we have a name for the waterfall movie, the scene. And then take 1 and type 2 and you see it's named it sequentially. And then the random extensions here, which you can change something that makes more meaning. On the Advanced tab, you can put names on the camera, a, b, real clip, date, and then a random extension again just like before. For some more advanced stuff. If you're on a film set, for example. And that set for a CMS.
26. Hardware: In hardware, we have a bunch of options that let filmic know exactly what additions you have. Anything from three-axis Kimball's, the specialist lenses. The first is clean HDMI out. This means you can put the video image from your phone without any of the menu items show up on the screen of your film IGAP. This can be used for a live broadcast. For example, you'll need a cable though, to be able to connect from your phone to an HDMI output. On iOS. Once you select this option, you'll have the option for audio also over h here might be output. Next we have options for gambles from the DJI Osmo goes to the zooms to the movies. This allows you to control the filmic app record and for example, from the gimbal directly. So you'll be able to press record on the gimbal and it will start recording on your phone. There's also a section for anamorphic lenses. Remember these capture a very wide aspect, aspect ratio, a video that you normally after these squeeze back to a 16 to 9 ratio later on in post switching this on the apple also D squeezy image back for you so that you don't have to do it later on yourself. You can whoever select, Preview Only if you want to be able to D squeeze and resize the image later on imposed to do the work for yourself is also a 35 millimeter adapter setting. You'll notice someone is turned on, the image gets flipped upside down. That's because a 35 millimeter adapter will flip the video when being recorded. Finally, we have the horizontal image flap, which can be used if you want to use the front-facing camera or selfie mode, because normally that will flip the image horizontally when you do this.
27. Final settings menu items: So next we have sink. This is where you can login, make an account, sign up and synchronize your settings. So if you use it on different devices, you have the whole thing top. And community. This is film IX, website is social media. Then we have first slide. This is fair mix new app. It's another purchase and it's very much like filmic pro, but it's for photography and videography. And we have stabilization. This is either on or off a uses electronic stabilization. And we have camera. So here we're in the wide mode and ultra-wide me up tally mode. And Selfie, which is using the front camera. And then double take, which is another application you can get from filmic and it uses multiple cameras. So your front and another camera, I get you in an interview between two different cameras, for example. Next we can look at the cameras on the front menu. So whatever is in green is currently, currently n. So let's click on selfie. Is a B, the selfie front-facing camera. You just click this button again and then go to tally mode. And notice here that the white balance has changed a lot. So we have to go into white balance and just make sure that it's selected to change for the camera view that you're in. And that's kind of wide. Again. This is the wide view. And finally, ultra-wide. And this will also depend on your camera, phone that you're using and what it has. And we have flashlight or torch. And these are just the different settings as an iOS. We also can pick guides here, there's no guides on the image. If you click this on, you will get these guides are hard to see, just gray lines, but the green is old lady Effie to say. And it sorry, you can follow the rule of thirds for composition. And we have another video coming right up after this one to explain us. And finally information. Just a quick stack I tutorials. And the main thing is the version that you have.
28. Stabilize menu: Filmic has now brought out
some options under stabilize, four options for
iOS and Android. Let's take a look at them. Historically, your camera's
native app seems to do the best stabilization when walking handheld compared
to a third-party app. There's four options for iOS. And the off mode here means
it's not using anything. Then we have Standard, which is supposed to use
a native iPhone app, cinematic and cinematic plus. These to utilize
software from the phone. But there's a lot of
lag, like preview lag. We'll take a look at it and
see what you think when you move the phone from
left to right. You'll see that under cinematic, especially in cinematic
plus the image on the, the preview image on your phone. It'll take a second to catch up. We'll take a look at that. Same thing for the Android. There are four
different options. Option one is off, obviously it doesn't
use anything. Then there's OIS, which is
optical image stabilization. So that's where these
optics actually moving within the phone to help
stabilize a four-inch EIS, which is electronic
stabilization. Software is trying to manipulate the footage to make
it more stable. And then option for
would be if you have optical image
stabilization along with the electronic stabilization
that try to optimize it. We're gonna be doing
normal ninja walk, holding the phone by hand. No Gimbels nor the gadgets. Just doing a normal
bend your knees, walking back and forth
and see what we get. This is a native iPhone app
with no corrections made, just walking to and
from the photo. The film extended
mode is supposed to utilize the native app
that's on your phone. So we're using an iPhone, so this should be the
same as the native app. Next we have filming
cinematic mode. This is supposed to use any optical image
stabilization that your phone has along with the
cinematic software. And utilizing them
together to get a smoother walking
image. Stabilization. Mass. We have cinematic plus. This is the same as
cinematic and tries to get the best quality
out of stabilization, but it has the most
previewed lag. If you move your camera
from left to right, you're looking at the screen. It's about a 2.5th before he catches up to where
you moved the camera. One thing to notice here is the when you're
in these menus, we go to stabilization. We have off. And you'll notice
here if we look on the side of the video here, where the welcome sign is, part of the door frame here. And if we go to Standard, see how it crops in, and now we're up
the welcome sign. It's much more zoomed in. Same width, cinematic,
cinematic plus. When you use these modes, it does do a crop in
to be aware of that. Now the other thing that
goes on is latency. If we go to 0 off, when I move, this
move is in real-time. If I go to Standard. And then we move
from side-to-side. Little bit of a lag
from what you see to what it records. Perfect. Go to cinematic. If I move, this is definitely a lag
from when I move to win, it sees it on the preview here. So be aware of that. If I go to cinematic plus, this is actually the worst. If I move this, it takes like a second or two for the
camera to catch up. We'll record. But if you're walking around looking at this, for example, it'll take a second or two
for two for you to see on your on your phone while
you're actually recording. That's going to make
it very challenging. It might be better off if you're going to use these modes to do. Cinematic. Might be a way to
do it a little bit of a lag. But it's not too much. Just have to play
around with them and see how they were for you. Some final tips here. If you're trying to get stable image as you're moving
or walking, like handheld. But at the shoot at a
higher frame rate and then play it back
at a lower one. So in this case here we're
at 24 frames per second. Capture in playback
at 24 frames. What options can we do
actually filming it can do this quite well for you. You don't have to
use posts edit in. Here we have four k
8-bit filmmaker extreme. And we can see that
we can shoot it at record at 60 frames per
second and play back a 24. But if we change this to ten, been for K ten bit
more color range, we can only recorded 30 frames per second,
the playback of 24. So that doesn't give us
much difference there. Now if we go back in now
and go to 8-bit again, we're in four, okay, you
can see here we can record as 60 and play it back at 24. And that will give us
some nice slow motion. What happens if we
go into ten ADP? If we go to ten ADP, you can see you can
actually record a 240 if we choose 120. And then we dropped
the playback down to 24 frames per second, you'll get a nice smooth image. And this will help
stabilize your footage.
29. Rule of thirds: So what is the rule of thirds? It's actually a rule or a guide and you don't have to stick to it exactly. But once you understand it, it makes your composition a lot better, whether it's photography or videography. And what it is is two vertical lines and two horizontal lines that split up the screen into nine equal spaces. And what you're trying to do is the eye is drawn towards where the lines intersect. So each camera, phone, everything has a grid. You can look it up in your settings. And if you stick to this grid and line things up instead of just shooting straight on, for some reason, your eye is drawn to that. And it makes the composition of what you're filming a lot more professional. But let's jump in and take a look at some examples of how we can use the rule of thirds. Now one tip here is it's a general guide. It doesn't mean that every time you pick up a camera, you have to stick exactly to this, but keep it in the back of your mind turning on your phone or your camera, and then just get used to it. And it helps you guide up like the horizons or a person in a shot and see how you get along with him. But let's jump in. So here's our first shot. Subjects over to the right, not quite on the intersecting lines, but in the same area. And he's looking into the frame versus looking away. So here we can see that it's slightly off somehow just looking at it. It's on a wide, wide lens. But he's not even quite in the center and definitely not off to one of the intersections. So this is looking a little better at the composition looks okay, It's over to one side. It's still not lining up with the grids. They didn't use the grids when doing this here. And, but at least visually it looks okay, looks better than the previous shot. So here's an example of someone just doesn't look quite right. It's not lined up. Maybe we needed to shift the camera with this one. So if we move the camera over and this is much more symmetrical, the two pillows where they need to be, and it just looks better. So this next image is a great image. And don't forget, just use rule of thirds as a guide the composition, what does it look like? What draws your attention to the picture or video? So here we have a lighthouse in the middle of the grid, which is perfect. But something else that's going on in this picture in composition is leading lines. We can see these rails draw your eye all the way down this path to the lighthouse at the bottom. And then we ask some other interesting points over in the right, there's another set of cliffs which has a building on it. And then the shoreline of the sea level over on the left. And this should be great even though it doesn't fall into the intersecting lines on the rule of thirds, it's set as a great image and can use this what draws your eye in attention to composition? If it looks great to you, then it's great. There's no fixed rules here. Here's another great picture. So the lighthouse is the center of the image. But we also have with this deck some great leading lines going all the way down to the dough. And this draws your eye down this path or this boardwalk all the way to the white lighthouse itself and is a great image. And as a lot, for whatever reason, as we said, You're just drawn to the house and that's what the intention that it was for this picture. And these leading lines also helped composition by drawing your eye down to the main topic, which is a lighthouse. Also keep in mind that the lines don't have to be straight. We have some curves, stairwells here going up that draws your attention from where you are up the stairway. So hopefully that explains the rule of thirds a little bit. Sure you use it as a guide. Put the grids on on your camera just to keep it in mind when you're looking at something. We're always look at the composition. Want draws your eye to the image that you're seeing on the camera or the phone. And move in a person or a subject, or a tree or a building over to one of the grid lines. If that makes it look better than you use it, or could just have something dead smack in the center and nothing else around it. So what looks good to you? So just keep it in your back pocket and use it and get used to try to bring it up and you'll get better and better at it.
30. Timer bottom menu: Along the bottom we see a box so far we've just talked about the time of function. We've already talked about this little white slider that will control the gain of the audio. We slide it to the left. It decreases the gain. And if you slide it to the right, it increases again. At the top right you see a battery level for your phone. Under that, you see the amount of storage space left you have on your device. By this little pie chart. And the main center, we have the counter, It's an hours, minutes and seconds far left. We have the frames per second and the resolution of the video that you're shooting at. However, there's some other really useful features in this menu. Tap it once to bring up the exposure wave form known as Lumosity histogram. This is dynamic, meaning it adjust constantly to what you're seeing and with the camera. You can use this to try to exposure image correctly. If your image is too dark, the spike will appear on the left representing black or dark shades. If your image is too bright, meaning overexposed, the spike on the right will appear showing up as bright highlights. So whites. She tried just to get an even range along the whole spread of this histogram. Keep in mind, however, it depends on what's in your image. For example, if you have a lot of dark or black in the image that you're trying to shoot, then you will see higher values on the left. Because most of the images dark. Well, if you have a very bright image and lots of light, and that will show up for the spike or the histogram will show up more to the right. So keep that in mind. So the histogram looks pretty centered. He is saying would be exposed correctly and you will 30 frames per seconds. So I'll lock my shutter 1 over 60. And I'll bring the ISO down as we always wanted to do. We can see that moves it over to the left side though. If I take it back to about a 100, that looks pretty good. It looks centered and histograms looking. Okay as an image, my ISO slow at 74 and my shirt as it went over 60. So that's Chapter menu once more. And then you'll get another histogram. But this time it's known as an RGB histogram. So red, green, and blue, all the colors would be separated out into these three channels. And honestly, whenever you going to use this, it's just something for you to take a look at. I never use it in any coloring, but it's more information if you want to see it. Next we have, if you tap again the luma waveform, this shows you contrast and your highlights and your shadows and blacks and whites. You can see, and it's real time. If I move my arm in front of it, you can see the waveform changing. And if I cover it up, it goes flat because black is the lowest part of the luma waveform. So if I bring back light, you'll see the different shades of light and dark. And it moves real-time with the video here. If I move the camera over to this tool, you can see that the two depths are actually from the two dark areas of the door frame and the height. And the middle layer, I should say, is the light and the window shown here. And if we go back over to this area of the wall, these are all the different light and dark shades that the limb away form C, on a normal post-production things like Adobe Premiere. This wave form is used to do the shadows, highlights, contrast, exposure values. Anyone's mobile go back to the normal waveform.
31. White bal & color temp intro: In this lesson, we're going to talk about white balance in camera, why you should do it, and why it's important. The trend nowadays, you hear all the time is we'll fix that in post. That's fine. But if you have multiple cameras, it's important to use a reference card, such as white balanced carrier and calibrate all the different sensors for all the different cameras you might use. So that will give a reference that all the whites and the colors which referenced from the white balance will all be very similar and we'll make your life a lot easier, imposed a new color correction. To understand white balance, we need to understand color temperature. Ever wonder why your subjects turn yellow and shooting them indoors. Or even why they might have a blue cast to them. And the certain harsh light such as fluorescent tubes, prime side and heavy overcast days. Understanding White Balance and color temperature and digital photography and videography. Very important. Because setting it incorrectly will give you all sorts of troubles later on, such as different castes of color over the images, as well as making the skin tones look unrealistic. So what is color temperature for the human eye and the brain is really good at interpreting images and color. So if you take a white piece of paper, even though there's different colors in this room you can sell tell this is white. If I took this out in direct sunlight, it would still look white TO wherever I took it out at night in the moonlight, it's still look white or in a very dark room. Well, your camera sensor can't do that. We have to tell it what's real white. And the y is, for example, the white doors behind me. If the cameras lighting and cameras and sulfur reducing give off a yellow cast, then they would pick up a yellow light or red light. If there was red lights are blue lights who would pick up that cast? So we need some type of reference tool to tell the camera what is true white. And that's what we're going to talk about now.
32. Filmic Kelvin scale: Calvin is the standard for international thermodynamic temperature range. It was named after a British engineer called William Thompson, the first power and Calvin who created the Kelvin temperature scale. Kelvins follow the same increments as Celsius, although they're not written in degrees. And there is no negative scale. Lord Kelvin, he did a block of carbon at its lowest temperature. The block of carbon glowed a dim red. As the heat increased. The burn-in block change color from red to yellow to bright blue at its highest temperature. In photography and videography, the Kelvin range directly corresponds to the temperature of the burning carbon and the light that it produced. When you shoot in Kelvin. The manually adjusting the camera's white balance to match that of the Kelvin temperature in the room. By aligning these temperatures, you can produce the most accurate white balance for the imaging camera. Adjusting Calvin allows you to manually do well, your brain automatically does in different lighting situations. As we said before, you see a white piece of paper is white. It doesn't matter whether the environment is a bright sunny day outside. For your insight and a candle lit room, your brain will adapt automatically and see the paper is white. So let's take a look at this Kelvin scale. It was assigned a value of 5500. Wouldn't match sunlight, direct sunlight with no clouds at midday when the sun was directly above you. So high noon, this is given a value of daylight at 5500 Kelvin. Any values lower than that will give off a warmer Chang. Any values higher than that, or give off a cooler tone. This doesn't matter whether it's indoors and you're looking at incandescent bulbs or candlelight, or even fluorescent tubes, such as these guys here. For the longer chains you'll see in hospitals and sum, all the kitchen lighting systems. Go to the other side of it. The higher the value, the cooler the image looks. And that can be if your right side, that will be cloudy days or even moonlight or overcast. Odd jobs as videographers is two. When we walk into a room, check out the room temperature. Is it more candle lit or incandescent light which is an orange tone? Or is it a cool light for a mixture of everything? Same when you're outside, if you're going out at sunset or sunrise, is it more on a cloudy day, full sun overcast? All these will cast different temperatures. And your goal is to match your camera to the temperature range on the Kelvin scale. So only then will the camera know what true white balances and that will affect a different color range. So let's take a look at the Calvin range and see where each of these settings fall in the range. At the low end of the scale, we have candlelight. This is around 15 to 20 tires and Calvin, it's some warm light and some the lower end of the spectrum. Our next line is around 2500 to 3500. And it's a tungsten bulb that you would get in household varieties. Between three thousand, four thousand is sunrise and sunset. This is also known as golden Iowa. And photographers and videographers around the world look for this lighting because it's very flattering and looks amazing. I'm very cinematic. Next we have fluorescent tubes arranged from 4000 or 5000 Kelvin, then only on white tinge to them, but they can come in different tones such as warm, light, cool white, or even daylight white. He is the most they used in office buildings, hospitals, things like that. Doctor's waiting rooms at five tires and the 6500 Kelvin is daylight with clear sky. So if the sun's right above you, there's no clouds. This is known around five thousand, five thousand, five hundred for 5,600 Kelvin at 6500 curators and Calvin is moderately overcast skies. This also gives you a more bluish tone. And our last one is eight thousand and ten thousand. That's where you're under shade. Points, really heavy, overcast sky, or even your out under the moonlight.
33. Imaging and white balance: Next we can see three overlapping circles of red, green, and blue. Tap on this to open the image in panel. Here we can see a large multi-colored square with the white circle in the middle. This represents a color temperature of that what the cameras censuses in Kelvin and tint. We can see here that the filmic app is showing a temperature of 5977, so I ran 6000 Kelvin. We can also see this value on the main screen. It's overcast today as you can see, and the filmic app is actually pretty accurate. You can also check this with another app. There's many of them just search the App Store or the Google Store. There's one that I'm using called ls vivo. And it said that the temperature is also 5908. So they're both similar within a range. It also shows you that a value of 6000 Kelvin is good for LED or fluorescent tubes or an overcast sky. So next we're going to click on the buttons again here, the three circles to bring up the white balance. Notice some bottom right. It says AWB auto white balance. It's in blue. This means is in auto mode. So as you move the camera around, it will change. So before you click on it once to make it read, this fixes the white balance to what it's currently seeing. So if the camera moves around now, it won't change. If the sky goes from bright to dark. Take it again and it goes orange, just means that it will lock when you press the record button. So Ruby and dynamic mode until you press record and then it will fix the white balance. And blue means it's in auto white balance again. We can move this little circle in the larger area to adjust our Calvin manually. Go from 3 thousand to 10 thousand. And then you can move it back down. And then we have, if you move left to right, you move the ten from green to magenta. So you can affect the image before you press Record. Hit limb back. The factor blue on AWB will set everything back to auto. And we want to click on Lock in the white balance before we record. Here's an example of the white balance not being locked. And they can see, especially in the background, as the camera's moving even a little bit to white balance is changing, especially with the light and the windows at the back. Here's the presets. Make sure they are in order white balance, so it's blue. And epilogue along the bottom, there's four icons. The first one is a light bulb, which stands for incandescent lights. So that would be the light source appear in the side. If you're outside and it's sunny, you press this one for outside and it's cloudy. We repress this one. And the last one is a modern LED lights, so fluorescent tubes. So we would choose, in our case today, it's overcast and we will choose the clarity. And that should give us locked the range towards that. And whatever we chairs. Next we can see an a and a b. And if you press and hold one of these, you're able to save the preset that you're using. So if you set it to a certain Kelvin range, you can save it on channel a channel. Be sure if you want to use a white balance card. You can see here the temperature and filmmakers, 5801, so 5800 in auto. And then you can use these little gray cards. 18 percent gray should try to hold it. It goes in focus. And then while it's there, you press unlock the white balance. And we can see that it actually changes to 6831. But this should give you a representation of what white is within the image. So it's still locked, even though it's often a little bit from the auto. This gray card will show up to make sure and tell the camera that whites and whites.
34. Log file format: To access the next folders. This is an in-app purchase for a cinematographer kit. You'll be prompted to pay for this if you want to access them, depending on your device, it will tell you if you have an 8-bit or 10 bits selected. This will be done by changing your device to 10-bit color in the bit rate and codecs menu that we covered earlier on iOS systems for eight bits such as iPhone 11 models, you have four options, natural, dynamic, flat, and log V2. For 10-bit iOS devices such as iPhone 12s, you'll have natural linear, hybrid log gamma and log version 3 on Android 8-bit, you have native natural dynamic flat and log V2 on Android 10-bit, you have native natural linear flat and log V3. Also an Android, you may find that some modes cannot be used. For example, when needed, if it's chosen, you may get a message saying that cannot be used as native uses that dynamic Tone mapping. And this gets disabled in other modes. So you have to choose one of the other modes. These flatter modes, such as flat or log V2, allow you to get more dynamic range. Dynamic range is nothing more than the difference between the shadows and the highlights. As if you are like look at inside or your family inside of a room. And then you come across a window, you'll see that difference in shade versus light. So just like in photography when people use raw files vs JPEG, this is the same for video. Having this clutter image allows you to color grade with a lot more depth and contrast. If you're gonna do post editing, if you're not currently posts editing, then I suggest you use a natural or dynamic image profile. Next we have the black, mids and white points, or we can change on the image. Here you can say if I move the black towards the right, it goes more towards caret. Caret towards the black egg gets darker and towards a wide it gets lighter for the mid-tones. And same for the whites have I move them towards the left eye gets darker and towards the right it gets lighter. To reset and go back to where you were. Just hit a little refresh cycle arrows at the top left and there's a reset everything back to the original. Next we have the shadows and highlights. These sliders will take your shadows are darker areas. By moving them to the left, I get darker. Room to the right, I get lighter. If you look at the palm tree there. And then we compare it back to the middle, same with highlights. So take C, lighter parts of the image and moves them from left to right, darker, right gets lighter. Again, you can reset with the arrows at the top-left. Final panel here, you can click on this tab to get RGB channels, red, green, and blue, as well as saturation and vibrance. So here we have a slider for saturation. If you go to the right, it goes more. For the left, it goes to black and white. And then you can reset it again, vibrance. The difference between vibrance and saturation is vibrant. So take the least amount of saturated color and try to increase that to bring up the colors that are more muted than others. Here that you can do here is drag the slider from the right. So from Riley, green and blue. So we can see here that really do some crazy things. But if you think the image is too red or green or blue, you can move those sliders over to where you want them. Again reset to go back to the beginning. So one last thing. On top left you can see here, this will give you what you're filming in. Fe stands a filmmaker extreme. And it's telling me that I have 29 minutes left if I keep it felt like extreme before my phone fills up its memory.
35. Hand held 1: All right, so today we're going to do some smooth transitions, all handheld using your phone. We're also going to be using the native camera app. So for whatever reason, the apps don't seem to do well with the stabilization. So the native apps actually do a do better. So whichever phone you have, and if you're using an iPhone, it has to be, well, if it's an iPhone 11 and above, then civilization is really good. If it's lower than that, you're not going to get quite as good a result, but see what you come up with. And for whatever reason, the app and filmic pro and other apps as well. The stabilization isn't as good as a native app for whatever reason you get a better quality image, but you don't get better stabilization. First things first, make sure that your lens is clean. You don't have a wife, just use a t-shirt or something. You don't want to find out that we got fingerprints and everything else all over the camera. So give him a quick wipe. So first of all, how do you hold your phone? So we want to stabilize it. So what we're gonna do is take this hand here and you want to hold it right in the middle. So right in the middle like this. And then use your other hand and just to help balance it or it's supported underneath. And that's what you're going to do here. That's the grip that we're going to be using. You can also use something like this or like we said in the past. So you can use it like this. But what's more, What's more comfortable is grab it in the middle and then also grab it on the side or underneath as you move. And now it's a lot more stables. So keep that move in when we're walking. Okay. So now you have your grip. What we're going to do is you don't want to walk like this. You want to walk with what they call the ninja walk. You're going to bend your knees to keep your shoulders as straight as possible so they're not going up and down like this. So hold the camera, support it. Pennies, and just walk at a brisk pace. Like so. And backwards if you have two like this. So There's a problem though. You can do like we said. And we'll forwards and then backwards. But if you're walking backwards, you can't see we go and you can trip over something on the floor, get injured. So what you can do this, take your phone and grip it like this. And then what you can do then is you can move backwards, but you can actually go to the side. So you can sort of see where you're going a little bit. Keep an eye, you keep your peripheral eye on the way you're going. If you're walking totally backwards, There's a chance you're going to fall over and get injured. So you don't wanna do that. So again, you can just grab it like this. Like so. And then walk to the side as you go back. So you get a peripheral vision of walking backwards. Okay, so another way of holding the phone when you're gonna go backwards. So the thing that Joe is to put your camera here, I'm gonna take this hand closer here. Put it like this. Like so. So that makes sure your fingers are not in the way of the camera. And then when you're able to then walk and we're able to walk forwards. To cite that. So you can actually look, you can actually look towards where you're going to be walking. We're going to walk like this. So the first thing we're gonna do here is get near to where we want to shoot. And then I'm going to set a wide angle. And I'm going to hold this as a natural iPhone app. I'm going to lock exposure on the brightest part of the image, which is the sun here. And the main video, I mean 0.5. And I'm going to start my video. And now I'm going to make sure that I'm not in the way. And after 321 can move out of the way. I'm also going to do one, hold in my hands like this. Let's try another one. And this is like so so we are locked on. All right. And, um, one more time. And 3-to-1. The next shot we're going to do is a panning shot. So the panning shots don't hold them like this. If possible. It's the further you get away normally, the most shake you have. So the panning shot p can have your arms locked in. So for a permanent shot, if you can have your arms locked in and you just want to move your hips like this. Okay, so I'm going to try it now. So torso more. So again, if we're doing it like this, we're just moving like this. And one other tip if during that tried to go, if you start left to right, then stay left to right, down to some this way, some this way. So if you're trying to use these as transitions, then it's easier to go the same direction. So you go laughed and you pan. And then he do it somewhere else. But then you left and Pentagon. And in post you can use that as a transition.
36. Smooth hand held 2: Okay, So now you get the idea. If you use these techniques, you can get some smooth footage. So here we're leaning down trying to look into the sun and just slowly to a pan up. The user knees. Try to keep it steady. Go at a constant pace to the top. This gives you an image that you can see here where the fountain itself is dock and we're facing into the sun. So you get that silhouette look where the sun is behind it. Get some nice flares and slowly go from bottom to top. In this next scene, we are using the ninja walk. Engineer's use heel to toe and just keep the pace constant. And doing the same thing, pull him back. I've got some room watching me from behind so I know that it's safe. And this one here we're going again from top to bottom, the panning up to the top, looking up in the trees and then coming back the other way because you can use that in two different directions and for B-roll, for example. So here is the finished video. This panning up into the trees gives you a different perspective. This one is for transitions, so we're just using a focus in outside before the tree and corn behind the tree. And just move left to right or right to left, whatever your preferences. So as it moves from block, this block image here on the tree, this image coming up will be in focus. So you can use that as a transition. If you do the same thing on another scene, you'll be able to use those things. This is a similar thing here. Well, we're pushing in towards this front toe and then we're coming down into the bushes. Again, if you get a close up in the bushes like this, you can use this as part of a transition. Again, looking up into the sky. And then now what we can do is put them all together as a montage or some B-roll. Put it together with some music and see what it looks like.
37. Every day examples Cloudy: So let's just summarize what we're trying to do. So these next few clips are going to be every day shooting, whether it's today, for example, it's raining, it's overcast, other times it'll be sunny. So just what you do the settings way that when you use filmic pro in your everyday use. One tip here is, if you're gonna do a lot of push in a movement, try using the native app. If you're going to use. Static shots are a little bit of panning. Use filmic because as we saw earlier, the stabilization for whatever reason is better normally in your native app on your phone, then other apps. So try them out and see which one works best for you. The other reason why you want to use filmic is for motion. Motion blur. Like we said, you have control over your white balance, your shutter speed, and your, your aspect ratio. So in your normal phone, you don't normally have that. So you have more control. In a filmic pro app. As we said before, when you just use a native app, it'll film but whatever frame rate. So for example, if it's really bright, the shutter speed will be really high. Which doesn't give you that, that normal motion blur that we talked about. So you are able to, if you want to shoot in 24 frames per second, you can set your shutter too over 48, and that gives you no motion blur. Now, another good thing to do is, as we said, always shoot if you can in 60 frames per second or something else we can do for k 60 frames, shoot in that because I'll give you the option to slow it down if you want to do some slow motion. All right, so take a look at these clips. And it just runs to normal day-to-day settings using the camera app. So let's jump in and take a look at them. So if we take a look at this, I'm going to shoot with the a normal lens. I'm going to check that I'm using for k filmic extreme, and my aspect ratio is 16 to nine. But I'll check my frame rate, et cetera, 60 frames per second. You could do 24 delegates had to 60 because it gives you more options if your phone can do this in four. Okay. So that's all set. I just went back in here to check that stabilization is on. This is all handheld. Then we choose white balance. So here you could choose a preset like clarity, like this, and see if you choose a wrong one, you'll get some weird effects. And then once you, I hit the AWB on the bottom, locked out here all turn red. And that's your exposure set. So everything is set for k 60, ready to go. So this is 60 frames per second. The timeline I'm using is 30 frames per second and it's hand-held so you see the jumping a little bit. So this is the same clip just slowed down 50 percent. So that hopefully that the syllabus smoother had this handheld. Here. I'm using this different app to just check my white balance here we can see it's about 6400 Kelvin. And we're going to go into the filmic app. So this is where we're going to start off. I'm going to go to my settings. I mean, for k from extreme 16 to 9 by frame rate is 60 seconds on playback at 60 by stabilizations on. And now I'm gonna go check my white balance here. Click on the AWB to that goes in the blue. And we see it's around 6500 and throw a lochia right there. I've set my exposure now to where I want to expose. So the sky, the lightest part that we can see here, that the shutter speed is one over 720. This means that filmic decided that even though it's overcast, it's very bright. So to compensate for that, to get correct exposure, it's going to set the shutter speed is 120. Or we might want to set that to 120 because fruit for our motion blur. So that, that a 180 degree rule. And I can manually set it to with 60 frames per seconds. And we are shutter should be 1 over 120. So I can set it here. We can see my ISO is still good and now it's blocked on the sky with that correct shutter speed. Now I'm going to use the other radical to lock on the focus. And also I'm going to move my composition for the rule of thirds. So these problems are sitting on that cross area, and now they're all there. I can press the record button and start recording. I'm in this camera, which is the normal camera of the of the ultra-wide of the normal Y1. Okay? My exposure is here. You can drag this around to wherever I want us to explore this fall. I want to expose for the hedged will do that, but you want to try to expose for the lighter areas, which in this case would be the sky. So the first thing I'll do is check. I've got my resolution is okay. It's okay for me to extreme 16 to 9 ratio. I'll check my resolution here. My frame rate is 60 frames per second. And everything else is good. Now, that shows me I'm for k and 16. I'm now going to put my radical for exposure where I wanted. I'm going to hit my wife islands and hit red. I guess he had 63. So but 60 to 100 Kelvin. Now the focus, I can put this wherever I want to on an iPhone. When it is white like this, wherever the camera's facing, it will dynamically as autofocus by hit, hit it once it'll read in that we fix that. So if I move the camera around, okay, the focus is set on the the point where the fountain was. If I wanted to focus here, I just hit it again and it'll focus here. So the next thing I want to do is setup my composition. I have my grids turned on. And then I'll just check the edge of the building here with my line. So I've looked like I'm fairly vertical and I'll bring the Crossfire Over to put the and itself on that left crosshair. So I think I'm all good to go. What I can do now is make sure that I can see here where I am with the radical over here, the RAM one. It's telling me that I am one over 960 because it's very bright, so is trying to compensate. So what I need to do is bring that day and if I want them the 180 degree rule, so I'm at 60 frames per seconds, so I wanted to change it to 1, 1 over 120. And then if I move it again, as we know, your ISO is going to change. So the cooperativity of Rida and we want to compare in each class we can. The lower the ISO number, the less green you'll have. So that all looks pretty good. I can just tap anywhere on the screen again. And I'm going to leave the radical for the focus just not locked. And I'm ready to record.
38. Gimbal intro: So in this session we're going to talk about Gimbels. Why would you need one? And what do you need to do to set it up? So there's lots of different types of gambles. They range from $50 up to a 150. The one we have here is from a company called DJI. It pulls down really, really simply and can pack away this it'll handle all come off. And this will pack away in your pocket even or definitely in a backpack. And then it is just extends and your phone will go in this piece and we're going to look at this in a little bit. It also comes with this little tripod bottom, just screws into the bottom here. And when you're using it, it also acts like a longer handle. But you can fold it out and you can drop it down somewhere. And then it acts like a little tripod. This is also handy for when you're balanced in the Gimbal. So why do we need to balance a gimbal? And the reason is that the better it's balanced, the less micro jitters you'll get. And also it puts less stress on the motors here. So Gimbels a use to help you get smooth footage, especially as you're moving. We're going to look at different Gimbal movements. Whether you're walking with them or whether you're doing a pan. So you don't always have to walk all the time. You can just shift your body. And this guy is a three axis gimbal. So it will help make everything a lot smoother. Now one thing that Gimbels don't do is they don't compensate for up and down movement. So you still have to do that ninja walk or the duck walk or whatever. Bend your knees and do heel to toe because it doesn't compensate for up and down movement here. So you still got to keep it nice and steady as you're moving along. Quite so we're going to take a look the use in this one. This happens to be the DJI Osmo three. There's a newer version of this called the Osmo for, but it's 90 percent the same thing. The Osmo four has a magnetic settings so you can just drop your phone in and take your right off with a magnet. Other than that it's identical. So we're gonna take a look at this sum. We're going to start off with how to balance your phone on a gimbal. It'll be for this one, but the principle is the same for all of them. It basically go into, you're going to center it in one direction and then in the vertical direction. All right, let's jump into it.
39. How to Balance: Okay. So before we make the phone in the Kimball, make sure you've got everything on here. If you have an ND filter or polarizer microphone, anything else? Any other accessory? Make sure you put it on here first. So on this particular one here, this has As I let us stick around for when it was never as as DJI. And know that the camera has to face towards this red sticker or towards the d on the DJI. So I'm just gonna put it inside of here, like so. And the best way to do this is you just hold the motors like this. So I should be able to just let it go and it drops forward. So that means that it's too far this way. So we're going to do is slowly push that back. Hold the motors here. There was a little bit too far that way. So now I'm just pressure a little bit further back this way. And you just gotta take your time and do micro adjustments. So there That's good. Now, in the horizontal, just by pushing this back and forth. The next thing you gotta do is the same thing vertically. So if I hold the motor again, you can see that it tilts this way. So we're going to use this back and forth mechanism here. Just to go back and forth. And adjusted site aside. Again, just micro adjustments. It takes the more you do it, the quicker you'll get at it. So there we have it vertically balanced and then horizontally it as well. So that's balanced and both ways. And I, all I can do is turn the power on and then the gimbal now and this particular one, if I just double-click this, it'll go from horizontal to vertical. Just like so. And now we're ready to die using a gamble.
40. Gimbal basic modes : We're going to
turn this on here. Just by pressing this button. I'm just going through some
of these buttons here. If we double-tap this, because the landscape mode, if we hit it again, double-tap. It goes to portrait
or vertical mode. This button here is a toggle. So if I move it up or down, or left or right. Okay, We can tell
him the button on the side is when this
is in camera mode, this is Zoom rocker here. And then the other, the
other button you can see here is this thing
here on the back. If you're, let's do
this again here. Okay? If I tilt this by this, if I double-click this
button on the back, I'll center it up for me. And if I'm trying
to move this and I hold this down, basically, it stops it from Ed
Locke said subset from moving up and
down. Like so. Like normally you would
mode of being follow mode. It would be by child laughed
as a writer follows me. If I look up, if I look
down, he follows me. If I hold this button
here, it will. First of all, double-click
him the center at, and then I can hold it down and no matter
where I move it. So if I move it anywhere, It's always an a face in the same direction
to either a go. So if I double-click
this and center it, hold the button, then
matter what I do. It's always going to face
the same way it's locked. Just particular
gimbal comes with an app called DJI in MIMO. And you can run it with this. And you can run it
with your native app. You can also run it with
the filmic pro app. And just by, if you look back at the filmic
pro hardware section, it just connects
S via Bluetooth. And it just allows you to use this record button to
start recording here. So the other thing that
you need to do here, which is a lot easier, because if you go to the, go to here, and then you do go down to the bottom
of the three buttons on the bottom left, this press M button. The mode button here is
normally set photo and video. So you click on that
once and the quick menu. And then that's fine. What this means now is if I
click on the mode button, you can see here, I can change to different modes. So I can go into follow mode just by
percussionists of a right. And then same, press
the NBA, the confirm. And now I'm in the follow mode. So if I go up and down, and then right and left there follows
wherever I'm looking. Again, can double tap to center
this on the back trigger. I can use the zoom button. So if I come nearer
to the camera, maybe you can see
I can zoom in with the Zoom Rocker on the side. And this is using
the DJI Memo app. They don't have to use this. But okay, the next thing we could do
is pressing M button again. And then we're gonna go
from follow to tell locked, proceed M button
again to confirm. So locked mode is
I'm in luck mode. So the follow mode
now as I walk, should try to keep it stable
as I go back or forward. Mike, impressive record
button like that. And then you will say that
this is now recording. Press it again to
stop recording. Hit the end button
one more time. Go to the right, and I can
change it to F pV mode, for example, select M and F pV mode is
like airplane mode. So whatever you do, It's like first-person view. It looks like you're flying
a plane or a fixed wing. So it just sort of
goes everywhere. So if you want to hit that again and go across
to follow mode, which is the default mode. And then again it moves
to wherever we want. So all right.
41. Gimbal Moves: So the very first thing is we're in vertical mode here if I double tap the Enter button. So when I go to horizontal, the other thing is here is it's a little bit tilted in this way. So if I double tap the trigger on the back, it will center it up and then it'll default to be in follow mode. So if I matter where I go, left to right or up To down, it's going to follow me. If I change modes to tilt locked. So now if I'm walking with it, it's going to try to stay straight to where I have it locked. Just means it locks the tilt I can sell, move left and right pan. Like this. Again, double-click to center. And then the I can also do this every evening from a normal follow mode by holding the trigger button down. I can continue to hold this and it will actually stay locked in this position. Another mode that we have is f pv mode. So NFP V, no matter what I do, it's going to act like a fixed wing or airplane mode, whatever you wanna call it, no matter where I do it, it's going to just change everything. So I want to go back to normal follow mode. Just like so. And this is normal, this is normal running. We can center it up. Again. One thing that's weird here on normal gambles, you can normally be hold the lock button down and just go down. So if you're trying to do like a jib shot, normal ones, you can hold it in what's called a flashlight mode. But here and this particular, because of the angle, because of this particular gimbal. It doesn't really work that well. So you got to try to do is go sideways like this. And you can lock it. And then he can go down. And then you can come straight back up. And MS side mode, like this. Or with practice, you can go down and then turn it back up like this. Join a job shop. But a lot of them, you'll be able to go and just do it in flashlight mode. But this one, if you hold it and go down, it doesn't stay straight. It's got a tilt to it. So if I do that up here, so I want to lock it and I want to come down. Doesn't okay. And he came up. Okay. So another way of doing that as you tilt it. And then you go down and then back up. Like so it's a bit, bit weird. But anyway it works. So these are the main modes you're going to use follow as default. Again, it follows you everywhere. In tilt and pan. You can double tap the side button here, the back button twice to center it at anytime. If you follow mode. Let's make sure I'm in follow mode. Yes. Okay. And I hold this button down. So if I hold it and no matter where I go, left or right, it's going to stay forward because I'm locking the axis. So my knife, I'm walking, or I turn it this way while I'm going sideways. With this button locked down, that's always going to face the same direction. Here what we can do is if you're in the MIMO app and you just hit this little camera there at the bottom. You can stand in front of the camera and just draw around your face to lock onto that as I move, it will actually follow me. And of course you have to set your settings for LP. And in order to be a manual, basically, no matter where you are, it will actually follow you around us like so. So if you're blogging or doing something, a lock on chairman over there.
42. Real life practice examples: Okay, so before you balancing MBO, make sure you have everything on here. If you have any filters or anything else, put them on first before balance and your gumbo. The other thing you might want to bring as a battery pack, because if, if Fermi all day It's an, a drain your phone. So make sure you have a battery pack as well. Turn this this way. I'm going to press Record and I'm just going to go down. And I'm bringing us back up. For this one. I'm just going to hold it and then go back. I'm going to turn this way again. Until the same thing. For the next shot. We're going to do a job shop, but we're going to also focus on the ground and I move up. So we're going to start here. Okay, next we're going to try to turn this upside down, has a low angle, go across the floor and then come up like a moving jab as well. So the next thing we're gonna do is, uh, reveal. I'm going to focus on the mountain, set the focus to the mountain behind me. And then I'm going to slide in front of this cactus chest behind my shoulder here. And that will reveal the mountain behind that and then be in focus. This can be used as a transition. Okay, the next one we're going to do is use the foreground to push up. So start low at the ground and then come up to reveal this cactus which is behind me. So using the foreground, casual lot of depth and it makes the shot a lot more interesting. So we're going to go here. So in this next shot, I'm just gonna go low to the ground from our weight for a car, the combine. And then we'll just raise up slowly. So we get the cargo and buy and the mountains in the background and the row behind that. So here, lock your gimbal off, News the heel to toe, bend your knees and just push forward. And this gives a good entrance to an open insane. And if you reverse it, a good ending to a scene, again, cheer for one here. Just go backwards and you get two for one. So a good way to simulate a drone shot is to just walk through trees or through small spaces. And you can be in the PHP mode or just a normal lock mode. The footage looks like you're flying through the trays. Another way to get a good drone shot it is to play says on a mono pod or a light stand, she can get much higher in the air and just walk through. And this will give you simulated drone footage. So here we place the gamble upon a cheap mono pod and was able to assimilate this fake drone flight here. Somebody that you couldn't ever do in the inner city, here in Rome. Here we're using the gimbal has a tripod and just manipulating the up-and-down movement for the GI stack.
43. Filmic end: Congratulations, you've finished the course. Hopefully you got as much out of it as we did put it all together. Now, don't forget the tips practices the key. Don't stop binge-watching tips on YouTube and get caught up in the fact that you need the latest cameras or the latest bones, the latest microphones and gadgets. Just use what you've got in your pocket. Now. Whether you are in your apartment, you're filming your dog, your family, and or just outside in the backyard. You don't have to be often some exotic location either. Just be creative, look around you and see what you can create. And I look forward to seeing the results in the shared project areas here. So hope you enjoyed it again. Thanks a lot, We really appreciate it. And I'll see you in the next course.
44. Filmic Pro Ver 7 Overview : You may or may not know that filmic Pro has new
version seven, which is for iOS and Android. But they've moved to
a subscription model, which a lot of people
are not very happy with. It felt like it
was bought out by a company called bending spoons. This means that you
have to pay to 99 a week or $49 a year for
the new version seven. Or if you've already
purchased the version six filmic pro version,
now called Legacy, you'll get a discount
of 199 a week or $40 a year to upgrade
to version seven. If you have grade, you can
get a one-week free trial by clicking on the X at the top of the left corner of the screen. And then the interface, you'll see the word
pro on the top left. If you click this, it'll take
you to the Subscribe page. Here. It tells you that
you're able to use all the features and watch
your videos in the filmic app. But it won't be able to share any videos or export
them to other systems. This means that you are now in the trial version
seven of filmic pro. The good news, however, is that you can still
use the version six. Were they in a subscription? And this is called
filmic legacy. As far as I know,
filmic won't do anymore software upgrades to
this version six, and I'm not certain, but I believe they will still do bug fixes and little
things like that. To go back to version six, click on the cogwheel
at the top-left, then click on the information. Then click Download
filmic legacy. This will open the app store to get the filmic legacy page. Now you'll have both
versions seven and version six legacy
on your phone. Any videos you had in version six or the previous filmic will now be inversion
seventh library. Here we can see if we
open the legacy version, we have no video
is in a library. But if we now go to version
seven in our library, all the old videos
that we had on our phone now show up in there. But you can transfer them
easily by doing the following. Go to the Files
icon on your phone. Select on my iPhone. Select filmic Pro, which
has no version seven. Press the three dots
at the top-right. Choose, Select,
select the videos that you wanted to transfer. Select the folder at the
bottom of the screen. Select Browse, select
on my iPhone again, choose filmic legacy, and then select Move
at the top right. And the videos that we're
all in version seven. And then moved back into your legacy folder
or version six and the filmic library. So
now we've done that. Let's take a look
at version seven. The layout has been
redesigned and now works in vertical as well as
horizontal orientation modes. The exposure radical, which is the circle and the square one, which is the focus
radicals are shown here. And if you press
on them, they'll turn red to show you that their law there'll be locked on whatever you move them
to within your scene. To unlock them, just tap them again and they'll
turn back to orange. On the top-left
is the mode icon. This will open what
filmic now cause I can, which stands for
quick action modal. This pop-up window
gives you access to actions without having to go into settings to look for them. We can close the cam just by clicking anywhere
off the screen. And it will close it again. Here we have the normal radical. Then we have the center weight, which takes a larger
area of the center of the screen for
focus and exposure. And you can sell lock them by tapping them and they turn red. Tap again to unlock them. Hit the mode icon again
to bring up the cam. Here we can go back to
the default radical view or we can choose manual. This will bring up sliders
with exposure being on the left and the focus
being on the right. Hit the mode icon again to go back to the default radicals. Next, we can click on the
image in button lower left. Here we have the white
balance settings moving and up and down. We'll adjust the
Kelvin temperature. Moving it left to right. Well, adjust the tint values. The AWB button at the bottom represents auto when
it's blue, locked, when it's red, and orange will lock the white balance when
you hit the record button, simply tap the AWB icon to change through
these three states. Next is a filmic filters
that are available. But I can use them as
shown here because I'm filming in progress
or a 10-bit video. These are only available
to you if you're shooting in 8-bit video modes. This next icon shows you a video formats the recording depending on the resolution you've sat. In our example, I'm in
progress and 709 mode. So my choices are natural. Dynamic, flat plus log V plus. You would use a flat
or log V format if you want more dynamic
range for color grading, e.g. later on in post. Here we'll choose
a dynamic profile. Lastly, we have sliders to adjust our saturation
and vibrance. Saturation increases
all of the color range. Well, vibrance will try to increase less dominant
colors in the scene. Next, we have the camera
selection button, which opens up a quick cam. Depending on your phone, you can choose which
camera you want. You can also use the
slider and there's a nice animation representation of the field of view
where the camera, when you select each one, it shows you what the
field of view will be. On this phone, we have
a 0.5 ultra wide lens, a onetime wide lens, which is normally the best
camera on the iPhone. Three times tele lens. So if I move the slider
from the tele lens, e.g. to the ultra-wide. Just click anywhere
on the screen the clothes that
can pop up window. This next icon allows
you to control your phone using another device. Through the filmic Remote app. You can control and
monitor the recording with another device like an
iPad or another phone. Which is another
separate paid out. By the way, you can control
an iPhone or an Android. You have to be a compatible
device, Android, Android, or iPhone to iPhone. You can use iPad to iPhone. Here we have the
Center medallion, which displays your resolution, frames per second, along with your battery and how
much free storage is left on your device. Click around. This will bring up
the RGB histogram and luma waveforms, e.g. so as you move through
the exposure radical, you can see this change. Next we have live
analytics icon, which brings up the
analytics modal. Here we have reactive
as you change the exposure and focus light
as well in manual mode. Zebra show up where
your underexposed in blue and overexposed in red. False colors will highlight
the exposure at value is following the zero
to 100 IRE system. These are used on
cinema monitors. Zero range shows up as pink. These are total black
and dark areas. Zero to ten shop is dark blue areas 90 to 100
show up as an orange, and 100 which is red, which is total white
are overexposed. If you're trying to
expose for skin tones, they generally fall
around 70 IRE, which shows up as a
light gray color. Bars. We're focus peaking, which
shows you what areas in the scene are in focus
by showing up as green. If we go back to reactive mode. And I go to the mode
and select manual. Sliders will slide
out from the side. As I moved the right
slider up and down, we can see what's in
focus as it turns green. The show us what's in
focus in the scene. Using a less exposure
slide as an LV, which will adjust ISO
and shutter together. We'll see the zebras appear in blue for underexposed areas, and red for areas that
appear overexploited. Next we have the play button, which so is the video library. Here we can replay videos
stored in the filmic app. And you can also move
them or share them to other folders or across the web. On the right, we have basic audio meter and a slider to adjust
the recording level. Again, tap on this to
show a pro version mode, which gives you the
decibel level meter. Tapping the mica the top
opens up the audio cam. And here we can select
the microphone that we're using that's being used on your device or
an external mic. You can also use the slider
to control the input gain. You can also turn off
the auto gain control by where the
software will try to optimize the audio
level for you. Click anywhere away from
the cam to close it. On the far right, we have a
zoom slider for digital zoom. If we use this in conjunction
with a different cameras, we can get extra digital zoom. But also remember that
digital zoom is not as good. It's just going to each camera individually
and leaving it there. That's the best optical zoom
for your video or picture. At the top left,
we have a cogwheel which opens up the
settings menu. This is nine sections now versus 15 on the
version six menu. However, items have been consolidated into ones
such as the video menu. Now as the encoding and
frame rate settings in one. Encoding allows you to set your resolution such
as four K or progress, as well as your data bit rate
such as filmmaker extreme. Audio allows you to set your
audio recording settings, where it has settings
for options such as DJI, Xeon or movie gimbal. Device has options to save your video directly
to your camera roll. E.g. I. Would suggest
not sending them to your iPhone camera roll because I hear that it can
degrade the image. So the best way to do
it is to move it to the filmic app and
then export it from there out to a desktop or wherever you're going
to edit with filmic. Presets allow you to
create presets, e.g. at four K 24 frames per second. For quick access. Stabilization, settings
can be turned on and off. Cms is for timecode management. And frame I0 is a collaboration online
for editing video clip. We can also turn grids on for things like
the rule of thirds. Finally, you have info for the software version
and also allows you, as we've seen, to download the filmic legacy
version or filmic. If we go back to manual, note just by swiping your
finger from outside to n will make the exposure
of focus light is appear and swipe them, them from in to out,
makes them disappear. The left slider is for exposure, and we have four modes. Lv will adjust ISO and
shutter speed together. Select an ISO will only adjust the ISO value
with the slider. Select any S will allow you to adjust the
shutter speed only. The z will act as a Zoom. Here we can set the
Zoom poll between the red and the
green bar is shown. Whilst in this mode, we can simply swipe towards the outside edge of the phone to close the exposure slider. Swiping on the right
side to show the focus. Later. I'm going to select focus peaking so that
we can see it better. This too has a red and green
bar to set focus, pull. Focus on the first
object you want. In this case the tree, the red or green bar that's nearest where we sat by
hitting the orange line. Now focus on the
second focus point, in this case the frog, and hit the orange line. Now you can do a focus
pool by simply tapping on the red and green bars for some move between the
two points that you sat. The same can be done for the
exposure slider for z zoo. Next, we can get more
control by going to the action slider
by tapping on the chevron at the
top of the screen. Every tap on ISO, it will bring up the ISO cam. Here we can use a slider, choose a preset value, or click on the graphic display. This will allow us to
manually type in a value. Notice that the top
that once you do this, it's turned red and it's locked. If we tap on the shutter
speed, It's cam opens. And we have preset value
for shuttered values, as well as shutter angles
that mimics cinema cameras. So if we're shooting at
24 frames per second, we can select the
shutter speed of 148, which is also a shutter angle of 180 degrees for
correct motion blur. In this example, we'd need an ND filter to bring the exposure down to
the correct level. So for now I'll set
it back to auto by unlocking the exposure
and focus radicals. Next, if we click on
the Kelvin value, this opens up the white
balance can hear, we can move the top slider
and change the Kelvin value, or the lowest slider and
change the tint value. We also have the
standard for set preset values plus an a and B setting that
we can customize. On the lower right, we
see the AWB letters. Blue means it's an auto. Red means it's locked, and orange means it will lock when the record
button is pressed. If you collect men, this will
bring up the encoder and frame rate menu where you can choose your
resolution and bit rate, as well as the frame rate
that you want to recording. You're also able to choose
time-lapse settings here. Next we have what codec
you're filming in here, and we're filming in HEVC. Last we can choose
a gamma format film by tapping that brings
up the Gamma curve cam. Here we have natural
for natural color look, dynamic for more
saturated colors. A flat look with less contrast, and a log V2 if you're an eight bit or log V3
if you're in ten bit. This log format and
contrast and saturation is less and is used to help capture more information
for color grading and post. Notice here we can see
that the mic is crossed, that the reason for this is I left the setting
and time-lapse mode, which doesn't capture Sam. So let's go back to
Michigan and frame rate and change this
back to standard. This will change a set
of time-lapse mode. Click the More button again, allows us to set the exposure and focus the center weight, which takes more
information as it makes the radicals larger. At bottom right we have
the normal Record button, Start and Stop recording. Finally, on top right, we see we have the
function button where you can create
a quick shortcut. This will set for a whole range of items for quick access. To set this tap and hold it. This brings up a
menu of nine items. So we couldn't use it
to set false color. So if we need to
access false color, we just have to tap the
icon on the top right, and it will quickly
bring that up. However, there's a lot
more options that you can choose by expanding the menu, by tapping the Plus
icon at the top left. Here we have a lot of
different functions and they're all grouped
in different color codes. One item that might be of use
is to play the last clip. This means when you click
on the function button, it'll bring up the last clip
that you shop so you can do a quick check on it
before you move on. That's it for the filmic
pro version seven overview. Is it worth the
subscription price to you? That depends on
how much you liked the app and whether
you use it every day, I would say, but it's
a personal choice. Anyway, don't forget
you also have the older legacy
version six or you can use if you've already
purchased it. With all that said,
Keep creative. And I'll see you
in another lesson.
 William Buckley