Transcripts
1. Introduction to Unreal Engine 5.5 for Absolute Beginners: So if you're curious to
learn a real engine ive, but you don't know
where to start, then this course is for you. My name is Mao, and I've been in the industry for over 12 years. I've worked in companies
like UBSOf where I work on projects like School and Bonds and Immorta
Phoenix Rising, and I've been an environment
artist for a long time. I've been teaching you step by step from complete beginning
on how to create a project. How to create your first world, how to navigate in reel, how to model inside unreal, simple modeling operations,
how to use blueprints. And by the end of this course, you will have a
great understanding of the basics of unreal engine. A real engine is very,
very big software. It has a lot of components, but this will get you
on the right track by offering you the best tools that you will use over and over. So in this course, you will
create a simple game where you need to walk and jump
into movable platforms, and then you will
go into a house, and the door will open for
you and close automatically. So by the end of this course, I'm sure you will be
very confident on tackling other unreal engine challenges that
you wish to take. So with that said,
let's get started.
2. Creating our Project: Alright, so you download
the Unreal Engine, and the first window
you see is this. This is the Epic Games launcher, and it has a bunch of things. But the important tab that you need to know is the library. The library is where your unreal engine
versions will store. For example, if I want
to add another version, I just click the plus bottom and I will just choose
the version that I want. Obviously, we will
be working with 5.5, which is the latest version. And you will see here that
I have my projects down access projects which
version I'm using. And also a lot of assets that
I had gathered over Fab, which is a library for epic games to buy treD assets
and a lot of other stuff. So in order to launch this, you'll see that it says 5.4
0.4. We don't want that. We actually want to
change it to 5.5 0.1. Also you can also set current. If you set current here,
for example, set current, you will see that
5.4 0.4 is here. You want to make sure
you set a current, so you can just
launch from here. And when you click Launch, you will basically just open
up the the project editor. So let's do that. So this is the Unreal
Engine project browser. You will see some other
projects that you had before and which
version they're using. And also, you have a
bunch of presets here. You have games where you can just choose first
person, third person, or any other type of game
genre you want to choose or film and video games where also comes with a
lot of presets, architecture as well if you
want to work on architecture, automotive design,
and also simulation. So we're going to
actually go on games. And I will show you how
to import this later. But for now, you will just click on the blank button here, where you can just create an
empty project. All right. Right here on the right side, you can just check
the started content. We're not going
to click on this. And instead of Blueprint
or C plus plus, we're going to chose Blueprint, which is the visual programming
language based on notes, and we're going to
change the name here, we're going to call
it my first project. Then click Create, and
you're good to go.
3. Navigate with the Camera: Alright, so now the
fun part starts. This is a real editor. And the big window that you
see here, it's the billboard. The billboard is basically
the representation of how your game or project will look like when
you ship it, right? So we're going to talk about this big window here later on. But for now, just
keep in mind that in the right, there
are the actors. The actors are all the objects
that you see on the scene, such as this one, or this
one when I click on them, you will see that the
actors are highlighted. And the next thing obviously
is the details panel. The details panel obviously give you different properties
for different actors, such as the skylight we have properties to change
in the lights, or the players start will
just have properties regarding the actor,
the actor class. So let's go and just talk about this big viewpoint because it's the most important
part of the editor. How do you navigate here? Well, with a right mouse click, you can just move
around like this. All right, right mouse
click, you move around. And while holding the
right mouse click, you can press W to go forward, to go backwards, A, to go left, D, to go right. All that by still pressing the right mouse
click. Do not leave it. Also, you can press E to
go up or Q to go down. Just like playing a
first person game. So it's like when you
combine all these buttons, you can just move around
like this, just like that. So middle mouse click
what it will do. Is to just fun
around in two axes. In this case, it's the C
axis and the Y axis, right? And the left one, you
can just move around, kind of like driving a plane. Is really really cool, right? Just left mouse bottom here. Now, personally, I like to use the right mouse
bottom for everything, and then use the WASD to move around and Q I need
to go up and down. For me, it feels
like flying a ship, and it's just very,
very convenient. Alright. So one thing
you will notice here and I'm going to talk
about these buttons later. But for now, you will
see that you have a camera speed here on
the top right corner. And you can just change
this, for example, put it to three,
and you will see that your camera now
move much faster, right? Now, you don't
necessarily need to go here and change this.
Let me go back to one. You can actually, while holding the right mouse click
and just like that, just scroll down with your scroll wheel and you will see that I'm
changing the values here. I'm scrolling down and I move much slower to
have more precision, and I'm scrolling up
to just go faster. You can scroll up
and down to go, you know, just slower. And that's how you navigate. It's very different from
other treaty applications. But also, it's very, very easy, very,
very easy to use. Once you get the hang out of it, you will be able to just
fly around and everything. All right? So that's
it for the navigation. Let's talk about other
modes here in the editor.
4. How to move objects: So let's talk about objects and actors that you can
place in the world. So here you will see
a green plus icon. This is the way to add an
actor here to the world. Now, you have different types
of actors. You have shapes. You have cinematics,
you have lights, and you can also write, for example, clouds or
something like that. You can just drag and drop here. So what I will do here is go
to shapes and drag a cube, hold the left mouse bottom, drag it just like this
and click it here. Now, you will see that
something happened. First, an object is
now in the world. You can also see here on
the right on the outliner. You'll see here on the
right, there is a cube here. And also, you have the
properties here at the right. For example, I can
change the location. For example, here,
instead of g hundred 50, I can just move it like this, holding the left mouse bottom, and I can just move
it up a little bit, and you can just
rotate if you want, or you can just click here to reset to the
default values, right? So what can you do with this? Well, first off, let's
talk about navigation. If you want to navigate and basically rotate
around your object, the first thing is
you need to press a letter F. It's
very convenient. Now the camera will be
focused on the object. And for example, you want to take a look at this
landscape here, press F, and now your camera will focus
here on this landscape. And while holding Alt
and left mouse click, you will be able to rotate
around I can go here again, press F. I can just find
my cube somewhere here. There you go. Click on the cube, press F. That's it. Now, the kismo
that you see here, these arrows here are
basically the move action. And these arrows, you see them because here on the
top right corner, you can see the move objects. Rotate objects, scale objects, and you select objects. These hot keys areread
very close to each other. Is that W E R and Q for select
without doing anything. So W by default, you will be able to move the object around
just like this. E, you will be able to rotate the object in
different directions. R, you will be able to scale the object like
bigger or smaller. You can also scale
in one direction, for example, like this. Only in the X axis. All right. So let me just press F. And let's talk about
the move a little bit because when I press move, you will see that
something's happening here. You see this icon here, this is the world
transfer coordinates. And the word transform
coordinates is basically what you see here in
the bottom left corner, which is the word coordinates. At Word coordinates,
this is the X axis. However, what if you
wanted to move this on the direction that is facing
here, just like this one. Just like this because
it's rotating this way. So you will need to change this. You can just press here, and you will be
able to change from world space to object space. And you will see that
the object space actually has different axis. Go back to world
space. It's like this. Object space looks like that. So by doing that, I can just move along this axis. And I can you know, it's very, very handful. I can rotate around and I can
move it along another axis, or I can just do it like that. Obviously, if you
don't want to do that, you can just go to
word coordinates, and then you can just
move it along this axis. The next thing is snapping. The snapping by default is ten, and it is turned on because
this blue icon is here. If I click on this one, you will see that not much
has happened here. It is a little bit more smooth. Maybe you cannot
notice in the video, but you can actually
turn this on and change this snapping to, let's just say 100. You will see as soon as
I change the snapping, the grid on the world
will actually change from 100 500, 1,000. Or just five or ten. So let's try 100
and move it around. You will see that now I
only move every 100 units. Now this is very helpful
for walls and things like that where you want to snap
them. Very, very useful. And by the way, if
you don't see this, this grid, if you
don't see any axors, you see everything like that, it could happen to you that
you accidentally press the letter G. Alright,
so it's here. There you go. Gain view is G. So just in case you
don't see anything, press the G bottom, and
you will be good to go. The same for rotation, you
can just rotate without any aces and change obviously
this for 15 degrees, every 15 degrees you will
rotating. Let's go back to ten. And the same for scaling, you can scale without
constraints, right? Notice that here
on the right side, the values are changing as well. So we're going to talk at the description values here now.
5. The Details Panel: So let's talk about the
details panel here. The details panel, it's a very, very useful panel
where you can just check all the details
for these actors. So every actor will have
its unique properties, but they all share one thing. And because they are actors, they can be placed in the world, and every actor in the
world have a location. Have a location, have a
rotation, have a scale. So no matter which
actor you click on, you will always have
a location here. Now, you do have the option
to change values here, and you may think, like, when am I going to use this, right? So for example, rotation
is one of the useful ones. You can just click here. And
you will be able to rotate the object on its original
position, scale as well. Also you can scale
this from like this. And, you know, be more accurate, maybe you can type the value, like two, for example. Let me go back. You can also click here to scale all axes in different
index with the same value. So if I press two here, all the axes here will
be updated, right? So there are a bunch of
things you can do here. For example, you can do math. So for example, I can
press one like plus one. And I can just do
something like this, or I can just press multiply
and multiply by five, and I will multiply by five, and I will have
exactly this, right? So this is very handful, especially when you don't
want to think, like, Oh, I wish this object was two
times smaller and you have a value like I don't
know, like 6.35. And it's like, Oh, I want
this exactly at the health. Like, Oh, it's okay. We can just divide, divide
this by two. And there you go. Now you have exactly
the same one. So the next one is obviously
the actor component. Every component every
actor has components. You can see here that next to the cube is static
mesh component, and the static mesh components obviously have a static mesh, which is a tree model, and also have a material, which is the white painting
that you see here. If you go here and change
this, for example, you want to change to
this gray material, you can do that. And also, instead of the cube, maybe you want to use cylinder, for example, or you want to
use a to something like this. You can do that. Or you can go to the
default values here, which is non, in this case. Let me Control C.
With Control C, you will be able to go back. You can also go to edit and
undo and redo. All right. Default values here,
obviously, you can come here, and this is the default material
which is non all right. So there are a bunch of
things you can do here. So for example, you can
put this to movable, you can simulate physics here. And what happens here is
like you can press play. Now you will see that your
object is falling here. Now, we haven't talked
about the play bottom here. We're going to touch that
in the next session. But just so you know
that you can change a lot of properties
here on these actors, and you don't necessarily need
to create a new one here. So that's it for
the details panel. Let's take a look at other
areas of the billboard.
6. Viewport Modes: So now let's talk about
different viewpoint modes. So the default that you
see here is the lead mode, and the lead mode it's
basically everything. It's the final image, right? Notice that when I click
here in the top left corner, you will see that I can
change this to unlead. You can change this
wireframe lead wireframe which is a new mode in 5.5. Can also go to detail lining and lining only
without the normal details. Go go for reflections to see how your surface is reflecting, player collision, and
you get the idea. It's getting a lot of different types of
view modes, right? You can either go for buffer visualization and go for overview to
check the buffer, like all the subsurface color, the world normals, the tangents, the shade model, have a different overview on how all these textures
are being rendered. And also, you can go to
Nanite check the view. There's no nanite in the scene, so we won't be able
to view anything. But the important thing is that you know these
hot keys out four, three, two, at five. Basically, the ones that
I use the most, you know, lead wireframe also
it's very handy, especially when you have a lot and you go for wireframe here, A two, you will see that
everything becomes transparent. So I like this lead wireframe
mode that is new for 5.5, which you can see the wireframe a little
bit better, right? So most of the
time, you may want to check the lead to
check the colors. Or you want to check
the detailed lining or the lining only, so you can check that lining without any color in the sink. Now, you don't notice
much difference because our sin is already gray, but when you add a lot of color, this becomes very, very handy. Another thing here is
this top right corner, you will see a bottom that you can actually change the wboard. And what happens here is that you can actually go and
have different viewpoints. A lot of people may
not know about this, and most of the time you will spend in the
treaty viewpoard. But just in case sometimes
you may want to be on the top or want to have a better overview of
where things are going, a lot of people don't know this, but you can actually change
this to another viewpoint, and you can actually
view it like this. Right. You don't necessarily
need to be on the wireframe. You can actually
view from the top here and you can just work here, like make this super
big, just like this. And you will see
that it's actually like updating here
in this viewpoard, you can watch what's happening
multiple times, right? So obviously, this may or may
not be something you want. Let's go back to wireframe mode, and let's go back to maximize or restore
this viewpoint here. It's like click here. Like here, you can also click on another one to make
it bigger, right? And you can also just move
them just like this to change the size of them,
depending on what you want. Most of the time, I'm
not gonna lie to you, you will be using this big
screen that you see here. Alright. So the next thing, obviously, it's real time. So there is not much difference here,
but if you had, like, fire animation or
anything on real time, basically, what it will
show is the fire moving. So if you have a
really slow computer and you want to save
some performance, maybe you want to toggle
this off. Show FPS. Basically, we'll show how much
FPS you have in the scene, depending on where you look at, you will have less
or more FPS, right? So and you also have a
different set of stats. You can check the statistics, how's your performance is doing. We're not going to touch
that in this course, but just so that you know, you do have access to those. Screen percentage is basically
the resolution for this. The more percentage
you have, obviously, the more quality you will have, but also the more
resources you will use. So leave it at the
default value for now. The game view, we talked about
this earlier is G bottom. G is a very common
bottom you will use. So G basically will hide everything that shouldn't
be included in the game. Such as the gizmo and
the highlights of this. So G will basically give you the best possible
representation of how your game will look like
when you export it, right? So if you don't see
the Gizmo or anything, probably, you do have
the G bottom enable. So make sure you click on this. Immersive mode, it's
another one very useful. You can press F 11, and you will have a big
screen. Very useful as well. And also there is another mode that it doesn't say
here, I believe. It doesn't say it. So you
can press actually F ten. And what it will do is basically create like a it
will make it bigger. It will just collapse the
right side of things. So you can just go here, and the outliner and the details panel
will not stick there. So depending on how
you like to work, you may want to use
one mode or another. Now, obviously, next, you have the bookmarks who we're going to talk
about it later, not really need to go
into that mode yet. Show you can show landscape, for example, and
hide the landscape. You can obviously use the defaults if you
forget which one you put, you can hide the grid, if you don't want to see
the grid or hide the fog. You know, different
types of actors. You can toggle them here if
you don't want to see them. That's very, very useful. And that's pretty much it. So with that set, let's move on and talk
about other things.
7. How to Play the Game: One thing I want to
touch on before we move into creating our new level is this bottom here,
which is very important. At P. This green bottom, when you click here,
you will play. In my case, I'm
playing below this, let me just delete this with a delete button. Let
me just play here. And what happens is that by default and real comes
with a player controller, which is basically you can
already play the game. You just don't have a
character or anything, right? So that's the play button.
You can just play the game. It looks like you are actually
nothing has happened, but actually you're
playing the game. That's the game mode you have. And also, if you click here, you will see that you can
have new Editor window, so you can just go here in case you want a new
window to test the game. You don't want this one. You
also have the Simulate one. So you can go Simulate and it looks like
nothing has happened. But I'm going to show you
something real quick. I'm just going to go
put this skip here, go to movable and put
it on Simulate Physics. Let's see what happens
when I play here. I start the game and
I see the cube here. Now, because my
players start is here, I'm always starting
the game from there. What happens if I wanted to
start the game from here, I can right click
and play from here. And now you will see that I already start in this location. Now, simulate is different. Simulation will not allow
you to play the game, but will view the
game kind of like in a goat mode where you
can see everything that is happening in the
game without playing. So let's click on Simulate. And what will happen is that you will see everything that happens when you play the game, but you are not playing. If you want to play, you
need to pause the player. Just click in here and now
you can pause the player. You can select Chief F one to get a cursor out of here
and you can just click here. Right to detach or attach. Press F eight if you want. If you don't remember
the shortcut, is chief F one, but F eight will
allow you to possess. F eight to toggle
the pauses bottom like possess the player,
that's pretty much it. So now that we know all this, we are ready to
create our new level.
8. Creating a new level: Alright, so let's just
create our new level now. We'll go to File here
on the top left corner. Left click New level. And here you have a
bunch of options, right? You go to choose
the empty level. We're not going to
choose the open world one. Not going to
choose a basic. We're going to choose
an empty level. So double click on this. And what you will see
is this black screen that basically
there's nothing here. Right. So the first
thing you want to do is maybe add some
sky and some light. So there are a couple
of ways to do that. Like, you can go here
to the green plus icon. Then you can go to
visual effects, and you can go for
sky atmosphere, and then you can go here for lights and go for
directional light, and then you can go here and go for
exponential height fog, for example, you will see that they are
here at the right, and there is a better
way to do this. So let me delete those
with a delete key, and I can go to Window and I can go to Environment
Light Mixer. And what this will do is basically it's a window
that allows me to create all the lights that
are required for my scene. You don't necessarily
need to add all of them, but if you want your
scene to look good, you want to add skylight, and you will see that
you get an error here that you need vlometric
cloud component. You need other actors
here on the scene. So let's go for
directional light, create sky atmosphere,
create Volmetri cloud, and create the fog. And just like that,
you will see here in this environment light mixer that you can actually
change things. So for example, I can
change the light color to purple and click Okay. Let me just go back to
the default values. Now, you can always find
them here in the outliner. But if you want to have all your lights in your scene and you
want to change all of them, then
you can do that. Another thing you can do
with this window here is click here and you
can move it here. So, for example, I can
snap it here to the left and I can
just go like this. And you will see that I
can actually change all of these properties now here in case you want to a new
window, you can do that. Now, obviously, if
you don't want it, you use click X to close
the tab, and there you go. Now the next thing I'm
going to do is to click the plus icon here and I'm
going to go to create a floor. So I'm going to go for the cube, and I'm just going
to track it here. And what I'm going to do
is to press R to scale. I'm just going to
scale it like this. I'm just going to move
it just like that so that we can have
a place to play. Now, if I play from here, you will notice that I will play everywhere from the camera. Like, I play from here, and the player always
starts where my camera was. And that's not something
I really want. What I want is to actually
have a player here. So I will go here to the plus and go for
player controller. Sorry, player start. It's right here. Drag and drop. And obviously, the direction
of this is very important. You can obviously, you know, point at this direction. For me, I want to point
at this direction, so we will rotate
it to 180 degrees. And now when I play, I will
always start from here, no matter where I look
from, whenever I play, I will just start from here. Now, another thing we want to touch on is the
content browser. So let's take a look at
in the next session.
9. The Content Browser: Okay, so let's about
the content browser. You can click here on
the content Brower to temporarily open the
content browser here. There is a shortcut for this, which is Control Space
bar. You can see it here. And whenever you
are in the project, Control Space bar will
open up this Window here. Now, there is another way to check this. You
can go to Window. And then go to Content Browser and you have different
content browsers. If I click here,
you will see that I have my content browser
already open up. And if I press Control Space, I will have the extra one here. For me, I tend to move this
and I put it here at the top, so I can have a bigger screen. Or if you have a second
screen like I do, you can just move
it around and have a big content browser
for yourself. I'm just going to leave
it like that for now. Let me control space, and these two are
exactly the same. They do have the same button, so you don't need to
worry about this. What is this is
basically the folder where all your files will
be stored in the future. You will see that you
have an engine folder. So that's something you
need to keep in mind. If you don't see it, let's
just go for reset filters, and you can go here to the content browser settings and just show engine content. We don't really want to use engine content here,
so click that. And I believe it will just, different settings for
different content browsers. So you can have
different settings here. So show engine content,
we don't want to do that. No, it looks very empty. You can actually
create something here. So for example, I can create a material and you will
have a new material here. Let me delete this. But what I want to do actually
is to add some content, and I'm going to add a
third person player. I'm going to add a character
so I can play my game. So I'm going to add here and I'm going to go to add
feature or Content Pack. And here you will see that
I have the first person, the third person, the top down, AR, BR, a vehicle. So if I go I'm going to go for the third person and
click Add to Project. And what this will do
is to basically import all the assets inside
my content folder. I have my characters, which I can see the animations. I have the skeletal mesh. I have materials. I have the skeletal mesh here, the rigs, the textures, and also I have the third person, which
has the blueprint, which is the code behind the character that allows me to move and I have a game mode. We're going to talk about
all these in a second. So if I play from here, you will see that
nothing has happened. And the reason for that is we have an update
the game mode. So let's go for Window, and we will go for, see if I can find
it. World settings. There you go. So world settings automatically will be
here at the right. And you will see that the game
mode here is set to none, which is the default
one we're using. Let's use the third
person game mode. Click on here, and
that's there you go. And now you will see that I can move around with this character. I can jump. I can
do a lot of things. That's really cool, right.
So what is a game mode? A game mode is basically the rule set that you
have in your level. Each level will have
different game modes. So for example, you may have a game mode where
it's a death match where you need to
kill your opponent several times until you reach a certain score,
and then you win. Or you can have a game mode
where you capture the flag. So you need to capture the
flag and get the flag, return it to your base, and then you're just going
to get a point from there. So the game mode is
basically the rules, and the game mode already
comes with a bunch of classes that it's asking. So what is the punk class? So for example, if I wanted to change the punk for this one, for none, then I would lose my ability to use the
third person character. So let me just go back to
BP third person character. That's what I want. Click
here and there you go. So you have player controller, which is the brain
behind the player, which is basically the player. You have the hat,
which is the UI. That's pretty much all
you need to know here. For now, now we
have a small level where we can just play around. Now what we need to
do is to, you know, create a little level for
us. So let's do that now.
10. Prototyping with the CubeGrid: So there are different ways
that you can create a level, and all of them requires you
to crack some messes here. Now, with Area Engine 5.5, we do have the ability to have some level
design tools for us. So what I'm going to do is to actually delete this ground. And here in the selection mode, you will see that I
have different tools. I have the landscape, I have the modeling. I have a bunch of stuff here. I'm going to go for the modeling
one. You will see here. By the way, if you want to know more about modeling tools, take a look at my courses, you will see a complete course on how to model inside and real. For now, we're going
to keep things simple. We're going to create a box
here and we're going to use the default values
here and we're just going to click
it just like that. Click here except and
now that we have box, let's try to make a
ground for our player. So what can we do here? Well, you could potentially
just scale things like this, and I personally like
to do that a lot, but in case you want to do something a little
bit more refined, you can go for the model tab here and then go
to polygroup Edit. And now what you can do is to actually select each phase and you can start modeling here. So I can just go here. And drag the faces
here. There you go. And, you know, I can I can do
this for quite a long time. I also what I can do is to actually create a wall
here, so I can go here, go to Extrude,
something like this, for example, and I can just
create a little wall here. I can extrude again. Just so that the
player doesn't fall, you know, can have
something like this. Then I can just click
Accept. Let's play the game. And looks like our
player is not in the right position. So
we're going to move it. And if you want to snap
things to the ground, just press the end key. Now when you play, you see
that your character is here and all the collisions
are working for us. Now, there is another
way to do that, and that is with the cube grid. So click don't click
anything here, make sure nothing is
selected in the outliner, and I can go for the cube grid. And what I can do actually is
to paint here what I want. And I can press E to pull or
Q to push, just like that. I can do the same here,
for example, right here, press E to pull, just like that. And I can actually create a
little hole here, Q to push. I can do the same
here. Just like that. And what I can actually
do is to actually just, for example, do
something like this, E for push for pull, sorry. And what I can do
is to actually go for the corner mode and
go for this corner. Click here, click here, and then do the pull again
with E, just like that. Also do that if you want, right? Or you can go for for example, you can go for this one here
and go for corner mode, select all of this,
and now you can just select these ones and do something like
that, for example, just like that, click Done, and now we can just paint here, press E, and you can see
how easy this is, right? We can just create different surfaces that
the player can just play. We can just go back
here, press E, just like that, and it
starts to to look very good. We can have some walls here, just some walls here and
there. We can also connect. Like, for example, this one, we can just connect like
this if we want it. I want for whatever
reason we want that. It's a very, very cool mode, and not a lot of people not
a lot of people use it. But, you know, it's very
handful for prototyping. So let's accept you don't need to really take
care of all these things. What I want to do is actually, I don't want to use this one. I want to use this mode and I want to put it
here. Just like that. I'm going to grab this, I'm
going to put it on end. Now when I play, you will see that I have
a little level here that I can just
just play around, go up, have something here, which is great, which is great. Now that we have this, let's
start to add more things to our level and show
you other tools.
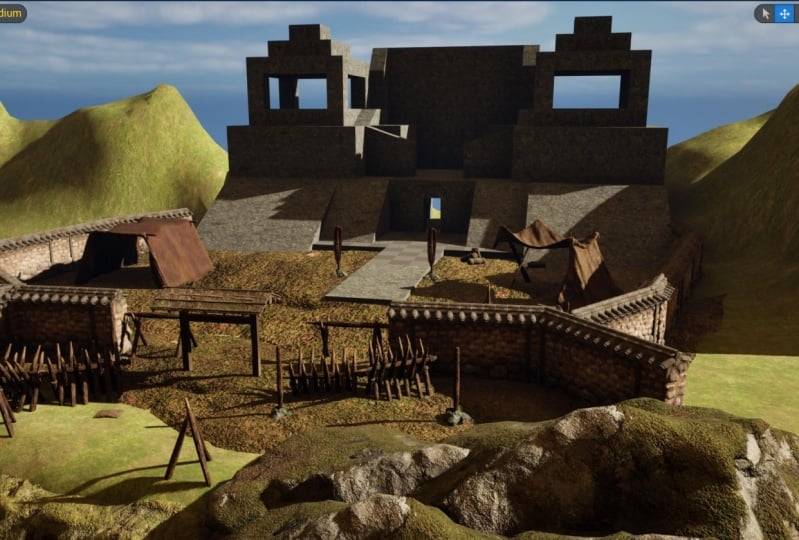
11. Modeling the house: So let's just say
your objective is to go here and enter a house. And let's just say there
is a platform here. So actually, we're going to create the platform
that we can go in. So let's just say let's just add a box here. Just just
put it like that. And what we can do
is go to model, polygroup Edit, and we can just go for
something like this. This will be our
platform. All right. And then we're going to
actually create another floor just like this where you
actually put the ground here. So the platform will take
us from here to here. For now, we're just
going to jump here. But for now, we're
going to go to model, and we're just going
to create a ground. So just like this, go here and just create
a big ground here, just like that. There you go. This looks like a decent size. So how I want to go and model
the house is very simple. I'm going to go here to model, go to box, and I'm just
going to put it here. Now, it's a good idea to
always test with the player. So right click play from here, just to test how
everything is looking. So we will just move this thing here and just go to model, polygroupE dit and
make it a little bit thinner and go here. And just create this
wall, just like that. Now, instead of
creating another wall, I can just duplicate
this by holding the Alt click and I can just move it just like
that. There you go. I can also alt and click
to rotate 90 degrees. So what I will do
is to actually put it here in position. Like that. And because I don't want
to create another one, I will just move this
thing here. All right. And this ground,
I will just scale this like this so that we have
enough room to work with. And what I will
do is to actually go here and put this
one just like that. Now, I want a door here. So when I play from here, I want to actually make a door. So what I will do is to
actually make a boolean here. The first thing you need to know is that when I
press control space, you will go here to
the generated folder and you will see your username, and here you have
all your measures. So let me use Control Chief
S to save everything. And, of course, we're
going to save our level into my first project. That's the name of our project, and we're going to
call it level Intro, something like that. All right. So when you press Control B, you can actually go
to the details panel, and here you can click here, and you will see that
you have this asset. So whatever you do
with this asset, all the instances
will be updated. So let me show you
what I mean by that. If I were to just go
to Polygroup Edit and just move it up just
like this and accept, all the instances
will be updated automatically because they
are a copy of this one. And the reason is we are
using this asset here. So let's Control C to go back. With that in mind, what I want to do is to actually not make a door here and
not update all the walls, but I actually want to
only update this one. So in order to do
that, I can just go to the content browser, and I could duplicate here, right click and duplicate. But there is a better
way to do that. We can go to transform, go to duplicate here, and then just with the
default values, accept. Now when I make any
kind of change here, go to model, polygroup
edit and just move it up. You will see that this one
is only updating here. So what I want to do is to actually create a
box just like that. And I want to make a bullion. So I will just go here,
something like that. And let me just grab
the player here. So I will control space,
go to third person. Actually, not a, go to
characters Mankins meshes, and I will go for money. Money is going to serve
us as our mesh that we can use as a reference
to check the height of everything instead of just playing the game over and over. So this store looks fine to me, maybe just a little
bit like this. Now what we will do is
to select this one, then select the other
box that we want to use, and then we're going
to go to model, and we're going to go bullion. By default, A minus B is
going to be the operation. We're going to subscribe
this box here. And the beauty of this
is that you can actually move it and you will
see it on real time. Like, how is it end up
looking, which is amazing. So we're going to
go here and click Accept. And that's it. Now we have our house,
which is great. So now that we have this, let's go ahead and maybe add a
roof or something here. So let's do that next.
12. Static Meshes: Alright, so in order
to add our roof, and let's delete this first. I don't really want to see them. Let's just create a very
simple roof so that we can have like a box here, right? And then I can go to
model polygroup Edit, and I can just do
something like this, something really, really simple. I just want to have
something on top so you can check what's going on. And I don't want it to
be, like, super thick. Let me just grab
it just like that. And and there you go. Now we have a little roof
here that we can use. So obviously, all our room became really dark and when I played the game,
try to get there. I don't know if I can get
there with my jumping skills. Let's take a look. Just go
here and yeah, we made it. Alright. So as soon
as I get inside, you will see that everything
it's almost pitch black. The reason it's not entirely
black is because we are getting light from the door. So we really need some
windows here, right? So in order to do that,
before I put the windows, I actually want to
add some meshes because doing this prototyping
is great and everything. But actually, what I want
is to put some meshes here. So what I will do is
to actually go to at and then add feature
or Content Pack. Then I will go to content and now have the
started content here. I will just add it
to the project. And you will see that
I will have a bunch of assets here on my
started content. Let me just go here and
go for started content, and we can go for meshes. For props, and you will see that I have different
props here. So what is a prop? A prop is basically a model. This is a model, obviously. But, you know, in order to
model something like this, maybe you require
a little bit of more thinness on
your modeling skills and your precision, right? So you don't necessarily
need to model everything. We're just showing you what
you can do here to prototype. So what I want to
do, for example, is to grab this door, right? And I will show you what's
the difference, right? So let me just grab this door. You can see that actually
my door is actually very, very small compared to this one. I can just go ahead
and make it like this. All right. And actually, what I can do is
to go to modeling, go here, model, poly group Edit, and I can actually move this. So if I want it, let me see if this door is actually a good size like this. So let me just play from here. Yeah, it's a little
bit big, right? So let's just make it the
right size. Let's try it. Alright. So you notice
that our hole here, it's very, very big. So what I want to do is to actually just go for
something like this. We can actually make
it just like that. You will see that UVs are actually changing,
which is okay, to be honest, it's
not a big deal, and we can go here and
actually move this back. Or actually instead of this one, we're actually going to
move this one a little bit. Just a tiny bit like that. Yeah, there you go.
Just like that. It looks like a fairly decent and we can just
put the door here. If you want to be more precise, we can just put it just
like that without this. There you go. Now you have
a door and look at that. The pivot point is just
right where it should be. We can just actually
move it just like this. And scale this a
little bit so that it's matching or
mesh, like that. And then we can open
it up just like that. And there you go. So
this is static mesh, and I will show you what I mean. If I double click on this, you will see that I have
here, it's another viewpoint. This is the static mesh editor. And what you have here is
your ability to enable nanite which you
always should do. But let's not touch that yet. It has two materials. One is for the door and
another one is for the glass. So this one has two materials. You can highlight this, isolate
or isolate each material. So you can have several
materials for one mesh. It doesn't necessarily
mean that you have to, but you could add
different materials, like, for example, glass, grass, brick, wood,
things like that. You can have different areas of your model with
different materials. And then, of course, you have
the LODs and the collision. The collision is very important. So if you want to
show the collision, you can just go to show
showed a simple collision, and it looks like we don't
have any collision here. Let's take a look at ALC let's see if we can
actually go from here. Yeah, we don't have
any collision. So what we can do now
is to actually go here. And there are a couple of ways. We can actually go
here for collision, and you can go for
auto Convex collision. And you will see that you
have this window here. You can just hit apply,
and it will just try to match the
best it can, right? And this is great if you want, the little details like this, but there are other ways. So for example, we can go
collision, remove collision. We can actually go
ahead and go to box. And this will be a bounding box. You can actually
move this around if you don't want or you
can scale it, whatever. But for now, the default
values looks just fine. So now, when I save this and
I start playing from here, you will see that I cannot enter the house because
there is collision. However, if I open
the door like this, we can just start
playing from here. And we can enter the
room, which is great. So those are static measures. We can actually move this guy here so that you don't you have, something like, Hey, let's put this mesh here so that
you don't go there. And we can, you know, just put a window
frame and try to put some windows later on.
Let me just delete this. But for now, for this lesson, it's important that you
know about static meshes, what they are and because you will use them quite a lot
in every project you make. Static measures is one of
the most important actor you will use to decorate
your environment.
13. Adding Windows: Alright, so time to
add some windows here. And we're going to actually use the windows that we
have here as a base. So if we go here, actually, I can add a
frame for this door first. We don't have a frame. So
let's go for the door frame. And let's go for this one. Actually, now that I see it, our Our door is really not looking very
well without a frame. So let's go ahead
and just go here, go to Polygroup Edit, and let's just move
this just like that. And we can actually
use these ones here. Just like that. There you
go and do the same here. Awesome. And now we can
actually do the same here. And we can remove the snapping for now just
so that we can have, yeah, something like that,
something like that. All right. So now
that we have this, we can just go ahead
and move this. And actually, I'm going to scale this just a little
bit, just like that. All right. That's much
better in my opinion. So we can actually
move this like this. Let's see if it's the same here. Actually, we did have a
little hole here, apparently. Not so sure about that.
Yeah, it's a small hole. So we're going to go
here to Poly group, and we're just going to
move it just like this. It's a tiny bit. Yeah,
there you go. Beautiful. All right. So now
that you have this, we're going to add some windows. So let's go ahead and
add some windows here. And we're going to add
them on these sides. Just because I want to
actually update everything. So if I update this here, first, you will see that
my window is not really like covering
the whole space. There you go. Now, it is. So what I want to do actually is to make a hole here. And in order to make a hole, let me just scale
this just like that. Alright, so that we can have an overview of what's going on. And we're going to go here
to create a box. All right. And we're going to go
just like this here, and we're just going
to try to fit in where our window will go,
like, just like that. There you go. Looks
like we're good to go. All right. So let's
go back for this one, and let's put the
scale back to one. Let's put everything back to default values and just move it like this. All
right, wonderful. And now what we can
do is to actually use this to make all the holes. So let's try with
one hole first, and I will control C after this. I just want to see
how it looks like. So look at that. Now, it looks like our window needs a
little bit more space here, so we're going to actually
make it just like this. Much better. Okay? So let's click
here on the wall, click here, and then
go to Bullion. Okay. We can always put
the window back to, you know, a decent state. Let's move this here like that. A little bit of an annoying
process, I believe, but we want to be
very specific here. And now what I can
do is to actually control Alt and click to
have multiple windows. Let's just put three for now. I think that's a good number. So we will actually go ahead and combine these
two, this three. We're going to go here
and we're going to go to transform and
then go to Merge. Click Except and you will
have your three boxes here. Now we will click on the
wall, click on this one, and then we're going to go for
Bullion. And look at that. Now we have windows here. And the beauty of this
is because this is an instance everything
will have a window. Which is not because my Boolean actually
created a new object. So let's go here, and it's good that this happens, so it doesn't happen to you. Go to Bollm and instead of
creating a new object here, I want to write to the
first input object. This will mean that
I will actually update all the instances here, and I will not create a new
object based on this Bollian. So I can just click Accept and now you will see that
you have your windows here. Now I can be a little
bit picky and, you know, just go ahead and do something like this. I
can do the same here. A little bit of a
thick window, right? Just go for something like this. And actually, I will
delete this one, and I will just go ahead and
just move it just like that. Yeah, there you
go. And now we can just put it in position here, just like that, and then put
it in position once again, just like that. Beautiful. And now we can do the same here. We can actually
just update those. But there is a better
way to do that. And I'm going to show you what our level instances are for
because now that you can see, it's repeating itself
over and over, and I feel like it's a good chance to show
you how you can, you know, make better
use of your time. Alright? So let's do that now.
14. Adding Materials: Alright, so now
that we have this, it may be a good idea for us to start adding some
materials here, and it's very easy. So
what is a material? If you go to your Saric
content and go to materials, let's go ahead and open
this brick clay new. You will see that's a bunch of instructions that is using. So, for example,
adding variation to the texture and then adding
it into the base color. And this may seem a little bit overcomplicated to you if you never worked
with Tre before. So I'm just going to simplify things a
little bit for you. Every material has a color, which is basically the
color that you see here or the color that you see
on the unlit mode, right? It has a roughness
to see how shiny it can be, how rough it can be. It has a normal map where you can have all the details where
the light comes from. And it can have an ambient
occlusion where you can just fake the shadows on your model without
actually adding geometry. So pretty much base
color roughness and normal maps will be the three things that
you will be working on. Anything else is an
extra, and obviously, it will add a lot into the
look of your material. That for now, what it
is is a combination of these different things that makes it look like a brick. A certain value of roughness, a certain color, and a
certain normal pattern. So let's just close this, let's see which one can
actually work here. So let me just crack
it here to this one. So in order to add it
to this one, actually, it's going to be a little
bit harder because we create instance static mesh. So what we can do actually
here is to just crack it here. And what you will see here is that our brick is
really, really big. It's really, really
big. So let me just go ahead and save this because actually what will happen is everything
will be updated. So preparing shaders, and
let's see how it looks like. There you go. So obviously, everything is, like,
super, super big, right? And we're not even
talking about this one. This one is going to
look even worse, right? So, it's going to be
very simple to use. We're going to use the modeling
tools to change the UVs. So we're going to
go to modeling. And we're going to go to UVs, and there is a bunch of
options you can use here. But for simple
measures like this, I like to use the project UVs. The project UVs basically will project the UVs from one
direction like a plane, or you can go here
and select a box. And a box will basically
be surrounding everything. It's kind of like a projection
for all the angles. So in order to see
if this works, we're going to go here
to the material mode and click on Checkerbard. And what we're looking for is to actually have
square values here. So, for example, like this one, we're going to play
with the dimensions, like the C axis value. We're actually going to
make it look like this, more square, just
like that, right. And this one we're actually going to make
it look like that. We're going to have to compose pretty much like
everything here, right? So let's take a look at this. Now how it looks
like. It looks great. In terms of the stretching
and everything. I think it looks great.
However, the break is too big. So what we can do is to actually change
the scale of our UVs, like maybe five by five, right? Maybe maybe six by six is a good number.
Maybe six by six. And we can actually
move the translation. I put it somewhere like
this. Look at this. This is perfect, actually. It's actually working
very well for us. And now that we have
this, we can actually go ahead and accept,
and that's it. Now we can do the same here. So we can actually go ahead
and edit the blueprint, and we can go to modeling. And go to UVs, project UVs, and you will see
that we're having a very similar thing
except for the projection. It's not really that great. So we're going to
go back to one and go to the checkerboard to
check how things are going. So obviously, the CX is value, we're going to make it
look nice and square gal. And then the X dimensions, we're going to make
it look like this. Don't really see it here because there you go,
something like that. And it doesn't really
matter because we're covering everything
with the material. But for now, let's take a look
at this. This looks great. Let's try 656. Okay, now we can play a
little bit with translation. So we can just go ahead and do something like
this, for example. It doesn't matter if they
don't align because we're actually going to put
something here on the corner. So let's just click Accept
and save save the incense. And now you can actually
if this happens to you, where it just disappears,
for some reason, just go to new level and then
open the resin level here. And there you go.
It's just a bag. It's just a bag. It
happens. Look at that. Now we have material for our wall. We can
do the same here. Maybe we can go for metal, maybe or maybe some wood planks. So wood planks will be nice. Maybe some wood planks? Yeah, actually, some wood
planks will be very, very nice. Maybe the oak Yeah,
something like that. And we can do the same here. We can just go to modeling, go to UVs, project UVs. And let's take a look at the checkerboard.
Everything looks nice. And let's try to
make everything look square here, let's take a look. And we're going to
go for 55 maybe. That's all we need. That's all we need. There we go. Now we have a small roof, we can actually scale this a
little bit, just like this. Doesn't need to be
perfect, you know. We just want to have
something to work with and put the support beings
there. All right. So now that we have this, let me just I think
it's fine like this. Now that we have this, let's
go ahead and add more stuff.
15. Types of Lights: All right, so let's
talk about lights. Lights is a very
important topic in real engine because no matter which project
you're working on, you always need to put
some lights out there. And this is a perfect
place where we can actually put
those in practice. So what kind of lights you have? So you have the
directional light, which is the one we have
for this is the sunlight. And the sunlight is
actually this one. And we can actually
rotate this with E, nothing will happen if we
move it, to be honest. But if we rotate this around, you will see that we're actually getting a different
lighting setup, right? So if I go like this, obviously, the lining
will come from here. So, you know, a shortcut
for this is Control L. Control L will actually
allow you to rotate your light freely in
different directions. So that's actually
how I like to do it. You can obviously use
the rotation here on the details panel or,
you know, whatever. But in our case, we don't really want to touch
that directional lining. There are a bunch
of stuff that are shared across different
types of light, such as the intensity,
for example, I can put like 50 and it
will be everything brighter. I can put zero and it will
be totally pitch black. So I will put something
like tree just so that we don't have a super intensive
flight going on for us. Obviously you can
change the color. You can change temperature, and this type of properties are most likely share across
different types of lights. So the next light I want to share with you is
the point light. So the point light it's exactly
what it names in place. It's basically a light that
basically has a radius, like an inner radius, where it has the brightest spot, and then it will go
out until it fades out unless you say this is
like zero, you know. And this is like ten intensity, and it will fade
little by little. Now, the thing about
lights is that the way lighting works is that
if I put a light here, basically, it will
rotate around. It will bounce back.
So and bounces for the for this one are just going to be in
all directions here. They are going to be
everywhere because, you know, it's a point light. They pretty much go everywhere. Now, if you want the light to point in a specific direction, that is the spotlight. The spotlight, it's
pretty much a cone here and pretty much the same. You got the intensity here at the highest value when it hits, and then it fades out
when on the outer cone. So you will see here that have an inner cone such as this
one and an outer cone, it will just fade away. And I can even make the outer
cone the same value here, so you can have a really sharp value if that's what you want. But it's just put the
default values here, right? So that's a directional light. If you want to say, for example, the light comes
from the outside, you can actually go do
something like this, like comes from this window, for example, just like that. And then you will
have your light here, it's coming from here. And what you can do, actually, it go to Advance and
use inverse fall off. And what will happen is that
you have a different way to show this lighting and
you can just increase intensity and have something
like this. Very, very cool. So that is the spotlight. Now we have the rectangle light, and this is a very specific one. Usually, we put those on like, for example, on Windows, things like this, where
we can, you know, just change the source width
and height just like this. So we have like a lining
coming from here, right? So let's put like 80
and let's put like 60 here or 80,
something like that. Something like that to show you the light can
come from this way. You can see what's
going on here. It's like a totally
rectangle light, just as the name implies, right? So the next one, obviously, it's the skylight. The skylight, we
already have it here. This is the basically I
will show you what it does. I will put the
intensity to zero. And what you will see is that everything looks really sharp, and what the skylight does is basically add a tint
to your shadows, so there is not pitch
black, you know? So the skylight what it will do, if you put real
time capture here, it will capture the colors of the sky, just like this one. And it will try to add some tint into your shadows
and all your scene. So for example, if you want to change the color
of this like red, you will see that you have a
tint of reddish color, like, kind of like when you are in a sunset or
something like that, and you can change the
intensity of color like 50 and make it like super intense so that everything has a value here
for that skylight. So basically, it is
the color of the sky reflected on the surface, right? So that's it for the lights. With that being said, let's add some lights
here into the room, so you know how to use them, and we will have the
introduction to blueprint.
16. Creating our first Blueprint: Alright, so in order
to put a light here, what we need to do is to actually let's just I
will show you a shortcut. You can either go to light and drag it just
like we did before, or you can press L
and click and it will add a light wherever
you have your light. Now, this light is great because it will
illuminate our room, which is very, very dark. However, we need a
source for that light. And luckily for us in
the started content, we already have some props here. So I'm going to go for that lamp ceiling that I have here, and I will just put it just
right here, just like that. And what I can do is to actually move this just like that. And you don't try to play
with the attenuation radius. First, let's try to
change the tint, a little bit yellowish, and then we can try to play with the attenuation radius,
just like that. And let's put it here, just right in position,
just like that, and let's put something like 50 or maybe 150,
something like that. Right. So that looks
really nice, to be honest. Now, the thing about these
lights is that you know, we will need to group them and put them like here so that, you know, it still
looks like, nice. And that's a lot
of work. And kind of like we did with this wall, where we create a level
incense blueprint. We will actually create
a blueprint for this. So let's open the content
drawer with control space, and then we will
go to MF project. And here I will create a new
folder called Blueprints. And inside of here, I will just create right click and
create a blueprint class. A Blueprint class basically will allow you to create
any kind of actor and you will decide which class you want to you want to get. So, for example, a pun, is a character that
not necessarily has a skeletal mes there
that can be possessed. A character is
obviously a player, player controller is like
one who controls the player. The game mode we talk about, it's a lot of stuff here. But the most common actor that you will create is
basically the actor, which is the most has the highest hierarchy in terms of the object class inside real. So this one we will call it BP underscore a Roof light,
something like that. So let's click on this
to see what's around. So what you see here, you can navigate the same as you do in the content
in the viewpoard. So you can add a left
click to move around, and you can add all the
actors that you want here. What we're looking for
is static static mesh. And we will go here. And notice that
there's nothing here. I can easily go here. I can actually press
Control space here, go to Props, click here, and I can just click here. Now, what you can actually do, let me delete this is
actually click on this one. And because you selected
this on the content browser, you can press a static mesh
and you will see that it's already pre defining
the static mesh that it will go as default because you already
have it selected. All right, now
that we have this, let's add a point light. A point light will be
right here, point light. Let's just add it, and let's
just move it into position. Let's just move it
just right here. Instead of trying to copy
manually all the values, I'm just going to go here and
maybe I can copy the color. Right click and paste. So I already paste the color. I can also copy the radius. I can just paste it here, right. So this will be working
exactly the same. And also, this intensity, we can change, right. So with that set, instead of using this one, we're actually going
to delete this, and we're going to use the
blueprint that we created. So let's go to blueprints and
go here to the roof light. And now that we have this, you will see that it's
actually working really well. And I have the pivot
point here at the top, so I can just move
the roof light here. Just like that. And I can put
it everywhere in this room. I can alt and click. I can delete these
ones if I don't want, and I can just alt and click. And then another one Alt and
Leftmose click to duplicate. Now, if I feel like
everything is too, you know, too bright
for my taste, what I can do is to actually change the main blueprint here, so I can just go here, go to my point light and change the intensity to maybe
divide this by two. Maybe maybe that's a
little bit better. Maybe put something like 2000. There you go. A little bit
better, in my opinion. So with that, everything will
change at the same time. You don't need to update each
one of them individually, and that's the
beauty of blueprint. You can actually put any
kind of component here and just change the way this works and you can add
logic into it if you want, and every actor in the
scene will be updated. So with that said,
let's continue.
17. Construction script: So let's add a little bit of functionality to these lights. What if I wanted to
change the intensity of this light but not
changing the intensity of this one without
updating all of them? So what I can do actually
is actually go here, click on the component, click on the point light, and
just change this to zero, for example, this will
update the light. But to be honest, there is a better
way to do that, and that is by using blueprints. So we have the
construction script here. So the construction
script basically is logic that will go for your blueprint
before you hit play. Before you construct
the blueprint, you will initialize
all the values here. So what we can actually do is to actually go here and
drag this point light, and we can actually get
the properties from here. So which properties
you want to get? Maybe you want to
get the intensity. So let's go ahead and
we're going to go for set intensity. Just like that. We don't need this, obviously. And now, what this
did was create a function that asks you how much intensity
you want in your lights, and by default is zero. Now, this is not a variable. If I connect this here, what you will see is that well, we're setting the
intensity for zero, and there is no way for us
to change it here, right? So what we need to do is
to create a variable. And a variable is basically data that has our blueprint
and we can manipulate this. So what you can do here
in this graph is to drag here with the left
mouse click and then go to promote to variable. And what we will call
is light intensity. That's how it will be called. Now, if we go here, everything is pitch dark, and the reason for that
is in the right side, you will see the default
value, it's zero. We actually want it to
be, for example, 2000. All right? So when we compile, now everything will be 2000. I still cannot change
the light here. When I click on the blueprint, you will see that I have a
bunch of properties here. Unless I access this
point directly, I cannot really
change the light. So it's very easy. Here on this variable, you
see the e here. It's like I close. We can actually click here. And when you see the eye open, it means this is a
public variable. By default, they will be
private because you don't want to access all the
variables in the editor. You want a lot of variables to be access inside the
logic of your blueprint, but in this case, I want access to this. So what I will do is compile and now you will see
that I have light intensity. And what I can do is to actually change
this, for example, to zero, and it will update
this area of the light. But it's not changing the rest. Every one of them
has its own value. For example, I can
go for 1,000 here. And actually, I can go for
1,000 for this one as well, and that will work
really nice for me. So that's a power of blueprints. You can actually just
keep adding those, and all of them will
have the same value. For example, this one can have 50 or if you don't like
it, you just delete it. And it's just
really, really nice. So with that, let's move on. Probably work on this door. This door may actually teach
us quite a few things.
18. Creating a Door that opens and closes: Alright, so to make this
door open and close, we're going to need a
blueprint for this. So let's right click
at a blueprint class, and we're going to
choose an actor, it's going to be BP
door. All right. So we're going to learn
some new concepts here. So let's click on this. And obviously, what does
our blueprint need? It needs a door, right? So let's go to static mesh. Right? And then we're going
to put the door here. I believe there is already
you can find here SEM door. There you go. This is the door. So now that we have this, we're actually going to delete this one and put our blueprint here so we can actually
see how it looks like. So we're going to go
from here. All right. And we're going to put
it in position here, just like that, and
we're actually going to make it a little bit
bigger, just like this. And now what we need
to do is to actually know how much rotation
we need for this, right? So we're going to move this
thing here, obviously, and we're gonna probably
100 130 degrees would be a good number,
130 degrees. Okay. So we need a way for
us to open the door. So this is where trigger
volumes help a lot. If you click AD,
you scroll down, you will be able to
see a box collision. So the box collision
basically will tell us whenever we get close
to this box collision, we are going to
trigger something. So let's actually make
it really big and actually move it just
like that. There you go. And actually, we're
going to make it just so that we have enough space to enter the door and close it. So this looks like a
decent decent space. So we're going to
do that. All right. So by default, obviously,
nothing will happen. Right. So what I need
is to open the door. And in order to do that, we're going to use the box, which is a box collision. And what we're going to do is to scroll down here
to the properties. This area is the
properties for this actor. So we're going to
go here to events. An event is something
that's pretty much like how you
get a notification on your YouTube channel. Like when something happens, you will just send
you the notification. So these are a lot
of events that already come with a box
with a trigger box. So on begin overlap, we're
going to start this. And what we need to do
is to actually create a timeline because what we need is to actually go
for the static mesh. Okay, and then go here and
then set relative rotation. So track this type
set relative rotation because you don't want
the world location. You want the relative
rotation, right? And what we want is to
actually put here 130. Okay? So let me show
you what happens here. When I go here, I start
and the door opens. Okay, so what happened? Now, if I go here again, it's like it will, you know, just hop in the
relative location. Like we just don't have a way to tell it
to go back, right? So what we actually
have, if this box, we can actually go
here and end overlap, and we can actually copy this. And put this to zero. Just put zero here. Remember is a relative rotation. Put it on zero and
see what happens. Here, I go up like this. I get an arrow
because I'm getting an infinite loop here,
but don't worry about it. So obviously, we don't want it to open and close
just like that. So what I need to do actually
is create a timeline, and I will right click Timeline. Timelines are really important. You're going to use them
a lot in blueprints. So we're going to go here
and go play from the start. And double click on this and you will see that you
have another window. And what I need to
do is to click on Track, add Float Track, and let me add
something like a length of I don't know, maybe one. One should be enough, right? And I will add two points, one at the beginning, and one at the end. So this one, when
it's the second zero, I'm going to have
a value of zero. And this one, when
the time is one, I'm going to have
a value of one. So now this rotation is kind of like this animation is
kind of like really static, so I can right click
those points and go to Auto and I will have
a smooth transition. Now I need to go
to my event graph, and this track is the value that we are
getting from the timeline. And what we need to do is to actually go here
and type a larp. LRP is basically a
linear interpolate. So what it does is basically you have these two values 0-1, and you have the A and B, right? And it will interpolate
from these values. Like for example, this
is A and this is B, and it will try to
go from A to B. When you go for one, B will be this value and A, you know, will be zero. Like it's kind of like interpolating between
those two values based on this value that is 0-1. So in our case, it's
going to be 130, right? So we're going to
interpolate 0-130. And how do we connect this? Because we cannot
really connect this. This green line means that we're actually
using a float truck. And this one is using a rotator, which is a vector that
has three values. So what we can
actually do is right click and split extract pin. And what will happen is that
actually now we can rotate on the C axis individually
using this value, right? So let's set the relative
location on update, and this one we don't
really need it because what we can do is to play
on reverse here. And what it will do is
to do the opposite. It's going to give me
a different value. So let's go here and
let's try it again. Let's go from here and
look at that. It opens. If I go, it closes. It opens, and it closes. Open and close. Open and close. And there you go. Now we have a door that
opens and closes. And the beautiful thing
is that it's a blueprint. So we can actually move
this somewhere else, and it will have exactly
the same functionality. So now that you have
learned about timelines and the larp node and
actually trigger boxes, you're on your way to learning a little bit more
about blueprints. And you can see how
little by little all these components
can interact together. And we're creating like a
little interactive experience.
19. Creating a moving platform: Alright, so now
that we have this, we actually going to
create a platform here so that we can
just go from here. We play the game, and
we go just like this, and then we need a platform
to go to that house. That's where we need to
that's where we need to go. So we're going to
create a new blueprint. Go to Actor BP platform, just like that, save it. And let's go ahead and put a static mesh here. Static mesh. Click on this one,
and I'm going to look for SM platform. There you go. SM platform already come with the architecture assets that came with the content
started pack. So what we can do is to
actually put it here. And what you will
notice is that actually our plug from here,
we want it to move. So now, if we just play, we don't really have the ability to we don't even have
a collision here. So let's fix that. So let's go for this mesh, and let's actually
apply a collision. There you go. Obviously, we
need a collision for this. Let's go for this. And
now we can walk on it. We just need a platform to move. So what we can do is to
add a component that is called interp to movement. And what it will do is to automatically add the
behavior that you can move. So what we will do is to actually play with
these control points. So let's go here. Instead of one shot, we're actually going to
go here for Ping Pong, which basically
means when it goes to the end, it
will just go back. So let's add a control point. At the beginning, it will be zero and position
will be relative. And the endpoint will
be, for example, let's just go into the Y axis and Y axis will be
I don't know, 300. And let's see what happens.
We play from here, it will go 300 centimeters, and then it will be going back. Let's try to go moving,
and there you go. So now, putting the value here is
a little bit inconvenient. So we need to use
these control points when we have the
construct value, just like we did
with these slides when we can change
the value here, we actually want a way for
us to move this platform on the editor so we
know where it can go. So what I will do is to
actually remove this, and go to the construction
script and drag this. And let's look for control
points, there we go. At Control Point position, the position is relative, and it will be on zero, zero, zero. That's great. We're going to do the same here. At control point position. But this time, actually
this position, it's going to be a variable. We're going to go here
promote to variable, and this will be called
position, right. So what we can do here, is to make it public, just like we did before. And now we can change the
position to let's say 500, 600. Let's try it out. Now it goes 600
on the C axis and goes up and down,
which is great. So instead of this, actually, I want this position to be
in the show tree D widget, instance editable and
show treaty widget. So what will happen here that I actually
do have a widget. So let's go here,
show TD widget, instance editable, you go. And let's see where is our
actually, there you go. It's because the
values here were 600. So let's put the position here, so let's move this here. And if you click this position, you can actually put it
just pretty much like here. Okay? So let's see what happens. When we play from here. Now,
it's a little bit fast, so we need to control the speed. So what we will is
to actually go here. And if you don't know
which variable to work, just go for the duration here
and you can type duration. We can type set direction. And just like this, we can just go ahead and put
it just like this. And the duration is
going to be a variable. Okay? So the variable
will be duration. And obviously, what I want to do is to actually
make it public. So go here, press the I bottom, and we're going to I'm going to put something
like five for now. But notice that now I have these values here
that I can change. I can just change
this position on the fly and also
change the duration. So the longer the
duration, you know, the slower it will be maybe five what's underestimating my
ability a little bit, right? Let's go for three. And now
we can just have a platform here that actually we can
just go ahead and jump here. And we can do this so that
let's move this here. And let's put the platform. Okay. So let's just
say you have one here, and let's duplicate this and let's reset the
position of this, and we're actually going
to go here on the C axis. We're going to start
here for 300, right? Just like that. And then we're
going to jump from there. So let's see how it goes. Okay. So we start from here. Okay. And what we
can actually do is to play a little
bit with the speed. So, for example, this one,
the speed will be two. So eventually we will
be able to catch it up. Actually, this one will be 2.5, and this will be two.
So let's try it out. So you can see how we can
play with this until we get, you know, something fun for us. Oh, my God, I thought I
was going to get there. But you get the idea, right? We can create these platforms
so that we can go there. And the beautiful thing about these components is that actually you can
put them anywhere. I can just go here to this
chair and I can go here. And just add a component. So go click here and
add Inter to movement, and we can put something like, change the control
points and everything. We don't necessarily need to
create a blueprint for that. We can add components
in everything that we actually want in
our in our scene, we don't necessarily
need to use a blueprint. Everything here that
you see here is a blueprint and you
can add components. So with that, we actually learn three
different blueprints. The door that opens
that uses the timeline, the light that uses some simple variables
to control the light, very, very useful, even if you want to do some
architectural stuff, and then the interpreted
movement that you can use here. So with that set, let's move on and work
on our level a little
20. Creating a simple Landscape: Alright, so now
that we have this, how about let's add a landscape? Because landscapes are
a really important part of the development process of every kind of
project that you have. So let's just add
a landscape here. And we'll just go for
this one, to be honest. I can actually lower
it down a little bit, just so that the landscape
starts in a lower position. But the things that you
need to learn here is basically the section
size basically is how big your landscape
is and the number of components and how
many components it has two by two sections
in each component or just one section
for each component. So basically, obviously,
the more sections you have, and the more quads you have, the heavier and more
memory you will use. So we're going to
just use the 63 by 63 just to keep it really small, and let's hit Create. Okay, now that we have this, let's talk about the
sculpting tools. So sculpting tools are
actually really useful. You can actually
just sculpt here, for example, like,
I can just go here. By the way, if you
don't see anything, it's because the
shaders are loading. So you have the sculpt mode, the raise mode, the smooth
mode, the flattened mode. The ramp one, erosion, and to be honest, that's all you need to
know. That's all there is. Alright. So the scald mode, you can change the
brush size here. And by the way, if
you want, like, a really big brush size, let's say if you're working
in a really big environment, you can put any value here, like 32,000 and you
will be able to use it. So don't be constrained by
the limits that you see here. You can change the
strength, obviously. So we can create
like a little here, hill here, just like that. There you go. L so that we can
have something here. And what I can do actually
is to create a flatten. Sculpt and flattening are
my favorite tools here. I can just flatten this out
and just go all the way here. Just all the way. And now that I think about it, I really don't need this. So let's just delete
this and let's just flatten this
out and just go all the way here and put
the strength to one so that we don't really have
any trouble with this, so just strength to
one all the way here. There you go. Beautiful.
So that's our house. We're going to work with the
position later. Don't worry. But for now, what
I need you to see, for example, you
want to sculpt here. You can also use chief
to sculpt negatively. Okay? You can also
use the smooth one. To smooth things out,
just to have not so much of a harsher transition right, something like that. And obviously, your Elo
disk will be working depending on how
far is the camera. So a ramp, for example, we work from here to here, and we can change the size and we can press Enter
and you will have a ramp. So for example, if
you want something like from here to here, just put the ramp again from here to here and put the ramp. You will be able to put a
ramp here, which is great. Alright. So one
thing I want to do, actually, press Shift one to go out of the landscape mode. I can actually go here to
rotate like 90 degrees. Just so that I can have
like my level here. There you go. Like, my
levels start from here. And like I don't know,
this is my landscape, so I will just go ahead and sculpt something
here, just like that. And maybe if we lose, like, we're gonna we're gonna be
having some trouble here, but in any case, let's just put like a little
manta here that we can use. Nothing fancy, really. Just so that you can play with the tool. It's like, really,
really useful. Okay. Another thing you
can do is do the erosion. I personally don't
like to detail my landscapes that
much because anyway, you're going to put some meshes, but you can put like
threshold like 28 and start, like, put the tool strain, like 0.1, and just start playing with
this just like this. Maybe like 50 you can
see what's going on. We're having these beautiful
natural erosion patterns on our on our mesh, right? Which is great. You
can put something like 15 and it will be super, super intense, just like this. Maybe that's too much. Let's go back to 30. And, you know, it is really
useful. It is really useful. So you can play
with these tools. There's nothing like you
can copy, for example, like, you can use the
schismo to just copy here. Let's just select all this and copy data to
Gizmo, just like that, and just move it and you can rotate it if you
want and press Control B, just like you paste
anything in real life. Well, not in real life. Windows, Control V to
paste it, and that's it. He, look at that. Now we have copy and paste this island here. Now what we need to do
is to work on this, and it will be a lot of
work to actually move this around and
to actually just, you know, try to
position everything. We don't want to do a
lot of manual work. So let's work on that next.
21. Creating level Instances: So in order to work with
this in a very easy way, we need a way to group this, and the best way is to
use level instances. So what we're going
to do is to actually select everything
here, just like that, select all the meshes and blueprints that we
have here, just like that. All right. Let's move it
to see what's happening. We need to actually select the frame and select the
blueprint for the door. We just need to select the roof. There you go. Now
that we have this, we need to create a
blueprint for this. We can go ahead and right click Level and create
level instance. Or we can just put it
the minimum C axis. No problem. And we
can put it just here. We can just put it like
house 01, just like that. Hey, look what will happen now. We can actually go ahead and just move it
down, just like that. But not only that, we can
actually just go ahead and move this copy and paste with pressing out and
just put it here. And what will happen is
that if I play from here, everything will work just nice. Let's deal with this
collision on this door. If you are having
an issue like that, so let's press Control
E to open this, then press Control
E to open again. Sorry for that. And
let's go for this door. And this door, we're
actually going to remove the collision. We don't really want it. Okay, so that's it. So cancel. And now we can just go
ahead and play from here. You can just go here. And now, actually, our house
is a little bit down, so let's move it
up a little bit. Otherwise, we won't be
able to get inside. There you go. And
we have our lights. We have all our blueprint here, and it's just
working wonderfully. So one of the cool things
about this is that you can actually
control E to open, and you can actually,
for example, go to maybe model here. And let's go to model, go to Polygroup Edit, go here. We can go to Inset,
something like that. Then go to extrude. You can extrude things out. Just like that, we can have
a little house and we can actually create a
little roof like this. Like we can extrude again. And we can do extrusion
again until we have, maybe maybe not this one. We're just going to
make it just like that. Alright. The other
thing you can do is to actually go here to
the UVs, project UVs, take a look at the box and take a look at the checkerboard, let's go ahead and make sure we cover pretty
much everything here. Everything should
be very, very nice. Density. Go check the original, and we can change the scale
to five, for example, or maybe yeah, five should
be should be good enough. So the good thing about this is that you are
editing the mesh. So obviously, all the
meshes are updating here. And if you add thing
else for your house, for example, you can
press Control E to open. You can also go to
Level and edit. We can put these support beans. For example, let's
go ahead and put some meshes, put some props, and let's go ahead and put the Pillar frame,
just like that. And we can actually
make it like big. Let's remove the scale. We can put it here
at the corners. Just like that. Beautiful. We can just
put it right here. And we can put the local mode. We can hide these areas that we don't really
want to show. We can do the same at the back but we're not really
going to sit. You can save. And
now look at this. Now, all our measures
are actually working. So now that we have this, we can actually go ahead
and play our level. Let's take a look at where
is our player start. Click here, press F. We're actually going
to move it here. We're going to start our level, choose right here or we set. Rotate it. And actually, we can just start from here to play and look at
that. Now we have this. We can go there, and we need
to go to the house there. So we're going to try to
do our best to not fall. So let's go ahead and jump. I guess this one I'm a little bit I was
a little bit slow. I think next one, we're going
to get. We didn't get it. But anyway, you can
play with this. You can make it as
fun as possible. Like this is
obviously an example. You can just put any
platform that you want. And obviously, you
can just go ahead and just put this thing here
to decorate a little bit. That's pretty much it. And what you can actually do here is just put
some meshes here, like, put some
materials or anything. Like, for example,
go for some grass. I don't know, and go
to the landscape. I just put the material here, and you have a huge, huge grass here in a
moment when it loads. So let's just play your game. And preparing shaders is
25. And there you go. Now we have our grass here. Now, we won't go into the
details of this landscape. For that, I will have more detailed courses
on how to decorate. For now, we're just
getting, you know, kind of like a a very, very introductory
video to real engine, so you know everything
that you can do. Now, you know how to put
materials, how to model, how to add how to add
materials on surfaces, how to create blueprints, how to create a landscape. We're touching a lot of
topics we touch about lights. We do have quite an interesting setup
going on for us here.
22. Working with modular assets: An important part of working
with Areal Engine five is also knowing
how to use assets. And luckily for us, we do
have the QuickL bridge. So if we go to the
Grain plus icon, we can go to QuixL Bridge. And here you will see
that you have a bunch of assets in your inventory. So let me just close
this and open it again. So go here, QuiksL bridge. There you go. Rose
now. There you go. Now you have all these assets
that you can use for free. Now, whenever you want
to download something, you can just click on here. You can download the
material, for example, and you can select
what do you want, medium quality and
then download, and it will download
to your project. In local files, you can see
all the assets that I have. And I dontlo this modular
building roof kit that I will use in my project. So I will just go to
the high quality, click on AD and you
will see that I have something like
this. So let's use it. What I want to do is
to actually update this roof because I
really don't like it. So let's go to Level edit. And let's delete this because I feel like
it's very, very ugly. So let's go here and
let's open the you can see that we have created a mega scans folder
with trey acids, and I import a bunch
of assets here, for example, like the beach rock and a couple of beach
rocks and this one. I didn't import that many, so you can just choose
whatever you like. So just choose the molar roof, and you will see
that I have a bunch of acids here that I can use. So let me use this. And let's use snapping
tools for now. So we can go for
this, for example. And I feel like
this is super big, but in any case, I feel like it could work. So let's go back to maybe
0.5 on all of them. So let's go for 0.5. And let's grab another one. It's actually out and
click to duplicate. And we can keep doing that here. And what I want to do actually, is to grab one of these corners and just put it right here. And I will just keep
doing this until I complete all my all my roof. So I can just duplicate this, and I can also
duplicate this one. And no it is here that actually the mesh is not in
the right rotation. A little trick I can I can show you that you can rotate in
the X scale to mirror this. So you can put instead of 0.5, you can do multiply
by minus one. So you can have a -0.5. You can also type
it, but sometimes you have a weird value. It will be a little
bit hard to make. So just like that,
now we have a roof. So we can go ahead and
actually duplicate this alt and click and we
can just put it right here. There you go. And we can
do the same actually here. We can go ahead and duplicate
this mesh and put it here. Actually, this one is a
little bit different. So let's try to look
for another mesh. Which one can fit here. Let's take a look at
this one, for example. Maybe this one I have the
feeling that this one can work. So let's go ahead and put 0.5. And indeed, it works. So let's go ahead and
put it here in position. Move it up, go right. Looks like we're going to copy this location and paste
it just like that, so we can have the same values. There you go. You don't need to be
super exact with this, especially because we're on 0.5. Actually, let's not
put 0.5 on everything. Let's just grab all of these and put it on one,
just like that. And what will happen is
that we can just move this around just like
this, minus one. Let's try to create
the roof without actually taking a
look at our own mesh. We can always scale
things down if we want. So let's go ahead
and move this here. Working with modular parts can
be quite tricky sometimes. I want to show you
the full process. There you go. So now
we can delete those. We don't really need them. Let's go ahead and
duplicate this. So let's go ahead
and alt and click. There you go. Put
it just right here. We can actually just do this if we want it. We can
definitely do that. Actually, I will go for this. All right. So now
that I have this, I can just select all
these just like that. All right. And I can
actually create a group, and let's have a
name for this group. Create a pack level actor, minimum C, just like this. And let's call it
House roof, like that. BPP will be this one, you will see that now I have a blueprint
here that I can use. So now that we have
this, we can just make some adjustments by scaling
everything that we need. We can just scale it like this, just like that. There you go. We can actually scale it
a little bit like this. We don't need to be super exact. Actually, we have this. Let's go for this one and try to scale it just like
this. There you go. We can go for
something like this. Maybe that can work for us. And also, let's scale
this a little bit just like this so that we
don't see these parts. Actually, we can move it around. It's a little bit of
a tricky situation where we need to play
a little bit with the location and the
rotation of stuff, so we can scale this a
little bit, just like that. We can just move it
up a little bit. And move it just like this. I think we really need
to take care of this, but for now, move it up a
little bit. There you go. And obviously, we need
to take care of this. So I'm going to release
snapping it's like that, so I can just move
things more freely, and I need to move
things like this. And I will do another one here. And this looks quite nice. Alright. So now
that I have this, obviously, I need to
take care of the roof. This is not what I
intended at the beginning. So we're going to
work on that next. But for now, let's save this. And look, actually, we can actually use this roof
that we had here. So let's go to Edit. Actually, we don't really we don't really want
this roof here, so no why it's still
there. Let's go for Edit. Let's just delete it and accept. There you go. That was
a little bit of a back. So now that we have this roof, we're going to add just
another roof here. This is not really going
to work quite well, but it's going to work for us. So we're going to
create very simple. We're going to go to modeling. And before that, we're
just going to add level edit and we're
just going to add a modeling box and put it right here where
we want our roof. And there you go. And we're going to go to model and just move everything
here, just like that. Beautiful. And we can actually
change this just like this and move everything like
this. Just like that. So we can make sure the
light doesn't go through. Wonderful. And now
we can just go back here and do the same here. Move it. And we can actually disable the snap
because not everything here needs to be exactly
the same, right? And also, we're going
to move it up a little bit just so that we have
our mesh touching this. There you go. Let's make sure everything
here, it's covered. So we go here to this area. I know this can be a little
bit hard to see sometimes, but that's what modeling
is about sometimes. It's just the precision of
everything. There you go. Now that we have this,
let's go to unlit mode and actually put
a material here. Let's go ahead and put the
wood that we had before. Maybe this one. And we're
going to go here to UVs. Project UVs looks like
everything it's right. So we're going to
leave it like that. Click Okay. Except
now look at this. Now we have a roof here and we're just working with
what we have, obviously. Make sure this one, let's go ahead and
right click and edit. And you can see that I can edit the house roof
or the house one. We can actually edit here, the house one, so I can
access to this roof. And go to modeling, go to model, polygrop edit and just
move it just like this so that we have everything
here. Nice and close. There you go. I'll
be a little bit of stretching, but it's okay. So now, even this
one is updated, so we don't really need
to worry about that. So that's it for
the modular parts. Obviously, you can play with
different modular parts, like, for example, this one, or you can play with
different assets. That's usually how you
work with modular pieces. You use the snapping
tools and duplicate them until you find something that,
you know, that you like. Alright, so let's continue.
23. Working with non modular assets: So how do you work with
non modular pieces? It's even simpler. We can add this to your project.
I already have it added. I have the nanite version, which is the version that we use virtualized geometry to have unlimited number
of polygons here. You can see here
nanite it is enabled. So what we can do, usually the landscape is
really not pretty, so we can just go ahead. And when working with natural
assets such as this one, I like to actually remove the snapping for
rotation and everything. And let me just scale
this just like this. And I can just move it around and play with
it just like this, for example, I can just go
for something like that, and I can duplicate this. And because this is a rock, I can use it in many
different shapes or forms, and I can just duplicate this
like something like this. And usually you want to hide the landscape
as much as you can. You can have something
like this, for example, and then you can go to
the landscape and remove parts that you don't want by smoothing things
out just like this, or, you know, you can also
flatten just like this. So you can have more of a
a more natural look here. That's why I always
advise people to not worry too much on the
landscape side of things. Even if your
landscape looks bad, you can always be hidden by putting like an acid
here and there, so I can just move here. Put some assets and
just play with it, and it can look very natural. And this is only one asset. Imagine what we could do if
we have ten more assets. But the idea when working with these assets is that
you don't have many. So I don't really want to
work on the back too much. Let me just duplicate a little
bit, a little bit more. I can just go ahead and
put something like this. There you go and go ahead
and put something like this. And now, obviously, I can go to the landscape mode and
I can sculpt a little bit. I can just smooth or use a shift click to
have this kind of look. And, you know, we're just creating
something really simple. We can also use our other
asset, which is this one, we can just go ahead and, you know, just have something
like this, for example. Because this is a very
high resolution mesh, will just look really nice. So actually, let's just use the one we
used before, just like this. There you go. And also
here in this area, we're going to do the
same. And that's it. Now what we need
to do, obviously is to fix the landscape. So we're going to go here and chief click areas that we don't want our
landscape to show. And we can also flatten some of these areas so that we
know where is the path. The path should be
like, right here. So let's just go
ahead and put that. And we can also do the
same here with the ground. We can actually go for
something like this and, you know, play a little bit
with the ground if you want. It will be up to
you, to be honest. For us, what I really
want to show you is to how to work with the landscape and how to use
some natural acids here. Let me just deal with this. Let's just flatten this out, and that should be That
should be good enough for us. Let's just finish it off
with another rock here. And these rocks are
just really nice, so I will just go ahead and
put it something like this. And I will make sure I
have collision here, so I will control E
to open the acid. And because I'm working
with a very big mesh, I want to increase the hull and the max birds and
the hole precision. So I have a more
accurate collision. Hit apply here, and you will see that it
will take some time, but I will have a
collision here. So now that I have this, what I can do is to
actually close this. I don't really need this asset. I'm going to remove it for now. And also, this one here, I'm going to flatten this one. I want to see anything anything ugly here. And there you go. So that's our house, and
let's try to reach there. So this one we're going to leave it here, and
this position, we're we're going to
go up and stride out. So let's save and play our game. You can see that I see the
mesh here and I can jump. So let's try it out.
So let's go here. Okay, we got it.
Let's jump here, and we did it up, but we fall. But let's try again, just test things out
so we can just run. You can see how
adding those assets greatly impacts the
look of our game. Or now we are jumping. And now, because
everything is a blueprint, it works just fine here. And now we have a house. And we can obviously, like, put a ground here, just like a just to make things
a little bit easier. So we can just actually
go here and go to level, edit, and we can actually go ahead and
just duplicate this. We have just the same
roof. It's fine. We can actually do
something like this. And there you go. Now
we have our ground. It's working quite nice. So it's actually move it
just a tiny bit here. There you go. And just save it. Now if we play from here, Sorry, something happened
there. All right. So let's just click
play from here. We can just go ahead and now we have a roof and
something happened here, and that is the
collision of this This floor is actually giving us a little
bit of a headache. So what we're actually
going to do is to make it go even lower. Just like this. There you go. Just like that,
okay? So save it. And now we will try again. Go ahead. And now we can. We can just get inside the room with some lights and everything. So really, really cool, really, really cool stuff. Like, obviously, we can just play with this as much as we can and add as much
detail as possible. Like, you can add
some assets here. Like for example, some props, can you can add a chair. You can add a table here. You can add another chair here, just like that. Right? You can play with
pretty much everything here until you have
something that you like. And I will leave that up to you and I hope you have enjoyed.
24. Using the Level Blueprint to Teleport the Player: Alright, so now
that we have this, let's actually put a little
bit of gameplay here just so that we have a
condition to respond. So first, let's go
ahead and actually, we can put a trigger
box just like this. And it will be just like here. All right. So it will compose all this
ground here, all this ground, and we can just put it up like that so that whenever
we touch this, what we can do actually is
go to the level blueprint, so we can just go here. An open level blueprint. And what you can have here is basically the level can
actually have some logic. Obviously, if you
add some logic here, you can transfer this
to other levels. But in this case, what I want to do is as soon
as the player touches this, so I'm going to click here
and in the level blueprint, I'm going to right click
and create a reference. And I'm going to
put begin overlap. Sorry, not this one. I'm
going to right click. And instead of
adding a reference, I'm going to add an
event, collision, actor begin overlap or going to actually teleport the player. So overlap actor set, transform Set World transform,
set Actor transform. There you go. And this
transform is actually, if you're wondering
what is it is basically the way for you to location and
rotation into one variable. So what we need to do
is to actually go here, click on this player start
and then right click, get a reference
from play Start and then get world Transform. Actually, just transform, get actor transform and
just put it just here. We can go to Teleport, and let's try it out. So we will go here, click, and what will happen
is that when we play our game and we fall down, it's like nothing's
happening here. Let's go ahead and with
our box trigger box. Are we actually using this? Yeah, I think we do. Let's
just go ahead and put this. And we can actually
instead of overlap actor. We can get player controller. Control get control pound. All right, so we will
get the controller, the player that is
controlling the pound, we will get the controlled pound that we're actually getting, which is the character. And we're going to cast it
to third person character. The cast is basically
we're going to get an actor from this class, and we're going
to make sure this specific class that we're using. And here, we're going
to put is valid. And if it's valid, we're actually going to use this
target here to transform. Set actor transform,
actually put teleport Actually teleport
will be much more interesting. So let's just go here. And go here for instead layer
start, get word location. Get actor location, sorry, and just put it here and
also get actor rotation. And just put this
one here. All right. So now, you can just go here. And let's try it out. As soon as we overlap this, then we go back
to where we were. It looks like our trigger box is actually a little
bit too high, so let's go ahead and go here to the trigger box and put
it a little bit lower. This is where your two D view
may actually be helpful. So let's go for the right, for example, and we can
just move this thing here. Let's put it on lead mode. Maybe not right, maybe left. Okay. So we can just
go ahead and put the wireframe, just like that. All right. All right. So now let's go
ahead and go back here. It's a little bit
hard to notice. But now that we play from here, if we jump, this is too low
for us to actually fall. So if we fall here, now
we start from here again. That's the beauty of the
level blueprint is that we can actually add some logic
into it such as this one. Let's strike out. I fall, and I start again until
I reach my target. So that's it, let's move
to the next session.
25. Wrap up and project description: Alright, so we have
concluded the project, and your task is to create a
simple level like this one. Feel free to create anything you want with the
tools that I've shown you. And you also need to create these platforms that
move up and down, just like this, okay? You need to create a
door that opens Okay? A door that opens here and also a blueprint with these lamps here that
you can just put. Also, you need to create a house where you use the level
instance blueprint. So you can create many
of them if you want. You don't need to decorate
the room just like this. This will give you a
good understanding of all the tools that
are in unreal. So I hope you found
this helpful. I hope you find this motivating in your journey to start
learning a real engine. This is just the
tip of the iceberg. If you want to learn
more from me and you want to deep dive into real
engine into other topics, make sure to check
my other courses. And with that's it, I hope to see your
project there. Bye.
 Mao Mao