Transcripts
1. Introduction: Welcome to introduction to Procreate. My name is Serena Archetti, and I'm a professional artist and surface designer from Italy. I create artwork inspired by the beauty of the natural world, travels, and art history. I have been incredibly fortunate to have my artwork licensed and sold world wide. In this course, I will guide you through the ins and outs of Procreate, and I will share with you my favorite tools in the app and/or you can easily incorporate them into your own workflow to make creating faster and more fun. We will start by getting to know the interface, exploring how to use brushes, working with colors, and then going over the adjustment tools Procreate has to offer. Because we will start from the basics, this class is perfect for beginners and anyone who wants to expand and improve the illustration toolkit. No previous knowledge of the app is required. If you already have some experience with Procreate, this class can still offer you an excellent way to refresh what you already know and give you plenty of less known tips to consolidate your knowledge. I know that learning a new skill on your own can be difficult and can leave you feeling overwhelmed and even demotivated at times, this is why I designed this class to be as relaxing and enjoyable as possible while still providing you with tons of knowledge. By the end of this class, you will be familiar with all the tools you need to create your own digital illustration in Procreate. I will give you a clear and structured path which you can follow to create an illustration from liner to finish painting, which you will be able to use to sell your designs, share to social media, and bring your own characters and stories to life. You can apply this knowledge to other creative projects such as pattern design, lettering, creating textures, and even animation. When you join the class, you will be able to follow along with over an hours worth of step-by-step videos, and you will get access to free bonus content, including the layout Procreate file from the class. The class line art and a set of Premium Procreate brushes to kick-start your Procreate journey. I use this same brushes in my work and they're only available with this class. I also send out new tips and freebies here to my followers in Skillshare. If you don't want to miss them out don't forget to click on the "Follow" button above this video. If you're ready to learn this powerful new tool, grab your stylus and tablet and let's get started.
2. Class Project: Hi. I'm so glad you've decided to take this class. Learning a new software can be challenging, especially if you don't know where to begin. This is why I structured this project to be as stress-free as possible and focused on helping you find your way around Procreate as fast as possible. As you follow along, you will produce a finish illustration using a liner that I have designed to cover all of the basic tools I used for illustrating in Procreate. I will show you my workflow which you can apply to any illustration so you will always know what to do next. This class is divided into three main parts. In the first part, we'll discuss Procreate's tools, menus, and interface. In the second, we'll block in and paint our illustration. In the final part, we will add the finishing touches to make our painting really come together. If you're familiar with Procreate's basic tools such as menus and interface, feel free to skip the first part and jump directly into the second when we start painting the illustration. Still, it's always good to refresh your knowledge and there might be some new information for you if you decide to watch to class all the way through.
3. Class Tools: The tools you will need to follow along with this course are; an iPad. I'm using a 2018 iPad Pro model. The latest version of the Procreate app, a stylus. I'm using the first-generation Apple Pencil. You can use any stylus to follow along, but I prefer using the Apple Pencil because I find that the quality of the response of the brush strokes in the app is so much better than any other stylus I've tried. I'm also using a paper like screen protector to make my iPad screen feel more like paper, but this last item is optional.
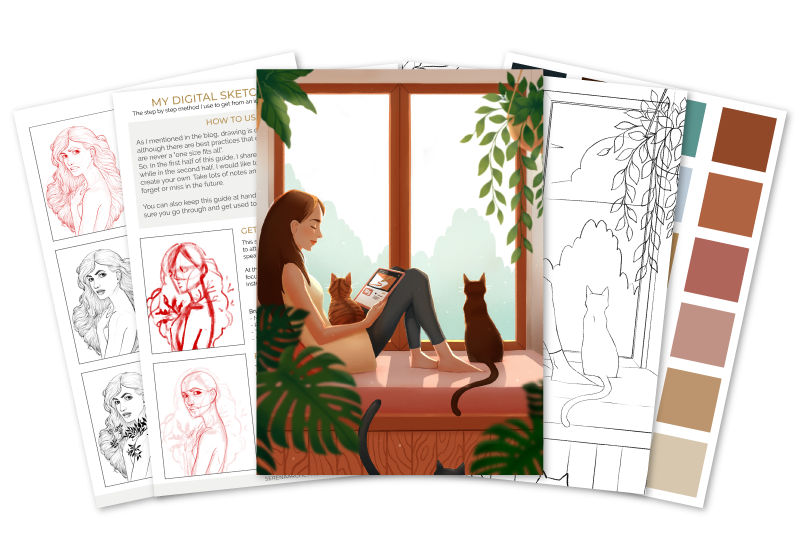
4. Download Class Resources: To download the lineart for your project, class assets, and bonus content, you can go to serenaarchetti.com/learnprocreate. From this page, you can scroll down to find the sign-up form and once you've entered your name and email, you will instantly be sent a link to download the class zip file. It will also sign you up to my mailing list where you will receive even more bonus content, resources, and mindset tips to keep you motivated along the way. After downloading the zip file from your email, open up the files app on your iPad, navigate to where you have downloaded the file and place it into its own folder. I've called mine Intro to Procreate. Once here, you can just tap on the zip file to unpack the files inside. Now in the first folder, you will find the bonus brushes, which will automatically import into Procreate when you tap on them. In the second folder, you'll find the layer procreate file of the final illustration we'll be making together in this class and the bonus sketching guide. In the main folder, there is the class color palette and finally, in the last folder, we have the two lineart PNGs. I Will show you how to import these class assets into your procreate file as we create the color palette and setup the lineart in the lessons coming up soon.
5. Gallery View: The first thing we see when we open Procreate is the gallery menu. Here is where we can see and manage all of our Procreate files. From here, we can tap on an existing artwork to open it and to return to the gallery, just tap on "Gallery" in the top left corner. Here we can also duplicate a file, that we can select in the top right menu. Select the file and click "Duplicate." Because Procreate does have a limit on how many layers you can have for each file, I tend to duplicate my work quite often so I can keep backups of my old layer. This is really useful in case I want to go back to see my original sketch or to keep some step-by-step images I can share with my patrons or social media. As you can see, Procreate has created an identical file to the one we copied, and even the name is the same. So if we want to change this name, we can just tap on it, to send this to preview, type in your name, and tap anywhere on the screen to confirm. We can also speed up some of the processes by swiping left on a file. From here we can share, duplicate, and delete the file. In this case, I'm going to click "Delete." Don't worry about deleting anything by accident in Procreate because it will always ask if you're sure before deleting anything. You can also organize your files by grabbing them and dragging them along in any order you like. To keep your files organized, Procreate uses a system called Stacks. Stacks work like folders in your computer and they're very useful to keep all the files of the same project grouped together. Let's create one to see how they work. There's two ways we can do this. The first one is to use the menu. It's useful if you already have more than two files you want to group. Let's click "Select." Select the files we want to group together. As you can see, when we select more than one file, the Stack option becomes available at the top. Let's tap on it, and exit this menu. Our Stack is made. If we click on it, we will now enter the group. From here we can rearrange our files by dragging them around. The first file will become the thumbnail for our Stack back in the gallery view. So if we click back here on the arrow, we can return to gallery and see that our preview has changed. Let's return to the group. If we want to remove a file from a Stack, we can just grab it, hold on it, and drag it up in the left corner until we're back to the gallery and then let it go anywhere to place it. This file is alone in the Stack, but that doesn't mean that the Stack is gone. If we click on it again, we can see that it's still here. If we want to completely remove the Stack, then we have to take all the files out. Second way we can create a Stack and this is useful when we only have a few files we want to group together, is to just grab one of the files, hover it on top for a moment, and then let go. This will quickly create a Stack. If we want to add an extra file to an existing Stack, we can just grab and hold, hover, and when the menu is open, I go anywhere to place it.
6. New Canvas: Now that we're familiar with how the gallery works, let's create a new canvas and get to know some of Procreate's essential tools. To create a new canvas, click on the plus icon in the right corner of the screen. In here, you'll be able to see all of your saved templates. But for now, let's make a new one by clicking on the "New canvas" button just underneath the plus icon. Here is where we can set our dimension for our image. Make sure your pixel is switched on. For our width, we're going to use 3,748 pixels and the height is going to be 5,000, which is roughly AC or double letter size. Underneath here, we can set our DPI and sensor tends to print my work. I set this to 300, the standard for printing. Identity is the biggest canvas size that procreate allows me to make because my work will be printed at a pretty large format. In general, it's very important to have good enough for solution while printing, so it's always good to work at the under DPI just in case you want to print your work in the future. As you can see down here in the maximum layer counter Procreate tells us the maximum number of layers we will have access to in the size of the document and depending on which iPad you have, this number might be different for you. Also, if we look over here to the menu on the left, we will find our settings for our time-lapse video resolution and color profile. I always keep my color space as standard sRGB and they like to keep my time-lapse replay at 4k because I use the videos for my YouTube channel and Instagram. Now that we have everything in place like we wanted. Let's click "Create".
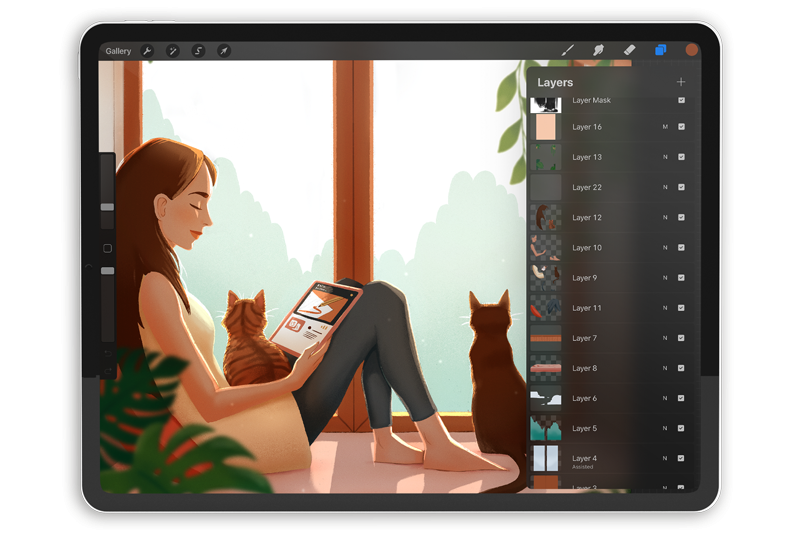
7. Drawing Interface: Now that we have our new Canvas, let's go over to drawing interface together. We're going to look in-depth at each of these tools in the coming videos. But for now, let's focus on seeing what they do and where they are in the app. On the top right of our interface, we have the painting tools, which are some of the tools we will be using most often throughout this class. The first one is the brush tool. We can select it by tapping once and then tap again to open up the brush menu. Next is the smooth tool which we can use to blend and mix colors together and after that, we have the eraser tool. Next, we have the layer menu, and lastly, up here we have the color menu where we can select, save, and edit any of the colors we need for our art piece. If you look over here to the left, we can find our sidebar. Here is where we have the tools for modifying the painting tool we currently have selected. If I pick a brush here and draw a line, we can then go over here to the top slider where we can increase the brush size by dragging the slider up. If we want to make it smaller, we can drag it down. The square button in the middle is called the modifier tool and if you tap on it, it will bring up the eyedropper tool. You can slide the eyedropper tool over a color you want to pick and release your finger to make it your active color. The modifier button acts like the Shift key on your keyboard, and you can set it to do different actions in your preferences in the Action menu under gesture controls. Underneath, we have the next slider, which increases and decreases your brush opacity. If I drag it around 30 percent, you can see now that the brush stroke is much lighter. If I slide it to the top, it will go back to a 100 percent opacity. Underneath the opacity slider, we have the last two buttons on our sidebar, which are the undo and redo arrows. You can tap on the top arrow to undo the last thing you did and tap the bottom arrow to redo it again. If you hold down either the undo or redo arrow, you can rapidly go through the entire history after 250 actions. Now, let's go to the top left of your interface where you can see the return to gallery button and the advanced menus. The wrench icon opens up the Action menu, which is divided in different tabs. In the Add tab, we can import images and add text. In the Canvas tab, we can edit our Canvas and access the Canvas information. In the Share tab we can share and export our artwork. In the Video tab individually tab, we can export and view the time-lapse replay. In Preferences, you can change your app preferences and look, and the Help tab gives access to Procreate help features. Next, we have the adjustment menu where we can find advanced adjustments like curves, hue and saturation, and a great collection of special effects under the Liquify tool. The Selection tool allows us to select parts of the image and refine our selection. Finally, we have the Transform tool which we can use to move, work, and shape our work in any way we like.
8. Gesture Controls: Before we go on, let's look at the gestures we'll be using most often throughout this class. We can zoom in and out by pinching with two fingers. Twist with two fingers to rotate the canvas. Pinch and release quickly to fit the screen, and to return to the view you had before, just make the quick pinch gesture in reverse. You can also undo by tapping with two fingers, and redo by tapping with three fingers. You can also tap with four fingers to enter full screen, and to exit you can tap with four fingers again, or click the icon in the top left corner.
9. Import and Transform: Let's navigate to the Action menu and import your color palette image. Open the Action menu by tapping the wrench icon up here to the left. Select the "Add" tab which is the first to the left and here we will get the option to insert a file, a photo, or take an image with the camera. In this case, we're going to tap on "Insert a file". If you followed along on how to download the class assets and bonus content, you should see the class folder we created earlier. Let's open it and pick the JPEG color palette. As you can see by this highlighted icon, Procreate will automatically start edit mode when you import an image. You can also click this icon anytime we want to edit an image or a selection. While edit mode is active, we can move our image by dragging it around. When we've selected on freeform or uniform, we will have access to the snapping option. This is incredibly useful if you're making patterns or want to align your drawings in the canvas. It helps you snap to the edges, to middle, or other elements on the canvas. You can see where the element here I have selected is trying to snap by these orange lines that will appear when you get close to a snapping point. If we pinch in and out with two fingers or use the corners, we can scale it to different sizes. If uniform is selected here at the bottom, the image will scale evenly and if freeform is selected, we can squash or stretch it without maintaining its original proportions. Distort allows you to move each corner individually and work to create a mesh that you can use to push and pull the image very organically into almost any shape. In this bottom menu, we can also flip, rotate, or fit the image to the screen. For now, let's reset our image and undo all these edits. I'm just going to make this image a bit bigger so you can see it better. Now that we have our image where we wanted, let's exit edit mode by clicking the icon above.
10. Creating Our Colour Palette: Now, that we have our image in place, let's turn all these colors into swatches, so that we can easily access them while we paint. To open our color menu, click on the active color up in the top right corner. From here, we can see that there is five color menus that we can choose from. You can switch between them here at the bottom. The first one is called desk, and it is great if you wanted to look at the full color wheel and see the relationship within your selected colors. In this outer ring, you can pick to use when you want to use, and you can use the inside circle to select the saturation and brightness. The next one is the classic HSL, which is the one I use the most often because I started painting in Photoshop, and I'm more used to this view when selecting my colors. The harmony tab helps you see the relationship between different colors you have chosen on the color wheel. If you tap the text right under colors, you will see that we can pick between five possible harmonies. This is a great tool when you're planning colors for a scene, and I also think it's really helpful when you're learning color theory and you need to see which colors work together. Next, the value tab is one I rarely use unless I really have a hexadecimal code to type in to get a specific color, which you can type right here. Finally, the last tab is the palette tab. Here, you can access all of your saved palettes. For creating our color palette for this class, we're going to tap on the plus sign and select "Create New Palette". We can then click "Untitled", which I'm going to name, learning. If you swipe left, you can see that you get the option to share or delete the color palette. Whenever you make a new palette, Procreate will automatically set it to default, which means that you will be able to see the color palette on all the other color menus. However, you can change it at anytime by tapping on the set default of any of the color palettes. When we return to our classic menu, you can see that we have access to a new color palette down here. To start filling it with our colors, we can hold down our finger on any area we want to sample. As long as you keep your finger held down, you can move around anywhere on the canvas to change your selection. You'll also notice, this circle will appear around your target. The color of the top half is the one you're currently picking, and the bottom half is the previously active color. Once you lift your finger, you will see the new color became the active color up here in the top right corner. Now, to save this color onto our color swatch, just click on any of the blank squares. If you want to move your swatch around, you can ALT and move any of the colors to a new place. If you want to delete a swatched color, tap and hold in place for a little longer, to make the delete option appear, and then just click "Delete". Now, let's add the rest of the colors to our palette.
11. Brush Library: The palette looks good from our previous video. Now, I'm going to delete this image layer. Let's go up to Layers, swipe left under Layer, and select "Clear". Now, let's navigate to our brushes. Because brushes in this app are so powerful and versatile, talking in-depth about this section alone will probably add another hour to this course. I will be publishing an advanced brush class for Procreate soon, which will cover from creating to even selling your own custom brushes. Depending on when you're watching this, it might be already available on My profile, and if it's not, don't forget to follow me so you can get notified when it goes live. As you can see, Procreate comes with a large library of great brushes we can choose from. A lot of these brushes I've either purchased or made myself. So what you see here here look a little different for you. You can duplicate and save any of these brushes with custom settings, import brushes from your favorite artists, and even make your own with your own images and textures. Now, the brush, smudge, and the razor tool all share the same brushes library, but each of them can have a different brush selected. If I have a finer brush selected under the brush tool to sketch, you could have a softer blending brush selected on your smudge or razor tool at the same time. For painting, we're going to use a mix of standard brushes from different sets. We are going to put them all in their own group in the brush library so that we can keep all of our working brushes together in one place. Let's scroll all the way up until we see a plus icon here at the top. Let's click on it and give it a new name. I'm going to call it like the name of this piece, so I'm going to call it Learning Brushes. Now that we have the grip, let's go find our brushes. Scroll down to find Sketching. We can then find the Bonobo Chalk down here. Swipe left to open the menu and then choose "Duplicate". Once we have our copy, let's drag it all the way up to the group we just made, and once it's open, let's go to add to the group. Now let's do the same for the 6B pencil. Let's go back to Sketching, find the brush, swipe left to "Duplicate", and let's add this one into the group as well. Next is a dry ink brush under Inking. Let's find Inking, find the brush, swipe left, "Duplicate", and drag this one into the group. Lastly, inside the airbrushing set at the top, we can get our soft brush. Let's duplicate this one as well and add it to our new set. Now that we have our brush set made, let's go over some sketching tips in the next video.
12. Drawing Guides: Let's explore some of the [inaudible] guides and tools that Procreate provides us that can help us with our sketching. To find the guides, let's tap on the Action menu, and then Canvas tab. To activate them, let's tap the Drawing Guide switch. Now, let's see the Guides option by tapping on Edit Drawing Guide underneath. Here, we can choose between 2D grid, which makes a squared grid over our Canvas, and it's useful for drawing shapes and straight lines. It is also very helpful for writing and calligraphy. Next, the isometric is a very simple form of perspective where all lines have the same angle, and it can be fun to draw technical drawings in interior design. Perspective is more advanced. To use it, we have to place vanishing points to make the guides appear. You can tap up to three points. To delete them, tap on them again to make the option appear. Last but not least, symmetry allows you to create a symmetrical drawing by mirroring your stroke. This is one of my favorite tools to use in Procreate. If we click on Options in the bottom right corner, you can set your symmetry to vertical, horizontal, quadrant, and radial. You can also switch to rotational symmetry, which will reflect and rotate your stroke at the same time. Let's create a simple vertical symmetry by selecting the vertical option, and then tap Done in the top-right corner. When you use a drawing guide, it will only affect the layers that are set on Drawing Assist. You can see, it's automatically applied to the layer we had selected on when we activated the guide. But this little assisted text underneath the layer name, you can switch Assist on and off on any layer at anytime from the Layer menu by tapping on the Layer and then choosing Drawing Assist. Now, if we draw on this layer, you can see the Drawing Guide in action. If we create and select a new layer and draw a few strokes, you can see that the guide will not work here because the Assist option is not yet switched on. If you want to switch off your drawing guides completely, you can go back to the Action menu under the Canvas tab, and tap on the Drawing Guide switch to switch it off.
13. Quickline & Quickshape: Using Quickline and Quickshape gestures, we can easily draw straight lines, smooth curves, and primary shapes. You can activate the Quickline option by drawing a straight line and keep holding your pen down without raising it from the screen. If you want to draw a curve, you can also hold the pen down for a moment and the line will smooth into an arc. Sometimes it can happen by accident if you draw slowly, but you can get the original line back by undoing once by tapping with two fingers. With Quickline, we can also draw ellipses in the same way. To draw a smooth ellipse, just draw and hold for a moment and it will create an ellipse. If you want to draw a perfect circle instead, while still holding down the pen, tap once again on the screen. This also works for squares, rectangles, and triangles.
14. Sketching Tips: In this video, I'm going to share with you some helpful sketching tips and my workflow for creating line art in Procreate. I've opened up this drawing I've recently finished, and if we open up the first layer here, you can see that the first stage is usually quite messy, and that's okay because I don't want to get attached to any ideas yet and I want to let the drawing speak to me in its own way. Using a big chunky brush helps me focus on the overall shapes, the composition, and the energy of the piece without getting lost in the details. Once I'm happy with how things are feeling and I feel like I have something to work with, I lower the opacity and start drawing the second pass on a new layer. This is when I start making the image work in perspective, draw the basic structure, and start gathering references. After I lower the opacity again and start drawing my final line art, which becomes much easier because all the hard thinking is already done and all I have to worry about is to add details and make it look nice. Drawing line arts can take some time, but it is the foundation of your illustration, and the more time you spend on it, the easier it will be to add color and light when you start painting.
15. Setting Up Your Lineart: If you have anything on your canvas from a previous session, we can clear it now by opening the layer panel, swipe left on the layer you want to delete, and select "Delete". If you only have one layer, you will only have the option to clear the layer instead of deleting it because procreate always wants you to keep one layer available above the background. If your canvas is not currently in portrait mode, you can rotate it by pinching and turn in it with two fingers. Now that we're set, let's import the line arts by going to the Action menu. Under the Art tab, let's tap on "Insert a file". Let's open up the Class Assets folder, then open the Lineart folder, and tap on the baseline art to import it. Because Procreate has automatically fit our image to the screen because we're using the correct canvas size to the line art, I'm going to click off the edit icon and accept it. Let's go back to the Action menu and click on "Insert a file" again. This time, let's import the line art for our plants. Again, it's fit to screen automatically, so let's tap edit tool to exit. The line art is looking great on the canvas. Now let's open up the layer menu and tap the plants line art to rename it. I'm going to rename this layer to Plant Lineart. Let's do the same for the base layer and call it Base Lineart. For now, we will be working on the base line art, so we can go ahead and switch to visibility off on the plant layer by tapping on this little check box on the right. Now we wanted to make this line art a bit lighter. We can do this by tapping on this little N icon, which will open up the layer mode and opacity menu. We can lower the opacity using this slider. We want to make it low enough that we can still see the line art, but not so dark that it gets in the way of painting. Underneath the opacity, we also have the layer mode menu and right now, we want to scroll all the way up until the Multiply option is highlighted. Alexa set the liner to multiply because it will make the liner to appear darker than any colors underneath it. It makes it easier to see it even if the colors underneath are darker than the line art itself.
16. Blocking In: Now that all the setting up is done, we can start blocking in all of the basic shapes of our illustration starting from the background. Procreate doesn't allow you to paint directly on the background layer, but you can assign it a color by tapping on it. Since the wall takes up a large portion of the image, I will pick this warm gray from our color palette to block in the wall color on the background. Now let's create a new layer by tapping on the plus sign on the top right of your layer menu. If your new layer is above the line art, you can just tap and hold and drag it down just above the background. Let's start blocking in all of the elements in the room one by one starting from the elements, they're further away behind our character. We already have the wall blocked in so let's move on to the window frame. I'm going to grab the dry ink brush from our brush set and grab this darker wood color from our color palette. Because the window frame is essentially a large rectangular shape, we can just use the quick line shortcuts to block it in. We can start from a corner and draw a line following the edge of the window. And to activate quick line, just hold for a moment to make the line straight before letting go. I'm going to do this all around the frame and you don't have to do it all in one big quick line, you can just do small ones like I'm doing just now and following the line art. This bottom edge is not going to be in the final image, so it doesn't have to be perfect. I'm just going to make sure all my lines are connected and make a closed shape so we can fill it in with the color drop tool in a moment. Now that we have the outline finished, we can fill this whole area in one go by grabbing the active color up here and dragging it down towards the inside of the outline. It will automatically fill in the color. Sometimes if you have used a texture brush to draw your outline and you try to fill it in, you can see that it leaves this small gap around the outline. To fix this, let's undo what we just did. Grab the color again but this time, if you continue to hold down your fingers on the screen, you can swipe left to right to adjust the color drop threshold. This decides how much you fill in. And as soon as you see the gap disappear, just let go and your shape will be filled in nicely. If you have a very textured outline, you might want to push it up towards a 100 percent. Let's make a new layer for the glass of the window and pick the light blue color from our color palette. From the canvas tab, let's turn on drawing guides. Then tap on edit guides underneath. Pick symmetry from the bottom menu and let's make sure it's set to vertical symmetry. And because this is another big rectangular shape, we can still use quick line to make our lines nice and straight. The windows are done so let's move on to trees. Create another new layer. And let's pick the turquoise color from our color palette and start blocking in the trees following the line art. I drew outside the line art, so now I need to erase everything outside to the shape of the window. We can do this by tapping on the glass layer. Pick select. And now all the glass of the window is selected. Tap invert here in the bottom menu and now we are able to work on all the area of the canvas except what was inside the glass. Now, if we go back to a tree layer, we can grab the eraser tool and if we try to erase, you can see that we're only erasing pixels outside the window shape, which is perfect for what we need to do. Since we want to delete everything in the selection, we can do it faster. If we go on the layer menu, tap on the tree layer, and then tap on clear. And this will erase everything at once. And that's it. Our trees are done. We can move on into the clouds. For the clouds, I'm going to repeat the same process we've done for the trees. It's okay not to follow the line art perfectly. Feel free to change anything in the picture, play around, and be creative with it as much as you like. The clouds look good so let's move on to the other elements. Next set will be making a new layer to paint in the wooden bench and we're going to pick a light brown color for the wood. This part is really easy, we can just make a line across and fill the whole area we have outlined with the color drop tool. Right next, the cushion, let's make a new layer again and this time let's pick this nice pink color from our color palette to paint with. I'm being careful with following the line art at the top but underneath, I'm going to just quickly complete the line to close the outline shape. Then fill in the whole shape at once, making sure that the threshold doesn't leave gaps on the edges when you drop the color. As you can see, this layer should be underneath the bench layer and it's okay. We can just open the layer panel, grab the layer and move it below the bench layer. I'm going to keep using this process for the rest of the elements. I'm going to speed up the rest of the painting. Our blocking in looks really good and now that it's done, we can move on to shading.
17. Clipping Mask: Now that we have all of our base color in place, our next step is to add shading and details. The first thing I like to do at this stage is to add form shadows and ambient occlusion. You will find ambient occlusion in all the spaces where it's hard for light to get into. I like to do this step first because it gives the whole piece a sense of form and dimension, and it stays relatively consistent independently of where we placed the light source, which means that we can be more flexible later on when we add a main light on top. To make painting ambient occlusion easier, we're going to use all the layers that we've made made far and use them as masks. There are two ways to do this. The first method is by using clipping masks. To make a clipping mask, let's create a new layer. Make sure it's placed on top of the layer we one to paint on, tap on it, and choose Clipping Mask. As you can see, this little arrow has appeared showing us that those two layers are now linked together. Now the clipping mask, let's use pixels on our base layer to mask the layer linked to it above. With this method, you are painting outside the base layer, but it will only be visible on the pixels below. With this method, we have a lot of flexibility. For example, we can change the opacity of the linked layer, erase it, and use adjustment layers without ever affecting the base pixels. This next step is going to take a while. I'm just going to speed up the video while I paint the shading for the plants. We'll continue together with the next step in just a minute. In Procreate masks do count as layers, so if we use too many, we will reach our layer limit very quickly. A good strategy is to start with a layer mask, and once we're happy with how the shading looks, merge it down with the base.
18. Alpha Lock: The second method we can use is to lock the pixels on the base layer and draw directly on top by tapping the layer and choosing Alpha Lock from the menu. I'm first going to start shading the planters at the top here with a darker brown color, and I think I'll choose the Bonobo Chalk brush to give it a nice texture. Here, I'm going to make my brush a bit bigger and I can paint just outside the planter, so I can get an even lighter gradation. Because we're using Alpha Lock, what I'm painting is only going to appear on the planter and not on the outside area I'm painting on. We can use the eraser to remove pixels or we cannot add anymore. I like using Alpha Lock because I find it faster and it uses less layers, but if you do make a mistake while using it, the only true way to fix it is to paint over from scratch. Once you're done, if you want to unlock your pixels again, you can open the Layer menu, tap on the layer again and just click Alpha Lock again. Or you can do it even faster by swapping from left to right with two fingers on the layer itself. For the rest of the shading, I will mostly paint directly onto pixels using Alpha Lock. But feel free to use either of the two methods you feel most comfortable with to follow along. Just remember to merge your layers down if you're using clipping masks and you're running out of space.
19. Layer Mode Shadows: In this video, we're going to start exploring the blending modes in Procreate, which are a great tool to paint light and shadow and to set the mood for our illustration. In this case, we're going to create a sunset field by darkening and warming up the environment. Let's create a new layer and make sure it's just below the line art. I'm going to choose this cream color from our color palette and I'm going to drag it down to fill the whole canvas with it. Now we want this color to darken the image and give it a subtle color cast. Let's switch this layer mode to Multiply in the Layer menu, let's click on "N". If you're familiar with Photoshop or another digital software, you might recognize some of these names already. The names tend to be consistent because some of them are named after processes used by photographers a long time before digital software was even invented. We're going to cover a few of my most used blending modes throughout this class. But you should definitely play around with them to see what happens and find out what you like. Sometimes they can end up with some unexpected but good results. In this case, we're going to scroll all the way up to Multiply. Now, if we switch the visibility on the layer on and off, you can see how the multiply layer is given a warm tone and darken the image in a nice even way. Now, I want to keep this effect only in the areas that would be in shadow if this light was shining through the window. To get this effect, let's tap on the "Layer" to open the Layer Option menu, then tap on "Mask". Now you can see the layer mask has appeared as a white rectangle linked above the parent layer. Layer masks are great because they're non-destructive and you can show and hide any part of the parent layer without erasing anything. You also have a lot more freedom to lock, edit, and move the mask without ever touching the parent layer. Now if we look at the active color with the layer mask selected, you can see that it has automatically switched to grayscale. This is because layer masks only work in black and white. Painting in black or the eraser tool hides parts of the parent layer and painting with white will make it visible. Think of it like an on and off switch, except with layer mask, we can also use grayscale to have a softer effect. Let's grab a soft brush and start painting in black around the window. The light would also be eating the top of the cushion so we want to paint this one as well and the side of the wall where it would be led by the window. Don't worry if you paint too much because with this method, we can just grab the white color and paint on the mask to bring all the shadows we need back. After we are happy we have the shadow layer looks, let's start the next step, which will be adding the strong light coming in from the window.
20. Layer Mode Lighting: Let's create a new layer and let's fill it with the similar warm tone we used for the shadows. This time we want this layer to make the image brighter. There are a couple of layer modes which can do that for us. Some of my favorite ones are Soft Light, Overlay, Add, and Color Dodge. As you can see, most of these modes are also quite intense and can quickly burn the exposure of your image and make it too bright. Let's bring the opacity of this layer down to about 30 percent. It is good to try a few different options to see what works best for the specific illustration you're working on. Right now, I think I will go for the Add mode because it's the closest to that nice saturated look that you get just before sunset. You can see it really well here on the cushion. Also, it's working well with the window, giving it an overexposed look, perfect for a high contrast image like the one we're painting. Let's create another layer mask by tapping on the Layer and selecting Mask. This time we're going to invert the mask so that we can hide everything. I'm going to use a hard brush this time because the sun is getting low on the horizon and it's casting some hard shadows in the room. Now we can grab the white color and paint the light coming in. I'm going to go ahead and speed up this process again, and I'll talk to you in a minute. The lighting is starting to look believable and now we just need a couple of finishing touches to push it just a bit more and make it more engaging.
21. Rim Lighting: Now we're ready to add rim light to our scene. We can see a rim light when an object is hit by a strong direct light from the back. Artists tend to use it a lot because it looks cool and it adds a lot of depth and interest to the painting. The contrast it creates attracts the eye so that you can use it to direct where you want the viewer to look. It's also a great tool to separate the elements of your illustration. To make the rim light, create a new layer and set the layer mode to Color Dodge. I'm using a midtone here because Color Dodge tends to highly saturate colors, and it's also a very strong effect. By using this midtone, we can just keep a layer to 100 percent opacity and get this nice warm effect, which is not too strong. Here, I'm going to add tiny brush strokes around the cat to give the impression of strands of fur being hit by the sunlight. I'm also adding the whiskers here because they are translucent and they will look almost as if they were glowing in the sunlight that's hitting them from behind. I'll do the same thing I did for the fur for the girl's hair, adding loose strands of hair this time instead of whiskers. I also like adding rim lights to places when I need a bit of separation between shapes. Even in cinematography, they will add lights in unusual places, so don't worry too much about being 100 percent accurate at this time.
22. Sunlight Glow: The lighting from the image is really starting to come together now. But the lighting from the windows still feels a little bit cold. Let's create a glow to warm it up. Let's create a new layer. Then scroll all the way down to find a window layer, select the pixels on the glass layer by tapping on the layer and clicking "Select." Then go back to the next layer we just made. Open up the color panel to select a nice warm orange color. The lower the sun is on the horizon, the warmer the ambient light becomes. We can pick a very nice saturated color here. Then let's take a big brush and fill the whole selected area in. After you're done, exit the selection and go to adjustments menu and pick Gaussian blur and select "Layer.' Now we can slide from left to right to adjust the intensity of the blur. I'm going to blur it quite a bit because I want to get a very diffused gradation for the glow. Around 50 percent seems to look good in this case. Now let's go back to the layer menu and open up the Blending Modes menu. Here I'm going to choose soft light. This mode brightens the image and keeps a nice warm saturation we're looking for. Soft light looks really good, but it might be a little bit too intense. I'm going to go to the opacity slider and bring it down to around 30 percent. It might not look like much has changed right now, but if I switch the layer on and off, you can see that adding that little bit of warmth, there's a lot to set the cozy mood for this image.
23. Dust Particles: Dust particles are easy way to add some life and movement to the scene. To draw them, let's make a new layer on top of everything. Grab our dry ink brush and open up the color menu to pick a white color. With a very small brush, I'm going to start adding dots all around the room. We can add them to the dark areas to add some contrast. But let's make sure to draw them all over the place. Let's make the brush a bit larger and start adding some bigger dots to create some variety and to make it look like the dust is closer to the camera. Okay. I think we have enough and it's looking really nice. Let's move on to the next adjustment.
24. Liquify: Looking at the imagery now I feel like we could add a couple more at least in the bottom right corner to make the composition feel more balanced. We could draw some leaves from scratch, but because we will throw them out later, we can save some time by copying the ones we already have and to modify them to make them look a little different. First, let's select the plant we want to copy. Let's go to the leaf layer. Now let's tap the selection tool and draw a selection under a leaf. Tap Copy Paste here at the bottom, which would create a copy of the selection onto new layer. Now let's go back to edit mode and tap on flip horizontal. Let's move it to the right side for now. We don't need to be exact with the placement because we can choose it later after we've done the final edits to the shape of the leaves. Let's exit this selection and I will just Zoom in so you can see the edits a bit better. Let's tap the adjustment menu again and select Liquify to enter the Liquify interface. Liquify lets you push and pull pixels around and it can be a real time saver if you want to make quick changes to your illustration, especially if you're already further along in your painting and you don't want to have to redo everything from scratch just to change a detail. In the bottom menu, we can change Liquify effect mode to a lot of different effects. We have Push, which is the most common one that I use. It's like a powerful [inaudible]. It moves your pixels in the direction of your stroke. Next we have Twirl, which has a left and right setting, and it twists your pixels around their stroke like little spirals. Pinch sucks pixels around up towards where you're painting. Expand, will expand the pixels away from where your painting, and it will create a nice ballooning effect. Crystals create a lot of tiny sharp edges, which might be hard to see here because they're quite small. Edge pushes pixels inward and it makes it look like the image is folding towards where you're painting. In this case, I'm just using Push to change the leaf shape around slightly. I'm going to go ahead and do that just now. Try to be careful when using Liquify too much because it can leave some artifacts and ruin your drawing, especially if you're working on a very textured piece, pushing around too much might make you lose that nice texture. Always make sure to double-check and go back if you have done it bit too much. If you feel like you've edited too much and you want to restore parts of the leaves back to the way they were originally, you can tap on reconstruct, which allows us to paint over the areas we want to restore without undoing any of the rest of the edits we have done so far or if you feel like you went a bit too far with the edit overall, you can also use the adjust slider down here to reduce the strength of the effects of all the edits you have done all at once. Once you're happy with the edits click Done to exit the Liquify interface. Now we can move our leaves in a place that we want them and once we're happy with the placement, we can just exit edit mode. Great. Now that we've finished painting, we're ready for the finishing touches and to get our illustration ready to be exported and shared.
25. Hue Saturation: There is a quick adjustment we can make to darken the leaves we have just made to make them feel closer to the camera. This works because objects that are near us tend to look more saturated and darker than ones that are further away. With our plant layer selected, let's tap on Adjustments and then use saturation and brightness. In this menu, we have three options at the bottom, hue, which changes the color of our selection, saturation, which makes the color more or less intense, and brightness, lightens and darkens the image. When I use this tool to darken elements, I always like to add a bit of saturation as well to make sure the color stays vivid. In this case, I think I'll push it to around 70 percent. Then we can use the brightness slider to darken the leaves a bit. I think around 45 percent looks good. It is darker, but it keeps all the shading and details. This is a very small adjustment again, but you can see it makes quite a bit different to separate objects from one another.
26. Adding Blur: Let's tap on "Gallery" at the top left of the screen. Once here, we can tap and "Select" at the top right, select our art piece, and select "Duplicate" at the top. I'm also going to click on the name and rename this copy, Adjustments. Okay, now that we have our backup, let's open it up to start blurring our plants. To create a blur, we're going to first make sure we're selected onto the right layer. Starting from the top plants, let's grab our selection tool and draw around them. Then to blur them, we can go to the Adjustment menu and select effect "Gaussian Blur." To change the strength of the blur, we can hold down on the screen and drag from left to right to increase the percentage or drag from right to left to decrease the effect. It is written quite small, but you can see the percentage number here at the top of the screen. When adding a blur, a little goes a long way, and in this case, it looks good at around four percent. I'm going to stop here for these two plants. Now, let's select the next plant and do the same process. Go back to the adjustment menu, select Gaussian Blur again. This time since the plant is a little closer to the camera, I'm going to make the blur effect a little bit stronger. I think around seven percent looks good for this one. Since the last plant is on its own layer, we can just select on the layer before going to the adjustment menu for the last time. Again, selecting Gaussian Blur. This time, we can use a even stronger blur because this plant is the closest to the camera. Nine percent looks good so I'll stop here for this one. If you want to see the before and after of the effect you're applying, you can tap on the screen and hold down the preview button in the middle. I think everything looks good so I'm just going to tap Apply. Now that all the leaves are done, we can clean up the layers a bit by merging the two plant layers together. Let's open up the layer menu, tap on the layer above, and then select "Merge Down" from the menu.
27. Lighting Touch Up: Since we've blurred this leaf, I can see a little problem here with the lighting layer. Because we added the leaf later, some of the light on the top of them is creating a harsh line that was meant to be for the cushion. Let's clean it up really quickly by going to the Layer menu, finding our light layer. Let's make sure we've selected on the mask, not the layer itself. I'm going to zoom in a little so you can see a bit better. I'm going to grab the eraser tool with a soft brush and low opacity. Let's just erase the parts that are overlapping the leaves. This is one of the biggest benefit by having the light on its own layer because it makes it really fast and easy to make changes like these. Now the lighting looks good, but I also think I want to move the dust layer below the leaves. Let's open up the layer menu again and find our layer, and drag it down to maybe below the leaves.
28. Adding Noise: Nothing in nature looks quite as smooth as digital art can look sometimes. To add in more texture look, I like to finish my painting by adding a little bit of noise. Noise is really good to bring all the details together, smooth out transition, and when we add the effect, you'll see that it is especially good with painting characters because it can give the illusion of a subtle skin texture. Also, the method we'll be using is a nondestructive one, which means that you'll be able to switch the noise layer on and off if you need to. First, let's create a new layer. Navigate to a color menu and open the value panel. To make our noise layer work, we're going to need to fill it with 50 percent gray. One of the easiest methods to do this in Procreate is to change your saturation to zero here and your brightness to 50 percent. Now we can drag this color down to fill our layer. After, let's navigate to the layer again, open up the layer modes, and scroll down to find overlay. As you can see, the gray has now disappeared. This is because 50 percent gray on overlay mode doesn't affect the illustration at all. If you did it right, you should now see a difference here. It should look like nothing happened. Now, to add noise, let's navigate to the Adjustment menu and select "Noise". We can zoom in a little so you can see what's going on, but make sure to zoom back out before applying the effect so you can see it at a normal scale. Like most other Procreate effects, we can adjust its intensity by dragging from left to right. If I put this to 100 percent, you can see what noise is doing to our image. Because noise is quite a strong effect, I'm going to drag this all the way down now and find where it's enough to add a nice subtle texture, but not too much where it makes your image really grainy. I think 7.5 percent looks good. Again, if you want to see what the effect is doing to our painting before we apply, we can tap on the screen to open up the quick menu and then hold down the preview to see the before and after of our noise. Once you're happy with that, just tap on "Apply". If you open up the nice layer now and turn its blending mode to normal, you can see what this effect is really doing to our layer. I'm going to zoom in a bit so you can see a little bit better. Here you can see the noise looks like little grains or static from old televisions. I like using this method because if you ever feel like the noise is too much for your illustration, instead of having to redo the whole noise effect from scratch, you can lower the opacity of this layer. Right now I'm really liking this amount so I'm going to keep it 100 percent.
29. Sharpening: To sharpen, we need to create a flattened copy of the image we can apply the effect on. I'm going to show you a method where we can do this without merging any of the layers we've made so far. By going to the Adjustment menu, and since I'm here, I'm actually going to switch off the drawing guide because we won't need it anymore. Then let's go to the Add tab and all the way down select Copy Canvas to take a snapshot of the whole Canvas at the moment. Now, let's go to our layer panel, let's create a new layer. Then let's go back to the Add tab in the Action menu, and this time, let's tap on Paste. The edit mode will open up where we don't need to touch it so we can just accept. Now, if I open the layer panel, you can see that we have a flattened version of our illustration on the new layer we just created. Now we can apply the sharpening on this copy by going to the Adjustment menu and tap in on Sharpen. I'm going to zoom-in quite a bit here so you can see better because this is quite a subtle effect to see on camera. I'm going to push the sharpening all the way as well to 100 percent because, again, it might be quite hard to see from this view since it's a really subtle effect, and I think you can zoom-in even a little bit more. From 100 percent, I'm going to start slowly bringing it down. We just want enough to make the edges of the formula cleaner and more defined. We don't want to exaggerate too much when adding sharpening because it cannot too much contrast and start to lose details of her image. Looking at this right now, I think 15 percent is looking quite good. I'm going to check my preview on and off to see the difference, and it's working really well, so I'm just going to tap on Apply and exit the Adjustment menu.
30. Export Final Image: Now that our image is finished, we are ready to export it. There's few different ways we can do this in Procreate. Let's look at some of them together. To export your file, let's go to the Action menu and then on the Share tab, we can see that we have two different menus. At the top, we have the Share Image, which exports as one singular file, and at the bottom, the Share Layers which exports each layer as an individual file or animation. Since we're working on an illustration, we're going to mostly focus on the share image options. Personally, I like to save a Procreate file as a backup, because not only it will save all of the layers with the blending options, but it also saves a video time-lapse replay of the whole canvas. I usually finish my paintings in Photoshop, so I always save a PSD version as well so I can access it on my computer. JPEG is also a good option. It does flatten your layers, but it's great if you want to go straight to printing or sharing on social media. PNG is also great because it works the same as JPEG, but it preserves transparency. If you're saving a sticker, that would be your go-to option. Let's choose the JPEG option to save the file for a class project. A menu will open up, where we can choose where to save the file. I usually save it to the Dropbox or AirDrop it directly to my MacBook if I need to do any final adjustments in Photoshop. Right now, I'm going to tap on "Save Image" to export to the iPad gallery.
31. Export Video Timelapse: To export a video time-lapse for your illustration, open up the action menu and go to the video tab. Here we can tap on time-lapse replay to watch the video directly in the app, or tap export time-lapse, replay it to save your video. After we choose export, Procreate will ask us whether we want to save a 30-second version or a full length version. I usually export both so I can then use the 30-second video on Instagram posts and use the longer one to share on Patreon and on my YouTube channel. I'm going to pick the 30-second options so I can show you this process faster and then we can choose where to export the video. I usually send it to my Mac through AirDrop because it's faster, but you can also save it to Dropbox or directly to your iPad by clicking "Save Video" down here.
32. Thank You: Congratulations on finishing the class. Now it's time to get started with your class project. The goal is to post a JPEG of your finished illustration showcasing all the techniques we covered together. Feel free to use your online art, but here is in one provided in the resource kit, which you can find at serenaarchetti.com/learnprocreate. You can upload your work in progress images as well as your final drawings to your project page and ask for help and feedback in the community section. If you enjoyed this class, don't forget to give it a thumbs up and follow me here on Skillshare by clicking the follow button, so you can make sure you don't miss any future classes or bonus freebies. You can also find more tutorials and resources like brushes and coloring pages on my website and blog at serenaarchetti.com. If you use any of the free resources or posterior class project on Instagram, you can always tag me at Serena.art. I would love to connect with you and see what you make. Thank you so much for joining, I can't wait to see your artwork. I will see you in the next class.
 Serena Avril Archetti, Artist and Creative Entrepreneur