Transcripts
1. Welcome!: Hi everyone, and a very, very warm welcome to this course that talks about all things journaling! A Creative Journal is a visual record of your thoughts and feelings and is rooted in self-expression. From the imagery to the words, everything that you do in your creative journal reflects your state of mind and aesthetic preferences. The way you use your creative journal is up to you! On some days you might feel like you want to write more about what's going on in your head and not focus so much on imagery. But on other days, you might simply want to cut and stick pictures that reflect your current mood. A journal can be whatever you want it to be. You can use it to reflect upon your everyday experiences, to make plans and to-do lists on a regular basis, to make a vision board or keep a track of your goals, to keep a record of your creative experiments, to preserve memories from special occasions or to simply relax and have fun. However, as exciting as this may sound, starting a journal can sometimes become a little bit complicated and overwhelming. On social media, especially, people often share beautifully planned journal spreads with terms such as "art journal", "junk journal", "bullet journal" and so on. And all of these terms can become too confusing in the beginning. But in this class, I aim to demystify these terms for you and simplify the process of journaling. My name is Ridhi and I am a multi-disciplinary artist, an art educator and a creative entrepreneur. I run four creative brands under which I sell jewelry, home decor products, surface design prints, stationery, wall art, and different kinds of lifestyle and gifting essentials. I have been making creative journals for a decade now and today in this Skillshare class, I'm going to be sharing all my learnings with you. We will be learning about all the different forms of journaling one by one. And we'll look at ways in which you can personalize your journals. We will also understand the similarities and differences between scrapbooking, creative journaling, art journaling, bullet journaling, and travel journaling. And finally, we will also be making one basic journal spread so that you can kick-start your journaling process. So let's get started!
2. What is a Scrapbook?: In this lesson, we are going to be talking about what a scrapbook is. It's highly likely that you have seen scrapbooks made by your parents and grandparents that they fondly like to open up every now and then to revisit the good times. Scrapbooks for a long time have been a great way to preserve memories of special events in one's life and are often even shown to guests that come to our homes. Scrapbooks are a wonderful way to save greeting cards, photographs, tickets to special events, travel memories, newspaper cuttings, postcards, and so much more. So by now you've probably understood what the purpose of a scrapbook is. It's actually quite simple.. to preserve memories for future generations in your family and to share a little piece of your personal history. There are no limitations to how creative you can be in a scrapbook. You can use stickers, cutouts from newspapers and magazines, ribbons, lace, all kinds of interesting embellishments and anything that fancies you... You can have one scrapbook or many. For example, you could use one scrapbook only to document your travels and holidays abroad. While another one could be to track your child's growth, such as birthdays, first day of school, fancy dress competitions and so much more. This is very similar to keeping a baby book where you keep a track of the first words your baby spoke, the day they walked and so on and so forth. Or you could simply keep one scrapbook, which is a mashup of everything that you want to preserve and you can just categorize it based on years, dates, months, so on and so forth. So how you organize or categorize your scrapbooks is totally up to you. Most people prefer using scrapbooks that are made up of acid-free paper so that all the pictures that you store in them can stay preserved for a long, long time. However, there are people who like to use regular journals and notebooks of all kinds to make their scrapbooks. Again, there are no rules. Scrapbooks are a popular gifting item too! They make for a great wedding, birthday, or holiday gift, and they are quite personal in nature. You could make one yourself or hire a professional crafter with an aesthetic eye to make it for you. In the current age of digital sharing and people living nomadic lives, physical scrapbooking doesn't seem feasible to many. So a lot of people have instead started using online software like Canva to make digital scrapbooks for themselves. Again, the idea is simple - to preserve memories, but the process has become more digital instead of analog. So now that you've understood the basics of scrapbooking, let's move on to the next lesson where we will be discussing more about how scrapbooking is combined with journaling.
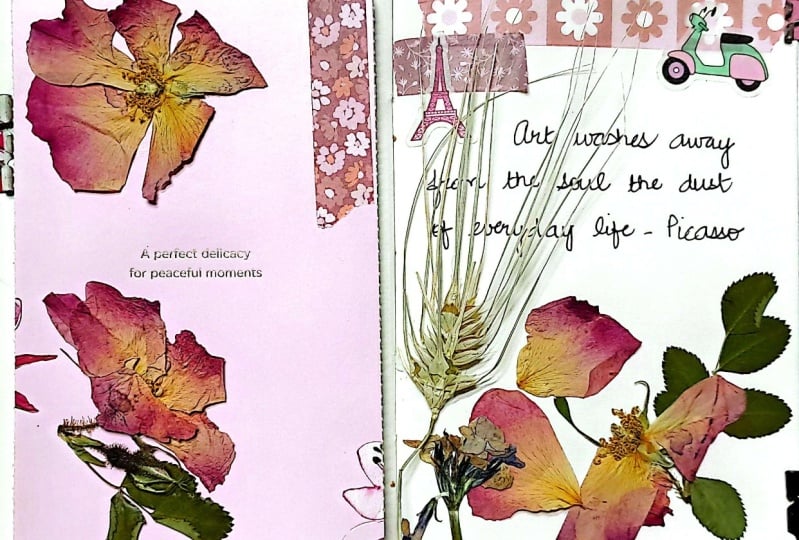
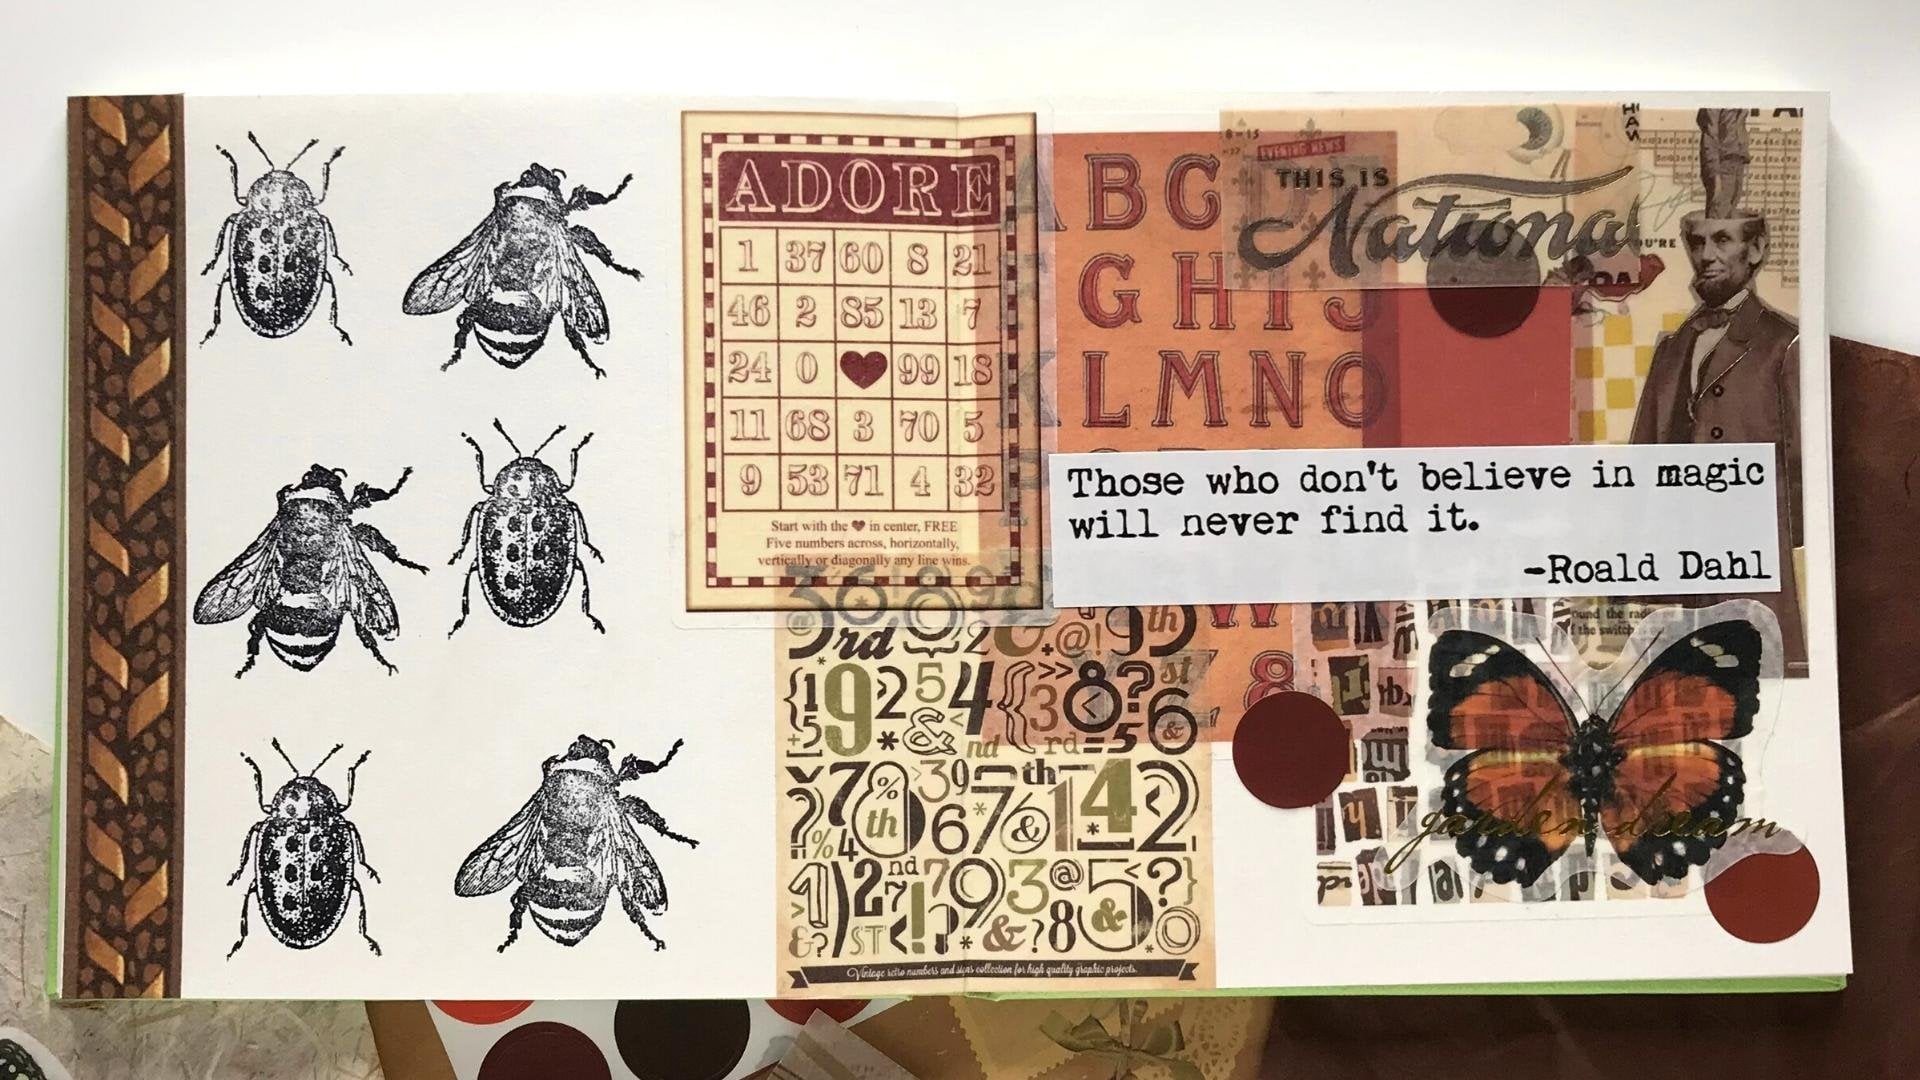
3. Creative Journaling vs. Scrapbooking: Perhaps, the simplest definition of journaling is that it is a written record of your thoughts and feelings. Often known as "diary writing", it is mostly used to document how your day went or what you feel at the end of each day, or simply to express your innermost thoughts. However, just like human emotions have no set definitions or limitations, journaling also does not have a single approach. Contemporary journaling combines text with visuals. This means that you will often come across journals where people have expressed their daily thoughts and feelings, along with hand-drawn pictures, stickers, and other forms of decorative paper or embellishments. And this is where the boundaries between scrapbooking and journaling start to blur... Just like you preserve memories in a scrapbook, a journal too is a way to store your personal thoughts and feelings. So let's say, you met a friend after a long time today and you want to write about that meeting in your journal, there is a high chance you would want to put a picture of the meeting in your journal too. Similarly, if you've come back from an amazing trip somewhere, you might want to stick some pictures, museum tickets, maps, bills, postcards, et cetera, along with the text that you're writing. However, the question is, do you want to share this text with someone else? Unlike scrapbooks, journals are more personal. While scrapbooks are often kept on side-tables and coffee tables in one's home for guests to go through them freely, you'd probably not like the idea of someone going through your daily journal, right? This is where creative journaling comes into picture. Creative journals are a combination of text and images that you can share publicly if you choose to. By implementing techniques such as flapcards, pockets, and envelopes, the most personal of your thoughts can stay hidden, while some general words and phrases can be seen by others. Again, whether you want to share your creative journals with others or not is a matter of personal choice, and you could simply use your creative journals for your own daily use as well. Creative journals include a range of art and craft techniques and are quite therapeutic and fun to make. Just like regular journaling, creative journaling also helps to reduce anxiety and stress, organises thoughts, understand behavior patterns, and so much more. In the last few years, creative journaling has become quite popular on social media sites like Instagram and Pinterest, where people share their journal pages done with beautiful decorative papers, stickers, tags and so much more. If the feelings are too personal, they share only a few pages and not all. The pages shared usually feature some basic quotes and phrases that indicate a theme or an idea. And so in that sense, one can say that creative journaling is kind of like a parent or a distant cousin to scrapbooking. You will often find similar materials being used for both of these techniques. Professional artists often look at creative journals as a way to use their skills along with their thoughts on a daily basis. It's kind of like a de-stressing activity for them. And since they're not obligated to share these journals with anyone, they often experiment with a lot of new styles and techniques in their journals. And we're going to discuss this a little more in detail when we talk about art journaling. But for now, we will move on to the next lesson where we will discuss a little bit about junk journaling.
4. What is Junk Journaling?: Now that we have discussed the similarities and differences between scrapbooking and creative journaling, let's discuss a new concept. The term, "junk journaling" is fast gaining popularity on social media. And there are two different approaches to it. The first approach is that of making a junk journal, while the second approach is more about the process of junk journaling. So let's begin by understanding what a junk journal is. As we discussed earlier, if you're interested in scrapbooking, then there are actual scrapbooks available in the market for you to purchase. These are made up of acid-free paper and have alternating butter people inserts in them so that the pages can stay preserved for a long time. As far as creative journaling is concerned, it can be done on scrapbooks or notebooks of different shapes and sizes. You can either take lined or dotted notebooks or you could invest in journals made of handmade paper, mulberry paper, and so on. It all depends on your budget and what you really like. But what if you could make your own journals sitting at home? Junk journals are journals that are made up of old magazines and newspapers, envelopes, greeting cards, posters, leaflets, and other ephemera that would have otherwise lost its value after some time and would have ended up in the junk. So essentially you are collecting papers of different kinds and then you'll stitch them together to make your own journal. Across the globe, there is a fast-growing community of junk journalers who find joy in recycling and upcycling random found objects. So from labels on shampoo bottles or peanut butter jars to tags found on clothes or stamps found on letters, and even cardboard found on cereal or cookie boxes, they use all kinds of random objects creatively and create a journal for themselves. This is of course, quite cost-effective too, because if you're just a beginner and doing this as a hobby, then using the materials at home is a great place to start. Now many people ask what's even the point of a junk journal? Because if you're using old newspapers and magazines to create journal pages, then they obviously have so much text printed on them. So how is there any scope for you to write any further on it? And that's exactly where creativity comes in. Junk journalers find new and creative ways to add their own personal pictures and text on the journals using techniques such as collages and creating flaps and inserts to superimpose or overlay the text onto the printed papers. Basically, instead of applying your creativity on plain pages, you would now be applying it on printed pages. Now you can either make your junk journal on your own as we just discussed, or you could even purchase one from shops that specialize in junk journals. When you make your own junk journal at home, there's a high chance that all your magazines or papers might not be of a similar color scheme. So the benefit to purchasing one from a shop is that it would usually come with papers of a similar color scheme or a similar theme, such as a botanical theme or a vintage theme. And so the journal would already be quite aesthetically pleasing to the eye. So you can start writing on it or start pasting pictures on it directly and begin your journaling process. Some shops even customize journals for you depending on your favorite color scheme and things that you like. For example, a sunflower themed journal or a butterfly-themed journal and so on. Now so far we have discussed about a junk journal being an alternate to a regular journal and how you can either make one or purchase one. But as I mentioned earlier, there is another way or another approach to look at junk journaling and that is to indulge in the process of junk journaling on a regular notebook or scrapbook. So while the base or the background is a regular journal, what you stick on it is basically junk, which includes random found objects such as tags, old book pages, random cutouts, stickers, and so on. This is very similar to collage-making or mark-making, where you have a given base and then you basically add artistic touches to it. So you can make your journal spread with a theme in mind or it could be completely random without a theme. It can be with text or without. It's totally up to you because there are no rules when it comes to junk journals. Interestingly, some people create a junk journal to use it as a phone book or a daily record book for grocery shopping, to-do lists, etc. It's definitely a cost-effective and environment-friendly method because you are reusing the papers instead of buying new notebooks and planners all the time. But an even more wonderful thing to do is to cover up the pages of your junk journal with art. And this is where Art Journaling comes into picture. We'll be discussing more about art journaling in our next lesson.
5. What is Art Journaling?: Welcome back! So in this lesson, we will be discussing what an art journal is. Now an art journal is essentially a visual diary of your artworks. Professional artists as well as serious hobbyists use art journals to keep a track of their experiments, as well as to test out new supplies. So for example, you've just purchased a new set of paints and you want to create samples or swatches of each of the colors, then you'll do that in an art journal along with the name of the color. This way you have a quick reference guide when you want to pick out the shades for your next project. Some people also use an art journal to practice their brush strokes or even create mini artworks before moving on to larger pieces. So think of it as a place to document your art learning and experiments. You can also supplement these drawings or paintings with words that help you to remember the process or the technique later on. Some people also make these as pattern books. These are basically experiments again for you to refer to when you're working on something big later on. Over the last few years, however, art journaling has started sharing some features with junk journaling and scrapbooking as well. So instead of actually drawing out the elements, people use stamps or stickers to create an aesthetic layout. The goal, of course, is self-expression, and you can use a combination of techniques such as drawing, mark-making, collages, and so much more. There are no rules when it comes to art journaling and you're free to be as organized or as random as you like with your art journal. If you're not a professional artist then there's a high chance that you don't want to keep a separate art journal. But instead, you'd probably like to keep one where you use your artistic elements or art skills with regular journaling. And that's totally fine too. So in that sense, art journaling also becomes like a child or a distant cousin of creative journaling, just like junk journaling. Depending on the art form that you are most likely to use, there are various journals to choose from. If you're just a sketch artist and like to draw with pencil or any other dry media, then you would mostly end up purchasing a sketch journal. If you use watercolors, then a watercolor journal with pages of at least 300 GSM would be required. There are also mixed media journals in which you can use a combination of techniques and art supplies. Mixed media journals are usually the preferred choice of most art journalers because you can use a combination of dry and wet media. However, it's not always necessary for you to buy a journal. Just like we discussed in the previous lesson, you can make your journal at home using old papers from magazines, newspapers, gift wrapping, et cetera, and use that as your art journal. Of course, this means that all your pages will not be of the same thickness and you will face certain limitations when it comes to the media that you can use on it. So you probably might not be able to use watercolors and acrylic paints on regular newspapers as effectively as you would be able to use them in a proper watercolor sketchbook. There are also certain limitations to making your artwork on the already printed text pages because the background would be interfering with your drawings or artwork. But then again, there are a lot of people who don't see this as interference and actually enjoy the process of doing their art experiments on junk journals with a lot of printed papers. It opens up their creative possibilities and they come up with new ways of covering the text with artwork. Art journals usually have a theme or a defined purpose. For example, an artist might be making an art journal only to practice the study of flowers, or only to study brushstrokes with acrylic paints and so on. But that's not a rule per se. You're free to customize and personalize your art journal in any way you like. So you could keep your sketches, pattern exercises, watercolor studies, and collage practice, all in one journal if you like. There's nothing wrong with that. Some people also use the concept of altered books for art journaling. So they pick up old books that have a few pages missing from thrift stores and scrap stores, and use those for their art journaling exercises. And since these books have already lost their value, you can actually give them a new life by repurposing them as your art journal. One of the most common ways in which people use altered books is by applying found poetry. Found poetry is a branch of poetry in which you select certain words or paragraphs or phrases from already given text and convert it into a poem or haiku. It is quite an extensive field of study. And people who like found poetry actually like combining their art journaling techniques with found poetry and use it on altered books a lot. So I'm sure by now you've understood that creative journaling is kind of like an umbrella term that has scrapbooking, art journaling and junk journaling, all under it. But they all share some common techniques and methods. However, there are still two other styles of journaling that are fast becoming popular. These are bullet journaling and travel journaling. And we will be discussing these in the upcoming lessons.
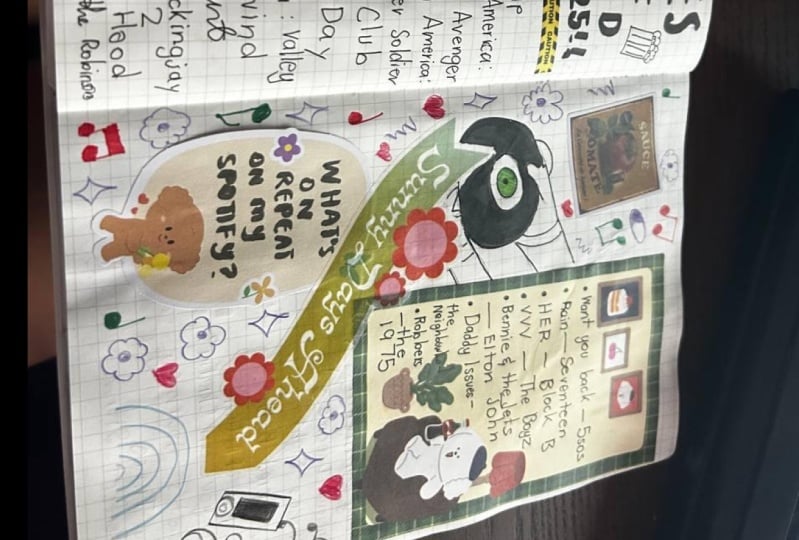
6. What is Bullet Journaling?: A bullet journal is your calendar, to-do list, goal tracker, and daily diary all at one place. It was invented by Ryder Carroll. And as mentioned on the official bullet journaling website, it is best described as a mindfulness practice, disguised as a productivity system. It's designed to help you organize your "what" while you remain mindful of your "why". The goal of the bullet journal is to help its practitioners, also known as "bullet journalists", to live intentional lives, ones that are both productive and meaningful. Bullet journaling uses the method of rapid logging, where you basically write everything in short sentences as bullet points. For this reason, most people use dotted notebooks that make it easier for these lists to be spaced out evenly and for you to make geometrical grids that are balanced. Bullet journals are usually handwritten and require only a pencil or a pen and the bullet journal itself. However, over the last few years, the art and journaling communities on social media have found ways to integrate creativity within bullet journals. From making colorful banners to using hand-drawn illustrations as borders and more, bullet journals now are a combination of artwork and logs. Some people even like to separate out the monthly pages by giving them theme-based illustrations and designs. And for this reason, many people end up using sketch pens, markers, stickers, stamps, and other kind of creative scrapbooking materials in bullet journaling as well. Since commercially produced bullet journals usually come with a dot grid template, it does take some time and effort on your part in the beginning to make the pages ready for your journaling process. But that shouldn't overwhelm you because you have full control over how detailed or how simple you want your journal to be. If you don't want to use artistic touches and simply want to use a regular ballpoint pen to plan out your day or write down your goals. that's good too! Like all other forms of journaling, how you use your bullet journal is totally up to you. A word of caution though, for those who are looking to mix art with their bullet journals... most bullet journal manufacturers make the journal pages with notebook quality paper, which means that the pages would probably be about 80 GSM or 90 GSM thick. So such thin papers might not ideally be suitable for watercolors and other kinds of wet media. But if you're really keen to use watercolors and markers that bleed a lot, then it is recommended to take journals that are thicker than 200 GSM, at least. These might be a little rare to find, so as a workaround, you can always do your watercolor illustrations on separate thick paper and then stick it on your bullet journals. Like I said, how you mix and match the techniques and make your journal work for you is totally up to you. When bullet journaling was initially developed, it was mostly a productivity and planning system and there was very little scope for you to actually write paragraphs of your personal feelings in there. But like I said, over the last few years, the boundaries between different forms of journaling have started to blur. And so now people have actually started to mix bullet journaling with regular journaling as well. The dot grid notebooks are definitely very aesthetic and pleasing to look at. And making lists on them can be a great way to motivate yourself to accomplish your goals or to get things done during the day. A lot of people also use the dot grid notebooks to make travel plans. And that's something that we'll be discussing a little bit in detail when we move on to our next lesson, focusing on travel journaling.
7. What is Travel Journaling?: If you're new to the world of journaling and don't know where to get started, then I highly recommend starting off with a travel journal. And this is because in a travel journal, you already know where to begin and you won't feel as stressed and overwhelmed as starting other kinds of journals. Travel journals can be a combination of many different things. One of the most common things that people use it for is to plan holidays or vacations. So it's almost like writing down your wishlist of places you would like to visit. And then what all you would like to do once you reach those places. So from writing about restaurants, you would like to try to hotels you would like to stay in, to monuments and museums that you would like to visit, you can plan out anything and everything in your travel journal. Another thing that you can keep a track of in your travel journal is some keywords or phrases in the local language of the place you'd like to visit. You can write these down manually or cut and stick pictures. Like all other forms of journaling, there are no rules to travel journals and you can be as creative as you like. Travel journals also work wonderfully well as vision boards for those who like to travel occasionally. When you're making these vision boards, you're kind of affirming that you'd like to visit these places one day. And you're just kind of like sending out positive vibes in the universe. And somehow you motivate yourself to get to these places! So that works really, really well for some people. One of the most common uses of a travel journal is to actually keep a log of the places you've already visited and to store memories such as tickets, brochures, bills, et cetera, in these journals. So again, it's kind of like similar to scrapbooking, but then travel journals are usually more detailed about the travel aspect than your personal feelings. So some people actually even write down recipes of the local dishes that they have tried during their holidays. Or even write down things such as the flight number or the hotel room in which they stayed, just to keep a log of everything that they encountered during their trip. You could also write about local architecture, culture, fashion, and pretty much anything that you like. Travel journals are great for self-awareness and reflection. And they also help you understand your preferences over a period of time. And of course, if you haven't traveled to the destinations on your wishlist already, then like I said, these journals act as a great source of motivation for you to work harder and make your travel dreams come true. So like all other forms of journaling, even travel journaling is great for mindfulness and it uplifts your mood. Travel journaling can be done on dot grid notebooks just so that it's easier for you to keep your lists segregated and organized. Or you could use regular notebooks which are either lined or plain. It totally depends on how much creativity you actually want to include in your travel journals. Whether you want to make collages, do illustrations, or simply just want to make lists. So depending on your intention and your purpose of the travel journal, you can literally pick up any kind of notebook that's available to you and customize it into your travel journal.
8. A Quick Summary: So just to summarize everything that we have learned so far, Creative Journaling is like an umbrella term that has a lot of different forms of journaling under it, all sharing some features with each other. The bottom line with all forms of journaling is whether you want to keep the information private or public. Scrapbooks are more for family sharing. And you can easily show these to friends and colleagues. And if your bullet journals are all about planning your day with meetings and deadlines, then there's probably no harm with someone else having a look at these. But you probably don't want to share your personal feelings with everybody. So you'd want to keep your junk journals and art journals mostly to yourself. So it all comes down to the intention and the purpose of your journals and how much information you're comfortable sharing with others. Now, as we discussed, there are several ways in which you can make your journal layouts. So if you're good at drawing, then your journals could include hand-drawn illustrations and doodles. And if you like using watercolors or acrylic paints, then you can use these to create abstract layouts or abstract backgrounds for your journals. Some people like paper crafting a lot, so you can even use that to create collages and use them in your journal spread. Remember, at the end of the day, everything you do falls under creative journaling. So it doesn't matter which technique or method you choose for your journals. At the end of the day, you're still engaging in a creative practice which leads to mindfulness and self-care.
9. Gathering Supplies : So now the big question is
how do you get started? The first step would be
to select a journal. And hopefully, by now you would
have decided whether you want a regular journal, a
ruled or a dotted journal, a plain journal, a
journal made up of handmade paper or
a mixed media journal. The next thing would be to start collecting some
materials to write with. So these include pens
of different kinds. So starting from a regular
ballpoint pen to brush pens, you can use anything just as long as your
journal paper is thick enough to handle the
ink and does not bleed. Then you will need
some pictures. So if you have a theme in mind, then looking for pictures
becomes really easy. So you would start
looking for pictures based on the idea or the theme
that you have in your head. So let's say you want to
make a journal spread about beach holidays or something
to do with flowers, then your mind
will automatically start looking for such pictures. So this would lean more towards art journaling because
you kind of have like a concept or
an idea in mind and you're just looking for
pictures to execute it. And in a way you're
actually looking for images that connect
with that idea. But if you don't
want to work with a theme and you just want to collect random materials and
random images, that's fine too! That leans more towards
the junk journaling approach. And it's completely
okay to look for random materials and use
those in your journal. Now, either way, one
of the things that I highly recommend is choosing
a color palette in advance. So if you have a theme
in mind already, then choosing a color
palette becomes fairly easy. So let's say you want to
make a journal spread on the theme of
romance and red roses, then you will start collecting papers and pictures that have pinks and reds in them along with some
pictures of roses. Similarly, if you're
writing about a holiday or a
vacation at the beach, then you would have a
lot of blues and greens and probably a little bit
of sand color to play with. But if you're
choosing to go with the junk journal route, then I recommend going on websites like
Pinterest to look for some color palette inspiration. Based on the color palette
that you have chosen, you can then start looking
for some paper cutouts. Paper cutouts should ideally
be of two categories. There should be
some plain papers, which are basically
solid colored papers, and then there should
be some printed ones. Now a great way to do this is
to look at old magazines and newspapers and hunt for that particular color that you need in your journal spread. So in fashion magazines, you will often see
models wearing various dresses
and you can take a small section of those dresses and use them
in your journal spread. Same way, keep looking for solid colored elements
in newspaper ads, greeting cards, wrapping paper, bills... literally anything
and everything around you! The good thing about selecting a color palette in
advance is that you're kind of like training your mind to hunt
only for those colors. So you're in a way filtering out the other information and focusing only on that
particular color. You might even consider using watercolors or acrylic paints to create your images
or backgrounds based on the color
schemes that you like. But it totally depends on how comfortable you are
with these mediums. And if you're more
of a paper crafter than you probably
might not use so much of painting techniques and you probably might like
collages more. So now once you have these random cutouts of
different shapes and sizes, start looking for
some focal imagery. So essentially focal images, as the name suggests, are the focal point of
your journal spreads. And they kind of
reflect the idea or the theme of your
journal spread in them. So for example, it could be
like a picture of a flower, or it could be your own picture or a family picture
from a holiday. Or it could be
something that you saw in a magazine ad and anything that has prompted you to write something in your
journal spread today. So whatever it is, think about what that
focal image will be, and then try to match the colors of your paper cutouts
to that focal image. You can actually do
this either way. So you can look for
the focal image first and then do the
paper cutouts accordingly. Or you could do the paper
cutouts first and see which color kind of dominates your paper
cutouts right now. And then try to match the
focal image to those colors. So really just feel free to
customize the process to your liking and do whatever makes your life easy
and comfortable. Once every few days, I indulge in the process
of Fussy Cutting. Fussy Cutting basically
is the process of cutting out images from
old newspapers and magazines and storing them safely with the intention of
using them in your journal at some point later on. When you're indulging
in fussy cutting you're simply gathering
material and you're not really thinking of the layout
at that point in time. So essentially the cutting
process itself is a lot of fun and it's lovely to
do it every few days. Now, you can even cut out some interesting words
and phrases if you like, from these old magazines
and newspapers or posters. And you can store them
safely to use them later on. So these could be some
interesting words that you have probably come across in the
headlines, in the newspaper. Or they could be certain phrases or quotes that you've come across
in a magazine ad. You can essentially
make collages of these words and form your own sentences. So feel free to just cut
out interesting fonts, interesting words, and store
them to use them later on. So now you have hopefully
gathered papers, images, and also some words. And all of this stuff
that you have gathered is from material that's
already available to you, such as magazines
and newspapers. Now this is a great place to start if you're just a beginner, because all of these things are readily available with you. But if you want to
invest in journaling a little bit more as a hobby, then you can consider buying
things like washi tapes, some printed vellum
papers, stickers, stamps, and other kinds of ephemera that
journal shops sell. So once you start
journaling regularly, you will realize that there are certain things
that you like more, and then you can make your
purchases accordingly. So for example, most of my journal spreads usually
have a lot of flowers, botanicals, butterflies,
and vintage elements. So I end up buying things which are basically
in these themes. So it all depends on your
personal likes and dislikes. Now, if you like, you can pause the class here and gather your supplies
before the next lesson, where we will be making a
journal spread together. Or you could watch the
next lesson first and then gather your supplies
to make a similar spread. So feel free to watch
the lesson as many times as you like to get
comfortable with the process.
10. Making a Journal Spread: All right then! So here
we are finally with all our supplies and ready to make our first journal spread. So for the purpose of
demonstration today, I'm using this black
journal with me. This is basically a
Mixed Media Journal, which is 6 x 6 inches
in width and height. And so I kind of have a thing for square journals and I also really like working
on black journals. So that's what I'm
using in today's class. You are, however, free to use
any journal that you have. There is no restriction
on the size, the shape, and whether you want to use a plain journal or a lined one. There is no restriction
whatsoever and you're free to use
anything that you like. I've also gathered all my supplies
here and I'm just going to walk you through how I usually select all my supplies. So usually I start by
picking out a color and so I've selected
blue and along with that, I have selected some
shades of grays, light blues, dull blues,
bright blues, basically different
kinds of blue papers. Some of these are
handmade sheets, some of these are
mulberry sheets. So basically they're just cutouts
from different places. I also have these printed
papers which are cutouts from, I think a paper pack that I had. And then I have this
new washi tape, which I thought I'd try it
out over here today in class. And so I also saved the wrapping
paper of the washi tape with me because it had that interesting
flower illustration. So I thought I'd use that. I usually also save these
little torn paper bits with me from
wrapping paper or from, you know, just generally from
other collage works. I save all the little
tidbits and I tend to use those as well in my project. Now along with this, I have picked out some stickers. So my focal images
are going to be these two blue flower
stickers which are kind of identical
to each other. And along with that,
I've picked out some stickers and
some vellum sheets. So as you can see
they're basically all in shades of blues and grays. And because the flower stems have these
green leaves in them, I also decided to use one
washi tape which has these, which has this interesting
leafy green pattern, which I thought would go
well with the floral theme. Then I have these little maps, some tags which have
random text on them. This one says month, then some vellum sheets... So basically, as you can see, this is a combination
of different things, but they're all in the
same color family. And I might not even end up
using all of these supplies. But I generally like
to collect all, all of the supplies based on the color palette
that I've selected. And then I kind of keep them together before
starting the project, just so that I know what
colors I'm working with. And I also have this
little stamp set with me, which has this interesting
floral pattern with these little sort of
glass jar illustrations, which I use with
the ranger ink pad, which is an archival ink pad. And so this is something that
I use on a regular basis. Then I also have these
little stickers, which are dot stickers
from this brand that I usually buy my supplies from
which is Kioku Creations. And like I said, I save a
little random paper cutouts. So these are some neutral
colored old book pages and some text pages which are leftover from the
previous projects which I have saved with me just in case I need them to
act as fillers or to, you know, just create little patches here
and there just to fill up the gaps on the layout. So that's how I collect
all my supplies. So as you can see, everything's
in the same color family, but it's just kind of like a mix of different items in
the same color palette. Now this journal
that I have with me, I have been using it for quite some time
and I'm just going to walk you through some of the journal spreads that
I've done in the past. So you can see that
I basically use papers of different
kinds... of textured papers, printed papers... plain papers. And I basically
change the base color depending on the text
that I want to write. So because my journal is black, I often have to first
paste a solid color paper so that I have space to write on and then put my
imagery on top of it. It totally depends what kind of journal spreads you like. So there are days when
I actually want to use a white pen on top of
a black sketchbook. And so then this journal
comes in really handy. But for today's exercise, I actually want to
use a white paper So the way I make
this work is that I basically take some white sheets and stick them onto
my black journal. And so like I said, depending on the project
that I'm working on, I will change the base
color of my layout. And I will use a pen which compliments the color
scheme that I'm working with. Now if your journal
is already white, then you can probably skip this step and then you don't
really need to do this. What I usually do
is that I basically just take papers
and glue them down. And I use this silicone spatula
to apply the glue evenly. This silicone spatula is
actually not mandatory, but I just like to use it
because I use a lot of liquid glue and this spatula just makes sure that everything is laid out evenly. And because this is a silicon stick, I can actually peel off the glue later on and then it becomes as good as new again. So that's the reason
why I use it. So like I said, if you have a white journal and you want to use
the base as white, then you can probably
skip this step. Or if you have a
kraft colored journal or like a toned blue
or a toned grey or you know, any other
mixed media journal with a base color
that you really like, then you can skip this step. But in case you have
a black journal like me and you
want a white base, then you can just glue
down some simple papers. Now, the papers that
I have chosen for the base work actually have a little bit of blue
threads in them. So this is actually handmade
paper that I have chosen, which has a little bit of blue, sort of like a blue texture to it with blue threads in it. And I thought that
went well with all the other blue
papers that I selected. So I intentionally try to look for even the
smallest of elements which match my
intended color scheme and try to bring
them all together. Now once the papers
are glued down, the next thing that
we're gonna do is work a little
bit on the borders. So the spread that
we're working on today focuses on
leaving a lot of empty space in the middle
so that you're free to write or stick extra
pictures if you like. And this is a simple
journal spread which is actually pretty
versatile in nature. You can use it in
your travel journal, art journal or, you know, just, just as a regular
creative journal for today where you can
just write a few words. So basically this kind of fits in well with all
kinds of themes. So I'm taking this textured, slightly textured handmade
paper strip over here with me. And this is like in a
slightly grayish-blue tone. And I'm going to stick
that at the edge. And the way we're going to work on this is that
we're going to try to balance out the elements on the left edge as well as the right edge of
our journal spread. So we don't really
need to make them as exact mirror images, but we're just going
to work on the borders in such a way that
the spread looks as if it's in harmony... like the left edge and
the right edge are in harmony... and they're sort of
like a continuous spread... instead of looking like
two separate pages. I am personally a
fan of tearing down little strips of paper
and giving them raw edges. But if you like
to use sharp cuts, then feel free to use
scissors by all means and use little strips of
paper, which are scissor cut. That's fine too. So I
have this now dark, dark blue, grayish paper which I've stuck and
then I have a light blue. And on top of this
I'm going to stick this slightly brighter sky blue mulberry paper
that I have with me. Again, I'm gonna tear out
a little piece of it. Feel free to just
take your time with tearing down the elements because the placement should
be pleasing to you. It should be aesthetic to you
and you should feel happy with the placements.
So feel free to take your time with this step. So I'm just going to
now apply some glue to this mulberry little bit and
apply this onto the paper. As you can see when I do
the collage approach, I focus a lot on
overlapping the elements. And I try to cross over the elements from
one to the other. And that helps in
layering and it gives a little more depth
and interest to the spread that
I'm working on. Now instead of using paper
cutouts the way I'm doing it, you could just as
easily replace this with washi tapes or stickers. So you don't necessarily have
to tear down little pieces of paper the way I'm doing
it to make the borders. You can use any kind of washi tape and split that
into two and apply that also. So the materials in journaling, can be used interchangeably. As long as you understand the approach, It's completely fine. You can use anything
else to make a layout which looks
similar to what I am doing. One of the things that I
like to play with a lot is the order in which I
balance out the elements. So now on the right side when
we were making the edge, I started off with the
darker paper first, then did a tiny
strip of the light one and then the
sky blue mulberry. But on the left side, I'm
actually going to start with the lighter grayish
blue paper first, and then add the other two layers. So in this way, I create some visual
interest on to my spread. And I make sure that it
doesn't look monotonous. And at the same time, it is
not an exact mirror image, but at the same time they
look continuous and they look balanced and in
harmony with each other. Now when I'm working
on these borders, I like to usually keep a mix of different
styles of papers because they bring
in a certain amount of variety and interest
in the spread. Sometimes I mix and match
only plain papers, which are of different textures. But sometimes I would mix solid colored papers
with printed ones. Like I said in the beginning, I like to keep a mix
of papers with me, but I don't necessarily
end up using them all. So in this case, I think
I'm actually quite happy with the way the borders
are looking right now. And so I'm probably
not going to use any printed papers over
here because I want the focus to be on the images
that I will use over here, which are going to be
like my focal images. So I basically want
this flower to sort of overlap on the left edge and this is like a
transparent sticker. So I'm just going
to peel this off and apply it in a
manner that it kind of overlaps and goes half on the blue edge
and half and white. And before doing that, I'm actually going to cut
out the extra edges of the paper, which are coming out from the top and the bottom
edge of the notebook. And I'm getting rid
of these right now because once I know
the exact paper length, I will be able to place
my elements a little better and I will be able to position them exactly
where I want them. It also makes it a
little easier to work when you cut out
the trims as you go along because they're not
really interfering with your work and they're kind of not like coming in the
way of your hands, sticking other elements
onto the paper. The next thing that
I'm going to do is put my floral stickers. I'm going to put
one at the bottom left edge and one at
the top right edge, just so that they're kind of
leaning toward each other and they sort of compliment
each other in terms of the angle at which
they are placed. And they kind of make the spread look
complete and uniform. And at the same time, I'm also going to use this tiny little oval
sticker at the bottom right, which basically has a
little sort of like a stamp and emblem
printed on it. So this kind of brings in
a little bit of contrast, but it also nicely sort of closes that little odd gap that
I have on the bottom right. The next thing I'm gonna do is use a little
bit of washi tape. Now this washi tape that I
have is in the shades of gray. So it's kind of
like a muted gray. And it goes really
well with the colors of the papers that we have
just stuck on the borders. So I again like to use my washi tape in such a
way that it's kinda like.. torn...so I tear it off with like a little rough edge instead of actually
scissor cutting it. And I'm just going to apply two tiny strips of it
on each of the edges. Again, the placement
doesn't have to be exact. So I kind of just like to have a little bit of the same
thing on both the pages. And that's how I know that they're going to look balanced. Once I'm happy with this, I am now going to move on
to the next washi tape, which has a little bit of
the leafy pattern on it. And this is slightly more
on the green color side. So this kind of compliments the flowers really,
really, well. It kind of goes well with
the stems and the leaves. So I'm going to use
a little piece of it again on the right side
as well as the left side. And again, you can play
around with the placement. So I'm placing these
right now vertically. But there is a chance that yours might look
better horizontally, depending on the size as well as the pattern
on the washi tape. So if you have maybe like patterned papers that you have cut out of
newspapers or magazines, you could use those. Washi
tapes are nothing but just like patterned strips which are readily available
for you to stick on. But it doesn't mean that you can't use anything
else instead of them. So if you have patterned
papers instead, all that you have to do
is just apply glue at the back and use that instead. So like I said, the materials in journaling
are interchangeable. Now the next thing that
I'm going to use is this little packaging that
I saved from the other washi tape that
I have with me. So it has this little
cute hand illustration holding the flower. And it's a good thing that
I saved it because this is going to look quite cute with this spread that I'm
working on right now. So I'm just going
to cut this out to the exact shape and get
rid of the excess. And now this is going to
be like an element that I can play around with
in terms of placement. So there are many different
ways to place it. I can do it on the top edge. I could do with
somewhere at the bottom. So every time you
cut an element, feel free to play around a little bit and experiment
in terms of the placement. Make the process intuitive... make it fun for yourself. And really it's kind
of just like having a conversation with
yourself to see what is it that
you like the most. So I'm just going
to glue this down to this spot that I have
selected over here on my spread. And I think this is a good place because it still
leaves me a lot of empty space to write my text and it doesn't interfere
with the whole spread. So I think this looks
quite nice over here. Now this washi tape wrapping
that I've just picked up is basically a
petal washi tape. So petal washi tapes are
basically tapes where you can peel them off
as individual elements. And since this is a flower, so each of the petals
can be individually peeled off from the tape roll. And you can place them in a radial or a circular
manner to create a flower. So you could make a
four petaled flower, a five petaled flower,
a six petaled flower, depending on the
design of the petals. But what I'm gonna do right now is that I'm actually
going to peel off the petals individually
and apply them in a row at the bottom edge so that they kind of look
like a little border. So I'm just going
to sort of place them one by one over here. And again, this is just
kind of like stuff that I'm doing because I
really like flowers. If you want to skip this step and you just want to stick to the plain borders with
just the floral stickers, that's good too! Everybody's aesthetic preferences
are always going to be unique and independent and
different from each other. So you don't really need to
be influenced by what you see on the internet or even what you see
me doing right now. Eventually just go
with your gut and, you know best how much text you actually want to fit in
your journal spread. So if you feel that extra steps might take away the space
(your writing space), then feel free to
skip those steps and just focus on making
the edges pretty. And that'll be it. Now once I'm done
with the bottom edge, I want something of this petal washi tape on
the left side as well. Like I said, this is
just my thing that I like to have a little bit of the same element
on both sides of the spread just to
balance them out. But if you don't want to
do it, that's fine too. So I'm just going to create a simple five petaled
flower on the top edge. So I'm just going to
peel out the elements and make the flower over there. And once I'm done with this, I think this is pretty much all that I want
to do in my spread. I'm now going to actually work on a quote that I really like. It's actually one of
my favorite quotes. And I'm going to
use my stamp set, my alphabet stamp set to create that quote
on the right side. So the stamp set that I'm using is basically in a
vintage typewriter font. And stamp sets also
come in many other fonts. So depending on a font or
a style that you really, really like, you can probably invest in
a couple of these. If you have good hand
lettering skills or good calligraphy skills, then you can just use those. So you don't really need
to buy stamps like me. I personally like using
vintage elements a lot, which is one of the reasons why the pretty wooden box in
which these stamps come... they... it kind of like caught my
fancy and I was like, "Oh, I definitely want this!" And of course like
the fact that it was... you know it had like a
vintage font... that was also
something that I really, really wanted because I really love working with
vintage elements. And once I'm done with
this quote which says, "Fill your paper with the
breathings of your heart", which is by William Wordsworth, I'm just going to put
the name at the bottom using a standard micron pen, which are also used for a lot of my Zentangle and
Zen-doodle work. And now on the left
side of my page, I'm just going to write down a few words about what this quote means to me and some general thoughts
about the way I am feeling. And that finishes off
my journal spread.
11. What Next?: Creative journaling is like an ever-expanding universe
of adventure and fun. There are always
new techniques to try and new spreads to make. So if you're interested
to dig deeper into this adventure and try out
new layout styles every day, then I have a class dedicated
especially for this. In my next class titled, "Creative
Art and Junk Journaling", we explore different
layout styles and exercises to develop
a daily habit. And I promise you that by
taking the next class, you will see
significant improvement in your creative skills and will definitely start to
enjoy the process of creative
journaling even more. I hope to see you
there. Bye-bye.
 Ridhi Rajpal, Artist + Film-Maker + Educator