Transcripts
1. Hello Hello!: To be able to create
something beautiful with your hands is such a satisfying
and happy experience. Getting your hands messy, playing with colors, and
making new ideas come to life. All seems like magic. With Jasmine aid
or acrylic resin. The magic tricks are actually very simple and easy to learn. You can be proud
of your creations and plant them off to
friends and family members. And who knows, maybe even start a small business or a side
hustle along the way. So my introduction to Jasmine, I had happened a
few years ago via social media when I saw
these beautiful soul satisfying videos
and pictures of wonderful creations created by the DIY community
across the globe. Looking at those
pictures and videos, I just couldn't resist and I ended up getting my
hands on a start at it. The next thing I knew, my pieces are functional and utility art became
a huge part of my business that
added variety to my portfolio and helped me generate a stable
income as well. Of course, as is the
case with any art form. It did take me a few trials
and errors to sort of familiarize myself
with the material and understand the way it works. Finally, I'm proud
to say that I have been working with this medium
for over four years now. And today in this
Skillshare course, I bring to you all
of my learnings, findings, hacks,
tips and tricks, and so much more in an
easy step-by-step process. If you are someone who loves DIY and creativity than I promised you that this course is going to open up so many
possibilities for you. This course is also good for someone who is interested in
starting a small business. Especially if you're already a makeup and someone who
makes handmade creations. You could even be someone from an architecture or interior
design background. And you might already be
familiar with the material. And this course will help
you understand how to use the mediums in a more non-traditional
and creative manner. The best part is
that you don't need any prior experience to
follow along in this course. Even if you're a
beginner and you have never even touched on hood of acrylic resin or
Jasmine. Don't worry. I've got you covered. Now for those of you
who they think the glass Hill with me
for the first time. Hi, my name is Ruby and
I'm assuming makeup, a multi-disciplinary
artist, a content creator, and a creative entrepreneurial. I'm popularly known as the
color body on the Internet, which also happens
to be the name of my small business where I create and sell handmade
home decor products or original paintings, surface design trends,
and a lot more. Apart from this, I also own another creative brand
by the name already do when I create and sell handmade jewelry
and occasionally other fashion
accessories as well. Teaching is a large
part of my work. And I travel across
the globe to conduct workshops for students of
all ages and skill sets. I have been a filtrate Asia
for quite some time now. And this is my h goes over here. If you are keen to
know more about my work and the classes I offer, then I'd recommend you to click on the Follow button on top of this video so that you'll never miss
an update from me. Now, coming back to more
details of this course, we will be developing new class projects using
two different techniques. The first one is
going to be a drink it dish using the
marbling technique. And the second one is
going to be a set of coasters using the
terrazzo techniques. The projects in this course
are totally customizable. So e.g. when I'm demonstrating
the modeling technique, we'll be developing
a twin get *****, but you can develop
something else instead. Similarly, when I'm doing
the lasso technique, I will be developing
a set of posters. You can instead
develop a planter or maybe you're going to
dish at that point and step. So we're all set to begin our wonderful
adventure together. But before that,
a quick reminder. Don't forget to follow me on my social media handles
that I often share a lot of behind the scenes process videos that will
definitely be helpful for you. So without further ado, let's hit Enroll and let's
start working with data.
2. FAQs about Jesmonite: Hi, and welcome
back to the cost. So in this video, I'm gonna be answering some of the most frequently
asked questions about Jasmine and acrylic resin. Now the first question
that I'm often asked is, what exactly is Jasmine? And is it the same
thing as acrylic resin? Well, the answer is yes and no. Acrylic resin basically
refers to a compound system. Read a mineral powder is
mixed with a liquid to form a whiskers mix that is then used for castings,
moldings, et cetera. It's different from epoxy resin, which is basically a
glossier, shinier, and transparent medium as
compared to acrylic resin. Now the reason why acrylic
resin has become a big deal in the last few years is because it offers some wonderful
advantages. Acrylic resin is
environment friendly and because the compound system doesn't give out strong films, it is also considered to be safer as compared
to epoxy resin. Some other benefits to
working with acrylic resins. Our that they are
highly durable, flame resistant, and
excellent attaching details, which is why they're
often used in theater and movies
are constructions, were fake moldings and designs
need to be created often. Another great benefit
to working with acrylic resin is the quick
setting and curing time. Unlike epoxy resin, that
often takes up to 72 h Take your fully acrylic
resins are dry within 30 min of boring and a
completely cured within 24 h. But now, going back
to the question, what exactly is Jasmine? Jasmine is basically a
brand of acrylic resin. It was developed in the
United Kingdom in 1984. It consists of a
gypsum based material in an acrylic resin and
is used extensively by Dia wires across
the globe to create some stunning pieces of
functional and decorated art. It is very easy to work with. And it's completely
beginner friendly, which is the reason
why people fall in love with this medium
almost instantly. That being said, there are other brands as well that
makes similar compounds. You might often find them in the construction section
of a supermarket. Or at places are shops that sell material for theater and
movies have constructions. Sometimes you will find them under names such as hydropower, acrylic, one beyond
mix and more. The point is that
all of these are basically different
brands of the same pain. So the median is acrylic resin. And then all of these
different manufacturers across the globe have different brands
off this acrylic person, of course, but their own
research and technology. So there might be some
variations from brand to brand, but at the end of the day, they're all like
granite presents. Now, you're probably wondering if they all work the same way. Well, impurity, all
acrylic resins have a powder and liquid that needs to be mixed to
create one with specimens. However, the ratio
of mixing the powder to the liquid differs
from brand to brand. So e.g. Jasmine, I recommend a mix in the
ratio of one is to 2.5, where one part is the liquid
and 2.5 parts is powder. But this can change
from brand to brand. And it can sometimes
also be want us to three or minus 22, etc. So while all of these
different ratios don't really have much of an
effect on the final output. It will bring about some minor changes in
your preparation process. And that is something that
we will be diving deeper into once we get into
the mixing stage. Another question that I'm
often asked is whether you can create a profitable business with Jasmine and
home decor products. Well, as is the case with
any art centered brand, making profits depends on
how you need your ideas are, and how much you are
pushing yourself to use the medium in
innovative views. If you keep experimenting
with the medium and come up with new and unique
products, then yes, definitely your
business will turn profitable for you simply because there is
a huge demand for eco-friendly alternatives
in the market now. And a lot of people loved the mat effect
adjustment AI products offer as compared to the shiny effect that
epoxy resin does. I can tell you firsthand
with experience, some of my customers
have you loved the marbling effect that we
can achieve with Jasmine? And this is the
reason why I continue to keep experimenting
with the medium. And this is the
reason why I still make products for this
medium every day. So like I said,
keep experimenting, keep pushing
yourself creatively, and you will
definitely be able to create a profitable
business for yourself. Now, of course, you
might still have some questions about how
exactly does when I've loved. And that is something
that we will be diving deeper into in our
following lessons. But for now, let's move on to the next lesson where we will be talking about all
the supplies you need to create my products.
3. Supplies Needed: Alright, in this lesson, we're gonna be talking about
all the supplies you will require to create your
acrylic resin products. So of course, the
first thing that we need is the acrylic
resin itself. I will be using Jasmine. I had 100 for this class. Jasmine has many different
variants and not all of them work
for the techniques that we're gonna be
doing in this class. If you choose to work
with the Jasmine I brand makes sure that it's
the EC 100 variant. Now if you don't have access
to the Jasmine I'd brand, then you can definitely
use whatever is easily and locally
available to you. Some of the options
that I know off include hydro cost beyond
mix and acrylic one. The next thing we need is
some sort of color and usually the pigments for acrylic resins come in powder
as well as liquid form. I prefer the liquid ones because they give
better saturation. But you're welcome to
try powders as well. Again, go with whatever is
most easily available to you. I prefer to buy my pigments from the same brand as that of the
acrylic resin manufacturer, which in this case is Jasmine. And this saves me
time and effort for calculating the pigment to
resin ratio again and again. But if you're keen to experiment
with different brands, there's no problem at all. You're totally welcome to use a different brand of colorant
than the acrylic resin. Just keep in mind and
double-check that the coloring that you're using is
meant for acrylic resin. Many times, my students
asked me if they can use their epoxy resin
pigments and acrylic resin, and unfortunately, they
aren't compatible. So with acrylic resin, you have to look for acrylic resin specific
colorants only. In this course, I'm gonna be
working with red, yellow, and blue pigments, but you can use any other colors
of your choice. Next, we need a weighing scale to make exact measurements
of the material. You can use any good-quality kitchen
weighing scale for this. Then we also need some
paper cups to make our mix. Now, in the interest of keeping my process environment friendly, I like to use silicone cups that can be re-used
over and over again. However, from experience, these cups usually don't
show up well on camera. You can't really make
out accurate color and texture of the mixture
with these cups. Which is why only for the purpose of demonstration
in today's class, I will be using these
white paper cups so that you can see everything
properly in the video. You're welcome to use
either of these options, whatever is easily
available to you. Then we need some mixing sticks. These can be old or
new popsicle sticks or barbecue sticks or anything else that you have
handy with you. Again, to make my process
environment friendly, I prefer to use silicone sticks that can be washed and reused. Or sometimes I even reuse
all popsicle sticks. But you can use
whatever is easily available to you for the purpose
of this class right now. You will also need moles. Now, I'm gonna be working with this hexagon mold
to make a drink at dish for our first project. And then a set of
coasters will be made using these
abstract circular moles. I also use these for
my epoxy resin work. So these are actually geode inspired irregular
circle coasters. And I really liked the shape. And so I'm gonna
be using these for the second project where we will be doing the
terrazzo effect. But of course, you can choose
any moles of your choice. They can be multiple planters, clocks, trays, key chains, literally whatever fancy zeal for the finishing and the
polishing of your pieces, you will also need some
papers of various groups. I recommend using at least
four different sand papers. The first one of 60 or 80
grit and other of 200, the third one of 600, and then a final 1,000 or 1,200. I generally use the wet and
dry combinations and papers. So you can use a little bit
of water while sanding. And that helps to avoid the dust particles from
flying off everywhere. And we also get to work
a little more smoothly. Next up, we need
protective gloves. Jasmine is a rather
sticky material and it's best to cover your
hands while working with it. This will also save you from any possible irritation
or allergies. I also recommend
wearing a dust mask. Even though Jasmine height is considered to be very
safe to work with, the powder can fly
away quite a bit. So it's always a good idea
to wear a dust mask to prevent unnecessary sneezing
and coughing along the way. Protective eye there is also a good idea to avoid
accidental rubbing of hands against the eyes and also to prevent the powder particles
from irritating your eyes. And finally, do not
forget to cover your table or work
surface with some kind of plastic sheet or all newspapers so that the Jasmine I'd
mix doesn't stick to it. Now for all of the
supplies that I have mentioned here
in this video, I have also created
a handy checklist in the projects and
resources section, which is right below this video. So you can refer to
it anytime you like. So that's it for
all the supplies. And now we're ready to move
on to our next lesson, where we will be learning how
to measure Jasmine night.
4. Calculating Jesmonite: Alright, so in this lesson, we are going to
be learning about the calculation of Jasmine. And now for any
Jasmine I project, we basically need a
mold to start off with. The size of the mold
will tell us about the total quantity of
Jasmine nitric wired. Now when I say total quantity, it means that total mix that we create after combining
the powder and liquid. Once you know the
total quantity, it becomes easier to
calculate how much powder and how much liquid are required exactly to make the total mix. So remember, the
first step is to always understand the
total quantity required. So I'm going to switch on my
weighing scale over here. And this is at zero right now. Then I'm going to place
my mold on top of it. Once I do that, you can see
that the mold itself has a certain weight of its own and they actually need to
reset it back to zero. So in order to do that, we're going to press
the tear button, which basically resets
the value back to zero. This means that now
the weighing scale, we'll take the true
and accurate weight of what goes inside the mold, instead of including
the weight of the mold and the
total calculation. This is sort of like
a rookie mistake when it comes to
calculating your mix. And if you can be aware of
it right from the start, then your calculations
become easier and faster as you progress along from one
project to the next. So basically, to summarize, don't forget to reset the
value of the scale back to zero after you have placed
the mold on top of it. Alright? So now with the mold on top, I'm going to fill
this up with water. And this is just plain
regular tap water. I want to fill this
up right to the rim. Pretty much how I would like to fill my Jasmine I mix later on. Once this is
completely filled up, we can see that the weight
is 70 g. Now this is a good starting point
for us to understand exactly how much Jasmine
night we will need. Out of experience, I can tell you that if the water
weight is 70 g, it means that we need double
the amount of Jasmine out, which basically means we
need the Jasmine I'd mix to be 140 g. Now of course, this is not set in stone. Depending on the brand
that you're using, your ratios might be slightly
different than mine. And this is something
that we can only determine with a little
bit of trial and error. When working with a medium
for the first time. It's always a good idea
to mix a little extra. Note down your calculations
for each mold. And gradually, you will start to understand whether you need your quantity to be
double the water weight or three times the
waterway, it, et cetera. And of course, like I said, these calculations will be
different for each brand. So all the calculations that I'm telling you here right now are based on my experience with Jasmine night
AC one-hundred. While most other brands
have a similar calculation, it's always a good idea
to test beforehand. So make sure that
you always calculate the total quantity required when you're trying
out a new brand. And then make a little
extra so that you don't run short when you're actually in the middle
of your project. Now, for the purpose of
making our first project, which is going to be the
marbling drink at Dish. I'm going to consider
the total quantity as 140 g as we just calculated. And now in the next lesson, we're going to understand
exactly how much powder and how much liquid we require to make this total mix of 140 g.
5. Powder & Liquid Ratios: Now, as we learned
earlier, Jasmine IRAC, one-hundred gums into
parts, powder and liquid. The mixing ratio for
this is one is to 2.5, where in one part is the liquid and 2.5
paths is the powder. To make this calculation
easier for ourselves, we will consider the
ratio to be two to five. We've simply double the ratio and it basically
means the same thing. It's just easier
to calculate with rounded off numbers
instead of decimals. So now we need 140 g
for our first project. Which means we need to split up 140 g into a two
is to five ratio. So how do we do this? Well, it's simple. We first add up the parts that are required
as per our ratio. For a two is to five ratio. We basically add 2.5 and that
gives us a total of seven. Then we take the total
quantity required and divide it by the total
number, which is seven. Which means we get 20 g as
one part of this ratio. Now, as per the two is to
five ratio to such parts are required for the liquid and five such thoughts are
required for the powder. Which means we need 40 g of liquid at 100
g of the powder. And just like that,
even if you're using any other brand
with a different ratio, you're going to follow
the same steps. You first add up the parts of the ratio and then you divide the total quantity of the mix required by the total
number of parts. That way, you'll get one part. And then with that one part, you can further understand how much powder and how much
liquid you will require. All right, now with all
that math out of the way, we have our calculations sorted. And as we just discussed, we need 100 g of the powder
and 40 g of the liquid. So I'm all set with
my wing scale, the powder, the liquid, the paper cups, and
my mixing sticks. Now when I switch
on my wing scale, it starts off at 0 g. And then as soon as I keep my
paper cup on top of it, again, the paper cup itself has a certain
amount of weight, which we don't want to include
in our total calculation. So I'm going to press
the tear button over here to make sure the
scale resets to zero. Now, I'm going to pour
the liquid first. So it's always a good idea
to give you a bottle, a little bit of a shake just to even out the
contents inside. Then we start boring. I like to go really slow when
I'm measuring something, because sometimes
the scale takes a second or two to show the
actual weight of the product. So you want to give a
couple of gaps and you're boring to make sure the scale
is catching up with you. Alright, so now I
have board 1 g extra. But that's not a big deal. I'm just gonna pour 1 g
back into the bottle. And then we have 40
g again with us. Alright? I'm gonna do the same thing
with the powder as well. And as you've probably noticed, when I remove the liquid
cup from the scale, it went to minus six. Then as soon as I kept
another paper cup, it went back to zero. And that's because
if you remember, when we read the MTP pick up, it was around 6 g. So this
is basically the scale showing us that it reset to zero after we had
placed the cup. And it hasn't taken into
account the weight of the cup when we took the
measurement of the liquid. Now if all of this seems confusing and you just
really want to double-check, the best idea is to press the
on-off button once again, when you're placing a new cup, every time you place a cup, just make sure that
you press that button and everything will
reset back to zero. So you're absolutely safe to
begin your next measurement. Alright, so even
with the powder, I got 1 g extra. And I'm going to scoop that
back with my mixing steak. And we have 100 g. So now we
have two cups ready with us, one with 100 g of powder and the other with
40 g of liquid. And now we're going to
learn how to mix these two, as well as add color to
them in our next video.
6. Mixing Technique + Adding Color: Alright, so in this lesson, we are going to be making our mix and then
adding color to it. But before we actually
start with the mixing, here's a little
bit of a heads up. So Jasmine, I, it has a
very short working time, which is also often referred to as the pot life of the medium. So we Jasmine I am 100. You basically have
to work very fast. You only have a window
of about 15 min, right, from mixing dough boring. And then of course,
you leave it for another 20 to 25 min for it to set properly
inside the mold. So when you're making your mix, make sure you have everything
completely ready with you. Right now. Everything that we have is in two separate cups. We have one cup with powder
and one cup with liquid, so we're safe till now. But the second these to start interacting
with each other, our clock is gonna
start ticking. So we want to make
sure that we are completely prepared to start
with the mixing process. You need to have your
moles on standby. You need to have your
tissue papers on standby. You need to have
extra mixing sticks, your pigments, literally
everything on standby. You don't want it any further
than arm's distance because you want everything around
you to be completely ready. Now keep in mind that the temperature in your
city or even in your home, a very important role in this working time
or bought life. At best, you'll have 15 min
to get everything done. And at worst, you'll have
about five or 8 min. Believe me, there was a
time when I was working in exceptional amount of
heat over here in India. And I could literally
see my mixture solidifying inside the
cup as I was mixing it. I'm really not
exaggerating this. The mixture can start to thicken inside the cup if
you're not fast enough. So like I said, the trick is to keep
everything nearby. My general rule of thumb is to give about 5 min for my mixing so that I can do
complete justice to it and there are no
lumps and my mixture. Then I spend another 5 min or so to pour that
mixture into the mold. So basically, I tried to get everything done within 10 min. If you can go faster,
that's even better. Now also keep in mind that
I'm able to manage this in 10 min because I work in highly controlled
studio environments, because I worked with epoxy
resin as well as Jasmine. I had so much. I like to
keep my studio environment anywhere between 21 degrees
to 20 degrees Celsius, depending on the brand that
I'm working with or the medium that I'm working with at that particular point in time. So this temperature setting
is a fairly decent window for you to get 10 min of working time with your
Jasmine admixture, which includes
five-minutes of mixing time and five-minutes
affording time. However, please keep in mind that these are just
my ballpark figures. Keeping in mind the
humidity levels and other factors over here in the environment
over here in India. And this might
differ slightly for the country that you're in or even for the city
that you're in, depending on the climate
that you have over there. So the way we usually start
with the mixing process is by taking a little bit of powder at a time and then adding
it into the liquid, not the other way round. And the reason why this is
important is because we don't want any lumps to be
there in our mixture. So I always take little
by little of the powder, either with a spare
spatula or a mixing stage, or by taking the cup in which I have the powder and then just dropping little by little into the cup in which
I have the liquid. And as I'm mixing, as you can notice, I'm purposely not going
very fast over here. The reason why we don't want
to go very fast is because we don't want a lot of bubbles
to form in the mixture. This kind of mixing
is very similar to the way we mix
epoxy resin as well. So if you're someone who's had some experience
with epoxy resin, you might just find
working with Jasmine. I had a little bit similar. Then as we add the
powder little by little, you can see that the mixture is going to turn more viscous. It's going to become pretty
much like cake batter. And believe me, it looks
absolutely delicious in-person. And I'm sure you can make that
out on the camera as well. But of course,
unfortunately not edible. So as you can see, I'm basically just
mixing it slowly. And I want to make sure that I scraped the sides completely. So you can see that I'm basically just twisting
my hand around, twisting the cup around
to make sure that I'm really scraping out all
the powder from the edges, from the sides and
really scraping that in and making sure that it's
one proper whiskers mix. One of the things
that are highly recommend when you're making
the adjustment I'd mix is to keep some variation
in your movements. So e.g. let's say you start out mixing the mixture with a
clockwise rotation. Then after a few turns, you should actually switch
it and go counterclockwise. And then somewhere
in the middle, you should also try to make the mix with
an infinity motion. So that means
taking your spatula and mixing it in an
infinity manner, or pretty much like
writing the number eight. The reason why that's
important is because it helps to get rid
of all the bubbles which are in your mix. So basically, just make sure that you're
mixing not very fast and you're using a combination
of these movements to get a nice whiskers,
homogeneous mixture. Alright, Now coming
to the pigment, I always like to give my bottle
a little bit of a shake. Again just to even out
the contents inside. And I'm using the color
red for my first project. So all we basically need
is just a couple of drops, or maximum three
drops on the spatula. And then we basically
just drop it in our cup and give it
a light swirled. There are two very
important things to keep an order over here. The first one is that
you shouldn't be taking more than a couple of drops
or maximum three drops of the pigment because it's very saturated with these
highly saturated pigments, you want to make sure that
you're using minimal quantity because they go a long way in bringing color
into your mixture. So overdoing it might actually take away
the marbling effect and you will end up with a solid color mix instead
of a marbling mixture. The second thing is that when you're dropping the
pigment in your cup, you want to make sure
that you're just giving it a very, very light swirl. You don't want to spoil it
too much because again, you don't want the color to takeover the mixture completely. So if you're able to get a nice marbling effect
within the cup, the way you can see it in my cup right now, then
you're good to go. The trick to getting a good
realistic marbled effect on your decimal night
product is to actually create a good marbled
effect in the cup itself. And so it's very important to stop yourself from
getting carried away in the mixing and make sure that you stop just
at the right time. As soon as you're happy with that beautiful marbled
effect in your cup, you should stop
because that's exactly what's going to translate
onto your product as well. So with this mixture is ready. And now in the next lesson, we'll be learning how to
pour it into the mold.
7. Pouring + Setting: Alright, so now once we have this beautiful marble
mixture ready in our cup, we want to start pouring it
very gently into our mold. But the first thing
I want to do before pouring is to sort of
pinch my paper cup on the top a little
bit over here so that it pretty much
becomes like a beaker. And then we can put the
mics in a thin stream instead of the mix falling
altogether at once in a lump. Now to achieve a
realistic marble effect, I like to start from one end of the mold and gradually
move on to the other end, just pouring from side-to-side. And I like to make sure
that I'm pulling this close together and color the whole
mould in one pass itself. The front side of the
drink at dish is going to be the bottom of
the mold actually, because the moles are
usually made upside down. So you want to make sure that you're fully focused
on finishing the design in the first pass and not really focusing
on filling up the mold. So focused on the design
with no empty gaps. And this is what is
going to show on the front side of the dish when you take it
out of the mold. Then once you have
that base layer done, you can start scraping out
the rest from the cuff and just start filling the mold
up with the leftover mixture. At this stage, if you
become a little messy or the design is not looking
very appealing to your eyes. Don't worry because this is going to be the
bottom of the dish. So this is actually
the backside. And it doesn't matter
what's going to happen over here
because as I said, this is going to
be the backside. So just focus on filling up the mold at this point in time. If you're already done with
the design in the first pass. Also, it's important to make
sure that when you're using a mixing stick to pull out all that leftover
mixture from the cup. You don't want to disturb the bottom layer that you just
put down inside your mold. Because if you do that, It's going to
disturb the design. Remember the first pass
is what your designers, which is going to show once
you take it out of the mold. So in other words, don't poke the bottom
layer and don't let that mixing steak touch the
bottom base of the mold. Basically that the marbling
effect doesn't get disturbed. And then just drop
the leftover mixture very gently in the
mold almost as if you're layering a little by little and just fill
it up to the top. Also, as we learned in
the previous lesson, you do have a little
bit of a window here, while the mixture is
still not very thick. So you can gently maneuver the design a little bit
on the backside as well. But if you're running
short of time, don't worry because this is
just gonna be the backside. So if you're not able
to fix it the way I'm doing it, it's totally fine. The next thing you want to do is tap the sides of
the mall gently so that all those air
bubbles come to the surface and pop
out on their own. I also like to lift my mold and then gently drop it
back on the table. And I also sometimes take it on my palm and tap it
again on the sides. And again lifting it
up a few times and dropping it back on
the table very gently. This basically helps to
get all that trapped air come to the surface
in the form of bubbles, which then pop out on
their own gradually. This is very similar to how vibration devices and tools in the construction
industry also work for concrete and
other similar mixes. So we're basically
just trying to get all that trapped air to come out. Alright, and now with that done, I can see that the
mixture is getting tick. I can see some creases
forming over here as well. So that's my sign to stop now and let this sit for 25 min. Make sure that you're
keeping your mold in a dust proof setup where there are no sudden
temperature changes as well. And even though you'll
be very tempted to touch this again and
again, don't do that. Basically makes sure
that the mole is left undisturbed and untouched
for the next 25 min. So grab a cup of tea or coffee. And I'll see you in the
next lesson where we will be the molding this
beautiful drink at Daesh.
8. Demolding Time!: Alright, so it's been 25 min and we are now ready to
demoed the drink at dish. Now at this point, when you hold your
mold in your hands, it might feel a
little warm to touch, and that's perfectly normal. This basically just means
that the mixture was solidifying over
the last 25 min. And at the powder and liquid, we're creating a strong bond. Now to build this out, we need to be very gentle. We want to make
sure that we don't harm the mold in any way, because of course, we want to reuse this mold
later on as well, as many times as we like. So we first start by
releasing the edges. And you can see that I'm gently just loosening the
edges all around, not putting any pressure
on the mold at all. And now I will go
all around once more and gently start to pull
the mold a little bit more. Finally, when I feel that
this has lose enough, I will just pull out the
dish very, very gently. Again, I'm pulling the dish
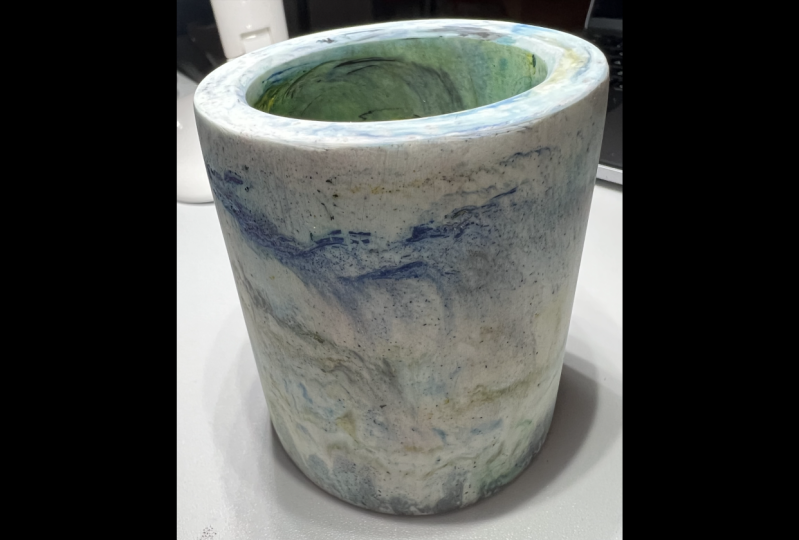
and not the mold itself. And wow, look at that. We have a beautiful marble
drink a dish with us. It feels very soft and smooth to touch almost like
a satin finish. And the marble design is
absolutely fantastic and very, very realistic as well. There are no major
holes in the dish, which basically means that I did a good job and releasing
the air bubbles. If I hadn't released the
trapped air bubbles, then they would have
burst inside the mould and it would have caused small
little holes in the dish. So this is definitely
a good result overall. And we finally have our
first project completed. Now keep in mind
that even though the dish fields pretty
solid right now, it still needs to
cure internally. With Jasmine, I am 100. After taking your
product out of the mold, you need to let it rest for another 24 h to cure
internally as well. During this time, make
sure that the dish has no extreme exposure to sun
or contact with water. Basically, take it out of the
mold and leave it aside for 24 h in a safe place before you can actually
start using the product. Alright, so with that, we're ready to move on
to our next project, where we will be learning
about the terrazzo technique.
9. What is Terrazzo?: Now before we jump on
to our next project, let's understand what
exactly terrazzo is. So terrazzo is an
ancient technique where chips of marble or granite are set in concrete and then polished to
give a smooth finish. You've probably spotted it
a lot of times on flooring. But more recently, the terrazzo
technique is also used to create stunning accent walls as well as home decor products. The idea is that
we basically take chips of a single color
or multiple colors, then set it against
the concrete mix of a contrasting solid color. This technique can be
easily replicated with Jasmine night and the
possibilities are endless. So for our second project, we will basically be
creating a set of terrazzo inspired coasters
using acrylic resin. And as you see in the picture, I have used color chips
against a white mix, which is basically the natural
color of Jasmine night. But you're free to use any
other colors of your choice. So gathered all your supplies. And I will see you in
the next lesson where we will talk about measuring
for the terrazzo technique.
10. Measuring for Terrazzo: Alright, so we're all set to begin working on our
terrazzo project. And for this technique, we again start by taking the mold of our
choice and putting water inside it to measure exactly how much Jasmine
night we will need. Now, I'm going to be using
this abstract circle, goes to mold, which is inspired by the shape
of natural geocodes. But as I said, you're welcome to use any other mold
of your choice. It could be a planter
mold, a mold for o'clock. I'm all for jewelry. Anything that you'd like. Now, in my case, one goes to mold, holds up to 60 g of water, which basically
means I will need double the quantity
of Jasmine aid, 100, which is 120 g. Again, this is my estimate based on my experience with
Jasmine I is 100. If you're using a
different brand, then maybe you'll need lesser
or more quantity than me. Now, I'm going to be
making for such coasters. So that auto makes that I need
is going to be 480 g. Now, out of these 480 g, we need to figure out how
much quantity will be the chips and how much
will be the plane mixture. I delete a good terrazzo
mixes one where at least one-third of the
mixture is made up of chips, while the other is plane, which basically means
we need 160 g of the chips and 320 g
of the plane mixture. Now, we will consider both the quantities of
the chips as well as the plane mixture as two separate total
quantities and then further divided into
a twist to five ratio. Which means if I take my chips total quantity to be 160 g, then the two parts that I will need for the liquid
will be approximately 45.71 g. While the
five parts that I will need for the powder will be 114 point to weight
grams approx. Now, did you notice
how confusing and tricky these numbers are? Because my weighing scale
only measures and rounded off numbers and it does not
take decimals into account. So this is a common
problem that we run into when we need specific quantities for a particular project. But the good news
is there's a fix. So the simplest method
to solve this problem is to increase your total quantity
to the nearest number, which can be perfectly
divisible by seven. So in this case, I will consider my chips to
be 168 g instead of 160, which means I need 48 g of the liquid and 120
g of the powder. Same way, I will take
my total quantity of the plane mix to be
322 g instead of 320, out of which 92 g
will be the liquid, while 230 g will be the powder. Now, just in case you're
wondering why we are looking for a number which is
perfectly divisible by seven. It's because Jasmine I ac
mixing ratio is two is to five. And when we add 2.5, it becomes a seven. So very similar to
how we calculated our numbers for a
previous project as well. Now whenever you get into your calculation for
a particular project, try and increase the
quantity a little bit to get perfectly rounded off
numbers instead of decimals. And of course, always increase the quantity
instead of decreasing it. It's always okay to
have a little bit of extra mixture as against running short of it in the
middle of your project. Now for the terrazzo techniques, we always make the chips first. We never make the
plane mixture first. And this is because
making the chips itself takes around
30 min or so. During this time,
your plane mixture would completely
solidify and go waste. We first prep the chips and then move on to
making the plane mixture. Now that you already know how to make a basic Jasmine
night mixture, I have a cup of ready with me with 168 g of Jasmine night. And in the next lesson, I will show you how we
can use this mixture to make colorful chips for
your terrazzo project.
11. Making Chips: So to make the chips, the first thing we wanna
do is obviously makes the total quantity required
for the chips in a large cup. And in my case, as I showed you, this is gonna be 168 g.
Then we want to take this mixture and divide it into smaller cups based on the number of colors
you want to use. So e.g. I want to use four
colors of chips in my project, red, yellow, blue, and green. So I took the mixture and divided it into
four smaller cups, or 42 g each, approximately. Now I didn't really use a wink scale to get
this to be exact 42 g. I just simply eyeballed and made sure
that they are almost equal, even if the chips
and one color is slightly more than the
chips off another color, I'm totally okay with that. But if you want to get
exact, precise measurements, then you can definitely use
a weighing scale to get exact quantities for each of the colors that
you want to use. So maybe you would
want to make chips of three colors are two colors or even a single color
for that matter. So prepare your
cups according to the number of colors
that you want to use in your project. And just as a reminder, this time, we're looking
for a solid color mix, which basically
means that we will actually be mixing the
pigment all the way in and we will not leave it midway like we did with
the marbling technique. We will still be using
two to three drops of the pigment depending on the exact shade that
you want to achieve. But this time, we
will mix it all the way in to achieve
a consistent, solid color mix instead of the marbling effect that
we derived earlier. Now another key point I
want to mention here is that Jasmine I pigments can
be mixed with each other. So e.g. in my case, I did not have a green
pigment available with me. I mix the yellow and
the blue pigments to achieve a shade of
green that I like. You can put two drops of yellow, one drop of blue, or two drops of blue and
one drop of yellow. Basically, you can mix and match two or three different
jasmine I'd pigments to achieve a shade
that you desire. This way, you will be able to achieve custom
color palettes for your projects and you will always have endless
possibilities with you. The next thing we wanna do is take some old plastic sheets and starts spreading our
mixture on it with the help of a spatula
or a mixing stick. Pretty much like
battering are dosed. These plastic sheets that I
use are usually saved from any packaging material
that I receive as part of my art supply orders
or grocery orders, or pretty much anything
else that I ordered online. You can also repurpose
or gift wrapping material or any kind of plastic sheets that
you find lying around, especially the
ones that are used to package flowers, fruits, and so much more widespread in the mixture with
the mixing stake, you want to make sure that
you're not limiting it to ten because that would lead
to very crumbly chips. That won't really give you a
prominent terrazzo effect. But at the same time, we also don't want a
very thick layer because take chips are not very
easy to polish later on. So we are basically
looking for chips with a thickness anywhere 1-3 MM. Now of course, at
the end of the day, this is a handmade process. So you can't really
get every chip to be of the exact
same thickness. But this is a general
ballpark figure for you to aim for when you're
layering your mixture. What I simply do is just layer every part
of my sheet twice. So pretty much like buttoning
a toast and layer it twice. With those two layers, I definitely get the
desired thickness. So don't worry too much if you don't get it
right the first time. With a little bit of practice, you'll be making red
chips in no time. Now, I have taken three
such plastic sheets to create my chips. One of the pieces is bigger, so I'm doing my blue and green
sections on the same one. But yes, of course you
can cut these up to your preference size as well
if that's how you like it. Now my goal at this stage
is to get all these colors laid out on the sheets before the mixture
starts to solidify. As I'm progressing from
one color to the next, I can already feel
the difference and the viscosity
of the mixture. It starting to get a
little tick and lumpy. And so I'm just going
to work as quickly as possible to get these laid out in an even and
consistent manner. Now once we have
all of these done, the next thing we wanna do is wait for 20 min and
then come back. In these 20 min, the layers will start to dry. And then we can easily build the chips off of
these plastic sheets.
12. Peeling the Chips: Alright, so 20 min
have passed and we actually come to the best part of making
terrazzo projects, which is the peeling
of the jumps. Now this is an oddly
satisfying experience. And if you're someone
who likes to watch those ASMR videos on
TikTok and Instagram, then this process is something that you'll totally
get addicted to. I can tell you firsthand
from experience, I'm totally addicted to making terrazzo chips for my projects. So all we basically
need to do over here is gently lift up these plastic sheets that we laid out our
jasmine right on. And it basically just start
to crumble them a little where the chips will just
fall off on their own. Once you lift up
the plastic sheet, you'll notice that
the chips kind of automatically break
out into random sizes. So you can control this a
little bit by taking some of the bigger pieces and
then further breaking them manually into smaller
pieces with your hands. But keep in mind
that you don't want too many powdery
small pieces as well. That's because otherwise
the terrazzo effect won't look very appealing. And you want those chips
to look prominent against the plain background that you have decided
for your project. So make sure that the
chips or not to crumbly and they are still a
decent enough size, like about a centimeter or a little more
than a centimeter, depending on the kind of
project that you're making. Just so that they look prominent when you're putting
them against the plane, the plane mix in your project. Now, I'm just going to be
loved all the remaining Desmond I had from all
the other plastic sheets. And this way we have all
our chips ready with us. I'm gonna do this quickly
for all the colors. You'll notice that
one of the reasons why these chips are
really easy to peel off right now is because
we're doing this immediately after 20 min. Had we waited a little longer. And if he had let this jasmine
light makes dry up to, let's say about an hour
or even more than that, then the chips would
have hard-earned a lot. And it would have been
slightly more difficult to pull them out of
the plastic sheets. So it's a good idea to get
the chips off within 20 min while the Jasmine out internally is still
a little bit soft. And of course we want to collect all of these in a paper cup. Now, if you're making chips in advance for multiple projects, you can of course, store them color wise and
separate containers. But for now, I already
know that my project is going to have a mixed bag
of these colored chips. So I'm just going to put all of these in one cup together. Another thing that
you should totally do is to crumble the
paper cups as well, in which you had initially
mixed your Jasmine night because all that
leftover Jasmine, I found the paper cups can
actually be used as chips. So basically, you can take
all the leftover Jasmine, I am from your mixing
states, from your cuts, from anything that
you had pretty much used during the mixing process. Especially if you have these
silicone mixing sticks, then it's really
easy to peel off everything from the stakes. And you can use all of
this in your mixture. You can use all of this as
chips as part of your mixture. Basically, if you notice, Jasmine light as a medium has really no wastage if you
use it all up nicely. So if you take out all of these contents from
the paper cups, from a mixing sticks
and even if some of it is sort of like stuck
onto your surface, like whether it's a
table or anything else. If you can peel that off, you'll notice that Jasmine, I'd really has minimal
to no wastage. You can also take
a mixing stage or a spatula to further break
some of the larger pieces. And also to mix the chips
better inside the car. If you still feel that the
chips are not mixed well, then you can just take an empty
cup and pour the contents back-and-forth until you are fully satisfied with the mix. And so once we have salvaged all of these little chips
from our mixing States, paper cups, and of course
from our plastic sheets. We collect them all in a cup. And in the next lesson, I'm going to show
you how to go about mixing these chips in
your Jasmine admixture, and how to go about
boring yogurt stores. I'm gonna see you in the
next lesson very, very soon.
13. Pouring Terrazzo Projects: All right, then we're all set with our mold and gentlemen, I'd mix and with our chips. And so as I mentioned earlier, I'm gonna be using this geode inspired circular,
abstract circular mode. I'm gonna be using
four of these to make a set of clusters or
set of four coasters. Basically, you can obviously change the quantities if you want to make a set
of two clusters, or if you're making
something else instead, you're totally free to
change the quantities. Now, as we had
discussed earlier, we're gonna do 322 g
of the blend mixture, which is going to be
two-thirds of the mix. And then we're
going to do 168 g. Or if the colorful chips. Now we already have the
chips ready with us, which we had measured and
calculated according to 168 g and we already
get them ready. Now, we're just
going to add those into our plane
Jasmine light mix. And you'll see that the
chips that rollout or the ones that bought
out the fastest rather are the ones which are
really small and crumbly. So you might want to
just manually dig out a few larger pieces as well and put those in your
Jasmine right mix. And in fact, if you
want to segregate your pieces beforehand and
only with the bigger ones, that's something that
you can only do. Now, one of the things
that we wanna do here is mixed this really well because we want all
the pieces to be completely coated on the
plane Jasmine admixture. We don't want any thesis to
fly away or we don't want them basically just running away from the mixture
has so to say. And they all need
to be completely soaked in the plane.
Jasmine, I'd mix. And once you have that ready, the pouring technique pretty
much remains the same. We're just going to pinch
the top of the paper cup and we're going to start
pouring it into the mold. Now in this particular case, because we're not
really looking at any formation as such. You can for pretty much in
any direction that you like. This was not the case when we did the modeling
project because we wanted the marbling lines
to look quite aesthetic. And we wanted them
to basically be linear and sort of
in a formation. But in the case of
a terrazzo project, it doesn't really
matter which side of the model you start with first. You can basically just
go about filling them all from any direction which
is most comfortable to you. And you are just going to fill up the mold all
the way to the top. Now we want to make sure
that there are no pokey, pointy pieces which are sort of walking out of
the mold right now. Because if they are
and if they are surfacing higher than the mold, then you will have
a lot of trouble sending them later on. So you want to make sure that
all the pieces are sunk. Indigestible night
makes really nicely. Now one of the simplest
ways to do that is obviously to spot
those pieces manually and either remove
them or seeing them in the mixture as
deep as possible. But another thing
that you can also do is pretty much what we did
with the marbling technique, which is to take your mold and just gently throw it
back on the table. And just basically
just keep giving this motion to the mixture so that all the air
bubbles rise on top. And all those little
terrazzo chips that you had in
your mixture again, sort of even out and
they can settle in nicely in the Jasmine life mix. Now I'm going to repeat
the same process for all the 4 mol. And again, keep in
mind that when I'm putting the mixture
and all the 4 mol, I am also side-by-side checking that the chips are getting
evenly spaced out. In my Jasmine I've mixed. I don't want one goes to
to have too many chips and the other coaster
do not have any. I want to make sure that the chips are kind
of balanced out. And just keep an eye
on the chips and making sure that they are evenly spread out between
all your course does. Again, make sure that
there are no pokey, pointy pieces which
are coming out. You can either throw them away or you can just think
them deeper into the mix. You basically just want to
make sure that the back is as smooth as the front so that you don't have a lot of
troubles handling this. So that the coastal
looks completely polished and nicely finished. Once you're done sanding. All right, and there
we go. So I'm done with most of my co-stars and I'm just going to
gently keep adding these back on the table. I'm just gently going to
hold them in my hands, in my palms and makes
sure that a tap all the sides so that all
the air bubbles released. Basically the same
steps that we did with the marbling
drinking dish as well. You want to make sure that
the air bubbles released at this stage because
otherwise they get trapped inside the mixture. And then when they
released later on during the process of curing, then they tend to
leave little holes on the surface which don't
really look very appealing. So in order to reduce
those holes where the bubbles possibly
tend to burst, we want to make sure that we released the bubbles
right now at this stage, when the mixture is still wet and when we're
still boring it. Alright, so it looks like all
my goals, those are done. So I'm going to wait for 25 min. And then I'm gonna come back
and I'm going to show you how these look when I take
them out of the mold. So I'm gonna see you in the
next lesson very, very soon.
14. Demolding Again!: Alright, so it's been 25 min and we are ready to
demoed are coasters. And the process of the molding, the co-stars remains
pretty much the same as what we did with the
marbling drink a dish. So the only difference
is that this time when you take out the
coaster from the mold, you will see that the
back is a little crusty, crumbly uneven, whereas the
front is absolutely smooth. And that's completely
normal because we had put in a lot of terrazzo chips inside this particular project. So the bank will feel a
little bumpy right now, but we're going to send
it later on so that it becomes as smooth
as the front side. And you will see
that your chips are basically submerged in the
way Jasmine I had right now. Or if you've chosen
a darker color than your chips will be completely
submerged in that color. And they're not really
surfacing so much on the top. And that's because we still
have our sanding job to do. So once we completely sand and polish these than
the chips are gonna show up nicely and
all the colors are going to pop up really
nicely on the surface. And so I had already
released one goes to a from the mold before I started
filming the video. So I'm going to show you three of these on
gambler over here. The process is pretty
much the same. We just make sure that
we're not stretching out the mold because we want to keep reusing the mall
for future projects. And we always just released the project from the
mall very, very gently. The goal is to not damage your mold because you want
to use it in the future. And the less you stretch it, the more likely it is
to stay intact when it comes to the shape of the mold. So your projects are
going to turn out to be absolutely perfect when you keep reusing them
all in the future. So these are my
Kostas right now. And the front side is going
to be completely smooth, whereas the backside
is going to be a little crusty with
a little texture. And that's completely okay
because we're going to sand it together
in the next video.
15. Sanding for Terrazzo: All right then, so
I'm all set over here with a nice big tree
filled with water. This is just plain
regular tap water. And then I have my coasters
ready with me for sending. So just to give you a
sense of comparison, I have one coaster already sanded and polished
with me over here. This is what the final output
is going to look like. So you can see all the
colorful chips are now basically on the surface and they're not submerged
in the Jasmine aid. So in order to do this, the first thing that
we want to do is take a piece of the
60 grit sandpaper. This is basically
one of the office and peoples that we have today. And so we're just going to wet our coaster as well as
the sandpaper a little bit and start sanding this
in a circular motion. Now one of the
things that I highly advise is to keep
rotating Jocasta, so that you're not overspending
one particular side. You still want this to be
completely leveled and you don't want one side to become thinner as compared
to the other. So you basically want to
keep rotating this and make sure that your evenly sanding all the sides
of the coastal. The purpose of the 60 grit sandpaper is to make sure
that the chips are revealed. Now at this stage, you will notice that there are some wildland scratches which are going to get
formed on the surface. But I can promise you
that this is completely normal and there is nothing
to worry about right now. The scratches are
absolutely normal. It's because we're
using a really, really rough sandpaper. And then as we move up higher with the grips
of us and papers, the polishing will automatically happen and the
scratches will go away. Now this process is going
to take you at least five to 10 min with the
60 grit sandpaper, depending on how deep the chips are submerged
in the Jasmine. I'm just going to
fast-forward the video a little bit for you
to see the process and for you to understand
how I basically sanding and how the chips finally revealed on the surface. Again, the goal is
to make sure that the 60 grit sandpaper is used to get the colorful
chips on the surface so that they're not submerged
in the decimal night. So we're basically just sanding off the top layer
of the cool stuff. All right, So that
looks pretty good. I can see that the
chips are now on the surface and they're
standing nicely, brightly against the
white Jasmine I had. And now I'm going to move on to my 200 grid paper and basically do the
same exercise again. The 200 grid paper is going to be a lot smoother and softer as compared to the 60 or 80 grit sandpaper that you've
used in the first pass. So this one is going
to help make sure that all those little bits
and particles that got left behind when we
were using the 60 grits and people are
gonna go away now. And this one is basically going to help make the
surface a lot smoother. At this point, you
will also notice some of those scratches fading away. So it's basically as if the scratches are getting
disordered onto the surface. And so gradually as we move up higher with the
San people grids, the scratches are going to
completely, completely vanish. And again, I'll have increased the speed of the video
over here a little bit. But to give you a realistic
sense of the time, it took me about 10
min of standing with the 60 good paper and about five-minutes of sanding
with a 200 grid paper. And now I'm going to move on
to my 600 grit sandpaper. Again. I'm just making sure that
I'm going horizontally, vertically in circular motion, just basically alternating
the movement of my hand and making sure it's centered nicely and
thoroughly all over. By the time you're finished
with the 600 grit sandpaper, your piece is going to
feel exceptionally small. But we just want to make
sure that it hasn't nice sudden feel to it. And for that, we'll give it
a final finishing touch. We're going to use
1,200 grit sandpaper. You can also use 1,000. I just happened to
have a 1,200 with me. So I'm using this.
Basically, the higher you go with the
sandpaper grid numbers, the more polished the look of
your piece is going to be. And this is how it's going
to eventually look like once the piece is completely polished and standard nicely. Alright, now I'm going to
move on to the backside. But while I'm sanding
the backside, I'm going to talk you through a couple of choices
that you have. So if you don't want
to send the backside of the coaster, that's
completely okay. As long as the pokey, pointy pieces that are coming
out from the backside or not to lumpy and the
bumps are not big enough. You can actually use
the coaster as is, but it's the bumps on
the back are too big, then probably a teacup or a wine glass is not going to stand very stable
on the coaster. And so it's not really going
to be usable in that sense. So you want to make
sure that you send it. And again, the sending process basically remains the same. You can use your 60 grid, then move on to 200 than a 600. And then at housing,
sometimes I just use 60.200 and stop at that because I'm not really
looking for a very polished, shiny effect at the back. But it's totally your decision whether you want to
send it at all or not. I'm just going to
send the back also a little bit just to make
sure that the ghost is a completely even out and they
are absolutely levelled. There are no big bumps at
the backside of the coaster. So I'm just going to abolish this also a little
bit over here. And finally, this is what all
the ghost does look like. I'm quite happy with the result. I think the ghost
does look pretty good on the front as
well as the back. This is the front side
and this is the backside. So yeah, So overall quite
happy with the result. And I can't wait to
use these coasters. And I hope you've also made a
beautiful terrazzo project.
16. Final Thoughts: Alright, so congratulations
on finishing the course and thank you so
much for taking this journey. If you're malnourished appeared any projects along the way. And I'd love for you
to post pictures of your wonderful creations
in the project section, which is right below this video. If you choose to
share your patients on social media instead, that I'd love for you
to tag me on my hand. Remember, as you go forward, the only way to harness
the full potential of acrylic resin is to be practicing and just
keep experimenting. The more your familiarize
yourselves with, the easier it will be for you to execute your ideas and
develop beautiful. I truly hope that this class
has been helpful for you. If it was, I'd love for you
to drop me a review about it. And if you have any suggestions on ideas for future classes, I'd love to learn about those as well in the discussions tab, which is also right
below this video, I love to create classes around what my students are asking for. So feel free to drop
in as many suggestions as you like in case
you already haven't, make sure that you click on
the Follow button on top of this video to subscribe to my notifications
on Skillshare. This will help you to stay
informed about new classes, UVA arrays, and other
exciting announcements. That I said goodbye. The only thing
available out there. Thank you so much once again for taking this class with me. And I would love to
see you in a lot of my future gases as well. Bye-bye.
 Ridhi Rajpal, Artist + Film-Maker + Educator