Transcripts
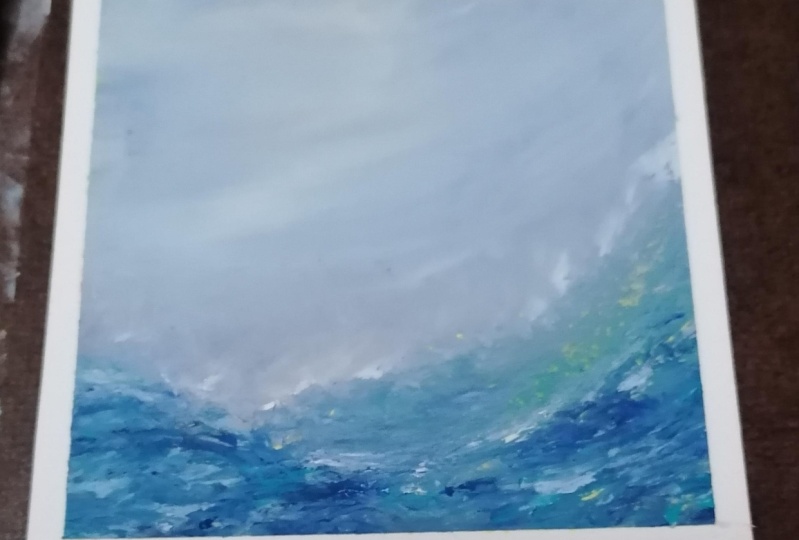
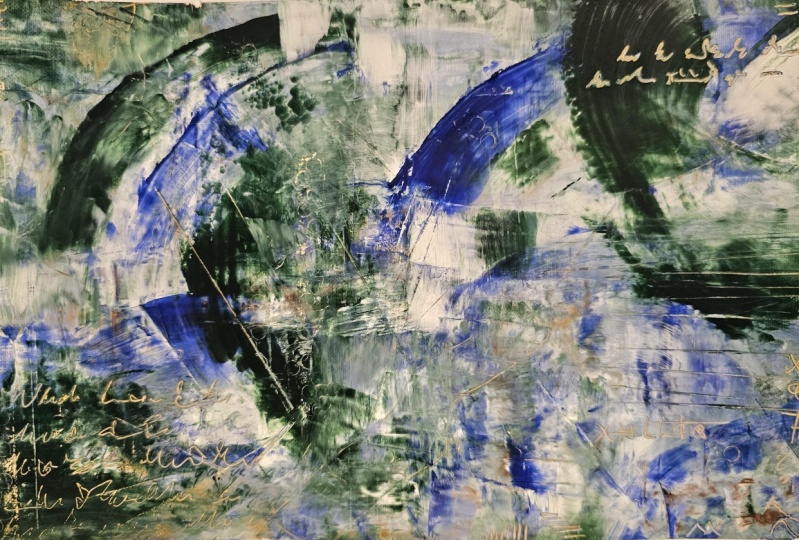
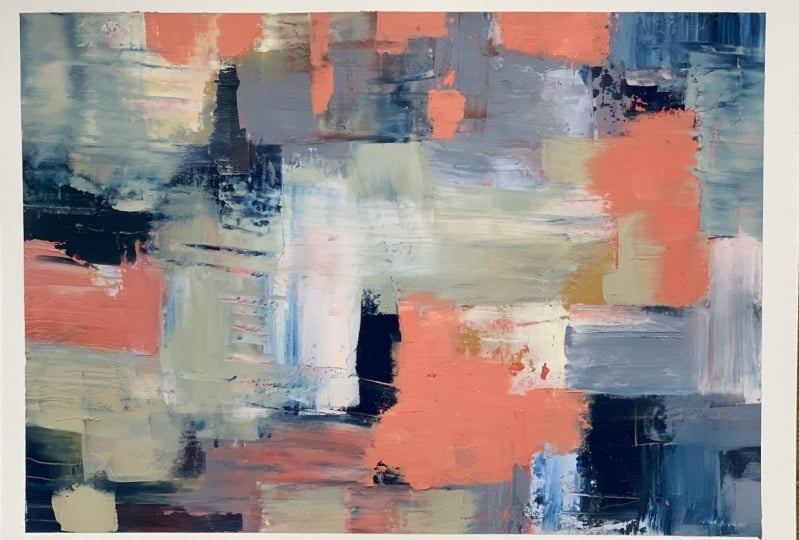
1. Welcome: [MUSIC] Hey, I'm Denise Love and I want to welcome
you to class. So let me show you
what we'll be doing. In this class, I'm
super excited. We have several
different kinds of projects to really
get you comfortable; working with oil and cold wax. We're going to start
small and just do some little junk pieces to experiment with a
little bit with the wax itself and with color
and with mark making. I'll be honest with you, out of the class, the junk pieces, which is
this big one and this one, are my very favorite. Sometimes it just goes to show
you that working fast and intuitively and creating
without lots of expectation, sometimes you get things
that you just never even thought you
were going to get and you get really excited. So we're going to start off with some little easy mark making
color experimenting pieces. We have bigger pieces, color study-wise that we'll do. As I was making these, I was questioning my
color choices and my design and the way
that I was ending up. Then as I walk away and
come back to these, I love some of these pieces. So sometimes you have to walk away from your
abstract pieces and come back to it with fresh eyes to really appreciate
what you created. This piece here, I'm in love with this
piece and I think maybe this could be the way
that's up, I love it. So turn them around, look at them in different ways. I like it because these are not super large and overwhelming. Yeah, I think I had
them all upside down. There we go. That's how
I feel they should go. [LAUGHTER] I like these pieces because they allow
you to experiment with color mark making. It's not such a big
piece that you're getting bogged down in size. So those are super fun. We've got the next
step up from that, that we'll then experiment
with where we take a larger sheet of paper
and create from that. I'm not even positive in my mind that I fully
love this as it is. So I still reserve the right
to maybe cut a piece or two out of it that I love
as an abstract instead, which I always love
that right there. I always reserve that right because that's my
very favorite way to create and we'll also create
a bigger piece than this, like a really big piece, and then we will cut
larger pieces out of it. That's the one as I'm filming this welcome video
that's still wet. So that'll be a surprise
when you get to that video. Then with the
leftover extra paint, I actually created this
beautiful piece right here. That to me it looks like
I'm looking through a waterfall out to a
lush landscape and lake. This is what I considered
my trash palette. It's where I put my extra
paint so I didn't have to throw it in the trash
can and it could be my very favorite
piece that I've created during this workshop along with these, along with that one. So funny that everything
is my favorite. But [LAUGHTER] it's like
these are like your children, you create them
and you love them. [LAUGHTER] But this
piece was super fun and just the scrubbing of the
paint to create that movement. I will probably hang
this one up on the wall. I enjoy it so much and I actually on the second
day after it dried, instead of coating more
layers on top of it, I'm like this is finished. That's amazing when
your junk pieces, your practice pieces, the pieces that we're
going the fastest end up being the most
intuitive and beautiful. So I'm super excited to
walk you through how I use the cold wax medium and the different projects that
we have in this workshop. I really hope you enjoy working with this
as much as I do. I can't wait to see the
projects that you come up with. So definitely come
back and share those. I really enjoy seeing the different colorways
you come up with, the different marks, the different ways that you
work with the paint. It's just as exciting to me as the pieces that I
come up with myself. [LAUGHTER] I definitely
want to see your projects. Please come back and share those and I'll see
you in class. [MUSIC]
2. Supplies: [MUSIC] Let's talk about
supplies in this video. I've got lots of
things on the table. Some of them are optional, some of them you
definitely need to have. Then I also want to mention a couple of books that
you could check out if you're interested in really going a little bit
further with this medium. That's Wabi-Sabi Painting with
Cold Wax by Serena Barton. This is a great
book for ideas and techniques and just seeing different artists and the
way that they do things, so I love that book. Then this book here, Rebecca Crowell and
Jerry McLaughlin. They do the cold wax
medium techniques, concepts and
conversations and this is basically considered the
Bible for cold wax painting. They've got lots of artist
examples and it's so full of inspiration and techniques
and different things. I really love this book. I've had this for many years, but it is still a book that
you can get out there. I love Rebecca Crowell so
much that I actually have an original piece from
her that I got this year. I'm sorry if my lights
are reflecting in there, but it's not a large piece. This is like five by seven that I've had taken to the framer, Rebecca Crowell, 2020, so this is something that
she's done recently. But it's so beautiful to me. I love the colors, I love the depth,
I love the marks. I just love everything about
this piece so much that I bought it when they came up for a little art auction online. Just to show you something that a real cold wax artist has created and then this is
some great reference books. If you really want to
dive deeper and get more ideas and more inspiration
and more information, these are great
books to refer to. I just wanted to share
those before I forgot. In this medium, we've got two things that we
need at the minimum, and that's the cold
wax and the oil because it's oil and
coal wax painting. For the cold wax, I'm using
the Gamblin Cold Wax Medium. There's a couple of
different brands out there and depending on where
you live in the world, you may have different
options than I have. But this is the one I'm using and what I love about this one is this a 16-ounce can and this goes a pretty
good, long way. If you decide that this is your medium and you
love it and you want to create big paintings and really spend time
with this medium, then there is bigger
containers of this. But the 16-ounce can goes really as far as I usually
want to paint in the year, so this will last a long time. I have a couple of cans
in case I run out, but I generally
stick in one can for quite a while because I just
like doing stuff for myself. I don't do it professionally
to sell things, it's just a medium that
I particularly love. What I love about
it is the cold wax itself is like frosting. It's like a beeswax
that's really soft. It's shortening, like when
you're cooking the Lord, people used to cook with. That's the consistency
and we're going to mix that with oil paint and what it's going to do is
it's going to make the oil paint a
different consistency. It's going to allow
that paint to dry a lot faster than
it normally would, and it has a matte sheen to it, like it's not shiny anymore because oil paint
is naturally shiny. This will make it matte. We have a product called Gamblin Galkyd which you
can add a drop of this or so to your little
mixture when we're mixing paints and that will put some of that
sheen back in there and also speed up a little
bit of that drying time. But generally, I
find that pieces are dry to the touch
by the next day. They may not be fully cured, but they're dry to the
touch so you can do more layers and scratching into it and more things to the painting whereas if it
were just straight oil paint, you could maybe go back to
it next week and it would still be wet [LAUGHTER]. The oil, the cold wax
medium is essential. There are a couple
of brands out there. If you get it out and it's
gritty then it's bad. It needs to be
smooth consistency when you're mixing your paint and if you mix it and there's little granules in it
or anything like that, the wax is either old
or it's a bad batch, so it should be smooth
consistently see you're using it. The Galkyd, I'll be honest, I hardly ever use the Galkyd, but it is one of those add on items that you might
consider playing with. Just a little tiny bit goes a very long way like this
might last you forever. This is a sample that
I had gotten from the Gamblin company when I had visited their
booth at an art fair. That's thing that they have, that I'm using, odorless mineral
spirits for clean up if I need to clean any
brushes or anything and I have it over here in a jar as my brush cleaner and that
last for a very long time. You clean your brushes and then all this color settles to
the bottom and you just keep using it until it's full of color and if you
paint like I do, you may never really change out that jar,
just last forever. But I'm using odorless solvent. Gamblin also has gamsol which is their brand of odorless
solvents so something to consider when
you're dealing with oil paint is you don't
clean up with water. Nothing I'm doing is
going to be able to run to the sink and
clean up with water. But I have found just
as a side note there, a really good way
to clean paint off your skin and your tools if you're at the
sink using water is the Dawn dishwashing. Soap, that blue soap that
they use. They use that. I just discovered that really
by accident they use that in places where they have
ecological disasters, where they have oil spills
and stuff and that's how they clean the oil off of
the farm animals. They use that Dawn
dishwashing soap and that stuff is fantastic. I keep a bottle of that
under my kitchen sink. Then if I do manage to get stuff all over me when I'm
painting and doing stuff, that's how I wash it right off my skin without
scrubbing my skin off. Just a little side note there
that Dawn dishwashing soap, It's great for cleanup of your skin and
probably your tools. I just never take
the tools now there. But it is a good kind of a non-toxic cleaner for yourself and your
skin. [LAUGHTER] So odorless mineral spirits or that game Saul's really nice if you have to
work with stuff. I don't like turpentine
or anything like that, something that's
going to smell so bad that runs me
out of the room, I just try to avoid. Another thing that I
like to have handy is painter's tape and you could
also use artist's tape. This is so we can tape
off our pieces and paint within the lines and then peel the tape because I gotta
be honest with you, peeling the tape is by far my most favorite part [LAUGHTER]
of doing the painting. I love to peel the
tape and reveal what I got and it just is magical. It goes from a big mess to a little piece of art when
you peel the tape off. So I do keep plenty of
painter's tape around. They also have a purple
tape which I've not tried, so I'm going to try
it in this class. This is for delicate surfaces and our paper could be
considered a delicate surface and painter's
tape will peel off your paper normally without
tearing the paper itself, it'll come off clean. If you're using masking
tape you're going to tear parts of your paper off. It's too sticky and I
don't recommend it. You could also use artist's tape that you
can get at the art store. I have some but it's not of the size that I
think I want to use. [NOISE] But I'll show it to
you and they'll make a mess. [LAUGHTER] This
is artist's tape. It comes in different
colors and this is good for working
on stuff for taping your pieces off to
and I wish I got the half inch size and I really
like this one inch size. I wish I had gotten a role
of this in this bigger size. But you can use
artist's tape too. I would just avoid masking
tape or regular tapes like that because they stick to your paper and then when you go to peel the tape off
they tear your paper. Always wear gloves with the cold wax because
you'll see why as we're painting pieces
my gloves will be filthy and if I didn't have the glove on
that'd be all over my fingers. Unfortunately lots of
art supplies are toxic so I don't want to be
getting as much oil paint on my hands as I sometimes do other art supplies
because it's harder to clean up but use the Dawn dish wash sink
soap and it makes it easier and some of these
are actually toxic. You can go nontoxic like if you want to mix
your own oil paints with natural pigments
and stuff like that if you're so inclined. But some of these colors that I've purchased
over the years, they're toxic and I prefer
to just be safe and wear gloves and it's so messy sometimes in the way
that I work with these, the gloves are filthy and
I can just take them off and throw the gloves
out if I need to. So have a box of gloves handy. Sometimes I even use more than one pair during a sitting if I'm
doing lots of paintings because they get to
the point that they're so covered in paint
that I need to just start fresh so that I
don't get paint all over my clean edges or
my papers or if I'm peeling the tape
I don't want to get any fingerprints all
over my clean edges. The other must have
obviously is oil paint. I have lots of different
oil paints and I have tried just so in
case you're wondering, you'll find
water-soluble oil paint out there also where these
are not water-soluble but they do have
those out there and I have a couple of tubes
of it but I think I've finally
separate them out of my oil box because
I don't like them. Water-soluble oil paints,
they're strangely waxy and less of that creamy oil consistent that my regular oil paints are. The one time that I tried them, I just absolutely hated the way that they looked and the way that they felt when I was using them so I veer away
from water soluble oils and I've heard a lot
of other people in the past say that they didn't really
care for them either. So I'm sure they're good for cleanup but I just
don't like them. If you're looking at oil paints, I would avoid the
water-soluble ones and just go for some that you
love the colors. I've got lots of
different ones here. I've got M. Graham
Company, I've got Gamblin. That's M. Graham, I've got
Rembrandt, Winsor & Newton. There's lots of
different brands. I do like to have a great big
white and then little tubes of any colors that I
particularly love and when you first go to
the art store looking at colors it's
super overwhelming so I would take a little
bit of time and just think, what colors do I like? What colors do I
want to work in? I also have sitting up here Charvin which is
my very favorite. Some of my favorite
colors come from the Charvin and
this tropical green is one of my favorites, it's such a bright, pretty teal. Then this Richeson Oils, I think I got this at
the Binders and I love this color but this has become unusable and look how
much paint is left. I got to where I couldn't
get the lid off so I'm sure I screwed it on with paint
in the way of the lid, so basically glued it down. I cut the bottom off so I
could scoop paint out of it. Then that starts
to dry so now I'm just going to have to go
buy a new container of this ice blue because
I love this color so much and these little tubes
have just become unusable. This is ash green. It's such a beautiful color too. I love these two colors and when I pulled
them out yesterday to do some little sample pieces that I was playing on myself, these two colors I couldn't
even use and they'd be really perfect in some things with oil and coal wax but these bigger ones seem
to last a little bit longer because I go back and forth with
the oil and coal wax. I will be doing tons of projects and that's my
interest at that time. Then I'll take a little break and move over to one
of my other interests, maybe watercolor
or maybe back to my photography or
something like that, so I don't play in one
medium all the time. I like to switch back and forth between all my
little art supplies because I like too many
things [LAUGHTER]. These will sit for a while
before I come back to them and then they're hard to get open so you need to
be really careful. At some point when you're
screwing these lids back on is to clean it up so that you can later get
these lids off. Some of my favorite
ones I may have just let go bad by letting those lid stay on there like
that and I may need to replace
them but I have had lots of these oil paints for
maybe more than five years. It really is something that I
come back to over and over. I may have to go shopping
for some new oil paints but I don't recommend
you buy too many, buy some of the
colors that you like, buy in a price range
that is reasonable. You can get artists
grade colors. The difference in the pricing really on some of these artists grade ones have more pigment
and lasts a lot longer. The student grade ones are less pigment and maybe
not as smooth and creamy. But buy what you can
afford and go from there and pick a handful of
colors that you love. Definitely a big white, Titanium white is the one I have because the white I
do use more than anything. [MUSIC]
3. Supply continued: This right here is the Messermeister
silicone bowl scraper. You can find these on Amazon, and they range $18 to 20. I do have a couple of these, actually, when you get them, they're in a package like this and they're all nice and clean. But the reason you want
it to be silicone is because the paint
wipes right off of it, and they're easy to
clean, and I could take a little bit
of vegetable oil and just smear it on here and just clean all this
right off of it. I got a new one at some
point because I thought, Oh, I'm going to wear this out. But I still haven't worn out, so I have opened the new one that I had
randomly over here. But I love this because it's got a really nice wide blade. It's flexible, more so
than the catalyst scraper, this one's pretty
common that you find in the art store, the
catalyst scraper. I like that this is longer, and it has a sharp point, whereas this one has
a rounded point, and it's not as flexible
because it's a lot thicker. This, I feel like gives
you a lot more control, especially if you're
spreading and mixing and really blending. This is my favorite. You can get those on
Amazon or kitchen. Nice kitchen stores
might have these. You definitely want at
least one of these. You can get the ones from the art store and play
with those if you want. I also have some hard
catalyst scrapers, but they're not good, in my opinion, for
spreading the paint. I like the soft silicone ones, but they are great
for mark making, so if you find some of these with the nice little
teeth on them, really great for oil and
cold wax with the teeth. Then there's also this
particular scraper that I think I got online when I was
searching silicone scrapers. It's okay too, but
it's a hard scraper. It's not the soft,
rubbery, malleable one. This is by far my favorite
and the one that you'll find most cold wax
artists using. You definitely want a scraper. Here's another catalyst
one with teeth. You can see it's well used. I do like these, but I
like them for mark-making, not necessarily for using it. Like I use that one. If you only get
one, get this one. You'll also want to have a variety of palette knives. I have lots of different
shapes and sizes and metal. I do like plastic ones because they're disposable if I ever get to the point
where I'm like, okay, I've overused it,
but let me tell you, this one is an older one, and I still haven't
got to that point. But the metal and the plastic
do react differently, and they feel different
when you use them, just so you know. It is fun to experiment
with both of them. They come in all different
shapes and sizes, and then I found, which I still haven't
actually used, but I found these on
one of the art sites, maybe in an ad of
different edges that the palette knife came in for
mark-making and stuff, and I'm like, how funny
are these and clever. I still need to get these
out and play with them, but they came in all these different
shapes, and I'm like, oh my goodness, I
need to have those, and I got them at a time when I wasn't playing in the paint, but I didn't think I'd
remember them later on. But these are great for
mark-making and stuff, so I thought, well, those
would be fun to play with. I haven't used them yet, so it's not like they're
super important. A couple of, maybe a pie
shaped one would be nice, maybe a longer spreader
would be nice. I'm going to play with this
one with the square edge. That might be fun. Then just different sizes. Really, the reason why you'd
want some different sizes is the bigger your canvas
that you're working on, you might want bigger tools, because if you're working
with little tools, you get little marks, if you're working
with bigger tools, you'll get bigger marks or
bigger paint spreading. Depending on the size
project you're doing, you might like to have a few different sizes on
those palette knives. Then I also like
mark-making tools. I have a whole little box of random tools similar to this. These are little
tools that you get over there in the clay materials where they work with clay. Because in the wax, you want things to be
mark-making tools, these make great marks. I've got just a whole set. At one point I bought just a
set of clay working tools, and it came with all
these fun options. My favorite is the one where it's got the
little ice peak on one end because you can use that for all kinds of little marks. These are the two that
I always have out to use with this. Just in case you're looking
for different tools. I have also found these
really fun things. They were by range, I've
had them for a while. But they're just
clear plastic pieces with different shapes on
them from mark-making, I love things that make marks. I also love this little tool. It's got just this kind of fun, a little aluminum pieces, and it'd be good
for scraping stuff. I do like having lots of little mark-making
stuff and go over to the area where they work with clay and get a few
clay making tools. If you just get one, get one with one of these long pointy edges,
that's my favorite. Some other things that I use
to make marks is cardboard. This really fun cardboard
came in a package last week, and I'm like, oh my goodness, that's the greatest sway mark. It's just a piece of cardboard, so I tore these pieces. It actually came in
a great big piece. I'm saving this and
using it many times. But I like that. I also like corrugated boxes and
I can show that. Let me go grab one. This is just some
corrugated cardboard. I love that too, excellent for mark making. If I get something like this
that comes in a package, yeah, you better believe
I'm saving that. Look how much there is. I'm going to be
mark-making and using this for a long time. I love things for cardboard. Look at your packaging
when you get any kind of packaging and see if you've got some cardboard with some interesting shapes or some corrugated like
I just showed you. Beyond that, you could
go to the art store and get different stencils. These are really
inexpensive like Styrofoam stencils were shapes on
it. This is my favorite. It's got lines and you can
see I use that quite a bit, it gives me fine
lines on my piece. This came out of the children's art
department at the Micheals. It was just a set of a bunch of different patterns that they could use to stencil on whatever
it was they were doing. I've had them for a while, but looking around
for something like these in the art store, something that's
got a pattern that you like and can be used as something stamping into
paint or something like that. Just look around and see what creative thing is you can come up with
that you could stamp into paint because the
oil and cold wax is the perfect medium for getting clean pattern when you're
doing that, I love it. Different options there. Other things, we're
going to be using. Let's talk about papers here. I am going to be
using in this class, the Arches oil paper and
you need to either use oil paper or prime your watercolor paper or whatever paper it
is you're using, you're going to have
to prime that paper. What I like about the Arches oil paper and I think there's one or two other brands
you might google oil papers to see what
comes up for you. It's got a nice texture. It's 140 pound, I believe. Yeah, 140 pound. It's a nice thickness. It is like a watercolor
cold press weight and feel. But this has already
been primed for me to be able to paint
with oil paint on it. If you use just plain
watercolor paper, it leaches all the oil, leaches into the paper
and it's disgusting. It's really oily because
oil paint is made of pigment and some type
of oil as a binder. So when you have your
paper that's not primed, that oil leaches into
the paper and make stains and outlines and
it's really terrible. If you're using a
watercolor paper, definitely prime that
paper with a gesso, a couple of coats before you paint and what a
pain in the butt. I go ahead and get the Arches oil paper and
I've used it from the very beginning and this
is one of my favorite papers. It comes in a couple
of different sizes. You've got this 12 by 16 inch, which is 31 centimeters
by 41 centimeters. You've got 9 by 12 inch, which is 23 centimeters
by 31 centimeters. For doing color
sampler projects, sometimes I like the bigger pad because I split this into fours. Then I have four
little color studies that I've got on here. Then if I'm doing one
big little painting, I like this 9 by 12
because I tape it off. Then that's a nice sized
painting to work on without being so giant
that it's overwhelming. So I am using the
Arches oil paper. Normally, in some of the
other classes, you'll see me use my ceramic palettes. But for the oil paint, I'm not using a ceramic
palette because, what a mess to clean it up. I am actually using
disposable palette paper. I like a great big one for this type project because
I want several colors out and I'm mixing them and I just like the
biggest one I can get. This one was pretty
large at 12 by 16 inch and the sheets
in here are gray, you can get disposable palette
paper in gray or white. But I think that the gray is fun because it doesn't distort
the color for you. It is a little bit truer
when you're mixing and I do like having
that to work on. Talk back to surfaces
that we can paint on. I like working on paper
because I can store these. Every class you take, they
talk about doing stuff on panels and things like that. After you do enough and maybe if you're just
starting with this, none of them look great. After you do enough
of them now you have samples and things that
maybe you love or don't, running out your ears. Just about everything I do, I do on paper because
I can store it. If I love it, I can
mount it to a board and then use it that way
if I want to hang it up. But that being said, I do have cradle boards
and things here because it feels different to paint on the paper than it feels
to paint on the board. I do recommend you
experiment with that. Now, you'll notice here, I've
got Canvas panel and Canvas. For oil and cold wax, I do not recommend you
use a Canvas product. I don't like Canvas
panel because when you put lots of layers
on these panels, my experience has
been they start to curve and I don't like that. It makes me mad. I
worked hard on it. I don't want it to
curve and distort. With the oil and cold
wax, once it dries, if this curves and you
try to flatten it, you'll crack the wax.
I don't like that. I don't like Canvas because
it's still pliable. If the piece is small enough and it's a really high
quality Canvas, that may be a really
super sturdy surface and you may decide
to give it a try. But over time, this
surface still moves. It's still pliable and you
could crack your painting. I don't want anything like that if it's a piece
that I really loved, I don't want do that. It's the wrong surface. So don't go with the Canvas
is the point of that. So there's lots of wood
panels that you could try. You could try these
little artists panels. They come in different
thicknesses and some of them are primed and some of
them are unprimed. Those would be fine if you
use the unprimed ones, you need to prime that with gesso before you get started. These primed one's maybe a
little bit more expensive, but they are fun to
experiment with. So I do have some of
those in my stash. Then the cradle boards
are my favorite. They are the ones that
have enough wood side there that you could see the
attached wood to the back. These are beautiful for
creating a piece and then having it where it's ready to hang because
I'd paint the top, I'd finish the sides, and
then it's ready to go. I do like cradle boards, they come in different
thicknesses. This is the three
quarter thickness. I really love the inch and a half thickness because
they look so rich. They're big and
they're standing out, they're like a statement piece. If you're just getting started, get the ones with
the thin sides. But if you get to the
point where you're making things that
you love and you want to gift things or
put things out for sale, go for the thicker side
ones because they look so rich and they elevate
the artwork so much. Let's talk about what
you can and can't use with these oils. If you're wanting to do mark-making underneath
the cold wax and oil, a lot of times, I will
do mark-making and some other colors and
things underneath my acrylic paintings
a lot of times. You can do that
with oil paint too, but you have to consider what the material is and what can
be layered on top of what. So if you're using
pencils, pens, markers, watercolors, acrylic
paint, anything like that, that can go on your first layer. If you're using oil pastels, which are different
than the soft pastels. These are the oil pastels
and they're very creamy. They're not chalky like the soft pastels
that I like to use. If you're using oil paint, oil pastels, oil sticks,
anything like this, that's got some type of
oil in the name, that you can put under the oil and cold wax or on
top of the oil and cold wax. Any of those acrylic, the pencils, the markers, the acrylic ink, the watercolor, any of those, you cannot put on top of oil paint,
they won't stick. Just keep those in
mind when you're doing different layering things. What are you wanting to do? If you're needing marks on top, here's a bigger
fatter oil stick. These are R&F oil sticks
and they're real chunky and they're not solid. Like you can just scrub this across the painting
and draw with it. They're not as solid as these. These are a little
more solid but still soft and I can mark
pretty easy with them. But if you're wanting
to do mark making on top of the oil and cold wax, like add color or something, it needs to be some oil
based product going on top. Any water-based product
can go underneath. Any oil based product
can go on top. The water based
products won't sit on top of the oil paints. That is all of my yummy pieces
here that I keep around. You don't have to have
all of it at the minimum, you need some paper, maybe some tape, oil and cold wax, and some marking tools and
you can get started. Some of this other is just things that I
have collected as I have gone along in my journey. So I hope you enjoy searching out and playing
with some of these tools. If you've got some
things on hand, start with that before you
go buy a bunch of supplies. I will see you in class.
4. Prepping your paper: [MUSIC] I'm actually taping off one of my pieces of paper. This is the larger [NOISE] of the papers that I'm
using because I want to do some color studies and I like to experiment
with my supplies. I've gotten this purple tape, which is over in the hardware section near
the blue painters tape. It set for delicate
surfaces and I thought, well that would be
very interesting to try and just see [NOISE], does it tear our paper
when we're done? I'm going to do color
studies on this sheet. I like working on several
sheets at the same time. This is thick enough and
I can move it around. I like working on several sheets at the same time so that I can then play with lots
of different things. Let's see, I got 10 inches
so let's just mark this. I want it to be mostly centered because a lot of
times I'll have to leave a piece sitting overnight to dry so that I can then
continue to add to it. Let's see what we got here. Half of that would be seven
so let's put this right here. That is mostly centered. I'm just eyeballing it
beyond there and I didn't want cut it even [NOISE]. I'm just going to eyeball. It may be completely crooked, but we'll see, close enough. Then you can tape it down
to your board if you want. But I'm just going to fold those over so I can peel
that back later. Is that even? Try like right
there, that's close enough. Some of my papers
you'll notice had great big double white
lines in between them. That was where I had
taken two pieces of tape [LAUGHTER] and taped two layers, but I
don't like that. I like it where it's the
bigger paint size and the little tape
in-between so that I have just a white line around
it when I peel these off. That's what I'm
doing with these. I'm taping off my paper. I'm going to do color
studies on this. If it's a piece and
we'll do this piece with a blue painters tape because
I got it here [NOISE]. If it's a piece and I want to
do several different types of abstracts in this workshop, I want to do color studies. I want to do a piece where
I just mark-make and do all my random stuff on
the bigger piece of paper like I do
with the acrylics. Then tomorrow when
it's dry to the touch, I want to be able to then search out compositions
that I like [NOISE]. I'm going to do one of these, tape up one of these
papers for that. That'll be a project. Basically, you can say three
different projects here. I've got the color
study project. I've got the big [NOISE]
pins where we're going to search out yummy compositions, so that's a project. I'll try not to leave any
white over here because I might get paint
on the tape and I want that to be a clean edge. Really a little tiny edge
on this would be fine. I could have done this with the real thin artist's
tape and have as much paint surface
left over as I could. But let's just go [NOISE]
with it and see what we get. I want to tape really
three different pieces. We've got this one
where we're going to get all yummy and messy. Now I've got that one taped. Then I have the smaller paper
here where we can work on just an abstract [NOISE] piece in this size would be nice. This could go along with, say, our color studies
where this would be a completely different
technique with our [NOISE] messy work that we're going to do and then experiment and see if we get anything we like
when we're done. This would be a little
more deliberate abstract, which to me is harder. I've got plenty of them, I showed you in the
sample [NOISE] video of all the different things
I've played with and the samples that I've made
throughout the years. I do find painting an abstract like this
harder for me personally [NOISE] because my
style has really turned into make a great
big messy painting. Freestyle basically. Not worry about [NOISE]
all the work that it takes to make a really
nice composition piece. Then searching out pieces out fun pieces out of
it when you're done. Whereas with this, you
have to be a little more thoughtful and
deliberate as you go. Which I find most
times I don't love the piece I signed up with or I get frustrated
in the process. Whereas when we do the
great, big, messy one, I love it every single time
and it took less thought and energy and it had
pieces that I loved. I got my paper prepped. When you're prepping your paper, doesn't matter what size
paper you end up with. Prep a big one that we're
going to make a mess on. Prep a color study one
that we can do colors on. Really, I like to prep a lot of color studies and
just play and play. Then prep a bigger
abstract possible piece. Then, true to my form, I may like it and leave it or I may cut a piece
out of it now that I love that technique so much and I'm much happier with my piece [LAUGHTER]
when I'm done. Paper prep, prep three pieces and then I will see you
back in class [MUSIC].
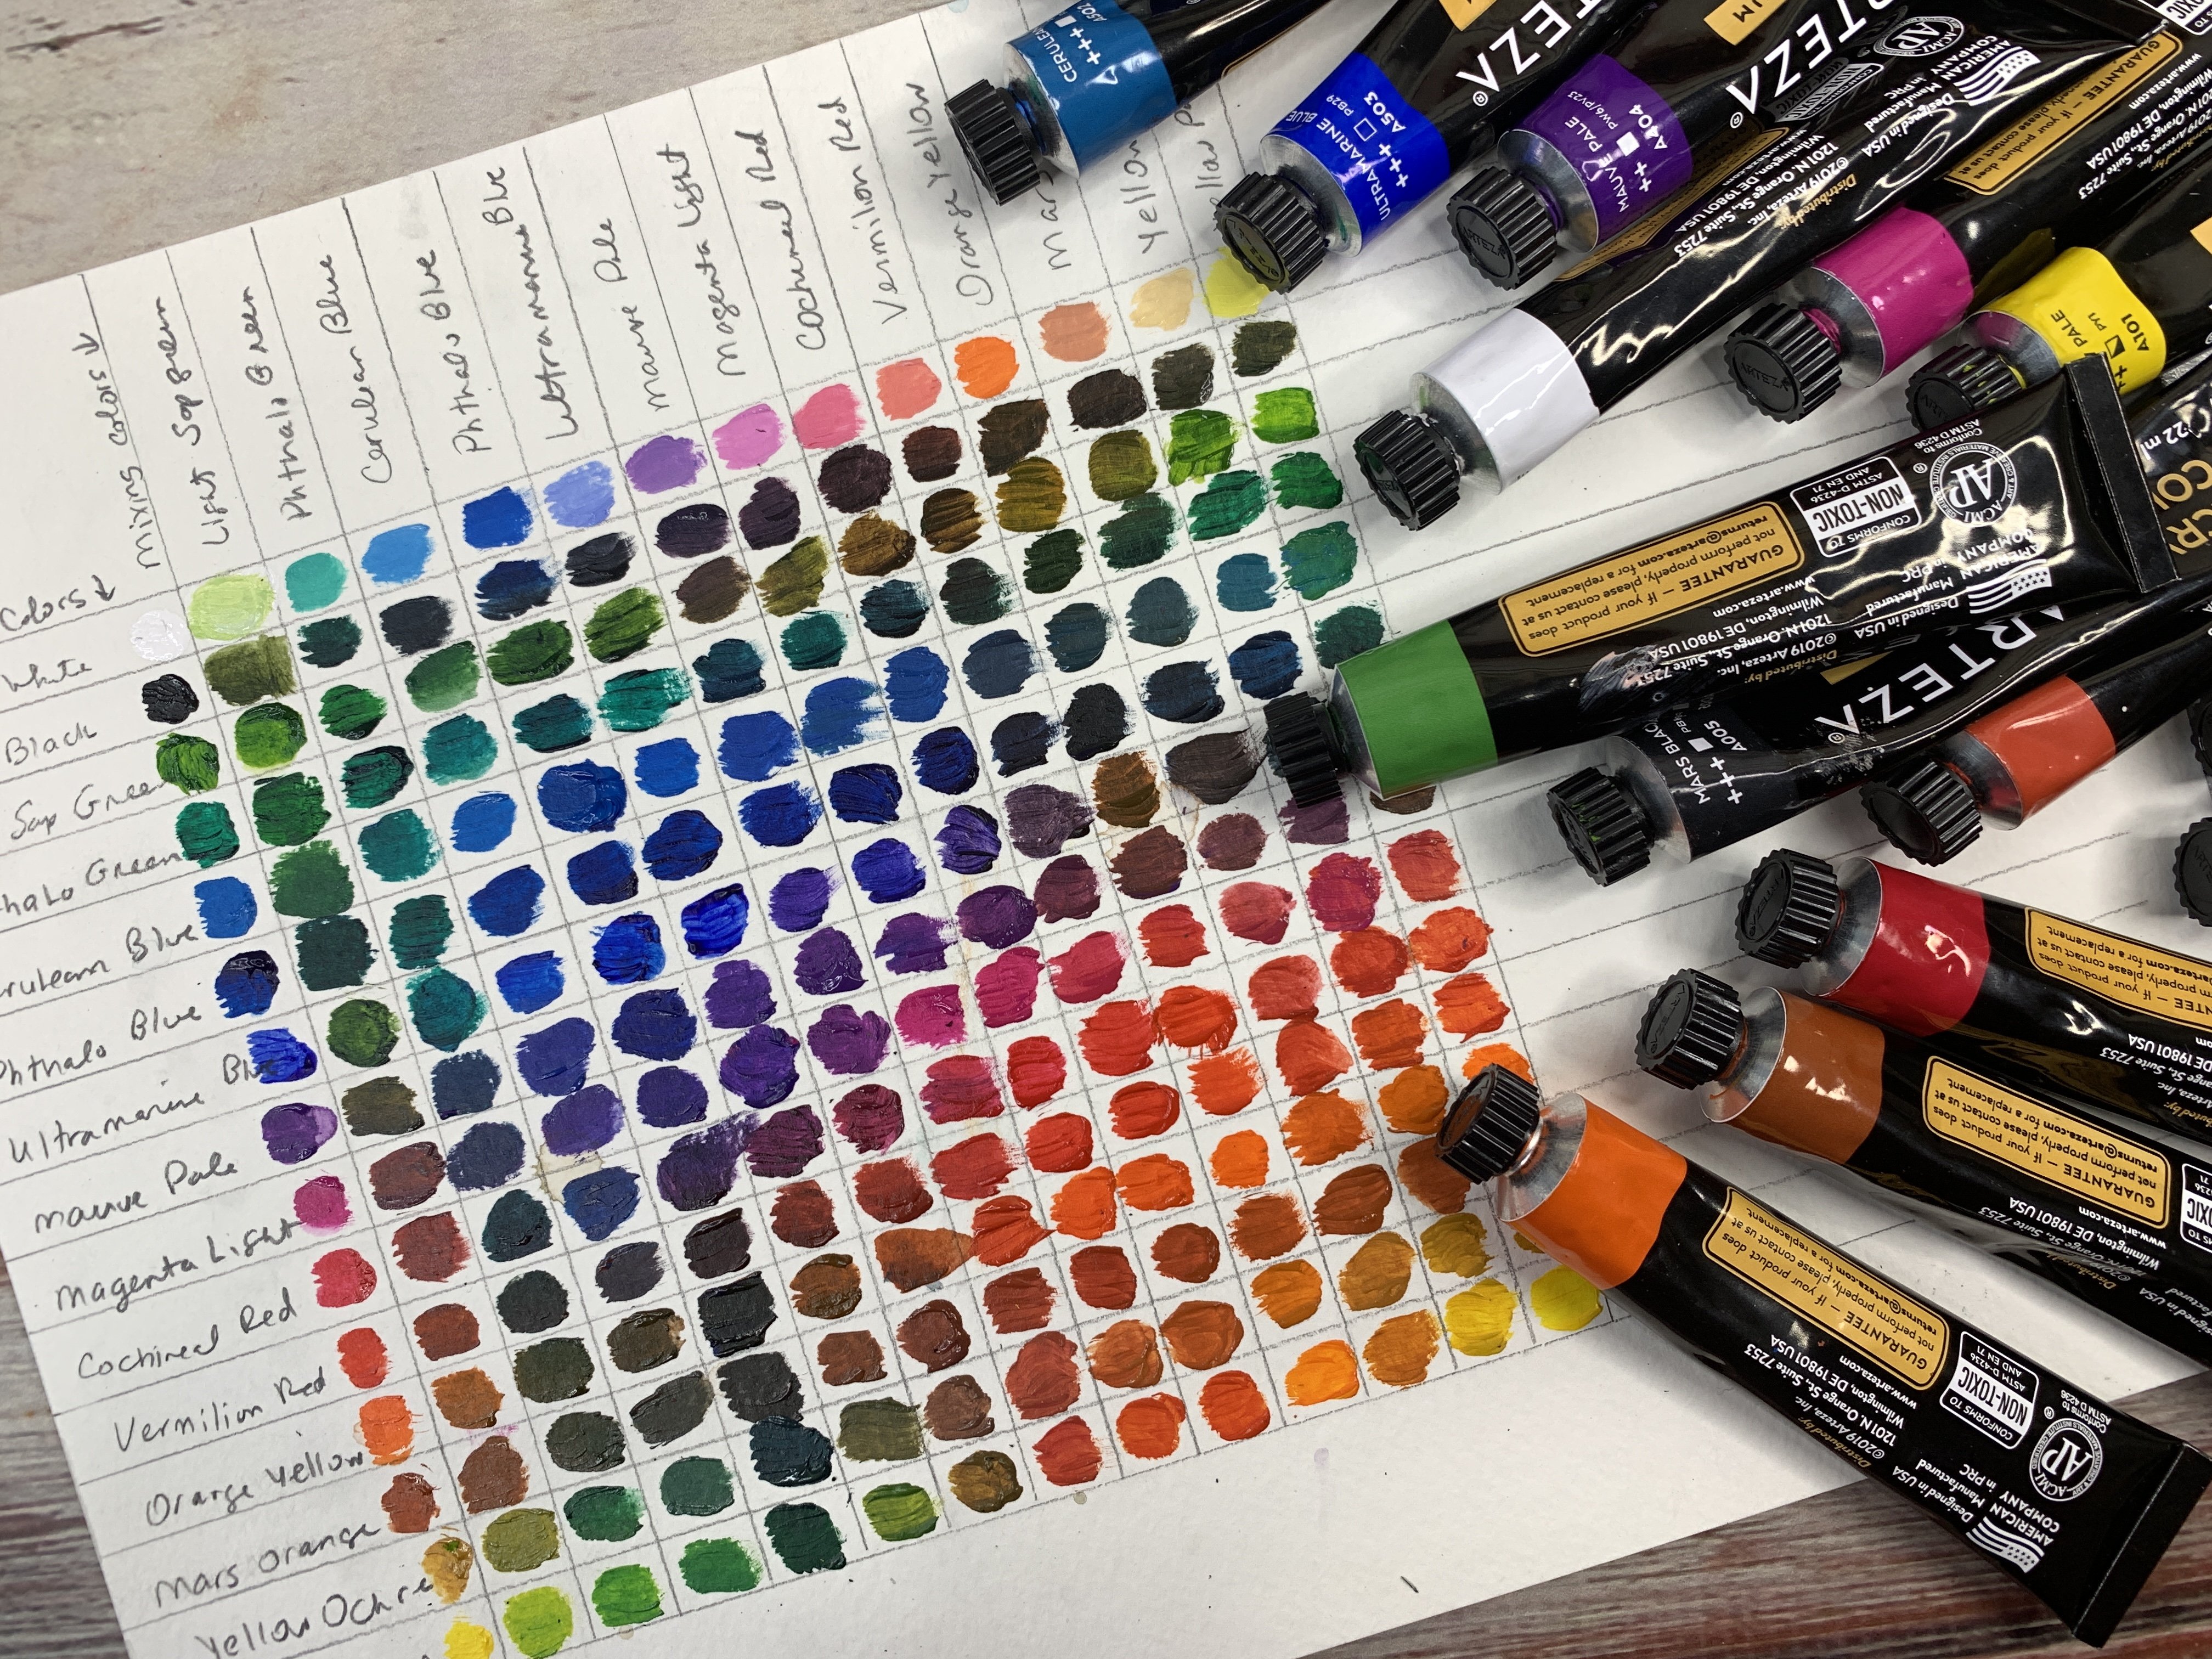
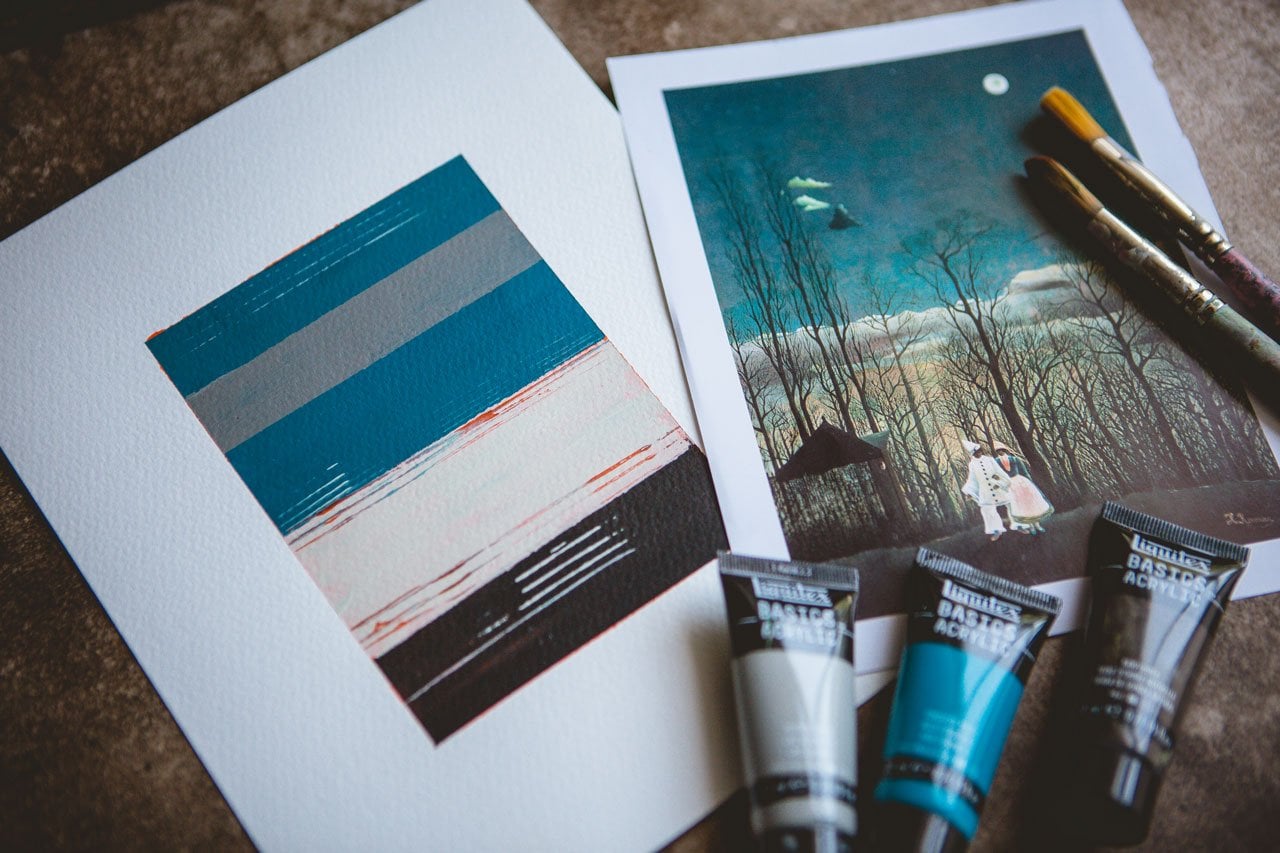
5. Mixing your paints: Let's talk about picking our color palette and
mixing our paints. So I've got some colors
that I've pulled out. I was very inspired by
the color palette in the finished piece that
I had told you that I got from Rebecca Croll
that I had framed. I really love how
underneath I can see bits of orange
and green and teal, just showing through the marks. I don't know if you'll be
able to see those or not, but they're very
slight underneath, just a tiny bit
that you can see. You can tell that the layers
were really built up. I like that. I just love that. I can see different marks. I can see that there's
this tan color out here. Maybe a darker raw sienna color and then there's this blue, maybe some darker blue or black. I was very inspired by
this color palette. While I would love to paint that piece in many
different colors, I would not make a very
good art forger because it doesn't really matter if I use a piece inspiration or not, I can never recreate it
no matter how hard I try. Everything that I create ends up being something
totally different. But I'm going to be inspired by the colors I think I can
see in that palette. So I pulled out some white, so that I can mix in some lighter tones of
the colors that I see. I've pulled yellow ocher. I pulled a Van Dyke brown, which is super dark brown. I've also pulled a burnt
sienna because maybe some of that was
a reddish brown. I've pulled a couple of blues. I've pulled this
indigo and turquoise. I remember seeing
some green in there, so I've pulled a sap green. That lightest blue on top almost reminds me of this
ice blue color. I can get that with the
titanium white and the indigo. Maybe we'll mix some
of that up since this one is basically toast. I could maybe even pull a brighter orange from that little bit of orange that we could see shining through. I could pull some
cadmium orange. It looks to me
like one layer was a bright colored layer and then it was left
to dry overnight and then the upper
layers were added to that possibly in
two or three stages depending on how long it took to get the look that
she wanted in the end. But I'm inspired by
that color palette. That's one way to pick colors. Find a piece of art
that you love and pull colors that inspire you
from that piece possibly. Another thing I do is look on Pinterest and I search
color palettes. Then you will find lots
of things like this where there's a photo and a
color palette underneath it. You can already see how those colors blend together
in something like that. These are some books that
I got from Ivy Newport. She's got two different volumes that had come out at some point. I love having these
two reference. Because I do photography
in my main job, I could definitely go through my millions of photos
that I have literally and create some of these wonderful color
palettes inspired by my own photos just by color picking colors
out of a photo. I could make little
circles and print that out and be inspired by some
of my own photos also. I do like those ideas. I also like just picking
out what are some of your favorite colors
if you're already good at pulling colors
together and stuff. Then pick out some
of your favorite. You could also work
with a color wheel if you are wanting to say, what color is going
to look good. I have several color wheels that I like to use
for different things. This one I like because it
has different shades in here. If I wanted to use, say, something in this
blue-green family and I wanted a
complimentary piece. I told you at some point in the workshop that there was a piece I did
with blue and orange, but they were very
vivid blue and orange. Maybe I didn't love
it, but if I went with a lighter shade of blue and light blue like this and
a peachy tone like this, we'd still be in the blue, orange complimentary
color frame. But I think those lighter shades would be more into what I love. A lot of color wheel
like this that'll tell you complimentary,
split complimentary, triad, tetrad, it'll just show you different ways to
pull color palettes out. That compliment and contrast each other in a way
that's been proven to be interesting and pleasing
throughout history. I love this one because of the different shades
it implies and shows me. Then the other side
gives me color mixing. If I take red-orange and
add some type of blue, here is the color I would get. It does get a little bit
into color mixing on this side if you find that difficult. I love
this color wheel. This one I like because
one side has tints where you've taken
white and added it to the main color to get lighter
shades of that color. Then the other side has shades
where you have basically taken the main color and added black to get different
shades of that color. That's really fun if you want to reference for
tints and shades. This color wheel I love because what it tells you is make
the bulk of your piece in whatever color range
that you've got here in this upper section and then you can use
this little section here to be some analogous
colors for these. Then you can compliment it with a touch of one of these to
give it a little tiny pop. The bulk of your
piece could be these, tiny bits of your piece could be these and then
a touch of those, and you've got a
nice color range of interesting colors that
are going to go together. I really like that
if you have trouble imagining what's
going to go with say, blue and green, well, a pop of red would be fun and these colors would
be in the group of analogous colors that would complement that really nicely. This is a really fun
color wheel also. I just keep these
handy in my art room. Sometimes I hide them
for myself behind stuff, but I do just try
to keep it handy. That's three different
ways that you could choose or even
four different ways. Pick a piece of art
that's inspiring, pick some of your
own favorite colors. Pick a color palette from say, Pinterest or use a color wheel to come up with some
interesting color palette. Four different ways
that you might consider coming up
with a color palette. Let's talk about
mixing our colors. I'm using the very biggest disposable paper palette because that's a lot of colors. I want you to be careful in the amount of paint
that you squirt out. We're going to be
mixing the paint with the cold wax in
about a 50-50 ratio. About halfway wax to half color. I don't want to put
a color out, say, mix it up and then
put another color out and stick my dirty
palette knife into my wax. You don't want to contaminate the wax with different
colors in there. You'll notice even though I've dug in there a whole bunch. This is a pretty new can compared to the ones where I've scraped all the
way to the bottom. Always keep your wax clean. What I do is I will just start. Hope I can get this green open. I may have to pick
another green. We'll see. I will start with a
little bit of paint. That is probably
even too much paint depending on how many pieces
I'm going to do because it goes a long way and I don't want to fill this up with a gigantic glob of paint and then get to the end
of my painting and think, oh my goodness, that was way too much paint and I'm
wasting all of this. Then I have to figure
out something that I can do with the extra paint
that I squirted out. I don't want to do all that, so I want squirt
out a little bit. I can always mix more out, but I don't want it to be so much paint that
it's overwhelming. That right there was way too
much paint, shame on me. You want to leave enough space. That right there might not
have been enough space. But I want to leave
enough space so that I have room to mix
that paint with the wax. I should have left a
little more space there. Oh good, the orange
will open here. That probably was
too much paint too. Let's see if we can get this green
open. If we can't, I'll pick a different green. I haven't even used
this one that much, but it is glued on there. There we go. Another thing that I might
not have mentioned in the supply video is that I keep a big
roll of paper towels. These are shop towels
like you get at the Home Depot over
there with the supplies. But I keep a big roll of that handy because I'm
using tons of these, especially right here
with the paint mixing. Now I've got all my colors down and I'm going
to put my gloves on. I don't work with the paint
without my gloves on. I'm just going to go
through and dig through and put a little piece of
wax next to each color. I'm looking for a ratio of about half of the wax
to half of the paint. I want about as much
wax to paint there. The wax is a little bit
different consistency, so it may look like I'm putting a little more wax there
than I really am. You don't want to really
make it too much wax to not enough paint because
then you're painting more. More likely, it will
just crack because there's not enough of the
oil paint in with it. I just put a little down with
each color and then I put the lid back on my wax so
that it doesn't dry out. Then I'm going to
put my gloves on because definitely going to want gloves on when you start mixing and working
with the paint. At this point too,
if I think there's some other colors
that I might want like I think actually
that I might want a lighter color of this indigo. Before I get in too far, I actually want to maybe put
another dab of white here. Then maybe a little tiny bit
of indigo off to the side. I'm going to mix
indigo in with the white before I add wax. If I do color mixing, I tend to mix up colors first
and then add wax to it. I'm going to get a little bit of wax to sit to the
side here though. Just so that I can really
see the color I'm getting. But you could certainly mix
them up after the fact. But let's just start. I've got a couple of
different palette knives handy here. I have a whole bunch, actually. I just want to add a touch of
blue to the white. The reason why I'm not
adding the white to the blue is because the blue is very pigmented and
I just don't think I'm going to get a
color that I want. Now that I'm looking
at this color, I actually think that it's too grayish and maybe a tiny touch of
green would be nice. That was too much green,
but I do like this color. Maybe more blue. Let's just go with that. I'm going to go ahead
and mix the wax in. Not exactly the color
I was going for, but I can continue to play. But look how much
paint that turns into adding the wax to it. It's at this point too, if you think you
want to work with the Gamsol with the Galkyd. If we wanted to, we could add just a drop of that to our paint.
This is an old one. They do get old. I'll have to find my newer one. It's at this point
if you want to add a little bit of shine
back into your paint, just like one little drop of it, it's all you need there for your little dab of paint and mix that in while you're mixing. Then you will get that little
bit of shine back in it and it will aid the drying time, but it drives to the
touch by tomorrow anyway. I think I need to find
my other container of that if I'm going
to play in it, but let's go ahead and
just mix our colors. This right here, is why
I like to have these around, paper towels
or shop towels. It doesn't matter, but I mix all my colors first
and get them ready. I'm using the plastic
palette knives. You can use the metal
palette knives, it doesn't really matter. Your method of madness
there, just go for it. You just want to get
all your colors ready. This does not going
to dry super fast. This is not like acrylic
paint where if you put out too much paint and
you let that sit for 20 minutes then your
paint has started to dry, this is not going
to drive that fast. But it's probably not going to hold over until tomorrow either. I want you to be
careful to not put out too much paint to begin
with because look how much it ends up when we
mix the wax with it. So don't put out too much
paint to begin with, start with little
quantities and you can always make some more
up if you need to. I'm just mixing it
until it's all mixed. Start with smaller quantities, because you're going to
get yourself into a mess. Where you're like, I'm
going to have to waste all this paint and I don't
want to waste it all. It's better to maybe
you have to paint longer than you intended because you're like, I
don't want to waste it. Let's do a trash piece. See why leaving a little extra room
would be good, because if you're really
messy with your paint mixing, you'll be all up
into your next color when you didn't mean to. This blue is so vivid. I might just switch. If you get like some paint on
here that's not coming off, you could put a little
bit of oil on here. Or take it and wash it in your Dawn dishwashing detergent, and get that off pretty easy. Another thing too,
for brushes, I'm cleaning, if you'd get most
of the oil paint out of it. If you don't want to use mineral
spirits or turpentine or odorless jar like a hive with odorous cleaner in it,
you could get most of the oil paint out of your brush with a towel and maybe
wiping it on paper. Then go clean it
with the Dawn soap. I have brush cleaners
to like there's that paint brush cleaner,
but that Dawn dishwashing detergent really does work
like the best and you can get your oil paint cleaned
out of brushes with that Dawn detergent
really nicely. It's like my favorite
cleanup method now. Then when I get this
so full, and you can see this is how my
gloves gets so dirty, because I'm wiping my
tools on my towel. When my towel gets
so full that I'm not getting enough paint off, then I just get a clean towel. I do go through a lot of
rolls of this when I'm working with this medium and I just know that's how it's going to be and
I don't worry about it. Paper towels have
at least a roll of paper towels, you get
the cheap ones from the dollar store,
doesn't matter. You just need something handy
to wipe your tools down. That way, you keep them
clean as you're going. Because you don't want to go back and have to try to clean all your tools later when
everything's starting to dry. See how nice that works? Got all of our colors mixed. It's at this point in
the mixing where you would add in a little
bit of Galkyd if you wanted a tiny bit of shine
put back in there and to work with their drying time. Again, it dries in a day, so it's not like it's
a great big deal. That is mixing our paints. Now, I am ready to get
started on a project now that I've got everything
started and going. So I'll see you back in class.
6. Mark making: [MUSIC] Before we get
started on our projects, I may have to mix up more paint, but I want to talk about, I've got a couple of small
pieces of paper here. I want to talk about
mark making and stuff. I just want to maybe put a little bit of
paint on to my paper here and just talk about different tools that we
could use for mark-making. I know I briefly covered
them in the supply video, but I thought it might be fun to actually see
what some of these do. I think I'm going to use some of this weird green color
that I came up with. It spreads like icing. That's what I really
love about cold wax is you're using other tools
normally besides brushes. You're creating
different thicknesses, maybe different patterns. As we spread other
colors on top of this. Like maybe we'll just go
for this other green. See I can spread more
colors right on top of that and work for a little bit until I get to
the point where I'm like, well, this is now too wet for me really to get any further. I'm going to let that dry till tomorrow before
I can do more stuff. Let's put a little
bit of white in there and then talk about, for a trash piece, this maybe the prettiest
little trash peace ever. That's pretty right there. [LAUGHTER] Now, if I had wanted to do that with
nothing underneath it, then I've got started. Now maybe I want to
do some mark-making. Some of my favorite mark making tools was this one
which looks like a little mini ice
pick and this is in the working with clay tools. It's a clay tool. I like
this because we can get lines and see how nice that created a
beautiful line for us. I love that. We could
also do things like, and I don't want to stick
my arm in these paints. I got a habit of just put my arm over here since
I'm right-handed. [LAUGHTER] But we can
also then do different, interesting little
marks like this. I could have done
something like that. If we use something like a
piece of corrugated cardboard, I like that because
I could maybe stamp right on it and that would
create a line for us. I could also use it
to drag through, so something like
that's really fun. This one super fun. Again, I'm going to use it like a stamp or a stencil
and stamp right onto part of my piece and come up with a
little bit of pattern. This I could use over and over. I might just wipe off the
extra paint and then put this back in my supplies
and keep on using it. Same with the corrugated paper. You can just wipe that
off and keep using it over and over cardboard. These are some of
my favorite tools, but my other really
favorite one was these little foam stencils
that I got at the Michael. You might look up foam stamps and see if you can come up
with some interesting ones. This is my favorite. I like
the little slight lines. Again, just tap it
right on there. Then look at that
yummy little set of lines that we
created, love that. You can also draw
through here and do different things on top
like with the oil sticks. But you can't do
it while it's wet. While it's wet, this is the
mark-making that we can do. I also could have, if I wanted to do
things underneath that, I could have done that first. I could have done
stabilo pencil. This is charcoal, I think. I can do charcoal. I
could do some stabilo. The thing about the different
stuff underneath it. You can put way more things underneath than you can on top. I could have done that. I could have done
this little oil stick because I can do some
of the oil stuff underneath the cold wax. The only drawback
because I don't want to be too much of
this underneath because it's very oily
and I don't think it ever really technically dries. I could also do some
acrylic ink under there. I could do acrylic
paint under there. There's lots of things
I could paint on, let that dry and then
paint on top of it. Then we'll come back. Then just like we did
with the other piece, we can then add this
layer on top of it. We could come back tomorrow
and scrap back colors. I can keep on adding a little
bit here, just on top. This right here is a beautiful
way to do a color study. I now know that this
little bit of green that I mixed up on top of this green, which was that sap green
by M. Graham Company. Sap green is really
pretty, I like sap green. Then that blue was the indigo, the titanium white and a
little bit of sap green, but look how pretty that is. Then once we get it like that, we can now go and add texture to the top because some of the
interests with pieces, like with the cold
wax that we're doing. Look at that right there.
Some of the interests is all things that you
see in the layers. I like that I I see through that green right there to
what I drew underneath. I like that I can then
layer on top and then stamp through and add some
texture to the top of this. I can drag a little bit of
lines through the paint and just to create one more
layer of interest in there. Then I could say, okay, this piece is finished. Look how beautiful
I ended up with. Now one thing I do see
that I didn't that I don't like is my gloves are dirty from the paint and
I just put a piece right here of this paint
that I don't like. Either I need to fix that now or because this is
a throwaway piece, I'm pointing these things out. If you're working with gloves
with a lot of color on it, you're going to take
that off and put new gloves on so that when you're doing
something like this, if it were really important and this is a piece that I was creating to say take
to a gallery and sell. I need to keep the
top white paper part of this as clean as I can. Pieces like that right there. I've led a little bit
of some other color, get on there from my glove. That's not acceptable when
you're looking to make some really nice
fine art pieces that you can sell and maybe take
to a gala or maybe frame. After you get past the
practice phase like I'm in, I do want you to keep really in good mind
like what do you have on your fingers and where are
you touching your paper and be real careful about how you're touching the
top of your paper. But for something
that we were just experimenting and talking
about mark-making, look how pretty those are. Those are maybe
the previous first little abstracts that I've made. [LAUGHTER] This
might be a case too, I could probably
still save this if I added a little bit of white like I added on this first one, maybe I want to put a little
bit of white in here. Maybe that white scraped
all the way over. There are ways that maybe
we could fix things that we've done. Look at that. Oh my goodness. I love it when I get something
that I really like and then just be real careful as you're picking
things up and moving it. Now we've covered that and now we have a clean piece of paper. I love it. Look at both
of those. Very pretty. Maybe from mark-making, you
pick two colors and a white, like I've done here. Just practice a few things. Practice dragging
your sharp tool. This it could be a sharp
metal tool like this. It could be a skewer that you
get from the grocery store. That's wood, I
love wood skewers? This is one of those
that it's over there in the grilling aisle, it makes really nice marks too. You can see the metal one is a little bit
sharper, finer line, and this one's a
little bit larger, but it still really makes
a great line. I love that. You can also, now that
I'm looking over here, I have some random brushes that had mark-making
tools on the end. That was really cool.
I like this one. Let's just drag
that right there. Love it. Oh my
goodness, look at that. A little bit of a line that
I just added in there, right here. I love that. I also have these
fun little tools with the little lines on them. I could have gotten
some little tiny lines in there with that, super fun. You could also with
this tool come through, I like things that
have writing on them. We could imply like a little
bit of writing over here. When these dry tomorrow, I could actually
write on top of this with the stabilo pencil. That would write
really nicely on top. It writes on
practically everything. Let me just look
around and see if there's any more fun tools. There was one more
fun thing that was in my box that I think
I want to pull out. This thing right here. Look how fun this is, what the little metal pieces is, it's almost like a grill
tool you use to cook with, love that. But
this would be fun. Let's just look at that. Does really nice,
crazy fun line. Look at that line. That is fun. Really fine metal line there
on that. That's super fun. I hope you enjoy a little
mark making exercise. I want you to mix up maybe
two colors and a white. Just take your palette
knife and just spread a little paint out there to get a feel
for how it spreads, how thick it is or
how thin it is. I kept these fairly thin. These are not so thick that I was having a big
clump on the top. I was trying to spread
it pretty thin but make them really pretty
abstract out of it. Then practice with
some of your marks. Find anything out in nature, a twig, something with leaves on it if you want
or no leaves on it. Any household items
that this one's fun. This is called a Kemper tool. That's fun. I got this
at the art store. Checkout anything
that you can make. You could do this with a
box or like card stock, cut out something
with little edges, work with card stock, any foam stencils
that you might find. Look at any of your packaging
to see if you've got some interesting
textures in the box. You'll a lot of times too, if the box is flat on
the top and the bottom, the inside usually hidden
and maybe you can peel those apart to get to some
of this corrugated part. Look around at
anything that could possibly make a mark and really
anything can make a mark. Be on the lookout around your house and at the
art store at anything interesting that you
could press into or draw with for these pieces. I hope you enjoyed
that little demo. I actually really like
my little samples here. I'm so happy with them. I'll see you back in class. [MUSIC]
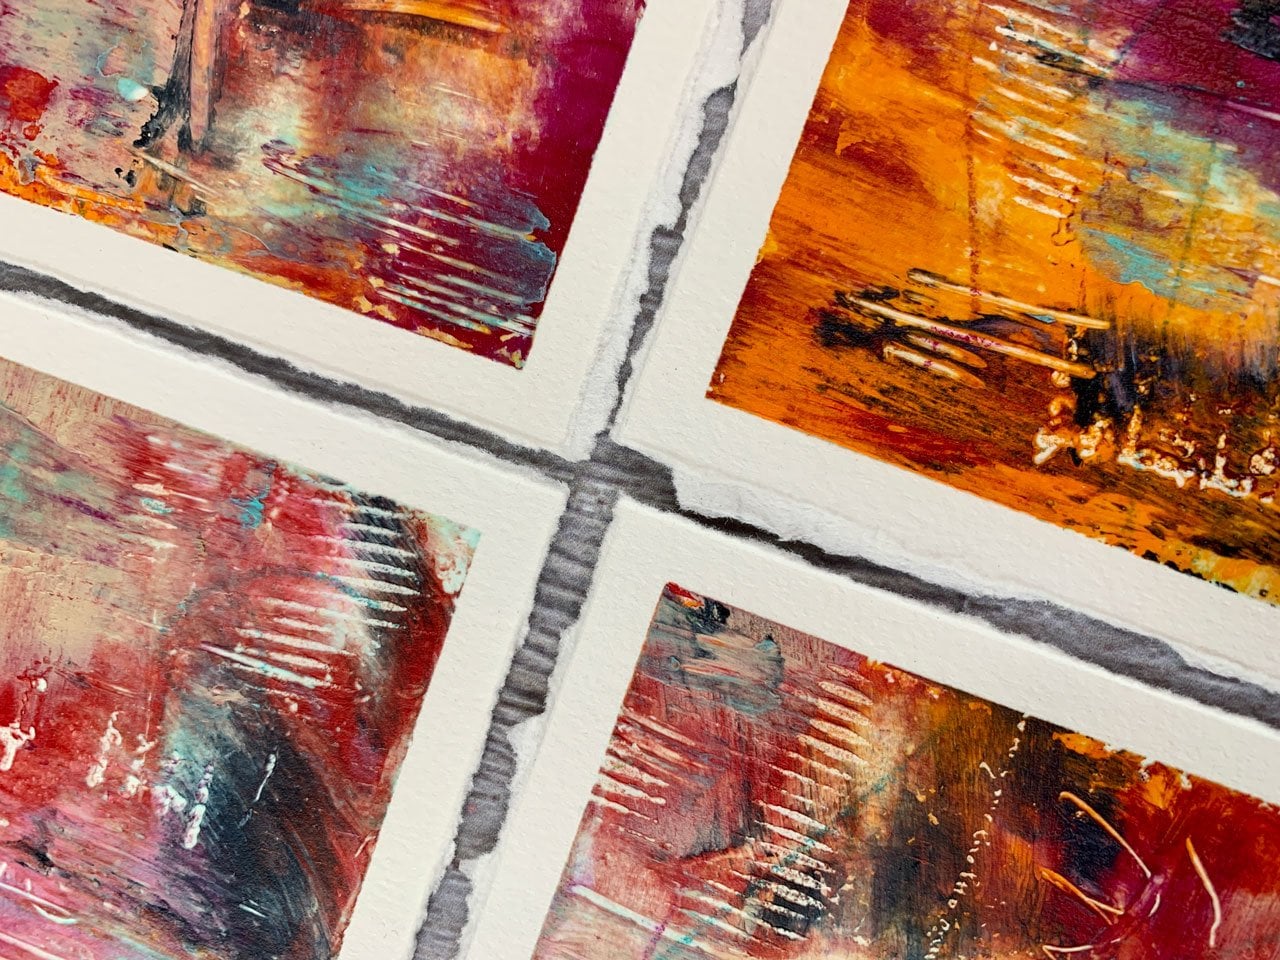
7. Color Study Examples: I wanted to do color studies in this little workshop here. So I want to show you just
random things that I have painted over the
years. No judging, I'm not saying any of these
are great by any means, I'm just showing you
experiments that I have done. Because I like to play
with color and experiment. I still, to this day, don't think I have
one certain colorway that's my colorway. Some artists you'll see and they'll work in a
range and you can recognize it pretty immediately
that that's theirs, and they've just developed
that over years of working. But I like too many
things and I in my home, I like too many things and I have a degree in
interior design. I worked with home buyers and things like that
for many years. it's very easy to pick color for other
people because you're not really emotionally attached to it and invested in the decision. But when it comes to
things for myself, I like too many things, I may love this blue and
tan tone or I may love this super bright color and those might not match in an interior or something like that. I just like too many things. I just want to show
you things that I have experimented with. I like doing color studies
because then I can say, I love this or I
don't like that, and then I can see why. Until you mix them, you don't understand why. You might like one
over the other, but when you start
doing things like this, you can go, I really
don't like what that did, I really love what that did. This is that medium paper
size that nine by 12. I told you we tape it off
and maybe do a bigger piece. This is what I do with those. Maybe when I'm doing
color studies, if I mix up paint, I've got too much
paint to do one piece, and so a lot of times I'll work on several pieces at a time. Because with the
oil and cold wax, you may not be putting all
your layers on in the same day because this technique
requires a bit of patience. Maybe you'll put a
couple of layers on today and set that to
the side until tomorrow. When I'm doing that,
I get a little bit frustrated if I'm just
working on one piece and maybe I want to be still playing at my art
table for the day. I will have several
pieces going at the same time so that
I don't waste paint. Because when you start mixing up your paint
and you think, well, this is not
very much I mixed up, you may over-mix your
paint quantities and underguess how
far that'll go. You want to have
two or three sheets available so that if you
did this and you thought, that's a lot of paint
I'm going to throw away, you could come back and
do another piece or have a trash piece available to the side where you would
put all your extra paint. At some point, that would be a nice little abstract
painting when you have enough
layers on it maybe, and a lot of people do that. It's almost like working in a set when you do more than one. But I really liked this
teal, like this colorway. Definitely, again,
no judging, I'm not saying these are
great by any means. They were experiments on my
part with color and scraping. Because another fun
thing about cold wax, the next day after it's dry, I can scrape back these layers to get fun things underneath. You might do a whole bunch of solid color layers just
to build up the piece. Then when you get
to the top layers, you've got something to scrape and color that will shine
through underneath. I really love that aspect
of working with this. Here I was working
with brighter color, I was mark-making with some of my catalyst blades that had
a little teeth on them. I do tend to decorate with
more muted colors because I find that that allows my mind free reign
and creativity. The walls are painted
a nice toke color, and maybe I decorate with colorful pillows that I can then change out when my mind changes. But I've discovered
when I paint, that the things I like
to paint and the ones that I liked the most are the ones with really
bright colors. These colors really
appeal to me. I don't like that
there's a pair, and I could frame them
if I loved them enough. Sometimes the things that are in your life that you'd like
to live in might not necessarily be the
things that you like to paint or that you're
called to paint. The same thing I heard an artist once say that
maybe this thing is that you collect are not meant to be the things that you
create yourself, it's not what's going
to come out of you. The things that I collect are a wide range too, because again, I just like too many things and I take a lot of stuff to
the framer now because I'm at a point where I have some pieces that I
think are so amazing that I want them framed in something more than just a
gallery frame from target. I take them to the frame
where I have things framed. The range of stuff that I've
taken in the past year, the framer was like, wow, you have such an
eclectic range of things that you love. I'm like, man I do, I just
like too many things. Purple is not really my game. But I did love this little purple set
where it has purple, a little bit of orange,
some off-white paint. Can't think of buff a
buff-colored paint. You can tell there
are several layers here and maybe the upper layers, the under layers might have been the orange and the maroon and the upper layer might've been purple and then the
buff on top of that, and then as I scraped back, we got all this
yummy texture and lines and color shining through. I do actually really
like these colors, even though purple's not
really my thing so much. Just another little. This one actually, I
do like the colors, but when I was done it
looked like a garden. I feel like little abstract
garden go in here. I like these bright colors. They're really pretty to me. Playing with blue and
yellow. That was fun. I don't really like
these colors as much, but when you see it far off, I actually like the overall look of it and it's very abstract. Playing in some blues
with some marks there. Here I had almost
like a landscape. This was my bright sun. This one is again, another one that visually
I'm really attracted to. I love that orange
and that maroon and the pink that's coming through. I really love those
colors in that. But I tell you, I
have nothing in my house that looks like
this decorative wise. If you come to my house, you wouldn't think
that this might be something that really draws
me when I'm painting. These are some fun
blue-green, yellow. This is the blue-green
without the yellow. That's fun to look and
compare how that extra color added into our
overall composition. Blue-green playing with
marks and scratches. This was that same
blue, green, yellow, but maybe I did it in a little bit different heaviness of the color and there's
less of that blue showing. This was really fun piece. I actually like
that ice-gray color mixed in with the brown
and the ivory there. That was a fun colorway. Purple, not my favorite, but it was an experiment
that I tried. Then going back here to the
orange that I really like. That one's okay,
I don't love it. Then going back, I do like
orange and purple together. This one I really love, and it appeals to me and
there's a lot of texture in it. If it'll focus on that. But you can see a
lot of yummy texture showing through those layers. I love that. Then I'm also fascinated
with red and teal. So I did play with the
teal and the red here. I didn't really
like this pink one, but I saved it
because I've made it. This is one of my favorite
things to do right here. I like color swatching. If you have seen any of
my acrylic workshops, I keep a color swatch book
and I save color swatches. This was pre-finding a fun book to make a color
swatch book out of. Going forward, I might find
another book like that one to create color
swatching with these. But these are different
pieces that I kept the colors because I want to know if this is a
colorway that I liked. I want to know how I got there. I actually wrote down underneath each piece what brand and what color it was
so that I could get back to whole
being light magenta, then I would know which
paint that was that I used. I highly recommend
taking a piece of paper, and this is exactly what I was talking about too when I said, if you're using
watercolor paper and the oil paint will leach
out onto the paper. Look at this, I've had
these now for so long. You can see that
the oil has leached out and onto the bottom
side of the paper. The next time I
do some of these, if I plan on continuing
with the strips, I will probably use a piece of my oil paper and cut it into strips rather than
a watercolor piece that I had handy because
we can see exactly, and if you look at my oil paper, that does not bleed through to the bottom for the most part. It has a nice prime surface
ready for oil paint already. That's exactly what I was
referring to when I said if that oil leaches out, you don't want your
finished piece to be looking like that. But these colors, I love. Now they're all nice and dry. Then I was playing
with mark-making and colors and experimenting. This is the color
studies that I'd like to do in some different
colors for this class. But I like taking
that piece of paper, taping it off, doing
all my messy painting, and then peeling the tape. I really love creating these. Then when I do a set like that, I want a sheet of
colors to go with it. I store these with their colors. You see how many I've done. When you get started, working on paper is so
much easier because you can do more with it and you
can store it fairly easy. Here is some more that I did, and this was mixed
media paper and you can see the oil leaches out of it. But I have my colors in here and different color
studies that I tried. On this one, I was playing with different stencils and just seeing how the
stencils work with the amount of paint and
how wet the paint can get. This was a fun colorway. Blue and orange is fun. I don't like how vivid
this blue and orange is. If I do blue and orange again, it's going to be like a pastel
blue and a pastel orange. Kind of like a sunrise
or something like that. But it is just a fun
way to experiment. This didn't completely
love the vivid teal. That just didn't appeal to me, but I did like this little
color study and then I know what colors I used,
so the next time I can look and see what
those colors do. Again, purple and gray. I love these. We go right back to the
bright red-orange colorway. There was lots of
colors in this one. But I do like the
yummy brightness, and this is that larger paper. You can see the difference. We get larger pieces, if we do color studies
on the smaller paper, we'll go back to this size. They're smaller and they're fun, but you get more out of that bigger paper with
these color studies. Although I do love these, this is one of my
favorites that I've done with the colors as
fun pastels of fun. Again, similar colorway. It might even be
the same colors, but I loved it enough
to just play again. Here's one where the colors are more in the
Terracotta tones. I really liked that. Here we've got blue, green, yellow in that family. I do love this one. Blue and yellow, but not such vivid as some of the
other ones that we did. This is more of a cobalt
and maybe a ocher. Yes, ocher and ice blue
and Prussian blue. This ice blue, that one that I showed you that I
liked so much that I'm going to have to
go buy some more because I can't get any
more out of my tube, it's just a really nice
icy blue-gray color. I love that color. Some more experiments that, not necessarily my favorite, but I just saved them
because I did them. I loved this. Look how
pretty that big pieces with the ocher and the pink. I really loved the pink
and yellow colorways and I did several on that. I love every one of these. As you stand back, you can see the other way
that colors can blend. As you get close, there's different mark-making on each one that I
was playing with. Overall, I just think
that's a really pretty set, and I could cut
that out and frame that as a little set
to hang on the wall. Then here's some that I don't necessarily like these
but I was playing with oil sticks and
some other stuff too just to get a
feel for materials. I don't love these, but I
hated not to keep them. This was really fun
because I was playing with some oil sticks
and some vivid colors. I actually love doing like this. This was oil sticks too. When I say oil sticks, it was these things and it was only these things just
as color studies. I found red and teal. I just love the three. Not really like this one
with the lines I left in it, but I just love how modern
and unique those are, just playing in the oil sticks
and seeing what they do. I know that was a long little spiel there
of different color things, but I just wanted
to give you an idea of what certain colors
that we could be playing in might look like and to just show you
different things I have experimented with for
color studies along the way. Then we'll be doing
some of these in class. I think you'll have a lot of fun experimenting with
that and then peeling the tape and then just revealing what amazing piece you
got when you were done. I'm pretty excited to be
doing some of these in class.
8. Color Study - Color blocking: [MUSIC] In this video, we're going to jump into everything that we
just learned with our color mixing and our
mark-making and our playing with some colors with
our color palette. Now we're going to do
some color studies and so I've got that big
piece of paper that I've cut into fours and this is the
time to just experiment and play with
different materials and if we get it
dirty and wet enough, maybe we will have to come back, let that dry overnight
and come back tomorrow. Lots of different things
that we can do here. I think to start, I'm going to start
by making some marks because looking at a white piece of paper is very
paralyzing sometimes. [LAUGHTER] I just have
some graphite here and this is a pencil, basically, it's just
pieces of graphite. I might do some different marks. We may see him and we may not, and you can do this with
any pencil that you want. You may see it and you may not. I'm just experimenting
here creating some loose marks that may or may not show up
in our finished piece. Then we could put other
stuff underneath here. Let's see there's that. Let's just look
around at what else we could use the
neo color crayons, another item that we could
mark underneath with. Let me pull that out and
I'm going to be using these color palettes inspired by my picture that I've shown you. But just in case,
colors inspired by this piece by my favorite
cold wax artist. My pieces definitely aren't going to look like her piece, but it is fun to use that as my inspiration and I could pick a few colors out of here
just to make some marks. Another thing that I
just thought of is, let's say we're in a hurry
for our first layer to dry, but still have a
lot of color on it. Instead of waiting
overnight for these, we can use acrylic paint
on that lower level and I have some acrylic inks
that I don't know. I randomly got a
bunch of supplies from a sketch box
subscription I had last year that sent
me random things to experiment with
that I really love. [LAUGHTER] I love
Gin's art supplies. I thought, why don't
we spread some inks around and this is very
interesting actually. This one is an acrylic ink, but it's almost sitting
on top of my paper. That was actually very
interesting outcome there. It probably is the
way the paper is primed so I'm just
going to spread it around with a palette
knife and just get some of that color on there because if you remember in
my little painting, I pointed out that I could see
some color shining through from the different marks that
were made through the wax. You can see just a tiny bit of color coming through underneath. This is how we can get those colors underneath
and maybe work a little faster than doing it
all in oil paint. [NOISE] What a bright color. I may have overdid the
yellow here on some of this. But this is a good way to figure out what do your supplies do. Let's try this one, and how do they work on
different papers, and how much is too much? [LAUGHTER] Until you do this, you're not going to know
and while you're doing it, you may doubt yourself.
Look at that color. I doubt myself a lot, but especially with abstracts, we may end up with something surprising that we
weren't expecting. Look at that. I love this color. Bright colors make
me happy sometimes. [NOISE] I used to dress in bright colors with
lots of pattern on it always like pattern to be on my shirts and one day my
step brother was like, "Are you wearing the
curtains from living room?'' I was like, ''No.'' [LAUGHTER]. It was hilarious. I was not amused at all. There we've got all that, goodness and yumminess
go and oh my goodness. At this point, I'm going to
drive this with a heat gun. That's what I mean about being impatient and drawing stuff. We can go ahead and just
draw that right up. [NOISE] Whereas
with the oil paint, heat gun doesn't affect it. You're not going to be able
to use that to dry it. You really actually
need to let it sit overnight for it to be dry to the touch with the cold wax because
heat gun does not work. [NOISE] That's pretty dry,
but I think what I'm going to do is go through and get the rest of
the ink off with my towel. One thing I noticed too that I didn't have
a piece of tape completely stuck down so if you want to make sure all your
edges are going to be clean, and I usually like clean edges, so I may not get a
clean edge out of that. Go through with your
finger and just make sure all your little taped edges
are taped down really good. Now we have some
crazy color to start with and I think what I
want to do is go over this. I may mix a little bit of
white and this ocher and just start in one of these
and start my coverage. Depending on how much
paint you lay on here will determine how far your
paint really goes. I may be mixing more paint as I go because these are
fairly big squares, this will easily be a five by seven or
something close to that. My goal may be to go ahead
and mostly cover what's on the background because
maybe I want to draw some marks and that color
just shine through. You'll just have to play and
experiment here with some of these and see
what's your goal. How much do you need to cover? I could leave a little bit
showing through like that. This is like spreading
icing on the cake. I just love the way it feels. I love that you're not
working with a paintbrush, you're working with
other materials. This first coat I'm
not being too careful with as I lay color
on top of that, I'll get a little bit softer with how much pressure I put on my palette because I don't want to dig through all the
layers while they're wet. That's what's really
nice about this. You can actually lay
full colors on top of other colors until it gets too thick or if you're just
not light handed enough. Then you would do
good to have it dry in between those layers. I'm putting these on
with a palette knife, but I could actually
be putting these on with my bowl scraper. Let me pull that back out too, because I may smooth this
out with the bowl scraper, like get a lot of paint on it, but then come through
and smooth it out. I just realized I don't have my gloves on and I'm
about to make a mess, so let me put some gloves on. You can get a box of these gloves at the paint
store pretty cheap. I just get whole boxes of them and then they last pretty
good long time. [NOISE] I want this to be a
little smoother than it was the way I put it on there. I might spread some
more on here just depending because I can put all the paint on
with the scraper, I didn't have to use my
little palette knife. I like that as an underlayer, and then [NOISE]
a towel ready to, as I'm going I'm going to
want to pull this paint off my scraper so that it's ready
to then do something else. We could do this several ways. This could be the first
layer of this one, and I could treat all the other ones completely different, I could come back
on this one and completely do a
different technique. I could make squares of color, more like in our color studies, I could come back in. This paper is a
little bit warped from the wet ink I
had underneath it, but they will flatten
them back out. You definitely going to be mixing some more
of this yellow ocher. [MUSIC] This one, I think I'm going to let that be because
what I'm going to do with these is let
these dry overnight, so I'm going to create all
four of the pieces on here, like the base coats
of these pieces, and then we'll be
layering things on top of that once it dries. Let's just go in with a different color
on the background, I'd like to be able
to see what are these different shades going to do when I scrape through them. Then when we peel that tape, that gets me so excited. That really is like
my favorite part, the tape peel, the reveal. [LAUGHTER] Let's go ahead, I want get some orange. But notice I'll clean
my little knife off before I dig into a
major different color, and then this might
create some interest tomorrow when we're
digging through. We may not see it at all, but at least we have
it to experiment with. It's on this layer too that I
would start my mark-making. Let's go ahead with
some dark brown here. One day might be all your prep work and
laying a base layer, and then the next day might
be where you come in with some other colors and you
start doing the fun stuff, so some of it is prep
work and that's okay. I'm okay with that. This
is some crazy colors here, I don't like any of
those that I've picked, but I know that tomorrow I'm
going to cover these up, so I'm just going to
go with it for today. I might actually
smooth this out with my bowl scraper just so that my layers aren't too
thick on this one. I feel like this one almost
looks a bit like Halloween. [LAUGHTER] There we
go. Let's go for that. I might do that over here too. Because I'm not going to
see any of this layer, I already know in my
mind that I want to lay some thin layers of
other things on top, so my goal here is to not have a really beautiful
bottom layer. That's okay. I'm just laying the groundwork for
me to be able to smooth things on top of these
tomorrow without something surprising
getting in my way. At this point, we could come
in and do some mark making, and then these marks will show through to the next layers, it'll make indentions
for us possibly, so we might go ahead
in here and just start adding in some
interesting textures and marks. [NOISE] That's definitely an
interesting texture. Then I might take my
little tool here, I could do [NOISE] maybe some scribbles that look like writing maybe,
that might be fun. [NOISE] I could go in and do some long marks, and then anywhere where
I'm building up paint, I'm going to go ahead and take that build-up off with me, I'm not going to leave a great big blob in the
middle of my painting. This one gives you a good
indicator too of being able to see colors
through your colors. See if I can lift this
up so you can see that. Let's see how you see
these other color shining through the
blue and the green. That's what those layers
make it so interesting for us, so I love that. Well, let's just see if there's anything else I want
to put in here. I love this little squiggle.
Yeah, look at that. We can just go through randomly, I like that right
there. I like that. Now, before I just
overdo everything [LAUGHTER] I'm going
to go through now, I got some other color on this, but doesn't really matter. We move that back in, we can cover that tomorrow
with a different color. I think I'm almost out
here, we'll try this. What I'm going to do now, I'm going to go ahead
and let this dry overnight and start on one
of my other little projects, and then we'll come back to this tomorrow to add
some more layers. At this point, we're
going to have to stop and let this dry enough to continue adding some real thin
layers of color on top of that to make an overall abstract
that I have in my mind, you can do all the pieces in one day and be done and
peel your tape and say, this is what I did today,
and sometimes I do that. This time though
I think I want to create some different
abstracts with maybe some layers on top
of this that I can dig into tomorrow and just
see what we can create. Some of these paintings, you can work on these
every day for a couple of weeks and just add
another layer each day. Depends how into you get and
the vision that you have. We're going to let
these dry overnight and I will see you tomorrow. [MUSIC]
9. Color Study - Mark making: [MUSIC] Let these dry overnight, so our underpaintings
are done and we're ready to start painting
on top of these. I did manage to find my
good container of Galkyd. If you ever get one
that's super thick and basically won't even
come out of the container, then it's no good. I don't really use the Galkyd. It simply going to add a little
bit of shine to our wax. That's why it's still
good, it's still sealed. It never did dry out [LAUGHTER]. But it adds a little bit
of shine to our paint, makes it more satin
rather than matte, and it makes the paint
a little more flexible. Just to maybe try
it out a tiny bit, you just want like a drop. It's not like you
want a whole lot. You can do more than a drop, but I was always told just a tiny drop and
mix it in really good. Then it also aids in the
drying of your piece. Because even though
these are somewhat dry, I wouldn't say they're
100 percent dry, they're definitely mostly dry to the touch because I did real
thin layers on this one. One of the pieces where
I did real thick layers, the paint's not as dry, but it's mostly stiff and we could keep adding
layers on top of it today. Even if it feels
dry to the touch, it doesn't mean it's
finished curing. You want to usually
let your piece finish curing for a few
weeks at least before you're going to try to finish it with more wax and then buff it because you
don't want to try to buff a piece a day
after you create it, it's just not going
to work for you. I think what I'm going to
do is I want thin layers. I want it to look like
we've built the paint up, and so even though we're
starting on this today, we may have to visit
this again tomorrow, if we're adding stuff and
the paint gets too thick. Let's just see how it goes. Let me see if I
can skip this up. I think I want to work on, say, this one first. Well, maybe the green one first, and then I may flip them around so that
they're closer to me. I think we'll start here. I've got some colors over here. The ocher, this dark
blue is this indigo. Let me get that back
out of the paint. Then this is the Van **** brown. This is warm white,
and this is white, white and white because, let me mix that
up a little more, I want to be able to mix this into a lighter shade and the blue into
a lighter shade, and I still want some white
and warm white available. What I'm going to do is
take a little tiny bit of the ocher and mix
that in the white and see if that's the
color I'm wanting. That's nice. I want
to do thin layers, so I want to build it up
into some other things. Earlier in the
paint mixing video, I think I mixed the paint first and then mix
it all with wax. This video I'm
showing you that I'm mixing the wax ones
all up together. You can mix paint either way. If you want to do it before
you put the wax in, you can. If you want to do it afterwards, you can do that too. Let me just add
smidgen of this blue. That's a pretty color, and I may want a darker shade later, but I don't know,
let's start with that. I'm just wiping off my
tools on my shop rag. I do have my gloves on today. You'll notice my gloves
are blue instead of white. The blue gloves,
just in case you're wondering, are nitrile, which are what medical
people use, I believe, and I got these at
the Home Depot too, so you can get them at
the hardware store. The white gloves
are latex gloves. If you have a skin allergy
or sensitivity to latex, then try the nitrile because
those are for people who can't wear the latex and
it's a good alternative. I think I want to have
some real thin layers. I want to layer this up. Let's just get some
thin layers on here. I'm using my great
big silicone scraper to do that because I don't
want it super thick, I want to build them up, and I want some of these layers to peek out from
underneath possibly, or I may go back with some mark-making and then let it reveal some of
the underneath. If we start off with
thinner layers, we can work longer because
once the paint gets too thick, then you're just
pulling paint off, it doesn't really work
that well for you. I am scrubbing it a little tiny bit to let some of these marks under
here show through. I'm just adding a
little more paint and a little more paint just to see. Let's get it where we want it. Then got a little orange tip
there left at the bottom, I love that. I like that. Maybe on top of that, I might layer some of the ocher. It's almost too. If
it's not giving you thin enough layers today, like if you're doing this
and you're thinking, well, I want each layer to be that
layer I was just laying on, then you may have to
do one layer a day. Now because these are a
little color sample sets, their practice pieces
we're experimenting, I really want you to get
some quick wins in there, and I'd like for you
to be able to finish a piece or two in
one or two sittings. But once you get to painting great big real
pieces for yourself, you may spend months on those. You might just come
in every single day and add another layer, another coat on there that
it just takes the build-up. If I were wanting, say, the Van **** brown on here and then the blue
on top of that, then I might have to
wait for all that to dry to put the blue on
top of that for tomorrow, so that the blue shows up. Keep in mind your layers. But I want these to be
a little quicker wins. I'm going to continue
layering some color on here. I am thinking a little
bit about composition. What do I want the
final piece to be? Because these aren't
like the big one where we're going
to cut pieces out. These are little
pieces that need to be finished when we pull the tape, because they're small. I'm thinking, rule of thirds, I don't want everything
right in the center. How do I want the
colors to merge? I don't want them to be
too tight and clustered, which is normally my style. On this size piece, it's really good to then practice some of the ideas
that you have in your mind. I'm keeping in mind
light and dark. Where do I want the
light and dark areas? If I put in a dark area, I don't necessarily want
it to be in one one. That didn't work there. Where
else could I put it so that we draw our eyes
around the piece? Look at that. This
instantly got yummy yummy. We're going to leave that
there. Don't touch that. [LAUGHTER] Maybe I want
some of this warm white. Don't be afraid to move your paper around
as you're working. I'm a little bit stuck here in my space that I'm using just
because of my filming gear, my rig, that setup to
show you what I'm doing. But as you're working, don't be afraid to
move everything around so that you can get to whichever
side you need to get to. Normally, I have a whole lot more table
space to be working on. But then would be outside my little gears legs and I couldn't show you
everything we're doing. So I'm trying to keep
it where you can see. Look at this. I
really like that. Let me add in a touch
of white maybe here. Well, I might go back
with a smaller apparatus. Let's let this one soak for a minute and
we'll think about it, and I might come to a
touch of white here. Think on this one I'm going
to go ahead and do a layer of what I've got
here on my piece. Look at that I already like
just the peaking of stuff, peaking underneath. I love that. So we might come back with one of our brushes that I've got some of
these catalysts brushes, I've got different things,
but I've got some of these that are actually
rubber brushes too. Does this need no more white? I mean, I almost want to be
able to ask your opinion. [LAUGHTER] How about we put
some mark-making in here? So I've got this yummy
tool that I love. Before we jump into
the second one. I've got my mark-making
tool that I really love so I might go in and
do some lines in here. Oh my goodness, I can see
all those yummy underneath colors already showing
through. Oh my goodness. Let me see if I can lift
this up so that you can see exactly how yummy those layers underneath start
to show through. That is like the goal. [LAUGHTER] We want what's
in the under layer there to be peeking through in
the different layers. Just add that interest for us. I love that. Because I'm working in
a lot of wet paint, I'm trying to wipe my tip
off so I don't end up with a great big splurges
of paint here on here. Now if we do all that
and we think, oh, that was too much
or I don't love it. Just take our little spreader here and we can work
some of these back in. We can push them back
a little bit so that they're not as strong. Just some fun little
details in there. We can come back with a
little bit of the white. You got to be careful not to dunk on the
paper here into the paint, which I'm really good at doing. [LAUGHTER] But I need to be able to get to this a
little better here. Here we go. I like that. I don't want it to be
so super dramatic. I wonder if I used
my score tip here, if I could have got a
little bit smaller line, I could also come in
with some other marks. Maybe some little tiny. I don't know. I'm really
loving that like it is. I almost feel like if
I continue with it, I'm going to ruin it. So let's stop on that one. Let's just say we love
that one. Let's go for it. We could add a touch of white somewhere else in there. But I think for
the sake of this, we're going to call
that one done. I don't want you to
spend so much time on these that you're
overthinking it like I'm trying to
do right there. Then I think on this one, I may still go with
the same colors because maybe this will be the series and just see what can I do to make this
one slightly different? What can we do? So
let's just go for it. That's pretty. So
maybe on this one, I want it to be some blue
and yellow coming in. I like that. Then maybe let's
do this white. Let's see. What do we want the white to do? Let's go ahead and bring
the white end right here. Again, if you don't
want the colors blending in with each
other as much as I have. Then paint your color on there and then come back
tomorrow and do it again. But I'm okay with some
of the color blending. We're going a little
bit faster today with these to get just so you
wouldn't get. Let's see. What do you want the dark blue, I like the dark blue. So let's see. Let's bring
the dark blue in here. Oh yeah, like that. Let's do that. Look at that. Let's leave that one. Now I don't
even want to touch it. [LAUGHTER] I do want to this little piece right
here. Oh, here we go. Don't necessarily
want that to be blue. I like that to be yellow. So let's go back with a little
bit of yellow and let that blue be underneath. There we go. So now we could do some
mark-making. So let's see. Let's use some of our
foam stamps here. Because I like those. They're subtle,
they're not as strong. Which I might come back. Maybe on this one we could do
a few dots. Let's do that. See there. [LAUGHTER]
Exactly what I wanted. Just a few dots. There we go. I like that. On this one because
we did dots there, we might come back and
do dots on this one too and I'm doing
it ever so gently. But look at that that's
exactly what I wanted. So subtle, not super-strong and then let's call
that one good. I think I'm going to
leave that like it is. I could come back
with some lines. Maybe a few lines weren't
straight, but it is pretty. [LAUGHTER] Let's
leave that on there. I might put a few lines here. So real pretty.
See if you can see the very subtlety that
we just added in there. But I'm loving
those. So let's flip them around and do these. You'll love some of these
when we peel the paint. So let's see what
we can do here. I might use these fun
cardboard on one. They don't all have to be
the same to be in a series, but when you're in a series, you want them similar. Let's start with this
color on this yummy red. Because in a series they
don't all look the same, but maybe you have
some similar elements that time altogether. So it's almost like
your goal here is to do four different
compositions using the same one color palette
to see what you can get. That'll tie them together, but they still all look like their own individual
little pieces. [NOISE] So I'm loving that. I'm even loving
this little bit of red that's shining through, our piece doesn't really have
read in our color scheme. I do like that coming through. I always like it when
you're working with a great big spreader
like this because you're less precious
and you get into doing some things that you might not be able to do
with a smaller brush. Should be like this pretty
ice blue that I mixed up. That's a pretty color. Let's do this right here. Let's just get this
all the way over. Let's let this be the majority
blue instead of majority yellow and then maybe I'll come back with a
little bit of yellow. I like it. [LAUGHTER]
Yeah, let's do that. Then maybe we got some brown here that I haven't
used before, the Van ****. Let's just put this right here. Let's just get it right here in the middle. That's pretty. I love that. That's pretty I
don't want to overwork it, but I do want it to
have like a shape. [MUSIC]
10. Color Study - Finishing your studies: [MUSIC] I like that right there. Let's do that. Then I might come back in
with this creamy white. I like that. Let's let that
do its thing for a minute. Then we'll come over
here to this one. Let's make this one. Let's just start off
with say the brown, because I haven't started
off with a dark color yet. Maybe we'll pull some
of the blue in here. Just making quick
decisions here, so don't think too
hard about it. [NOISE] Look at that.
That's really fun. Then I might come back in with this lighter yellow that I made with the
ocher and the white. Fill in some of this, then we might top it off with the light blue. Let's just see what we get here. That's fine. Let's put some
more of this blue over here. I'm not being as careful as I might be if this were
a piece that I was doing for something
really special. It is fun to work in this way where you're playing
with colors, you're experimenting
with something you've not played with before just to see some
of what you can get. I don't think I want
any white in here, but I might come
back over here with this yummy yellow a little bit, just to give some touches. Let's put some marks in, that
might be my least favorite. I do like working
in a series because then I can see what I can get. Not all of them, I'm
not going to like all of them and I'm
okay with that. Let's do some of these
yummy lines like that, and then come back
with some dots maybe. That's pretty. Then we'll just look at it is or anything else we want to add or change, or we ready to pull the tape and set these to the
side and let them dry. I like that better now
and I flipped it over. Oh, I didn't put
any in this one. Because I don't want you to
think too hard about these, I want you to set
yourself almost like a timer and say, okay, I want to spend 30
minutes on these today, 30 minutes on these tomorrow, and then I'm going to
go with whatever it is I got and just see. It makes you work faster, almost like if you set a timer, it makes you go faster,
it makes you think. It makes you not get into your own headspace
because you're going much faster and
thinking less about it. Then when you're done, the abstract piece
is a little more organic and a little
different than what you might normally have created. Let's call these done for today. I can trim these out of their little square after
they're dry in a day or two. But let's go ahead and pull the tape because that is
the most exciting part. It's usually the part where
I end up with something crazy good that I
wasn't even expecting. Let's just peel our
tape and do the reveal. Oh, I do like this purple tape. It does actually give me hope. I didn't start with
wherever I started. That's hard figuring out
where did you start. [LAUGHTER] But it's actually super easy to peel
off of the paper, and it's giving me a
really clean edge. I do really like
this purple tape. This is the painter's tape
for delicate surfaces, which is nice because your art paper is a
delicate surface. You want to be able
to preserve that and not tear it if this is a nice piece of art
that you're creating, or I will say that
it looks like here I didn't have it stuck down
for those under layers, which drives me a
little bonkers. I like a clean, white age. [LAUGHTER] But that's
okay. These are our practice pieces, and I can always, if I frame it, put that under a mat. I think I need to take off this tape and I need to
be really careful because I've got blue paint on my fingers now and
I don't want to get that on my white paper there. I'm just going to make sure that I've got most
of that wiped off. Wipes off pretty good there. I'm getting it off
of the tape because the tape is still wet. If I peel this tomorrow, I wouldn't be having
any of this issue, but I want to go ahead and see what our final
pieces look like. [NOISE] Look at these. I love this colorway. Even though I took
these colors from my inspiration piece that
I have from Rebecca Croll, you can see that what
I ended up with is nothing like the piece
that inspired us. I just liked using the same color tones because
I liked those colors. Look how pretty these
are, and I think I like it better this away. Now that's all done, if you did this and
then you're thinking, tomorrow when you come back
and you're thinking, oh, this needs a touch
of whatever or some finishing top marks with
some oil supplies on top. Because now if you want to
put something on top of this, it cannot be anything
water-based. If you want to put something,
extra marks on top, it needs to be
something oil-based. You could do that
with the oil pastels, you can add a few extra
marks if you wanted. You could scrape back, you could dig into
the wax because once it's partially dry but
not completely dry, you can still dig into it
and you can scrape back. If there's an area
that you don't like, you can actually take one of your putty knives and you
could scrape some back. But I'm actually thrilled with the way that
this turned out. I think I'm going to
leave them like that. These three pieces really
matched to me and then this is like the odd ball,
[LAUGHTER] but I still love it. Hope you enjoyed this
exercise, I really like. On some of these, you can see those under colors shining through, just tiny bits that add to the
overall layers and interests when you get closer
and look at your pieces. Do an ugly underpainting, it doesn't matter
because the stuff you put on top is going to
cover the most of it, but you'll still
get little glimpses of the under color
showing through. I love on this one, how, right here on this
corner you can see the orange bits shining through. I love that right here. Just shining through a tiny bit. Super fun. I hope you
love this little project. It's a little color study
project that we can just let loose and experiment without
too much involved in it. I cannot wait to
see the ones that you create and the
colors that you pick. I will see you back
in class. [MUSIC]
11. Larger Abstract project: This is our larger abstract
that I want to do in the similar way as I've
done the color study. I need a little bit
more paint out. I'm going to put a
little bit of the white and a little bit more ocher, and a little set of four. That's your trial towards
getting to this bigger piece. It's the way you
can try out marks, and what color did you
like on the bottom, and what do we want to end
up overall on the top. Get a little more wax out. It's your place to play and get some things figured out before you get to
this bigger piece. But I do think it's important to do the smaller ones
before you hop into the bigger one because the bigger one you can then pull one of
your smaller pieces. The ideas that you
created on it, you can pull those together into a bigger piece easier than just jumping into the bigger piece. I'm going to use the
same color palette for the bigger one that I used
for the color studies. I'm just mixing up a
little more of this ocher, and I'm going to mix up a
little more of that white. Then if I have leftover paint, I may take a board
because I actually have a cradle board that I can use
as my extra paint palette. This is just primed in gesso. It's primed in black gesso
rather than white gesso. You do get a different look to your piece if you start off with white or if you start
off with black. Black makes the colors more vivid than the
white base does. I find that very interesting. I'm going to use this as my
extra paint trash palette. It may end up being a piece
of trash when we're done. But you may end up with some abstract piece that
we love when we're done. I'm doing this on
a cradle board. You could do it on paper. But I do think it's fun to experiment on
cradle board to see the difference in painting on this versus painting on paper. What we might do
is this could be all our extra paint for
our underlayers and then I might then be able to use
this as a fourth project. That's my goal there. I do have a cradle board handy. It's already primed. You can prime it
in black or white. We're going to put
that to the side. That way I don't feel
like I have to then paint another piece out of
these same colors. I can start with a
new color palette if I want to jump
into my next project. But definitely, the reason why I say don't mix up too much paint, let it be a little bitty dab of paint because when you
mix it with the wax, it goes so far and it turns into way more paint
than you even think. This is another like we did
with the color studies. We're going to paint
this base coat on and then we're
going to let that dry overnight before we come
back with our coat tomorrow. If you're working with a
bigger piece of paper, I find it easier if you'll
work with larger tools. Instead of using the little
bitty palette knife, like I used in little pieces, I'm working with
a bigger scraper and I'll probably work with
a bigger palette knife so that all of my marks
don't end up tiny. I really have a habit of
getting tight in on my piece. I get close in on
my photography. If you'll work with bigger tools as you get
with a bigger piece of art, some of that you'll be able to then maybe stop
yourself from doing. It's hard to work in a
little tiny cluster of lines if you're not using
a little tiny tool. I could have started
this piece off with mark-making, but I didn't. We're just going to go with it. That's great little extra paint there and then I'm
going to clean off my scraper piece here. Could go ahead and
do some mark-making, that might still show
through our layers. You want to get in the habit of doing some mark-making
with each layer. You end up with interesting
things that shine through in the end that you
might not have expected. Do it even if you think
that it's going to be covered up
because in the end, it may be just a little
tiny piece that we see that makes the piece much more interesting than you
thought it was going to be. Like on the painting, you had a little tiny bit showing in the upper
corner of an orange. That's a surprise
because you don't expect it to be there
until you get closer. Let's just see if we come in with a palette knife with white. Almost looking for a glaze here more than like a
stark white shade. Look how pretty
that's turning out. I'm not being too deliberate
with my composition there. I'm just adding color at this point because we're
not in a finishing layer. So the composition
could definitely change with each layer. I like things that look like they could have been writing, but you can't quite tell
what it might've said. That's why I'm doing this little squiggle line right in here. You might think I had
written something in there, you're not quite sure. Then we can smooth a
little in there and then it's like hints of writing. It's not like it was
really super vivid or hints of our line and stuff. I love doing that. Let's see. At this point, I'm not
sure if I want to continue adding to this today as much
as waiting for tomorrow, and then layering
my next thing over the whole thing possibly
and making some marks. I think for today, I'm going to stop
and let this dry, and we'll come back to it tomorrow when I'm ready to layer on top of that pretty sturdily. I will see you tomorrow.
This one's dry to the touch. We let this sit overnight so
it is really pretty and dry. I think what we
might do before we even lay paint on it is just to show you you can dig right into the wax that's dry the next day. We can come in here and
make some yummy marks on our piece without damaging the paint or getting
too far in there. Look how pretty those lines are, and we don't dig
out tons of paint that is thicker and harder and, I don't know, it's easier
to almost mark-make on top of dry paint like that. Look at that. It just
makes the most beautiful, crisp lines and
marks. I love that. Once you come back to your
piece from yesterday, don't be afraid to come
on here and go ahead and scribble on it and
do some mark-making. You won't be able
to stamp in like your foam stamps or
anything like that. That's not going to work.
That had paint on it. But you can do something
like a little bit of mark-making in that wax, and we could scrape back if there's something
that we hated. I could take a knife and
I could actually scrape back some wax, and you can see it just comes off
nice and easy there. I don't know if that
was blurry for you. I'm sorry if it was. I've got my paint palette out from my little sample sets that we were just doing because I don't want to throw them away. I don't want to think super
hard on this one either because I want you to
get some quick wins. I want you to think
a little faster. We're doing some abstract. I don't want you to get
real bogged down in every layer being
really hard to do. I'm going to work
a little faster on this little bit larger piece also just to see what fun
stuff I can come up with. I want to go in the direction of pink and ocher and
this warm white more so than the blues because
I like pink and ocher. It's one of my favorite
colorways in there. So I like the undercolor
that's here already. Maybe I'll come in and do some pink areas on top of this, and we could see some of our shine through of
our bottom layers. It doesn't have to be super thick paint as we're going because if you like
the bottom layer, you don't have to cover
it up completely. You can work with it. I got some pink edges here. I like that. Already liking this. I think I'm going to
come back with some of this yummy ocher white color. That's pretty. I like how this created some
texture on its own. Look how that created this pretty bit of
texture in there, just pulling from the texture
that's underneath it. So pretty. Picked up some pink here. I don't know if I
want that there. I'll go pick up some of this
warm white that I mixed up. It's another light shade
that I can layer on top of what we've got going and just add a subtle layer
of difference in there. With that color change being a slight lighter shade than the ocher that we
had mixed with the white. I like that. Now let's come back in with some actual ocher. Just to add that extra layer of depth there because
we're covering ocher, but it's a little
different shade because the other one has the white paper
showing through it. So now we're adding
that extra layer of depth there with this
top layer and texture. Then I also reserver the
right when we peel the tape, if I love a piece of it better than the whole thing, I reserve the right to
cut out the piece I love because that really is my favorite technique
on the abstract. If I end up not
loving the piece, I can cut the pieces out that I love and then I feel
like I've never wasted anything
because I love what I've pulled out. Look at that. I'm liking that. Let's see if we go in with
some mark-making. I've got some of the cardboard, so we might do a little bit of some cardboard work in here. Maybe I'll use this
to pick it up. That's really light, but look at that extra tiny bit of
detail. Let's go with that. I like that. I like the dots. Let's put some dots in there. These layers are
still pretty thin, so the texture I'm
adding in here is not so dramatic that
were like texture. I like that. Now this is an instance
where we could come in tomorrow and we could scratch through and add some more layers
tomorrow if we wanted. If we get to tomorrow
and we think it needs some more, we could do that. I'm going to come back now,
now that I've added those, maybe a little more
of the pink on top. I'm choosing to do most of
this stuff with no brushes, but you can certainly do
brushes and stuff if you want. But the cold wax is harder to control because it's so thick, it's not as easy with a brush, but you can certainly put
some brush marks in there. You could try and just work it. It's spreading the pink
around a little bit, tying that color all
the way through. I like that. I'm
going to go back and play with the ocher
a little bit more. I'm not good with just
a block of color. It's just not my style. It's not what ends
up appealing to me so when I have just a
splotch of color on there, I just cannot leave it alone. I have a feeling I might be cutting some
out of this tomorrow, but we'll see. We
could come back in and do some marks. Let's go ahead and just go ahead and add some
interest to these. I love doing a little
ladder. That's fine. Look how fun that is. Little ladder mark-making
in there, so pretty. I might come over here and do some scratch through
this little bit here. Look how pretty that is. It's got the yummy
yellow showing through, super fun there with that. Maybe do some real
soft lines right here, which I might mimic
just above it and I'm just touching real light so I don't pick up too much paint. Maybe we'll have some
fake scribble writing so it makes it look like
something's in there. You can put real words in there
if that's your thing, too. If you've got some
beautiful words of poetry or something that
means a lot to you, add that in there. Make it messy writing, but make it be something
that mean something to you. I love the writing in there. That really set that off for me. Let's go and add
some more up here. If you want to obscure it a tiny bit like you love
it but you're like, let's make it even
more obscured, come back with one of your
spatula tools and just lightly work that
in so that's it's almost like the
writing is in it, not on top of it. I love that. That works out nice. I do love rubbing the line back with your catalyst.
That's pretty cool. I'm loving where that is. I'm going to go ahead and
take the tape off so we can see what the finished
piece looks like. But I guarantee you
all come back tomorrow and cut a piece out of it because I love this
little scrap right here. I love this little
scrap right here. I love that right there. I love little bits of it so much more than I love
the whole big piece, which is the way
I tend to create. It really just behooves
me usually to just create a bigger piece and
then come back and pull the bits out that
I really, really love. I even love this
bigger 6 by 9 piece. This right here, I
love that right there. But I'm not going
to cut this one up for this video
because it's all wet. But let's go ahead and
peel our tape off. Let me pull one of my gloves off so I can peel the
tape and see what we got. Because this I want you
to work a little faster, I just want you to
think of it as a fast, fun, abstract work. I don't want you to think
super hard about it. I don't want you to spend days and days
on your first one, but when you get to the point
that you're like, okay, I want to dive deeper
into these paper pieces, are such a wonderful way to experiment with all
your techniques. If this were a piece
that I was wanting to really have those
layers dry in-between, then I would do a layer, let it dry overnight. Do a layer, let
that dry overnight. Then at some point, I
would finally be like, okay, now my piece is done. Cut the tape on the back pretty good here. I'm
going to get it where I can grab it. There we go. I make sure there's nothing on my finger before I
touch the side of the paper because I've already got paint on
this side of the paper. I can see it throughout
right there. I might just take my paint rag, so move your paint a
little further away. I can't move it so far away with the filming, but I do have it far enough out where I could
trim that if I loved it enough that I wanted to
use it for something. I'm just cramped in here
with the filming, sorry. Now that we're done and I
flipped it over, I love this. We can actually see what direction do we
really love it best. But I'm feeling
like this direction right here is what I love. I'm actually super
happy with that. Maybe I won't cut anything
out of that and that'll be my finished piece. If you're going to
sign your pieces, too, I recommend you wait until
the next day when it's dry. Then you can take your
little marking tool and just sign your little
signature on the piece itself. I could do it now, too, though. This is 2020, so I can put
the year in there and then I have signed my
piece. Just decided. It's easier the next day
when the layers mostly dry, you get a nice clean
signature in there, but that's how I'd sign
it if I was done with it. But look how beautiful
that actually ended up. I'm super happy with it. I may not cut any out of it and I may come back and just see, is there anything I like better? For some reason,
this corner up here I'm just in love with. As a, say, like a
five by five piece, I would love that mounted to a cradle board and
then hung on the wall. But I actually love
my big piece, too, so that one might
just stay like it is. I hope you enjoy doing
the bigger paper piece. Don't spend too much time on
your first several pieces. Work a little faster with
bigger tools and just see, get into the
loosening up and see what can you create and how does the paints work and how
do you enjoy working on a little bit bigger surface
than the sample pieces, and just see what
you can create. I'm looking forward to
seeing your pieces, the colors that you pick out. If I didn't tell you
what that pink was, it's light magenta
from the Holbein one. That's the only
color that I added onto my palette for this one. I'm looking forward to
seeing your pieces. I'll see you back in class.
12. Random Abstract - Color blocking: All right. On this big piece
of paper that I prepped, I have changed my colors, and I'm very inspired by the sample set that
I showed you earlier, where I used the pink and
the ocher and the white, a little bit of gray, and I had these colors with it, so I knew exactly what
colors they were. It was a Portland
Cool Grey by Gamblin. It was a whole bean, light magenta, which
I love this pink, and the Winsor & Newton, yellow ocher, and a
Gamblin warm white. This was a little
sample I had been given by the Gamblin rep
at an artist show. Then before I had
pulled this back out because I was thinking I
wanted to do orange and pink, I had put out some cadmium
orange by Winsor & Newton. That's up there too, and I don't know how
dominant that might be, but it could be something
to add into this but I'm just really inspired
by this color palette. I'm going to make one of
my great big abstracts, like I do quite a bit
with my acrylic paints, and then after it's all dry and we're done
adding everything to it, the next day or the day after, once we let it dry overnight, we're going to then search out little pieces that maybe
we found interesting. We're going to take our
little viewfinder and see if there's any
composition in the big one that we love. That's my favorite way to
create abstracts because I can create without trying to
consider my end result, which is very freeing. Then I put out a bunch of paint here and I don't
know how much I'll be leftover because
I don't know, I got super happy with the
white and the orange there. I do have another
trash can cradle board that's painted black because I had painted
five or six of them, and so I just went into my closet and
grabbed another one. The black is nice because
it makes the colors more vivid than white, it is different in
the look you get. But I have this ready, so if I have leftover paint, I can put that on
here without wasting the paint and that can be the base of another
future painting. On this part, I'm just going to take a
big piece of graphite, I don't get paint everywhere
before we get started here, I think this thing
is hilarious because it's just a giant
piece of graphite, like the inside of a pencil, but it's the whole
thing and I got it in a sketch box subscription
that I had and I never would have bought
that but now that I've used it several times,
I really like it. It's a nice silvery gray color and it's easy to work with, I really like using this
thing, and since I have it, I'm going to use it and I'm just adding marks to the paper. We may or may not see them, it's something that sometimes we see and sometimes we don't, but it does get passed
white page paralyzation. But this whole
technique really gets past that white
page paralyzation because of the way we do it, we're just laying paint on with no thought of what our
end piece is going to be. The paper is so
big, maybe I don't have enough paint
mix, we'll see. I'm actually going to do
something similar to what I've done in one of my little
abstract classes, the Abstract Adventures 3, and try to work in larger
color blocks here, just for a different
technique than what we've done in the other ones and
be a little more deliberate. We're maybe only going to
work on this, the one day, this might not be a
multi-layer piece where we multi-layer
for days and days, if may, we'll just see what we can get today
and tomorrow search out interesting pieces. In which then, we could, if we found something
we really loved and then that piece
needed more to it, we could always add to those
pieces when we do that. After we cut out
something interesting, we could then add the interest, if we needed something more. But let's just start
with this and just see. I'm trying to work
more in blocks of color because the
little abstracts that I ended up with in
the acrylic class are some of my very favorite and they're sitting over here, maybe I should show
those to you real quick. I hate to talk about
something and then you wonder what I'm
even talking about. But you can see, I'm in that pink and brown
and ocher color family again with a little bit
of this rouge-y color. I really like it because
these I was working in larger color blocks also and now that I'm
looking at this too, I really liked this dark brown. I may come back with
a little bit of Van Dyke brown and add to my palette because I really
love how that came out. These little acrylic pieces are even just as much inspiration as that original bit that
I was just showing you. I'm just going to lay
a color down here. Let's just go on into our next color and
then we'll search out fun stuff tomorrow once this has dried, just see what we can get. We can already tell it's
going to look nothing like the inspiration
piece because I'm working in great big
blocks of color and that inspiration piece, the color was mooshed all around together. That'll be very interesting
to then look at that and see, well how different did the
different techniques create? I doubt these every time I do, I'm like, I don't know, am I going to like this? Is this going to turn
out how I thought? I'm in that moment of doubt
right now thinking, no, did I pick the right thing that I should have gone a
different direction. Just know as you're
painting these and you're having
those thoughts, I'm having those
thoughts right now. We all have these thoughts. I don't know. These are so
much more vivid compared to that inspiration piece that I don't know, am I
going to love this or not? I don't know why
I just wiped off my knife when I went
right back to the orange. To start with on these, my goal is to get the
background covered, get all my blocks
of color started. That's where I start with
on these. That's my goal. Then I'll start going back
thinking. Do I love this? Do I love that or
can we add now that we've got some color going? Maybe I want two colors
to mix together. Let's start making
and stuff and just see what can we do in here. You already know that this
orange is so overpowering that maybe that just needs
to be a touch of something. Maybe smearing some of these other colors on top
will make me like it better. Mixing on the palette
knife as I'm doing this, might be taking away
from my overall goal of making these big splashes
of color to start with, but you've got to start
somewhere, so I just figure. We'll start there and see
what we can get as we go. See, look at that as this mix. Now, that is really pretty to me compared to these big
strong colors out here. I really like that
the oil paint takes a lot longer to dry
because now we have the opportunity to go through and get these
colors to mix and do stuff. I could still be doing
this an hour from now if I wanted to just work on it for a long
time. I love that. I love that I'm not hemmed
in with a time frame. Might have to mix
up some more paint. How about that? That's
very interesting in there. Still have some gray here, so I might need to
start pulling gray in for I break down
and mix up more paint. Look how that just,
oh, my goodness, that was super fun
right in there. I'm going to need
some more paint. Let's start getting
out some more paint. Just as a reminder, mixing out a little
dab of paint, and then I'm going to put some wax right next
to each dab of paint. Then I don't think I
want even more orange. Then we're going to
try to mix that, and I say a 50-50 mixture. That's what we're going for. I like to keep these
little pink keys handy. I always hide
things from myself, so I have to have three or
four little of the same tool. I have three or four of
these little pink keys because I am always setting it
down and then going, oh no, where'd my
little pink go? But if we've got more than one, then I can just
grab the next one. Then eventually, when
I do a little cleanup, all the paint comes back out. Let's save that. All
paint comes back out. I was not thinking and
talking at the same time. When I started cleanup then
all the little pieces I find where I hid everything for myself and then I can put it
all back where it belonged. Got a little rag here. Mixing each color clean
with a clean spatula. If you'd like to
work with stencils, if you could do some stencil
work here too, you could press the stencil into
the paint to make a pattern like we did with these foam pieces that
have texture on them. Let's start mixing some
more of this color, let's see the white with it. In the end, you can't tell that I started with
big blocks of color, but sometimes, you just got to go with wherever that
feeling is taking you. I do like the way that this smudge together
really prudently. I could smooth some
of these layers with my bowl scraper just to see what we get before I
start mark-making. Makes the color
very interesting. Very atmospheric. Little more ethereal, almost, which I find interesting
that may not be your style. Tomorrow, that might
not be my style but every single
day I set to paint, maybe I'm feeling something
a little different. Look how pretty that is. Then if you wanted
tighter color and more definition than I'm doing, definitely paint
whatever inspires you. Another thing I like to do too, let's see if I can get
this as some of the white, really fun scrapes and
texture when we just pull white across or may not get it because
it's still very wet. There we go. This texture
that we can get when we add one color and just
work it in a certain area. This is softly wet, it might have worked better dry, but I like this texture. I like that one right
there. I like that one. I didn't mean to do that. Let's spread that back out. I'm just going through and
adding some really thick, solid color on top of here. Just to add to the composition
that hopefully will eventually search
out and discover. No rhyme reason where I'm putting
these and again, I'm still just playing. But I hope in the end, all the plane gives us interest that we just
didn't even expect. Sometimes, these are too thick, like with that white is
just too thick up there. I think once I use
all this paint, I'm not going to mix anymore, so I might not need that
trash palette for this one. Let's call that one good
with all the paint. I don't know, we're going to end up with
something that we like. I don't know. This is over so that I
don't stick my hand in it. How about that? Now, let's use some of our bits and pieces and go in and
add some pattern. I just did that where I
spun it accidentally. Be really careful not to spin. I just smooth it
out a little bit where still got our
texture without ruining it. But be careful not to spin these or
get so excited that you do that or something because it looks like you
moved when you did it. It doesn't look like
you did it on purpose.
13. Random Abstract - Adding Details: [MUSIC] Then I've got
the one with the dots here. I love dots. I'm just going to
be real careful, tap some dots in with hopefully,
not moving it around. I don't care that
it has paint on it, I just let the paint on there. It just dries and it still
works again the next time. I really like this
one with the stripes. I'm going to stamp down
a few of these with some stripes. Look at that. I love that. It
could come back in with a little drag
tool and just see. At some point, you
have to decide, do I have enough going on? Am I ready to stop? Maybe I do have enough going
on and we can just see, are we ready to let this dry? I just might look around with my little
viewfinder and see, is there going to be something tomorrow that I think I love? Or am I just overdoing
it with the color? Tomorrow, do I need
to come back in and really do like a
white or something over here so that
bits of this shows through and it's not so chaotic? That might be something
that we do tomorrow. We may spend more than
one day on this by then editing out different
bits of this to make it really be something that we can pull a composition
out of that's not overly busy because some of this really not
what I had in mind, so we may then work
on this tomorrow. Let me let this dry overnight and we will revisit
this one tomorrow too. I'll see you then. Here is our big junk palette
on the next day. I will say this is probably 80 percent dry because some of this paint is super thick and
you can see if I touch it, it still gets on my finger. You definitely want to
be working with gloves. Let me put my gloves
on because some of these paints like the
cadmium and stuff like that, they're toxic to be on
the skin and I just try to keep as much off
my skin as possible, but I'm not afraid of the paint. If you have problems
with paint fumes, then consider a
little air purifier, a fan, maybe a window open, consider some of those things. I'll be honest and tell you, the fumes don't bother me, so I actually just
can't even smell them. Maybe in my old age [LAUGHTER] I'm losing my
sense of smell. I don't know. This is our underlayer
and it's got lots going on and then we'll put
another layer on top of this. I'll definitely have to let
this dry another day before I then take my yummy
little viewfinders and pick out pieces that I love. This is my favorite
way to create. While this paint is
in a semi dry state, it's dry enough for us
to layer on top of it and it is the perfect
time to add any additional mark-making
that you think you may want because you get such a nice clean edge in the semi dry state compared
to when the paint was wet. We don't have to
add too many marks, but we may just
like a few in here. I like to scribble writing, so I might put some of those. I also like it when
there's a random ladder [LAUGHTER] like you have
a mark and another one. Then we have just some
nice cross hatches in there and I call
that the ladder. I found this little
tool too that this paint is still
wet enough for me to create some
little circle marks. This is a rubber spout funnel, [LAUGHTER] but just think of
things that have shapes that would make interesting designs. Because I've got such
thick paint on here, it was still wet enough for me to make little circles in here. I was just looking around at different things that
I could mark make with and just seeing anything I
wanted to add to this layer before I now start
on a top layer. I'm going to use the paint that I've already been working with. I'm going to try to use all my paint that I've got out and just see
what we can get. I'm going to actually maybe
start with some white and start editing out
some of these areas. I say editing out
because right now there's too much
going on and there's almost nothing for me to look at as focal points within some other areas that
can shine through. I almost want to edit
what's going on here, not really thinking about
how I'm editing though. I'm still very much working intuitively because this
is not my composition. I'm going to be finding
compositions out of this. Will be today because now
on top of the wet paint, there's no way that I'll be able to cut these without getting
paint on everything, but I do want to at least
get that next layer on. Then we'll have to
let this dry and then we can start searching out
compositions that we love, but I do want to edit some
of the busyness out of it. I actually like how
this is turning out now that some of that white is toning down the busyness
because I want it to be not super
overwhelmingly busy. We'll come in now and we'll use this almost as my trash palette and fill in with some of the paint that
I've got left over. I could be more strategic
with specific colors too, but these are in
my color palette. Let's just see what we can do here with the paint
that we've got out before we start mixing any other paint if I want to do that later. Let's just take a look
before we go any further. Now, I could then
start thinking, what do I love here? Are there enough dark and light? Do I have enough showing through of the under layers that I like? Nothing standing out to me yet, so let's just keep going, but if you did your
little viewfinder, which this is just four strips of watercolor paper that I've cut up and taped together to
make a five-by-five square, and then this one I think
is a five-by-seven square. I've done the same thing. Decide what sizes you want
your finished pieces to be and then you can cut some
squares out of those pieces. We don't have to be so square here with our paint
putting on this. We can start doing some
little shapes and things. I could use other things to put the paint on with
if I wanted to work with a catalyst tool
instead of the big tool, I could do that. Let's do that just to
see the difference. I want you to experiment with the tools that you
use to put paint on so that you can get a feel for what some of these
different things will do. Let's go in with some yellow
and maybe I want to get some other marks and streaks in there instead of everything
being so straight. That might be fun. It's got a lot of paint on it. Let's keep that paint. This tool is a completely
different field to work with than
the bigger tool. This is by far my favorite. I'm almost scared here, but let's dive in
with some dark color. Maybe we need some
darkness in here so that when we go to
pull compositions out, I've got some dark, I've got some light areas, I've got things of
interest I can pull from. That's not all one tone, or one shade, or
one color family. I don't know what part
of this I'll love, but I'm definitely adding different shades just
in different places. I like it when it does
this yummy mixy thing. That's really pretty. It doesn't all have to be
completely solid color. Let's see. Did that
give us any areas of contrast where
we're thinking, "Oh, I love that." This, you can almost
too start thinking of an area that you love
and then think, "Oh, I need more of this or
that," and you can start working towards a
composition in this way. Maybe that needed some dark. Maybe we need some of those
little lines that I love. I love these lines, I love doing that
in pieces of art. The paint is so thick
right now that it's not necessarily a
completely clean line. If I put this paint, do this technique on dry paint, it wouldn't be going all the way through to the base color, but I like that it is doing that on the base color for this. If I go softer, I get less down to the base, kind of fun. See, now, I've got some spots where the
color is a lot darker, maybe I like that, maybe I don't love it, maybe I love it completely. Who knows? This is definitely
experimental play. It's an excellent way to
experiment with color, blend things that you wouldn't normally
have thought would go and just see what can we get. We've got brown here, but I don't know if I want
to introduce another color. I might go back with some of the colors
that we were already working with and just
add some in here. Then when you're looking
for compositions tomorrow or whatever
day you're doing that, you don't have to call at the end if you've got
something that you're like, okay, this is almost here and
this needs one more thing. Don't be afraid to cut
it out and then add that element that you're
thinking it needs. Let's come back with some light. I like that. Let's make it do that again. I like that. Definitive line
of lightness that was fun. I do like that. Completely
different color palette than what I had
imagined in my mind. If you're wondering
there. [LAUGHTER] That's the fun of
working this way. You just get things
that are yummy and surprising and I
didn't expect that. It's things I could
never recreate again [LAUGHTER] I can guarantee you this is not something I could
recreate a second time. These are one and done. These are custom
one piece things. You're not going to be able
to do this over and over. Which is what I like
about working this way. Then you get fun ideas of compositions and colors
to work with later. I love that. I love using these as samples for future
larger projects maybe. I like these little
bits of pink. The thicker you
put this paint on, the longer it will take
to dry, just know that. We may or may not be
able to come back tomorrow and cut this out,
because now we've got many, many layers of very thick paint. Let's just see, is
there anything in there that I'm thinking that I like. I'm thinking I like that. I'm looking up in my camera, viewfinder the camera
that's filming because it's almost like I'm
standing back to look at it. I really liked this
piece right here and I like that there's
some light and some dark and some other
things going in there. I almost want to be able
to cut it up right now. With acrylic paint, we can
just wait a few minutes. It'll be dry. I'm not liking
anything right in here. I don't think I love that piece. I might go back up here and add some more stuff just to
see if later I'll like it. With acrylic paint, oh, I didn't think that made that. Well I like that
quite a bit more. With acrylic paint, I
like it right there, we could be waiting an hour and then we can come back
and cut this out. I really like this down here and I really
like that up there. I like that they're in
the same color range, but they're not
exactly the same. I like that. Will we like
it tomorrow? I don't know, but with acrylic paint,
we wait an hour. We come back and
cut this out but let's put some darkness here. We're not going to
be able to do that with oil paint because you can't just put a heat
gun on oil paint. It doesn't work that way. It won't dry it for you
like you expect it to do with the acrylic
paint, just doesn't work. Maybe if we put the dark like what's going
on in this little area here. Tomorrow, I hope I
remember I like that. [LAUGHTER] This is
that yummy little bit of gray that we made with that
pretty blue and the white. I don't want it to be a
line that we went that way. I want it to be a little more
organic there. [NOISE] Now, my goal is just to use up as much as this paint
really as I can. I want to go ahead and not
leave paint sitting out over here and not get it
all over myself. [LAUGHTER] At this point,
I'm going to think, what other marks can I
make on here before I call this one for today? I've got my yummy little
wire thing so let's just go through and maybe
add some little lines. That's fun. [NOISE] That's fine. I like this little wire things
and we can go squiggly. We don't have to
do straight lines. These little tiny wiry
pieces that were perfect for making fine little
lines. I love that. Looks like a bunch of writing. I like a little extra
thick paint then out. Of course, if you
stick yourself, that hurts. [LAUGHTER] I do love these yummy extra little
scribbles that we got going on there and I like the dots so let's put some dots in there. This paint's real thick
so I'm being super careful not to move
this all around. I just want to just have
a finger's worth of dots. Wherever I tap my finger down, that's probably the dots
we're going to get. I don't want the whole thing. I don't want it to be
one big square dot thing and I don't
necessarily want it to be a bunch of paint that
I've just laid down on here on top of another color. I'm moving it all
around. That's fun. The underside of this
would make a bigger dot. That's fun. Let's see if there's any.
[NOISE] These are really fun. It might be fun just to
scrape a whole area of paint off. [NOISE] That's fun. That will element down there. [LAUGHTER] We just revealed
some bright orange. That was pretty exciting
to reveal that. I don't know if I'm going
to love that or not. Then of course, I'm
cleaning it up as well as I can here with my
dirty paper towel. Let's just get a new paper
towel and then I can just clean that up pretty
easily and put that back away. Let's just see, did I
just overdo it with those lines down there or
did that add to my piece? In this case too, what I could do if I decided, some of this is too
much or I've got some weird paint sticking up, I can come back through
and soften some of these. Those were definitely
vivid there. I don't know if I'm going
to love those or not, [NOISE] but very interesting
little experiment there. We could even now come
run through here and soften these up a little by just smearing some
paint back over them. We got texture there, but it pushes it
back into our piece so it's not so vivid on top. [NOISE] Then,
let's take a look. Do we still love that piece? I think I still do. There's still enough
light and dark in there. This piece up here
is still pretty fun. Tomorrow when this dries, I'm going to hunt some
pieces out of here and this colorway is way
different than I expected, since I threw that dark blue in, but still super fun and I
think we're going to end up with some interesting pieces
that I didn't expect. Got to let this dry
for another day. There's no way that I
can do anything with it today and even tomorrow, it may still be slightly
too wet to cut because I want to be able to put my
big ruler on it and cut out. This may be a project
that I come back to in two or three days
because the pain is so thick, I may not be able to cut it out tomorrow, we'll
just have to see. I'm going to set this
to the side and let it dry. Then I will come back after we've got it to
a point that I can search out and cut
some pieces [MUSIC]
14. Random Abstract - Cut outs: It's the next day and this piece is dry enough for me
to at least touch it. I think for the moment, I'm not going to add any
more elements to it. I'm going to go ahead, peel my tape off. There's a little
bit of this ocher, I think I just cut
it off the tape. I will be real careful as
I'm peeling that you're not touching any edge that I
don't want to get dirty. But because this is a piece that we're
cutting pieces out of, it's not so important, but I just thought
I'd mention that. This stuff is not dry
like acrylic paint, how pretty some of this is. When I cut these pieces up, that's when I really love
[LAUGHTER] what we end up with. If you end up with a great
big piece that you love, then definitely feel free
to leave it as a big piece. I do actually love
this pretty good. But there were several
in here that I liked. I think I'm going to take
my five-by-seven piece. I have a five-by-five piece. I can do five-by-seven and pull out maybe one composition, but if I had gone
further to the edges, I probably could
have got two out of that or I could do two here. But I like the five-by-five. I think I'm going to
use the five-by-five. I have a cutting mat down here. I'm just going to search out yummy compositions that I love. For some reason I love
this because of the dark. I'm just going to place
this around and see, and don't be afraid
to turn these. I really like think that right
there because of the dark. I like this. That's even nice there. I liked this one up here
like this because we had the dark corners there. Let me start cutting out
the ones I know I love. I'm going to start with
this one right here. I can either use some
type of cutting piece, this as a quilting ruler, but it's really nice
edge to cut with. I can also just draw this out and cut it with
some scissors. I usually like to just have
one of these wood panels that I use for doing art
in the same size. I usually just cutting around that because it
makes it so easy. I think that's actually
what I'm going to do. I'm going to get that
right there lined up, and I'm just going to
cut around this piece. I have a very sharp exacto
knife that I use to cut with. That just makes it easier, I just line it up and
use the wood as my guide and makes it very easy to cut
these out. This is wet too. You don't want any of
this to be super wet, because if you're
using this as a guide, I'm pressing down on it, and I don't want
to pull a bunch of paint up when I
pull my piece up. I may because it might
not be dry enough. [LAUGHTER] But the goal is to not pull a
bunch of paint up. Look at that. I love that. Let's cut another
one out. This is my favorite part,
these little reveals. I can tell here that the
blue was not as dry as it could have been
because I can see a little tiny fleck it
pulled up right here, but it's not anything
that bothers me, it adds into the composition. But you just want to be careful
if you're working these faster than it intended. I liked this one, right here. Do I like it right there? I think I do like
it right there. I like that too. I think that one
could be the winner. Let's do that one right there. This is yummy. All right, so let's just eyeball
it right there. There we go. This is
my favorite part. This is as good as peeling tape. It's the reveal for
what did you get? Like unwrapping a
Christmas present. [LAUGHTER] I can feel that the paint under this one might not have been
100 percent there, but actually it's fine. Even that piece right
there, there we go. Add to the texture.
Look at that one. Let's see, I think
it goes this way. Look at those together. Oh my goodness,
I'm loving those. I set those to the side and see what else we've got
because there's one more up here that I
liked right right here. See we might even
at this point say, do I have enough for
a five-by-seven? Is there anything in
there that I like? I like it as a five-by-five. For some reason I'm just
obsessed with yummy squares. I think I want it right there. I'm going to go ahead
and line this up basically with the
corner because that's about where that
went. There we go. Make sure I've got it
in where the paint is, there we go. Don't cut yourself. [LAUGHTER] Just poked my hand. Let's pull that one
to see what we got. Look how beautiful. Now, this did pull a piece
of paint off of here. You might wait an extra day. You want to make sure it's
dry before you pull that off. We can go back and fill that spot in with the
paint we peeled off, or I could just
come back later and add some paint in
there. Not a big deal. That's definitely
why you want to make sure it's dry enough though. But I still love
it. Let's look at these three pieces that
we got out of here. Actually now that I'm
looking up there, there's a fourth
piece I might like. Look at these three. Loving those, such a
pretty collection. But now that I'm looking at
this last piece up here, these are nice for
collage elements, almost like this one. I just want to view it
real quick and see. I think this is one that I'm going to go ahead and cut out. I love that too. You know what I could do just
because I know it's wet, is I could try to
line this up and cut inside this line and just see
if that works just as good. [NOISE] That I'm not actually holding this
hard thing down on it, but I'm almost afraid
now that I've done that, I'm going to cut the piece
smaller than the other three. Maybe I'll just go right back to using my piece of wood
and be real careful. [NOISE] I was pressing
down on the wood, not intentionally pretty
hard on the other ones. Maybe if I press
less hard because, I'm pulling this
probably a day early. There we go. See that
one's just as pretty too. Then what we have left
over, super pretty bits. I can use these bits
for collage pieces when we're done
and I can just cut those out with scissors. [LAUGHTER] These can be
pretty collage elements. This one right here, I
love this little strip. This could also be a strip
that we could use if we save our color palette in a book like I do with some
of my other classes. That could be the piece that I use in my color palette
book that I keep. Let's just go ahead
and cut these out. Then we see what we got left
but I actually like this. As a little mini piece
of art that might make a nice framed micro piece of art because both of
these are pretty too. But this one is appealing to me. It might be an inspiration, might be a collage piece later. Here's our four pieces
that we cut out. I am in love with those. I doubted the color palette, but now that I've played
with it and used it, it speaks to me now
that it's done. This technique is one
that every time I do it, just about no matter what
I use material-wise, I get something out of
it every single time. I'm pleased when
I leave my table, I get little pieces
of art that I can feel good about
that I did that day. Instead of getting
up and leaving mad because I didn't
create anything I liked, I leave pretty happy for
the rest of the day. [LAUGHTER] I hope you
enjoyed this technique. When you get to
the cut-out stage, maybe let your piece dry two or three days rather than
the next day if you're using thicker paint here because I was trying to
finish up my little workshop. I went ahead and
cut the pieces out, but it is not completely dry enough for us to cut on it like we did with the one that had
a little piece of paint that came up but I could
tell I should have let that sit for another
two or three days. Just make sure if you're
doing this piece, do all your bottom layers, and then let that dry overnight, and then do your top layers, and then let that dry overnight. Then if you do
anything the next day, then let that dry [LAUGHTER] until you get to
the point where you think, I'm ready to cut it out. Then set it to the side, maybe wait three days and then come back and test to
see if it's really dry enough to be leaning on it and picking out and
cutting out of it. I hope you love this technique. I can't wait to see the
ones that you create. I'll see you back
in class. [MUSIC]
15. Abstract on cradled board: In this video, I'm going to use this piece
as my trash paint piece. What I mean by that
is rather than waste all the paint that
I've put out for today, I want a surface to be able to use that paint on rather
than just throw it away. So I thought this would
be a great time to just experiment on a piece
of cradled board. It's painted with black gesso because I painted a bunch
of these at one time intending to do all kinds of fun stuff and then
they sat in my closet. When I was doing this
piece thinking I needed a board that I could use
for my trash palette piece, and that's the ones
I happened to grab. That's black gesso
painted on there. You could paint yours
with white gesso because unfinished board, that oil leach into the
board instead of staying on top like we want and you need to prime the board when you're
doing the oil paint. I have taped off the sides because when I'm done, I
want to be able to just pull the tape off and
the side to be clean because on the off chance
that I love the piece, I want it to be
nice and finished. If you were to paint this and you didn't cover
the sides and you had cold wax and oil
paint all over the side, you could clean that up with a scraper and sandpaper
and sand it down. But let me tell you
that's a lot of work when you could have just taped
it off and been done. So this is the board that
we're going to use as just our leftover
paint trash palette so that I don't waste anything. We can make this an abstract, we can make it several layers and dig through
and in the end, end up with a pretty
abstract because on the top layer in the end, you may have all these layers underneath it of
different things but maybe that top layer is a finished painting that you add after everything was dry. My goal here is just
to use all my paint. Getting it on this first layer, I'm not looking to do
anything specific other than not waste the paint
and throw it away. I'm just trying to cover the surface and then this
might be something that we dig through upper layers then we'll find these interesting
things underneath it. When we're all done, it may
not be anything pretty. You may be a better painter than me and just end
up with something beautiful on
everything you paint. Mine takes effort. It doesn't help though that I'm using all the leftover
random weird onus in such a way that I'm not
trying to get something exact. You could certainly be much more specific about
this than I am. Let's grab this green. See? I don't really even care
that they're all mixing up, I just want to get the
paint on there and then I will pick a different color
palette for something else. When we do something
on top of this, these underneath layers may
be what adds the extra bit of interest to our
piece, so it doesn't really matter how ugly it is. This may be what gives us those interesting
peek-throughs. It's really thick so by the
time I come back to this, I'll definitely be glad these
layers have dried a bit. I think I've got all
the paint off of here and I may
smooth this out with my silicone knife just to get my layer a little more
even for the next coat. I don't even care that I'm
mixing the colors in here. It's actually prettier
now that I've mixed that. I just want it to be more of an atmospheric look under there not anything special, really. Now, look at that. See? Sometimes you surprise
yourself with what you get. Look how pretty that is. Almost like a scene
at the ocean, maybe when looking through
a waterfall and this is the color shining
through the waterfall. I just like this a
whole lot better now. Look at right there, doesn't that look like a
waterfall? That's so pretty. What started out as questionable and I
wasn't liking it at all, has turned out to be
really interesting here with our colors. Then I'm just going
to wipe the edges so I don't have a big glop on here to have to do
anything with later. Here is the beginning of our extra palette that
just used up all my paint. I didn't throw any
paint away and that's the first layer that's
going to be under there. Look how pretty that
layer turned out as I was painting all those
terrible colors on there. We're going to let this dry. I could do some extra marks in here or some things
if I wanted to, I could go ahead and use this
as my experimental thing. That was real pretty actually, I'm really happy I did that. Let's put some dots up here. Look at that. I just moved them. When you're doing
these dots like this, be careful that you're not so excited and you're
pulling it a little bit. Because if you'll
notice up here, I got a nice little dot, down here I got a smear. In a case like that, I would probably come back
with my palette knife and maybe spread those back in a little bit and let them still be a little
bit of texture, but not quite that smear
that look like a mistake. Well, we could actually paint some botanical
right on top of that, like a white edge botanical. If we were doing this
in acrylic paint, that would be really pretty. I can also take my little knife here and
I could come through with a few little marks
and my paint is so thick that I don't want to do too much on this. Let's see. I like it like it is. I hate to even do anything
else to it right now. I like the texture. I
like what I have going. I like the marks that we have. I like the yummy waterfall
look that it created. Let's let this one
dry until tomorrow, and then we will decide what we want to layer on top of that
to continue our abstract. Look how pretty that is. So working on a wood panel, little different to
working on paper. I do encourage you
to try at least one even if it's your extra
paint panel like I'm doing. Because in the end,
that could just be the bottom layers of something fabulous that we put on top. Let's let this dry overnight. I'll be back tomorrow. Our trash piece is dried. I'll be honest with you, I love this one so
much just like it is that I don't want
to paint on top of it. I thought because I feel that piece is where
it needs to be. I could come back in today
and do some scratching on it. I could sign it if I
wanted to sign it. Which way is down? I think this way is down. I could come back over
here and sign it. I put the year on it. See how beautifully that signs if you decide to sign like that? You'd wait until the next
day, it signs beautiful. I would not say it's
100 percent dry because this had real
thick paint on it. If I went to dig my finger
into it or anything like that, I would definitely damage it, but I don't want to
change anything about it. I think I love it. I could come and add a few of those scratchy
writings in there if I wanted it to look a little
bit like some scribble. The paint is still pretty thick. Even though it sit but not dry, I almost don't want to even
scratch into it right now. I wanted to show you
how I might finish the sides of a piece that I like like that just because
we're on a cradle board. I'm going to pull the tape off, I'm not going to add any
more paint to the top. I'm going to pull my tape off. It was painting
with black gesso, so that's why the
sides are black. At this point, I could go back now with some black paint and definitely paint the
sides really nicely and make sure that it's exactly
perfect like I want it. If I had any paint on the side that I
wanted to scrape off, I could get one of my clay tools and do a little bit of scraping if I needed to
like one of these, that's got a little scrappy edge on it. Let's do this one. I could come right along the
edge if I had any clay that was overhanging
because sometimes you do and pull that right out. There's a little
bit that came off. That's how I could really
easily just clean the edges, just run along there with a little tool and
clean that edge off. I could also very
carefully with my fingers, I could smooth that down
and make that a nice finished edge without
any trouble at all. Then that would be set. I actually like
it like that too. I'm just loving this piece. I don't even want to change it, but look how pretty it
is with the black edge. That's one choice. We can be ready to hang that. Another choice that
I really like is using metallic wax on the side. I have metallic
luster by DecoArt. I have gold but apparently I've had it for so long and it's been not sealed as well as it could be that
it's now hard. When you buy the waxes, they don't stay good forever. The gold would've been
pretty on the edge of this, piece of that gold just
fell on my painting. Hung on, let's get that off. It doesn't last forever
so you got to be real careful when you buy it that just know that eventually it's not
going to be as good. Here we go. Until
you could probably add some of this wax,
because this is a wax. You can add wax details on
your piece if you wanted to. Then I also have art
alchemy metallic. This is a copper color
and it's not too dry. I do like this pretty
color is pulling out of some of the color that I already
have in this piece. I could go through and add some little decoration in
this color or I could even, maybe if I wanted part
of a stencil on here, I could do the stencils and
a wax because it's wax. I think it'll sit on
top of the wax nicely. But what I'm going to do is
take one of my shop rags, my blue towels here, put a little bit
of this on here. I'm going to finish
the sides with this copper piece, copper wax. You just put it on there
just like that with your finger to the consistency and the thickness that you want. Then we just let that
dry just like we did the cold wax on top. We just let that dry for
a bit and it's finished. We don't have to really
do anything else to it. We could come back with a rag and buffet it if we wanted, but this is basically
painting on the side with metallic wax which I
think is so pretty. Look how beautiful that side is. It shines really pretty. It's a nice finish to our
piece that we've created. I do like these extra touches
when you go to finish these extra details
that just elevate it. Make somebody excited as they're looking
around the piece and discovering all the
different elements that you added. I just love that. I love that as an art
collector because I collect a lot of art
from other artists. I like supporting
other artists on their journey to be a
full time working artist. I just love collecting art, being inspired, having it
hanging around my house, and when they have
such fun details for me to look at and discover, really makes me appreciate
the hard work and effort that they've put into the pieces that
I have collected. It's the extra details
that really complete it. I'm being very careful not to get this on the painting itself. I don't want the
metallic on the top, if I can avoid it. At this point, the top
is still wet and so I really wouldn't consider
taping off or anything. Not that I'd consider
putting tape on the top of the
painting anyway, but just in case
you're wondering, can I tape it off? I wouldn't even consider that. I would just do this
slowly and carefully. Or if you're painting the side with a color that you
think will complement your painting or with black, just be super careful with your paintbrush as you're
painting the side. Because you could use
black acrylic paint and paint the side and
that'd be just fine. I'm wearing a hole
in my rag here. Let me just pick another
spot to finish off here. You got to be
careful touching it. It's not like you can touch the sides of this with your fingers. You'll have a fingerprint. Be real careful after you've wax the side that you've got this in a place that you
cannot touch it or awhile until it's dry because you'll put
fingerprints on it. It's just like wet
paint at the moment. It's not dry yet. Not set. Then tomorrow or few
hours from now at least, then you'll be able
to touch the sides, but for the moment, just
consider it wet paint. If you do accidentally
touch anything, go back with your rag and touch it up real quick
before it's set. I really didn't expect to call this one done without
adding more paint to it. I'm pleasantly surprised myself that it's so beautiful
just like it was the one we spread our
paint on it yesterday. Don't be afraid to call a
piece done before you thought you were going to be
done with it either because I just love that. I don't want to put
anything on top of it. I love how it looks like. I'm looking through a waterfall to a lush landscape beyond. This is maybe some water, or maybe I'm in a cavern and looking through
the waterfall. It just looks like a
waterfall to me and I'm just in love with this. Now we have beautiful copper finished edges that
are going to have a slight sheen to really set that off when we hang
that up on the wall. I hope you enjoy your trash
piece as much as I did. This is our leftover
paint piece. Once I'm done painting today, if I have leftover
paint over here, like I've gotten now from the different
projects I was doing, I will get another one of
these and spread paint on it. I may like that first layer or I may decide tomorrow that
it needs many layers. It's very serendipitous on these pieces when you've
got leftover paint, what you're going to end up
with and if you love it. I can't wait to see your leftover paint pieces
to see what you get. Those are unexpected and fun. I'm looking forward
to seeing those. All right. I'll see
you back in class.
16. Finishing your pieces: In this video, let's talk about finishing your pieces. If you're going to
do little pieces like this and cut them out, you can frame them
just like that. I'm going to pull a different
little product over here. But you can frame
it just like that or you can mount them
to cradle boards. I really like mounting
stuff to cradle boards when they are
paper mix like that. It's very easy to do. If I'm going to mount those, these definitely have
to be super dry. I would probably
cut it a little bit bigger than my piece
or cut it out, glue it to the piece, and then flip the
piece over and trim off any edges that you had, even if it's supposed
to be the same size unless there will be a tiny
piece you have to trim. To glue the board, I use Yes paste. I put Yes paste on
the board and then I put the piece of art
on and then I take a piece of wax
paper which is like a parchment paper or deli paper from the kitchen and then I
spread those out really good, make sure it's all stuck down
and then I would let that dry and then I would
paint the edges. If I'm going to
use a paper piece that I'm going to mount later, that's how I would do that. These I have not cut out, but I really love this set. You can cut them out and
frame them under glass. You do want this to be
really dry because as the oil paint in this
dries over time, it gases, like it puts
out a little bit of gas, and if you frame it too soon, which I had this but I got to tell
you my experience has been a tiny bit different, but I've heard if you
frame it too soon, then it could gas onto the
glass and make it foggy, so then you'd have
to take it back out, clean the glass off, and then put it back in. But I got so excited
with one set of wax things that I
was creating that I framed one that was
practically still wet and they're still hanging
in my downstairs desk area. They look great. You're just going to have to
experiment with that. Let them dry for a couple of days before your
frame it if you can. But I have framed
one practically as I finished it and stuck
it in just so I can be like, look, I've done
all four of these. If you have glass that fogs up after the fact, just know that's what happened. The oil paint gassed, and you just need to take
it out and clean that off. Now, as far as the
finish on top goes, if you don't add any
other materials on top of the wax paint concoction
that you have here. Like if you don't
put more wax crayons or something on top
really it's finished. You don't have to do
anything else to it. But a lot of people like one final coat of
something on top like a Varnish on their
art pieces and for this, I wouldn't necessarily
recommend a Varnish, but you can try the Gamvar. It's made for the top
artwork and it brushes on. The problem with the Gamvar is if your oil paint mixture had more than 30 percent wax and I was telling
you I used about a 50/50 ratio so mine was about 50 percent paint
to 50 percent wax. That ratio is too much wax. If you put the Gamvar on top of these with the larger wax ratio, then it actually
starts to break down the wax and it ruins your piece and so I don't
personally use Gamvar, but if you're going
to use a very low wax consistency and you want to finish with
the Gamver like you would an oil painting,
then you could. But Gamblin says, it's got to be less than 30 percent
wax in that mixture. If you want to coat
it with something, you probably want to be very careful and go
ahead and cut these out. But you could put a clear coat of cold wax on top of that. This stuff is just basically some bees wax and some resin. It's not really
bad for you and I. Just basically stick
my fingers in it. It's like shortening. I just get a glob
out here and then I just rub the wax
right on there. You could also rub
the wax on there with a lint free cloth or like the shop towel that
I like to use. The shop towels which come from the paint department
in the hardware store. Because painters like these and I like these
because they're lint free and they're a little
sturdier than a paper towel. Coat the whole thing
in a clear layer, then let that dry for, I want to say, more than
several days because these pieces that
I have that are not quite dry, you
can't do that. You can maybe add the
clear wax on top of it, but I wouldn't be rubbing
it in like I normally would because these pieces
aren't completely dry yet. I'd want the piece
completely dry then I would take a layer
of the clear wax and then let that completely dry and that would be
my top finished coat. Then what I would do
is come back with a lint free cloth or a
t-shirt or something and lightly buff the surface
and that will give you a satiny sheen and a final
finish to that piece. You can just buff
it just like that. Now these don't have a coat
to clear on them and you can buff them also to get
a final finished coat. That's how I would
finish the top of these. If I had to have
something on top, a clear coat of the cold wax, let that completely dry and cure for awhile
and then buff it. You don't have to add anything. These are fine,
just like they are. They're wax and color. The other way that
I would finish if I were mounting it to a board, you can either paint the
sides like I was talking about with the smaller
piece that I had out here. You can paint the
sides a color that you want or in this project, I show you how I
wax the sides with a yummy metallic wax to give
the sides a nice finish. That's another thing
that I think is really fun for finishing, is some of these metallic waxes. I do show you how I use that wax in this project and
it is something I find really beautiful on
the side of pieces that you might want to consider doing but if you don't
want to do that, you can just take any color of acrylic paint that you love and paint the sides and that
piece would be finished. Then I would always
in the bottom corner, come down here and
scratch your name. This is a clay tool that's
got a nice pointy thing, but before the wax
is too cleared, I just sign it in the corner. That's where I like to sign. You choose what
works best for you. Then if you can't see it or you think
I don't want to sign the front or whatever, and you can definitely
sign the back, put a year, put a quote, something that you'd like to put on the back of your paintings, that's perfectly fine also. But if you're going to
glue this down to a board, then I would wait and put that information on the back
of your board back here. Hope that gives you
some good ideas on ways that you
might finish these. There's lots of
different opinions for ways to finish art and
do things like that. But with the cold wax, you are a little more
limited on things that you can put on top of that and I don't want you to ruin it by using something like a
Varnish that's not going to be as good with a heavier wax mixture like most artists do
with the cold wax. Most artists do cold
wax medium on top, let that dry for awhile and then buff it and then Dorland's is another brand of cold
wax as the Gamblin. I have tried both and it's about the same exact thing so
either one works just fine. I can't wait to see some
of your pieces finished. That would be amazing
if you frame it up or do something on
a nice cradle board. I'd love to see those projects. Come back and show them to us in the projects area and I will see you back in class.
17. Color palettes: [MUSIC] I want to remind
you, as you're going, to start collecting some
of your color palettes to refer back to. I know we saw some of
these in an earlier video, these are some color
palette collections that I have played with. I'm not saying they're great
or anything like that, it's just color studies
that I have tried as I was experimenting
with color, and mixing color and marks
and what I want you to do when you do those color
studies in class, is I want you to take a
piece of scrap paper. You can do this in
your color study book like I've shown
in other classes. This is my acrylic colors. You could do this
with oil paints and a pretty little
book like this. I like to keep color palettes of things that I have tried
and experimented with. With the oil paints, I will write what brand it
was like Winsor and Newton, Lamp Black and then
titanium white. It's pretty much titanium white. Then if I created a color
out of some other colors then I noted what I used, so that I would know,
Charvin tropical green. M Graham quinacridone violet. Winsor Newton Payne's gray. That's how I came up with maybe these reddish
lavender colors for this particular color set. So I want you to
get in the habit of having some little
scraps of paper around. I like little scraps like this and then I keep these with this. They were very easy to
pull out to show to you because they're handy and I
just keep it stored with it, which is why I like
working on paper pieces. If these aren't some
masterpieces that I'm creating, it's nice to work on papers so you can store it
and refer to it later. But get in the habit of
creating yourself a little page and put a little of each color
on there as you're going, and write down what they
were and save that. So if this was a color palette that you're like, "Oh my God, I love this and I want to
revisit it a couple more times," now you remembered
what you used, because I guarantee you, if I came back to
this a year later, because these are
definitely some that I made last year
or the year before. There's no way I'm
going to remember what it was that I used. So I love having these
little bits of paper. I created lots of these
and I will create them for the pieces that
I did in class also, if I didn't mention
it throughout class. I just like having samples in colorways of
things that I love, and I love seeing the
colors that you use too. In class, if one
of your projects that you end up doing are the little set of
four color pieces, do your color samples with it. I want to see that you did
your color pieces too. Like this, I've revisited
a couple of times and I wouldn't have
remembered these colors after doing the color study
if I hadn't put it down, but then I could revisit
that on bigger pieces and different mark-making
and seeing what did I love. I love this set is such
a fun, happy color set. I love this with the whole
being light magenta and the ocher and the cold
gray and the warm white. You'll notice in class, that's the colors that I
used in one of the projects. I got that inspiration
from this color palette. Even though what I ended up with might not look identical
to what I did here, that's where the
inspiration came from. It's a color palette
that I know I love and I'm going to want to
revisit it again and again because it makes me happy, and I'm going to want to
know what those colors were. So I have that. As you're going,
definitely make yourself some color palettes to
put with your pieces when they're dry so you can refer back to them and figure out how did
you get to where you got when you created your
pieces in class. I'm pretty excited to see what
color palettes you choose. I like trying out things
that others discover and so, if you find an
interesting color palette that you wouldn't mind sharing, all of us would love
to see that too and maybe that's a color palette we could play with too. [MUSIC]
 DENISE LOVE, Artist & Creative Educator