Transcripts
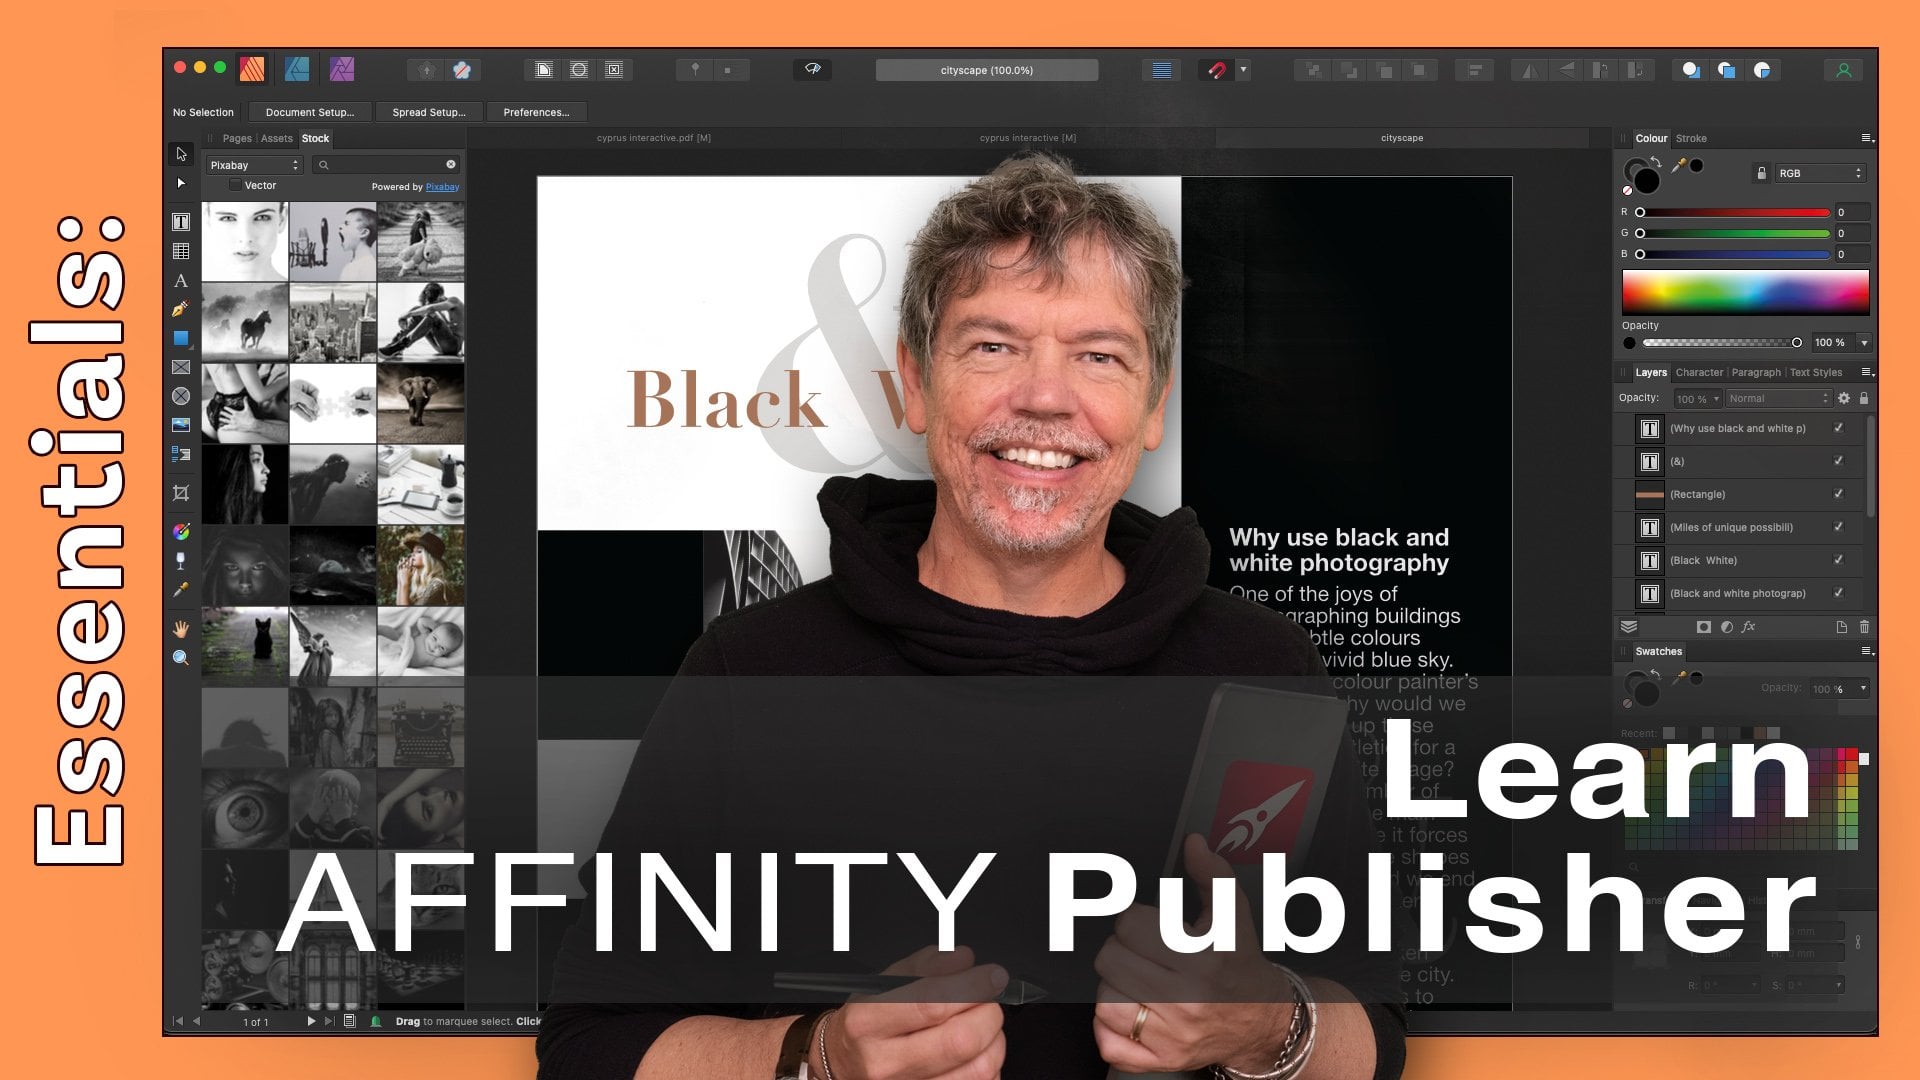
1. Intermediate to Advanced Course in Affinity Publisher: Hi, my name's Tim Wilson from Red Rocket studio. I'm a graphics instructor and a university lecture. I would love to help you to create amazing publications using Affinity Publisher. This course is designed for you in such a way that you'll first cover a series of lectures and then usually a project or two to work on. These projects allow you to put the knowledge you have learned in the lectures into real-world examples. You will have a body of work you'll be really proud of. I can't wait to help you to learn Affinity Publisher.
2. The Minor Differences Between Version 1 & Version 2: Before we get started
in the software, I'd like to talk a little bit about the
differences between Affinity Publisher one and
Affinity Publisher two. And before you start worrying, don't worry, there are
very, very similar. Now, you might be doing
this course using Affinity Publisher
one or publish it to the course itself was
recorded in Publisher one. But I'm going to show you
the differences now if you are in version two, now, I've got a document open
in Affinity Publisher one, you can tell at a
glance because it says Affinity Publisher at the top. I've got a second version
of Affinity Publisher here. This is Affinity
Publisher to I've got the same document open and you can tell it says
Affinity Publisher two at the top there. The main difference
that you visually see between the two
is the toolbar. If I move publisher to over a little bit so you can see publisher one
in the background, published two in the foreground. What they've done is
they've taken some of the tools and change
them and made them. Well, it looks slightly
nicer with some color. So e.g. the table
tool there, in one, It's black and white
into it's in color, it does the same thing. The type tool, once again has
changed ever so slightly, slightly different icon, you
can see the pens changed. The shapes, no longer
have the filename. They just have the line around
the outside going down. We've got the merge
data merge tool, and once again, they've changed the icon exactly the
same with the fill tool. They've changed
the icon in there. It's exactly the same
thing and you can see they sort of look the same. Now, the last thing over here
is the definitive publisher to has this Fill
and Stroke option, which is the same thing that
we have up the top here. Whereas in version one, you only have it at the top. You don't have another
version down there. If I move this down to that, you can see the
tops of these two, you'll see that they
look almost identical. Along the top, maybe some
slight color differences, but that rarely is it for those. The main look. Lastly, in here, if
I move them across, they have changed the
layers ever so slightly. Affinity Publisher one,
which is this one over here. You have a little arrow on the left in Affinity
Publisher to, there's a little arrow
that made it much smaller. And then they've put
a little icon over there to show the type
of layer that you're on. None of those things really make any difference to the workings. When you are working
in Affinity Publisher, you'll find that these
things are almost identical.
3. Studios Have Moved in the Menu (V2): When it comes to finding
your studios and panels in Affinity
Publisher one, we would go along
to the View menu. We go down to the studio. And all of the panels
are listed under the studio sub menu in
Affinity Publisher two. And I'll just go and get up. Affinity Publisher to all of your studios are listed
straight in the Window menu. Over here. You don't
no longer have to go to that sub
menu to find them. They're all still the
same panels in there. The last thing that
they've changed around in here is if you in
Affinity Publisher one, I'm so Affinity Publisher one. If you go to the document
menu and you go down to the Resources Manager over here to find all
of your resources. In Affinity Publisher two, you will get that get there
in a slightly different way. You'll actually go to
the Window menu and the resources manager will
be in the Window menu. It's the same with
the font manager. They've moved it
from the document to the Window menu in here, but it's still the same.
4. Introduction to Custom Shapes: In this next section, we're going to be looking at shapes from basic shapes through to custom shapes. We're going to use all sorts of tools, including the pen tool. And then at the very end, we're going to be creating two posters for our project. These two over here. Once again, like always, you can put your own take on the projects. Let's get going.
5. Creating Shapes / Shape Tools: Let's have a look at the shapes now. Now if I go along to my toolbar and we go over to the shapes, you can get to the different types of shapes by will, either clicking and holding, which will bring them up. Or you can double-click, and that will bring them up as well. Or you can click on the little arrow at the bottom right-hand corner, and that will bring them up. So double-click on there. And if I go down here, we've got a number of different shapes. Now we're not going to be looking at every single one of them. I'm going to take you through some of the most important ones. Just basically a rectangle and an ellipse. And you can have a look at the rest of them when you've got an afternoon to spare. Let's start off with this rectangle tool. Now when I click and drag to make a rectangle, if I just click and drag like this, I will get a rectangle. If I hold down the Shift key on the keyboard, I will get a perfect square. And the same goes for the rest of those shapes where you can click and drag out a perfect square, perfect circle, et cetera. Now, when you're actually drawing your shapes are like this. If you have a look along the top bar here, there's a lot of different tools. And I'm going to go right away to the right-hand side over here. And I've got three little tools in here. Now to show you what that does. I'm going to increase the stroke width or weight as it's called on my shape. I'm going to go and choose a totally different color here, so it's easy for you to see. And I'm going to go right the way to the top, to the top left hand corner. And I'm going to just change the width like sir. So if I click on the Shape and I want to make a new shape, I'm going to go along and get my, my shape tool. Now you'll see if I'm on this middle button here and I make my new shape, the new shape comes in above the others. If I do it again, but I do it with this tool here, the one on the left of the three. When I click and drag, you can see how puts it behind the one I've just drawn. Let me do that again for you. I'm going to just get rid of those. So by the way, I'm using a shortcut there which is, see the Command or Control D on which machine you're on, Mac or PC cannot control and a Select All. And then I just press backspace or delete to get rid of it. So once again, if I click and drag, if I go to this one here, when I draw in my next shape, it'll come in behind that one. If I go to this one here and click and drag, it comes in above that one. So just keep an eye on that because it's easy to think. Sometimes it comes in front, sometimes it comes in behind. So what is this last one here? Well, the last one brings a shape in as a clipping. So I'll do that. I'll draw another shape over here and you can see how just clips into that other shape, there are masks that shape. We're going to be getting into masking and those sort of things later. So let's get rid of these. And we'll just have a quick look, very quick look at some of the options for the stroke. So if I make my shape like this and I've got a stroke on it, I'm going to go up to the top to this, to the little stroke option. You've got your width over here for your stroke. And if you go down here to order, now, this means that I can either have the stroke above the fill or the fill above the stroke. So over here, if I choose that one, now my fill is above the stroke, so you can't see half of the stroke. If I choose this one here, you have the stroke above the fill. To the right of that. We've got Scale with Object. Now what happens is if I've got a shape like this and I decide to scale it and I can scale it right the way down, all right, way up. The stroke always remains the same size. Now for something like this, this is absolutely perfect. But imagine if you've done a logo and that logo has got a stroke around one of the parts, and you suddenly scale the logo up. And the stroke just equivalently, is smaller because it remains the same. So this is when this can come in useful. And we'll be looking at doing some logos and some icons in the project. And you'll see how you can actually put this in practice. But scale with an object. If I switch said on, now when I select the object, I scale it up. You can see the stroke scales with the object as I'm scaling it up and down. You know, check that out. They are in the stroke options along here. So you want the order and you want to have a look at this scale with object. At the same time, we'll get into these ones here when we look at some of the lines and using the pen tool and stuff like that. Try it out.
6. Groups: So here's a very quick but useful technique. If you have got a number of shapes like this, you can select them. You can click and drag over them to select them. Or partially over. If you've changed your settings, that you only have to touch them. We looked at this earlier in the lectures. But if you've got a bunch of shapes like that and you want to group them together. It's really simple. You just go up to the Layer menu and choose Group in there. Now, if I then move one of them, they will all select at the same time. Now, if I double-click one of them as I've just done there, I can then go into the group and then start moving around individually. You'll see once again, they're still grouped. Double-click on here, and I can go in and I can move things around and adjust them all within that group. When you click out of them, it goes back to the normal group. If you wish to ungroup, you can go into the Layer menu and just choose to ungroup the ones you've selected, or ungroup everything in there. But don't forget, double-clicking takes you into the group and you can then adjust them. Click out and you're back to a group again. Try out.
7. Copy & Replicate Shapes: Let's have a look at how we can replicate the shapes. I'm going to go down over here in my shapes, I'm going to choose a diamond shape and I'm just going to draw in a little diamond in there. Now I've got a very, very thick stroke around that. So I'm actually going to go down to the stroke over here and either take the width down or over in my swatches, I can just choose a little nun as long as I'm on the stroke rather than the fill, I can choose none. So the first thing is if I want to just a copy of something, the easiest thing to do is to select it, hold down the Alt key, and then you can click and drag to make a copy. We've looked at this before, I've mentioned it before. So it's Alt, click and drag to make a copy. So I'm just undo those two. But what about if you want to make multiple copies very quickly? Well, we can do it from the menu or there's a shortcut. If I start to move this, I'm going to hold down the Alt key and I'm going to just go down over there. Let go of the mouse and then let go of the old keys are the processes. Once you've selected, hold the old key, click and drag to move it, let go of the mouse, then let go the Alt key. I say that because sometimes if you release the one before the other, it'll goes horribly wrong. Now, once I've done that, if I go up to the menu and I'm going to go along to the Edit menu. And we've got an option here which says duplicate and duplicate. It will do exactly that. It will just duplicate that last shape or the last move, shall I say that once again? Let's go over here to edit and duplicate again. Now of course, I don't know whether you noticed, but the shortcut for this duplicating is different. A PC, it's Control J. On a Mac it's Command and J. So hold down the Alt key, I'm going to click drag. Now, wanna make sure this is perfectly lined up. So I'm also hold down the Shift key. And then I will use Command or Control J to just repeat that all the way along. Let me go and do it again. So I'm gonna select all of these. I'm going to hold down the Alt key, drag down. I'm holding down the Shift key so we go perfectly vertical in there. And then I can use Command or Control J to repeat them very, very quickly. These of course, are individual items, so I can always go in there and it just change the color on one or two of them. Should I wish ICER, but do try that out. So remember, it is Control or Command J to do the last thing that you've done. Again, try it out.
8. Convert to Curves: So back to the basic shapes again, I'm going to make a rectangle over here and it's just fill it with a totally different color. Now you'll notice around the outside we've got these little handles that you can pull on. There's also one for rotating the shape around. But at the moment, I'm using the Move tool at the top that off the two arrows. This is the black arrow right at the top. And I can move it around and as you say, I can rotate it. But what about the white arrow tool called? If I go to the white arrow tool, once again, I can click to select my shape. It appears to do exactly the same thing. Now, those of you who are coming from the Adobe stable, particularly Illustrator or InDesign, will go, Hang on a second. That works totally different in InDesign. Well, kind of, but not entirely. If I've got a shape like this, it's still a shape object. It's a rectangle. And if I go up to the Layer menu, what I'm going to do is I'm going to say convert this to curves. Now, it's still a shape, it's still filled with green. But I can then select the individual points, and I can then move those points around. So if I go back to the black arrow tool, can once again I have the little handles. If I go to the white arrow. Now this white area is called the Node tool. And affinity calls these nodes. So whether you call it nodes are points the same thing. I can move them around. So I can just click on one and drag it about. If I click to select two of them, you sack and move two of them around as well. Let's get the move tool again. Move the whole lot about and I'll delete that. I'm going to do it with a different shape this time. So I'm going to go to an ellipse. Once again, I'll make my elliptical shape, the black arrow tool, the move tool. You know what that does? If I go to my node tool, it's still doing the same thing. If I click and drag to select ID, same thing. But I go up to the Layer menu, down to convert to curves. And then I can select the individual nodes over here and I can move them around. If you're working with curves though, you then also have handles. So you'll see if I drag this handle, I can then twist the shape around like that. So these handles help to give us really smooth curves around here. Now these are known as Bezier curves. And if I drag this handle here, you'll see if I were to pull those in and move that right to the middle. Are kinda get a point in there. If I pull them out and get hold it now, pull them into into the middle. If I pull them out, I will then be able to get much more of a smooth curve. And as I said, they're linked together. So when you move one, the other one moves as well. So it keeps this curve really nice and smooth. So before we go any further, let me stop at that point. Try that out. Don't worry about if your curves go all over the show quite yet. I'll give you ways to control them bit more shortly, um, but check those out, make some shapes, use that node tool. But you have to always go to the Layer menu first and convert to curves before you can use that node tool with them. Try it out.
9. Convert to Nodes: What other things can we do with the node tool? I'll have a look at this. If I were to get a shape like that. And I'm going to come along to my node tool. But obviously we go to the Layer menu, convert to curves. And I can then select a curve and move it around. Hook at the top where it says Convert. I can then convert curves into or points, shall I say, corner points. Corner nodes get confused with these words, nodes, points. Same thing. I can convert the corner ones into smooth ones, which rounds them off. And I can still move that around. I can still adjust the handles like so. Now, if you've adjusted your handles and you've made a bit of a mess like I've done. There is a smart corner node tool. And if I click on that, it just resets it back to this equidistant handles. Once again, I can click on this little point here. And there we go with vector points. Once again. Let's have a look at this on a totally different shape. So I'm going to go across too. Well, Let's go and get this hot tool and do a heart. And I like to change the shape, that's heart into a mosque. So I'm going to go up to the Layer, convert to curves. I'm going to use my node tool and I'm going to select that point and that point together and make them into sharp points or corner points. I can always still pull them around and I can move them out. Going to move that one out too there, I think. And this one here. Well, let's see what it looks like. If I go with a corner point. Here we go and Quick Mask rounded off. It's not too bad at all. Just put in some eyes and mouth and all set. And we do try that out on the various shapes in there. It is really easy to do, but don't forget, you need to convert it into curves. First. Heavy goes absolutely anything in here. And I could take an ellipse, for example, really quickly go into layer, convert to curves, select the nodes, and basically make it into a diamond shape. Try it out.
10. Shape Options: Why do we have to go to the Layer menu and convert these shapes into curves? Well, it's because a lot of these shapes have their own little options. And they are that shape. They're not just a bunch of lines. For example, let's go to the curve again. I'm sorry, the heart again, if I do that, I've done with you spotted it, but there was a little red dot over here. Now this little red dot, as I hover over it, you can see a line appears vertically. If I click it allows me to pull it down, and I can then just adjust that particular shape so we can go from a guitar pick into something a bit more wild and wonderful, looks more like a ionize to me, but that's just me. Let's have a look at a few more of the shapes. You can experiment with all of these shapes yourself. But if I went to something like this polygon, draw a polygon. Remember, I'm still in the polygon tool here, I'm not in the move tool or the node tool. I can go along to that little red line and just pull on it like so to either go from a circle through to this weird star-shaped in there. So do have a look at these. And when you go to a tool, just look out and see this little red line. And if there is one, well, just click it loops. Let's try that again. Sorry, yeah, I missed there. So we'll go to this donut shape. Click and drag and move over to the red line in there. And if I click and drag, you can see I can actually go round here to make any angle that I like really useful by the way, for doing charts or pie graphs that very modern sort of look to a, a chart that you can have a, check them out. They're all do slightly different things.
11. Convert to Picture Frame: Don't forget with all these shapes that you made, It's not just about having color and lines around the outside. We can use them to put images in. So if I want an image in this particular shape, I need to go to the Layer menu once again, but instead of convert to curves, I say convert to picture frame. That's now picture frame. And I can just take any image that I like and drag and drop it straight in, or you can place images as well. Once again, I doubt it's easy.
12. Understand the Pen Tool: Let's look at creating our own custom shapes using the pen tool. Now, I'm going to go across to the pen. And what I want to do is just to check that I've just got a stroke. So in my swatches over here, I just want a stroke. I want none on the fill. You can click on that little circle there to choose none. And for the size of my stroke in here, I'm just going to choose one or two points. So quite narrow. Let's have a look now at using the pen. If you use the pen to start off with, the best way to work is to just start doing points. So I can just click points like that around. Once you've done some points if you wish, and you can either finish the shape off like that or I'll just do it again. You can leave it totally open. It doesn't matter either way. Now you notice when I'm drawing with my pen, this little line follows me along. This is called an elastic band or a rubber band. And if you find it annoying, you can go alone to this little bar over here and you can switch it off. It's that little button there, the rubber band mode. And so now it won't follow you around as you go. If you switch it on, it will. I'm going to leave mine switched onto it. You can see a bit more of what I'm doing. Once I've got my shape like this, I can then go and I can use my move tool to move it around, scale it rotated. Or I could use my node tool to select the individual nodes in there. And I can then go and round them off. Like so. Try, try that out, just get a feel for it. And then we'll make some shapes that you can recognize in a moment.
13. Draw a Fish with the Pen Tool: So let's do a little shape that you can recognize. I always like to get people join fishes because basically anything can look like a fish if you try hard enough. So, but we'll make one something that looks like a fish using my pen. I'm going to start heavy here at the nose of the fish. And I'm going to go up to the head and I'm going to do this with just these straight lines over there. So this is the top fin on the back of the fish down there, over to the tail. There. Let's move across there. Another finished the bottom is a quite big fins, but the bottom of the head and back to the front of the head. Now, that looks more like rubber fish than a really nice smooth fish. So I'm going to go along and use my node tool. And you can see I can just select the individual nodes and round them off. Let's go through here very quickly. You might think that this is a long way round and you're absolutely right, it is a long way round. And I will be showing you a shorter way of working very, very soon. But this is the best way to get to learn this tool. If you're able to select two to time, that'll work too. So we can round those off like that. And I can then still go in with my Node tool and just pull the fish around, adjust those curves until I get something which hopefully will actually end up looking a lot more like a, like a fish that's pull that one in. S1 goes over here. I forgot to do that one. Let's round that one off as well and pull in the tail and move that out. Like so. That's not bad, not best fish in the world, but you get the general idea. So you can do straight lines first and then round them off. So do try that and then come back. And we will do the next one where we will actually cut out the middleman and speed the process up.
14. Draw Advanced Curves: So let's cut out that. A lot of that work using the pen tool. What you can do is if you click instead of just clicking a second time like that, if you click drag, so it's one we're going to click and drag all at the same time. So click down, holding down the mouse and drag, it will give you the curves automatically. Once again, I can click drag, click drag like that. So let's make a fish that way. I will get rid of that. I'm going to go and get my pen started the nose. I'm going to go to the top of the head. I'm going to click drag out to make a bit of a curve. And you can see, I can see exactly where that next line is going because of that rubber band mode. Let's click there. Over here for the top fin. I'm going to click drag and then I'll click there. Click drag, and click, click, drag, click, OH, that's down a bit. Click drag and click. It's too long whenever here. Once again, now I've made a mistake. I've clicked dragged over there. Let me show you how you can get rid of that with a shortcut later. But for now, you can use either Command Z or Control Z to just undo the last thing that you've done. So I just click over there. And once again, click, drag, click. As I said, if you make a mistake, just use the Command Z or Control Z to undo. All right, that's a very strange-looking bottom fin over there. But hey, anything can be a fish. And I'll use my node tool now to start to move these around. I'm gonna select all of those and just pull them in a little bit like that and maybe even move this up a little bit too. They're looking fish-like. So try that out. Click, click, drag, click, drag to get your curves and your corners.
15. Remove Handles: Hope you fissures looking good. Let's take the Sun. So using the pen tool, if you click and then you click and drag and you think, Oh goodness gracious me. How do I do a straight line from that point on when I have actual 3D clicked and dragged and got a curve. So easy. Just go back to your last point there and just click it once. And the next one will be a straight line there. So if I were to click and drag here and he direction, I can just obligor the mass. They are back here. And click ones and I can get a straight line going up there. So click and drag back to the last point. Click it once. Let's put this into our fish. Now, there We're going on upon a bit. If you think that this is not something that you'd be using much and you're struggling with it. Don't worry about it. You can move on to the next section. Don't just watch the rest of these videos is not many of them. And so you get the idea and I'm going show you some other techniques as well. But don't let it worry you at all. This is very much more the vector graphics side. So once again, making this fish, I'm going to click, go up to the top of the thin, not the middle of the heads. I'm cutting out the middle part. Click and drag. And that does my head all in one go. If I then click on that, I can then click and drag over here. Click there, click and drag. You can see how I'm actually getting rid of that middle point or not having those middle points in there, just click and drag their one-click, click and drag one-click. And doing it this way, you're cutting out so many points and you'll also speeding up your work so much. And you can see the difference in speed that I'm going at now compared to the first time that I did it. Now hey, that looks like a much better fish as well because it's less points to mess around with. So try that out. Remember, it is just click, click and drag. But then back to your last point and click it. I've got one more technique with, with this for those of you who are really pushing on getting advanced. And once you've had looked at this,
16. Break Handles: So for those of you who want to be a super advanced Vector Graphic, publish a person. Have looked this. If you go to your pen and you want to start off with a, with a curve. If you just click and then click and drag, you only have one handled control that whole curve. So if you click and drag first, then click and drag again in the opposite direction, you now have two handles to control one curve. And you get much smoother, Much better curves. That way, if you're looking for something with a bit more symmetry to it. So I'm going to click and drag and click and drag again. Now, maybe I want another curve which kind of comes around here. If I went back to last point, like I showed you in the last lecture and ticked. When I go down here, you can say, I can't get that really nice semicircular curve because I've only got one handle here controlling that whole curve. So here's the last technique. Click and drag. Go over here, click and drag again. But this time, if I went back to that point, you hold down the Alt key and you can click and drag a second handler. So what it's done is it's taken these two handles and it's allowed to break them. So now when I go over here, I can click and drag again. So back to their hold on the old key and click and drag out. Let's move over to here. Same again. I'm going to click and drag of their time rather than even letting go of the mouse and going down to the old key. If you just hold down the old kid will allow you to break that handle. Anyway. That's my starting point. Click and drag. Now look what's happened is it's, I've dragged out, it's tried to get those two handles to link together. So the last thing we do is hold down the Alt key when you get back to the start. And now you can drag it out. What's in fact in invisible handle. So let's have a little lasted a look at that again. So I'm going to go to my pen. I click and drag my first handle. Move over here, click and drag a second time. You can either let go of the mouse, go back to your point, hold down the Alt key or wash just to hold down the mouse, just hold down the Alt key and drag. I'll click and drag again, hold down the Alt key, and drag. Click and drag again. Hold down the Alt key and drag to adjust the screen's going in and asked because I'm on a magic mouse here and that it's zooming at the same time. So once again back here, click and drag, hold down the Alt key to break those handles for their click and drag Alt key to break them. When you go back to start. Zoom that back in again. When you go back to your start, hold down the Alt key first, then click and you can drag out an invisible handle. You can still use your node tools to select those points, move them around, and adjust the handles. And once you get into that stage there, you will be a vector graphics publisher expert. And these same techniques work within publisher. They also work very much the same. If you going into Designer. If you go over to the Adobe site of the dark side, you'd have to Debbie side. You'll find that both Illustrator and InDesign work in almost exactly the same way as well. So we can use one, use all of them, try them out.
17. Cap, Join & Mitre: Let's make a little shape and look at some of the options for this drug. So if I were to click and I'll just click and drag and click. Over there. You can see I've got quite a thick stroke on there. Let's make this a little bit larger. Ever them. And I'll use my node tool to click and move some of these points around. It wasn't something, I don't know. It looks a bit like that. Now you notice that the ends, because I've made this stroke quite a wide over here, are rounded. And you can change the roundness by going over here to the caps. So you can square off the caps if you wish, or you can have an extended cap. Everyday. The extension is the same width as half of the stroke. But the default at the moment is this little rounded cap over there. Now, then we've got joins in here as well. Let's move that up a little bit. I'm going to click over here and do a shape like that. And let's have a look now at the joins. So if I go over here, you'll see that I can kind of round off those corners or I can cut them so they become cutoff corners. It still keeps this rounded ends over here. Or we can have square corners in there. You just choose what you like. So what on earth is this little miter thing over here? Well, if I have a very sharp corner like that and we got the corners in here, you can see, if I choose round, it, rounds it off. If I choose the corner, it makes a corner. But if I choose, sorry, if I choose the bevel, it makes a bevel. If I choose the corner, it doesn't make a corner. If I were to pull this out a little bit more. Let's just make sure we are on a corner option. There we go. So you can see how it goes from a corner and then it cuts it off like that. And that cutoff is due to this little miter in here. If I increase the number, let's put in, say seven. In there, you can see how it will, right up until it almost parallel, it will keep that corner. But of course it does mean that sometimes you get lines which will go whizzing off in all directions. So there's no right or wrong here. You just change that number to decide at what point you want those corners cut off automatically. Now, we'll come up to align and Top Hat alignments later on to align all sorts. But for the moment, I'm just going to leave this, it'll alignment alone at the moment. You can see if I'm doing this, not much is really happening, but we'll come back to that at a later stage. So do check out those options. Make some weird, wonderful shapes with corners and round bits. And in here have a look at the caps, have looked at the joins and try changing the miter and see if that works for you.
18. Arrow & Line Alignment: So a few more options. Once again, back to the stroke. And over here we've got a start and end. This is where you can use arrows. So if I just go in here with that shape selected, you can see how to automatically just put on arrows and ends. For me, you choose whatever you want from there to be honest. But if I've chosen an arrow like that, I can then choose where the arrow sits. So that's the next two buttons along here. So does the arrow go to where my line finishes? Or does the start of the arrow go way off the line and to the middle of the arrow is where the line finishes. I'm gonna go back to that one there. The other one allows you to flip it around so it can go to the other side of the shape. So the, really the main one that we haven't touched on yet is the align. Now, when you do try line and you click on it, you think, well, that doesn't seem to do anything. It's because a line only works on closed shapes. So if I make a closed shape, you can see that's kind of a strange with that. Let's get rid of that. And the arrow. So over here now, this will be really obvious. When I click on Align stroke on the inside, it puts a stroke on the inside of that middle. If I go to the outside, it's on the outside of that shape. And this, the default is the center. Have a bit of a go with those as well.
19. Geometry: I have got one more. I have your brain's not too frazzled because I've got one more way of creating custom shapes to show you and this is the best I have left, the best answer last and easy. What I'm going to do is I'm going to take some shapes over here and I'm going to use an elliptical shape every day. I'm going to make a copy of that shape. And if I select them both and I put a stroke around the outside so you could sort see the, I've got two shapes there. I want to join them into one. Now I'm going to use function in here called geometry. But you might know this from other applications because it's very often referred to as the Pathfinder. So I'm going to go to the layer geometry, and I'm just going to say Add and that will add those two shapes together. Now, once I've added together, could do whatever I want. Your eye can convert that if I want to text in there or if I went to the layer. So I can either convert for text or I can say Convert for a picture frame. And I'll go and find some pictures in here. I've got some trees here already. So I'm just going to put a, put a picture in there. We've got to conduct binoculars type of look in there. Don't forget, you can always remove the stroke if you don't want it. But let's take this on a little bit further because it's not just about adding shapes together. We can subtract shapes. So if I have a rectangle here and I had a ellipse ever there. I'm going to select both of those shapes. And then I'm going to go to once again, layer geometry, how to say subtract, and I can subtract one from the other. We keep going. I could do another shape over there and maybe select both of those. I'm going to go to the layer geometry and add, and add those together. What I've kind of crazy, they're sort of like a little puzzle pieces, bows and I could have multiple puzzle pieces by Holden the old key and then rotate them around and you get the idea. Let me do a little logo for you now. Logos are actually surprisingly easy to do in publisher or icons that you normally think they are, or should be done in something like designer. But let's have a look. I'm going to take a little circle over here. And my circle, I'm just going to pull the bottom down. Now, remember, you can't just pull this down, just that point because the shape needs to be converted to curves. So now I can pull that point down to get a little guitar pick shape in there. Right? Let's move in a little bit like so. So I'm going to hold down the Alt key and make a copy of that shape. Let's do another shape over here. I'm going to have a circle there. And we'll have more copies of that circles that would have a circle there and a circle here, and another one over there. Okay, So with these little shapes that I've created, I'm going to create a, a fruit brand. Loops without being too exact about what I'm creating that you'll see if I select these two here. And I went to the layer down to geometry and added them together. You can see it'll add them together into that shape. If I took this one over here, We're just select them both. And then I'm going to go to once again, layer geometry and subtract. And bet you've guessed what I'm doing already. Let's take these two here. And I'm going to go to Layer geometry. I'm going to use intersect and that'll leave the overlapping area in that. Now with these points here, they're a bit too sharp. So remember you can always use your Node Tool. I can select that little point there, are going to round it off slightly and select this one here, and round that off. And you can still go and play with those settings if you think it's too much, just pull these in a little bit like that, whatever works for you. Give it another color. I think in here and make it more of a yellowish color and we'll give it a green leaf so we don't get sued by any company. And so I have a bit of a go with that. You can use this tool for anything. I could put photos in there. I could use it for text as well if I wished. But try it out, mix-and-match. Everything's made of squares and circles. Seriously.
20. Project: Eclipse Poster - Photo & Text: Let's build the first about two posters for this project. The first one we're going to do is going to be the poster for a band. And we're going to make up a band. And I've called mine eclipse. And I've gone continues a picture of a solar eclipse. And then I'm also going to use the graphic tools to make up a sequence of the moon being covered up. So let's have a look. Son being covered up, ultimately being covered up the Moon, covering up the sun area. So I'm going to start off with an a A3 document because that's the size I want my poster and I'm also going to set everything up so it can go for commercial printing. So let's go over here to New Document. And in here in the print options, I'm going to choose a three. On the side here. I'm going to switch facing pages off and I only want one page for this particular document. Moving down though, the color format is going to be CMYK because I'm going to be sending it for commercial printing. And the profile, the best thing to do is actually to speak your printer about a profound ask them what sort of printer, sorry, what sort of profile would recommend using? We tend to use a fogger 39. But you might find in the state you're using something like a web swap, web coded swap, but check with your printer first. Then moving down, I'm going to put my bleed in. Am I bleed is going to be three millimeters all the way round margins. Well, I'm going to leave them at 25, but it really doesn't matter because it's going to be a poster. Wouldn't go fairly close to the edge for this. I'm going to click on Create. And let's have a look at this with the margins every day. So that's what my document is going to look like. So the first thing I'm going to do is to bring in the picture for the background. So I'm going over to stock. And I've done a search already for space. And I found the type of thing that I want over here. It's going to be this eclipse. So I'm going to draw in my shape for the picture. So I'll go over here to the picture frame rectangle tool. I'm going to click and drag and I'm going from bleed edge through to bleed edge of the really important, just be careful that you don't miss it like I've done. Okay. I know it's easy to do. I've just done that over days. I'm going to pull it down to the bleed. So make sure that goes right away to the bleed. It's so easy when you've got a bleed on nature things that you've got it. But you haven't, especially with these big documents. And I take my Eclipse and drag and drop it in. And I'm thinking that I want to change the size on this, so good down to the zoom slider and I can then move this around, like so. Now I would like to have on this poster the little bit of sun coming through. I want that to be on the top. So I'm going to rotate my picture around like this. And I'm holding down the Shift key. So when I rotated, it rotates in small increments and it's very easy to get it to 45 degrees. And let's see what that, what that looks like. I think something about that size and I might just move it across into the middle, like so. So that's what I'm after for my basic background picture, A3 poster was an image going right way out to my bleed. Now, once we got to this stage here, I'm going to go to the Layer and I'm going to lock that objects are just choose lock that locks it down. So when I'm putting pictures and takes to anything else on there, I can't touch it by mistake. Rent. The second thing I'm going to do, one I'm here is to put in some text in the middle. So I'm going to use the Artistic Text. I'm going to click and drag the text size at. Remember we can change this later on and I'm gonna put in Eclipse. And now I'm going to select the text and I'm going to make it white. So I am going across here, make sure I'm on the fill and choosing white. And then I'm going to go and choose a typeface for this. So we want something, you know, if this was done for a band, they would probably have their brand typeface in there. I don't have something, so I'm looking for something which looks kind of delicate, like an eclipse is a little bit delicate. He met somebody, got a son being killed by the wound. I'm say it's delicate but you get what I would I mean in that. So I'm looking for something which would be quite thin and narrow. That's an interesting typeface in there, but I want something a little bit more narrow than that. I'm going to keep going down and find something in there that's interesting, but maybe not quite right there we get a melody sudden. I like that. It sort of looks like it's made out of string almost. And we're gonna take the size down a bit over here. So a 144 is not quite, quite big enough. So I'm going to increase the size by just grabbing the corner in there. Move this into the right position. So I'll use the move arrow to do that. And that's what I'm after. From the middle, a sort of a nice sort of swell. But you can choose whatever typeface you like for this half ago. Get up to the stage, and then we're going to make, using some of the graphics, some of the various stages of the eclipse.
21. Project: Eclipse Poster - Create Eclipse Shapes: Let's make some moons which are being covered up, sorry, some sons which being covered up by the moon, doesn't matter, it's just a white circle. I'm going to use these, the ellipse shape in here. I'm automatically eclipses and ellipses. I'm gonna, I'm not gonna get confused. So I'm going to draw a little shape over here. Now. I'm going to hold down the Shift key to make sure that that is a perfect circle. Doesn't matter if the shape is not quite the right size or it's too big or too small. We can change that later on. Now I'm going to zoom into that area. So if you're on a Mac, it is Command and plus to zoom in. If you're on a PC, it's Control and plus, to zoom in, I'll just go down to two there. What I want to do, by the way, when I'm moving around, just to remind you, I'm holding down the spacebar. Spacebar gives me the hand and then I can just click and drag around it. So much easier than trying to use these little sliders, the top and the bottom. So space-bar move around a bit. What I'm going to do now is I'm going to take a copy of this. I'm going to move the original of the day. Then I'm going to hold down the Alt key and make a copy. So I've always got the one shape in there. So when I'm working in cutting these out and I'll be working with copies all the time. It's just in case I go wrong and I can also use the originals to cut from the new ones when I hold down the Alt key and make another copy of this. Now you'll notice when I'm copying this, this is going perfectly horizontal. And that's because I'm holding down the Shift key at the same time. So I'm holding down the Alt key to get the copy and the shift key to go perfectly horizontal. So here's the first of our, Our sons being covered up. There. I'm going to select both of those. So I just want this a little bit cut out there. And I'm going to go to Layer geometry and subtract. So that will be the first bit that's cut. Let's do the next one. So over here, we're going to hold down the Alt key, make a copy of that. When I hold down the Alt key again and do one that's maybe covering about half of it. There. I'm going to select both of them and do the same thing again. So I'm just gonna move it across just a little bit like that query. So select both of them. I'm going to go to Layer geometry and subtract once again to go one there, one there. I think we need another, another one which is just a slither and then we'll just do the outline after that. So same again, hold the Alt key down to make a copy of that. I'm going to hold the Alt key down to Copy again. And a good just having a little slither like that coming through. Select them both. And we need to do same again, layer geometry and subtract. You're getting the general idea here. So for the last one, I'm going to hold down the Alt key to make my copy. And this time, when I make the copy, what I'm going to do is I'm just going to scale it down. So our scaled-down them, holding down the scale down them holiness scale, it scales proportionately. Just a little bit. I'm going to put those together so one on top of the other, like that. And then I can select both of those and go to Layer down to geometry and subtract. Now you probably looking at me thinking, you know what, Tim, they would have been an easy way. And you are absolutely right if you're thinking that. Because if you take a shape like this, I may as well just have gone over to my stroke and made the stroke white. And then in just increase the width on there, it would have worked exactly the same. So you can do whichever you like. Sometimes one way will be faster than the other. I'm going to zoom out over here and it's put this one on that side. So we kind of have the full sun and it is slowly being covered up by the moon until it's totally covered. Like that. I'm going to select all of these shapes altogether at the same time. And what I'd like to do is to align these shapes up so they are all absolutely in line. So to do that, there's some options along here. So where we've got this sort of interactive toolbar at the top, I'm going to go along and I'm just going to choose this middle one. And that'll line them all up perfectly. Now, as far as moving these around goes, I'm going to hold down the Shift key and just move some of them around. Here. I'm not going to use distribute to distribute them because being that some of them are actually semi-circles. And so a full circles. I want to do it by eye. I think it will look better that way. But if you want to use distribute, that's absolutely fine. Once again, I'm just going to pull this out a little bit over here. This one can come across like that. I'm kind of happy with the distribution. I'm on the adjusted his image more. And that one out as well, just a smidge. Okay, let's select all of those now. I want to be able to work with them all at the same time. So I'm going to go over to the Layer menu and I'm going to group them together. It's right at the top. We've got group there. So now when I select one that all selected the same time. So I've got all of them selected in here. I'm going to just scale them down now. So once again, a hold down the Shift key to scale them. Sorry, I tried to get I don't hold down the Shift key to scale them because they're in a group. If the winter group I could hold down the Shift key to scale them. You still notice how I'm not home down the Shift key. And this getting perfectly. If you do hold down the Shift key, then it will miss. Scale them if you like, or disproportionately scale them. So I want to get them just to the right of scaling size. I'm going to place them there. Now. There are some other things that you can do once you get to this stage over here, if you like. And you could go along TO YOU effects. Now if you can't see you Effects, it is in the studio. Options. So you can go to View studios and you find the effects are over there. And you could then try some different effects in here. For example, there are outer glows. So maybe I might put on an outer glow on there and just increase the radius a little bit. Let's have a little look and see how that's working. Honesty, I'm not seeing much of that radius going on. And we go through just got a little bit of a glow from the outside of that. But you can try whichever ones you like, habitable, go with that. And then we'll come in, we'll put in the type finally, and then export it out as a PDF.
22. Project: Eclipse Poster - Save As PDF: Where we are at the moment is great, but I need to put some details about the new album this band has got out. And the new album is going to be called run from the sun, hence the artwork. So really easy, I'm going to use the Artistic Text tool. Click in here and just put in my text. And I've selected, I'm selecting all using Command or Control a to select it very, very quickly. And then I'm going to take the size down. I can see my sizes up the top here. So I'm going to choose something appropriate that would work well in there. And then I also obviously need a typeface that works too. And usually at this stage, once again, you'd probably going to have some stuff from the branding already. I'm just going to pick something really quite simple. And I'm going to go down to use something along this line from Beirut over there. So it's a big heavy duty typeface for the name of the album, right? That's in over there. Let's make it a little bit smaller. I'll just select it and take the size down, just a fraction. 64, I think works for me in there. And once again, we just move that to the middle. You can see as I'm moving the smart guide pops up. So it tells me exactly what I'm, what I'm doing and putting it in where I'm putting it as somebody in the middle. Now, the other thing that I want is just a little bit more detail in there. Something along the lines of new album out and the release date. And I'm going to do that. So it looks like one of those folded corners and that you get because they're really simple to do. So I'm going to take a shape over here now I don't need a triangle for this. You could use one if you wanted. But I'm going to take a shape like that. I'm going to fill it with white. Then let's make sure that's filled AND, and not, and not just the stroke. And I'm going to rotate that 45 degrees. So I'll just rotate around holding down the Shift key until I get to 45 degrees. You can see when you are rotating with the dude like that or like this, over there is a little number that pops up next to the cursor so I could see us on 45 degrees. And then I just want that across the corner. Like so. All the rest of that will be cut out and it doesn't matter if you leave that there because everything else will be cut. So I also now need some text in here. So rather than having to go and choose the same typeface again, I'm just going to hold down the Alt key and make a copy of that type. Just put in new album in there. This is going to be a lot smaller, so I'm going to scale it down like so. And I'm going to make the type I think a darkish gray to fit in with the rest would make sure I selected first go with a darkish darkish gray. So it's not too overpowering in there. Now look that might type is underneath my shape. So in order to move things up and down, if we go along to the layer, we've got some Arrange options in here and I'm going to choose a move to the front, and it'll just pop it right at the front of all those objects. So I've got that. I need to rotate it. So rotate, hold down the Shift key until I get to 45 degrees, and that's going to go in somewhere around that point over there. I also want the date in there. So same again. In fact, I should I would normally have done this before I rotated the text. I'm just going to make a copy of this bit of text. Try and get hold of it. So let's try that again. Selected, hold down the Alt key, click and drag. I'm just going to rotate it back, holding down the Shift key until we get to 0 again. And in here, Let's have dinner date, the 23rd of July. And pop that right in the corner. And I think I'd like that. So 23rd to maybe be a little bit over or in a different direction. Let's go to the paragraph options and just central line. And let's write a line that in there. So to check it, click on this little windscreen wiper over here. That is how your album is going to look. Of course, you can go and add in new colors in there. Maybe the data is so important that I might want to choose red to go on that. So I'll change my grays into colors. And I'm going to pick a nice sort of darkish read for that. And we go, Okay, it's ready to go. Remember, you can always move anything around in here if you need. But the important thing is to save your work and you should be saving as you go along as well. Then I'm going to save my work now. So File, Save As. And over here I'm going to call this ECL for Eclipse. And I'll just save that onto the desktop. And then I'm also going to now go along and I'm going to export. So I'm going to use File and Export. And in here I'm going to choose PDF. And we can just keep the preset on pdf fx for ever that the raster DPI is going to be 300. That's a nice high resolution for printing. And over here, we whips, strike that sentence again. And over here where it says More. I'm just going to make sure that all of these things are looking as they should look. For example, over here, we just can make sure that set to 300 in there. And down the bottom. Over here, we've got honest spot colors. We don't have any spot colors in this particular document, but we're going to leave that on just in case you do. And then are we going to include the Bleed? Yes. Began to include the bleed and we're going to include the printers marks as well. So if I put in all the marks that the printers use, so I'm going to then close that down and export this out. So of course, ECL printers over there. Now I've opened this in PDF and you can see my printings marks are there, my crop marks are in there as well. But look at this type in here is fine, but this type is a problem. So what we need to do is we need to change the type in the document. In Publisher. It's no longer editable text because this requires the text to be editable, will change it. So it's no longer editable text. We're going to make it into what is called outlines. So let's go back and fix this. And this is one of these things that happens from time to time. You get something and you think, Oh my goodness, what is it? What's it done? Why isn't doing what I want? Well, I'm going to go along and I'm going to select the text over there. And then we're going to go and we're going to make that text into an outline. So to do that, where it says layer, I'm going to choose convert to curves. So what we have now is no longer editable text. You can see if I double-click it, it, it's just shapes. Now, at this stage, I normally wouldn't save and I would do a Save As so. I always have a version saved aversion with the Oedipal editable text in there. And I'll just save as for the text which is has been broken up into shapes. So anyway, let's just go into File and I'm going to export again. This time exactly the same settings. And in here, I'm just going to choose that same PDF X4. And then we'll go to more, make sure that I've got the printers marks and bleeds on over them. And you can see over here, even though it does say embed fonts, we're just being sure that we don't have any issues with those funds. I'm going to just click on Close and I'm going to export this out. Right cell. Print version 2. Let's click on Save. Whereas look at the difference there. So now we've actually got the correct type in there compared to that one, which is showing the wrong type. On that. There is, the type should be fine. As you can see. But you can do that with all of your text should you need? Or if you think there's going to be a problem. We'll be looking later on at more of the settings to do with type and embedding, typing, embedding fonts. So have a bit of a go with that. Craig, your poster. It doesn't have to look exactly the same as mine. Just create something which looks very, very exciting. And don't forget if you've used a weird, wonderful typeface. And it's very large and sort of a feature. You don't want to change. So make sure that you make it into outlines.
23. Project: Whale Poster - Create Vector Graphic: This poster is going to be a totally different star to the last one. We're going to do something quite delicate and upmarket and it's all going to be about saving the oceans. So we're going to make a little graphic, a little whale icon or logo if you, if you like. And we're going to bring in some text as well. Let's start off by making the document once again, this is going to be opposed to we're going to go with a three on this poster. So I'm going to go to file new document. It's going to be a three. Same again. Over here, we're going to go down 300 DPI for the resolution. Remember that's also sometimes referred to as PPI, DPI dots per inch, PPI pixels per inch. Moving down, we're going to just ignore this image placement policy preformed better because it doesn't matter for this. We're not going to bring in any graphics with the last one. We wanted to embed the image. Moving down. We've got one page in here. We don't want any facing pages on this because it's just a one-page document over here, the color format, this is for print, so we're talking CMYK again. And once again, you choose the color profile based on what your printers tell you. Moving down again, over here, we will put in a bleed all the way round of three millimeters. Once again, speak to your printers, they might tell you, or we prefer five millimeter bleed, go to whatever they suggest. But generally three millimeters is the industry standard. So I'm going to click on Create. And we're going to make a little whale over here just using some basic shapes. So I'm going to go over here and I'm going to start off with an ellipse. And I'll draw my lips. When I'm drawing it in, I'm holding down the Shift key to draw the shape. Now, I would like to have a stroke around the outside. So my stroke over here is going to be black for the moment. And the fill at the moment is the sort of off-white default color. So I can see exactly what I'm doing, but we can change these later and you see, we will let me go now and do a rectangle. Now I'm going to put a rectangle down to halfway. And you can see how it snaps to halfway on that bottom shape. I'm using my move tool. I'm going to select both of them and then I'm going to cut one out from the other. So in the Layer menu, under Geometry, I'm going to say subtract it, subtracts the top from the bottom. And this is now the body of my whale. You can see it's quite stylized. Then for the tail, I'm going to use to sort of elliptical shapes with pointy corners. That makes any sense. So I'm going to take a, an ellipse over them and I'm going to make a copy of that ellipse. I'll hold down the Alt key, draw copy. And what I want to do is I want to drag the sort of at 45 degrees, I'm holding down my shift key until the halfway points kind of meat so that meets the line over there. So when I select them both, this is the area that I want to keep. So I'm going to go to Layer down to geometry. And I'll sad, just want to keep the intersection, which is going to be that one over there and you can see how nicely it snaps onto that area. Let's take another copy of this. I'll hold down the Alt key and make copy. This one. I want to flip over. And we've got some little flip options at the top is some buttons over here along the top. And if I click on one of the museum, flips it the other way round. So now all of produce moved along. Holding down once again my shift key. And there's the tail for my, well, the next thing I want to do is I want a bit big fin down here. So I'm just going to use one of these, hold down the Alt key and make a copy. And there's the fin from my, well, I thought I put them put a stroke around there. Obviously. It wasn't enough of a stroke. Now look at this. I've gone to stroke there and normally I've been going up to the top to change my stroke. But of course that's not there because I've selected multiple items. So how else can you change the stroke? Will go and find the Stroke panel in the studio over here. And you could separate stroke there. As I'm sure you know, if you go to the View menu down to studio, you'll find the stroke option and there. And this is where I can change the width of that. So you can actually see now what I'm going for in here. So that's kind of where I'm heading except I don't want to fill There's so I'm going to go back to my swatches and with the fill, I'm going to choose none the little circle over there, except for this one here. This one I'm going to fill with white because I don't want to see the bottom of that. Honestly, I could have filled them all with white if I wanted. Lastly, I'm going to put the iron, so I'm just going to do a little circle over there. My small, small little I. And we'll pop that at the bottom. And so there is my whale done and I'm going to stop over there so you can try it out. But I'm going to suggest that when you get to the stage, go to file and do a Save As case the worst happens, you don't want to lose all your, all your work. So let's call this one ocean. And obstacles on the already a good pair. When I shouldn't write and have a go get to the, get to that stage and then will make the radical.
24. Project: Whale Poster - Change Stroke Options: I hope you're well as looking good. And now I'm going to select my whale. And I'm going to go across to the color. And I just wanted to choose a different color for it. So instead of going to my grays and got my colors and pick colors from here. Or if you've made any custom pallets. While we were looking at colors in earlier lecture, you can go along to that custom palette and pick some of those colors if you wish. And I think I'm just going to pick this sort of turquoise petrel blue color. Now, I want to go to my stroke and I want to show you some stroke options over here. If I were to change the width or the weight of the stroke in here, you can see how it's rounding the corners of all of those shapes. This might be something you want, it might be something you don't want. It's a personal thing. But if I go down here and I can go to the Align option, and I can align this on the inside. And that gets rid of that roundness. And you can see if I go for a thick one, it just goes into the middle. If I go to the outside, It's going the other way is rounding it out even more. But the inner ones stay as co-owners. Of course, if we leave it on this one here, it round the outside as well, but it's going from the middle. So what about using the joins? Well, we can also use the joins. If I go to the miter join over here, you can see how it's cornered off some of those areas, but it's going from the middle or once again, from the inside or the outside. It's up to you how you would like your whale to look. Just choose some of those options. The important thing is not to choose the correct option. To have a look at them and know how they work. So in future, if you need one of those options, you know where to go for them. I think I'm actually going to choose using doing this on the inside over there and maybe make it a little bit thicker. Like so. As you can see, my eye was not selected there. So I'm going to go back in here again and just, oops, change that and decrease it. There we go. That looks, looks a bit better like so. So once you've got your whale looking good, we're going to group it together so that if you need to select it, the whole thing selected at the same time. So I'm going to go along to layer and group. And let's move that up a little bit. Like so. I want some text in here. I want this to say one ocean. So I'm going to use initially the Artistic Text and I'm going to click and drag and put in my one ocean. And then I'm going to select it and go and find a different typeface now, same as before. I'm looking for something which suits the feel of the document that I'm that I'm working on over here. So I'm looking for something which is delicate ish. So it's got that sort of interesting old, delicate feel. And I'm going to go with this typeface. Yeah, you can pick anything that you like. I'm also going to go to my colors or my swatches and just change the color of the type to something which is sympathetic for the whole this document or the subject shall I say? And last I'm going to move that in. So I've just got that one ocean which goes down here and I can pull that out a little bit like so much. We're going to be bringing in some more type down the bottom here. I have copied a little bit of type. You can make find your own type somewhere, copy from the web or typed in yourself. But this time I'm going to be using the frame text. So I'm just going to pop the frame text in black. So for there and paste my type straight into there, we can select all of that text. And once again, pick a color or whatever you think will go with the feel of your document. Lastly, we need another title at the bottom here. So I'm going to use my artistic text. And this is where I'm going to kind of click and drag over here. Ok, save. Right? So I think that one will, will do is put in a capital as well. And I'm going to just size it down a bit until that fits. Now, you can of course, go wild with yours and make any changes you like. Remember if you want to change something you've grouped together, you can always double-click to go into that object. So you can have going into isolating that object in the group. So I can go in there and I could change stroke for just the eye, even though it's grouped together. If I select the whole thing and go to my stroke over here, you could see it then changes everything once again in that stroked area. So in fact, probably looks a whole lot better in my case, being really, really narrow. What I have noticed as well over here is that this tail doesn't quite match up. So I'm going to zoom right in. I'm not worried that I'm actually within the group itself. So I can just double-click. I can move that around. And you can even use the arrows on your keyboard to move things around. So with this one here, I'm going to double-click it to isolate it. And we can just move it down and in a little bit until it's in the right position. Over there.
25. Project: Whale Poster - Save As PDF: Well, as you can see, I mentioned to fix my tail, I just overlap them slightly. It looks a little bit better that way. And I've just put in a bit more text over here, another bit of text which is only you can save the sea and just a little bit more texts there about the weekly news. So I want to save this out. I'm going to do is I'm going to go to file and make sure I've saved it. First of all, which I have, sorry just to save again. Then I'm going to go to File and Export over here. And I'm going to use once again the PDF option over here. I'm going to go into PDF of x, for which is the latest version of our PDF. And I'm going to keep my raster on 300. But to be honest, this is all vector anyway, so it doesn't really matter. As you can see, it says nothing will be rasterized. But just make sure if you can images in there that you keep that on 300. Let's click on more over here. And I'm going to go down to include printers marks over here. And I'm putting on include bleed. But to be honest, it doesn't need a bleed because nothing is going on the outside. So there's nothing to be printed extra. But princes still like to have those bleed marks even if there's nothing which goes over the edge. So I'm going to leave it on for them, although technically we don't really need it. Moving down. Over here, it says embed fonts. In the end, you can see I can choose either all funds or I can embed the text as curves. Remember last time we went in there and we changed the text into curves manually. But over here I could just say converted all and make it into curves. And I'm going to go down here and close that. So let's click on Export. I'm going to call this one ocean, a click on Save. And we should have a document with us any second. There we go. Everything is looking really good on on that. I'll just zoom out so you can see the whole thing with all the printers marks in there. So have a little go with it with that yourself. And if you couldn't thing which goes to the very edge or you put in a background color. Bleed marks are essential. Like mine. It's not so much but will still put them in any way for the printer and do check out what's happening about your funds. Are you embedding the funds into the document or are you converting them into curves? Try that.
26. Introduction to Design with Tables: This set of lectures is all about tables. And I'm going to get to creating tables for all sorts of different types of tables. They're actually really easy to do in Affinity Publisher. And for the project at the end, we're going to make some interesting looking tables for sunken, be so deadly boring. But we can do interesting ones like this. Si unit.
27. Create a Basic Table: Let's have a look at one of the important parts of a brochure, creating or opposed to creating, which is making tables. Now tables don't have to look like a boring spreadsheet. And as you'll see with our project, will make them quite exciting. But let's start at the beginning. I'm going to take the table tool, which is on the left-hand side. And what I'm going to do is I'm gonna click and drag. Now you see as I'm dragging out, it's automatically making both rows and columns here. So I need to choose how many rows and how many columns I want. Now, we can change this later, but you'll see on the right-hand, bottom right-hand corner, it shows the width and height. And then there's a CNR. So for columns and rows, at the moment, I've got two columns. I'm going to go over to three columns in there and rows I'm going to go to, well, let's just do four rows. Lack sir. So that makes my basic table now across the top, ABC and 1234, those will disappear when I click off of it. That's what my table will actually look like. So let's get back to the table tool and I'll click on there. Now, if I want to change the size of the table, I can do that by going to the little handles on the side and I can pull that down so I can stretch the table out one way or the other horizontally or vertically. We can also go in here and we can move. And I'm doing it from this area at the top, we can move the distances between the rows and, oops, let's try that again, between the rows and the columns. So I can do that. And I can do this over here as well. And I'll be showing you how you can reset it later. Now what about if I want to add more rows or columns? Will, all we do is once again, in this little area on the edge, go to those double arrows at the bottom and I can just drag down. You see if I keep dragging, it's just adding more rows in there. And same again, I can go to the side and I can add more columns, just keep dragging until they come up. And likewise, you can get rid of columns that way as well. I'm going to use the Move tool and just move the whole thing around into the middle of my document. So do try that out. It's a simple way to get into into your tables. And there's a nice features along the top in there.
28. Copy from Excel: So if like me, you've made a bit of a mess of your table and I've got a big cell there and well, the rows and columns are all over the place. If you click and drag to select the cells and you can do that either by clicking inner cell and dragging across. I'm still, by the way, in the table tool. Or you can actually click over here and you can drag across from the little dark areas at the top. You can see I can select things like that. So if I selected all of them, I'm going to right-click inside there in my cells. And then I can just evenly distribute rows. And right-click again, evenly distribute columns to get back to where I was. If you are selecting rows like this, once again, you can still right-click in there and evenly distribute the rows in there just for the one column. So let's do that over here. Pull that out. I've selected in there evenly distribute rows. And you can see it just fixes all of them even though they're not selected. So I've got all of my columns looking Okay Ish for the moment. And now I want to start populating them with information. Now I can just type straight in. So if I click in there, I can put in January, February, etc. Without however, what a lot of people will be doing is they would want to use a spreadsheet. So I'm going to go over to Microsoft Excel. And I've got a little spreadsheet over here. You can see it's just red, green, and blue set Sunday, Monday, Tuesday at some numbers in there. And then this is a very small calculation which adds up the Choose day figures. So I'm going to select those. So I'll take them an axon and I'm going to copy them. So we'll just copy that. Going back into publisher. Now, if I click and drag across here, I can then paste those figures directly into publisher. Now, it really is as simple as that, copying and pasting straight across. You can also use paste so you can go to File and sorry, File and Place if you wish to place an existing spreadsheet as well. So if I then went and changed any of these figures, I went in here and change that to 45. You can see it doesn't do anything to my calculation because this is not alive calculation. You'd have to go and bring those figures in again and do the calculations in Excel. This is just bringing the figures directly. And so trout, those two options.
29. Place from Excel: So another way to get information from Excel is to actually place your table into publisher. So to do that, you could file, go down to Place. And we're going to find as a Excel spreadsheet here. And it is the XLSX file format that we're actually bringing in. I'm going to click on that. Click on Open. And you can see now I just click and drag to bring in the table. That's just a regular table. Once you've brought that in, you can then go in here and you can select it. You can make any changes that you like. It's not live. It is just placed into the document. Try that one out.
30. Table Panel: So let's take these tables a little bit further. I'm going to go and bring up a table panel. So if you can't see it, go to the View menu, once again, studio and the table is, well, it's down there. Mine is actually showing up on the right side here now so that you can see what's going on. I'm going to pull it out. So I'm just gonna put it out over to here and close down some of these options. So you can see we've got options for the frame, for the stroke and fill cells, vertical position, rotation, baseline grid, cetera. So let's start off over here with the frame. So remember you've got your cells and they are in a frame like you have text in a frame. So if I go to the fill over here and I choose a color, you can see it's affecting my entire table. All of the cells and the fill for that hole. My brain's going totally blank. Map the fill for that whole frame. Let's say none on there. Likewise, if I go to the stroke and I gave it a stroke, Let's go with a vivid blue in here. And we'll just make it a bit thicker so that you can see what is actually going on. You can see once again, it's the frame that is being affected. So these ones here do the frame. I'm going to just get rid of that color. So we'll have none on the frame so it no fill, no stroke on the frame. In here we can go to inset. So if I have got some texts like this over here, I can then choose to inset it now. I can do left, right, top and bottom, or I can unlink them. And then I can just do them from one side. And you can see how it's actually moving, not the text, but the entire frame. This is really important because when you start to work on here, you think, well, why can't I just move the text in? And that's another setting. And so let me get rid of, rid of that. Moving down. We've then got the stroke and the fill. And this allows us to then work on the individual cells. So if I went along to these cells here, I can go to the fill on them and I can give them some color. So let's just choose a sort of a bit for orange type of color for those ones. And likewise, I could go down here and we'll have a different color for those. So I'm also going to choose it maybe a slightly more orange color. And once again, let's select those and we'll do a different color on them. Or forgotten the number in here. To be honest, I'm just going to delete that and pull this up to get rid of that last cell. Now what about all of these borders in here? Well, if I were to click off of that, you can see this is what my table would look like. It's got a very thin border around all of the cells. So what I'd like to do is to be able to adjust those. And the ones that you adjust depend on what you clicking in here. You can see if I go to this border here, it's actually doing pretty much the same things. The frame is the one around the outside of the cells. If I click on this one, we actually talking about these ones here. So if I went to that one and then maybe I chose none for the color. See what I'll end up with is something that looks like that. But I've still got the border around the outside because I had a border on there. Let's select all those again. Once again, if I do this, it's going to do all of them. So if I didn't want any and frames around, sorry, any borders on my cells, I could then just choose none from that one. And now there won't be any borders at all. It'll just be the straight colors. Let's select that again. And this one can be quite interesting. If you choose, say for example, you're a white paper and you choose a white background. And then you can go in and you can increase the weight of your stroke. And that just leaves you with little cells are like that and it appears to be just little squares of color. Nice subtle effect. We obviously need to move the text around as well. I'm going to select that again. You'll notice that I'm just double-clicking to get back into my cells. So exactly the same along here. We can do the tops and bottoms and all of them, both for the columns and the rows, will be doing this in the project, we're using this to set up a particular style of cell. Moving down to the cells. Over here, we've got width and height. Obviously you can pull those around as well. But then, and it's select these. I then also got in here an inset. So I can actually insert my text a little bit if I need it. And this is different than into the frame because the frame when it insets in there is in setting the whole table inside the frame. This one, he is doing it to the individual cells. Over here we've got the vertical position. I liked this one because I like to have things in the middle of myself. So over here we can have it at top, the middle, or the bottom of the cells. If you've got multiple lines, you can have justified top, middle, and bottom at the same time. So it goes from top to bottom. So I'm going to put those right in the middle. Now what about getting my, my text where I wanted? Well, we can just go over here to our paragraph options. And I can just use a central line to central line, everything in there or left aligned. If I needed. I'm going to stop at at that point there. So you can just have a little bit of a go with those and have a play. Know the difference or understand the difference between all of these options here, particularly the difference between the insects because that is ready, sometimes quite confusing. And try out the different borders.
31. Color of Text: So how do we change the color of the text? If I were to select all of these cells here, you can see everything here. That little icon up there, this fill over here. It's all to do with the cells themselves and rather than with the actual type. So the clue's in the name, the type. Let's go to the Character panel. And in the Character panel in here, I can then go into my character, my font color. And this is where I can then change the colors in their second job, maybe with a white on that. Remember in here you can also change your typeface so we can go with something entirely different. Do try that out and remember, the characters were working with a character options in the character studio or the character panel in the studio. Tried out.
32. Lines & Photo: So let's do reformat on this. And I think rather than actually changing this one, I'm going to hold down my Alt key and make a copy. So I've got a copy of that. Keeping the original. I'm going to use my table tool. And I'm going to select all of these cells because what I want do something a little bit rather than sort of friendly like that. I want something that gives a little bit more serious for numbers. So I'm going to go over here up to the table options. And I'm going to get my fill and I'm going to choose a none for the fill. Now, that unfortunate means that my text is disappeared. So I'm going to go have to go to my character panel and choose a color. And I'm going to go with, I think, a gray color for that. And I'm just going to choose something a bit more serious for the type. Now that I've got that, I'd like to actually bring back some of the lines in here. You can see there are no lines. If I were to just click out of this over there, It's just the text by itself. So I'm going to select this and I'm going to go into my table options again, I'll go to stroke and fill. And a down here, I'm going to put in some lines through the middle. So I'm going to use inside of vertical and it's going to be those three there. So I'm going to change that to black and I'm going to make it quite thin. I think I'm just going to go with a a one-point in there. Now, I don't know whether you noticed, but they were kind of gaps in between here because going across here we've got a white stroke which is quite thick. So let's select this again and same again. I'm going to go over here. I'm going to use my horizontal lines. So I'm going to go inside horizontal. And you see it's now selected those three. And same again, I'm going to choose black. And I'm going to take this down to 1 in there. Let's take these ones here and these ones here. Now, how did I select like that? Well, on a PC, if you hold down Control, you can then select across and down and up and whichever ones you want on a Mac, it's Command. And then I can go into my fonts. And I think it's the regular. Let's choose bold for those. Once again, not the most exciting table ever, but it's a lot more corporate and, and smart. Try it out, have a play with different styles of tables and see what you can get. Don't forget, these are just tables and they have got totally transparent backgrounds. So you can take them, you can put them on to other things as well. For example, if I had a photo here, let's just move this out of the way for a little bit. And I'm going to put a photo in. I like that. Let's just go and find a quick picture from the stock Library. And I'll find it as over darkish picture. Suddenly like Pat works very nicely. And then I can just bring this across and place it on top. Now it's underneath at the moment. So I go to the Layer menu. I am going to say a range moved to the front. And you can then see how we can actually do things like that. We've got a picture inside the table, just going to select all of those and change my type to white. So it will be a lot more visible inside there. Once again, try it out.
33. Photos in Cells: I've got four people over here and a very small table. And some information about those people. I want to do a table showing the company structure, photograph of the person and their position in the company. So as you can see, just move that over a little bit over here. This is a very simple table. It's just two across and four down. And I've got my four pictures in there. So I've made the pictures the size that I want them to appear in my table as well. For now. If I go over to Word, I've then got the company structures. So if somebody emailed me the structure of who's who in here. And I'm going to start off with the one at the top over here, which is markers. Oh, I'm going to copy his information. And once again, click in here and just paste it straight in. And I'm just gonna do the same with the others really quickly. It would have been easier if this was in a spreadsheet because I can just copy the whole lot at the same time. And we'll just click in there, paste that in. Just like you to see what happens. If I go in here and click and drag across those like so and copy them. You see, because it's from word, if I then paste it in there, it would just put them all into one cell. So that's why I'm doing them individually. So let's do this one over here. So it is a lot easier if it's coming from a spreadsheet to pop that in there. And the last one over here, we'll copy that paste in there. Now, the first thing is that I want to get this text. So it's sitting in the middle of the cells. So I'm going to select all of the text over here, go into the cell options vertical position, and I'm going to put it right in the middle. Unfortunately, can see with the marketing directors and the production directors at the moment that they are kind of on two lines. So I am going to pull this out a little bit like so and target them over the one line. And then of course I can go in here and I can just make this smaller back for my picture again, we can still actually move those around back to there. So if you're using this, you can do them individually. If you pull from there, does both of those cells together, all the cells together. The next thing is, the text is very, very close to the edge. So I'm going to go once again to my table options. I'm going down to the cell options, not the frame options, because remember there is an inset in the frame options. I'm going to sell options here. We're gonna make sure there are unlinked. And from the left-hand side, I'm just going to push the text over a bit. Right. So what about the pictures, getting them in there? Well, I'm going to copy the picture. So I'm using shortcut, which is Command or Control C to copy it. Go into here, put my cursor in there, and then paste the picture straight in. I'll do the same with the rest of them. So we select that, copy it. You can cut it to be honest, which is Command or Control X. If you don't want the original, their back in here and paste it in. Let's do that again, twice more. So copy that one and paste. And lastly over here, copy that one and paste. And I really don't need these. I will delete them in there. Okay, so we still have the same problem with this, where we've got the pictures left hand to the top. So I'm going to select the cells here. So I want to select these cells appear. Let's go to the selection tool. Select those cells. And the same as we did with the text. We can then central line in that way, we can go to our paragraph options and we can align them in the middle with the paragraph option as well. I know it seems strange because you're working with pictures. There we go. We've got it a very quick table with the staff in in there. If at any point you want to get rid of the lines around the outside, we'll just go over to your table options. We can go into the stroke and fill section, select all of those. And I'll select everything, go in here and choose none. And that will then just give me a table without any borders around. Try that one out. This one is particularly useful, not just for staff, but anytime that you need picture and texts, picture and takes pictures and text, just copy and paste your picture into the table.
34. Save Table Format: If you want to save something that you've formatted like this. And I really liked the way that I've done the colors in here and the white lines between it. What I can do is I can save that as a format that I can then reuse on other tables. So just looking along the top here, this sort of interactive bar. If we go over to the right-hand side, there's a little table format option here. If I click it, it will open up the table formatting panel. Now, all I need to do to add the sin is in here. Go up to the top right-hand corner, the drop-down menu. And I can just say add the format from selections. I have selected the table. And you can see there's a mini version that has appeared in there. So if I brought in another table, created a table from scratch or anything, like rarely. Over here, let's just put in some numbers. And I went up to my table format and I clicked it. You can see automatically it just applies that formatting to this new table. There are some pre-made ones in here as well. You can just go from the basics through to any that you've saved yourself. Try that one out. It can save a lot of time, especially if you've got multiple tables on the same document and you want the same style across all of them.
35. Project: Table in Poster - Set Up Brochure Look: For this project, what we're going to do is we're going to create a PDF that your clients can download. So it could be attached to a website or you could be emailing it out. And the particular one that we're going to work on is a list of prices. So for three different categories of pricing. And we're gonna be using pictures in there. We're going to be using other things, not just tables. So the first thing that I need to do though, of course, is to just clean up this look because I've been using Stroke panel. I've got the table panel out. I'm going to go to the View menu down to studio. And right at the very bottom, it just says reset studio. Do, um, to apologize that it's actually off of your screen, but it's right at the bottom, so it's kind of cut off at the bottom, you can't see it. So it says reset studio down there. And that resets all of these little studios. So I'm going to start off by going to File and New. Now along the top in the presets, we have got print presets. These are generally aimed at printing to office printers and home printers. We've got press ready. And these ones tend to be aimed at producing something for press. This photo options in here and you can see we've got photo sizes in, in inches, the web options over there. And then we've got device and architectural sizes in there. I'm going to go with print over here, and I'm going to choose an A4 document. Now that puts in my size over here, I'm going to keep the DPI at 300, so it'll be a reasonably high quality. But I'm going to go with the orientation being landscape rather than portrait. I only want one page in there. So I'm going to switch my facing pages off because this is not going to be printed out or if it is, it's printed on a home printer. I'm going to keep the color format on RGB eight. So do I need a bleed for this? Well, no, not really because it's not painful commercial printing if somebody prints it out probably or probably printed out on a home printer where you have a one-page being printed at a time, but most of the time it will be viewed on a screen. So let's click on Create and that sets up my initial document. So what we're gonna do here is we're going to be creating three individual tables, but we just have to create one and then reproduce it twice more and then tweak it and change it around. But before we even get into making the table, let's make the surrounding cool-looking stuff. And what did we do with this is I'm going to go along and I'm going to start off with a shape, a rectangle. I'm going to put a rectangle in that doesn't matter where you draw it, because we can always move it around later on. So I'm going to have a rectangle like that. I'm going to leave it this off-white color for the moment, I will change to white later, but it's just easier to see when it said off-white color. And I think what's something along the top? Over here, somebody to confined shape. And down here we've got some segment tools. So I'm going to make a shape like that. Now. It doesn't matter how big I make it because I can always change it later. You can see you've got some little options. Yes, I can actually change that segment to whatever I want. I'm going to go to serve a half like that. And I'm going to roll it. Oops. Let's try that sentence again. I'm going to rotate it all the way around, holding down the Shift key to make sure it snaps to the opposite way round. I'm gonna move that up to the top and you can see how it snaps perfectly in there. And I think we'll make this, yeah, that's just the right size. So I want to put a bit of a gradient on him. We'll look at the colors later, later on. But for the moment, if I just fill it with a color, and then I'm going to be using a gradient. So I'll go to my Gradient tool and I can click and drag over that to get the gradient. Now in my swatches, I can then go into my colors. And on one side are put in one color. And on the other side, I'll put in a different color in the S1, get the gradient look going on. Like so. So I want another shape at the bottom. So I'm going to use my rectangle tool and draw another shape to something along that line. Now, if you find that your gradients or the wrong way round, although you can change them separately, I'm going to manually by going in here and just pulling us around. Moving that to that side and this to that side, like so. Lastly, to give this a bit of depth, I want to add a drop shadow. So I'm going to select the items. Let's start off with these 2 first. Because I wanted a drop shadow to be different to the one at the bottom. I'm going to go now and I'm going to find my Effects. Now. If you can't see the effects, what you can do is you can go to View Studio and effects in here. The other then I'm going to put in an outer shadow. Now to see it, I need to pull this across to the right a bit so I can see what I'm, what I'm getting. That looks about right. I'm gonna make it kind of slightly soft. And you can choose it to make it as hard or a soft tissue like the top. If you drag this, you'll find that you can actually drag the angle around. Says I'm pulling it around where the light is shining from. So I'm going to keep it. I think like, like so just reduce the offset a bit. You just have a plain make something that looks interesting for you. And then the bottom piece, I'm gonna do the same thing again. I'm also going to put a shadow, but the shadow on the bottom one is not going to be quite so harsh. I wanna keep it a bit more subtle and make it bigger. I'm going to take down the opacity, right? So, and now I can finally make that one white, so we'll still be able to see it. If I click on this little button along the top, the windscreen wiper, that's how it's going to go into b and we're going to have three of those across our Help page, but I'm going to stop there so you can try this out. Build a basic section that we're going to put the table into. Do some colors, does some shapes, anything you like, it really doesn't, doesn't matter. The table is the most important part.
36. Project: Table in Poster - Add Table, Format & Type: I've got my background for the first one. And what I wanna do now is to put in the table. The table that I'm going to be doing is going to have two columns and 10 rows. If we have a look at this Excel spreadsheet over here, this is the information that I want to, to go down. So the idea behind mine, yours might be different. The idea behind mine is that I'm going to have three different plans for this holiday hotel with meal choices. So each one of them is going to have to things that you'd get for the meal. And depending on which plan you go for the budget or the intermediate or the premier plan, you can have certain meal options. So you can see from my spreadsheet over here, these are the different things that I'm going to be bringing in. So let me make the table now. Now, I don't want to move this by mistake. So I'm going to select it. And I'm going to go to the Layer menu. And I'm going to lock it down. I'll be unlocking it later. But for the moment, it means I went touch it and push it out the way by mistake. Let me go to my table two. And I'm going to draw a table in here. So this table, I want to have two columns in there. Now, once again, it doesn't matter how big you make it because you can always change it later on. And when it comes to Rose, I wanted 10 rows in there. Now this stage, I can then start to pull this down. So I get some more space in here. I can go to the top and I can pull this across because I want to have a meal choices in here. And in this little area, we're going to have ticks and crosses to show which meals are included in that specific plan. Okay, so it looks a bit ugly at the moment. And what I'd like to do is to get rid of the line around the outside and maybe make these strokes a light grays. You can barely, barely see them. So same again, I'm just going to click and select all of those. I'm going to find my table panel. So I'll go to the View menu down to studio and find the table which is down there. Remember in the frame that affects the whole frame, I want to go into stroke and fill. And I'm going to click on the outside. So this is the line around the outside. And here I'm going to just choose none for that. Then I'm going to go to all the inside ones. And for those I'm going to keep them nice and narrow. But instead of black, I'm going to go with a gray so you can barely see the lines, but there are enough to show me all show people that it is, how it is divided up. I need to bring in that table now. So what I'm going to do is to go over to Excel again. I'm going to select all those cells, copy them. And in here, I'm going to select these cells here. And I'm going to paste, and that'll just paste them straight into there. Now of course you've done this before. So you know how to do this. I'm going to select those cells in there. I'm going to go over to my table options and into the cell options over here. And from the left-hand side, I'm going to inset it a little bit. So we'll just push it over away from that line. And here I'm going to pop it in the middle. I said, if you need to change your type, go along to your character panel. And we can change that to anything we like. I will just find the typeface that I'm working on. Got those bits in the way by mistake. And I'm going to keep it really simple. Yeah, I'm going to go with Helvetica for a change or been using aerial quite a lot. So let's go with helvetica, new, nice little delicate typeface there, especially if we go to light, type on that. And don't forget, you can always go in here if you wish. You can change the lightness and darkness of that. I'm going to make it as of a dark gray color. Once again, gets up to this stage and then we'll put some ticks and crosses on the left-hand side.
37. Project: Table in Poster - Make Ticks & Crosses: Let's make some ticks and crosses to go in the appropriate areas next to the meals. I'm going to zoom right in. And we're gonna make the ticks and crosses look a bit more interesting than just a normal taken across. I'm going to start off by using an ellipse. So I'm going to draw an ellipse like so, not make it too large. And remember, I'm going to scale it down before I put it into the table. So I'm going to give it a, a bit of color in here. So let's have a red one. And then what I want to do is to make it, give it more shape. Make Lummus button like I'm going to go across and find my Effects. If you can't see them. Window menu down to the studios. And I'm going to use a different effect from the usual outer shadow. I'm going to go down to the one which says 3D. And if I click on 3D, you can see now it's kind of given a shadow and highlight to that shape. It's given it a bit more depth. And I could choose how much, how much depth I want to give it using these little radius is. Now to be honest, that by itself would actually work and I could just have what appear to be little balls, green ones or red ones to show where things are. But I'm actually going to do it slightly differently. I'm going to make them flat. You can do whatever you like. So let me now make a copy of that. So we're going to have one which is going to be red and one that can be green. I think I will just scale it down before I go any further. I'm just at the right size. Let's have a look. Habitats little bit too large to go down a little bit like. So I think that's what I'm going to be doing. Perfect, that looks, that looks great. And in here, if you find it's not quite right. You can always just tweak this until you get it as you need. I'm going to zoom into that. So I'm just going to use my zoom tool here. I'm going to click and drag to that shape and now need to make a copy of it's our hold down the Alt key once I've clicked on it and copy it. And we're going to have a red one and for the cross and again to have a green one for the tick. Let's just pick a green which is not too to interface. There we go. So to make the little cross and the tick, I'm actually going to use the Pinto to just very, very quickly draw a little shape. So for the cross, I'm just going to click like this. We want to give it that sort of hand-drawn sort of looks of it. It doesn't look too perfect. So I'll just go every day and just popping one, maybe go out there and back there. I said it doesn't have to look perfect. That's pretty good actually. That's just what I was after. And then I'm going to make that white. So I'm going to fill it with white. But I'm going to go to the stroke and I'm going to choose none for the stroke. So when I move this on top of that, you can see that's what I'm after, kind of like a a very groovy type of cross through the middle. Let me do the same again with a tick. So I'm going to make the tick shapes there. Maybe out here, a bit like that, into there and up to there. Back to the start. Once again, this is white filled, So make sure it's filled with white oak and lasted parodies. And I can just move it across on top of that one now, it's should be on top of it. But I think it's underneath. So I'm going to, while it's still selected, go to layer a range. And I'm going to owe us has moved to the back. So why? What else could be wrong with that? Well, turns out if you have a look over here, it's actually my fill. I've got no fill and no stroke. And just make sure there's a fill on there. There we go. It looks absolutely fine. If you're really getting into this. You could even select both of those and go along to Layer, go down to geometry, and just subtract the one from the other. And that'll give you kind of a gravy shaped like that. I kind of like it. So it looks like it's actually on the tops. I'm going to undo that. And remember with all of these items, you can always give them a bit more depth by going into the shadows. And if you want to put on a little bit of a shadow onto the items, I can have a bit of a shadow on that cross or do the same on this one here. And once again, a bit of a shadow on the tick to lift it from the background. Now, I want to keep these together, so I'm going to select them. And I'm going to go to a layer and choose Group right at the top. Select those two, go to layer and group. So those two are grouped and those two are grouped in there. Now let's have a look at putting these into the appropriate area. I'm going to select. Well, let's have a look and see what, what I need. So on this particular one, I just want to have the, the main meal with a green one. And I think I'll give them tea and coffee as well. So we're gonna go to the green one, I'm going to copy it. And then I'm going to use my table tool. Click inside the table and paste there. And the same over here, same for coffee and same for T. Then I'm going to go along and I'm going to choose this one here. Copy that, go to my table tool. And they're not going to get any starters or putting sodas, no wine, no spirits like cheese and after-dinner mint. Right? So they still don't look so good. So I'm going to select all of those. I'm going to center them in the middle, so in the table and we'd go down here and I've been to center them right in the middle. And I'm going to use my left indent to just push them across to where I think they should. You'd also try using in the Character panel, the center align. There's, I think I'm going to move them over just a fraction more like that. Let's have a look and see how that looks. Yeah, that's pretty much exactly as I was hoping for. So once again, I'm going to stop there. Try it out, make some shapes, you don't have to do them like mine. If you just wanna do ticks and crosses, or you just want do buttons, It's entirely up to you, but get those in. And then we're going to start replicating this and putting more text in as well.
38. Project: Table in Poster - Add Text & Copy: I want to zoom out so I can see the whole of the screen. And there's a really nice shortcut. If you use on a Mac it's Command and 0 on a PC it is controlling 0. That will just fit the page into your screen size. I think I'm done with this table for now, so I'm going to close that down and I want to put it in a bit of text before I go any further. So I'm going to use Artistic Text at the top. I'm going to click and drag. And this is going to say budget. I'm going to select that type, go down and find my character panel. And if you're thinking, you know, there's a lot of messing around with characters and character panels. In the next set of lectures that we're going to be doing. We're going to be looking at styles so we can make a style. We're using existing style to just Stein up our text very, very quick. It's a lot faster than doing it the long way that we're doing to the moment. So I was using Helvetica for the initial ones. I'm going to go back to helvetica new. But this time I think for the top, I'm going to go with a medium or a bold option. It's called the bold option up there. I'm going to make the type white. And I will just move it by eye to the middle. But you can see even though I'm moving it by eye, those guides still pop up and show me exactly where I am. I'm going to take a copy of that, so I'm going to hold down the Alt key, copy this text down to the bottom. I'm going to change this and this will be the price. So let's have this as a $120 pair. Once again, our move that into the middle and you can see how it snaps straight away from me, but I don't want that to be bold. Let's go with something more regular for, for that bit of text. And it will pop some more text in here. Don't get rid of these little ticks for the moment. We're going to just move them to the side. We're going to have to use them when we get that the next options up. So we're our next options. Well, I'm going to go to the Layer menu and I'm going to unlock all. And that means that this bottom section and these bits hit are locked before can be unlocked. I'm going to select this whole piece of artwork, and I'm going to move it across over there. Now. I want three of these. I'm going to hold down my Alt key and make a copy of that one. I'll move that one to that side there. I'm going to hold down the Alt key and make another copy, which is going to go into the middle. So I've got three of them. So this one will be my premium. And I'll move those into the right position. And this is the the budget premium. So what do the middle one be? Middle shall think of a better word just now. And then we can go in here and once again update that the prices I went to force you to sit through me doing those. I'll do it while you're trying yours out. But what about these ones over here? So the middle price range, they're going to get started with putting and maybe a glass of wine as well. So all I need to do here is to go and select the green tick, copy it. I can go into starters and I can just paste it straight it Whoops, in there. Now, I made a mistake there, that was my fault. I should've been using my table tool and then I should have clicked in there. We can just delete that and paste that one in. So they're going to get putting. So I'll delete that and paste that in. And I think we'll give them some wine as well. Right? And then I could do the same over here. So these ones, I'm going to give them all the little green ticks way through. Now, although this seems like a long way round, at least it's faster than having to recreate these tables from scratch all the time. I'm going to update my bits of text and add a bit more text him while you try the next section and then come back and we will then save this out for, well, for people to go man around.
39. Project: Table in Poster - Export Digital PDF: As you can see, I've put a little bit more text in mine over here, so nothing too exciting, just brief description of the rooms. Let's have a look with the preview on. And there we go. But I do want to change the colors of these gradients. I'm going to start off with this one here. I'm going to select it. And I'm going to select the one at the bottom as well. Hold down the Shift keys have selected both of those gradient shapes. And then I'm going to go over to my Gradient tool. And I think on this side here I'm going to make this more of a lighter blue there. And this side here is going to be more of a greeny blue. If it's something like that. And I'm just kind of looking. So although it's, the gradient doesn't directly go from one to the next. It sort of gives an appearance of doing that. I could have done one huge gradient of all six of those items, but I prefer to do it this way. So let's take this one here and that one, once again go into my gradient tool. And this one here is going to be River, a brighter blue. And this side here is going to be more of a purple. So let's go from there into a into a purple color like that. I think I'm happy with everything that I've got in there. I'm going to click on the preview button and seems to look for right. Now, let me go and save this. So I'm going to go to File and Save As. And what I'm going to say is you should already be saving this as you go along. I haven't, but you really should be saving it as you go. So we'll call this hotel price. Now I'm just going to put this somewhere. I can find it for me. It's going to be on my desktop in there. Now we want to export this as a PDF for, well, for emailing around. So I'm going to go to File, I'm going to go down to Export. I'm going to choose PDF in here. And in the top I'm just going to say PDF for digital high-quality in that. And then we will click on Export. I'm just going to keep that as the default setting. Its export that over here, I'll put it onto my desktop and click on Save. And then there we go. That's how it's going to look. And that's what I can email around. So back into there again, let's just have another quick look in here at the settings. So File Export. We're going to be using PDF and digital high-quality print. And you can still go into the more settings in here. And we can either embed the fonts as before. All we can.
40. Introduction to Master Pages & Layers: So we're going to be looking at a whole range of ways of working with larger documents, from layers through to master pages. And if you haven't come across master pages before, you can kind of think of them like page templates, as well as a number of other techniques, including things like adding documents to existing documents. At the end, we're going to do a project which is going to be a multi-page brochure, which we're gonna put together. Lots of pictures, lots of texts. But we're going to be using master pages as part of the process. When you finish this project, make sure that you do save it. Because in the later lectures we're going to come back to this project and take it even further. The one that we're going to be doing today or now is actually going to be taking the project to a printer. So it's as if we've set it up ready to go for commercial printing. Later on in the lectures, next set of lectures, we'll be looking at how we can actually change that to make it work on screen and put in hyperlinks. Let's get going.
41. Why Use Master Pages?: I've got a little brochure here. It's called headshot for a casting agency. And when I go down, you can see there's my cover page. And then all the rest of the pages are exactly the same. So they've all got areas for the text. They've got a little thing that says headshot there. They've got a photo which is different on every single page. So I can go through here and I can change the photos, I can change the text about the particular actor who the page is about. So and when we start to look at master pages, master pages allows us to work with multiple pages like this in a really user-friendly way. You see if I've got a document like this and I was looking at this page and thinking, you know what? When I built this, all of these pages, they don't look exciting enough. I should have put this picture over to the left-hand side there and maybe I should have done two lines of text. But because I've built this with a master page, I can change it very, very quickly. Let's have a look. I'm going to go into normal modes. So out of preview mode in there. And I'm going to go across to my master page. Now, the master pages up here. And if I double-click it, this is my master page. It's like a template for all the pages that are in there. And you can see this is the template for where the picture goes. So if I pull this across to the side, you have low care. All my pages will do exactly the same thing in the picture. We'll just move across to the side. If I went to the text over here and I changed it. And up here, instead of having three columns, I changed it to two columns. Once again, all of my pages will update if I decided that the coloring was wrong. And this part here should actually have been, well, let's make that a dark green and gold color that I've got there. And this little section here should have been green. Well, once again, when I go back to my document, you'll see that it's updated every single page. Switch on preview mode. You can see the images have moved and the text is changed and the colors have changed as well. So this is the main reason that we use master pages because it allows you to work very, very quickly with multiple pages or at the same time if you update something in, updates on all of the pages. Now, I haven't used one master page there for my document, but as you'll see, we can actually make multiple master pages. So you can have a different master page for each section of your large document. Look the next lecture and we'll start to create some master pages and you can see exactly how they work.
42. Pages Panel: In this next section, we're going to be looking at working with master pages and the pages panel. So let's have a little look at the pages panel now of course, like everything else, if you can't find it, go to the View menu, go down to studio, and you'll find the pages is in there. So when you look at it on a document, you find something like this. At the top, we've got something which you can open and close called master pages. And then below that are the pages in your document. Now the great thing about the Pages panel allows you to navigate around your document very quickly. So I can just double-click quickly to jump to a page like so. I can also use the pages panel to add new pages in. If I go over here and decide that I want a new page after page number one. I just right-click on page number one and say add pages. Now VHA can choose how many pages I want to, I want to before or after. Page number one. And then over here, the type of pages that we can use, either a nun page or a master page. We're going to be looking at this in a lot of detail shortly, but I'm just going to keep it to none for now. Click Okay. And you can now see I've got a blank page in page number two, and I can just add as many pages in those alike. I can also delete pages by right-clicking on there and just saying Delete and that will remove that page. So do have a little quick go at the master pages with anything that you've, that you've created. It really doesn't matter whether you've got one page or ten pages. Just have looks at, you know, where to find the pages in here. You can right-click. You can add pages, you can delete pages as well. And if you can't see it, you might need to click next to the word pages on the little arrow to open it up. Like so.
43. Adding Pages: The other really useful thing about the Pages panel is that we can use it to reorder our pages. So at the moment, I have got my intro page over here. Then I've got this person here. I've got another person over there. If I wanted them to be the other way around, I can drag one of these pages. I'm going to drop it on the right-hand side of the page below, and that'll put that page after that one. You can see how it's just flick them around. Or let's say for example, that I thought that page number five, this one here should be in position number two. I can drag it up to page two. And if I go to the left-hand side, you can see how the integral, There's a little line that appears on the right or the left when I drag it over, if either to the left hand side, then this will come in before that page and that becomes page number two in there. So you just drag and drop it either on the right to go off that page or the left to go before that page.
44. Create a Simple Master Page: Let's have a look at creating a master page. Now, what I'm going to do is I'm going to start a new document. So I'm going to go to File and New. And I'm going to print area here. I'm on A4. And I'm going to put in some pages. I'm going to put in four pages for the moment. I'm keeping facing pages switched off for now. You don't have to. But when you first learning about these paid these master pages, it's easier to work without facing pages switched on. We will get to switching them on later. And then the rest of the settings, I'm just going to leave on their default. I'm not too worried about anything else for now. Let's just click on Create. So you can see over here in my pages that I've got four pages there. And I've got a master page option right at the top. If I click to open the master page, this is my master page. Now, it is really important that you understand where you are in the document because it's so easy to think you're in a master page when you're actually on the main page or vice versa. So in order to keep track of where we are, if I go to my master page, I double-click my master page. You can see over here, it looks well, it just looks like the normal page. If I double-click page 1 to page one, it looks like the master page. So have a look down the bottom here. And this is page 1 of 4. If I double-click them master page, it now says Master a in there. So do keep an eye on that because what it is so easy to go wrong. I've done it myself by mistake and I've seen so many people have trained do it as well, try not to make our mistakes. So I've gone to my master page, I'm in the master page. Let's just go out of preview mode. And anything that I do in the master page will automatically be applied to the other pages. Show you what I mean. If I went here and I made a shape, and I'm going to go to my colors on the right-hand side. And I'll just put in a quick color in there. Let's put in this purple color over there. You can see straight away that it's added to all the other pages. When I go back to my document here, I've now got purple on all of the pages. The great thing is that if I then wanted to change it, I can go back to my master page. Double-click the master page. I've checked down here that I'm in the master page and I could change that to something else. We'll click on that. And it's going to put something a little bit more subtle. And I can just keep adding things. I'm going to get my Artistic Text tool and put in some type in there. Once again, you'll see it adds it all the way down. If I added in a photo, Let's go and make a little photo box here. I'll just do something like that. And I'm going to go along to my stock library. Let's find something gold. Then we'll add in some something gold. I mixed my goal at the top. Look a bit insipid, doesn't it? And I'm going to move that over a little bit to there. I think once again back to my pages, you'll see the same thing has been applied to every single page. But what about if I wanted a picture on every single page, but I wanted in the same place on every page. Well, if I go along back to my master page, I'm going to go along and I'm going to draw a picture frame in here. So let's have a picture frame that goes across the bottom like that. And then I go back to my main document. You'll see that I've now got a picture frame on every page in the same position. So if I want to put something into that frame, if I went to my move tool, you'll see if I click it. It is locked. I can't move it by mistake. There is a way of unlocking it or to move it around. I'll be showing you that later. But what it does allow me to do though, is to go along and just find images to go in there. So let's pop in a bit of gold in there. And you can see now how quick this is to build a document, because I can just go to each of these pages and drop in the photo appropriate to that page. It's going to get another one over here. Gold flowers. And the last one at the bottom. Let's find a different gold there. So once again, when I go back to my pages, you can see all of my pages are set up there. Each of the picture which is in exactly the same position. And if I went to my master page, double-clicked it some in the Master page and use this move tool. And I moved the picture over. See it will apply that to all the other pages in there. So it's just a fast way of building your documents. Try it out. Use a single page just for pages for the moment, keeping it nice and simple. Glue and your master page, do some things on your, on your master page, whether it's putting in a full picture like that or colors, or just a blank picture frame, which you can then fill in later. Try now, and then we'll take it on a little bit further.
45. Add a "None" Page: If I want to add in more pages, I can go on to my document and I can right-click and then say add pages. And in here you can see I'm going to add a page before this one for my front page. And then it says, do you want that to be a master page or do you want it to be a nun page? Well, if I choose none and click Okay, then I get a totally blank page here without the master page on it. So I can then do whatever I want. And what I'd like to do is just go in here and add a quick picture as my front-page. So into the stock libraries. And let's just drag in a fast picture into there. So there's my front page. Now. What about if I've added a nun page and then I changed my mind. So I'm going to right-click Add pages and I'm going to say, after page to settle, come in at page three. I'm going to add in a one-page over there. Let's click. Okay. So here's my nun page. And then I think, you know, what would be really great for clever master on there. Well, all I have to do is to click on the Master page and drag and drop it on top of that page, page 3, and you can see how it brought the master in and overwritten. The other page. As I hover over these pages, it actually tells you next to my cursor that they are from the A-Master page. If I go to my first page, you don't get that. Put that one there. Says master a, master a. And then once again, all I've gotta do here is going to find an image to place in there. So it's going to find something which excluded goldfish. So once again, try that out, just right-clicking adding pages, choosing whether they're coming before or after. And with you want to master page or a nun page from there. But even if you make a mistake, you can still go and drag your one-page, your master page, onto your Nano page.
46. Clear Master: How about if we wanted to do it the other way round? And we wanted to take something with a master and remove the elements. Well, if I go to my page 6 over here and I've just double-click to time on page six. I can right-click it and I can say clear masters and that will clear the master from that particular page. If I wanted it back, I can drag it in from the top from our master page, or I can right-click and I can say Apply Master. And then in here I can choose to apply the master page. Now when you're applying master pages this way you'll find that you've got quite a few other options in here where we're applying it to all pages or odd pages or even pages. We're replacing existing master pages because we can do multiple pages, as you'll see later on. I'm just going to click Okay with this specific page over there. And that brings my master back again. So do check this out. Right-click on the page and you can either clear the master or apply the master page.
47. Text in Master Page: It's going to add some text into the master page, which we can edit, edit later on. So I'm going to go along to my Text Frame Tool over here. And I'm going to click and drag a text box in there. Now because it's difficult to see what's in the textbox. I'm actually going to go along to the text menu. I'm going to go down and I'm going to insert filler text, which just puts in some text in there. I can also go along and do any changes that I want, whether it's stars that we are going to be looking at in a lecture to come. Or changing the typeface, align it left, right, or even going into my columns and choosing 23 or four columns. So now that we've got the text in there, when I go back to my document, you'll see that it appears on every page the same bits of text. What about if I've got some other texts that I want to replace this with, well, I can just double-click or go in with my text frame tool, select all this text deleted, and then I can put in my new text in there. And you can see it's just come in just on that page over there. So we just kind of using the master page as a template for the text and we change it then or updated on every single page. It's great because it means that when your credit your document, you don't have to have all the finished edited type. You can just put placeholder text in there and income in later on and fill all your content. So into the master pages, just make a text frame. Do what you want to the text frame, fill it and you can fit it on text and insert filler text in there. And the same thing will be applied to all of those pages. Give it a go.
48. Add a Second Master Page: Let's have a look at making more master pages. So why might we want another master page? Well, with our setup over here and all of these pages, it could be that I want some pages or set of pages where instead of having text down the middle, I might want to have a totally different layout and I want a number of those pages as well. So what I can do is I can go to my master pages up here and I can add a new master page. So I'll just say add master. Over here you can see it's called Master B and it goes from sort of a, B, C, D, all the way through. And in here I can choose the size of my master. I can choose whether it's portrait or landscape. I can even go into the margins and I can adjust the margins specificly on other master pages. I'm going to keep mine on exactly the same settings that I've got. And I'm going to click Okay, and that gives me a second master page here you can see there's my first and there's my second master page. Totally blank. So let me go and build this master page. On this master page, I think I'm going to have a photo down this side. Once again, I'll use one of those gold stock pictures in there. And let's, looks quite interesting one, Let's drag that one in there. Well, that doesn't work at all. Let's try it. Try it again with something else, bit more gold. It's better. But over the top, but better. And then maybe over here, I want some picture frame. So I want another one in there and just pop it up over there. Once again, it doesn't have to be quite right yet because I can adjust it once I see it in conjunction with the rest of the document. And what else should we have? Let's have a bit of text in there as well. So we'll have a text frame going down there, but I only want to be one column, so I'll change it to a single column. And so we can see what we're doing. I'm going to go to Text and I'm going to fill it with insert filler text to put in the text in there. So going back into my document over here, and oops, one, I'm going to zoom out a bit so you can see my whole document from a distance seem to be missing a picture in there. I'll just bring that picture back. Okay. That's better. So here's my documents so far. All the pages of the same apart from the very first one. I'm going to go to my pages panel because I've got the second master in here. And what I'd like to do is I'd like to have the second master coming in after page number four. So I'm going to right-click on page 4. I'm going to say add pages. And in here, I just want to apply it after page 4 and I wanted to be the master B. Let's click. Okay. And now you see after page 4, I've got a new page in there, which is Master B. And same again, I can just get my pictures and drag in a quick picture into that frame. And at any point, I can just go in, I can move those around, I can add more of them. It's add a second one in here after this page from Master be click. Okay. And same again. We'll just pop in a quick photo in there. So when I'm looking at my document, some of these, and let's just go into preview mode. Some of these are coming from master a and some of them are coming from Master B. And then when I look at this and I think you know what, that picture just doesn't seem to work in there. I should have made it a different size. I can always go back to the master B. And let's make sure that we can see what we're doing using my move tool. I'm just going to pull it out of there and move it all the way across back to my document. And there it is with the pictures running all the way across. If I want the gold in front of the picture, back to my master page, I can click on this little right-hand side, gold area and go to the Layer menu. Arrange, moved to the front. And you'll see now when I go back to my document, it will now be in front of those pictures. So once again, try it out, add in a second master page in there. See how you get on.
49. Edit Detached Page: What you probably are found now is when you have master page elements on a page. Although you can change the text and you can even change the pictures, you can't actually change their position or rescale them. So looking, for example, at this page over here, although I can go to the pictures and change them, I can even change his picture on the right-hand side, move it around. I can't go in and adjusted or move it around or resize it. But there is a way of doing this. I'm going to go over to the Layers panel. If you can't see the layers panel, you go to the View menu. You know the routine. Studio layers. I'm going to go to the master them on you can see because I'm on this page here, it's showing me that I'm actually on Master be conceal the content. You can just right-click on that little arrow there and that shows you the content on that page. If I was on this page here, the layers is now showing me the laser for master a. So I'm going to go to this page here, and I'm going to right-click on Master B layer. And then we get to use edit detached. So when I choose Edit detach, the first thing you see, this is red bar that comes along the top here and that says you're actually you detached this from the main master page so you can actually make changes to it. So if I were to click on this shape here, and I could pull it out and say, well maybe this would look better if it was a lot bigger over there. And maybe this picture would look better if it was down here. Now it's only affecting the page that I'm on. So when I click on Finish, you will see that it hasn't affected this page here. If I had did this, if I did it in the master page, it would have affected both pages. Let me do that again. I'm going to go to a different page here. And although I can click and I can adjust the picture in there, I can't move this around. Likewise with the text icon actually change the size of that text box. But if I go over to the Layers panel, right-click where it says Master a. In this case because ammonia on a page with mask on it. I'm going to go down to Edit detached. I'm in the detached area. You can see the red along the top. And now I can make any changes that I like. I can make the text a whole lot smaller. I could go in here and maybe adjust the picture and pull it up. Let's go with this picture here and we're going to move it to the middle point there, seemed to have lost my picture, might need to do something to bring that back, or I'll place it in there again. Now that I've done that, I'm going to click on Finish. And you can see it's only affected this page. The rest of the master pages still look exactly as they did before. So check that out. You right-click on the master and choose Edit detached. Don't forget to click Finish when you're done.
50. Page Numbers: Let's have a look at how page numbers work now. I'm going to do it on an empty document. So I'm going to go to File and New. And in this document, I'm going to put in eight pages. Now I just have a look over here. While we are in this area. It says default master. So you can see that when you create a new document, it is picking up one of the master pages, the default master page in there. So that's why you get the A-Master applied to all of the pages. Initially. Moving down, I'm going to just create that document. And I want to put page numbers on here. So I'm going to go over to the master, double-click on the A-Master, check that I'm in the a master in their page numbers are so easy to do. All you do is you use your text frame tool and you click and you draw a text frame. I'm going to do quite a large one, just that it's easy for you to see. And then I'm going to go across to the character panel. And I will increase the size of it. Once again, just to make it easy to see. And in fact, I'll even go into the paragraph and center it. So alright, so now you can see the little flashing I-beam over there. I'm going to go to, and this is the magic part text. I'm going to go down to Insert across the fields. And I'm going to choose page number. Well, we went to be doing as part of this course. You can also see here we've got next frame, previous frame, total pages is all things that you can actually insert a new document. So when I insert the page number, all it does is put in this little town called a hash or pound sign, depending on where in the world you live. That's it. Page numbers done. I'm going to go back to my pages. And you'll see now that if I zoom out a bit old, my pages have been done. But what about if I change the order of them? Well, let me just bring in something onto these pages. So I think OV on page number one, I'm just going to pop a quick picture. Yeah, we've still got the gold stuff up, so I'll just put in a gold picture in there. So that is on page number one, axon. So what about if I took page number one and I dragged it next to page two, so it becomes Page 2. Well, you can see it's still sorted out. That's now page 1, this is now page two. So the great thing about page numbers is once you've put them in, it doesn't matter if you shuffle your pages around, if you add pages or subtract pages, the page numbering will still always remain the same. So to do it, it has to go on the A-Master page. You make a little using the Text Frame tool. A little frame. Text frame. Doesn't matter what you do in the character or the paragraph options to make it look interesting if you want. And then it is text, insert fields, page number, and that's it. I should now have two page numbers on every single page. Give it a go.
51. Multiple Master Pages: This time what I'm going to do is I'm going to do some multiple master pages and some page numbers as well and mix them together. So I'm going to do a new document. I'm going to do a four I'm going to keep the page numbers down, so I'm just going to go to four pages in there. Once again, facing pages is switched off. We'll come to that very, very soon. And I will click on Create. So what do we need to do? First is I'm going to put my page number into my document. So I'm going to go to my master, a, double-click it, check that I'm in master a, because otherwise it just looks exactly the same. And this is where I'm going to put my page numbering. So as before, I'll use the type tool or the frame text tool, shall I say? And I'm just going to draw a little text frame down the bottom. I'm going to put my text, going to text. Insert fields, page number into there. I'm going to select it. And over here, once again, just so it's easy for you to see, I'm going to go into the character panel and make it a bit larger. And you can change your typeface in here as well. There's no reason why you have to stick with the the LDL thing that they gave you. You can even change your colors. I could make it gray. So now when I go to all my pages, you'll see though I thought had made gray. Let's try that again. Select that and we'll go with a gray on there. If I now go back to my pages, double-click them. There we go. You can see I've got a great text in there. Now I want to bring in some other master pages because I might have two sections that I want to use now, one page numbers on both those sections. So I'm actually going to make a new master page for these sections. So I'll go to the top, click, add master. This is going to be called Master B, or you can actually call it anything you like. This time I'm going to call this. What do we call this? Green? Green bar. I'm going to just put a bar down the side and a dark green click. Okay, so I'm in my green bar master page over here. Once again, I check that I'm in green bar. I'm going to go to my swatches. I'll pick the colors. It uses talk gray. And I'm going to do as we've done before, taking the rectangle and draw the rectangle in on that side, like so. And I'll make that green. Now, I did say that I wanted to different master pages as well as the page numbers. So I'm going to go and do another master page here. So clicking there, and, uh, let's call this one red short bar. So same again. Over here. I'm just going to do one, maybe halfway down over there and make that one brownie red. Now, I've got three separate master pages in here. We're not going back to my document though. You can see that on page number 1234, have just got the A-Master on with the numbers on them. So if I then decide that I want the green bar attached to page two, if I right-click it or I drag and drop onto it, say Apply Master. And I'd say, Okay, I want the green bar over here. If you have replaced existing, switched on and click OK, it will replace it totally with that master page. However, if you apply the master and I'm going to apply the master a this time, but I switched that off. Then I can have multiple masters. I've got two masters on this page. I've got the page number master as well as this right. Green bar. So let me go to page 3. Ever hear page three, I'm going to right-click and I'm going to say Apply Master. And I'm going to add the red short master to that. Let's click. Okay. So now I've got two masters on there. When I hover over a page, you can see if I hover over the page one, it says Master a hover the page to this green, green bar, and master a hover page 3 and master a and read short. So you can add multiple masters on there. If I clicked on there again, apply master. And this time I'm going to apply the green bar. And click Okay, now I've got three master pages, all applied to that one page. There. They still work exactly the same. If I go into the master page and change them, they will update on all of the pages. But you can apply multiple master pages to individual pages.
52. Facing Pages: When it comes to doing spreads and facing pages, if we're creating a publication and I've got a book here, recipe book, and on there we've got a cover, we've got a lot of pages inside and we've got a back to it as well. What I'd like to be able to do is to create the pages with an open like that. So I'm not actually just creating single pages, but I'm seeing across both those pages. So to do that, I'm going to go to File and New. And once again, I would choose a fall, but I'm going to switch facing pages on. Let's make this eight pages in size. And when I click on Create, over here in my Pages panel, you can see I've got my first page there. And then page 2 and 3, if I double-click comes in together, page 3 and 4, page sorry, 4567. And finally, at the bottom we have page 8 by itself, which will be the back cover. So page one is the front cover going through to the back cover, and then all the rest of the pages are spreads or facing pages. So what I'm going to do now is good my master page. If I double-click on my master page, you can see the master pages actually the two pages together. It's both your left and your right hand side. So if I were to put in a color bar across the top of the right-hand side page. And I'm going to go and give that a color. And let's pick a silver purple there. And once again, you can see in the pages panel, it's affected all the right-hand side pages, but not left-hand side pages. Let's do another one on the left. I just hold down the Alt key and make a copy of that, of that to the left. And it's really bright with this example here. We've got some green on that side and you can see how that is working. Now, we're not going back to my pages. And we'll zoom out a bit. You can see all of my pages have got the appropriate side on them. But what about if we drag in the wrong one? Well, let's say for example here, if I've got these two pages and I right-click and I clear the master from the left-hand side page and are clear the master from the right-hand side page. So I've Got Rhythm Master over there. There's no master page on those. I'm going to drag in this right-hand side page here. Let's go back to my page, drag it in and drop it on the left. And you can see it figures out it knows that it should use the left-hand page on there. Once again, if I drag the left-hand page onto the right here, well, it figures it out for you so you don't have to worry about getting left to the right pages mixed up. So that's it. That's the difference between using single pages or using facing pages. Just know when you're in your masters that you worked on two pages at a time. But you can always drag them in and just drop them like so or right-click and apply them exactly as you've done before.
53. Document Section: So going back to my cost or headshot document, I've got the cover page here. Then I've got a blank page. I wanted to put on something later on to that page there. Then I've got my actors who've all got their own page starting over then you can see I've got page numbers in here now as well. So my third page start on page number 3. What I would like to do though, is I would like to although you can't see the page numbers on there, I would like this one to actually start on page number one. So we do that by making a new section. I'm going to go to page 3 in my Pages panel. I'm going to right-click it and I'm going to say start a new section. Now in here I've got a section 2 and I'm going to say restart page numbering at one. On this page, let's click on Close. And over here you can see, although this still says page to page 3, page 4, etc. My numbering now starts at number 1 and goes all the way through down there. So at any point, at any time, if you need to restart your numbering, go to the page where you want to restart your numbering. Right-click. You want to say start a new section in here. Restart the page numbering at, choose what page you want to restart it. Choose the style that you want. This all sorts of stars we numbers. Click on Close. And there we go. We're starting number one over there again. Try it out.
54. Merge Documents: I've got a second document that I want to attach to this document. So I'm going to go and open up to show you. So if I go to File and Open, and it's this one over here called action actors. And there's just two pages on there with the various actors showing them in action and a bit of text. Vcr can update the text with whatever I want. So let me close that down. So I want to bring in those two pages over here after page number 10. So what I'm going to do is I'm just going to right-click on page number 10. I'm going say add pages from file. And this is what Where's the file that you want? Well, there it is, It's my action actors. I'm going to click Open. And now I can choose what I want to do. There were only two pages in that file. So page numbers 12 or I could just say all pages if you just want one page, obviously just put in the page that you want. You've also got the option for sections in there as well so he could bring in a whole section. And I want to add my pages after page number 10. I'm just going to click OK. And there we go. It's just brought in those two pages. They've now become part of this document. So it means that you can actually work on your document in various bits. Or you can have different people working on different sections of your document and then you can bring them altogether at a later stage.
55. Layers: Let's look into the layers now. I've mentioned them as we've been going through, but I want to show you a few more bits about the layers. The first thing is where to find them, or BC, it's in the View menu down to the studio. And you'll find the layers in the studios. Somewhere. There it is over there. Now I've got mine up already. I'm going to pull it out. So it's easy for you to see what I've got in here. The first thing is because I'm on a page, the layers are related to the page them on. You see, if I go to this page here, double-click on that page there. You can see it shows me the layers for that page. If I go to page number 2, there are no layers. There's nothing on that page, so it is totally blank. Forget to page one will have two items. There is the pictures and there's the headshot text in there as well. Let's get back to page number three. And I'm going to click on the little arrow to open up because it says that there is a master page on this and everything is inside that master page. Now, think that I like about the layers. Is it if I want to find something, I can do it quickly in here, because if I double-click, it will just jump to whatever it is that I am double-clicked on. So in this case, it's that the page number double-click on that headshot, double-click on that frame, double-click on the picture. And you can just very quickly move around with in your document by double-clicking. If I double-click on the master over here on the picture, sorry. And then it shows me my whole document. You can also show and hide things in here. So by going to the little tics over here, it is possible to show and hide items on that particular layer. If you're on a layer that doesn't have a master page, you won't have anything in their 20s say Master, you will just see like this one here, the items that are on that page. And I can switch them on and off individually like that from what one of these pages here, then even though you can see the tick in there, I would switch it on and off. That way. Don't forget with your masters. You can then go into your master pages by either right-clicking and choosing edit detached. Or you can do this from the menu as well. So I can go to the Layer menu. And down here we've got the options for detaching master page. You go to master page and edit detached. It's exactly the same thing in there, and that takes us in. Now, I can switch these on and off. And you can see I can show and hide items that are on the master page. Let's just click on Finish. And there. Let's get back to this page 4 one more time. So I can either hide things in there. I can then even go into items like pictures. And I can see the picture inside its picture frame. So we've got two objects within, objects in here. Try that out and see what you get inside those, those layers. It's really useful and it's just a great way of jumping to particular areas that you want to work on.
56. Adjustment Layers: So looking at the layers, again, as you can see, I've got a bit of text on this layer and I've got a picture frame. So at the moment, this is the picture frame which I've selected. If I click on the little drop-down arrow and click inside there. Now I've actually selected the photo which is in that frame, the picture inside the frame. So know where you are in your document. But the other thing that we can do is we can add adjustment layers. And this is really exciting. And for a publishing package because normally it's something you do in maybe the photo package. I'm going to go down to the bottom over here and you can see we've got effects. And in the middle, we've got adjustments. If I click on this little adjustment icon, there are so many different kinds of adjustments that will cause hint here. Now, if you do use the photo package or any bitmap editing package for that matter, you will recognize a lot of these adjustments to show you how it works. I'm going to go down to black and white and I'm going to put a black and white adjustment layer in here. Now, when I've done that, the first thing that happens is this little adjustment layer appears in here. My image goes black and white. Both the photo and the text goes black and white. And we've got some settings in here. And what these settings allow me to do is to just adjust the different colors in the image. So if I went to this red one, for example, I could make any reds go lighter or darker. And obviously it's picking up the skin tones. Let's go and try the blues and see if we can make the blues go lighter or darker in there. And the light blues as well. But I'm going to close that because this adjustment layer is affecting every layer below itself. So if I drag it below the text headshot, but above the picture, you can see now the headshot text is in color, but the picture is in black and white. And the great thing about these, if you don't want them Will you can just tick them in the Arctic them again to bring them back. If you really don't want it, you just drag it and drop it into the bin at the bottom. Now I quite like that black and white, but I won't do a different one. Once again, I'm going to go down here by the way, I've just clicked off of that. So neither of those are selected. I'm going to go down here to the adjustments. And let's use Posterize over there. And you can see we have a post Dr setting in here knocking change the number of levels on my pasteurization on that image. Once again, if I look at that, I think you know what, that looks so tacky. Just Binet. And so try them out, go down, choose the one you want. There are so many different items in here. Some of them like the shadow and highlights, allow you to sort of increase the dark areas or decrease the dark areas are dark and down the lighter areas. And you can see how I can just adjust that image. And I'm using the shadow area to just get a bit more detail in the darker parts of this image. And I can have a second one in there as well. So I can go back to my black and white and add the black and white. On top of that. I think the blues should be a little bit lighter over there. I'm happy with that. And none of that is set in stone because I can always untick them in there if I want the original back again. Remember you can move them around so I can take my text, drag it above those two. So it's going to be in color. Try it out. It's a lovely way of working and you don't see this very often in publishing packages.
57. Adjustment Layer with Master: So I've gone to one of my pages here which has a master in it. And I want to put a black and white or a posterize just onto the photo here. So you see if I click on the picture frame, and then I go in here to do an adjustment. And I choose what they choose black and white. You can see it's jumped right to the very top. It's jumped above the master page. And to affecting everything which is in that master page. Now, honestly, I don't want that, so I'm going to bin it again. If I click dropped down to go into the photo inside there, and now do that again. So let's do black and white. You can see now it's only, it's attached itself to the photons, only affecting the photo, not the rest of that master page in there. The other thing to remember is with your master pages, you can always go into Edit detached by right-clicking it. And it's easier to work sometimes in there if you need to move things around. Have a go with that last one.
58. Mask with Vector: I put in another picture in here, and I want to now do a layer mask to mask it off. So if I go onto my shapes in Ghana, I'm going to pick a little shape. I'll just use a star tool, I think. And I'm going to draw a star over the top of that shape. Now, I want the picture to appear inside this star. Um, I am going to just adjust the star slightly, like so. If I go to my layers and I right-click on the star layer, it's directly above the picture. And down here, I'm going to say mask to below. And what it does it make some mask and the image appears inside it. The great thing about this, as I can still adjust that mask. If I want something slightly different, I'm just going to put it in a little bit. Like so. And right now that I've got that, The other thing that we can do as well is we can go down to the effects because that stars not showing up properly. So I'm going to go to effects and I'm going to go to Outline. I'm going to switch on an outline. I'll just increase the radius to make it a bit more obvious. In there. I can of course change the color to anything I like. So let's see what it looks like if it was pure white. No, I think let's go pure black instead. Over there. Once again, I'll close that down. None of this is set in stone because the masks can just be hidden. I can go along here and just hide that mask for don't want to see it. You can also see I've got the effects there so I can click on the effect and undo the effect if I don't want that as well. You can add as many effects in there as you like. Anyway, try that one out. You build some really interesting items with these masks.
59. Mask with a Gradient: So I want one last page on my document. So I've put put it in a new page and I've put a picture in there. But I want to show you another masking technique. So what I'm going to do is I'm going to take a, another shape, put the shape over the top. And by shape I actually mean picture frame. And put a second picture in there. So I'll drag this picture into there as well. I think I'm going to make her a little bit larger and just move her over a bit like so. So you can see if I look in my layers, I have got the orange layer, then I've got the blue layer there. And I can show and hide to see both of them. Now on this top one, I want to add a mask. Now I'm going to blend these two pictures together. So I'm going to go down to, on that top picture, I'm going to go down everywhere to the mask. I'm going to click on the Layer Mask button. And it's putting a mask on this layer, on the blue layer at the top. Now I'm going to click on the mask, and then I'm going to use a gradient. So I gave it to my gradient tool. If you remember the gradient from white a few lectures ago. And I'm going to just click and drag across. Now, it's automatically just starts to mix these pictures together. But I need to go a bit further. So on this side of my gradient, I'm going to choose white. On this side, my gradient, I'm going to choose black. And now you can see with that black and white gradient how can pull it around. And what I'm doing is I'm actually hiding some of that top layer. So the further I pull this both ways, the more of a gradient, gradual mix of those two images. I'll get to a pull us up to here. And there we go. I can mix the two of them in. I can still go to both those pictures and I can click on this picture and I can move it along. If it wasn't quite in the right position of the jet, be careful because that gradient, I don't want a sudden ending to it. Likewise with this image over here, click on the, on the picture. So let's go to that one and just move it in a little bit over there. But I've got to be careful of the turban, but we can blend multiple images that way. So to do it, you just need a picture at the mask by adding this little button down here and then user gradient on there. Let's have one more so you can see it in action again. So I'm going to take a picture here. I'm going to drop a picture in. And let's go and get something which is not a portrait because liquid strange, otherwise, it's just have some c in there. And I will drop this image down there. Mighty make it a little bit bigger. Let's pull that up a little bit like so. And then I'm going to add a mask, which is this button down here. It's next to the adjustment layer button. It's a square with a circle and click on that. I click on the mask, so I'm actually in the mask now. And I go to the Gradient Tool and just click and drag to get your gradient started. On one side of the gradient, choose black, on the other side, choose white. And then just start to move it around until you get a really good mix of the images as you want them. Once again over here, if I pull this up too far, you're going to see the edge of that image below. So I'll just pull it down to at least that point in there. And I can then make a whole montage with different images and just blending them in and out. Have you would have to have lots of fun with that. It's a great tool.
60. Project: Brochure for Print - Set Up Document: Into a pretty big project. Now, as you've seen earlier, we're going to be building a multi-page brochure with Facing pages and a lot of really cool stuff, including master pages, of course. So let's get going. Now. I've got a subject that I'm going to use, my brochure, but you can use any subject that you like. And the subject I'm going to go for is the island of Cyprus. It's one of my favorite places in the world. And if you don't know where that is, definitely worth having looked forward sort of below Turkey and above Egypt in the Mediterranean. Brilliant, brilliant place. But I digress. That's what I'm going to do my brush around, but you can make it whatever is close to your heart, whether to place you've stayed or a sport or cooking or anything. Let's get going. I'm going to go to File and New. And I'm creating a new document here now I'm going to be using a four, but I'm thinking that this is something that's going to go for print. So I'm going to use the press ready preset in here. Once again go to A4. And what that does just puts in a few extra bits and pieces that I had then don't have to tick. So starting at the top, we have got my sizes. I've got the number of pages. Now. I don't know how many pages against B in this final multi-page brochure. But I'm going to start by putting in about eight. And I'm going to be using the default master. I'm going to have facing pages on and we're starting on the right. So number one would be page one and beyond on the right-hand side, down here, the color format. Remember this is going for, for printing, so, and commercial printing, so it's going to be seen by eight. And then the color profile, as we've mentioned before, January, if you're in Europe, you'd probably use the fogger 39. If you are in the States, probably go for the web, swap coated. It just depends on where you are in the world and what your printers are working with. Because you know, you might send it to the printers now of course, center to the outside world to be printed. They've got a different color profile. Talk to your printers, that's the best way. So moving down over here, we've got our margins. Now for the margins, I'm going to leave them on the default. We can change them later if we want. An important thing here is the bleed, three millimeters bleed all the way around. Once again, told you printers they might like five. I'm going to click on Create and then got my document app. You can see I've got all of my pages in here. Now for this document, what I'm going to be doing is I'm going to be having a number of different master pages. And the first master page that I want to build is the master page, which is going to have the things which will be applied to almost every single page. And that's going to be page numbers and a little bit of text along the top. So starting in my mask, I'm going to double-click my master page. And this is where I'm going to put the bits and pieces that I want. So in here, I've just having a little bit of text along the top because some, Cyprus is all about beautiful beaches and exploring land and some old, very, very old ruins in there as well. So I'm just going to say Explore, and that's going to be the word. So I'm going to have on every single page, and of course I probably have Cyprus in there and some page numbers at the bottom. Let me start with my page numbers. Remember, if you don't get your texts right at this stage, it doesn't matter. It's on a master page. You can change it later on. So I'm going to go over to my type or my shortest say the Text Frame Tool. I'm going to draw a little frame. And by the way, just before you start working, just check. I'm on the master page. Have I double-clicked it? Yes, I'm on master a. That's fine. So I'm going to click and drag to do my textbox down there. And then I'm going to go up too. If you remember from the early lectures text, I'm going to be inserting. And I'm inserting in fields, the page number. Now it's just come in, it's quite small. I'm going to highlight it. And I'm going to go and just formatted for the moment. In the next set of lectures, we'll be looking at better ways of doing the formatting and using styles, paragraph styles, character styles. But for the moment we're doing everything manually. Of course, if you finish this course, you come back to do the project again. Know about styles. But for the moment I'm just going to go to the Character panel of their view menu down to studios. Can't find it in character. I'm going to choose the typeface that I want. So I want something which is a little bit sort of curly ish for now. So I'm going to add onto my l's and choose this one here called last. I'm going to select that we'd make it bigger. There these page numbers again be fairly large and I think instead of having a black, I'm going to go into severe medium light gray in there. So let me pull that in a little bit like, like so. Now this is going to go in the bottom corners. I'm going to pull it out to about over there. Remember the margins are just there to help you. They're not specific to what we'll print and what won't print. This is commercial printing. We can print anywhere on that page right to the edge. But I'm going to place mine just down the bottom in there. And I want the same thing on the other side. So I'm going to hold down the Alt key, make a copy of this placed on the other side over there. And I'm just doing it by eye at the moment. If you want to be more accurate, you can measure it. You can have a look at your rulers guides, et cetera. And then in here, I want to align this over to the right. So I'm going to go over to the paragraph options and choose a light right alignment. So although I'm going to be putting some more texts in here in a moment. Let's just go back and have a look the page and make sure everything works. And I double-click over here and you can see my pages are all numbered correctly. Now, honestly, that looks a little bit over the top. I'm just going to go back to my master. Select this. But if text in here and maybe choose a slightly lighter gray for it, sets a very light gray and I'm, I take the size down a bit. Now, if this was in a style, a character style, this would be just a few seconds work texts bit longer because somebody could have been doing it manually at the moment. So 48, I'm going to go to 36 now do the same on this side as well. Take that to 36. And hopefully I can remember which one of these I was using. Well, we'll find out. I double-click on my pages. Oh, that one is darker in there, so let's go back again. You can see how you can just work backwards and forwards. Over here, I'm going to select that and use that color gray in it. So that's my pages all done. If they're all the numbering is sorted out. And I still need to go back to the master page and put some more information on there, but I'm going to stop there so you can build along with me. So make a new document used the preprocessed settings. If you prefer a different size you want go landscape rather than portrait or whatever. It's entirely up to you. And at the moment we are building the the master page with the page numbers. So double-click on your master page. Check that during the master page it's so easy to get that wrong. Putting your page numbers and come back. And then we'll do the next part of this master page.
61. Project: Brochure for Print - Columns & Master Page: Now before we put in the little lines and a bit of text, I mentioned before that you can always change your margins later. And that's what I'd like to do now. But I'm going to do it in my master page. So whenever that master page applies, it has those particular columns and guides and sorry, columns and margins on it. So I'm in the master. Once again, I'm checking the bottom dead. I'm definitely in the master area. And I'm going to go up to the View menu. You might remember from way earlier in this course, the View menu. I'm going to go down to my guides manager, and I'm going to put in two columns in there. The other thing I'm thinking is that these margins, well, they're not wide enough. I really want a lot of space around the document. Having a lot of space in your document is called negative space, and it just gives it that feeling of room to breathe, really that the document has room to breathe. You'll find that January documents that are promoting or selling more expensive items tend to have a lot more negative space. And have a look next time you looking at documents and thinking, oh, that's a quality product, lots of space around it. Anyway, I'm going to change the margins up to 35, I think, all the way round here. So 35 there, 35 here, and 35 Ever there. And click on Close. And now if I go back to my document, you'll see on every single page, we've got the same margins all the way through. I'm gonna go back to my master once again. And this time I'm going to draw in a little line and I'm going to use the pen tool to do that. So with the pen tool, if I go along here to draw my line and I'm going to start on the bleed and not on the edge of the page or on the bleed. I'm going to click and then I want to put my next point in here somewhere. So when I do this, you'll see that I can put point. Anyway. If I hold down the Shift key, then the point will actually snap to being horizontal. So it's quite easy for me, it's just a tad my next point in like that. Now once I've done that, I'm going to go over to the stroke and find my Stroke panel. I'm just going to increase the size a little bit or the weight of that of that line to something that I feel looks appropriate for my document. I'm still keeping in quite quite thin, but I think I'm gonna go to points. And when it comes to the color, once again, I'm going to be using a very, very light gray on there. Now that I've done that one will the other side is really easy to do because I just use my move tool. I can hold down the Alt key and I can move a copy across and mortar holding down the Shift key once again to make sure copies perfectly over. So I think that's in the right position every day. Let's check it. That's looking good so far. So next thing is a little bit of text in here as well. So this particular bit of text is going to say adventure. So this whole brochure of mine is all about the island and venturing, but we can change that later. As I'm sure you remember. I'm going to use, well, I could use either of these two type tools. I think I'll go to autistic text for this. I'm just going to click and drag I'm Artistic Text out and put in the word adventure. Now, I need to find a typeface for this. And the typeface I intending to use is Montserrat, but you can use anything you like. So I'm going to get onto my m's there and months right there we go. And we've got regular but I'm going to light over there and I'm going make the size a whole lot smaller as well. So I'm just looking for something along this size will just have little bit of text in there. Once again, I'm going to move it into the right position. Now, don't forget when you're moving things around, you can always use your arrows as well. And if you hold down the Shift key, you can use the Shift key to move or shift key with the arrows to move it in larger increments. Once I've got this into the right position, now just move it over a little bit more. I can then do the same thing as we did before. Hold down the Alt key and we can drag it across to the other side. One more bit of text up the top here, which is going to say Cyprus. And the text, I really just wanted to be on the left-hand page. So same again, I will use my Artistic Text tool. Putting the word, I'm going to highlight it. Go across. Now this time I'm going to be using my original typeface, which, which I had for the numbers which is called Lust. L, have their same again, making it fairly light over there, so it's just, just visible. And I will take the size down a bit as well. So I'm looking at about 30 points for you. But once again, you do whatever works for you. I'm going to place that in the middle or my texts didn't seem to be correct. Let's try that again. The film not on the stroke. Great. So that's looking good. If I get my individual pages, will just go along and switch on the windscreen wipers. Preview mode, and have looked at pages and that's what they're going to all look like at the moment. If you look at this and you think, oh, that doesn't look right or that doesn't look right. Just go back to your master document once again into edit mode and you can then change this. So same again. I'm going to go to the type and maybe duties of a mid gray over there and the same with this one. Mid gray. Have that hope I got the right one. Don't forget at this stage it's a really, really good idea. You know what I'm going to say? File and Save. So you can call this absolutely anything you like. I'm going to call mine Cyprus in there and we'll learn. I'll just put it onto my desktop for the moment. So have a go get up to this stage here. So you've got your first master page done. And then we'll come, we'll start building some more master pages.
62. Project: Brochure for Print - Build a 2nd Master Page: So this is going to be the base master page to sketch, gone on almost every page except probably the first page and the last page. But then I want to have two different styles of pages as well as having this master page, I'm going to be building more masters. So on some of the pages we will have two masters at a time. It doesn't make sense. They would mean watch the next bit. So I'm going to go up to the top to where the masters are. And I'm going to make a new master page. So there's a little ad Master Page button up here. If I click on that, it says, what do you want to call this? Well, this is going to be called B master or you can call it anything that works for you. In fact, I'm going to change this and I'm going to call this one my pen layout. So it's going to have a panoramic picture across both of them. So pen layout in there and I'm going to click Okay. So now I've got a second master page called pan layout. And you can see I'm actually in Pan loud at the moment. So what I wanna do in panel out is I want to picture that's going to go across two pages. So I'm going to use the picture frame tool. I'm going to draw a picture from there up to their work. It's not a picture, it's a picture frame really going to go a little bit higher. And in fact, I think I'll stick with that. And then the second thing I want is to have some text in here as well. So I'm going to use my text frame tool. And I'm going to do a text frame in there. And this text frame, I'm just going to for the moment, fill with text so I can change the typeface on it. So I'm going to go into my text menu. I'm going to say insert filler text. Now you can see that way out and there'll be a pain if I had that on every single page. So I'm going to select it all. And over here I'm going to go to my character. I'm going to choose the typeface that I'm using for everything else, which was Montserrat. So if we come down to the M's and O's, so that's going to be months rat. And I'm going to take this down to my normal body text size, which for this document is going to be 12 in there. That's very difficult to read. Small type like that. If it's light grays, I am going to go with a much darker gray on there. I'm going over to my paragraph options and I'm going to left align the paragraphs. The next thing I want to do though, is I want to break this into two columns. I don't want to have to go in with the, the columns that I, that I head. So I'm going to go over here to the columns, and I'm going to choose two columns in there. So that's going to be my, my main body texts. It's going to look like that. Just going to move some of these bits down just a little bit. Have there that's going to move down a bit like surf. And then I want a heading in here as well. So I will do a separate frame for that over there. Now you can see straight away that when I do this frame look at that, It's still got two columns. I'm going to take that back to one column. And I'm going to put in what's going to be my heading text in here. So I'll just call it head. I'm going to highlight that. Let's go back over to the character and sorted out. As I keep saying, next lectures, you're going to be doing this all with styles, using paragraph and character styles. So in certain ones threat for the heading, I'm going to be using something called Playfair. So it's under piece. You can use any typeface you like. Right. Which appears to be gone. Okay, well funded the moment, but I would just pop on another typeface for, for the moment. I'll find that just now I don't know quite where it's gone at the moment. I'm going to left align that. So every paragraph left align, make it a bit bigger in the character options over here. So I think I want my headers in here to be about 3000, fairly large. And I'm going to indent as well. So that's in the paragraph options. And we can then indent The type. So if I scroll down over here, we've got all of these options. Remember, from spacing tabs justified, et cetera. I've got a spacing and I'm going to choose to indent the text. That's this one over here. So we indented like that. So once this is done, I'd also want the same thing on that page as well. So these two pages are about symmetry. So I'm going to hold down the Alt key and copy that across to there. And that's all ready to go. Let's have a look at putting this together now. I still need to do another master page, but we'll get to that soon. Let me go back to my document and you can see on my document over here, I have got if I go into preview mode, I've got this master page, A-Master page in there, so I'm getting tongue-tied. So what I'd like to do is to now get my pen layout onto page two in three. So I'm going to select both Page 2 and 3 as click on one. And I'm going to Shift click on the second one. And then I can just drag my pen layout straight in there. You can see if I do it this way, I lose my page numbers. So now if I hover over it, I've only got the pen loud on this one, I've got the master a page. If we right-click and say Apply master, then what I want to get my master a back again. So as long as I don't have replace existing, switched on, if I click Okay, you can see I've got both of those on at the same time. Let me do it to page 4 and 5. So I'm going to Shift select both of those pages for foreign five. Right-click say Apply master. And make sure that I'm, in this case, I'm applying the panel layout because I've already got the other loud on there. And I'll click Okay. So I can very, very quickly just add in any master pages that are need. Now let me go and find a bit of content in here. So I'm going to go to the stock Library and I'm looking for some waves actually rather than Cyprus, I'm going say waves in there somewhere, really, really awesome waves. And I just want something that looks a bit BCCI. Let's try that one there and drag and drop it in. And we can then drop it on that double spread on that pan. Should I say? Remember, you can always zoom in and out. So I can zoom in here. And I'm just going to move that around to get more vessel with a C type of look at the bottom of the page there. These ones can be changed as well. So if I highlight that, I can then change that it keeps the same typeface, the same formatting. And I'll change this to island of dreams. Anyway, do have a go with that. Don't start building the document too much yet because we need to build another master page first. But I just want to show you this how it would actually work within your document. So you could have the two master pages together have a go.
63. Project: Brochure for Print - Duplicate Master: Let's do a second master page. Now. If I go up to my pen loud master page, I don't want it to be doing a totally different master page. I want to be using some of these items as well in my next master page. Now I could just go in and maybe copy those onto a brand new master page. Or if I right-click on this master page, I can go down and I can duplicate this master. So I have now but two of them have got panel out and I've got a second panel out down here. So I need to rename this one over there. And it's called this non symmetry or something like that. Once again, name it to anything that works for you. When I get down to these ones here, you can see I've got pen lout on those and I've got this one here called non symmetry. So I'm just going to double-check to make sure I'm in the non symmetry layout. And I'm gonna get rid of a few of those bits and pieces. So I don't want that this is going to come down. I think I want this to be I think down, down over here at the bottom. And that one's going to stay there, but we're going to have a second one. Above it is wells will have more text along the top. And I also want to then have a picture over here. So I will use my picture frame. And I'm going to draw in the next frame all the way across. It's going to go over to about there. I might need to move it up a little bit over there. I haven't actually got any guides in at the moment. It's always a good idea to put some guides in going across and grid up your page so that not only do you have guys going up and down, but you haven't gone left and right as well. I haven't done this, that for this particular example though. And I think I want some more text in here, but this text is going to be reversed text, so it's going to be white text on a colored background. Now, before I put the color in, I want to make the color up over here in my swatches. So I'm going to go into my color. I'm going to put, I really want something that's sort of a nicely see green, turquoise color. So I'm going to just drag that over. I'm looking at this color over here. Maybe make it a bit darker as well. And then I'll go to my swatches and I'm in my custom swatch here, but you could do it in your colors as well. And then going to click on this, it'll add current filter pellet button. And now I've got that color in my swatch for this document. So let me go and take a shape and I'm going to just use a rectangle. Drawing my rectangle over here where my text is going to go in there. And then I will just copy one of these bits of text across. I'm going to hold down the Alt key and copy it. Now you can see the problem straight away, that my text is behind the shape. So Layer down to arrange and move to the front. So we'll come up into the front. I'm going to also select all this text in here. So I just clicked a number of times to selected. I'm going to go to the color and I'm going to change the color of the text. Sorry, let's try that again for you to go to the Character panel. And we're going to change the color of the text in here to white. So I'm going to get reversed text on my blue background in there. So I've solved, kind of kept this text in line with that bit over there. You can move these around and make it look as you want. My needs a little bit of tweaking still, maybe maybe this needs to be a bit bigger. We'll have to see how it looks on the final page, but that's my second master page. Now done.
64. Project: Brochure for Print - Add Pages: You'll notice that I've removed the master pages from all of my other pages. In fact, i've I've left the A-Master page on this. All my pages have got page page numbers on. But what I want to do is on page one because that's going to be the cover. I don't want a master page, so I'm going to right-click on page one and just kinda say clear masters. To look at a page one you can see there's no master there. And maybe for the final page as well, I'm going to page eight and I'm going to clear the masters from that. And in fact, this document is a bit shorter. I want four more pages, so I'm going to go to page 6 and 7, enemy to add more pages. So if I go to this little button at the top here which says add pages, it says, how many pages do you want to add? And I want to add in four pages and I want them to come after page 7. And are all want them to have the master a master page on them. So I click Okay. And that gives me Well tons more pages with master pages on rattling the went to we get to page 12. Now, Minnelli, nearly done with this, but the next thing though, is that I really should start page numbering in different places because you don't want your cover to be page number one. Maybe you've got your cover on there which is a nun page, then you couldn't in a page and you want your page one to start on what is actually Page 3 over here. So if you'd like to just sort out your master pages to move them as more pages. And then we'll come back and we will make this into a new section, pyramid and how to do that. Have a go and see if you can remember. Otherwise, I'll show you in the next lecture.
65. Project: Brochure for Print - New Section, Template & Place: Well, if you haven't worked out how to do the sections, Here's how I'm going to go to page 3. And I'm going to right-click it because this is the page that I want my new page one to start on. So I'm going to right-click in there. And then we'd go down to start a new section. And in here it says Section one is page 1 and 2. Section 2 is page 3 to page 12. So I'm going to instead of continue page numbering, I'm going to say restart page numbering at page one. So in fact, Page 3 is now going to become Page 1. I'm going to keep the same style in there and I'm just going to close that. So you can now see that my page 3, if I zoom out to show you, there's nothing on there, that's page 2. And this is now page 1 over here. Now this one doesn't show up the other page one from section one because well, it doesn't have a master page on it. This one over here. I really need to get rid of that page number in a better don't want to remove this little section uphill, this little area up here, the word Cyprus and the, the line and the adventure. So how could I do that? Well, what we can do is I'm going to just make sure I'm on Page and number two over here. I'm going to go along to my layer down to master page and Schumann, the edit detached. When say Edit detached, the little orange line comes long over here and I can go to my page number 2 and just delete that page numbering from that page. Now you'll notice that it hasn't affected the other pages as well are just choose Finish. And it's done. That's all I've got kind of some of the master page on here, but I've deleted some of it as well. And I think that's my document now ready to really start working on. But what I want to do is I want to save this out as a template so that I can always come back and start a fresh maybe next months newsletter. You want to use the same template, but obviously bringing more pictures and different text. So I'm going to go up to the File menu, and of course I've done my saves. I'm saving my normal document. I've called it Cyprus. You can see Cyprus at the top. But I'm going to go to File and I'm going to export as a template that's near the bottom there. And so I'm going to call this Cypress template a newsletter or news. I'm just going to click on Save OK. I'll put this onto my desktop over here. So if I close this down, now, if I want to work on the editable version that I was working on, then I would go to file and when I open it, I would actually open up this Cyprus file over here. If I wanted a fresh one, I would go to my Cyprus template news over there. And when I click open on there, you'll see it just says untitled. And that then requires me to save this as a copy, does have staccato my master pages in there. I've got these pages through here. But the difference is that I've got to do a Save As so I'm not kind of overwriting last months newsletter. We close that down and I'm going to actually go back and open up my working file that I have been working on it. But there's one more thing that I would like to have a look at here before we actually get going. And that is how images are handled. You see if I bring in an image from stock over here and I place it into a hope. Now I've just gone and I've lost my tools over there. Now. Obviously we can move things around to get them back. But if it's happens to you, you're oh my goodness, where is such and such gone? The fastest way is just go to the View menu down to your studio presets. And whoops, Let's try that again, sorry, Data studio. And the studio presets right down the bottom says reset studio and that'll just reset it for you. So I was about to go to the pictures and show you what happens over here when we go into the stock library and I drag a picture in. Now it doesn't matter whether it's here, whether it's in your master page, it's going to do exactly the same thing. So we can see the picture in there. Let me do another picture over here. But this one, instead of actually bring it from a stock library, I'm going to go to file and place and place a file that I've got on my machine. So I'm going to go and find my images over here. And all. Let's bring in a cat. And once again, the image comes through in there and they look for old-world exactly the same. The difference at the moment is the way that affinity is actually dealing with how these pictures come in. This one here, the image is actually embedded into the document. This one here, it's linked to an external file. So if I went and threw away the picture of the cat, this would cause me trouble. So let's have a look and see how we can change these settings. Yeah. You see when we went to file and new document right beginning because I chose press ready, it assumed I was going to make this mass have big file or big document. So it said the picture placement policy actually then went to preferred linked files rather than preferred embedded files. So how can we see if this is a linked or embedded file? Well, what I'm going to do is I'm going to go to the document and I'm going to go to the Resources Manager. And in here you can see that this bit of see there is actually embedded. But the cat is linked. At this stage, if you think, oh my goodness, what I'm gonna do when you can just embed that file if you want by clicking in the resources manager. However, we can also change the preferences on the document. So I'm going to get a File and down to my documents setup. And one of the options there isn't says Image Placement Policy. I'm going to change it to imbedded. So from now on, any far that I bring in will by default be embedded into this particular document. Once again, try out the template savings a template, and also have a look at the placement policy in there. And if you want to see if things are linked or embedded, go to the document menu, go down to the resources manager, and this shows you any files and with embedded and which page you're on as well while you're in there.
66. Project: Brochure for Print - Add Masters to Document: Let's start building this document now. So page 2 and 3, I'm going to bring in the master page, which is the pen layout, as well as having the page numbers on there. Because I do want page one in there as well. So Let's have a look at how I could do that. The one way I could do that is to select both sides. I select that side and this side. And then I can go to my pen layout. And if I drag them in, you see over here, if I drop it in there, it drops it across. And if I were to then bring a picture in there, I'm going to go to the stock library and just find a quick picture for the moment. My picture goes across both of those pages. Now, why am I showing you that? Because it seems like obvious rarely. Let me undo that over there and do it again. So the first thing I want to do is if I'm dragging and dropping a do need to be careful that I've selected the right area. If I click over here and drag and drop, well, you notice that the master page a disappears. So that's the first thing to be careful with dragging and dropping. The second thing is if I right-click over here and I were to then go to apply master pages. I could just apply it to the right-hand page and not a left-hand page. So once again, I've got to be really careful. When do I wanted if I put it onto one page and then did the other side, I would actually have to separate master pages. Net picture would only go across half of my pen. Just be careful with this. So to be sure, I want this master page to go cross the two pages. So I'll select the left-hand page. Are then hold down the Shift key and select the right-hand page. And I'm going to right-click on there. Go down to Apply Master. I'm going to add my master pen to those two pages. I don't want to replace the existing one. I'm going to click Okay. So that'll bring it in there without any problems. So on my first two pages, That's what I'm going to have. But on this page, I don't want the head and I don't want this bit of text. We're going to put on something different on there. We're just going to leave it, leave it blank. So we might later, because on the next set of lectures we're going to be looking at how to do a table of contents. Or we might come back, put a table of contents there later. But for now, I want to get rid of this area. So remember, we go to the Layer menu. I'm going to go to master page and edit detached. And then I can click on this, delete it, click on that and deleted, leave the picture there. I'm going to finish. So that's going to be my page 2 and 3, page 4 and 5, much simpler now, I'm just going to use this next master page set. So I'm just going to apply those masters in there. There'll be page 45. That will be the non sim master. I don't want to replace the existing ones. I'm going to click okay. So page 45 should have that setup going like that's his foreign five and this is 23. Because remember when numbering from the beginning from the first page in there. Now I'm just going to keep working our way through here and I'm just going to put one master page, then another past page, one last page, another master page. So I'm just alternating them all the way through. I'm not going to do the end over here. And to be honest, You'll get bored if you have to sit and watch me do all those are stop and do it while you get to the stage as well. So have a look at going two pages. Make sure you select both of them. Then right-click, then apply the master and make sure that replace existing is switched off when you choose the master to go in there. And don't forget, if you go to the Layer menu Master Page, you can always edit detached if you want to remove parts of one of those pages.
67. Project: Brochure for Print - Add Photo & Adjustments: To help you've got all those bits and pieces in. What don't need to do now is I'm going to start putting in some pictures. I'm just going to pop in a picture, show you an option with the picture, and then I'll stop and then you can go and populate your document with all of the pictures. But first of all, looking at the pages panel, if you pull it out, you might find that your pages COVID all of the show. This can be a bit confusing. And if you do pull it out, so just know that you can pull it out and push it in again. In there. I've gone to page 2 and 3, which on my document is actually page none and page one there. And I want to put in an image. So I'm going to go to the stock library. And for this page, for me, I want some waves. I'm going to drag some waves into that image. Now, I like this picture, I think looks really good. But I've got a reservation. I think it looks too blue. Maybe I want to maybe tweak the color a little bit so it looks a little bit greener. So on this page I'm going to go over to my layers. And I'm on a layout here called pan layout. If I click in Pan loud and go from the picture, I'm going to click on the arrow again and get right into that picture there so you can see the little funny icon on the right-hand side there. So that's taking me to the picture. And if you remember, I can now go down over here to these little buttons and I can apply an adjustment to that. So in my adjustments, I'm going to go along and I'm going to find an adjustment called color balance. It's actually the bottom there is there. And you can see now how can just sort of add a bit of color, maybe make it a bit greener if I wanted. In. It is very subtle. Let's try the yellow. Here we go. You can see the difference as I'm moving this around. Very, very subtle. But I'm really looking for something which is a bit more turquoise rather than the blue that it was. It's pull it out a little bit back, so just go wild with that. And remember you can add multiples in there as well. So I could go and add a second one. And I could go down to something like a vibrance. And vibrance allows me to just really push those colors and make them very, very vibrant. Or just mute them a bit. If the image is too bright, we can mute it back in. I'll add a little bit of vibrance to that to bring the color out. So do have a bit of a go with it. Put in some pictures into the various places depending on what your document is going to be about. So for me, I'm going to find pictures of C and beaches and hotels and put them in. And remember, if the picture doesn't fit, if it doesn't look good unit if the colors wrong. Go along to these settings here and maybe do an adjustment on the color until it looks as you want. It. Remembers try and keep your colors consistent throughout it gives the whole feel of the document a lot more professional and pleasing look. To be honest. Very often when I'm thinking of designing documents, I also think about movies and the way that movies look and looks at called color grading, where you can guess a look throughout a movie. So if you take, for example, something like the matrix, the matrix is got a very green and yellow feel throughout. Mad Max has got a very bright and vivid colors throughout, depending on the field that you want from your document, you can then tweak the colors like that. So for my document here, I want a lot of greens and more blues, greens and vat petrol, turquoise, the type of colors. So I'm going to tweak the images as I'm bringing them in to get that feel for the document. Had lots of text sorry, lots of pictures in there. And then come back and we'll talk about what we can do with the text.
68. Project: Brochure for Print - Add Text: Well, I've been busy on mine as you can see, not any pictures in throughout. I've also put some text in as well. So let's have a little look at what I've done. So I've got a picture in there with some text. Wanted to show you a bit about my text. The text here has actually got an effect on, you can see effects in there. And very, very subtle. It's just a little drop shadow just so that it separates the type from the picture, making it easier to read. Going down, I've got some more typing here. And because I wanted the dreams and romance and I want an ampersand between it. But I didn't like the ampersand that came with that particular font, lousy using, I used one from a different typeface in and just made it a whole lot bigger. And with that in mind, you'll notice now that my no longer says adventure over there. Maybe the client change their mind and decided that it should be dreams and romance rather than adventure. So we need to update it. So I just went in so easy to do into my master page and change that to dreams and remains. Once again the same. I've just got a whole lot of text in here. I've just put in some different terms, different names in the titles of the articles. And then all the way through until the very end where I've got exactly the same thing, Islander dreams and romance. And I just copied and pasted it from further up the document. Now, this cell still something that I need to do here. Because if you have a look on some of these pages where you have romance in there, that one looks all right, but this one, it's too close to the type. So I need to get rid of that. Now. To do that, what I'm going to do is if I go to this page here, I'm going to use the technique that we looked at before by going to layer master pages and edit detached. But I'm going to do it from the layers panel. Now that's because I've got two separate master pages on this document and I need to get to the appropriate one. So you can see if I look at my master pages here, I've got the A-Master and I've got the non symmetry master. I'm going to go to my A-Master, right-click that and then choose Edit detached. And this will enable me to select the romance and deleted from that page there. Let's go down over here and do it on this page over here. So I need to make sure I'm on the correct master page first. So I'll click on A-Master or master, a right-click that, go to Edit detached. Now you see if I were to click on something which wasn't in the master a page like this one. It's still locked. If I can click on that romance over here, and I can't seem to get to it to try that again. Now, if you can't get to something like that, well, we've got a few ways that we can get around it. One way is to actually go and find the part of the layer that you want to do something with. So in my case, it's in non symmetry and this wildlife. And if I just hide it in here, in fact, I can just hide the entire layer. So now when I click in there, I can select it quite easily deleted and then go back again and show my entire set in there. So I think those look all right. I'm going to stop there. If you'd like to just catch up with this, add some more text into the document. If you want to change any of these bits around, just that you can get a feel for how things change by all means. Do so, and then come back and we'll look at the next stage, which is PTFE and saving the whole thing out.
69. Project: Brochure for Print - Export as PDF Settings: Let's make a PDF. So I'm going to go to File export. We are exporting this footprint and we want to give the printer, all of the printers marks. So I'm going to PDF in there. I'm going to be using the PDF for. This allows all sorts of interesting things like transparency to, to happen. But if you're not sure which one to use, talk to your printer and ask them for their advice. The raster DPI, That's the resolution of the images. I'm going to keep it at 300. And then I'm going to go down to more and more. You see this a lot of repetition of what we had before. So we've got how images can be downsampled if they are too big. Because if we take a big image and we squish it down, so it's quite small, the resolution goes up. And we're going to be allowing JPEG compression when the images are compressed. Down here, I'm choosing PDF FX For, which is what we looked at before. And I want to convert images to color spaces. I want to honor any spot colors that are brought in. We'll keep overprint black on. And in here, I'm going to say include the bleed and include all the printers marks. Finally, embedded fonts. Well, we'll just say text as curves in there. Now once again, talk to your printer, ask them what they like from these preferences. Because some printers prefer one thing, some printers prefer another. I'm going to close that down. And lastly over here, what are we doing? Well, all spreads in here. Otherwise I could just choose whichever pages I wanted to PDF. I'm going to click on Export now. And we just have to wait for a little while. And we'll call the cypress brochure. You just have to wait for a moment while it gets on and PDFs the whole thing. So everywhere, I'm just going to zoom out a bit so we can see the whole thing. But first of all, you notice we've got all the printers marks around there. We've got that says Cyprus brochure. Let's get rid of that in here. And I'm going to zoom out a bit so we can see the document. And then in here you can see my spreads might my facing pages. In here. There we go, all the way down. And finally to that one. At the bottom. Of course, you might want to send a copy of this to your client. And you don't want to show all the printers marks because it's distracting for them. So what we can do instead then is exactly the same thing. We can go to File Export and choose PDF by all means, use the same settings that you were using before the PDF X4. But when you go in here, just don't include the bleed or the printers marks for them. Just convert all the images to the color space and click on Close. Right, let's export that out. Again. Then once again, we have to sit and to allow thumbs for a few minutes. And then you can see we've got it exactly the same thing. But without all the printers marks in it, zoom out a little bit so you can see the whole of that. The document in there. Now, we're going to use this document in the next set of lectures because we're going to put in some page or table of contents so people could see what articles are on what page. So don't get rid of it. When you're finished. You'll have fun. And I'll see you in the next set.
70. Introduction to Styles & Grids: One of the important ways of managing large publications and getting consistency throughout your document is to use something called styles. And there are different types of styles in Publisher. We're going to be looking into those for right now. We're also going to be looking at some other things alike, something called a baseline grid, which enables us to learn about text correctly. Let's get going.
71. Baseline Grid Document: When we're working with a lot of texts, particularly large documents, it's very easy to get text out of sync. Even on smaller documents. To be honest, I've got two lots of texture and this text is both, it's 12 points. Both bits of texts are 12 points. But as you can see, they don't actually line up perfectly. So if I were to drag, for example, a guide from here, if you have a look along the left text, it says the third, largest, and third. And if you go to the right, cypress officially called the Republic, lines up perfectly. But when we start to go further down, you'll see that the text on the left is not always aligning to the text on the right. If I go down here, when by the time we get to city, cities totally off. So in order to combat this, and when you have different settings within the document, we line text up to something known as a baseline grid, and that's a grid which the text-based line sits on. Now, to get there, It's nice and easy because there is a little icon right at the top of the screen. If I click on that, it takes me into the baseline grid options. So this is for the document. And what I'm going to do is I've got an option here to show the baseline grid. And I've got an option to use the baseline grid. So I'm going to show the baseline grid first of all. And I'm going to say use the baseline grid. And you can see how my type has now just jumped into the right position and it all lines up. So if I were to take this bit of type here and pull this up or down. You can see the type is always just jumping onto that baseline grid. Even if I leave the top halfway over, it's still finds its way to the baseline grids. I don't have to worry about lining up my type at the top of the text boxes at the top, because the type will always jumped at baseline grid. Now the texts that I've got here has got letting of 12 points of then this is 12 points here and this is actually 11 points, which is why to slightly out. So in here, if I go to my grid spacing and change the grid spacing to 13 or 12. You can see now it's pulling it closer together so I can get a 12 points there or I can move it. And I can change the lighting in here. If I go smaller than the type size, which is 12 points, then you can see how it can very quickly jump to double lines because the spacing of the grid is less than the size of the type that you're in. So just make sure that this is slightly bigger than your text and it will all work perfectly.
72. Baseline Grid - Frame & Ignore: So I've switched my baseline grid off. And if I want to put a baseline grid just on individual or multiple texts frames rather than the whole document. Because the way I was doing it before, it affected the whole document. What I can do is if I select a text frame, I can then go along to my text frame options. So I'm going to click on this little t up here. This gives me the text frame panel. And in the general settings over here, if I switch on, let's try that sentence again. If I go down to the bottom, I can say use a baseline grid. So the baseline grid is now only working on this particular text frame. And once again, I can choose the size of the grid in there. But let me go and put this back onto the entire document. So I'm going to say use baseline grid on the whole of the document. And then and I've got a heading up the top here that says Cyprus now, want to move it down just a little bit and you can see because of the baseline grid, it just jumps onto that grid all the time. So if I go back to this text frame, now once again, if you can't find it, It's that little t up there. Or if you go to the View menu down to the studio and you'll find your text frame option there. And if I go into general how jumping the gun earlier, I can say ignore baseline grid. And now I can move this around and it won't be affected by the baseline credit. All the member has switched that off. It will jump back onto the baseline grid. Use it on your documents. It really does help to keep all your type lined up and looking much more professional.
73. Styles - What are They?: Let's have a look at how to speed up the editing process or design process by using something called styles. And we're going to start off with paragraph styles. Paragraph styles are ways where you can style your text. And it's not just a paragraph options that you're styling. But when you use a paragraph style, it uses all the character stuff that we've done, but it applies it to an entire paragraph. The second way of working with styles is that we can work with character styles. Character styles allow you to select characters and apply the styles to just a word or a number of words. Let's get on to have a look. So I've got some text in here that I'd like to style with some styles and I'm going to use the pre-made styles that they've given you to start off with. Now to find your styles, you can go to the View menu, down to studio. And I'm going to go across and down to text styles. These are the stars they give you. And you can see this. Normal is no style. We've got bodies and we've got a whole number of different styles all the way down here. What you'll notice is that some of these styles have the little paragraph symbol on them. And that's conducted backwards P. But some of them have an a on them. And the ones with the p.ball, our paragraph styles, the ones with the a or character styles. So we're going to start off with paragraph styles. So if I just put my cursor in this bit of text over here now I've just clicked afterward, exciting. You can just about see the cursor flashing in there. And I go and choose one of these styles in here. Let's use this heading two style. You can see how it affects all of the text in that paragraph. Let me go back and use the body style in there. I'll do the same on this bit of texture. Apply the body style. This one can have the body style, body style over there. And this will be the body style in there. And then I'm going to go to the headings. There are also individual paragraphs and I'll choose a heading for those. So let's go with this middle heading. That's quite large. You can just choose a different one. Let's go with heading to this one here is going to be Heading 2 as well. So you can see how fast that was to just style up all my text. Now, if I want to maybe make a word stronger or give it emphasis, I can select a word from any style or any text and go down to my character styles. Over here, I'm just going to click on strong emphasis and you can see it's actually italicize that word. Let's select this word, cathartic experience. And I'll use strong on there. So it's come bold, strong experience, bold and italic. Now the ones that they give you of wealth, they're not bad at all for quick editing. But the whole idea is we're going to be making our own style. So you go to stand up a piece of text and use that style throughout your whole document. Do try out the styles, the basics as they are at the moment, and then come back. We'll take it to the next level.
74. Make a Custom Style: I'm going to remove these styles from my text. So I'm going to just click and drag to highlight all the text. And in here for the paragraph style, I don't want any style, so I'm going to choose a no style over there. And down here for the character style, I'm also going to choose no style. And that's gotten rid of both of those styles. And I'm back to the very basic text that I had. So let me go and make my own style. Now, I'm going to start off by using the body text or making some body text style. So I'm going to select my text over here. And I'm going to go too long to the character panel Studio. And I'm going to set up my texts as I wanted to be. So in here I can choose the typeface that I want to use in here. So let's go and pick a, an interesting typeface, but not one that's so wild and wonderful did become actually read it. So I'm just going to go down here and I'm looking for something which is some slightly rounded and rather pleasant to read. A love the look of that type, but it's so difficult, it would make it very hard for my clients to actually read and they'd get tired as they're reading. So I'm going to go down and I'm going all the way down to the T's. And I'm going to find Times New Roman boring as anything, but it's so readable. So Times New Roman, nice and easy to read. You can use anything you like really doesn't matter. So I've got my serif font in there. When they talk about serif fonts and sans-serif fonts are the serif fonts, the ones that look curly bits like Times New Roman was this one up here doesn't have the curly bits, so it's a sans serif, sans serif font. Also pronounce a Sans Serif font. So I've got my type in there. I'm going to give it some color. I think I'll make it sort of a gray, a lightest gray in there. And size-wise, well, let's just change that a little bit and make it 11. And I can go through all of these settings in here. I can change anything that I like in here. I might even go down to my my lettering. And it's just increase the leading on that a little bit as well. Now that I've done all of that to make a style, I go over to my text style options. And down the very bottom, I'm going to put it up so it's easier for you to see exactly what I'm doing. There's a little backwards P, the paragraph symbol with a plus next to it. If I click on that, it takes all of these things that I've done to my text and makes them into a new paragraph style. So I'm going to call this gray times. Body. Give your text style and name that you can recognize if you're just call it text R1 textile to you never going to know what you're doing. And let's just click. Okay. So the great thing now is I've now got great times body in here. Unfortunately, I spelled with a lowercase, I should have put in the capital, but I could fix that. I'm going to click in this bit of text and I can then apply gray times buddy. Same over here, apply it, apply it, and apply it in there. Now that I've done that. If I then thought, you know what, that just doesn't look right. It's too light. Maybe the lettings too much, the size might not be right. The great thing is I don't even have to select my text. I can just leave it unselected. And this could be from page one. It's on page 20, it's on page 220 throughout my document. And I want to adjust it so I can go to my gray times body style, double-click it. And before I go any further, I'm just going to change the name. So it's says Grey and times the capital T. And we go, My in a shakes have gone now. And so I'm going to go across two character in here. And you can see this shows them using Times New Roman. And it shows me the size as well. If I go in here and change the size, you can see how it's affecting every instance of that text in my document. If it was on page one or page 600, it would automatically update as I change the style. So I'm going to go with 11 in there. And then I'm going to go down to color and decoration. I didn't like the color. So in here, I'm going to go to my color and I'll just make the silver darkish green color in there. And it's looking, looking better. You can see how many options we have in here. From positioning, we've got kerning, we've got tracking, we've got letting something else I wanted to change. So I'm going to just change my leading to 12 points. That seems better. It looks more readable over yeah, can go to the language. Because on one's skin, the language for the spelling checker. What are we going to do about hyphenation? Well, either leave it on auto. Well, I'm just going to choose none in there. Moving down, we've got so many different options that we can go through. So I'm going to just move onto the paragraph options here for a moment and have a quick look at what I can do with my alignment. You can see I've got left, center or right alignments in there or fully justified. But I'm going to go to my left indent. I'm just going to indent the text a little bit as well because I think that would look quite interesting. I'll click Okay, that's now done. So every time I use Times or gray times body, well it's actually dark green. Dark green times body. I can apply that style. So once again, do try that out and tried to put just somebody, just one of those for the moment. And I'll come back and we'll do the heading off to that slightly differently.
75. Add a Nested Style: For the next bit, I want to do another paragraph style over here for the heading. But I'm going to do a differently this time rather than setting everything up first. I don't have anything selected, so I just clicked off my text. I'm going to go over to my style over here. And I'm going to click the Create Paragraph Style button. And in here I'm going to call this times heading. But what I'm doing is I'm saying I'm going to base it on the gray times body. So it's picked up all the information that was actually in the gray times body in there. And then I'm going to take this a little bit further. So I'm actually going to go along to my typeface in here. And you can see I can say no change or I could actually change it. I can go to the weight, the type way to font-weight. And I could say, well, let's actually make it maybe a bit bolder. So I'll go with bold in there. We'll go to the color. And rather than using gray in there, I'm going to go with a much darker, almost black color there. So you can override what is actually set up in the document. I think I'm fairly happy with with that. Let's see. Yeah, we'll just leave that on. Bold bear should really make it bigger. So let's go to the font size. And I'm going to go to 18 points in there. I'll click Okay. So now I've got another one in here, which is my times heading. I'm going to click in the spirit of text in here, find my times heading. There it is there. And same again. I can then just apply that heading all the way through. Now of course, you're probably wondering, well, I hope you wondering what would happen if I adjusted the body text. So if I went to the gray times buddy, I'm going to just click off of my text and double-clicked on gray times buddy. And I went to the font option. And I changed the font family from times to Tahoma. Look at that because the heading was based on the body. It's also changed the typeface for the heading. If I've made a mistake, I can just go back there again. And once again, I can just change that back to Times New Roman or let's have a look at what basketball looks like. However, if I went to my times heading and I double-click that, I could change the typeface in here. And it's changed that to Tahoma now without affecting the body. So there's this hierarchy now, we've got the body at the bottom. Anything we changed in the body will affect any thing that's based on that style. So the way that you build your document is if you do your, your base, your body first, and then any headings that you're going to have which are going to be similar, maybe a similar typeface to the body. You can base them on that. And that way, if you have to make a serious change to the original, the base type and change the font. You'll find that your headers will update as well. But if you update the headers, it won't affect the body. So do try this out. It really is just a matter of not having anything selected, going to the little p with a plus on it. And in here, make sure under general, it says based on and you base it on whatever you want to base it on, which is going to be the lowest rung of the ladder. So for me, I based it on my times gray gray body in there. So you can tell it to do multiples based on that. Let's cancel that. So do you happen to have a play with that? And then we'll move on to the character styles and you can see how they work.
76. Custom Character Style: I bet you can see how again, to do the character style now as well. And you're absolutely right. I'll go down to the Character Style Option. Click on the little plus. I'm going to call this bold and red, who? That doesn't look like boulders it. Bold and red. So in the character options in here, I can go to the font-weight, and I'm just going to choose bold. Now, I've done something really, really bad because I've got the text frame selected. And you can see how it's changed all of my type in there to whatever I'm doing in here. Well, let's keep going. I'm going to go to the color and in the text fill color, I'm going to make this red. Okay, it's made a mess there. We'll click Okay there. So I've now got a star called bold red. I'm just going to click No Style and that'll take me back to where I was. It's an easy mistake to make by clicking the new text before you actually make your new character style is just de-select that for the moment. So you can always choose no character style in there. So now I can actually go in to the words and I'm going to choose amazing. And in here we're going to find bold red. And standing. Oops, let's try that again. And once again, bold red over there. And masterpiece, bold red. Now of course, exactly like the paragraph styles. If I then realized that red just doesn't work for me, or bold doesn't work for me. Make sure I de-select everything. I will double-click on my bold red Style and go in. And let's make this a much darker red over there. And I'm going to go to the character ends to bold. I'm just going to choose medium. I'll click Okay, and it will automatically update. You can see we can barely make it out now. Masterpiece and amazing and standing up while they are red, I know it's difficult to see, but it has done it. If I didn't like that. We'll just go back in here and medium. Let's change this to bold again. Here we go. So do try that out. This is useful for just picking up words in your document that you want to emphasize.
77. Update a Style: Let's have a look at the update buttons because sometimes you want to update your style very quickly. For example, here if I go along to my black and white City and I'm just going to take the word city and I'm going to change the color to something else. So in my color here, I'm going to make it purple. Let's go with a really bright, vivid purple, like so. And then I want to update all the rest of the text in that stamp tool. So it looks like this bit of text here. So all I have to do is to go down to this little update button and click it. And you can see it's updated the rest of my style to that. Let me do it again. So I'm gonna take this word here. And what I'm trying this out and might find that I don't like Times New Roman and I want to use something else. Use that typeface there. So I now want to update the, oops, let's try that again. So it's good at this one here. And then I want to go down here and just update all the rest of the text to that style. So these two little buttons here, we'll update it, the paragraph or the character style. And those two often making new paragraphs or character styles as well. Have some fun with that. And then we've got the little project at the end and we'll be using this as part of our project.
78. Effects Style: Now, what about these styles over here? Well, I'm just going to change or remove those for a moment because these styles or about the effects. So if I take a shape like this, I'll just make a copy of its hadn't totally ruin this one. And I click on one of these stars, you can see it puts on various effects. And if I click on that and then go to my layers, you can see the shape that I've got has got some effects on it if I click on the Effects. So this particular effect is made up of an inner shadow, a 3D and outline, Bevel and Emboss, et cetera. But of course you can save your own. So if you are constantly doing, for example, a very subtle drop shadow, maybe you want to save that because it's going to go through your whole document on every title, for example. Well, what I can do is I can make the effect first of all. So I'm going to go down here to my effects. The effects. Click on that. I'm going to say outer shadow. I'll switch it on. And then we're going to just create increase intensity may be the offset of bits. I can see what it is that I'm doing. And the radius as well. Let's pull those up. So hopefully we should be able to see what we're getting. There we go. It's a bit of a drop shadow. There. May be less intensity. And maybe I'll reduce the opacity as well. So I'm just doing this until I'm happy with the shadow that I'm, that I'm getting. By the way, if you want more of a glow, the inner shadow, you can also go to the color and just pick a similar color to your objects. If I clicked on blue, for example. And almost like slacker, a glow rather than a drop shadow. I'm going to go with the drop shadow for the moment though and click on Close. Now if I want to save that, if I go over to my styles in here, let's pull them out so that you can see the more. And I'm going to go up to the top right-hand corner. And then in here, I can actually just add the style from the selection. So I've selected the shape, add the staff from the selection. And if we pull this down, There's my style there. So whenever I want to use it, you'll see the tool. So I filled it with purple because, well, that's what I was using. Let's have a few shapes here and we'll give them a different color as well. So I'm going to make them gray. If I then select some of them and click on my style, it goes purple and it adds the drop shadow. So it's just a way of creating an effect that you can reuse time and time again. So to do it, Put your effect on your shape first. Then once you've done that, go up to this drop-down menu and choose add style form selection. It's not just the effect as you've seen, it's also the fill and stroke colors on that shape. And then you can just use it by clicking on it whenever you need to use it, we'll use the ones that are there. If you really have to. Anyway, to try that out.
79. Introduction to TOC & Hyperlinks: In this last set of lectures, we're going to be looking at using things like hyperlinks in your PDFs. Not only that will also make a table of contents. And you can see how easy it is to create a table of contents Based on page numbers that we've looked at before. Let's get going with the last one, but don't forget, there is a project. The project we're going to be doing here is a fairly free one. As you'll see, I've put together the bits and pieces that, that you can do with your eyes closed, basically. And then I'll take you through the more advanced stuff so you're able to put together whatever you like subject wise. This get going on the last one.
80. Interactive Document Overview: This is not a project. What I've done is I've put together a little ebook, a little mini magazine, or they're often known as easiness. And mine is about thrash music. Now that I mean to it, but I love the look of it and I do love guitars. So this is my cover over here, and this is the final PDF which I'll be sending out. And then I've got two pages here and I've got a table of contents. And as one of the things I wanted to show you in this little section. But I've also, if I flip through here, got these little buttons here, would say next page over here or previous page, and we can jump to a previous page as well. And the way these little buttons work is if I click on them, it will jump me to the next page. Or I can go up here to go to the previous page. Or right at the bottom here, I have got a large bit of text, which is actually a baton. And when I click that, it takes me back to the table of contents. So those are the things that I'm gonna be showing you over the next few lessons. Now, if you want to build something like this, it is really, really simple to do. And in the first of the next set of lessons, I'll show you how I built mine. Although as I said, this is not a project, but if you want to put something together like this, It's really simple. Let's get on.
81. Build the eZine: Here's the document in Publisher, and I want to show you the weather was set up and built. So if you do want to do your own, you know how to how to do it. So the first thing was I did a new document and the document, the O settings that I used, I went to print. So in print here, I chose A4. And down here, I'm going to prefer embedded images. And I just put in the number of pages that I wanted. Now, if this is not actually going to be printed out, you could then use RGB in here. If you did think that you were going to be printing it, you'd use CMYK. Likewise, down at the bottom, if you thought this was going to go for commercial printing, we would have a bleed in there because this is just going to go for screen use. We won't bother about that bleed. Now, the next thing in here is that I then started to build some master pages. So I've got to master pages over here. And this one over here has got the word Thrash on it. And we've got previous page and the next page, a little bit of text in there. And once again, our show you how those work when we get to doing the hyperlinks. My second master page, as you can see, has got absolutely nothing on it. And that's because it was an absolute mistake. So I actually only needed one master page for this. But if you did want to add anything else as a master page, this is where you would put it. So if you don't like best bet, you can just delete them like that. And if I delete the Master Page, you can see it hasn't actually changed my document at all. So I've also got page numbers in here and my page numbers are white because I want it to appear as white on the images. Now further to the document itself, it's just double-click. You can see I've got a picture in the background. So I made a picture frame and I put the picture in the background. I'm over there. And then going through these pages over here. Once again, I've just got pictures in the background. These are just full screen images. So this one there, the top of the Schechter guitar, they're headed Schachter. And over here I've got a texture. And I found these pictures in the stock libraries. And there, once again moving down, There's a picture in the background there. This is just a black shape. I just used the Shape tool here and I made a black shape. You can see if I move it out the way. That's all that it is. It's just a black shape. Moving down. We've got a picture here which is a double double page image. So it goes all the way across. We've got two more pictures in here in the background. Another picture here in the background. And this picture which isn't a separate little picture frame over there. So we can sub layer this effect up. Now on this picture here, I've also went in and if we go to the layers, I put a little effect on there and defect that I used was an outline. I just chose the color I've kind of got this green is our highlight color, the lime green SILAC cover color. And then I can just adjust the width, a weight of that area in there. Let's close that down. And then finally on the last page, we've also got a picture in the background. Now when you start putting these pictures in, what you will find is that very often upcoming above you, things like your page number and maybe any other texts that you got on those pages. So it's really simple. All you do is you select the picture and you go to Layer, arrange and move it to the back. When it comes to the text itself, I brought in the text. I use the setting here to get two columns. And I also went along to the text options. So the Text Frame Options is this little button over here. You can also find it obviously in the view and the studios. And what I did was under column rules. I'll just open that up so that you can see it. I then put in a rule or a line between those two columns. And you can see here that I could just change the color of that column if I wanted a different color for that column, I'm just going to pick a bright green for the moment there. And you can then just adjusted in here as well. So I could actually just take it down from the top. I can go over here and I can change the width or the weight that line in there. If I thought something thicker might be a little bit more exciting. Just get back to 1 and I think I had 1.5. So that's for the text. Then the headers over here. Now the headers, what I did was I've actually, if I go over to my options here for the text styles, I actually made a style. So I select the text first and then I made it green. I chose the typeface that I wanted. And then I went and clicked a new paragraph style button at the bottom, and I named it green header. And I've applied that to all of these headers here. Now this part is very, very important because if you don't do this, then you can't do the Table of Contents data. Once again, as you can see, this just text on the pages over here. And I'm going to come to these buttons. And how did the very, very shortly, if you do want to set up something like that, that's absolutely fine if you just want to watch the section because we're going to be doing this again in the project at the very end. That's cool too.
82. Table of Contents (TOC): Let's have a look at how we can build this table of contents now these also known as TOC is or talks. So to build it, what I'm going to do is I'm going to use the Text Frame Tool. And I'm going to draw the frame that my table of contents is going to appear in. And then what we need to do is we need to find the Table of Contents panel. So I'm going to go to the view down to the studio. And in here we've got a table of contents option. Here it is. Over here, you might find it's actually automatically defaulted to the side anyway. And then I'm going to make sure I've clicked inside this frame. Right in the top left-hand corner, this little button, it says insert. So if I click on that button, it automatically inserts a table of contents. Now, although there's a lot of options in here, what I'm going to do is I'm just going to go down to the style name and you see what it's going to do is it's going to pick up the style and make them to the table of contents because I've got all those headers in each area and I made a style and apply that to them. I can go down here. And the head of that handmade was called Green header. So if I just go down here for a moment, all these ones here, fender, Gibson I bananas, valve versus solid. These have all got a style on them called Green header. So when I go in here and I untick that one and that one that they give you an I tick the green header. You can see automatically it's made a style now because I've got this on a black background, is difficult to see in there. So it's applied a style which is a TOC style in there, and it's black text. If I wanted to, I could override that and just say let's make that white and you can see how the text is now come through. Or I could go with green are just choose green, slime green in here because that's sort of the, the theme color that I've got going through. If I just deselect that, you can see there, all the pages are in there. We can always move that around to move those page numbers further away or closer together. Let's have a look at this now. So you can see in here that I've got then the first one which is valve versus solid-state on page two. And there we go. We've got valve versus solid-state. Over here we've got page 3 of your fed Nick Gibson and AI webinars, and those are all long page threes. So of course, the big question is what happens if I then decide to change something? And I decide to change this to Stratocaster and tell if these words don't make any sense to you. Well, if your top person, they would take us to that. So now when I go back here, again, you can see it's still set to fender in Gibson rather than the two new names. So going along to my table of contents, a little update buttons here. And this one to update just a table of contents you in. There's another one to do all the table of contents. You might have several table of contents in your document. So I'll just click on this one over here and it's updated. You can see I've lost my overriding color, which I will just put back in there again, and it's been updated, those little words in there. Now, There's a lot of other options that we have in here. But the most important part to note is that your table of contents works based on a paragraph style. And in my case, it was the paragraph style that I made called Green header. When you do this, make a paragraph style on different pages, and then you can find that paragraph style in here, right? Have a bit of a try with, with that. And if you're actually doing this as we go along, otherwise, once again, we will be doing this in the project at the end. And the next thing we'll come to in the next lecture is going to be how to do those links, little hyperlink buttons that I showed you to jump between pages.
83. Hyperlinks: Let's have a look at the Hyperlinks. What do we need to do before we actually get going with a happenings is just very quickly show you on my document that I've got some hyperlinks on these bits of text here. This one there, there's one there. I've got another one over here to go to the next page. I've got that to go to the previous page. And you'll notice that some of them have little lines underneath and some don't. I've done them both ways and I'll show you how you can get rid of those lines as well. But before we do those buttons on the pages, I also want to link the table of contents. So when I click on something like the valve versus solid state on here, I wanted to jump to the article which is valve versus solid. So what did we do here is I'm going to show my hyperlinks, studio or panel. I'm going to go to the View menu down to studio and find hyperlinks. There it is. Over there you can see I've got quite a few hyperlinks in here. That's because I've got hyperlinks on those buttons. You probably won't have any in there at all, but that doesn't matter. Let me go to this one here. I'm going to go to valve versus solid-state now going to select that bit of text. And what I want to do is when I click it, I went, when the user clicks it, I wanted to go to this page over here, which is, and I'm not looking at the numbers directly. I'm actually looking at the page number here. So it won't go to page two. I want to go to page 4 because Page 4 is actually page 2. I know that's confusing, but use the numbers of the page numbers here. So what I'm going to do is once I've selected that in the hyperlinks, I'm going to make a new hyperlink, that's this little button here. And it says hyperlink type is going to be a page type because we're going to go to the appropriate page. And in here I can choose which page I wanted to jump to. And then in here we've got character so we can actually apply a style from that. I'm not, I'm just going to leave that blank and click. Okay. Let me do another one here. So I'll select just a word. You can do the whole thing including the page number, just a word over there. I want that to go to page 5. So I'm going to make a new hyperlink here and go to page 5. In there. We'll click Okay, this one here. The eye Bernays one is also going to go to page 5. Remember not page 3 as it says over there, the real pages, page 5. So once again, I'll click over here and that's going to get a page 5. You can see it's just picking up those numbers. Let's do this vintage shred down here. Now that is going to go to what is actually page 8. In reality, although it doesn't show this page 18 here. I'll do a new one. Over there. You can see it's picked up page 8 or you can choose your own page if you like. Let's click. Okay. That's exactly the same thing for these little buttons here, which are bits of text. Now, I made them in my master page, so I can then click on them or you can just type them in. It really doesn't matter. So let me go down to one that I haven't done over here. So I don't think I've done that one there. So I'm going to select the text. I, so select that again. I'm going to make a new button. I want this to go to this page here, which is actually page ten. And you'll see now because doesn't have those page numbers on, I've got to actually go in here and say page number 10 in there. And once again, click Okay. If you want to do a large piece of text like this one here, the word Thrash once again, I will select that. And all I did for that one was I wanted that to get my table of contents is a do a new hyperlink for that. And table contents is actually on page number 3. So I'll click, Okay, just remembered my settings from before. Now one of the things that you'll find is that when you get a page like this with a hyperlink, the default setting on that hyperlink, it uses a character style, the hyperlink character star, and the default color is usually blue. But you can of course, override that with any color that you want. We choose the color from the top of there. I'm choosing that lime green if you want, and you don't like the little line underneath it, you can just go behind, say no style and that will remove the hyperlink style. The hyperlink will still work, but it just won't have that hyperlink style on it. So even if you haven't built a document like that, just have a play with one or two pages and get the hyperlinks to work for that. Now, once you've done this and you've got all your hyperlinks in there, you obviously want to test it out. So we're going to save it. So just do a normal safe first. And then we're going to go to Export. We're exporting it. We're going to ignore this pre-flight because we're going to talk about it later on. And we're going to be using a PDF. And the PDF I'm using is one of these digital presets in here. So digital high-quality. And the reason I've chosen that is when I click on More, you can say I want to make sure that it actually include hyperlinks in there. If that's not, take two, then it won't have the hyperlinks on there. Let's close that. I'll export that out. And I'm going to just give this a save. Let's call that shred in them. Wait for that. And once it pops up, it should just open up Acrobat. And those links should work. Sometimes it takes a moment. That depends on how big your images are. Going to pop those images into the final document. Right? Finally, Let's have a little look at this now. So if I just zoom out, fact, I'll use that which is sort of fit to one page. And I can then scroll up and down here on my table of contents. And if I click on one of those, you'll see it'll jump to the appropriate page over here. If I go to next page or previous page, those buttons work. If I scrolled right way down to the bottom, clicked on this word Thrash. It'll jump back to the table of contents so you can make your own navigation system. With that. Try it out.
84. Project: Digital Brochure - Overview of Double Spread Doc: Onto our last project. Now for this project, what we're going to do is we're going to use a project that we've already created and we're going to repurpose it for digital. So when we worked on this project and I used Cyprus over here, we had a number of pages. We never got to do the table of contents because we hadn't got that far yet. So we will start off by doing a table of contents fairly soon into the project. So if you do want to do the table of contents and then saved out for print, that's absolutely fine. If you didn't do that project, have a look at it and, or build something yourself. Very similar to this. So what we're going to do is we're going to be putting in links in here. But most importantly, we're also going to be changing the structure of this document. Because at the moment, if I were to save this out as a PDF file for interaction, the first page is one page and then the other pages, the subsequent pages are double spreads until we get to the last pages, which is one page, which doesn't always make sense. You know, when you're looking at a, at a document on your computer screen, you're gonna see two pages at a time. So we'll look at changing the document for that. Anyway. Let me show you what the final document will look like. So the final one is going to look like this, where we're actually going to have to make sure that it fits on one page. Have a double spread like this, so people can see it as a double spread. And then they can start going down to the pages and seeing them as double spreads until we get to the last page, which is also going to be a double spread. So the other thing that we're going to be doing is we're going to be putting in links into the table of contents. You can click on a link to jump to that page. And then of course, you can always go back by clicking on this little word or icon or whatever you want up the top to jump back. In my case, it jumps back to the table of contents. And then we'll save this out as an interactive PDF.
85. Project: Digital Brochure - Changing the Spreads: The first thing we're going to do with this document is to save a copy. So I'm going to go to File, Save As, and I'll just give this another name. So I'm going to call this Cyprus interactive or inter. I'm going to save it somewhere where I can find it. So in my case, I'm putting it on my desktop. So now I've got a second copy that I can work on. I don't want to work on the original otherwise. Well, I've lost though the one footprint. Now the next thing we're going to do is we're going to add some more pages and I want to add in a second page after page one. Now, you're going to find that things are gonna go a bit wrong to start off with. So I'm going to go to my Add Pages button that's in the pages panel. Began. If I click on that ad pages button, it says, how many pages do you want and where do you want them to go? So number of pages where I'm just going to add in one page. And I want the page to come off the page number 1. It's click. Okay. So you can see now it's put that page after page one, it's then on page two. Now of course, everything goes horribly wrong. You think What on earth is going on? But bear with me on this. Let's get down to the bottom because after page, the final page, I want another page in there as well. So what I'm going to do is I'm going to add a page at the end. So I'll click over there. And over here, I'm going to go and I'm going to put one page at the end of the document after page 13, which is my last page in there now. So I'll click Okay. Right, So things are still not as they should be. Now what I'm going to do is I'm going to go to the Documents Setup button. And in here, I'm going to say, I want to start the pages not on the right, but on the left. I'll click Okay, and now you see that moves to the left, then the blank page moves next to it. And all my pages are back to where they should be again, right way to the very end page over here where we've now got a blank page on the right-hand side. So moving to the topic of that first page and I've got the new blank page that I put in there. And then we keep going after that. Now let's just go back to this page and fix this page. So I'm going to click on the photo and I'm just going to put it out like that to make sure it covers the page and I can move it around if I need to get any more space inside there. And maybe I'll make some changes here. I'm just going to move the text across to that side, the x, it might look a little bit better on, on that side over there. Because remember this is now a double spread in there. We want something which is a little bit more cinematic. Same on the very last page, I'm going to double-click on my last page and you can do whatever you want in here, but I'm going to take this little picture and drag it out. I'm going to move it into the middle there or active and move it to one side. It really doesn't matter what you do in here. So I'm going to place mine and middle, I'm going to have, whoops, Let's try that again. I'm going to have the Island of dreams. I can either leave it in the middle there where I can go and pop it over there. I've got space for a bit more text if I need. I've also brought in a little logo in here. Now this is a vector logo, but you place it in exactly the same way that you do a normal picture. You just go to File and Place it straight down over there. So you do what ever you wanted to make your image look better if you like the text, the middle, if you want the texts on right-left, it's entirely up to you. And then do a Save again before we go any further. So you're going to be saving this as a separate document so that you don't ruin your original run to have a bit of a go with that. And then we'll come and we'll do the table of contents now.
86. Project: Digital Brochure - Styles & TOC: So let's have a look at doing the table of contents. Now, what we need to do before we did the table of contents is to make sure that we have got some paragraph styles that the Table of Contents can read. So I'm going to go to my first one here, which is permafrost, and I'm going to select the text. I've styled it as I want it to look with the color, but you can change that. You can see in my text style panel it says no style. If you can't see textiles, go to the View menu studio and you'll find them near the bottom. So what I'm going to do now is I'm going to click the little new text style or new paragraph style button at the bottom. And that will make me a new paragraph style. I'm going to call this blue header or blue head. I'm going to click Okay from there. So now I need to apply that because it hasn't automatically applied it to my the headers. I have to go to those headers and I'm applying it. And somewhere in here I should have something that says blue head, which for the life of me I just cannot see. And there, there it is, right near the top. Should've known. And I'll click on that to apply it in here. I'm going to apply to that. I'm applying to this. You'll notice I'm not selecting all the text. I'm because it's a paragraph style. As long as I click in there, we'll apply it to that bit of texture. So if I click on the word time and click and blue head, if I go back to alone, it still shows up as blue head in their back. Once again, wildlife, moonlight, sunset drinks turtles. And oh, we just got two more to do this, one here. And hotels are there. Right? So make sure that you make a style and apply it to all of the headings that you want to use. And then we go back to the table of contents. I'm going to use my type tool. I'm going to click and drag a text frame in there. You can make it any size, any size you like. I need to find my table of contents. I'm going to go to the View menu. And we're going to get onto studio and table of contents TOC. And we had to make a new table of contents by clicking on the top little Insert button. And in here, I'm going to untick that and untick that. So these two can be untagged. And we're going to go and find and tick my blue head. And you can see now it's picked up all the information from the blue head style. And don't forget, you can always select this. You can go and change the colors. You can change anything about it rarely, as far as the loop goes. And if you find that those are too far apart, well, you can just move them closer together. Like so. I'm going to close that one down and I'll move this into the right position. So I'm looking for something which may be looks like that. I might have to fiddle with that until it looks, it looks good. But remember, you can put place that wherever you wanted to go. Click over there. I think I might even do that. So it kind of goes into this frame, this column. How moved my table of contents to the middle. Okay, that's not looking too bad. Might need a little bit, a little bit more work, but do try that out and get your table of contents done. Once you've done this, open up your other document of the first of the cypress or whatever it is that you've done that was for print and have a go with the table of contents there. Once again, you'll also need to make those styles as well.
87. Project: Digital Brochure - Sorting Pages Number: Have you noticed the next problem? Well, it's not a major problem, but it doesn't look right. You see over here we've got page number 1, which is on the right-hand side, the right-hand side. And really because we are going to be seeing these as double spreads now rather than turning pages, I want page number 1 to go on the left. So if I go over here and right-click, and I'm going to go down to the options for sections that start a new section, edit section. Over here. If I've got a section there, you can see I've got Section 1, which is going from page 1 to page three. And section two starts at page four. So I've got page one and page 234. So let me go to section two. And section two should actually start on page 3 in there. And we're restarting the page numbering at one over there. Let's click on Close. And now you can see that comes up as page two in there, seem to have lost my page number on this page here, so I might have to go and bring it back. So how do we get a page number back over there? Well, if I go to this over here and I just clear the master off of that. And then I'm going to bring my master page back again. So right-click over there. And we're going to apply the master, and we'd be applying the A-Master in there. Let's click OK and you can see how to pop back again, there's my page number 1. Now, I should've done it over both pages. It's right-click this in here. I'm going to go to Apply master, and that's going to be my master a as well. But the other thing that I'm missing now's the text because that's on the other master page. So once again, we can select both those pages at the same time, say Apply master, and I can apply the second master over here with that particular page layout, the pan layout. And I'm not going to replace the existing master pages. I'm just going to switch it off and click OK and you can see how it's brought it in. It has brought in this bit of text in here and the word head in there. I want to get rid of those. You should know how to do this now. But we're going to go through it again anyway. I want to get rid of them from the pan master page so we go to Layers. And excuse me. I'm going to make sure I'm on my pen layout layer. I'm going to right-click it. And in here I'm going to say Edit detached. So we said the little orange bar on the top. I can now go to this bit of text and delete that. And I don't want go do want that one. I don't want that. And I don't want that one as well. Let's click on Finish of the there we go. So my pages are all now numbered the correct way round right away through to the end. So have a look at that and try and fix your page numbers. And remember if you don't have anything and you want to bring it back, just reapply the master page again and you'll find you can just get it back. And if you do need to add or delete anything from that master page, remember, you go to the Layers panel, right-click on the appropriate master page because there's two master pages or three master pages in the document, Right-click on the appropriate one and you choosing the edit detached to remove it from the master page just on this particular page.
88. Project: Digital Brochure - Update TOC: So of course, the eagle-eyed among you will have noticed the other issue. And that is that our page numbering is now incorrect on our table of contents. So we're gonna click on the table of contents. I'm going to go to the View menu. I'm going to find my table of contents in the studios over here. So table of contents in there. And we've got this little button here, so I can click on that to update the table of contents. And you can now see that sailing is on page three. And there is sailing on page three. So remember if you make any changes including changing the page numbers or moving articles around or adding new articles. You'll need to go in here and just update your table of contents. Nice, easy one that really quick.
89. Project: Digital Brochure - Creating Links: Let's make some links now from the table of contents. So I'm going to select, starting with this one at the top here. I'm going to go to View down to studio and find my hyperlinks. And in the hyperlinks I can very quickly work my way through and click on a new hyperlink for that one, you can see it's picked up the page already. I'll click on. Okay. And I can just work my way through here doing the various links. Skipped a few more of these done everywhere to all of them because well, you know how it's done, what I've done to your, your, uh, whether way bad. What I do want to do is to do this word cypress at the top. And I want that to be a button that will always jump back to the table of contents because it's on every single page. So people know that that's come to the home button. For want of a better word. It's easy to do. But rather than going through every single page and trying to find it and apply it, especially if this is a very long, long document. If I go to my master page and in the master page, I select it and then do a hyperlink from that in the Master page. And this is going to go to page well, it's actually page 3 over here, which is my table of contents. I'm going to put that on to page 3 in there and we'll click, Okay, and that's done. Now, the last thing I might want to do is also link to an external website. So I'm going to go into a little website over here. And I think on here on the word island of dreams. If they click that, and I know this is not going to be too obvious. I wanted to actually jump to a website about Cyprus. So I'm going to go down here to the ad Hyperlink button there. And I can then instead of using a hyperlink for a page, you'll see there are different types of hyperlinks in here. I'm going to go to the option which is URL. Another useful one is the email link. So you can put a link which will then open up their email package. And very, very quickly from the PDF, I'm going to use URL, and this is where I type in the URL. Now, I find it easiest to actually just copy it, so I get it right from the web. So I'm going to go in here and I'm going to find a website about Cyprus. Let's go with the not the government travel advice. Let's use visits Cyprus over here. So now it's really quick for me to just go in Havana that copy that the whole URL, including the whole HTTP thing, and I can paste it into there. Let's click. Okay, we'll leave it set to the same character style that it had before. I'm going to go to File and Save. And I'm also then going to go to File and we're going to export this out. So file and export. Now I'm going to ignore this pre-flight warning for now, I'm going to show you what it is. Very short piece. I'm just going to say ignore and continue. In here. I'm choosing PDF digital, high-quality. And under more. I'm going to make sure that I'm including hyperlinks in there. Let's click the Export button and give it a name. Cyprus into works really very, very well for that. So this will just take a moment to save it out and then we'll be ready to be clicked on. Fortunately, there's not too many images in here. Obviously, the longer you document, the longer this is going to, to take to do. Do be careful if you're sending this to people because if they're viewing the PDF in a web browser rather than actually in Acrobat, some of these links might not work properly, but test it out on your own browsers. So there it is in a Acrobat PDF. And I'm going to just go down to the next page over here. So I'm going to scroll down to this page here. Let's just do it that way, becomes square in the wrong way. If I go down to these, you can see there live links. If I click on fish food, it takes me to fish food. On page number 4, if we want to get back, I can go back to the word Cyprus and click on that, and that takes me back to my table of contents. I didn't do these ones down here, so I just have to use the those ones in there. Once again, click on the word Cyprus to jump back to the top. Of course, you can do this with little buttons with texts on which say go to next page, you'll get previous page or jump to page 25, whatever the case might be. Have a go with that, and then we'll package this whole thing up for saving it properly.
90. Project: Digital Brochure - Final Package & Preflight: One of the things that popped up earlier on was a bit of a warning Timmy, there was problems on my document and this is known as pre-flight thing. When you get the software to just check the document in case there are any problems. Now, there are two problems in mind that I've set up so that you can see what's going to go wrong. But you might find all sorts of other problems on yours. Let me show you a pre flighting is I'm going to go to the View menu studio. And down here I'm going to find the preflight option. So pre-flight in there. And you can see on my document straight away it says there's a missing font in here. And if I click on fixed, it actually shows me in the font manager which one is missing and a substitution and a substitution style in there. Now I can actually click on locate and it will show exactly where it is in my document. So I can see the problem over there on that page. And if I went to another page, I could see I'd be able to see where I've used this throughout my document. The other problem for me is something which says non-proportional scaling, and there's a five on that side there. So if I go down here, the issue is this picture here, you see to get the picture to fit and look really good. I've squished it in a little bit. Right? So, so I thought I could get away with it because nobody notices that the sun is slightly squished, but obviously publisher notices. So what I'm going to do is to show you that you can see it says 50 percent by 36 percent. If I double-click on this picture and I were to scale it up. You can see it will update itself now and show me the exact sort of percentage that I've got in there. That to be honest, I think I can actually get away with this being slightly squished rather than having the boat almost fully in there. You can't usually do that on most images, but I think with this one kind of works. So I can then just ignore that. You can see it's live checking the document at the moment. If you find it annoying, you can kind of switch it, switch it off. And if you're not sure if something just say check now to force it to check. I'm going to close that down. Now. We've got our document and we've saved it out. But I want to archive this document so I can then come back to it in two years time. And I want to make sure that everything is actually ready for me to work with. Now, if I've used images which have come from the stock library, those images will usually have been embedded into the document. If I've gone and I've chosen images from my desktop. Once again, I could either have imbedded those or I could have been linked them to the external file. Now this is where things can go a bit. Pope, horrible. Because if you've linked to external pictures, because you've got so many images in there, you don't have bogged down your pick your document and make it too slow. And then you delete those pictures. Well, you've got a problem because the images have been linked to those ones. So what publisher does is it gives you the option to package it. And what it will do is it will copy all of those images into one place ready for you. So when you save it, you can save your document plus all of those images. Now let's just have a look and see if there are any images which are external on this particular document. So what I'm going to do is I'm going to go along to the resources manager. It's in the document menu. And in here you can see that, well, all of my images are actually embedded in the document. But let's add, didn't have one embedded because I can actually click on something and I can actually make it into a linked file. So I've made interlinked facets now, going back to where it was on my machine. Now, let's see if we can embed that. Make that one interlinked file, as well as all you make it this interlinked file, you better save it somewhere. So I will just click on that. Now I've got two linked files over here. So this would be a problem if I just save the document out and save the document somewhere. And then I deleted those two linked files from the original place. So let's see how we can actually do this. I'll just close that down. The easiest way to do it is go to the File menu. And down here, save as a package. And in here, we've got things like the summary. It tells us about the fonts and the one remember that we checked that was happened to be missing. And any images that are over here, if you've got any missing images, they will be appearing here to now just click on, Okay, and it says, where do you wanna packages what I want to put onto my desktop and choose package in there. And it says the folder is not empty. Choose an empty folder to continue. Okay, let's make a new folder over here, and we'll call it Cyprus folder. We'll click on Create. There we go. That should be happy now. So we'll click on package. And it's doing it. It's saving all of those bits into that folder. Let's have a look at that folder because I'm quite honored pizza my desktop, but here is my Cyprus folder and I'm going to open it up. And in there is some ie, those bits, it's easy to see. In there is a copy of our editable file. In here. In images are the two images which were linked. The originals are still the original places. Just copy them in here. And in here are copies of fonts as well. So you see that if I then take that Cyprus folder, I can install that. It doesn't matter if I delete all the other images or if I'm going to pass it on to another designer or somebody else to work on. Once again, I give them this packaged folder and they've got everything they need to work on that full document. Don't just give them this one over here. Likewise, if you ask for a document from a designer, never asked them for the document, always ask them for a package document. That way you get the fonts and the pictures as well. Have a girth.
91. V2 Updates: Using Footnotes, Sidenotes and Endnotes: One of the features that
everybody really wanted in Affinity Publisher one was notes and particularly
footnotes. And four, publish
a to infinitive, put them in plus some others. Let me show you how it works. I'm going to zoom into
this a little bit of text over here. And this is a bit
of text here about creating a wall of flame
around colleagues. So I'm going to go
into that because I want a footnote at
the bottom to say, don't try this at home. So I've put my cursor
next to the word flames. And I'm going to go
to the Window menu. I'm going to go
down to reference. Under reference, I'm
going to find notes. Now this gives me a whole panel
and you can see we've got footnotes which go at the bottom of each
individual bit of texts. Side notes which go to
the side of the text, or n nodes which go to
the end of the story. So I'm gonna do footnotes
for this example. All I need to do, my cursor is next to it, flames is click on the
little icon at the top. And it'll pop it in for me. So I'm going to type in, do not try this at home. And as you can see, it's gotten a little
number one there, and there's a small number
one next to the word flames. Then I've realized, actually
I want another footnote for black and white images
over here, so black and white. And then I'll, once again, I want to footnote to say
traditional photography. I'm going to click
in there. I'm going to add another footnote. And you can see it automatically understands that's
coming in above it. So I can put traditional. And then I want
another one down here to do with beginner. So I'm going to click
on the word beginner, once again, adding
another footnote that comes in the end. All right, so what about if
I wanted one on the side? Once again, I can then just go and select the area that I want. I'm going to click on the
word techniques over here. Or let's click before
techniques in them. And I'm going to
go to side notes. And I'm going to click the
little icon once again, and it puts the side note
over on the side here. Once again, you can see I've got my side note to the side there. There's a little one
there and it's popped a little one on there. So it hasn't really
distinguished between the footnotes
and the side-note, you'd probably only want
to use one of them. There are lots of options in here with footnotes
or side notes. You can go in to see
how the numbering work. So if you decided that
this one really actually shouldn't be numbers
because it gets confusing. I can use a, b, c, etc. So I can have a,
b, c on this side and the numbers down the bottom. This formatting options in here, positioning once again to the closest side left
a frame rate of frame, wherever I'd like that to be. I've just moved it over
to writer frames at popped it on the
right-hand side. Do try that out. Particularly these footnotes
really, really useful. Have a go.
92. V2 Updates: Multi Frames & Image Autoflow: I'm going to move down
to my second page so that I can bring
in some pictures. Now, I'm going to click on the
little windscreen wiper up here to go back to
toggle to normal mode. And I want to bring in
six pictures in here. What I'm going to do is I'm
going to go along and I'm going to use one
of these frames. So I'm gonna go to
the picture frame. I'm going to start dragging in my first picture frame in here. Now I want to cross
and three down. So I'm going to go to my
arrow on the keyboard. I'm just going to, I'm still holding down the mouse button. By the way, I haven't let
go of the mouse button. So don't let go of that. I'm going to press
the right arrow. And you can see how then
gives me two frames. Like so. I want three going down. So I'm going to use
the down arrow over there to put in my
other frames in there. So that's actually looking quite good with all
those close together. But what about if I wanted
some room between them? Well, if I hold the
right arrow down, so rather than clicking and
I've just hold it down, you can see how we can
move them further apart. I'm just kinda keep holding down while that slowly
moves apart that way. And then exactly the same thing. I'm going to hold the
down arrow and just move down this way as well. I think I'm just about
getting to the right place. And I can still use my mouse because I haven't let go of the mouse at
tall at the moment. To just get those to
go all the way across. Run through that
again very quickly. Start with a shape. Click and drag. Use the right arrow to
make a second frame. Use the bottom arrow to go down. If you use the up arrow,
it will remove them. So the bottom arrow down. If you want to.
93. V2 Updates: Autoflow Images: Let's have a look at another
way in Affinity Publisher to that we can place images
quickly and this is a lovely, lovely features they've added. Especially if you've got to do repetition e.g. business cards. And maybe I want to print
out ten business cards, So I need ten on
one page and then the back of the
business card and other ten on the other side. Well, what I'm
going to do is I'm going to go along and
use the technique that I showed you earlier to make multiple frames for my pictures. So over here I can
just drag out, I use the right arrow
key to move it across. And then the down-arrow key to increase the numbers
going downwards. And I also want to actually just have a little bit of a
gap between them as well. So I'm going to hold
down the right arrow key to move the gap
between those two. And I'm just waiting to
kind of gets to the, to the margin over there. And the down arrow key to go downwards to that
margin in there, maybe just a little bit more. Right? I think that's it. So now that I've got
those on my page, what I'm going to do is
to bring in the picture. So I've just
de-select everything. And I'm going to go
along to File and Place. And we're going to find the
pictures that I wanted. So if you try this out, they should be a
little folder now, in with your assets
for version two, which is going to be this
business card folder. And I'm going to bring
both of those in, some selecting two of
them at the same time. Click on Open, and they've come in to this place image area. Now I'm going to
select them both. And I'm going to bring
them in to this page. Remember, I've only got
one page up at the moment. But what I want to
show you is this, it'll repeat option in here. Remember I want ten of
these business cards. So I'm going to increase
that number to ten. And then I just move over to
my page and I click once. And now you can see
it's put ten on one page and the ten on the
second page in there as well. So one side of the
document or the side of the document tried out. It's brilliant.
94. Thank You!: Well, sadly we've come to the end of this course, but I hope you feel like it. Affinity Publisher master. Now, don't forget to look out for some other courses. Bias and what we're constantly adding to the courses. And as new things come available in affinity, we will try to put a course out on them. I hope it goes well for you all the best. Create some awesome stuff.
 Tim Wilson, Adobe Certified Instructor and Expert