Transcripts
1. Part 00 intro: He Architectural
visalization community. Welcome to this course where
we explore the creation of an interior architectural
visualization scene utilizing the powerful and freely available
software called Blender. Throughout this course,
we will dive in into various crucial aspects
of RVs process, all done entirely within the open source
realm of blender. Our journey includes texturing, learn the art of texturing, covering UV mapping and
more lighting techniques. Discover effective
methods for eliminating your scene composition
rendering, and get the low down on
rendering within blender. Post production
elevates your work through post processing
within blender. Furthermore, in the future, we'll expand our horizons
with bonus content, such as exploring different
lighting approaches, harnessing the power
of light groups, leveraging the capabilities
of EV rendering, adding a vinet effect
to your creations. Streamlining your workflow
with batch rendering, mastering post production using affinity photo and finally, crypto meet The level of
this course is intermediate. Should have some
basics with blender. To start with this course, I advise you to watch the blender guru
Donna's tutorial and have a blender version
4.0 beta and above. Finally, join us in this
open source journey to enhance your architectural
visualization skills, said, an.
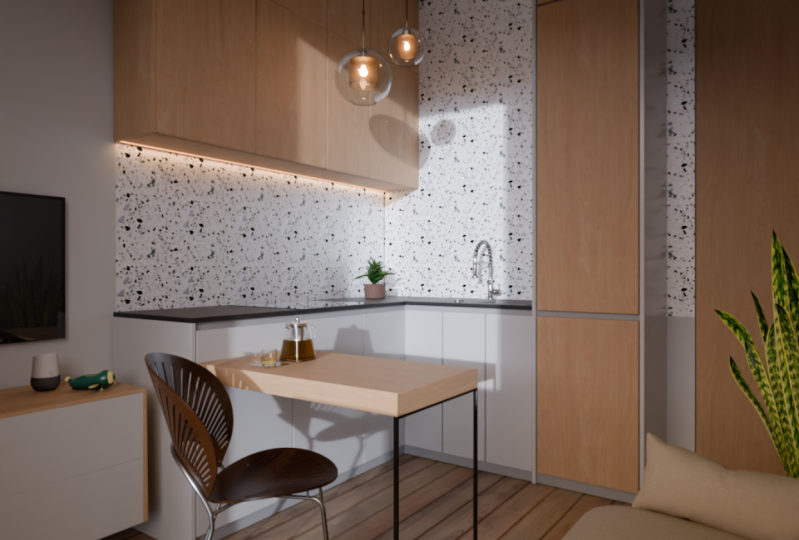
2. Part 01 Uvs: Everyone will come to the start
of our short RCVs course. In this step, we'll do a step after texturing which
is UV and Rabbi as is. Here we have our scene. You can download the
base mash model. We need to know that I'm not going to dive into
modeling processes because it's a simple
process which is box and push and pull
the extrude method. You can download the references with the plan of this project, it's designed by another
group of interior designers. You can download this, you can find the link in the
description of the content. You can download the file and work with us in the
UV and texturing, and lighting and
post production. Everything after
making UVs issued to take consideration to apply the scale to
all your measures. In your first, I need
to select and select all and click control
A and apply the scale. The first thing or the
second thing I need to do is to go to Viewport, Shading, and apply
material here. And you see that we have
principal vis D. So we need to add an image texture with mapping and
texture coordinate. To do that, we need
to enable our node, we call it node regular to have shortcuts in our
show shader editor. To have this node set up image texture and texture
coordinate mapping, we need to select the
principal SDF and click control D to have this image texture
in the base color. The next step is to
click in this plus nu and go to generated
type blank and UV grid. Click this and you will see
that we have a UV grid. To apply this texture to all
other elements in the scene, we need to select all bike, clicking A or select
and all select this last by clicking Shift and
select this last like this, and click control L
and link Material. You see that the
great texture is applied to all other
elements in our scene, but you see that we
have some problems. We need to fix the UV's. To do that, I need
to let the elements selected go to the edit mode
and go to edit mode here. And select all in the edit mode. And click or go to UVs and
keep projection, keep. Projection is a good method
to UV wrapping in R industry. Or you can choose smart
EV project like this. Select the Q projection, we needed to be scaled
to these boxes. I think that project is very
good for this situation. You can choose from both here. In this situation, I
choose the projection. I think that the UV is good
because all it squares, if you see this UV grid squares, it means that you are
in the right way. This is everything
for the UV mapping. See you in the next
one which is checking.
3. Part 02 Texturing: Welcome to the texturing part. As you see here in
our references, we have four different
materials and other standard materials for the four different materials. We have wood for this cabinet, we have floor wood
for this floor here. We have marble here
in the countertop, we have this terrazzo here. There are standard
materials here. We don't need the
PBR material in this MDF texture and
the wall material. Now we need to
apply our texture. We will go inside
our base mesh model. We already do the UV mapping
in the previous video. We need to apply the wood here
first in this table here. What I'm going to
do is to delete this grid material and add a
new material like this and name it wood or anything
you need to name for. We need to use an M
texture in this tutorial. What we need to do
is to make sure that asset manager is installed. And we need to go to the
section of materials here and make sure that you download this wood material in
your folder direction. I will give you the name of the wood texture
to download it for free from the IMs
website and IMs shop. The wood is called
Wood Oak Orleans. We need to click on it
and import the material. The second step is to
apply this material. We need to delete
this wood material and apply the wood
for the table. You see that the wood is
applied for all the table. But in the reference we see
that we have this metal here. What we're going to do is to add another slot to our table. What we need to do is to add new material and call it metal. To assign this
material to the legs, we need to go to the edit mode and click here in
the empty space. Then click here in
the legs with L to select all connected
pieces and vertices. Then go to slot two and
assign the material. Then we need to go to the principal PSDF and make
it metallic like this. Make metallic one
and change the color to black as you see here. We have our wood in this
table, in the references, this wood is in the
wrong direction. What we need to do is to go here and select
this part here by clicking L to select
all connected measures and go to the UV editing here. I will select and select this and rotate them
the 90 degrees. I need to select this and select this and rotate
them to 90 degree. As you see here. We
have another problem. What we need to do is to go to the table here and click Shift to select
just these phases here. What I need to do is to return, select just these phases like this and rotate
them in 90 degrees. I don't know why select all
and rotate it in 90 degree. If we go to the layout, you see that the wood is
in the right direction. We need to apply the wood
material for other parts. In this scene, we have
wood material in this, what I need to do is to select the material and go
to material here. And apply the wood oak also that the direction here
in the right sense. Also, I will apply the
material for this part, and this part, and this part, and the other parts
in the kitchen. What I'm going to do is
to select this and this, and select this, and select this part as
last part selected. Then click Control Help
and link Materials. You will see that
the materials are applied to the other parts. Also, I need to
change the rotation of this wood here to
make it in longer. What I need to do is to go to UV Editing and make
sure that we are in the Viewport
sheeting. Select. All in the UV mapping and
rotate in the 90 degree. We have like this, the right
sense rotation of our wood. We will return to this
layout view part. What we need to do
now is to apply the standard material for this. I will delete the UV grid
and add the U and name it, paint like this for the color. Change it a little
bit like this, make it 222, for
example. As you want. You can make the
color as you want. And I will apply
the material for other parts that
has the same color. I will select this and
select and select the wall. And click this last click. Link Material. We have another standard
material, this kitchen. It has a black color
and black material. What I need to do is
to delete this and add the new material and
make it black paint. And change the color to black and the roughness
a little bit to 35. Also for this white, I need to decrease it to 35, also the same color,
black To this. I will select this and
select this last click, control L to apply it. What we need now is to apply the terrazzo and the
marble and the wood. We start with the wall, I will apply the Azo
material like this, apply the terrazzo, and assign another
material to the wall. Add a new slot and add
the new material and name it Raz this. Select the principal
BSD and click Control Shift Go folder where
you store your texture. This texture named Terrazzo 014. I download it from MB and G. You can download
it also for free. Assign the material
to see like this, that we have the right
material in our scene. What I'm going to do now is
to change some settings. First is to decrease
the scale to 0.00 0.02 And change the saturation of this color to saturated. What I need to do is shift a saturation and
click saturation, make it 0.2 to make it
in this color like this. Secondly, we need to
apply the wood floor. We need to delete the grid. Also make it floor
wood like this. Go to Principle BSDF, click Control Shift and go to the folder where
you start your floor. I will apply this
laminate floor. 02 Downloaded from
Polyhven Textures, select all and principal
texture selected. Also, I need to decrease the
displacement and the color. As the last material is
marble is the same thing. Delete degree the grid
and name it Marble. Go to Principle SDF, selected and control shift and go to the folder and Apply. The marble material is
downloaded from BNCG. Also select all and click
principle SD of texture. You see our texture is
good applied, same thing, decrease displacement and change the color to be as the
terrazzo saturation. Color saturation value 02. Like this, I think that we
finish all the materials, just this sailing material. I need to apply
the same material as is this standard material. Make sure that I select
just the sailing, then select this
last and control L link material like this. I think that not missing
other materials, just the glass material. I will check it in
the next torial. This is everything
for the textures. See you in the next torial, which is glass material.
4. Part 03 Glass material: For the glass material, we need to apply a
texture to our window. I don't need to apply the
wood texture for this. If you want to apply,
apply it, you are free. But I will apply just glass
material for this window. I don't need the wood because it's not in my camera frame. I will not work on it. First, I need to apply
material to my window. Click and apply and make this metallic like this for
the frame of the window. And change the color
to black like this. Now I need to assign
another slot and name it Glass Assign. And the faces click
glass and assign. What we need to do is to create our glass
procedurally because the glass of blenders ful need
to create it procedurally. Click Sha, shift a shader and make the principal SD of glossy. Because the glass is
glossy and transparent, what we need to do is
to add transparent, add a mixed shader, and add these two
materials together. What we need to do now is to
add a factor which is fl, drag and drop, and search for F factor and change
the IR to 40. This method I learned
from blended guru, we need to decrease the
glossy roughness to zero and make sure that
we have a white color. I need to plug this
to the surface. Now what we need to do is to
add another mixed shader. Shift to duplicate this node and plug the
transparent material. Here we need a factor. Also, drag and drop, and search for the light path. I need the shadow ray. Need to combine the shadow ray with diffuse and the glossy. What we need to do is to add a converter math and let
it and click Diffuse. Add another ad material node, glossy ray, like this. Our glass like this. If you go inside the scene
and I will show you that we have this glass like this. If I turned on the word scene, you need to go to
cycles and turn the light on and check the
scene word to work with HDRIs. Come up with blunder.
You see that the light is inside the scene. I will increase the
density to ten to see that the light is inside
our scene like this. We have a good glass
material in our scene. This is everything for the glass material in the next one, which is asset placement, I think that I already
mentioned asset resources, for example, Choco for image and maybe poly high heaven
or something like this. You can fill up your scene. I will not do a part for filling up
the scene with assets. You can do this as
homework for yourself. See you in the Lighting
or the Camera Set up Tutorial. See you soon.
5. Part 04 Camera and composition: Welcome to another part in this short course,
Arcs Interior Blender. This is the assets that I
already place in my scene. You can distribute
assets as I do, or choose your own distribution. After starting placing camera, I will mention something, If you place a sink here, you need to do a
bullume modifier. What I'm going to do is
to select the sink here. And click shift to make
the cursor to select it, click Shift and add
a cube like this. And they will scale
it to be appropriate to the sink like this in y axis. What I'm going to do
is to apply the scale and select this and
select the console top. And select this last and click control shift B and
make sure that you are already enable the bull to in a blender make a
difference like this. I think I make it the opposite. I will select this and this and control shift
and make it bullion. The second thing I need to select the bottom of
the kitchen like this, what I'm going to do is
to hide this instantly. I will add another cube by duplicate this
shift D and hide this. I will select this cube and select this countertop and click shift control and make
difference to have this hole in the
kitchen countertop. Now I'm going to be placing a camera in our scene
as you see here. I will change this to the
viewport and I will go to the top by clicking
seven in the pad. And place the camera
here, for example. And place the camera
here, shift a camera. I will go to the camera
by clicking zero In this left viewport like this, I will play around the
camera, for example, in the x axis, I will make
it 90 degree for the height. Generally, the heights in
the interior photography, it's from 0.9 to
zero to 1.2 For me, I will to select this one. Play around with the
position of the camera. Also go to the camera
properties here. Make sure that the camera
is selected and go to the Camera properties in the Viewport display
here option. Go to Composition guide
and enable the third rule. If you want to change the resolution to a port stretch
resolution, you are free. In my case, I will make
it square resolution. I will place my camera
here like this. I will rotate my camera like this to have
position like this, and make sure one
of your objects is placed in the intersection of the third of
rule rule of third, what I need to do is to go to the camera properties and
also go to the camera here. I always, in the
most of time I use the full frame camera to
have a good focal length, especially in the small
spaces like this. I will use the full
frame camera by typing 17 millimeter like this. You will have this
camera focal length. I will a little bit place
it here and place it there. I think that I'm going
to rotate it like this, like this, it's good. We have an object here
and an object here. If you go to Viewport Display
and Composition Guide to enable other stuff, other rules of composition, you will see this
composition like this. Try to place your objects in the intersection of this rules. For example, in my case, I have this chair
chair here to have good composition and
cool vision to our eyes. This is the storial
for camera placement and the tricks that I follow to have a better composition. This is everything for this
Storialee in the next one, which is lighting and rendering. See you in the next one.
6. Part 05 Lighting (HDRI): After creating our Ma set up
and have a good composition, now we are in the
lighting process. The majority of the lighting
for interiors is natural. We need to apply our HDRI. Also, there is another
type of lighting, which is aesthetic light, and we have this task line. In our tutorial, we will cover the HDR lighting and
the aesthetic lighting. To add an HDRI in our scene, we need first to change
the render engine to EV and choose cycles like this. And change the device to GPU
if you have a powerful GPU. Also change the mode to
rendering this and wait a second for the
compilation of texture. It will take time,
so be patient. Like this, our image is
compiled to render view, what we need to do is to go to this arrow here and in
the Viewport shading, you need to check the
scene word to see the real HDRI worked
in the shader editor. What we need to do
now is to split our view to the second
view like this and change this to shader editor and go from
object to word node. What we need to do now is to add a texture environment or use
an add on called Easy HDRI. I will put it a link in
the content description, so you can use this add on. Or you can add directly by
clicking control like this. And open your folder and
choose the HDRI you want. For me, I will use
Poly Heaven folder, They have a cool HDRIs and I will search for an HDR
called Forest Like this. I will choose this, Forest Grove for K. I will choose this and wait for it until
he loaded to our scene. As you see here, we have this texture coordinate with mapping and texture environment. What we need to do now is to
play around the rotation, Rotate your HDRI until you have the sun inside of your scene. I will increase the rotation
like this until I have the sun inside my room like
this to have a better view. You can enable the
noise option in the viewport like this and you can rotate your sun like this. I will make it a little bit 120 to make it as a
fel light to my scene. The other side here, I will make it a little bit dark to make it as a field light. And the acida is a key light. This side here is a field light. So what I'm going
to do is to go to Render Settings here and go down to color management and
change your view transform. You can let it film, but in
this version of Blender from 4.0 to 4.1 they include the GX, which is, I think, that
it's better than film. In the concept of highlighting, I will choose AG X like this and change
the look to punch. And try to play around with exposure value like
this until you have a good lighting without any
over highlighted setting. For me, 4.5 it's great. I think the lighting,
it's great. Like this. You can increase it
to five like this, you can fix it or change it. Also, I will enable this
option which is Render Core. So I will render
just this region here by clicking control B in the Render Viewport
and Dragon drop like this to have just
this viewport here. This is our method
to light our scene, which with HDRI it's
just an HDRI rest. Now just the aesthetic lighting which is this lighting here. I will go here and
select this plane here and return to
the object mode. In shader editor, I will delete this grid material and add the new material
principal BSDF. Go to the emission option here and change the color
to whatever you want. I will use black body drag and drop and search body color. I will use 3,500 color temperature for
aesthetic lighting. Three of the
strength, it's great. Choose this three value, I think it's great for you. This is everything
for the lighting. See you in the rendering
and post production part. See you soon.
7. Part 06 Render settings: We'll come to the rendering
part For the render settings, I will not use too
much setting set up. I will let everything to the default by starting
by the render engine. I will select cycles
and the device GPU. For final render, I will use the final preset and decrease
the max of samples to 1024. Don't use too much
samples in your scene. If you don't need it, don't use it for the noise I will
use for the final render, open image noise because it's very accurate than the optics. I use optics in the viewport rendering
because it's very fast. And use the GPU lights, I will use light three also. I will not check the
advanced futures because I don't need
it for the light path. After experimenting with the full global illumination
and the default, I think that the default is
very good for this scene. If you need more, you can choose the full global illumination
setting For the clamping, I will led it to the
default as I say already. For the performance I will use the faster render and check if the persistent data is enabled. Because if you want
to rerender image, you will take time check the persistent data is enabled to not taking time
to build BV H and so on. For the color management
we talk about it already. We use GX with the look punchy and the other values
exposure in the gamma. After hitting render, we need to check some
passes to use it. In the post production process, we need to use the
noising data and we will not use glossy and
direct and indirect, but who knows, maybe
we will use it. But in the post processing we will use the
ambient eclusionck. Make sure that you are checking
the ambient ecclusion. We will talk about the cryptomat and the light groups
in the bonus videos. This is everything in
the render settings. We can hit Render and wait
for our render to finish. Click Render and render the image and wait for
the render to finish. I already hit Render, so you see that my
image is rendered fast. Then the first time, because I already enable the
persistent data, this image will take
two to 3 minutes. I will post the record and
wait for the result to finish. See you in the post
processing part M.
8. Part 07 Post production: To the post processing part. What we need to do is to go
to the compositing like this and use nodes and
split our view to two. And disable the backdrop. Disable this like this and click in here to hide
this panel and change this to image editor
and search for viewer node to see your result. To see your result we
need the viewer node. Click control shift and click on it to have
the viewer note. We can zoom out and zoom
in in our image like this. And click shift and drag. And like this. To collapse all
these wire frames. The first thing we need
to do is to add O. To add this, we need to
click Shift a click color, and click Mix and mix color. As you see here, we
have this O node. It's a black and white map. We need to mix it with the
mixed color like this and plug it in the second image
and change this to multiply. Because it's a black
and white map, we need to decrease it a
little bit to 0.1 If mute, mute, you see the changes. You can increase it to 0.15
like this as you want. Now we need to add some passes. We can adjust exposure. If you don't have this
organization of the nodes, you should have the
version of 4.1 or 4.0 We can add an exposure
node to control our exposure. Like this, you can
increase and decrease it. Also added to add some filter filter, we have box and sharpen, We need to decrease it to 0.05 If you need to
increase it a little bit, increase it as you see here. If you don't have
an accurate values, you can change the
box sharpen to diamond and decrease
it a little bit to 0.03 Like this two
don't have this Tifft. I will decrease it a little bit, 0.02 like this, I think
that I get the right value. Then I need to add filter or I need to add a
glare effect like this. As you see here, This
is a strict effect, but I don't need it. I need the fog glow and make the quality to high and
decrease the little bit, the size to six like this. The final effect we
need to do is to go to transform and add
the lens distortion. If you already use an
old version of blender, we'll find this lens
distortion in the category. We need to click Fit
and change those 20.001 To have the
real simulation of the lens distortion
of a real camera. Now we need some
color correction. What we need first is the
color, brightness and contrast. We go to color just and brightness and contrast
to increase the contrast. I will make this one to
have a little bit contrast. If you see that the
contrast is very overrated, you can decrease it to 0.2 to
have a little bit contrast the image muted and
muted to see the result. If you don't love it, decrease a little bit to
0.1 and make it like this. The next node we need to
add is saturation value. To have a little bit of
vibrance in our image, we need to decrease
the saturation to 0.9 To decrease a little bit
the saturation of the image. The final node, which
is the color balance, we need to add it
like this and change the left gum again to
offset power slope. To change the color
of your image, the mode and the color
of white balance. You can change it to bluish and you can change
it to greenish like this as you want it,
something of taste. This is everything for
the post production, we interest the final
node which is the noisy. Every realistic
render or re, render, and real images has
some level of noises. What we need to do is to
duplicate this and add it here. And plug it with
the noisy image. And change the blend
mode to mix and increase a little bit of
the noise because the real images has some
level of noise like this. If we mute it and muted, you see that we
have some level of noise to have some
realistic result. This is everything about
the post production. In the bonus videos, we will talk about the light
groups and the cryptoma. This is everything
in this course. I hope to see your results. If you make a result
with this short course, please share it with me in Facebook or
Instagram or e mail. See you in next and future
courses. Have a nice day.
9. Part 08 Bonus Sky texture: Either. I already illuminate the scene using HDRI
for the moment, I will try to use sky texture and use another method to
illuminate this scene. If you want to, not wasting time searching
for HDRIs, use this method. It's a method come
up with a Blender. What we need to do is to go to the shader editor and change the object
to word like this. What I need to do
is to duplicate the background and plug
it to the surface. Now we need the sky texture. Click here, drag drop, and search for sky texture
and the sky texture. If you want to let it
like this, let it. But I will show you
some settings to do. I will return everything
to the default. I will go to color
management and turn the exposure
to zero Like this. I want my son to be
inside my, my scene. What I need to do is to rotate
to the scene until I get the sun inside my
interior scene. As you see like this, it's very good as you see here, that the sun is very intense. What I need to do is to decrease the sun intensity until
I get soft light. Sun like this. The second setting is to
make the shadows soft. With increasing the sun size. Like this, I will
make it them ten. Like this, we have a
great illumination. You can now play
around with rotation, elevation and dust and ozone. I don't like, this is mood. I will decrease it to zero. I like the little bit of dusty. I will decrease the ozone
and make the dust ten. Also, I need to increase
the exposure to maybe 1.2 to make this look. Now I can hit Render and
wait for render to finish. I always show you the result
after see you soon, 12. This is the final render. What I'm going to do is
to go to the compositing. If you already follow with
us in this arc base course, you know that we already
make noise layer here. I will decrease
the noise layer to 0.25 This is the final result we get with the sky texture. This is everything
for this video. I will give you a note
that this course is a bonus for our full course. In, if you want to
watch the full course, full course of this series, you can get the
course on Gam Road. The link is in the
description down below. And see you in next
bonus videos M
 Mohamed BENIANE, Archviz 3D artist