Transcripts
1. Introduction: Welcome, everyone,
and thank you for joining me. My name is Yaya. And in this class,
we're going to focus on RIV state machine and create
interactive animations. RIV turns static visuals into interactive animations
that people actually want to mess
with and click on. It's a total game changer
for web, apps and games. If you're an animator,
a motion designer, a product designer,
looking to add interactivity to your work,
you're in the right place. A little bit about me, I'm a freelance motion designer with over ten years of experience working with clients
from all over the world. Most of that time,
I've been using traditional tools like after
effects and Cinema 40. But when I discovered Drive, it honestly felt like falling in love with motion
design all over again. It's such a fun
and exciting tool. Since then, I've spent a lot of time learning the
ins and outs of RV, and I'm super excited to share what I've
learned with you. I created this cloth
to make that learning curve a little bit less
intimidating and more fun. Once it clicks, it's a powerful tool to
have in your talking. Right, let's get started. First, make sure you have RV installed and set up an account. You can find the link in
the course description.
2. Understanding Rive’s Interface: Now that we're all set up, let's take a tour
of Re's interface. Just a heads up. RV's
updated pretty often. So things might look different on your screen, but don't worry. The features and tools
are all still there, just maybe in a slightly
different spot. Getting familiar with
the interface will make your workflow in
RIV much more efficient. Take some time to
explore each section, and once you're ready,
we'll dive into animating using
the steak machine. Here in the home section, you can see your recent files, links to some useful tutorials and community examples where you can explore projects
by other artists in the community and see
what people are up to. Here, you can search
your files by name, and down here, you have
your personal files. If you want, you can
organize your files into projects like I did here
for this Skillshare class. You can right click to
create a new folder or a new file or click on the
icons on the top right. At the top, we have the toolbar. Here, we can customize our file, export and create share
links, create artboards, layouts and groups, design
tools like pen and shapes, bounds, text, and events. Hierarchy and asset panel. On the left side, there's
the hierarchy panel. This displays all the
objects, assets, controls, and animations in your file, showing their parent
child relationships and rendering order. The assets tab is where we can see all the
assets that live in this specific project and where we can import
assets like images, ladifils and audio files. To the right, we
have the inspector. This panel lets you adjust properties for the
selected object, dynamically updating based on your selection and current mode. The central area is the stage, an infinite canvas where you can place artboards containing
all your graphics. So far, we were in
the design mode. But if we click here, we go to the animation mode. This is where we set up our
state machines and timelines. Here on the timeline, you can create animations, access playback controls, and set keyframes
for your objects. In the state machine mode, the timeline is replaced by
the state machine graph, allowing you to visually connect animations and define
transitions logic.
3. Introduction to the State Machine: Okay, let's talk about
the state machine. It's what makes animations
respond to user actions. Think of it as a set
of rules that tell rhyme when and how to
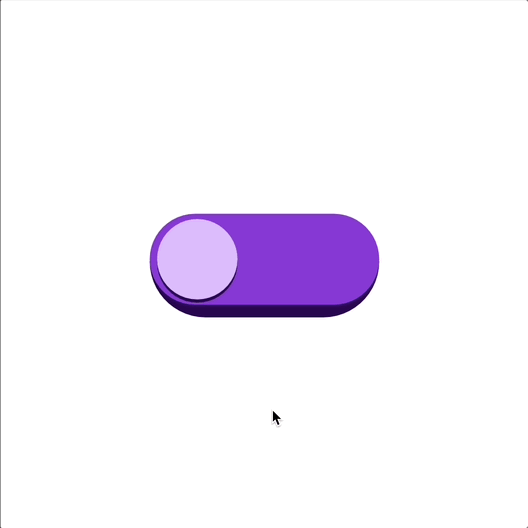
transition between states. Here's an example. We have one state where the
switch is on the left, then another one
where the switch is on the right
and changed color. In the state machine, we can use inputs and listeners to set up interactions and use transitions to create the flow
between states. Then when we play, we can test our
interactions here. Now we're going to recreate this interactive
animation together. Download the resources file, drag the dot rev file into RIV, then follow my steps.
4. Tidy Up the Hierarchy: With RIV, it's crucial
to organize your layers and hierarchy before you
move into animate mode. If you start adding
keyframes and then go back to design
mode and change things, your animations might break and you'll get unwanted results. So let's stay in design mode and get things organized fast. If you need to work
with SVG files, you can go to the Asset panel, click the Plus
button under Images, select your SVG file
and click Upload. I can drag it into the stage or right click
Generate artboard. In the hierarchy, we
can see our design, and under this group, I can see all of my objects. Before we do anything else, we must organize the hierarchy into groups and rename
all the layers. That will make our life so much easier when
we animate later. I'll use the Hide show icon to help identify
what layer I'm editing. I'll go from the bottom up. This is the background layer, and I like to actually
just delete it because Rave already added fill color to the artboard here. So I'll change that to white, but just know that
you can remove it completely if you want to
have a transparent board. I'd like to point out the
icons on the left here. This one is telling
us that this is a custom shape layer
with a custom path, whereas the rectangle and ellipse icons are
telling us these are procedural shapes which have some extra parameters like
corner round and origin. You can always convert to a custom path by clicking Enter, but beware that you can't convert it back to
a procedural shape. Now, I want to give you a hard rule and I want
you to swear by it. Always, always, always
group your objects. Always, trust me. This would save you
a lot of heartache later and will give you lots of flexibility
when animating. Great. Let's group and
rename everything. The green dot is
only for reference, so I'll group it and
move it up later, I'm just going to delete it. The One more thing I want you to always do
is create a root group. Always. This group
will not be animated, but it will allow you
to reposition and scale the entire animation
without anything breaking. And I want this group right in the center
of the artboard. Now I have this main group with the anchor point on
the top left corner. So first, I'll just ungroup this using the
shortcut Shift Command G. Then the best way
to create a root group right in the center is to
create an empty group layer. You can use the shortcut G and click anywhere
in the artboard. Then align to center using the align tool and drag all
the other layers into it. I'll rename this group. Then I'd like to
create one more group just in case, and that's it. We have the hierarchy organized, and we're ready to jump
into animate mode.
5. Setting Up States with Timelines: Alright, buckle up. We're switching
into animate mode and setting up timelines
and the state machine. Now, I'll be introducing
some new concepts here, so don't worry if things
don't click right away. My recommendation
watch this lesson all the way through once just to get the feel
for how everything works and really take it in. Then come back, rewind, pause when you need to, and follow along at your own speed. You've got this. Switch
to animate mode. By default, we have a state
machine and a timeline. My plan is to create
two timelines, one for each state, one for the on state, and another for the off state. Then go to the state
machine graph and connect them with transitions
to create the animation. I'll head over to
the first timeline and rename it state one. So it's clear that this timeline represents one of our
animation states. I can right click
and duplicate it, then rename it state two. Now we need to tell Rive which properties we
want to animate. In this case, I know I want the dot to move
along the X axis. To do that, I'll add a keyframe. I'll click the
little diamond icon next to the position value. Once it turns blue, that means a keyframe
has been added. You'll also see it pop up
in the timeline below. If I expand the layer, I can see exactly
what's being animated. It's the dot layer position, X axis, and its current value. Now let's do the same
thing in state two. But this time, instead
of clicking the diamond, I'll just drag the X
axis arrow to the right. RIV automatically
adds a keyframe when you adjust anything that
has a diamond next to it. I'm going to type -63.5
for the position, since that's the opposite
mirrored value from state one. To test it, let's jump back and forth between state
one and state two. Yep, looks good. The position shift is
working perfectly. Now, let's do the same
thing with the colors. Click on the dot layer
over in the inspector, you'll see the colors
used in that group. We can add keyframes to each of them just like we
did with position. Now switch to state
two and this time, select both the dot layer
and the reference layer. That way, we can grab the color values from
both layers at once. In the inspector,
under selected colors, just copy and paste
the hex values. If I hit you on the timeline, I can quickly reveal all the
properties with keyframes, and you'll see the
updated yellow shades are now showing in state two. Let's toggle between
the two states. Great. The color
transition is working. We're now ready to hook this
up in the state machine. By default, RIV gives us a state machine with one
timeline already connected. If I click Play, you'll see that this timeline just plays
once, nothing fancy yet. Now, let's drag in state two
and connect State one to it. That creates a transition
between the two states. But if we play it now, you'll notice it
immediately skips over state one and jumps
straight to state two. That's happening
because we haven't told Rive when to make
that transition. So now we need to set up a condition to control when
the transition happens. Before we can add conditions
to our transitions, we need to set up some inputs. You will find the inputs
panel right over here. RIV gives us three
types of inputs. Number, Boolean and trigger. Let's start with the trigger. When I click to add one, you'll see it works
like a one shot input. Perfect for things like a click, where you just want something to happen once and then reset. Now we can head back
to the transition, and in the inspector, we can add our trigger
as the condition. So here's the logic now. We enter the state machine here. It plays state one, then waits for the
trigger to fire before transitioning to
state two. Let's test it. Hit play, click the
trigger, and it works. But if I click the trigger
again, nothing happens. And that's because
we haven't set up a transition going back from
state two to state one. To fix that, let's create a transition going back from
state two to state one. Once you connect them, you'll see a little arrow
pointing back to state one. Now just add the same trigger as the condition for
this new transition. And we did it. Now,
every time we click, the state machine will keep toggling back and forth
between the two states.
6. Dive Deeper - Transitions + Listeners: Now that we have the basic
transitions between states, let's take it up a notch. Let's make our transitions
a bit more interesting. Right now, the switch
from state one to state two happens instantly. There's no sense of motion. When we select the transition, you'll notice we have a few
parameters we can play with. Let's start with the duration. It's currently set to
zero milliseconds. So let's change that
to 500 milliseconds. Now when we play the animation
and fire the trigger, we get actual movement. The dot slides
from left to right along the X axis
over half a second. Next, we can fine tune the
feel of the transition by adjusting the interpolation using this graph down here. This graph represents the full duration
0-500 milliseconds, and the curve shows how
the transition moves from state one to state
two over that time. Right now, the curve
is perfectly linear, which is why the motion feels
a bit stiff or robotic. But if we choose this
cubic option here, we get this beautiful
curved line now the motion eases in, goes linear through the middle and eases out again at the end. This type of animation
is called easing. Notice how much
smoother it feels now. It's more natural because
in the real world, objects have weight and mass. They don't start
and stop instantly. They take a moment to speed up and another
moment to slow down. You can also fine tune the curve by adjusting
the handles. For example, we can
create a longer ease out. So the animation starts quickly, then gradually slows down. See how that changes the feel? I really encourage you to
play around with the graph, try different curve shapes and see what kind of
motion you can create. Depending on your project, you might want something snappy, smooth, or more dramatic. For now, let's stick
with the cubic option. It's a solid default that
works nicely in most cases. Oh, in a quick tip, you can also copy and paste your costume easing curve if you want to reuse it
in other transitions. Now, let's talk about a
really important part of working with RIV,
adding interactivity. Up to this point,
we've been triggering the animation manually
by clicking the input. But that's just for testing. What we really want
is for the user to interact directly with the
button on the artboard. So how do we make that happen? That's where listeners come in. Let's open up the
listeners panel and click the plus icon
to create a new one. You'll see the inspector now
gives us a target field. Click on that and RIV will prompt you to select an
element on the Canvas. In this case, we want the buttons face to be
the interactive target. You can also select
it in the hierarchy. Now that we've set the target, the inspector is asking, what action do we
want to listen for? There are a few options here, but for our button, we're going to choose click. So now, whenever the user
clicks on the button, we want to fire
trigger one input. Okay, quick recap
of what we've done. We created a listener,
set a target, chose the interaction,
and linked it to an input that
controls the animation. Let's test it out. Hit play, go over the button's
face, and click. Nice. It works. And if we click anywhere
else, nothing happens. That's because the
interaction is only tied to the
listener's target. In our case, the button's face. I'll go ahead and
rename this listener to Face Click just to
keep things organized. Now I think we're ready to add another layer of
interaction, a hover effect. This will be similar to what
we just did with a click, so we'll move through
it a bit quicker. We'll start by creating two new timelines to
define the hover states. Hover on and hover off. Drag the State machine to the top just to
keep things tidy. Let's start with hover on. When the user hovers
over the button, I want the face to
look a bit brighter. So I'll select the
face layer and bump the brightness in the
color settings up to 100%. Remember, Rive needs to see
keyframes in both states. So make sure to add keyframes to the color on the face
layer in each timeline. Let's give it a quick test. Hover on, hover off on off. Perfect. We've now got two working states for
the hover interaction. Now, you might be wondering, how do we combine this with
the existing click animation? For that, we'll need to add a new layer to our
state machine. Right now, everything is
running on layer one. So I'll rename that
to something like click on off to keep
things organized. The cool thing about RV State
machine is that it lets you stack multiple layers of interactions on
top of each other. So let's go ahead and add a new layer just for
the hover interaction. Now let's drag the
two hover timelines into the graph and connect
them with transitions. We want the animation
to start in hover off, then transition to
hover on when the user hovers and go back to hover off when they
move the cursor away. So here's the logic. When the
cursor enters the button, we transition to hover on, and when the cursor exits, we transition back to hover off. To control this interaction, we'll need to add a new input. And for hover, a bullying
is the perfect choice. It's simple. It can be
either true or false. It works great for something
like on off states. Now we can use that
bullian as a condition. For the transition from
hover off to hover on, set it to go when
the bullian is true. And for the transition back, set it to go when the
bullion is false. Let's give it a quick test. Click to set the bully in
true, we get Hover on. Click again to set it to force, and we're back on Hover off. Nice. That's working
just as expected. Now let's add some polish, just like we did with
the click interaction. I'll set the duration
for 150 milliseconds and apply cubic interpolation for a smoother, more natural motion. Let's play it back.
Yep, that feels good. The final step is to
actually make this hover interaction
work on the artboard. For that, we'll
need two listeners. One to detect when the
cursor enters the button, and another for when it exits. I'll name them hover
Enter and hover exit, just to keep things clear. Alright, let's set up
the two listeners. For the first one, set
the target to face, choose pointer Enter, and set
the bullion input to true. Then for the second listener, use the same target,
but this time, choose pointer exit and
set the bully in to force. Just to recap what we've done, we're listening for when the
cursor enters the button, that sets the bully in to true, triggering the hover on state. And when the cursor exits, the bullying switches to false, bringing us back to hover
off. Let's test it. Hit play, hover over the button. Hover on. Move the cursor away. Hover off. Perfect. That is our hover interaction working. And here's the cool part. If you click the button, the on off interaction
still works, too. So now we've combined multiple layers of
interactivity in one animation. Go ahead and try
it out yourself. See if you can add hover
interactions to your designs. Now you have
everything you need to create your first
interactive animation. If's capabilities go further than what we're looking
at for this course, but it's based on
these fundamentals, states, transitions,
inputs, and listeners. So it's time for you to take these fundamentals and
put it to practice. I can't wait to see it.
7. Interactive Class Project: Okay, now it's time to practice. Watching the lessons is great, but if you really
want to get better, you have to get hands on. Trying things out, messing up, figuring stuff out, that's where the real learning happens. It's the only way to build confidence and truly
understand how it all works. So for this class project, pick one of the designs in
the resources files and try creating your own interactive
animation from scratch. Here's a full time lapse of the process from
start to finish. It's a quick recap
to help everything click and reinforce what
we've learned so far. Make sure to organize
your hierarchy, group your objects,
and rename the layers. Create two states. Add transitions. Add inputs. Add conditions to
the transitions. Add listeners and set
the input changes. Add hover interaction. I went back to the
design mode and added a new fill gradient to be
used as my hover highlight. Use a bullying input. Add two listeners
for true and false. And it's done. Good luck. I'll see you in the next lesson to show you how you
can share your work.
8. Share Your Work: So you've just created your first interactive
animation. Well done. Now it's time to share it with
us in the project gallery. Let's start with a cover image. Here's how to create one RIV. Click add to Render Q. Choose design mode. Select PNG format
and click Start. Once it's done, go to the complete tab and
download your image. You can upload this PNG
as your cover image, choose the scale of your
image, and click Submit. Add a project title and a few
words in the description. So we have two options for
sharing our work here. Option one, paid plan. If you're on RV's paid plan, click Generate Share Link. Then copy the embed
code from here. Then go and paste that
code into the description. It's a great way to show off your interactive animation in action and let the user
interact with it in real time. Option two, the free plan. If you're using the
free version of RIV, you can't create a share link. So if you want to
show things like hover or click interactions, you can use a screen
recording tool like Jiffy capture
on Mac or on PC. You can record your screen and convert to JIF on
the Jiffy website. Just open your animation in RIV Start Jiffy capture and position the recording
frame over your artboard. Make sure to enable
capture cursor in the settings so your
interactions are visible. Then recall your interactions
and export as a Jif. Then drag and drop your Jif
or paste your embed code. When you're done, click
publish and your work will be live in the
gallery. That's it. I can't wait to see
what you've created. Sharing your work is
such a great step forward, so don't skip it.
9. Final Thoughts & Next Steps: Okay. Congratulations. You did it. You've made it through
the course and learn the foundations of
interactive animations using RV State machine. You should now feel
comfortable creating animation states,
setting up transitions, and using interactions like click and hover to bring
your designs to life. That's a huge step,
especially if this was your first
time working with RV. Of course, like
any creative tool, the key to mastering RV is
practice practice practice. The more you
experiment and build, the more confident you become. So keep going. A great next step is to explore Rives marketplace. You can see what
others are building. And if something
catches your eye, you can click the remix button. It'll open in the editor, and you can look under the hood and reverse engine how
things were built. Honestly, I've learned
so much by seeing how other designers solve
problems in their files. Thank you so much for
joining me in this class. I hope you had fun and feel
excited to keep creating. Don't be afraid to play, break things, try weird ideas. That's where all the
good stuff comes from. Keep animating, and
I'll see you next time.
 Yaya Gadon, Motion Designer