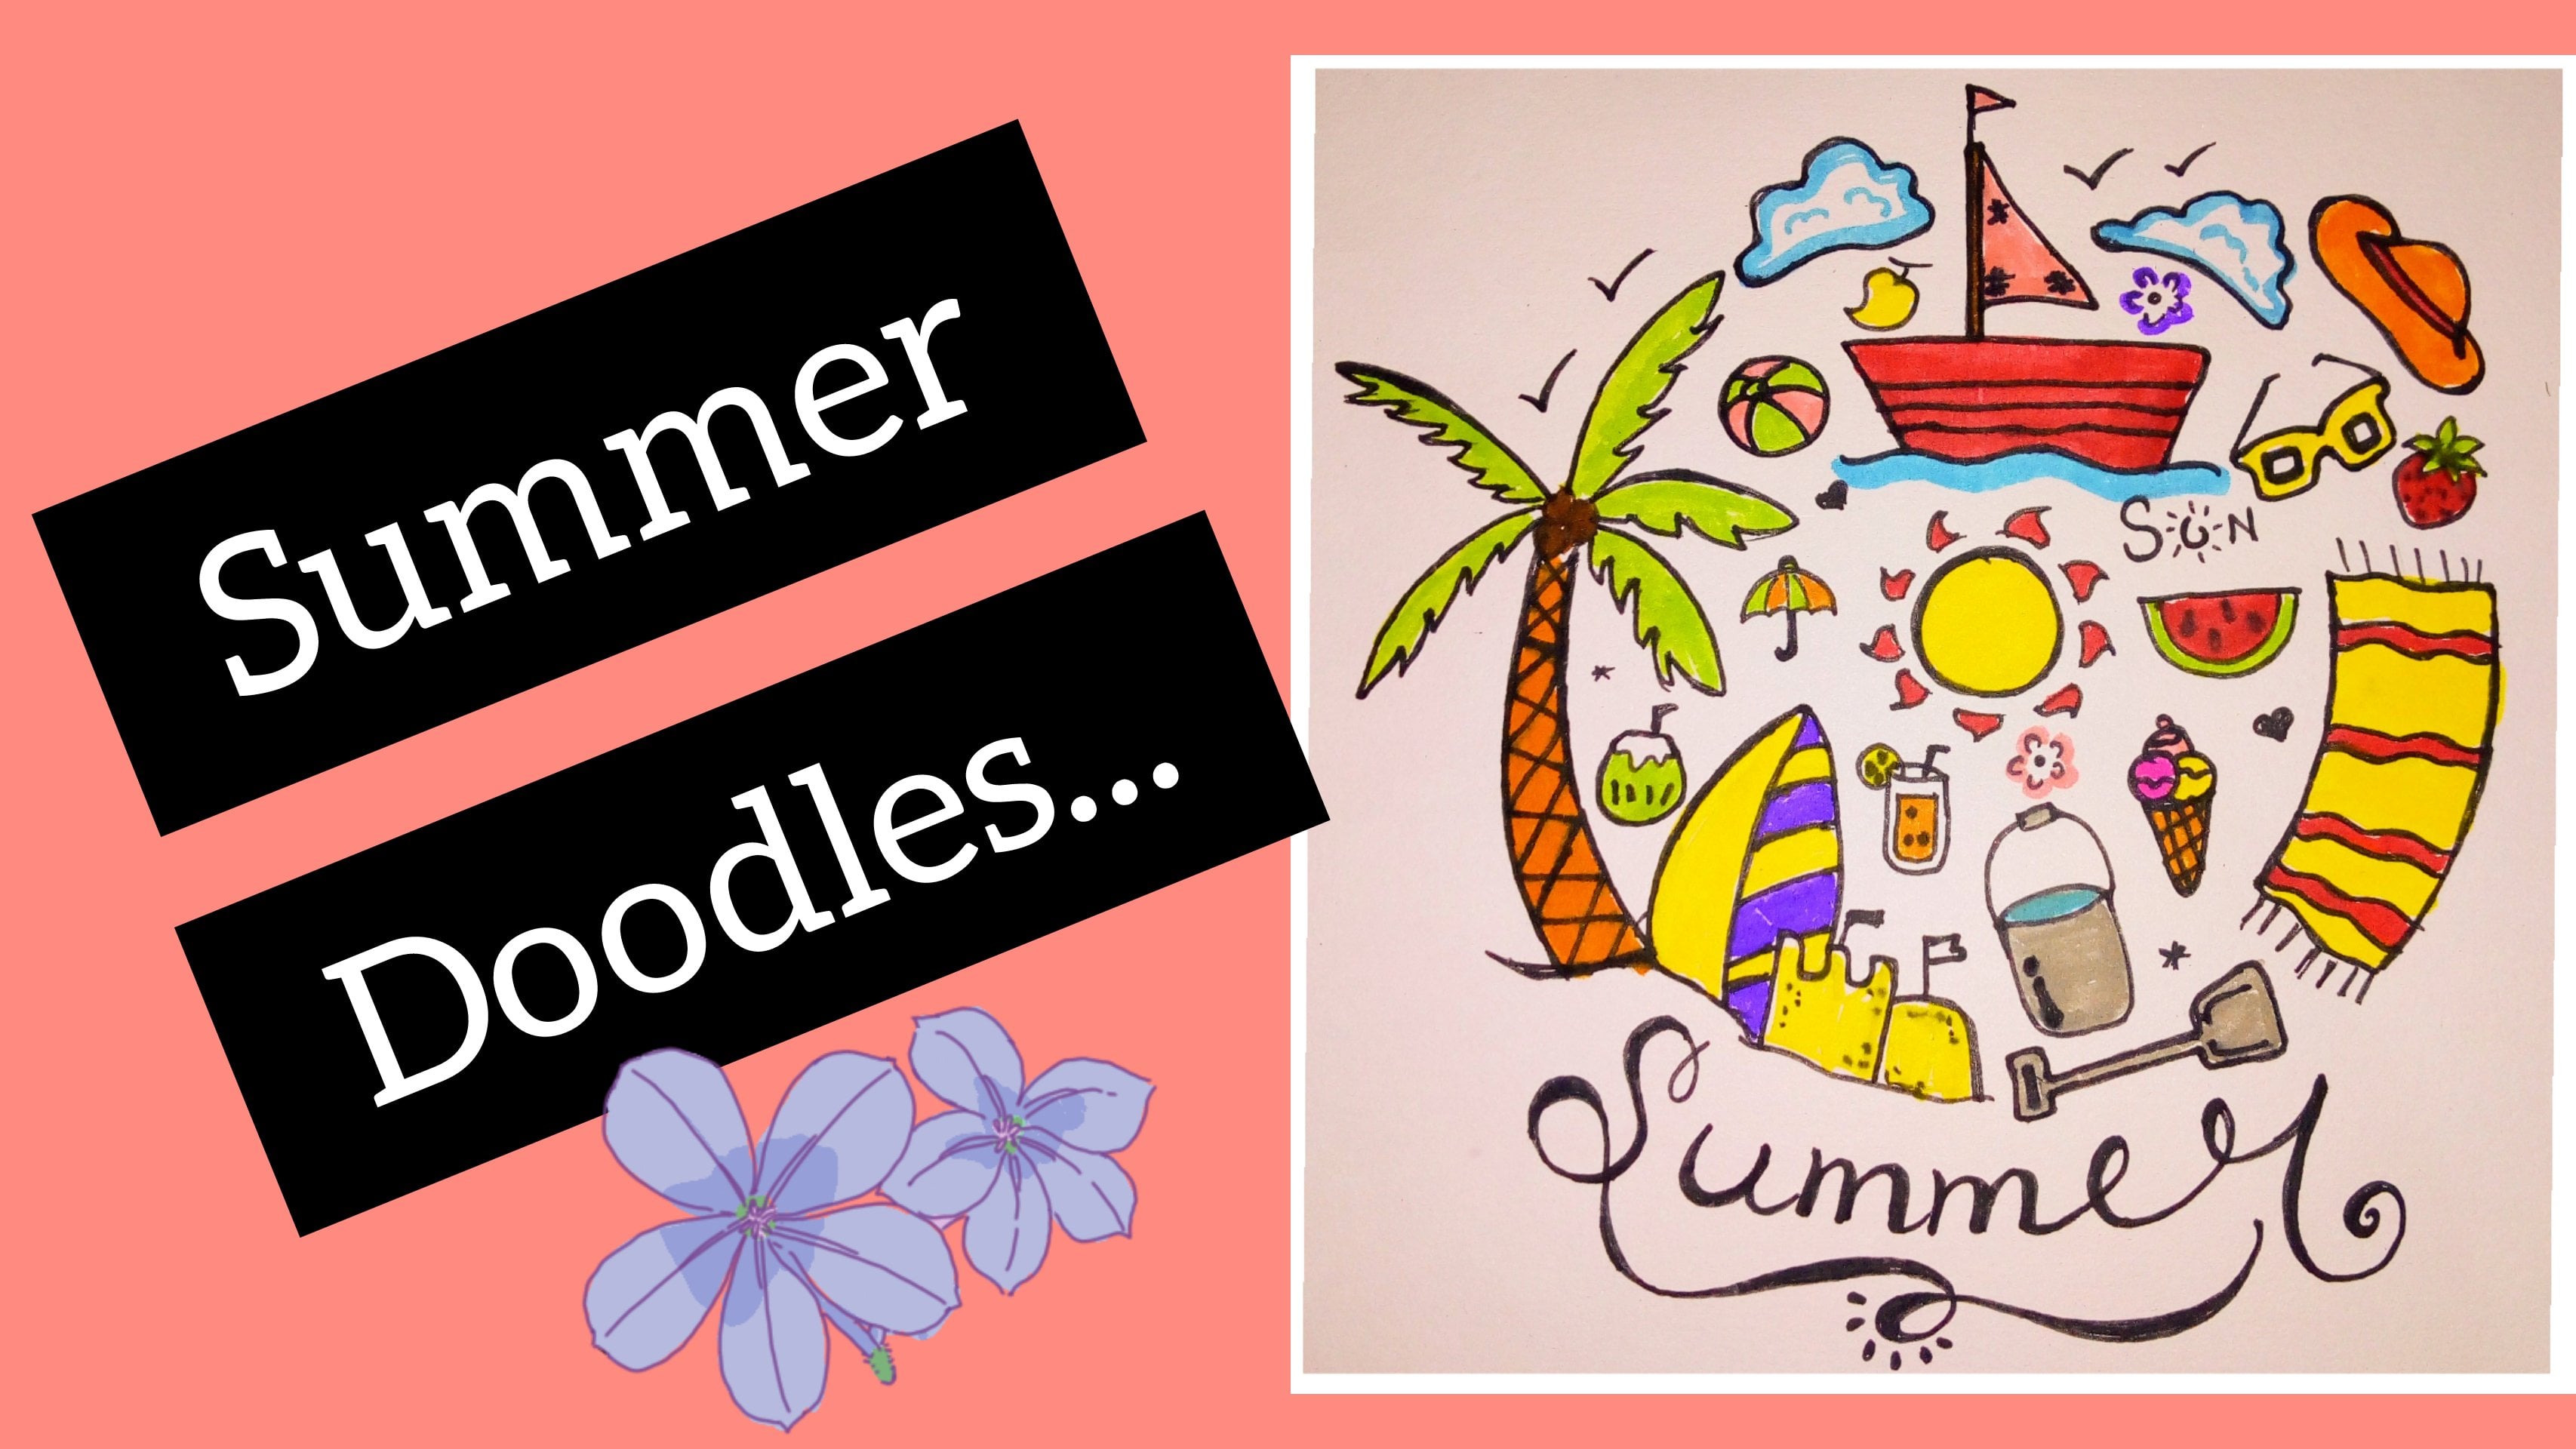
Transcripts
1. Introduction: Hello everyone. Welcome to my, this poor guy. Goya's painting class. I'm an artist and an educator. This class, I'm going to teach
you to draw any info card. That is why the
painting is created by private people from North
A3 range in my raj, India. The simplest one and the
most important aspect of this painting is that
it depicts social life. Picture of human beings
saying any words are created along with the scenes of daily life and lose
rhythmic pattern. So I teach you from
the very basic in which they first defined line
to draw some human figures. Then we will learn
to draw borders. Then some birds,
animals, and so on. In Bali, I extend. After that using
these basic things, we will draw two finite
boiling paintings. First on the black paper, either using my pen, the help of pain. Another one on some ways
that we can reuse it. So come join and gain mastery
over this Indian folk art. That is, thank you, buh-bye.
2. Material Needed: Hey, all before
discussing the supplies that we are going to
need for this class, let us first take a
look at its history. As we know that volley painting is created by tribal people. So initially these beautiful
volley paintings were made on mud walls with a
piece of rising water. I'm chilled. Bamboo stakes were used
to act as paintbrushes? No, no, don't worry. We're not going to use all of
these materials. So here are the things that you are going to
need for this class. Multipled white
sheets of any size. When A4 size blank sheet, when all CD or old cake,
this pencil, eraser, black fine liner, CDMA
or normal black gel pen, white or silver pen, paintbrush, acrylic
colors and Dotson. With all these things
you are ready to massa Indian forgot
volley painting. So see you in the
next video. Bye.
3. Human Figures: So let's begin with the human
figures in volley odd Stan. ****, we will start
with this simple and the basic shape that we can
say we will use alphabet. And then one-by-one,
we will move further and learn to draw
a complete human figure. Then we will learn to draw
different human figures. Like we will learn
to draw, remain man, boy, girl, man, or
lady, and so on. I'm using this light weight, a full-size white color sheet. But you can use any other
type of any size sheet. Or in fact, you can use your sketch book in which
you practice your artwork. So it's up to you.
You can use any type of sheet as it is
just for practice. And then I use this black city marker to
draw the human figures. However, instead of the smoker, you can also use
black fine liner, simple black gel pen. But if you do not want to
start directly with the pen, you can cause the
start with the pencil. Now that everything is ready, let's us start with
labeling our sheet. And for that, I'm
going to write volley human figures as we are going to draw human figures
only on the sheet. Here. You can notice
that I'm writing it very free handedly,
unencapsulated. There is no need to write it in very stylish way or very decoratively as it
is just for us, since we are just
practicing it on the sheet so you can write it three handedly in your
running writing. If you want, you can
underline it as well. Either with the
state line are just like me with the help
of these wavy lines. So there are two to three ways to draw the volley
human figures. We will start with
the simplest one, and we will draw it
in different states. So for this step number one, you have to simply draw an
X alphabet just like this. And once you draw it, label it with the number one. We can draw further or the
next step hail as well. But in order to
practice more and more, we're gonna repeat
each and every step again and again so that
we can muster with that. So let's start
with the step two. And for that, first of all, repeat this step
gun, just like this. And then join both the
upper and the lower ends of these intersecting lines with the horizontal line like this. So now the body of the
human figure is ready. Now, in the third step, repeat both the previous steps. And here you can notice that
I've drawn this X or vague, broader than the previous
one in order to show the difference between the body of different human figures. Once you're done with the vote, the previous steps start drawing
too small vertical line. So what this horizontal
line, just like this. The second step, I
forgot to label body. So if you want, then
you can also label it. And if you don't want to, then you can leave it. The third step is also done. So just label it with
the number three. Now let's move on to the Info two step
and this step first, repeat all the previous steps. And then how we are going to draw the head of
our human figure. So far that first repeat
all these steps like this. And then over these two
small vertical lines, draw a small circle for the
head of the human figure. Just like this. If you want, then you can also label
the head just like here. I am with data for two
step is also done. So by now, we have
learned to draw the body and the head
of the human figure. Now in the upcoming steps
were really learn to draw the hand of the human
figure as well as legs. Now, let's move on to the
next step in which we will learn to draw the body of the human figure
in different way. So far that you
have to simply draw the letters like this and then join these two ends of the letters with the slant
line, just like this. And you can see with that the body of the human
figure is ready. Earlier we learn to draw
the body with the letter x. Now, we have landed
with the letter Z also. Now, what you have to do is you have to repeat the
step number three, unfold for the neck and the
head of the human figure. So just draw two small
vertical lines and then a dot or small
circle like this. So bloody hands to start
with the right side and simply draw a V-shape like this. Repeat the same
id left side too. And you can notice that
it is somewhat looking similar to the tick mark, right? So the first step is also ready. Now let's move on to the
next step in which we will learn to draw the
lakes of human figures. But before that, repeat
all the previous steps. And for the body of
the human figure, it is up to you. You can either draw it
with the help of letter x, o with the help of letters Z. Now that we have repeated
till the step number five, it is time to draw the legs of a human figure that I'm going to do with very
simple alphabet. That is, okay, So you might be thinking
how it is S Now, right? Let's see here. It
says like this. Now these two VMs, instead of these two VMs, I have drawn at, appointed it. Just like this. This is what I have there. Right? Now. Let's draw
the, another leg. Similarly like this. Okay? So our human figure is ready. We have drawn the hands, legs, body, neck, head, everything. So with dark, the drawing of human figures step-by-step
is completed. Now, let's draw the
human figure once again using the
previous estates, either with the
help of alphabet x, o, with the help of Alphabet Z. As more you practice, more, you will gain
mastery over it. Once they complete
human figure is ready, start filling the black
color in the body of the human figure that is in both upper and the
lower triangles, just like here, I'm telling. After this, start filling
black color in the head. Also. What does our human
figure is completely ready. So let's label it. And here I'm labeling
it as volley me. He is drawing are wildly me
human figure is this simply, let's give it the
number seven as well. Now, let's learn
to draw the void leafy me and it
is not very hard. It is as simple as
the boiling mean. We just have to modify
it a little bit. So first draw the body of the volley theory
mean like this. Then with the help of
two vertical lines, the neck under small circle
over it for the head. After this I, this
circular part, draw a small circle like this. I'm Phil, both the head and this circle with the black color. Once you completely fill
both these circles, you will understand that
this is smaller circle is somewhat looking like the
hair bun of the female right? After that start filling color
in the body of the female, just like we failed the
valine right after this, start drawing the hands and the legs of the volley female, just like we learned to draw
in the fifth, sixth step. So the volley female
human figure is JD. Now it is up to you. You can leave it as
it is right now. You can add some
SSDs, just like here. I'm adding here, I'm marking some small dots around
the hair band like this. After that, draw two
small slant lines here. I'm too small dots, one over each line,
line like this. This representation
for the accessories of the burn of the female. After this, draw
two small circles at the end of both
hands like this. And then draw two
small curve like this. And they both hands to
Representative bangles. Now in the lakes as well, draw an oval shape, very thin ovular shape to represent the
anklets and defeat. You can clearly noticed the difference between
the male and the female and male we haven't drawn any burn and
any accessories. Violin, female, we
have drawn a bunch, then been accessories, bangles. Then anklet, but it is not necessary to draw
the accessories. You can totally skip
this as a three-part, as this small circle
representing the hair been as enough to represent
that this human figure, as for the volley female. So it's up to you. You can either draw the
SSDs or escape this. So let's label this human
figure as wildly female. I'm with the eight number as
I'm here for the reference. I'm also drawing a
small human figure for the female that is
without the SSDs. So that in the future
you do not get confused that it is
without the CSS3. So it might not be
a worldly female. Know to draw the human
figure for the volley goes, where do you have to do? Is you have to draw till
the step number six, just like we do till the step
number six was the body, then the neck part, then hide with the
help of small circle. And then the fifth
and the sixth step, the hands and the legs
of the human figure. After this, what do you have
to do is you have to draw two slant lines when it eats
side of the head like this. And then near these
two slant lines, draw one more slant line, but very small in
such a way that it is in opposite direction
than the previous one. So these two slant lines are
for the grades of the good. And with that, our human figure for the volley girl is reading. If you want, then you
can also fill color in the head and the body
of this girl as well. Now, for the volley boy, simply first draw the figure
of volume meal like this. Then at the head, draw small, small lines like
this to represent these small hair over
the head of the boy. The boy is ready. You can live with both boy
and girl with number nine, or you can label them
separately with number 910. Now, it's time to learn the human figure for the
old men and oil lady. So let's start with the oil men. And for that, first of all, draw a V-shape like this. And then over both
the slant lines, draw a semicircle like this. But make sure that this bottom semicircle is somewhat straight
from the bottom. Just like this. Now from here, draw two small
slant lines for the neck. I know what the slant lines
draw a circle for the head. After that, draw the legs of
the human finger like this. And then from this point
draw a slant line like this. Then one like this, and another hand like this. After that, draw
one more slant line in such a way that
it is this take, which this old person has
been holding on with this, the human figure for the
volley old men is ready. You can label it as I have done, or you can also fill color in the body and the head
of the human figure. Okay, let's draw
a V-shape again. And then from this point, draw a not so straight
triangle like this. After that, along
the slant line, draw a semicircle
just like this. Now, I draw the
neck and a circle for the head of the
lady, just like this. And then draw one more circle. Hail for the hail been deleted. Just like this. After that, like we draw
the hands of the old men, draw the hands of the old lady as a one slant line
for the steak. Just like this. After that, draw the
legs off the oil lading just like we
do for the old man. Okay. So now let me explain
that why I have used this kind of v-shaped to
draw oil man or lady, unsaid of that X or Z. It is because I want
it to represent a kind of vent to back off the
old men and old woman. So for that, I have
used that V-shape. Okay, so now let's
take a look back. We have started with this simple x alphabet from which we have
learned to draw the body, the neck, then the
head over that neck. Then we'll learn to
draw the lens that has hand and the legs
of the human figure. And with that, we'll
learn to draw, how to draw the vole
male than female. Then we learn to draw
wildly girl and boy. I also will learn to
draw some oil men, an old woman, right? So these are the
volley human figures which you have started from the very basic and learn to draw different type
of human figures. Now, you have to practice
these human figures, and I'll meet you in the
next video in which we will learn to draw different
types of volleyball orders. So see you in the next video. Bye-bye.
4. Border Designing: Now in this video, you will learn to draw different kinds of
volleyball odors. But before moving further, let's leave with this sheet. And here you can either write volleyball orders
or simply borders as it is just for you. You can write it 300 lead, just like here I'm writing. If you want, you can
underline it as well, though with the straight
line or some wavy line. After that, take a
ruler and divide the sheet into two equal
halves vertically. Just like here, I have did. Then draw a horizontal
line in such a way that it passes through the starting point of
the vertical line? Yes. Just like this. After that drove one
more horizontal line parallel to the first one in such a way that the
distance between these lines is about
1.5 to two centimeter. So with the help of
this vertical line, we are able to draw two different bodily
borders in a single room. Now, before we starting
off first volleyball, let's divide this into two equal halves by the help
of the horizontal line. Just like here I'm drawing. Okay, so now that
we have two parts, Let's start with the upper half. Here. I'm going to
draw triangles. I'm for that. Here you can say
that I'm drawing kind of connected
via an inverted V. Or you can also
see that there are multiple w's are EMS which
are connected to each other. You have to draw this kind
of pattern till the end or this vertical line if you
are copying the exact way. Once this is done, let's complete the shape of our triangle by drawing
this horizontal line. And here I'm gonna fail black
color and this triangle. If you want, then you can
also simply shaded with the help of this black pen
or whatever you are using. Or you can also draw some slant lines
inside the triangle. And with this, we're done with the upper half triangular
design of this border. Now let's move on
to the lower half. And here I'm going
to draw small, small vertical lines
just below the triangle. Now it is up to you. You can either decide to draw only fixed number of vertical lines below
each and every triangle. For example, you can draw six vertical lines below
each and every triangle. You can draw these vertical
lines randomly till the end. What else you can do here by drawing these vertical lines? You can increase or decrease the spacing between
each and every line. On here. You can notice that
while drawing these lines, I haven't touched
them till the bottom or the horizontal
line completely. I have left some space between these vertical lines and
horizontal lines, right? So once you draw these
vertical lines completely, start drawing circles at the end of alternate
vertical lines. If you have small space
between each and every line. But if there is no space
between these lines, then you can draw the circle
at the end of every line. It is up to you. You can modify the
design as per yourself. With this, our first
var lib order is ready. Now let's move on to
our second volleyball. Um, but diet, again, take your ruler and outline the upper horizontal
line, just like this. After dark, outline the lower
horizontal line as well. Now, in-between these two lines, we are going to repeat
this same pattern that we have drawn in the upper half
of our first live order. Once you are done
in those direction, repeat the same pattern
but in opposite direction. For example, first, if you
have an upside down triangle, then those time do
the opposite of it. Here you can notice that these shapes that
we have got due to the merging of two
opposite side triangles are not very equal every time, but it is totally
okay as right now, we're just practicing it once, if you will, draw it very carefully with the
help of the ruler. You'll get these shapes aqueous. Now, what you can
do is you can draw some small rectangles
inside these shades, and it is up to you. You can either fill color
in those rectangles or you can add some crisscross pattern inside those rectangles. Now, this is small triangle. Draw one more small triangle
like this and fill color. And you have to
draw this kind of small triangles in between
all the triangles like this. And repeat the same process till the end of
this border design. With this, the second volley
border design is also ready. Now let's move on to the
third and the fourth one. I put those two wider design. Again, draw two
horizontal lines, just like we drew earlier for the first and
the second one. Now let's begin
our third border. I thought that first of all, outlined both these
upper and lower horizontal lines
with the help of the marker pen or
whatever you are using. Once then that start drawing small semi-circles along
this upper horizontal line. Just like here I'm drawing. And you can notice that each semicircle is connected
with the previous one right? After this, draw two
more semi-circles inside all of these
semi-circles, duly decreasing in
size, just like this. Repeat the same till the
end of this border design. And at some point you feel that your semi-circles are
somewhat bigger than mine. I'm you can draw more than two semi-circles
inside each of them. Then feel free to
modify this design. Now, let's draw small, small vertical lines along
this horizontal line in such a way that does line will be in centre of
two semi-circles. Draw us more vertical
line like this, and repeat the same till
the end of this design. So hail in total,
I've drawn five, so two vertical lines, but they can vary from
person to person. After this draw to two small circular arcs over each and every
vertical line. Such a way that the first circular arc does
not touch the vertical line. Here. You can notice that, yes, I have left some space between the first circular arc
and the vertical line. Now, if you feel
that you can add one more circular arc
over the second one, then you can add as. So here, I'm going to add
one more circular arc over the second one over eating every vertical line,
just like this. But if there is no space, then you can leave it
as it is right now. Now, the last part of this
design is to draw a small, small circles in between all
of these vertical lines. Just like this. I'm with that our third
border designers also ready. Now it's fourth-quarter
time einfach that again outline the upper
and the horizontal line, just like we did
in the third one. That you can either use ruler or you can also do
that free handedly. Now here also we
are going to draw semicircle along this
horizontal line, just like the third one. But this time I'm going to draw somewhat small semi-circle as compared to the
third border design. And also they are
semi-circles word continuous, and there was no gap
between two semi-circles. But here we are going to leave some small gap are distance
between two semi-circles. And make sure that whenever
you draw these semi-circles, you leave that equal, or tried to leave that equal
distance between them. Once you draw this
kind of semicircle along the complete length
of your border design. I've been more
semicircle in each of them and fill color in
those semi-circles. However, you can skip this coloring part
and leave them empty. Or if you want, then
you can add some crisscross pattern inside
those is small semicircle. Now along this first semicircle and I'm going to draw
small, small lines. I inhale, I'm intuitive
drawing nine lines, but that is up to you. You can change the number of these lines according to the
size of your semicircle. And once you draw these lines, start adding some small
circles over these lines. Just like here, I'm drawing. Defeat the same
pattern that is pause, draw these small lines
and then you would, these lines are small circles. And you can notice that
here every time I'm drawing nine lines around
each and every semicircle. You can do that
according to yourself. If you want, then you
can also copy the same. Along this horizontal line, we are again going to
draw semi-circles, however, smaller
than the upper ones. I'm just like we add one more semicircle
in the first one. Hello, We are gonna
do that also. You can notice that
semi-circles along this line are somewhat in-between the
upper two semi-circles. Okay, once then that
now start drawing smooth muscle that goes around
these small semi-circles, just like here I'm doing. So you can see how
beautiful it is looking. You have to repeat
the same process till the complete end
of the border design. Just like here I
have done, right? And with that, our fourth wildly border
designers also ready. Now for the fifth and
the sixth border design, first draw two horizontal lines, just like we do for
the other ones. Okay, so now let's
just start with that. First of all, leave
order design. I'm caught that first if I outline the upper
horizontal line, either with the help of
the ruler of re handedly. Then draw horizontal
line leaving about 0.1 or 0.2 centimeter
distance between them. Just like this. Okay? Now what we're gonna do is we're going to
draw a slant lines towards the right
side inside does a small gap. Just like this. You can draw these landlines and opposing direction as well. So it is up to you. You can either draw
them towards the right or towards the left eye. In fact, you can draw some straight lines instead
of these landlines. And fake. You can
increase or decrease the spacing between these
lines are the straight lines, whatever you are drawing
according to yours, you can leave a
small gap or you can leave some more gap
between these lines. After this outline, the lower
horizontal line as well. Now here we are going to draw
kind of leaf shape along this horizontal line and
sensitize a little bit tricky. So here I'm using this pencil for drawing
these design first. And then I'll just
outline them with the help of the Margo's
gauge or Blake pen, whatever you are using. So just first draw the
design with the pencil. And if there is any need, are you feeling that it
is not looking good? So right now you will
be able to erase it. But with the pain or the marker, you will not be able to do that. So if you find any
design a bit tricky, you can do that first with
pencil and then outline it. Okay, so now that my design
is ready in this portion, so I'm outlining it
with the help of the marker that I've
been using so far. Once you outline the
complete design with the help of your pen or
whatever you are using, make sure the ink
has dried up very well before it is in
the extra pencil bar. After dark linear
sheet and start drawing small sulcus
between these two leaves. But near the upper
horizontal line. I'm not going to draw these circles near the
lower horizontal line. But if you want so then
you can add there too. But to me, this is
looking much better. If you want, then you can add
some designing lease also, like you can add some shading inside these leaves
so that is up to you. You can modify it
according to yourself. Okay, now, it is time
for our sakes to only border design and data
is gonna be very simple. For this one, you
just have to draw a wavy line between these
two parallel lines, just like here I'm drawing. And you can notice that
it is very simple. After that drug, one more such wavy line
parallel to this first one, if you are using a gel pen
or a marker just like me. But if you are using
something that has taken up, then there is no need
to draw two wavy lines. You can do this in
a single group. Now to make it look, take wavy line just well, black color between
these two wavy lines, just like here I'm doing. Now, draw small sulcus, just like here I'm drawing and fill them with
the black color. Repeat the same till the
complete length of your Goddard is on with us. Or simplest border
designers really.
5. Some More Borders: Now for the seventh,
eighth garden design, what do you have to do is draw three horizontal lines
parallel to each other, leaving equal distance among d3. Once you draw, all
these three lines, outline the middle line, that is the second number
line with the help of the marker or sketch pen
or whatever you are using. Just like here I have. Okay, now let's pause, complete our seventh
border design. And for that, draw a
seven desert like this. Or I can say that first draw a small horizontal line
over the first one. I'm from first to the third, draw a vertical line like this. Now from this point, draw a small horizontal
line like this. Then again a vertical line and continue this same till the
end of the border design. Pale by drying this kind of pattern along the
central horizontal line, you can notice
that we're getting kind of close square
or rectangular shape that doing alternate manner. Now in Dutch shave, we're going to draw small, small circles and fill them
with the black color itself. If you don't want
to draw this kind of circle in these
glues triggers, then what else you
can do is you can completely fill these shapes
with the black color. You can add some
crisscross pattern inside. Then you can simply draw slant
lines or vertical lines. So it is up to you, you can do anything. So with this seventh
border design is ready. Now let's move on
to the a to design. And yes, that is
also going to be very easy as we are going to draw kind of leaf design around this central
horizontal line. So for the leaf here, I'm drawing a round shape
from the top like this. Hail. I'm going to repeat
this same design till the complete length of our border design to make it look like a somewhat
wine design. Now, it is your choice. You can either exactly copy the leaf design just
like here I'm growing. You can also draw some, another kind of shape
or another kind of leaf that you have learned
earlier somewhere. With that, our eighth border
design is also ready. I hope you guys have
found it very easy. Now, let's move on to a ninth
and the tenth to design, I'm caught that again, draw three horizontal lines just like we do for
the seventh, eighth 1. Now for the ninth border, outline the central
line like this. Then leaving about
0.05 centimeter distance from there to draw one more line
parallel to this one. Now and they tend to
border design plus outline the central line and
then the upper and the lower horizontal
line like this. So now that outlining
part is done for the ninth and the
tenth grader design. Let's just start
drawing on ninth one. So far that here I'm going
to draw a slant lines, just like we do here. But here we drew them
towards the right. This time we are going to draw them towards the left side. You can clearly noticed
the difference between the slant lines that
we drew earlier. I'm now drawing now around this line that is
looking at kind of group. We are going to draw
alternate triangles. But example first I'm going
to draw a triangular shaped like hair touching the bottom
horizontal line like this. Now, I'm going to draw the, another triangle in such
a way that it would look like that this line
is extended to the, another side as well. So from this point, I'm going to draw another
triangle like this. Now from the spine, draw a triangle at this time. Now repeat the same till the complete length
of the border design. After that, draw small, smaller triangle inside each of the triangles that we
have drawn so far. Then you can either
fill color inside those smaller
triangles or you can also draw some slant
lines are straight lines. In fact, you can also draw small circles inside
these smaller triangles. After that, draw small circles
are the opposite side of each and every triangle close to the central horizontal
line, just like this. Now if you want, then you can add
some circular arc around the circle says way. But for me, this
design is complete. Now let's start drawing. I tend to order
design on this one. I'm only going to use vertical lines and
horizontal lines. So let's start with
the vertical lines. Draw about five to six
vertical lines like this. Now, in the upper half leave approximately equal
space that we have used for five to
six vertical lines. And again, draw the vertical
line on the lower half, just below the space that we
have left in the upper half, I start drawing vertical
lines like this. So in this way we
are kind of drawing vertical lines and
alternate minor, right? You can increase or
decrease the spacing between these vertical
lines as for yourself. And if you're not able to leave approximately equal
distance between two sticks of vertical lines, then what else you can
do is you can mark small points at a distance
of one or 1.5 centimeter. This way you will be able
to leave approximately, or we can say, almost
equal gap every time. So here we are done with
these vertical lines. Now it's time to draw horizontal lines and
these empty boxes, you can also draw small
circles in these boxes, just like we do here. But since I have
already decided to draw this border with vertical
and horizontal lines, so here I'm filling these empty boxes with
horizontal lines only. If you are feeling that
you are not able to draw this straight
horizontal line, then what you can do is take
a rough sheet of paper and start drawing straight
horizontal line over that sheet
of paper roughly. And you'll notice that once you reach the end of the sheet, you are able to draw that straight horizontal line without the help of any ruler. So I tend to order
designers also ready. Now to draw the 11th
and 12th border design. First of all, draw the
upper horizontal line. And this time I'm going to draw it with the
marker directly. But draw the lower
horizontal line as usual with the
help of depends. Now to start the border design, draw vertical lines from the upper horizontal line to
the bottom one like this. Then we are going to
join this point and this point with the help
of slant line like this. Join all these points like this. And this way you'll notice that we have got some
triangular shape. Now, in these triangular shape, I'm going to fill
them with the help of the vertical lines like this. But if you want, then you can fill
these triangular shape with the help of
horizontal line. As you can see, our 11th border design
was that simple. Now let's move on to our 12th
border design on five dot. First of all, draw a straight horizontal
line in between these two in such a way that the upper part is bigger
than the lower bound. Now in this upper bar, Let's draw upside down triangle in such a way that the base of the triangle do not touch the upper horizontal
line like this. Here you can notice that I'm not drawing these triangles
connected to each other. So you have to leave a small gap between each
and every triangle, just like I have done. After this, draw us nice
vertical line and this gap i1 at the both side of
this vertical line draw a leafy pattern
just like this. Then Martha dot
over it like this. Now repeat this same pattern in all the gaps between
all of these triangles. Once then dot start
drawing small triangles inside all of these triangles
and fill color in them. However, if you don't want
to draw these triangles, you can totally skip this. And in fact, you can skip
this coloring part two. You can add some,
another design. For example, you can add some circles or you can
simply add some shading. So it's up to you. You can modify it
as per your cells. So this border design is ready. Now, wait for a while to get
the ink dried up very well, and then erase this line
with the help of year. It is as this line is
not required anymore. Now, again prepared
two horizontal lines for the next two water designs, just like we did so far. And then the 13th
border design outline the upper horizontal line with the help of the
marker like this. Now, draw small circles
or semi-circles along this horizontal line at EQ
descend from each other. And then once you draw them, fill color in all of these circles with the help
of the margarita or sketch, spin this around the
horizontal line, draw the circular arcs around
these circles like this. And then draw some small
slanting straight lines around the circular arcs in such a way that it completely
surround these circular. Instead of these small lines. You can also outline the circular arcs with
the help of small dots. After this, along the
bottom horizontal line, draw a semicircle and outline it with the help
of small dots like this. Repeat the same till the complete border design
and make sure that you draw these semicircular
design such a way that it comes in between
the upper two designs, but along the button going
after that just outline the bottom horizontal line as with data 13th
border design is ready. Now for the 14th, winds simply draw a wavy line, just like we drew earlier between these two
parallel lines. And earlier we have
drawn a thick wavy line, but this time we don't need, so after that draw small, small, not so straight lines along this wavy line or devotes
side of it like this. Then add small, small
dots over these is more lines just like here on id. So these small
dots and lines are representing a leaf-like
pattern along this wavy line. With that, this border
design is also ready. Now let's move on to I
lost you order designs. And for those two, again, prepare two horizontal lines just like we have done so far. Now let's draw the second
loss border design. And for that simply
draw a triangle between these two lines and the fill color in it
just like I'm doing. Or you can also draw
some lines inside it. After that, draw two
vertical lines like this. And now you have to
just repeat this thing. Draw a triangle,
we'll color in it. Then draw two vertical
lines and just repeat the same till the complete
end of the border design. And in the end you'll
see the ideas. You have got a very
beautiful border design that too was very simple. Now, let us just draw the last and the final
border design. And that is also very simply, you just have to
draw semi-circles along the upper horizontal
line like this. And made sure that
you do not draw these semi-circles
connected to each other. Now from this point, again, draw a semicircle bit bigger
than the earlier one. This way you will get a kind
of crescent moon shape. After that drove four circles, just like here, I'm drawing in-between the crescent
moon kind of shape. And you can notice that
the size of the circles I gradually decreasing as we
move top to the bottom. Now, draw small
vertical lines from the center of each
crescent moon shape, just like I have drawn. And after dot, draw
small vertical lines, at least four at
the both side of the central vertical line and gradually
decreasing in size. Now I just smaller dots at the end of these vertical lines, just like here I'm doing. If you've worn so then you can do this in alternate manner. And with this or 16 volleyball, other designs are already somewhat easy and
somewhat a bit tricky. However, these 16
are just example and there are lots of different styles to
draw volley borders. So just practice
more and mood to draw different kinds
of volleyball odors. And now I'll meet you in
the next video in which we will learn to draw different
kinds of volley birds. So stay tuned.
6. Birds: Now it's time to draw different
words in wildly style. So let's first of all leveler
sheet and put that here. I'm writing volley birds
and that to 300 Lee. If you've gone, then you can
simply write words only. Now, instead of underlining
this volley boats, I'm going to draw a straight
horizontal line with two dots are the both
side of this volleyball. So it is also a way
to decorate your, whatever you have written. Now, let's start drawing. Our first two are Leiber bird. So for that, let's first of all draw a triangle for
the body of our bird. Just like this, right? Now from this left side point, draw a curve towards the
right side like this. And this curve is the
neck of our volleyball. After died, draw a circle at the end of this curve,
just like this. So this is where the head of our bird then from this point
draw a not so straight, triangular shaped like this. As this is the beak of a bird. Black color and the
beak either with the help of margarita
or sketch pen. And then draw a small dot inside the circle
for the IL-5 body. Now for the legs over. But first of all, draw as land line from this
point, just like this. And then draw three
small lines for the close of the bird like this. Now it's time to draw
this second leg. So first of all, draw a
small line like those, then align somewhat parallel to the first one, just like this. After that drug law,
just like this. Draw three lines like this, and this one has
four toes by two. We have drawn only three to show that one is at its backside. Now for the wings, draw three lines
from this right side vertex in which one is this
trait and horizontal one, while the other two, that is, whilst they need slant lines. Now, just draw a kind of leaf-like structure at the
end of these three lines. Yes, like this. So these are the faders. After this draw, a kind
of ovular or pointed at both ends shape inside
all these three shapes, I'm fill color in it. Yes, just like here I'm doing. Now to decorate
these three lines, we are going to draw a lots of V kind shape along these lines. On these weekend shapes are representing that these
are the small feathers. And after that draw small, small slant lines or
small curvy lines around these leafy like structure to make it look like
more beautiful. I'm with that the wings
of a bird are ready. Now draw a smaller triangles inside this triangular
shape and fill color. As earlier, it was
looking quite empty. So do add some design. I have drawn this triangle. You can add some pattern also. The DOD for the ground draw not so straight three lines over the head, just like this. Just like we here do
this kind of pattern. We are again going to draw
it around these three lines. Like make sure you draw them the same very small ion with us. Our first volleyball
drawing is ready. I hope now you are
able to recognize it. Yes, it is a peacock. Now, our second word is dog. This time, I'm not going to draw this talk directly
with the marker. I'm gonna use my pencil first as the body shape of
stock is bit tricky. So draw a figure just like here. I have drawn a pointed round the burning and kind of
overlap from another end. Now that the basic
shape is ready, I'm going to outline it
with the help of my marker. And if there is any need
to adjust the shape, I'll do that directly
with the marker now. Now from this point, draw a kind of S, or I can see a V-shaped like this as it is the
neck of our bird. And from this point, draw a not so proper circle. Or we can say as they to
ovular shape like this. After that from this point, draw out the copper
burn just like this, and then fill color and
no mocker small dot inside the circle for
the eye of the neck. Hey, Andy, body of
a bird is saying, now for the legs of a
bird, first of all, draw a straight line from
this point, like this. And just like we
drew the claw here, draw three small lines
for the claw here. Now for the second
leg, first of all, draw a bed slant line like this, then a line like this to show that the bird is somewhat
sanding on ads one feet on D, and then fill black
color in this shape, which is the body of a bird. As this time, I'm not gonna draw any other pattern
inside the shape. You can also do shading instead of filling
color and the shape. And in fact, if you
are not interested in shading or filling
color in the shape, then you can totally skip
this step as right now, it is just for our practice. Videos, do not forget to label which bird we have drawn
as the help of this. You will be able to remember how you are going to draw this, but in volley art style. So here I'm labeling
it stopped. Now. We are going to
draw a flying bird, and that is the flying crew. Here. I'm again
using my pencil to draw the basic
outline for the bird. So far the body, first of all, draw a kind of oval shape, but one side should
be pointed while the, another should be ovular, or we can say kind of circular. Once the body shape is ready, draw a slightly curved lines at the both side of the shape. And these lines are the basic outline for
the wings of a bird. After that draw or not. So straight line and
then circle like this. Now at this point, draw the beak of a
bird and the same, I'm going to draw a Smiley
beak than the earlier ones. Then Margo's smile dot for
the i inside this circle. Just like we drew
three lines here. We are here also
when I draw lines, but this time we are drawing
four lines instead of three. Now that basic shape of
our flying bird is ready, let's outline it first and
then we will add details in. Now for the veins along these
slightly circular lines, draw small, small lines just
like here I'm drawing here. These small lines are kind of representing the
feathers of the bird. After that, outline these
whole lines as well like this, and then draw small, small circles at the end
of each line like this. Now, just like we fill color
in the body of our stock, you can also fill
color here as well. So here I'm filling color. But if you don't
want to do that, you can do shading or you can draw some pattern inside it, or you can also skip
this completely, as I have already told you that this is
just for our rectus. The dark just label this
bird drawing us grew. So here I'm writing grew and
my running handwriting only. Now for the food. But first of all, draw a slant line like this, and then divide this
line into two parts. I'm doing the ratio
of two is still one. So here I have
divided it like this. Both parties to the lower one
is even part of the line. Now, this upper part, we are going to draw
the body of a bird. So far diet, you have
to draw out kind of circular arc along
this line like this. Okay, So body of
the bird is ready. Now draw a slant line in
the other direction and then join these two lines with the help of a curvy
arc like this. So this is the tail
of our burned. After that, draw a circle
for the head of our bird. As this time we are not going to draw the neck of this bird. After drawing this drawing, be kind of tilted downwards and fill it with the
black color itself. And then mark a small dot inside the circle for
the eye of the bird. I'm for the ground, draw three lines like this. I know what these lines
draw small circles. So the crown is also ready. Now let's decorate
the body of a bird. And for that, draw a small semicircle
inside it like this. And now in this version
I'm going to draw some lines like this for
leaving a small gap. Again, draw such line
and then repeat the same till the end of this semicircle or the body part of the bird. Now this is small portion of the body with
these small dots, just like we do in
the dot painting. Now openly tail reason
with the help of multiple small circular arcs which are parallel
to each other. But if you don't want
to draw it like this, you can also draw some another kind of
pattern to fill the tail. Now it's time to draw
the legs of our burned. And for data, simply draw two straight lines like this and then draw the clause
just like we have learned to do it with this, our food, but that is
goo is also ready. So just write down its name, just like we have
written other's name. Now, let us draw our fifth two, but that is so far
the body of the hand. First, if I draw a triangle in such a way that it's epics
is towards the left side. Here is just like this. And then fill color in this
triangle just like we have fill color in the body
of our crew and stalk. And if you want, then you can also draw
some patterns just like we do in the hoop
Woo. It's up to you. You can either fill
color or you can add some drawings or designs
inside this try look. After dark, draw a straight line from the spine like this, as this is the neck of our hay. And then draw a small circle at the top of this line
here, just like this. And this circle is
the head of our hand. No mark a small dot inside
the circle for the IFR hen. And then draw a V-shape here
for the beak of the hand. As this time, we have drawn the beaker bit different
than the other ones. After that, draw the
crown of the hand, and now it's time to draw
the legs of our hand. So plastic water draw a
small line like this. And now from this point, again, draw a line or we can see
our slant line like this. Now for the second leg, draw a line which is not
parallel to the first one. Then like this. Okay? After that, we have to draw
the clausify hand. This time. I'm going
to draw it like this. Now what events? I'm simply going to draw lines around this
point like this. First of all, I'll draw some four to five
lines in this way. And then when it comes
to the last line and simply going to draw a
loose shape like this. So first one is ready. Now simply label it as Hen. Now, we are going
to draw these 610, the last bird in Bali, I'd say so far that I'm again using pencil as it's shape
is also a bit tricky. So first of all, draw
a circle like this. And then drawn this circle, draw a kind of circular
facing upwards like this. Then draw one more circular
arc from the bottom side, just like this, and then join Google these acts at
the end like this. So the body and the
head of our bodies. Now, let's draw the IFR world
as you have learned so far. And then a small beat like this. So now that the basic
shape of our bodies JD, simply outline it with the help of the agarose gel
pen you are using. Now, this time we are going
to draw the legs of a bird. They different and most
people are kind of v-shaped like this and then
a straight line like this. So you might remember that
this kind of feet or legs, we have drawn an odd human
finger right? After that. When it comes to the tail part, simply draw small, small lines
from this point like this. Now in this body part of a void, simply draw a circular arc parallel to the body
outline, just like this. So we are going to fill this body part with this
kind of lines only. Does our body is always already. So this bug is known as fatal. Now, just write down
its name so that you will remember which body
you have drawn here. And with that, we have drawn are all these six bullets hail. There are lots of
different words that can be drawn in galliard sale. Even these six words can also be drawn in different ways
in this volume at state. So these are just samples
you can practice more and more and modify the
designs as well yourself. Now, in the next video, we will learn to
draw wildly animals. So stay tuned. Bye bye.
7. Animals: Now it's time to draw
animals in volley art style. So here I haven't written wildly animals on the
sheet to label it. You can also write it like this. Okay, so now we will start
with our first annual gutters. Got that first of all, draw a small triangle in such a way that its apex
is towards right side. Is like this. Now from this point, again, triangle but bigger
than the first one. Yes, just like this. So this is the main
body of our gut right? Now, to draw the head or
the game CDPS of the guard, what do you have
to do is draw us more horizontal line from
this point like this. And then draw an upside down triangle touching to
this line like this. Now we have the basic outline, our basic head
shape for our God. After that, draw ahead and add both of the vertices like this. Yes. And then from these
vertices, again, draw a somewhat small line
towards the downward, as these are the
ears of our God. And then my two small dots
for the eyes of our God. Now let us draw the
legs of our God. I infer that. First of all, let's draw from this vertex as land
line like this. This is the first leg. Now for the second leg, drawing unbalanced
line from this point. Here is like this. Okay? Now for the hoops, I'm simply going to draw
triangles at the end of these lines and then fill color in those triangles
to highlight them. And then for the,
another two legs, simply draw a slant line
from this point, like this. Then again, draw one more
slanted line from this point, but the stem towards
the left side. So that in the end we'll get a V-shape after
that, draw hooves. And for that, I already
told you that you have to draw a triangular
shape just like this. Then for the tail of the gods, simply draw a circular arc from this vertex
of the triangle. And then simply draw a kind of leaf-like structure
at the end of this circular arc
to complete detail. Now here I'm filling
black color and these two triangles are
the body of the code. If you want, then you can
also add some patterns, some lines, some triangles
inside these two triangles. Once then that just
level it down. That is the God. That's it. Now, let's move on to
our second animal. That is cow died cost if all simply draw a horizontal
line like this. Now, divide this line
into two equal halves. I thought that simply mark
a small dot on the line. Yes, like this. Okay. Now, along these two
parts of the line, draw two triangles
in such a way that the epics of those triangles
are not very sharp. Dull should be blind or I
can say somewhat circular. So this is how a blind
shaped triangle look. Now repeat the same
and draw this kind of triangle at the backside
of this line also. Now here at this point, draw a small semicircle for the hump of the cow
and fill color in it. Now for the head, first of all, draw a horizontal line
and then from its booth, and you have to draw
two slant lines, just like we draw a triangle, it might make sure that
you don't join them. So here you can notice that I've left some space at the
end of these lines. Now, to completely
close this figure, we are gonna close it with the help of incomplete circuit. So from these two lines, draw a circle like this. So here you can notice
that the upper part is incomplete triangle while the lower part is
incomplete circle. But if you are not able
to draw it directly, then first of all, draw a triangle with the
help of the pencil. Then over the end of it to draw a circle to get this kind of
bigger and then outline it. Now, hail mark two small dots for the nostrils of the cow. And I decide to
small dots for eyes. More detailing. So here draw
two leaf-like structure at the both ends of
the horizontal line for the ears of the cow. And then again, from
these two points draw two circular arcs facing
each other for its horns. Then for the legs of the cows, simply draw not so straight. Or we can say a big
circular arcs like this. And then at the
end of these lines draw a triangular
shape for its hooves. Then draw a wavy line like this. And a leaf-like structure edits and to complete
detail of our cow. After that, just
like we have faded black color in the
God Hail also, I'm going to fill this
with this cow is complete. Now let us move on to our
third animal data's host. So here also draw two triangles, just like we have
drawn for the good. But this time there is no need to draw them
of different sizes. So here I'm using this letter Z technique which we have learned in the
human figures video. No, for the neck of the horse, simply draw a kind of
semicircular connected to this point and then extend this point of the arc to
get a small vertical line. And along that line draw
a triangle like this. I add a small dot
inside it for the eye. And with that the
head of our horses ready now to represent
hairs on its neck, simply draw this spiral
pattern along this circular. Now from this point, draw two circular arcs, body legs of our horse. Then at the end of the circular outs draw two
triangles, but it's hooked. And this time I've drawn
them in circular arc, or we can say a bit
circular to show that the horses
running after that draw two legs from
this point to in such a way that the circular arc is facing
towards the left side. Now why is it still possible
to draw a line like this? And then again from this point, draw one more such
line to join it. Now we have got the
clothes swagger, n-sided, draw one more line. And with that, the tail
of our horses ready. So the horse is ready. Now, if you want, then you can fill black color in its body and then it
will look like this. Now, it's time to draw our
fourth animal that is JIRA. So for that first of all, draw a horizontal line
like this and then divide this line into two equal house with
the help of small dot. Now, along these two paths, we are again going to
draw two triangles. So let's just start with this
one land line like this. And then from this
plane drove by most land line to
the center point, which we have done on
horizontal line like this. So this part is going to be
the neck of our giraffe. Now, along this
part of the line, draw a simple triangle
just like this. So the body of the
giraffe is ready. Now for the head. First of all, draw a
U-shape here like this, and then join these two aims of the EU with the help of
circular arc like this. Now from this point, draw a leaf-like
structure for its ear. I'm here to our
sequence like this. In Denmark, two small
dots inside this figure, but it's, I know it's true. So now that basic shape of its head is ready,
just outline it. And if you find that there is
need to correct something, then you can do that
with the pen directly. After that draw at school legs
to a different side and to the bedside using straight or the slant lines only there is no need to use any curved lines. And then far it's still draw a wavy line from this
point. Fill color in it. Now, if there is any
extra pencil part, then it is it as by now the
ink has dried up very well. And then fill color and the triangular
shapes of the body, either with the
help of Margaret, I sketch men or you can also add some shading or some
patterns inside it. For example, you can
draw some lines, some small circular or triangular shape to represent
the patches are lighter, dark part on its body. Food animal that is
giraffe is also ready. Now, we will draw a monkey
as our fifth anyway. So again, draw two triangles
using that z technique. But this time, draw these two triangles just like
we draw for human figures. Now for the further steps, I use my pencil as these
can be a bit tricky. So now first of all, draw a kind of ovular shape over this horizontal line
like this, right? After date from the top of
this ovular shape from here, draw a figure just like this. After this row of V shape
inside this figure, just like some humans
have V-type hairstyle. Now this reason draw two
small circles for its eyes. And then here a small
vertical line for its nose. I'm small circular. Mouth. After that hail draw
two small circles, one at each side, but its ears. So what does the head
of our monkey is ready? Draw two circular
arcs from this point towards the side,
just like this. And then join these
two circular arcs with the help of the finger
like structure like this. Now repeat the same
for the left-hand, but in the downward direction. The diode from near the
adjoining point draw a kind of s-shaped or
a wavy line like this. Then draw one more such line parallel to the first
one and join them. So this is the tail
of our monkey. Now draw two veers
off line leaving small gap between
each other like this. Join these two lines of a pale with the help
of the figure, just like we have joined those
circular arcs of our Hank. Now that basic figure is ready, outline all of that. And if there is need
to rectify anything, then you can do that directly
with the pen or marker, whatever you are using. I'm going to outline everything, then fill black color and detail and the triangular
shapes of the body. So the monkey is ready. Now let us move on
to our last and the final animal
that is elephant. So here, first of all, draw a horizontal line. Then with the help of the ruler, draw a vertical line
till this point. Yes. Like this. Then draw a vertical line at the another point of the
horizontal line like this. And join those two lines
leaving a small gap at the first vertical
line from the top with the help of this
circular arc like this. Now, draw our triangle along the part of
this vertical line nine does this triangle as
the head of our elephant. Now omega small dot inside
the triangle for it, I am from this epic spine
draw a circular arc, so I leave it like this. So this is the trunk
of our elephant. Now, draw a straight vertical
line from this point, like this, rho one more
parallel to the first one, I'm joined both of them. So here this figure
represents that there is a marked
over the elephant. So now that this is the mat, you can add any kind of pattern like you can
draw some tree or Florida or simple semi-circles
or any kind of pattern. Then draw this kind of pattern at the both
side of the mat. Now, draw small triangles
along this horizontal line and fill color in it to show that we have decorated
our elephant. On. Let us draw the
legs of our elephant, but that extend this
vertical line, this point. Draw one more such line parallel to this one like
this, and join them. Draw one such horizontal
line inside it. I'm full black color and similarly draw one such
leg at the back side too. And you can notice that this leg is similar in
length to the first tune. Draw two more legs in between. This is space, but you have to draw them a bit smaller than the previous ones as these two legs are
at the other side. So that's why we
are making them a bit smaller than
the previous ones. On with this, our last and the final animal drawing in
volley art style is complete. So hail, we have learned to draw six different animals
and volley art style. You can draw other
animals and this way too. Now, I need you in
the next video. So stay tuned. Bye bye.
8. Huts: Now it's time to learn to draw hearts are houses in
volley art style. So here I have already prepared my sheet with the label
that as volley hurts, you can also write volley houses or volley
hard slash houses. That's up to you. So let's
just start with number one. And for that, simply draw a
kind of inverted V like this. I make sure that it is
not pointed from here. Now I have to make
it a bit curvy, or we can say a blend pointed. Now, draw a wavy lines inside the strong one slant
line to the another. Now it is up to the
size of your design. You can add these
wavy lines as well, that these wavy
lines are kind of representing that the
roof of the heart is made up of either
husk or stocks. So the roof of the
heart is ready. Now let's draw the front side, or we can say the
walls of the hut. And for that, simply draw a straight vertical
line from this point. You can also use ruler or a scale to draw
the straight line. Now, draw another vertical
line from the spine like this. Okay? So these lines here are representing the
boundary of a hood. Now, what do you have to do? Draw to such vertical lines by lead to these previous ones? Yes, like this. Now we have to join all
these vertical lines. So for that first of all, draw a horizontal
line like this, and then draw when most
retirees on a line parallel to this one and join it
and black color in it. Now this area and draw a small rectangle considering the bottom line, as it speaks, **** does this small
rectangular shape is kind of representing the
entrance in the house, since it is the entrance point. So let's draw a door here. So for that first of all, draw a slant line and then
a small vertical line. And again slant line like this. This is the door of
our entrance point. Now that basic shape is ready, let's add some design in it. And for that, draw two
horizontal line like this, and then add vertical
lines inside it. Repeat the same as
this site to draw two horizontal line and
add vertical lines. So hair designing is done. Now let us move on
to the rooftop. And for that, Hey, I'm simply drawing slant
lines in each part like this. Here you can notice that I'm not drawing the slant
lines connected to the upper ones so that we can get a kind of some
pattern in the roof. If you want, then you can also add some shading in this roof. But now our first
Wiley Hurt is ready. Let's label it as number one. Now for the second
HUD, first of all, draw a straight horizontal
line like this. Now leave about 0.5 to one
centimeter from the left end. And then from that point, draw a straight vertical
line like this. Repeat the same at
the right side, leaves some gaps and then draw
a vertical line like this. Now join these vertical lines again with the help
of horizontal line. Horizontal line like this. And we'll black color just like we have failed
in the first term. Now, draw the rooftop and
the shape of an inverted V, just like we have drawn
in our first term. Now, we will draw slant
lines in this roof area. So here we will draw to slant lines facing
towards the right side, while to slant lines facing
towards the left side. The basic outline of
the roof is ready. Now let's add some designing
these parts of the roof. So now let's first of all draw a dotted line with the very
light hand and this part. Then start drawing kind of v-shape along this
dotted line like this. Now repeat the same in all
the parts of the rooftop, just like we do in
the first part. Now, along the main outline
of our roof, draw small, small slant lines to represent
the husk or these talks. Here in this part, draw a small square like this. Draw one more here as well. And inside these
two small squares, draw a plus pattern. Like these two small squares
are the windows of our hut. Now let's draw the
entrance part of the hood. And for DOD, draw a kind of inverted you considering the
bottom line as the base. Now, if you notice that
these two windows and the entrance part
as somewhat looking like the eyes and the
mouth of our hood, though it's not like that. Okay, so the second
heart is ready. Now let us move on
to our third heart. Now, first of all, draw the base of our hood, just like we have drawn in the
first and the second hood. And then instead of filling
black color and this base, I'm filling it with the help of small vertical lines,
just like this. Okay? After that, draw
two vertical lines parallel to each other, just like we have drawn in the
first and the second hurt. Then join these two
vertical lines with the help of the horizontal
line like this. Now considering this horizontal
line as the base draw to slant lines to form a
triangular shape like this. Now extend this
horizontal line a bit more from both
sides like this. And then from the end point of this horizontal line
or this extended bond, draw a semicircle covering this triangular shape like this. Now, in this triangular shaped, start drawing slant lines, just like here I'm drawing. First of all, we are drawing the slant lines are somewhat tilted towards the right side. Then when we reach
about this center side, drawing the slant lines
tilted towards the left side. Now, this part of HUD simply draw two lines to
guide them like this. Now leave a small gap and
draw two lines like this. Remember that these
are just examples. You can modify the
designs as per yourself. Now here draw a small
rectangle leaving distance D both sides as this is the entrance
part of the hurt. Okay, after that, help draw slant lines in the upward
direction like this. After that and
this portion start drawing slanted lines
and downward direction. So in this way we will get a
kind of crisscross pattern, just like hair right now
we are getting okay, Now, outline this
rectangular part to highlight the entrance
part of the hood. And with those are told
her designers also ready. Now it's time to draw the
fourth heard so far that simply draw a semicircle
for the roof of our hurt. Now from this horizontal line leaving small gap
at the both side, draw two vertical lines and
downward direction like this. And then join these two
vertical lines with the help of the horizontal line to
completely close the figure. Now, inside this
rectangular shape, draw a vertical line like this, dividing it into two parts in such a way that one part is
bigger than another one. Similarly draw a vertical line. And this reason as
well, after dark, draw two circular arcs in this area facing
upward direction. So the basic shape of
this heart roof is ready. After that, draw a horizontal
line here and this area. And now in this part draw
a circular arc like this. Leaving small gap drove one more such circular arc
and not so parallel manner. After that, draw multiple
slant lines leaving small, small gap across
these circular arcs. So in this way, here we have drawn a kind of
bamboo or a wooden. Still. Don't know that all the
basic shapes are ready. Let's add design in it. So here I'm starting
with the roof and simply drawing slant lines. Or I can say a slightly
circular arcs. But if you notice, then you will find that
in the left side part, some of these landlines are tilted towards
the right side, while in the light side part, some of these landlines are
tilted towards the left. Once you draw all
these landlines, outline the basic shape
again to highlight them. After that, outline
this horizontal line to make it look more thicker
and more highlighted. As now we are going to
add design and the spot. So here I'm simply drawing lots of vertical lines
and this upper part. And then I'll do the same
in this lower part as well. I'm here. You can
notice that I'm getting very thin
vertical lines. And that's only possible because I'm drawing them with
very light hand. So once you're done with
your detailing part, outline all the basic shapes. Once again to highlight them. On with this, our food
hurt is also ready. Now for the fifth heard, first of all, draw a
straight horizontal line, but this time we need a
big thicker lines so you can outline it two to three
times to get that thickness. Okay? After that, considering this line as the
base of a triangle, draw to slant lines intersecting
each other at the top. Draw two small vertical lines, one from each end of
the horizontal line. Join these two
vertical lines with the help of a horizontal
line like this. After died from this point, draw a vertical line and
downward direction like this. Repeat the same ID
right side to leave a small gap and draw a
vertical line like this. Now, join both of these vertical lines again with the help of
horizontal line. And then draw slant lines
and this triangular shape, just like we have drawn
a non hurt number. Now here I'm drying most
landlines close to this one. After that and the
empty space dramas most land lines summing downward direction while
some in upward direction. After this, in this
rectangular area here, I'm drawing some triangles, but you can also draw
some circles or squares. Now, let us draw the entrance
area of this hurt and that simply draw a rectangle leaving equal distance I D both sides. After that draw a small
and narrow rectangle along this horizontal line. Then draw one more rectangle. But this time along
this red thing. In this way, we are drawing a kind of a stair to
enter in the house. Now, draw two more
small rectangles when it eats side for the
window, like this. After that here,
I'm simply adding two vertical lines
in each rectangle. But if you want, then you can simply
add that plus sign like we have added
another second heart window. And then along the sides I'm drawing semi-circles like this. You can also add some
other kind of pattern, like you can draw some triangle
or you can simply draw one more outline of
the rectangle to make it look more
and more attractive. So with this, our first
title is also ready. Now let us move on to our sixth
hertz side and **** that. What do you have to do is draw an inverted V-shaped like this. Now, to close this trigger, you have to join both
of these landlines with the Hale-Bopp and circular
arc in upward direction. So this time, instead of
using horizontal line, we have used this circular arc. Now leaving small gap, draw a vertical line
and downward direction. Repeat the same at
delights, I do. Yes. Now join these vertical lines with the help of a
horizontal line, just like we have done so far. After that, you can extend this horizontal line a bit
more and then again draw a horizontal line parallel
to it and close it with the help of
small vertical lines and add pattern like this. Then again, draw a
rectangular shape for the entrance and just
below this entrance, but at least more lower
part with black color just to represent that there is some math before
the entrance. After this draw to
slant lines parallel to each other or the left
side of the entrance. Or you can also draw it at the right side
of the entrance. And once it is ready,
start drawing small, small slanted lines between those two parallel
lines like this. This is to represent the
bamboo or the wood and steel. Now let's move on to the
roof part and for DOD, draw a circular arc
at the top like this full black color
in that small cushion. After that, draw two more such circular arcs
gradually moving downward. Yes, like this. Now, along these
circular arcs here, I'm drawing small, small
slant lines just like this. I'm with dot, or this
height is also ready. Now let us draw our second last heard so far that first of all, simply draw up kind
of inverted V, but make sure that this time you do not make
it pointed one. Draw it slightly blind us
circular from the top. After that, join these land
lines with the help of two horizontal line leaving small gap from the bottom side. Now, draw two straight
vertical lines, one at each side from the ending point of
this horizontal line. And join both of these vertical lines with the help of straight
horizontal line, just like we have done so far. Okay. After that, now,
let us draw when most straight vertical line
parallel to this left one. Yes, like this, leaving
equal descends at the right side to draw one
more vertical line, like. So. Now in this middle part, we will draw the entrance
of our hut and God, god simply draw a
rectangular shape. However, you can modify the entering shape or impact the complete heart-shaped do. So. You can also draw and voted you for the
entrenched shape. And here I have
also drawn to dose just like they are
opening inward direction. So now that basic
shape is ready, let us do designing. And so here I've drawn two horizontal lines
and the rooftop, and then adding small
vertical lines in this area. One son died, divide the rooftop again with the help of
horizontal lines like this. And now in this second
part of the roof here, I'm going to draw slant lines instead of the vertical lines. After that, I'm going to
add small vertical lines. And the third part, just like we have done
in the first part. But if you want,
then you can add small vertical lines
in all the three bars. Or you can also add slant
lines and all of them. It is up to you show
your creativity and our designs
according to yourself. Now let us add designing in both of these narrow parts
of the heart as well. I'm spot that again. I have divided it with the
help of two horizontal lines. I'm drawing slanted
lines because just above the roof part as well with
the vertical lines here. This time I filled it
with these landline. After died, divide this
risk bought into two, like upper one is bigger
than this smaller one. Now, in this upper or
we can say second part, I'm going to draw
vertical lines. And remember to get these thin vertical lines
are these twins landlines. You have to draw these
lines with very light hand. Or if you have 0.05
and then fine liner, then you can use that. But if you don't have, then do it with light. I normally I'm with
this R7 is also ready. Now let us move on to our
last and final design. And this time we are
going to draw it a bit different from all of
these about seven designs. So simply draw a straight
horizontal line. From both ends of
this horizontal line, draw to slant lines and join these two slant lines with the help of a wavy
line like this. Now, leaving small distance
on this wavy line, draw two vertical lines, one at each side. I'm joined them with the help of straight horizontal line, just like we have
been doing so far. This is our basic
boundary of R hut. Now, I'll divide this area into two equal parts according
to the one is to two ratio. So for diet here, I'm drawing this vertical line. Do this approximately. There is no need to do that with the help of rulers and all. That is no need of calculations. Just do that approximately
according to yourself. Now, divide this
into three parts, but again, unequal parts, like first and the
third parts are equal, while the second one is bit bigger than first
and the third one. Now draw two straight
vertical lines. And this part as ****, we are going to draw a window. So once you draw both of these
vertical lines like this, draw two horizontal
lines between them. Yes, just like this. Now let us move on
to the roof part. So here I'm drawing
slant lines like this. I'm going to fill this complete
BOD with these landlines, but some of these land
lines that are near the left side will be tilted
towards the right side. While those land
lines that are near the right side will be tilted
towards the left side. You have to draw these
lines according to that. And then fill these empty spaces with the help of multiple
horizontal lines. Here. Again, I'm saying that
to get these ten lines, jaw them with very, very lighting if you
don't have fine liner. So here also you can notice that I'm drawing it
with the marker itself. But since I'm
drawing it with very light and I'm able to
get that ten lines. Once that I'd shadings
or designs or some vertical lines and horizontal lines
and this part too, but do that according to yourself is how I have
decorated it on, yes. Now the window is
clearly visible. In this part of HUD. I'm not gonna draw
any pattern or any design like vertical lines, triangle, and so on. Because I'm trying to show that this is the open
part of my heart. For that here, I'm
simply drawing basket. But you can also draw
bamboo or wooden stairs, or you can draw
some human figure. In fact, you can also draw any Milo Bud that we have
learned in previous classes. So it is totally up to you. You can draw anything that
we use in our daily life. But he has obviously don't draw mobile or computer
as at that time, these things are not there. So you can draw some baskets, tails just like I have
told you earlier. You can draw some
part, or in fact, you can also draw farming tools. On with this or eight samples of heart and volley art
style are ready. Now let me know in the
discussion box which design you found very easy and which
design you like the most. Now, I'll take a
leave and meet you in the next video with three
and volley outside. So see you there.
9. Trees: Hello all, welcome back to
the new video of this class. This video, we
will learn to draw plants and trees
and oily art style. We are going to learn nine
plans increasing this outside. So without further ado, let's start drawing
our first tree. First of all, let us
draw the stem of a plant or the tree so far died
simply draw naught. So state vertical
line like this. Now, again from the spine
drove when most such line, such a way that in the end
you get a kind of narrow V-shaped and then fill this empty space between these two lines with
the black color. After that, draw the base
of the stem like this, and then start
drawing the branches. So here you can notice
that for the branch, I'm drawing slant lines
in upward direction. Repeat the same
and make sure from the point where it is
connected to the stem, you make that point
a bit thicker than the point that has
not connected to the stem. What I'm trying to
convey is that the more you go away from this tender
moody branch gets thinner, while the more you are close to these tender branches thicker. I'm here, I did talk. I'm drawing very thin branches
as these are new, small. Now let us start drawing
leaves so far that draw small slant line as the stock and over that
draw the leaf shape. So here I have decided to draw leaves around all of
these branches in pale. But if you want, then you can draw
these leaves in alternate manner to here. I've also decided that around
each and every branch, I'm going to draw in
total five beliefs. What else you can
do is you can draw all of those leaves that
are close to the stem, a bit bigger than those
that are away from the stem to show that leaves that are
away from these new leaves. And that's why they are small. While those that are close to the stem or some oil leaves. And that's why they
are big in size. You can also worry the leaf
size according to the branch. The lower the guns, the bigger the leaf size. And the more you move
at the top side, the more the size
get decreasing. With this, the first
volley tree is ready. Now let us draw the stem
for our second tree and for DOD simply draw
inverted narrow V, or we can say a narrow
triangular shaped like this and fill inside this just like we have this term of
our first tree. Slightly extended space from it's both side, just like this. Now along this stem, I'm drawing linear
leaves in pair. You have seen this kind
of leaves in maize plant, of grasses are in Spider Lily. You have to draw this kind of leaves across the complete sin. Just like here I'm drawing. Once you draw, all the leaves, start filling black
color in them. However, if you don't want to fail black color
in those leaves, then you can simply
draw a thin line inside them to show that it's
the metric of that leaf. You'll notice the leaf size, then you will find that
as you move upward, the size of Lee's
keep decreasing. So how would that our second
number plant is also ready. Now, let us move on to
our third plant stem. So if I draw a slightly
circular arc like this, now, again from the spine, draw one most likely circular
arc in such way that the distance between
these circular arcs increases as we move downwards. After that. Fill the space between that with
the black color, just like here I'm filling. And then from this point start
drawing slightly circular. So here in total, I'm going to draw
seven circular arcs and which will be towards
the upside direction, guidance on towards
the right direction, and some will be in
the left direction. So here D7 circular arcs are righteous around
which we will draw leaflets in the shape
of small lines. I'm going to draw a
proper leaflets around the circular arcs as if I do so, it will get very messy. So to avoid that here, I'm drawing these very
small and fine lines along this circular arc. And you'll notice that
these leaflets with directors are kind
of looking like the exact boundary
leaves, right? So third tree is ready. Now let us move on to
our 4234 it to stem, draw a slant line like this. Now from the same point, draw one most landline
and joined both of the slant line with the
help of horizontal line. Now, this time,
instead of completely filling this inner part
of this stem here, I'm drawing multiple
horizontal line to fail it. Now, draw a small
circle over this point. Did part of this stem like this, draw one circle inside it and then a full
circle like this. Then from this circle
draw seven lines, just like we draw
in this type three. But here we are going to draw on the street and slant lines. Here we are not going to
draw slightly circular arcs. So draw three lines. I divide sign, and similarly
three at the left side, one in the center. Just like here, I have
drawn these seven lines. At the end of these lines start drawing leaf-like
structure like this. You have to draw this kind of leaf-like structure around
all of these lines like this. Once then that start drawing such leaf shape inside or not, these leaf shapes as well. I'm then you can tell black color in those
small leaf-shaped. However, if you want, then you can skip
this small leaf. But instead of that, you can extend
these seven lines. And around these lines
you can draw a small, small lines for the
veins of the leaf. Now around these
seven lines and start drawing slant lines in
the direction of leaf, just like we have learned
to draw an arc third tree. So you have to draw this kind of leaves around all of
these seven lines. And then draw such
a small slant lines around all the leaves as well. So with this four to
three is also ready. Now let us start drawing
the tree and fat diet. Draw a not so straight
vertical line like this. Now from the same point
drove and more such line. I'm doing both of these line with the help of small
horizontal line. Then fill this small gap between the lines with
the help of your marker. I now start drawing branches. So far the branches here, I'm simply drawing them with
the help of the wavy lines. Then along all of
these wavy lines, which are the
branches of a tree, I'm simply going to draw
multiple V sheets here, just like you can notice. So this time, instead of drawing leaves around all
of these branches, I'm simply drawing small, small circles around
those small slant lines on the branches to help these small circles are representing
berries or flowers, or we can say birds. So draw this kind of pattern around all the
branches of this tree. However, if you want to draw leaves as well as this pattern, then what you can do is you can divide your branch
into two parts. You can draw leaves in the lower part that is
close to these ten. And in the upper part you
can draw this pattern. Our fifth, the tree
is also ready. Now it is time to
draw us 6234 dot. Again, draw a stem just like we have drawn
for our fifth degree. But this time, leave
a much more pointed or ten part at the top as
compared to the fifth one. Until this empty part
with small slant lines, instead of filling it completely
with the black color. Now around this ten line, draw an oval shape like this. Then extend this thin line till the end of this ovular
shape like this. Around this ten
line, start drawing. My people smile lines
just like this. So they are, those
109 is the midrib, while these small slant
lines are the wings. Now draw for such leaves around this is same
in pair of two. So here we have drawn
our first pair of these leaves and do
not forget to draw. It's my Dr. Unwin's. Once you are done with
the first pair of leaf, start drawing this
second pair of leaf. And this time draw the leaves a bit bigger than
the first pail. With this or six to
three is also ready. Now let us start
drawing us seven sample that is planned for this bus. If I draw a straight
vertical line like this, now from this vertical line, you have to draw six circular
arcs and a pair of three. And then at the end
of each circular arc, you have to draw two circles. First draw a big circle, and then inside that big circle, draw a small circle. After this around
the circular arcs that are acting as branches, start drawing leaves in pale. You can notice that
around first and the second circular
arc from the bottom, I have drawn three pairs of leaf vine and the
third circular arc. And around this central one, I have drawn only two pills. That is because I'm
going to represent that the lower branches are bit bigger than the upper branches. Okay? So now around
all of these circles, start drawing small,
small wavy lines. Here. These circles are
representing the flowers that are present at the top
end of each and every brand. Once then that start
outlining this circular I'm wavy line part with the
help of small, small dots. Here. With these
small, small dots, we are completing the flower
illustration. After this. If you want, then you can fill color in each and every leaf. But that is totally optional. If you don't want to fill color, then you can skip this. And with this R7
sample is ready. Now let us move on to
our eight samples and it sustained simply draw
a wavy line like this. Now at this wavy lines, randomly draw small, small
wavy lines for the branches. Here there is no pattern. You can draw it as for yourself. Once the branches are
ready, start drawing small, small ovulated leaves around
all of these branches. So in this way you will get a finite lead compound leaves. I'm, since there is
no fixed pattern, you can draw as much leaves you want to draw on a single ground. So it's totally up to you. On some branches, you can draw less leaves while others
can be fully loaded. So draw them according
to yourself. And with this or eight
sample is also ready. Now let us move on
to our last and the final sample of
plants and trees. So far it's a stem. Simply draw two
wavy lines and fill the empty space with the help of black color, just like this. Now, around this system, start drawing take and small
branches in alternate menu. So here in total, I have drawn for such branches. Now consider these will run just as the main jointed
I'm from them. Again draw small wavy lines and some circular lines
for more branches. Then at the end of these
thin and small branches draw a circle and outline that first circle with the
help of small, small dot. Now, these green circles
and small dots around them are collectively
representing the flowers at the end of the branches. And then draw circles in
between the branches to represent that these are the birds that are
about to bloom. Now repeat the same on all
other three main branches. And with this, our last and the final sample of plants and trees and
volley art style is ready. All of these nine samples
are looking so great. Now, you have to do
two things that tastes more plants and trees and volley art style to gain
mastery over it. And seconds, let me know in the discussion box which
blind dot resample you like the most. Now, I take your leave. I need you in the next video. Till then, practice
mood and mood. Buh-bye.
10. Complete Warli Painting: Border: Hello everyone. Now here in this video, we will learn to draw a final
and the complete picture of only using all the basic things that we have learned
in previous classes. Now we will draw on this black color sheet with the help of this
uni-ball white pen. But if you don't have
such uni-ball white men, you can also use white acrylic paint
with very fine brush, or you can also use
silver glitter pen. So that will also be visible
on this black color sheet. So let's start our painting. But that first of all, we will draw Bordeaux, but we're not going to draw a border touching the
edges of this sheet. So far that what
do you have to do? Draw a margin. Or you can say draw
a ball leaving 0.5, one centimeter from the
edges of each side. And then along those lines we're going to start
drawing our boiler. Now you might be thinking
why I'm doing so via haven't decided
directly drawing border. It is because if in future you ever want to get
your painting frame, then it will not be
a problem if there is any need to adjust
the size of sheet. Only dark empty part
will be cut down, not you're designing part. So here I've drawn
this line leaving one centimeter gap from
the end of the sheet. Now let's draw this
line at the site too. So here also I'm leaving approximately one
centimeter gap. But if you are not able
to do this directly, then what you can do is
you can mock two points at the starting and ending part
and then join those points. Now, let's draw
lines for designing our border along
these marginal lines. This time for the boardroom, I'm gonna draw two lines. So let's first if
all the points at each side so that we
can join them easily. As I'm not gonna do
this approximately now. So here I'm mocking two
points at each site, at the gap of one centimeter. And then I'm going to
join those points. So points are ready. Let's start drawing lines. So first of all, let's join the upper points and then
join the lower points. So you can see we
have got three lines, like first one was
the marginal line, and then to that we
have drawn right now, now in-between these spaces, we will draw our designer. But before that, draw these two lines at each
side of the sheet. But remember here we are
using this black color sheet, which is also required to
handle very carefully, just like we handle
our white color sheet, As it is also very
prone to these things. So if you don't handle
it carefully and let suppose you got some pencil
mark in between the sheet, then you will not be able
to erase it as it will not look good on the black sheet to erase pencil or something. It will leave some steam, different kind of
seeing that as not as evil and white sheet but it
has very proper is the well, on this blank sheet. Once you draw these two
lines at each side, it will look like this. Now, here you can
notice that one side I went ties those two lines
to the marginal line, but on the other side, I have to that point. So in this way we have got a
patent to and if you notice, then I also have that
erased part scene. So if by johns you
have that same, then try to hide it
in your designs. Now, what do you have
to do is outline all of these lines with the help of your white pen or silver pen, or white acrylic paint. Or you can also use
white pencil color. So whatever you are using, just outline all of these
lines with the help of that. But be very carefully once
you outline your one-line, pick your scale very
carefully, clean it, and then start outlining the, another line as if it leaves
some stain on the sheet, it will not look good, uneven hamper you're designing. So be very careful. And we all have heard that line better late than never write. Similarly, we can use something like better late than stains. Like scenes are not good. We can be a bit later. You can complete your
painting up very late. But those saints know. Once the outlining part is done, Let's start designing
our border. I'm going to design this border and do something
different with dark. But you can choose any of them. In fact, you can draw
your own garden. So let's get started. Hello, first of all, I'm drawing vertical
lines in between this bus through just like this. Okay? So here I've drawn it around
four to five such lines. Now, the bottom line
leaving that much space, I start drawing
vertical lines again. So now it is up to you. You can pause, draw all these vertical lines and Dennis are doing
horizontal lines. Or you can draw these
vertical and horizontal lines simultaneously like first
you draw vertical lines. Then horizontal lines
and vertical lines. You can do it just
like here I'm doing. I'm simply dividing these
lines with the help of the vertical lines
into small, small boxes. Then I'll fill these boxes with vertical lines and horizontal
lines simultaneously. So now that boxes are ready, Let's just start drawing horizontal and vertical
lines in these boxes. So here I've drawn horizontal
lines in these two boxes, and now you can see that we
are drawing them alternately. Now to avoid the
confusion and mess up my design with vertical
and horizontal lines, I'm first failing
some blocks with horizontal lines and then start filling the rest of the
boxes with vertical line. I'm just like I have to do an
add water designing video. You can increase or decrease the spacing between the
lines as for yourself. So fill all the boxes
along this side with these vertical and horizontal
lines very carefully. Once and that it
will look like this. Now we're going to repeat
this same border, this side. But here we are going to draw a bit different
design than this. So let's divide this side
into small blocks with the help of the small vertical
lines like we have divided our first site and then start filling the
alternate boxes with vertical lines or horizontal
line that is up to you. That's totally optional. You can draw either
vertical lines or horizontal lines
that does not fix the ideas you have to fill it with on the lines or
vertical lines only. Remember if you are exactly
copying me, which is okay, then only will alternate boxes with the lines as in
the rest of them, we are going to
draw three circles, just like here. I'm drawing. Here. I have much do two
designs like at one side, I have completely
filled all the boxes. Then on the other side, I have drawn circles
in some boxes. And then in third side, we will exactly copy
the first site design, while in the food side we will copy the
second site design. So in this way we are drawing the patterns
in parallel ways. Once you've completely draw the border at different sites, your sheet is gonna
look like this. Now, draw four lines, one at each side
connected to each other, leaving a small gap about 0.1 or 0.2 centimeter
from the border line. So that you avoid the mixing of border design with
the central design. Once then died, she does
Eddie with definer and the complete border design has ended looking so beautiful. Now in the next video, we will start drawing
in this central part. So let's meet you there.
11. Let's Draw Hut: Hello all, welcome
to the second part of this final painting
on black sheet. Now, here we are
going to draw hut in the center part that I'm
gonna use this sample sheet. And from all of these samples, I'm going to draw this one. You can select anyone from these eight samples and
modify them if you want to. Or you can also
design your own hurt. So let's keep your sample sheet aside and start drawing on hood. So here I'm first of all drawing the upper horizontal line
with the help of the pencil. Then draw two slant lines, one from each end that too
in opposite directions. Once then that outline
all the three lines, including two slant line and one horizontal line with
the help of the white pen. Be very careful while outlining these
lines and if needed, then clean your scale
time to time in order to avoid any
kind of stains. After that join both of the slant lines with the
help of the wavy line, just like here I'm drawing. Now, after leaving small gap at the left side
of this wavy line, I start drawing vertical
line till the bottom, leaving small gap as
they are to repeat the same idea right
side to leave a small gap and draw
a vertical line, just like we have drawn
at the left side. Join these two
vertical lines with the help of the horizontal
line from the bottom. Just like here, I'm doing. Throw one more horizontal
line leaving about 0.1 or 0.2 centimeter
gap from this upper one. And the same here, I'm drawing a bit
extended horizontal line from both left and right side, now exceeding the
upper horizontal line as the length of the second one. I'm joined both of these horizontal line
and fill color in it. Hey, if you don't want to fill color in this small portion, then you can also draw small
slander vertical lines. Now, let's add
designing the roof. I infer that here. I'm going to draw slant lines, just like we have drawn here. So let's just start
drawing slant lines and with some odd tilted
towards the right side, while some are that are
tilted towards the left side. So draw them accordingly. And if you don't want
to draw a slant lines, then you can also draw
straight vertical lines or you can also draw
straight horizontal lines. So it is up to you. You can modify in between this design according
to yourself. Once you draw all
this land lines, Let's start filling the empty spaces between
these landlines. But that hair, I'm going to draw multiple circular
arcs like this. However, in this sampling part, we have drawn straight
horizontal lines and this spot. So it's up to you. You can either copy that
sampling clot and draw horizontal lines or you can also draw the circular
arcs in this part. You can also adjust the spacing between these circular
oxides for yourself. For example, if you want to
draw less circular arcs, then you can increase the
spacing between them. Or if you want to draw many circular arcs and you can decrease the spacing
between them. Once you completely
fill all these spaces, it will look like this. Now, let's divide this lower
area into two equal parts, just like we have
divided in the sample. So here I'm dividing it
into one is 22 parts. Now, divide this area
into three parts with the help of a horizontal
line in such a way. The first and the third pipes
are somewhat equal in size, while the middle value, or the second part as bit bigger than the first
and the third one. Now, in this part, let's draw a
rectangle or square, just like here, I'm
drawing for the window. Once the shape is ready, draw a plus mark
inside this shape just to represent that there
are bars and leaving do. After this draw small
semi-circles along all the sides of this shape
just to decorate the window. Here, you can notice that yes, I have a lots of designs and this heart as compared
to the sample hood. After this lettuce, well, this first third part with
the help of slant lines. So here I'm drawing the slant
lines in upward direction. Once then that again draws landlines and thus
far centered but, but the same
indifferent direction. So here I have those in order to get that
crisscross pattern. You can also draw a straight horizontal
and vertical lines and these areas in order to get this kind of crisscross pattern. Now in this area and this sample heart we have
drawn up basket. Now here I'm going to draw up, but first of all, let's draw a sketch of the pod with the
help of the pencil. And then we will outline it. I'm drawing this small and
round shape of the pot, but if you want, then you can also draw along in
the narrow part. That's totally up to you. Once the sketching part is done, start outlining it with
the help of the white pen, just like we did
in the roof part. Medea's be very careful
while outlining as you don't want to
ruin your design, right? Once the outlining part is done, let's us start
decorating the spot. And for that here, I have drawn this circular
arc and I'm kind of making it bold one after that drove
and more such circular arc. And in-between those
two circular arcs draw a triangular shape, just like here, I have drawn. After this outline all the
basic shapes of this HUD. Once again, just
to highlight them. On with this, I heard is ready. Now in the next
video where we'll draw some human figures, but animals and so on. So see you in the
next video. Bye-bye.
12. Sun, Birds, Trees and so on...: Hello all, Welcome back
to this new video in which we will draw the other
elements of this painting. So let us start with the sun. And thought that
here, first of all, I'm drawing the basic outline of the sun with the
help of depends. So once the basic
circular shape is ready, let's just start filling it with the help of circular
spiral lines, just like here, I'm drawing
with the dotted lines. Remember to draw here anything. You always either use
very sharp pencil or mechanical pencil in order
to get very thin lines. Now that spiral circle shape
is ready for this one, let's just start
drawing sun rays. Now, it's up to you. You can either draw straight or slant lines
while the sun rays. Or you can also draw small spirals around
this big spiral circle, just like here I'm drawing. You can also practice
these spirals on some route sheet and then directly draw them
here with the pen. So here I have drawn
only four to five satisfied those shapes
around this big spider. And now I'm starting
to outline all of these shapes with the
help of my white pen. Videos outline all
of these lines, everything and every
motif very carefully. As once it is done, it is done. You can't undo it, you can't go back, right? So just do it very
carefully with full focus, attention on when it comes to outline the last
line of this spiral circle. Make sure you outline
it two to three times so that you get a highlighted
outline of that son. After this, let's
us start outlining all those four to five motors that we have drawn as sundries. Then we will start drawing these Sundays directly
with our pen. Make sure you draw these
small spirals circles very carefully and try to draw them approximately
equal in size. I suggest before you draw these motors hair
directly, go and try. These motors tend to
15 or 20 times on some rough sheet with deepened and then
start drawing here. So once you
completely draw these spiral and motels around
this spiral circle, it will look like this As
indeed looking so beautiful. Now what do you
have to do is draw small dots just above
this viral motors, but in such way that D.com
in between two spirals. On with us, our sun is ready. Now we will draw boats. So from this sample, I'm going to draw this
flying through and pick up. So let's first of all draw its basic shape just like we have learned and
the birds will do. But this time I'm going to
draw it such way that it looks like it is flying in the left direction
instead of the right way. Once the basic shape is ready, let's start outlining it with
the help of your white pen. Just like here, I'm outlining, outline all the basic shapes, whether it is the
body, neck or head. And then once it is done, start drawing its
beak and the eye, just like we have learned
in art boards, video. After this outline, the
basic shape of the wing and across those lines draw
small slant lines like this. Now outlined these small
lines for details. At the end of these lines
draw Smiley face sulcus, just like we have learned. Now, hail and this body part, instead of filling
it with white color, just like we have learned
in our previous video. I'm going to draw some
design inside it. So here I've drawn these
small circular arc and data. I've drawn lots of triangles. And this space between
the body line and that circular line as
well with vertical lines. Now, the rooftop draw
another bird, for example. Here I have drawn this peacock. You can draw another
kind of BOT-2. Let's say you can draw
Hou Bu stock and so on. In fact, you can also draw
an animal like a monkey. Now here just below this, and we will draw
two human figures. So let's first of all, let's start drawing our
first human figure and put dot drawing upside down
triangle like this. Now since I want to draw my human figure in
musical instruments. So here I'm drawing two
horizontal lines like this, enjoining both horizontal lines with kind of elliptical circles. After this, inside this
kind of cylindrical shape, draw small horizontal lines. And then to complete
the human figure, draw incomplete
triangle like this. The basic upper and the lower body of the
human figure is ready. Now from both ends
of this baseline of the first triangle draw kind
of circular arc when it eats side connected to the musical instrument
to show that the human figure has hold that musical instrument with the help of the thread
around his neck. After this, draw its legs
just like here I have drawn. Then draw attains around the
same point from which we have drawn that slightly
circular outside the boat side. I inhale, I have
drawn it attains connected to the
musical instrument, just to show that it is playing
that musical instrument. Now, draw two small
vertical lines just above the baseline
of the first triangle. Over these two vertical lines, draw a small circle
out human figure head. So with this, our first
human figure is ready. I'm filling this
circular part or the head part of the human
figure with the white color, just like we have learned
in the human figures video. But when it comes to the
body of human figure, I'm not going to fail it completely with the help
of this white color. Instead of filling
it completely, I'm going to draw some designs just like we have
added in our crew. So here also, I'm
adding designed, but it is up to you. You can either fill it
completely or add some design. Now, let us draw a second
human figure that is female. So far Does hair. I'm using this z alphabet
for drawing the body, but you can also
use Excel Verbit. After this draw, its
legs like one is on the floor while another
one is in the air. Then draw It's one hand
and downward direction, while another one in
upward direction. So here we have drawn its
hands and legs like this to show that the female is dancing on the beat of
the musical instrument. After this hair draw to slant lines and datas are
good like this, and fill it with
the white color. Here I've drawn this circle
a bit tilted towards the right side to show that the female is dancing
facing upward direction. After that, draw the hair and
accessories to decorate it. Now here in the body part
of this human figure, instead of filling it completely
with the white color. Again, drawing some
pattern inside it. So here I'm drawing some circles and circular arcs around
it. Just like that. You can exactly copy
the same design or you can draw another kind
of pattern that you like. Now, draw the third and
the last human figure, Hale, I just sent to the
pod inside this hut. And this time I have
used that Excel pervade. Okay, when it comes
to its end draw, It's one hand like this, under slightly
circular arc or the, another hand just like it
is holding an X and X hand. Then draw its legs
and the head and the body part with the
white color completely. In this beam, a human
figure earlier, I forgot to draw and
glitz and the Bangles. So now I'm drawing
them. After this. Let's draw a tree at the
right side of this hut. And for that draw to
circular arcs like this and fill the space between these two circular arcs
with the help of small, small vertical lines like this. Now from this point
to start drawing circular arcs just
like here I'm drawing. So here I'm drawing total six circular arcs as
these are the righteous. And now along these
lines or these edges, I'm going to draw leaflets. So just like I have
taught you in a video, draw small, small slant lines along the circular
arcs like this. You can notice the
ideas in this way we are getting a
complete leaf shaped, just like we have seen
in the palm tree. That tree is ready. Let us draw the last element of our painting,
that is grasses. So here I'm drawing some grasses near the human
figures like this. Sum here near the tree. I am, congratulations. Our first complete volley
painting is ready. As indeed looking so beautiful. I hope you guys have enjoyed
the process so much. Now, I'll meet you
in the next video with another complete
wildly painting. Till then, stay tuned. Bye bye.
13. Second Complete Warli Painting: Hello everyone, Welcome to this second complete
volley painting video. And this video, we will use this oil cake base
as our canvas. But if you don't have
this circular shape, then it's totally okay. As our focus is
not on this shape, our focus is on some waste materials so
that we can reuse it. If you don't have, let's say, an oil cake base in any shape, then you can use an old
CD that you don't use. No. Okay, so now before we draw our volley
bending on this oil cake base, let us first repair it
and give it a base coat. For that. Here I'm applying white color as a file
directly apply my main color. It will not look that shiny or that attractive
on this color. Let's pause, give
it a base coat, and then we will start applying
our final color on it. Notice to apply white color
on this cardboard base. You don't have to
soak your brush in water as if you smoke your brush in water
and then apply color on this base,
what will happen? It will get very wet. So to avoid it, just dip your brush in
the water and take out quickly so that it
gets only damp. You don't have to
make it so the water and then start applying
white color on the base. In fact, if you don't
want to use water, then you can skip it completely. If your color
consistency is fine, then you can apply
a color directly. Or if the color
consistency is very thick, then you can add
medium and make it fine and then start
applying color. It is totally okay if some background color
is peeping out at some points as later
we are going to apply another color
that is the main color. But let's say you don't want
to apply any other color and you want to
draw your painting on this white vase only. Then you can apply
two to three goods of this white color and then the background color will
not be visible anymore. While painting this base, make sure you painted x2 so that we get that final
and the finishing Look. I'm yours. If you don't want to paint your work table that you
obviously don't want, then you can place an old
newspaper clothed table mad or any other
bone just like, Hey, I'm placing this board plastic
bowl, mellow my canvas, and start painting just to avoid that painting stains
on the work table. Okay, so after covering it
completely with the color, either leave it for ten to
15 minutes to get it dry, or you can also make it dry with the help of
your blow dryer, just like here, I'm drying it. There is possibility that
letting it dry naturally on its own may take more time
than ten to 15 minutes, as it depends upon
the temperature. Once it gets dry completely
startup line your main color, you can apply that
color Edo with the help of the paint
brush or a sponge taper, that's totally up to you. Right now, I'm skipping
this main color applying part as our main
focus is not on this. So here I've applied the combination of
red and yellow color, which have become a
deep orange color. I'm yes, you can see that it
is looking very beautiful. One Cl completely
apply the color, let it dry naturally or
make it dry completely. The Blue Rider. Once it gets, I completely
take your ruler and measure its diameter so that we can find its center if
it is a circle, radius, if it is
off another shape, just measure its length
and divide it into half. So here the total length of my diameter was 19.5 centimeter. So I've considered my center of the circle at 9.75 centimeter. After marking the center point, open your compass up to 3.5 centimeter or according to
the size of your cake base. And start drawing this
circle just like here. So here I've drawn a circle with a radius of 3.5 centimeter. After that, I'm drawing
one more circle with radius 3.6 or 3.7 centimeter. One better off cycle is ready. I hope it is visible to you. Now, open your compass
up to six centimeter wide and draw one more
circle, just like here, I'm drawing one son died again over your compass a bit more than six centimeter. Let's say you open it
up to 6.3 centimeter, draw one more circle around it. So now we have two
pairs of circle and I hope these
are visible to you. After dad's side outlining these circles with the
help of your white pen. And let's say you don't
have white pencil. Instead of using
that silver Ben, use Blake pen that will look
more good than silver color. It wasn't necessary that you
had to draw circles only. It totally depends upon you and the shape of your base on
which you are painting. Since here the shape of
my base was circular. That's why here
I've drawn circles. But let's say the shape of your base is a
square or rectangle, then you can draw
rectangular or square. Outline all these circles we divide our black pen
that you are using, but be very careful
while outlining them. Make sure you do not retain the shape
that you have drawn, whether it is the
so-called r-squared. Once you completely outline the first pair of these circles, start outlining the second pair. Similarly, once you completely
outline all these circles, it will look like this. Let's just start
the designing part. And here in between the
first pair of circles, I'm going to draw two things. Lines and small dots here. Let's first of all
draw three lines, Denmark four dots
just like this. Then repeat the same, draw three lines
and mark four dots. So you have to
repeat the same till you completely reached
the starting point. What else you can do to fill this space as you can
draw only one element, whether it is the line, are the filled dots. And you can also draw Hulu circles instead of
these lines and failed on. Once you fill it completely, it will look like this. I was entered looking
so beautiful. Now let us move on to our
second pair of circles. I'm here and this is space. I'm again going to use
these two elements, only, lines and dots. But this time here I'm drawing four lines and
three dots and set up three lines and fulfilled
or as I've told you earlier, you can also draw
only one element, whether it is the line
or the period odds, or what else you can do is
you can draw some spirals, circles instead of
these lines and dots. Once you fill the
space completely, it will look like this as ended looking so
beautiful you guys. After dark, sad drawing small circles along
this circular line, just like here I'm drawing. Once you completely draw these circles along this
first circular line, it will look like this. Now we will draw design along the edge of
this circular base. But before starting
that designing part, Let's first outline it
with the help of our pen. Just like here, I'm outlining. Now the thickness of the outlining part is
totally depends upon you. You want to draw
it very thin line. You can do that too. You want to draw a thick line. You can do that too. But if you want to draw design
after this outlining part, then I suggest you to
draw a thin line only. Otherwise the main focus will go on that take line
instead of the design. So after outlining the edge
of the base completely, start drawing small semi-circles connected to each
other along this line. You can modify these designs
according to yourself. For example, instead of drawing these connected
semi-circles, you can leave some small gap between each and
every semicircle. And then in between that space
you can draw some circles. Are some line that's
totally up to you. Or what else you can do instead of drawing
these semi-circles, you can also draw triangles. And those triangles, you
can draw some slant lines, I'm straight line, or you
can completely fill them. You can draw one more
small triangle inside it. So it's totally up to you. You can modify the
designers for yourself. Hey, also you can feel
these semi-circles completely or you can draw
small circles inside, then you can draw in fact one more semicircle
inside all of them. But once the designing part
at the edge completes, it will look like this. We can say that this video was more about the basic things. Now in the next video, we will draw the
human figures and other elements of this painting. So stay tuned, Bye bye.
14. Final Part: Now in this video, we will draw human
figures, trees, and some other basic elements
just like triangles, circles, and so on. So let us just start drawing human figure and
this circular space and hail also on growing human figure with
the musical instrument. Just like we have learned in our first complete or
living thing. So far. Dot first of all, draw an
upside down triangle in such a way that it's ethics
comes near the center point. After that, draw two
horizontal lines, just like we have
learned to draw there. And these two horizontal lines will be connected
with the help of elliptical circles so that we can make it a complete
musical instrument. After that, below this
musical instrument, draw a kind of incomplete triangular
shape just like this, to show that the upper part of this triangle is covered with
this musical instrument. So the basic shape is ready. Now let's draw lines inside this musical instrument,
just like here. I'm drawing, I'm here in total. I have drawn three lines. After that drove. It lives inside each of the
elliptical shape and then fill this and complete
triangular shape with the white color
just like here, I'm filling it once then that start winning color in this upside
down triangle too. If you're doing wonderful color, you can draw some
designs as well. But here's don't leave it empty as it will not look that good. Then draw two small
vertical lines just above the baseline
of this first triangle. Over died. Draw a small circle for the head of
our human figure. And then fill this
circular shape completely. Now, draw two slightly
circular lines, one from each side of the baseline connected to
the musical instrument. Just to show that these
lines are the strings that are around the human figure to hold up the musical instruments. Then from the same end
points of the baseline, draw one hand at each side
in such a way that it shows that the person is playing
that musical instrument. Once then dot, start
drawing the legs of our human figure with the
help of multiple slant lines. Just like here I have drawn. This was our main human figure
with musical instrument. Now, in this part we will
draw more human figures, but they will be
smaller in size. And with that, we will draw
some trees and lines as well. So before we start designing
or drawing in those areas, let us was divided into six
parts with the help of lines, just like here I'm drawing them. B6 parts are going
to be of two types. In such a way. Three of them are going to be smaller ones by other TR
going to be larger ones. We are going to arrange these
larger and smaller cars and alternate menu. But example, if the first
part is the larger one, then second part is going
to be the smaller one. The division part is done, and that's how we have
gotten six bytes. Now we're going to start
drawing in these six spots. So first of all, let's us start
with these smaller parts. And smaller parts, I'm
going to draw trees. Hello, In this video, I'm drawing palm tree just
like we have learned in the trees video on infecting the first complete
volley painting. You can draw some different
kind of tree as well. Or you can also draw a blind. And instead of these
plants and trees, you can draw some bird or
any month, It's up to you. You can draw it
according to yourself. Hey, I'm drawing same drain, all the three small parts, but if you want, then
you can also draw three different
reason D3, smallpox. To show that for whichever ADL we are drawing
this painting, there are different,
different trees. So once you are done
with these small parts, let us start with
these big parts. Now in these big box, we are going to draw human
figures so far down. First of all, draw
the human head, or we can say small
circles for their head. Once you draw all the
filled circles to start drawing the other body
part of the human figure, just like we have learned
in the human figure video. So here I'm drawing
six human figures, but you can increase or
decrease their number according to this phase
in which you are drawing. Also, let me tell you that
I've sped up this video. I'm not drawing this fast. Whenever you are drawing, just draw it at your pace. There is no need to hurry up, droid very carefully and calmly. Enjoy the process. Now when it comes
to the hands here, I'm drawing the
first-person hand just like that person is
holding some steak. Similarly, draw the hand off
the last person as well, like the person is
holding a stick. Draw other hands later,
but before that, let's first draw the legs of
each and every human figure. Once you draw legs for
all the human figures, Let's just start
drawing the hands of a human figure that
we have left earlier. So here I'm drawing down
Heinz and the shape of alphabet X is just to show or represent that each and every human figure is holding the other one from their waste. So designing in
this part is done. Now you have to repeat the
same in other larger parts to, once you've done that, it will look like this. If you look the
painting as a whole, it will look like
the central person is playing a musical instrument while the other papers that are around that person dancing. Now it is time to draw
designs around the circle. So far that here I'm drawing
a triangle like this. Then leave a small space
and draw one more triangle. So I'm gonna repeat this
till the starting point, draw a triangle lever space, then draw a triangle and so on. But he has tried to draw
these triangles are equal in size and to be
equidistant from each other. I'm once you draw all the triangles around
this circular line, let us start failing
color in it. So here I'm using this
white acrylic paint to fill color and these
triangles videos. You can also fill
them with the help of your white pen or black
pen that you are using. But what if you don't
want to fill them at all? Then there is a
solution for that too. You can draw some slant lines or vertical lines instead of completely filling
these triangles. Now what have you don't
want to draw these lines. Then don't worry, there
is one more alternative. And that is you can draw a small filled circles and
not on those little circles, you can add some small
dots are other designs. So what I mean to say that there are lots of designs
that you can draw. It is not fixed that
you have to fill color only you can do whatever you
want or whatever you like. So now that I've filled
all the triangles, now I'd go to in these small semi-circles that I have drawn
earlier around the edges. So here I'm also feeling them, but if you have drawn
some other design in it, then that's totally okay. So once you fill all
these semi-circles, it will look like this. Now to give it up finishing
look here, I'm drawing small, small dots around all these semi-circles with the
help of my white pen, just like this one's done that let us start out the loss and the final
step of this painting. And that is to draw small circles between
each and every triangle. So here I'm drawing these
circles in this space that we have left earlier between
two consecutive triangles. If you don't want to
draw these circles are thinking that you
will not be able to draw. These circles are
approximately equal in size. You can use dot
painting technique. This art painting is
very simple and easy. You just have to
dip the backside of your paintbrush and mark the
dots between the triangles. I'm with this. Our second complete
volley painting is ready. I hope you guys have
enjoyed the class and got to learn
lots of new things. Now that you have reached
the last part of this class, I have to project works for you. But for that, Let's meet in
the next video. Bye-bye.
15. Project Work: So guys, here are
your project works. Try to draw to complete
volley paintings. One on A4 size sheet
while another one on some waste material so
that you can reuse it. Click there in process and final pictures and
upload those pictures. And this class project
and resources section. I'm eagerly waiting
for the pictures guys. Also don't forget to
review it and share your valuable feedback
for the upcoming classes. If you don't want to miss notifications for
my newest classes, then do not forget to follow me. Thank you so much
guys for joining me. Bye bye. Take care.
 Tanya Maheshwari, Artist and Crafter