Transcripts
1. Introduction: Hi everyone. Welcome to my Skillshare class. I am dynamics Shri, an artist and not graphed DO. And this class, I'll show you how you can draw different research designs using simple and easy what I Nikola illustrations. But before that, let us discuss what is read. So it is an arrangement of flowers, leaves, our standards fostered in a ring. It's usually of circular shape, but while drawing, you can modify its shape as per your choice. These designs are very easy to draw. So this class as well, everyone out there, you can use these designs and your will agenda or while designing the cover page. By the end of this class, you will be able to draw these simple read two designs on your own. In the next video, I'll share the material required for this class. And then in the end, there is a fun class project for you. So let's start.
2. Material Required: For this class you will need a plain white sheet fencing. It is Banga, black fine liner and grasping. Now I'll share some alternatives for the above-mentioned material. Light, you can use Norman Blake pen and place our fine liner. Any kinda like crayons, pencil, watercolor on sketch-based in place of brush, pen, and compass are any circular shape object in place of Bangladesh. So the next video we will prepare basic outline for our reads. Keep watching.
3. Preparation: Basic Outline: So if I Savoy in far the reads, what we are gonna do as draw basic outline sheet for the reads. And for this, they read Ross our goods. To draw these circles, I will use this Bangor. And you can also use compass. If you have any other standards, a large island, you can also use that. I'd said, totally optional and just use anything circular in shape for this. So let's start drawing circles. I'm going to draw us, go inhale. In this corner. I will draw in total three circles in this room. It's a totally up to you whether you want to draw a circle from its inner aside from its outer side. You can take any radii for the cell as it's up to you or what size you want to draw your reads. And it's totally okay if the circles are in very much the same from each other. Okay? After this, I will draw three more circles here and this row just below the above ones like this. And you can change the number of total circles in each room according to the space of your sheet and size of your circle. Okay, So six circles are ready, but we can see some spaces empty hail, and we can use this space for drawing more circles. So let's draw two more cycles, hail. And this way we will use this empty space. So anyway, so this sheet is one. Now we have drawn eight basic outlines on this sheet. You can also draw any other shapes like triangles squared and so on. Basic outline. Now, I need you in the next video with first floral wreath design. Keep watching.
4. Simple Floral Wreath: Okay, So as this sheet has to tell eight basic outline for reads. So I'm gonna draw a phi florals and three Laurel reads design. So let's start with the first Street, which I'll draw here at the basic outline. And for drawing, I'm going to use black fine liner down, but you can also use normal Janet been our stem, any other color pen, and it's up to you. Okay to start, I'll draw a PLA heal and for this, draw us our gun like this. Betters. I'm drawing kind of incomplete circles around this circle. And here you can notice I have drawn six factors, but you can modify it according to your set. And if you know, do draw some other kind of fly, you can draw that too. After this, draw us more detail at the right side of the car and I did left side as well. Then draw up the arrow leaf I D both sides of this dash. Hey on notice by drawing these leaves, I'm not joining them with the dash. Repeat the same, draw up the era of leaf around this dash. Do I know it's totally okay if D, these illustrations are of equal size as this really doesn't matter. After this, draw, a flower here just above the right side leaves again, but this time this flower will be smaller than D first one. Let's draw its by density is like this. You can notice that this is a little bit smaller than the first one. Now try to draw a similar size flower here just above the left side leaves. So again, draw a small circle and then expectancy like this. After this, draw us Mozart up here just to have of d right side like this. And draw one more such circular arc here as well. So as we draw leaves here, draw a such nice around these two arcs to draw four pairs of leaf. And when I did top-end of D, This is the branch with the leaves draw a such lease. I round this lib, law and fathers. Let me take my she'd done little there and start drawing them. So since we have Drew Ford bears out leaves around this OK. And when I did dot, so I'm going to repeat the same here as well. Just to draw for bears out leaves around this when do, and when I stop. Now and let us draw up large hill, just suppose it to this one. Draw us are good and six incomplete circles around it. Just like graded, I will try to draw it similar in size with d plus 1. Now, to fill this space, I'll draw four to five circles here in increasing order. So let's first draw these mono one and then gradually increase their signs. After this, draw two small circles here like this. Similarly draw Hill, Line 2, 3, 4. I'll do small circles here. So our first floral wreath is ready now and maybe it for three to four minutes to dry incompletely. And then we will erase the pencil. I'm full colors in it. So let's erase the extra Benson and make sure that ink has dried up very well. Otherwise it might get messy. Now, we will fill color in our design. And for this, I use light and green colors to make it look like orange light green, yellow, pink, and so on. So in this flyer, I think I know fav color in each part when by one and neatly fill the same color and this block 2. Or you can choose any other color like orange, yellow, It's up to you. Now, I'm going to fill these leaves with light green column to symbolize that these are young leaves, but you can also very dark green color to show that these leaves are mature ones at CR choice. Okay, nice part is done. Now let's spend a look alone and these shoes wildflowers. And if you want to change the color, then feel free to do so. After this, in these models are because I'm going to fill orange color. You can change the color as per your choice, are simply leave it as black and white. But I really like colourful things. I never had any pain, gullible things that affect us very much. It's done. You can notice how objective and beautiful it is looking. Now you can write in here between this design like happy, thank you, good day and so on. So I'm going to write happy IN fathers, I'm using my favorite color is blue. And don't worry if you are not that good enlarging as it doesn't matter, you can write in here with Glaucon capital letters. And I might show you that in some other design. This is just an example to show you that you can write in here. You can simply write anything in your handwriting and just highlighted some points does to, as I'm doing. And our first floral wreath design is ready. Now I meet you in the next video with another floral wreath design. Ten. Then keep watching.
5. Flower Vine Wreath: Okay, Now we're going to draw a second read to design Hill. Doesn't also uploaded read, but it will be are different from the first one as all the parts and the first one are at some distance from each other. But to hail and this line, all the parts will be closely associated with each other. So let's start drawing festival. Draw a small circle here like this. And then four petals draw multiple inverted you around the circle. I find it somewhat looking like us. And after this draw a leaf. And so real spider here at the right side of the flower to resemble our time 100. Then draw us are clock here up to this length. Noun, draw two leaves here at the left side of the flyer and small spider dendrites here. You can also add more tendrils our lives near the plant, just as I'm adding to make the design more heavy. Now, just like this, draw us are all KO2 and tried to draw the Botox or same land. Slight differences or gain, but they shouldn't be very much difference in length of the Botox. After this, I'll draw vine, I'm for this, we will draw leaves that are on the UK, just like I'm showing you. So let's start drawing such leaves here like this. Repeat the same here. And if you want, you can also tell the other sheet just like I do and it's done. Now what I'm gonna do is maximum dots here near the tenders and some here near the flowers. Now, just above divine Hale, I will draw one more fly like the first one, but smaller than that. Draw a flat above the left side vying to try to draw it similar to the second one in size. And notice I'm saying similar, that means a small variations are still looking. After this. Draw three circles gradually decreasing in size like this, just above the floor. And you can draw more cycles in this fight then depending upon the size of your wreath. And then draw us, OK, in the lifted space like this noun, draw us are going here just above D-flat or this, dividing it into two equal parts. And then draw such least AI is when. So I'll just do it my sheet under David and start drawing it. And repeat the same on the other side too. So another way to design is also ready. You can write whatever you want hail, and this is space like you can write handle. Thank you, amazing. And so on. Wait for two to three minutes to get the ink dry completely. So by now I guess ink has dried up. Bu ready wins, so let's erase the pencil bug and then we will fill color in it. Now we're declaring, let's build this plan with the orange canal. If you want to change the column, feel free to do so. Fill the other two flowers with the orange also. And if you don't want to fill color, then leave this design as it is right now. Now fill light green color here and the leaves and just outline these spiral tendrils like this. Hey, I'm going to fill these wines made light green color also. But if you want, you can fill it out. Bring color has been. Okay. Now, I will fill these top most wines with dark green corners. But if you warned you can simply same color and all the wines. After this pen red color and this circle and secondary design is also ready. In the next video we will draw a type floral wreath. So give watching.
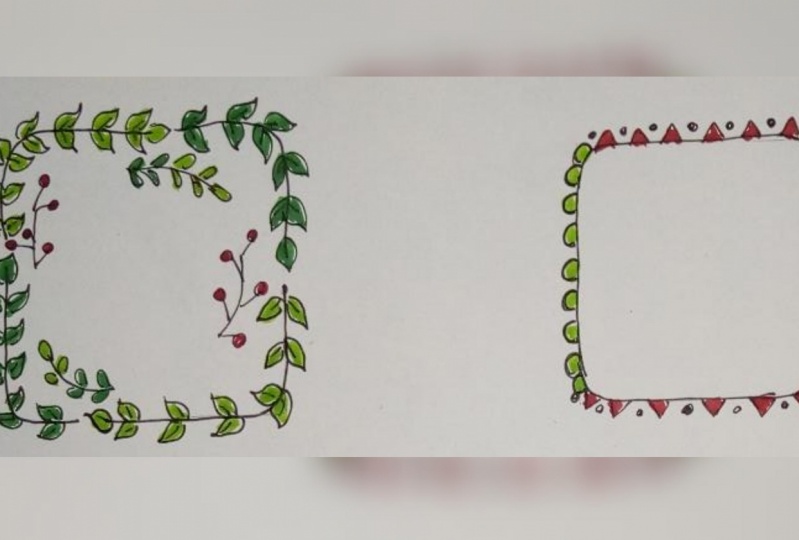
6. Heavy floral Wreath: So now let us move on to the third read, and I'm going to draw this read using 32 for common patterns like I'm going to use pine needle, berries, simple leaves and yes, But illustration. So first starting their design, first seek a pencil and Mumford points over the basic outline of the wreath, that is circuit to divide it into four equal parts. Don't worry, you don't have to be very acutely just Monte probable points. So we have divided it into four equal parts. Now let's draw us are from 1 to the next one, like this. And as I said earlier, we are going to use for different illustrations. We will just simply repeat those code again and again. So first of all, draw on leaf like this. Then draw another leaf at the right side of the arc, and then one moon at the left side of the AMP. And you can notice that the size of Lee's is gradually decreasing. Now I draw berries and for this, draw our main line and from it draw multiple small lines in different direction to resemble the branch. And then draw a small circles like this. I did top of the lines to illustrate berries. Draw some more berries at the top of this arc law and all the directions like this. So two out of four patterns are drawn. Now we will draw our third button that does pine needles. And for this, simply draw our main slightly curved line and draw needle-like leaves around it. Draw one more pine needles. After this, let us draw the fourth illustration. I'm fought this, draw us my line here like this. And you can notice that it does not vary much a straight, it's slightly curvy. And I did stop and draw an oval shaped like this. And for liquid small dots. Yes, it is an illustration of library draw same here also by lead with dots and here as well. So by now Darfur part says ready, we have a draw. Three parts like this as well using these formulas stations only. So again, draw an up and it's totally okay if it's not very much so glow, draw up pair of leaves around it, and then berries below a draw up by Newton here, just above DNS, I'd leave and La Verne oppose it to eight and above the outer side leaf like this. Draw some berries, just have a pine needle and an opposite to draw a pine needles like this drug when mood by needle just have of the berries and after this drought, remove lyrebirds and berries here. So here you can notice that the second part of the rate is also ready. Now, what do you have to do is repeat the same for illustrations to draw the other two parts of deity. And don't worry, I'm not drawing the class. I have just suspended or and if you want you can modify delete. So design like you can use some other illustration or different design of relief or you can add to o zone. If you weren't, you can divide the whole basic outline into less or more parts then foo, It's totally up to you. I knew modify it according to your space and design. So yes, it is done here. You can notice that this is a little bit heavy design then the previous ones. And yes, it's a really very heavy to design. Okay, So if you want, you can add colors and neck. If you don't want to add gorilla, you just simply leave it like this. But I'm going to fill colors and neck as I really like colourful things. But it's totally optional. Okay, by non-dot Inc has already dried up. Let's erase the extra pencil and then we will fill color in it. So far tiring, I'm using light green color brush pen, but if you want, you can also use pencil or watercolor. It's up to you. And you can also use dark green color for coloring these leaves. But I'm going to use that color for pine needles as by needles out of dark colors. So let's go dark green color in the pine needle. And for this, I'm just simply drawing a straight line with this dark green color. And if you don't want to add color and just simply leave these pine needles as they were right before. Okay, now I'm failing red color and these circles to represent bodies. After this idea, look in the fly birds. And if you want, you can change these colors like you can very orange are somewhat low light pink color in these flood words. It's totally up to you. Okay? So you can see how beautiful and amazing It's looking with such heavy design. Still, if you want to make it more heavy, you can add some more details and leaves and you can write inhale whatever you want to. And I'll meet you in the next video with the next redesign. Till then, keep watching.
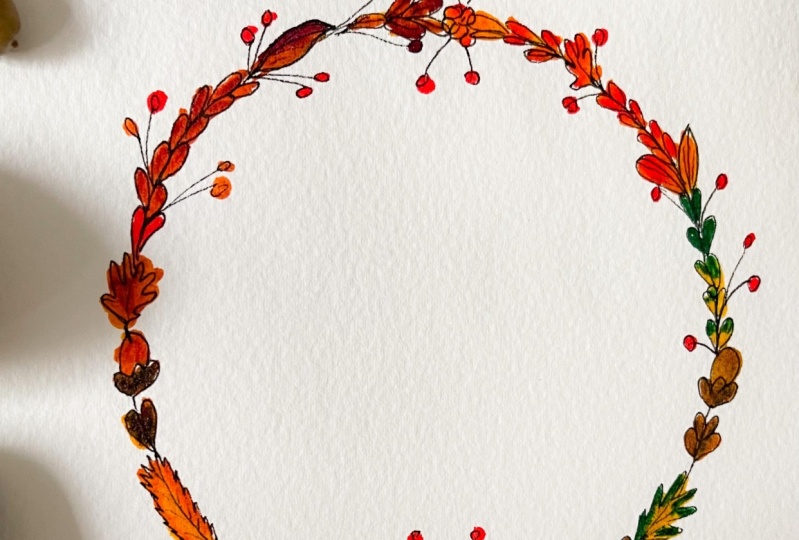
7. Rose Floral Wreath: So for default floral wreath, I'm going to draw a ruse flood, and those will be just an illustration. I'll show you hail. So far the rules just draw spirals are good, starting from the center. Okay, So let's just start drawing our wreath. But this, I'll draw in total three rows designs to heal. And one in the center of these two, but it's slightly lower from their level. So let's drove us rows starting from the same done like this. And then draw the second one. Yes. And after this, draw the third one just in the center of these two roses. Okay, so three roses are ready. After this, we'll draw leaves, but before that to draw a circular outside the both right and left side. And tried to draw both the same land. And then start drawing leaves around these arcs. This time, I'm drawing on different types of leaves than the previous one. I'll show you here like this. And this leaf has margins like a jewel rose leaf has. But if you find these leaves difficult to draw, then you can just simply draw as we do and see, Let's see our design. And it's totally up to you. What illustrations do you want to use an IT. There is no right syndrome. Draw some more leaves here at the right side out. And you can notice that the size of my nieces gradually decreasing. And so cave number of leaves where each on the left side, as it really doesn't matter. So leaves why it is done now let us mark some dots near the floors, some near the leaves, and just feel free to mark these dots wherever you want to. Okay, now draws are leaving small space, just have a D both sides, that is left and right side leaves like this. And it's totally okay if it is not a proper, so it really doesn't matter after this mock r dot haha at the left side and point of this out and draw circle over it. And repeat the same at the right side too. After this, what we are going to do is draw up the era of live just above the left side and design. And repeat the same design. Just mag dot, circle it up and draw up arrow, leave till the right endpoint design. So I know that that is false. Floater read to designing part is done. Now let's add some color to a, but before that, wait for two to three minutes, so that indicates dry completely. Now let's erase the extra pencil part. And always remember the aim should have dried up completely. Otherwise it miter in your design. Now, let us pass fail color and Rose. Hey, I'm feeling red color in my rose design. But you can also better baby pink, yellow, or orange column as Rosato of different colors. After this, I'm gonna fail light green color, and the lease, but I'm not fail them completely. I'll fill the upper part of the lease with the dark green color like this to give it shape. And if you want, you can simply use one color, unlike you can either use light green color or dark green color. It's totally up to you. Now. I'm going to adjust West will the bottom part of the lease with the light green color. And then I went third top part with dark green color. Okay, So, uh, now as these top leaves are smaller, doulas treat them as young leaves. I'm filling in dim light green color. Now, in this design, what we do is bid alternate pairs of lives, whether light green color and adopt us with the dark green column. So I ring of leases done. Now let us add color to the circus. And these circles are kind of illustrating birds. So I'm painting red color. And these, as I've failed read Quran matters. And it's done. Our fourth floater redesign is ready to use. In the next video, we will draw LAS and the fifth floral wreath design.
8. Black and White Wreath: Now we will design fifth and the last floral wreath. I again draw rules and this read, but this time I'm going to use different rules in illustration from the previous one. I'll show you here how we will draw another rose illustration. I'm fought this war, do you have to do just draw the beaver's nose illustration as I shown you in the last video. And for its fighters, draw small, slightly curvy triangles around circle like this. Draw some more petals just above these ones. And this time dropped vectors above the empty space of two petals, and it's done. Okay, so let us draw these rows, illustrations hail over this basic outline. Draw it as I shown you. And I'm gonna draw this read Blake invite only. So I'm filling these vitals with deep blacking. But if you want to add color, then don't Philip completely just draw the shape of vectors. Okay, So this rose is ready. Now let us draw the second one just diagonally opposite to the first 20 rows. Spirals are going to end in slide Leica, red triangles around it for its petals. And if you know to draw some other rows illustration, you can use E2. It's totally up to you. So the, another rose is ready. Now let us move on to its leaves bark and leaves. You can use this illustration like this, or if you want to draw any, I didn't leave illustration. Use that. It's totally up to you what illustrations you want to use in your design. Draw two more leaves here at the left side of this rule is like this. After this draw leaves around the rules and I'm going to draw two leaves. But you can also draw more than two leaves depending upon the size of your leaf and read. Okay, so now let's draw pine needles here. Slightly curvy line and you don't like leaves around it like this. Then draw some tenderness here. And for tenders, just draw a spiral lines like this. Draw some more tendrils here as well. Now, again, draw two more pine needles here just above dependence. Then draw some spirals circles here to represent those words. Now, I'll draw tyros here. I d left side of the first one, but smaller than the former one to symbolize that it hasn't completely bloomed here. Draw some more tendrils and find Nader's near this plot two. And then draw our Brown Chuck Berry's about the pine needles like this. After this, I'm going to draw a branch of lease, got this raw, us are up and leaves around it. So this part is done. Now let us draw one more rows here, just diagonally opposite to this smaller one. And as I said earlier, these are small roses haven't blown completely yet, so I'm drawing only five buttons. Now. I'm draw a branch of berries here and do tenders just above it. Then draw our branch off leaves here. And just like we did earlier. So another that is 53 to design is also ready. And some black and white designs also look beautiful. But if you want to add color, feel free to do so. Now, let us erase the extra pencil part as the ink has dried up completely. Okay, since we have talked about blooming of floss during this video so we can write bloom here and this design and fathers, I am using pink pen. You can use any other color do. And you can also write some adult words to, it's up to you. Also, if you find difficulty in writing this creatively, just write it in your running writing our block letters, it doesn't matter. Now I'll just highlight some parts of each letter. And if you want to skip this step, feel free to do so as it's totally optional. Also, you can use a sketch spending place of color pen to avoid this step. So it's ready. Now I meet you in the next video with Lauren designs. Keep watching.
9. Laurel Wreath: So now we will draw first laurel wreath and ludus simply draw our circle up at the left side, leaving some space from the top till the bottom middle point. And from there extended like this. Repeat the same draw, another circular arc at the right side to leaving some space at the bottom and extended like this. Now and just draw again over these arcs to highlight them. And as we know, laurel wreath is basically made up of connected branches and leaves. So these oxygen at desk branches. Now and let us draw leaves that own these oxbow, which I'm going to draw leaves like this. And for giving you a heavy load, I'm drawing these leaves closely connected with previous ones like this. Keep, continue drawing the leaves in peer till the top end point and here and draw one leaf at the top like this. Now, this sheet are little bit and start drawing leaves here around the left side out. Do haha also draw the leaves closely connected with each other and at the top and draw one leaf like we did earlier. And that's it. First laurel wreath design is ready. Now, wait for a while to get the ink dry. And then it is the extravagance and no deaths here we have double up the yargs, so it might take time to get dry completely. Be careful while erasing the extra pencil. Okay, so a non-linear spell color and the leaves and focal ring, I'm going to bend light green color in the top part of the leaves. And then I filled out green color in the bottom part of the leaves. You can also filter any run a red, light green or dark green corner as well. So in light green part is done. You can also leave it as it is right now, or very dark green color. Unlike me. You can also use other colors to fill these leaves like orange or yellow, to represent our term. It's totally up to you what you want to illustrate from your read to design. So it's done and see how beautiful it is looking. Okay, now let us move on to the, another laurel wreath. For this one, I'll draw ribbon here. But so far and draw a slightly curvy rectangular shape like this. And then I did this side draw our kind of trapezium shape like this. Repeat the same on the left side of the rectangle to 0 after this draw been more such shape inside D, both like this. Now draw driven towards downward from the rectangle like this. Draw one more such shape. I did this right side. Do. I know it's done. So after this, let us draw grant and FADH that again draws our glove up like this. But this time I'm making it a little longer than the previous one. Draw another circle out at the right side as red meat shop, Both dogs are similar in length. Now start drawing leaves around these out in DPR like this. You can notice that this time I'm not drawing them closely connected with each other. In this way, we will get a little bit lighter design then the NPVs were. So let me do it my sheet, our little vague and repeat the same HIO. And so draw leaves in payer till the end and draw a single leaf I did top of the arc, try to draw equal number of pair of leaves around both the ox. And here in this empty space, draw two small dots when after the boot side leaves and draw us organ in between these dots. So designing part is done. Now, wait for a while and vernix get dry. It is extra fancy. Okay, So if I've got a ring, let us build red color and some parts of ribbon like this and yellow and adopt but you can also change the ribbon Ghanaians but your choice. And then when I didn't gonna indeed links, you can also fire debris in Kano or you can fill both light green and dark green and alternate pairs. And that's it leaves via, it is done. Now often pinker now in this circuit. So another second laurel wreath is ready. In the next video, I made you with DTI laurel wreath design. They'll then keep watching.
10. Last and Final Wreath Design: Okay, so far the last and retired laurel wreath design. I'm going to draw it slightly different from the others. As a drawn we're proper, so good. For this. What I'm gonna do is draw a circle like this. This is a branch and around it, I'll draw these in pairs like this. Notice I'm drawing these leaves like we do in vice, but these pairs are in very much closely associated with each other. Now let us draw another for this. Let me take my cheetah little way and draw up in such a way that first stock overlaps the second one. And it's totally okay of business not up of X, I'll clear up as a T allele, doesn't matter. Grown leaves around this out as we did earlier. So two out of four branches with leaves are ready, repeat the same, and draw other two branches as well. You can simply increase or decrease the number of branches I square the size of your wreath and length of the branches. Just modify it according to yourself. Also, you can use any other leaf illustration too. Like you can use live illustration which we have used in the second laurel wreath design, are simply draw these pairs of leads closely connected with each other. It's your design and modify it as per your choice and ys. So our last laurel wreath design is ready. It is the extra pencil marks when the ink dried up completely. And that's it. Now, let us, when cholera, in this design, I'm going to find our green canal and this branch. And then I'll fill the same color in the alternate drums. Then now we weren't doing this with alternate pairs of leaf, but this time I'm filling same color in alternate grantees. After this pen light green corner in other left branches datas and the second fourth branch leaves. You can also change the color combination. Like you can feel light green and yellow color, light green and orange color. You can same v-value, just one choline, all the branches. It's totally up to you how you want to illustrate your design. So our last laurel wreath is ready. And with this three to designing is also complete. They are the total reads which we have designed by now during this session. And you can write anything like hello, good morning, Thank you, and so on. And we're doing the designs just like I've shown you in some reads. So I hope you enjoyed the session. In the next video, I'll share a fun class project with you so that you can track does designing more and more reads, and do not forget to review the session. Bye bye.
11. Project Work: So everyone here is your final class project. Try to draw these simple designs on your own. Pictures up your design and upload those pictures in your project and resource section. And do not forget to review my class. Also, if you don't want to miss any updates regarding my newest classes on Skillshare. Do not forget to press D Follow button on my profile. Thank you so much guys for joining me. Bye bye.
 Tanya Maheshwari, Artist and Crafter