Transcripts
1. Introduction : Hello and welcome to my first culture class. My name is Holly Hoffman, and I am a watercolor artist living on the Big island of Hawaii. A lot of my inspiration here comes from the beautiful tropical fruits and flowers that are found in Hawaii. So I decided to create a Siris of skill share classes, demonstrating the watercolor techniques that I use to paint tropical fruit. So these classes are going to be open toe all skill levels. The only prerequisite is that you have a basic level of sketching ability and some simple watercolor supplies, which we will go over in the next segment of this course. So in this first class, we're going to cover how to paint beautiful tropical Tobias, a couple here that will be referencing. And so we're going to use a wet and wet watercolor technique to start and then go back in and practice, adding some crisp details to really make those papayas come to life. So thank you for being here, and I hope you will enjoy my class
2. Supplies: So now we're gonna go over what supplies we need for this course. You're going to need some watercolor paper. I'm going to be using this Canton Excel watercolor paper. It's very affordable. And for being a cheap watercolor paper, it's pretty decent quality. Next, you're going to need a pencil and an eraser just for doing our sketch work. Before we begin painting, you're going to need a paintbrush. I would strongly recommend a round paintbrush, preferably a size eight. You could go six or 10 on either side of that, but what's really nice about this is when it's wet. You can get some nice, thicker lines for your wash work, and then you can also see that it comes to a very fine point on the end. So that's really good for the detail work that we're gonna be doing after we do our wet and wet washes. You're also going to need either some papayas if you have them available to you locally, or you can search Google images for pictures or copyright free photo websites like picks, obey or unspool ash. Some of those, and then you'll need either paper towels or ray or sponge something like that is really handy. To have to dab off your brush or sometimes get too much water on your paper to take that sponger paper towel and kind of dab it off. I like to keep a little piece of scratch paper handy just to test my washes. Make sure they're the right color that I'm looking for. And then you also need a ceramic plate or some kind of a palette. So over here to the side, I have a ceramic palate. You can see I've been painting in this one, or I have on this little tin of paint. I also have this sign that I could mix my washes. So now we're gonna talk about the watercolor paints. So if you have just a very basic set with the primary colors, that will work just fine for this, so long as you are familiar with the color will and just basic mixing. So, for example, I'm not going to be using this set today, but I will show you this has your primary red lemon yellow, ultimate ultra marine blue. It has a Chinese orange, which is kind of like a lighter version of like raw sienna, and then it has Payne's gray. So even if you didn't have a brown shade, you could work with the three primaries. And like a black or a neutral tint on, do you just have to be familiar with how to mix your oranges and your greens? Because I'm not going to go over that specifically in this class. But this would totally work if that's what you have around what I'm gonna be using today are these liquid watercolors by Dr pH Margins. So the colors that I'm going to be using here are this, uh, Hansa Yellow light. This is Gambo sh. And then we have brilliant cadmium red sap green. And then I have a carbon black and a Venetian brown just a dark, dark brown. We're gonna mix the a little bit of the brown with the black to do the seeds within the papaya again. If you were working from a more basic set, you could mix a little bit of all three of your primaries to create a brown mix in a little bit of your black, and you would have the same thing, is what we'll be doing here. So those air the water colors that I will be using today. And then, of course, you will need some kind of a jar or glass of water to rinse your brushes. Some artists prefer to have one to rinse in and one to grab clean water from. If that's what you like, that's just fine. Um, and I think that about covers it, So in the next course or the next segment, we're going to get into sketching.
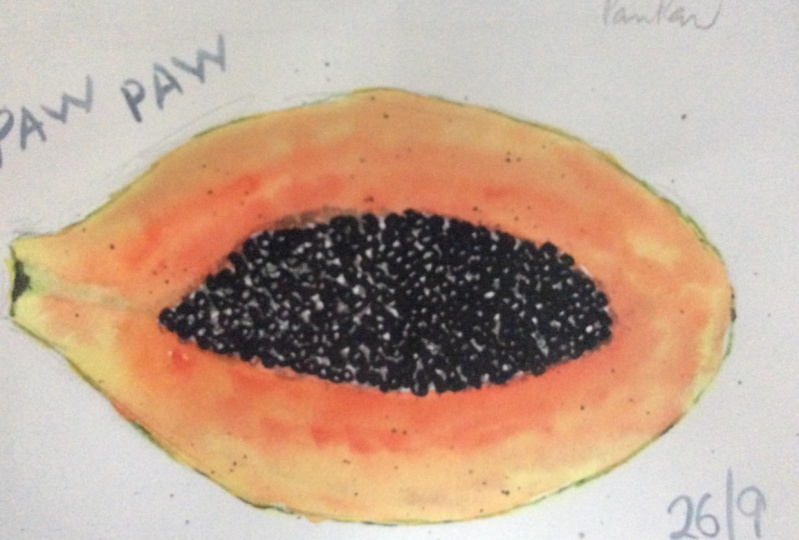
3. Sketching & Composition : All right, so now we're moving into sketching. I went and cut one of our papayas in half so that we could see the inside and look at it as a reference. So when we're sketching, there's a couple of things we want to keep in mind. First of all, you want to sketch as lightly as you possibly can, because you don't want your pencil lines to be really dark and heavy and show through all your watercolor work, unless that's a style you're going for. But if you're gonna try and erase them out and you press down so hardly that it created a dent in the watercolor paper, it's gonna be really hard to get rid of those lines. The other thing we want to keep in mind is, if you are doing this as more of an illustrative piece, if you're planning Teoh, scan this into your computer and digitize it may be for making other products like prince or tea towels or something of that nature. You're probably gonna want to leave a little bit of space between, um, your whole papaya, which will be drawing and you're half papaya, Andi, because otherwise, if they're touching. It's gonna be really hard to separate those. If you have some space and on the computer, you'll be able to move them around and change your composition a little bit if you want to . So we also would like to kind of balance thes fruits on the page so we don't want him to be all on one side or, um, you know, at a at a strange angle, we want it to look as natural as we possibly can, especially if you are looking at this as more of simply a watercolor painting that you're not planning to digitize. You want it to turn out nice to have a balanced composition. All right, so now I'm going to begin by ever so lightly sketching this whole papaya. Hopefully, you can see it on camera. The nice thing about drawing things like fruits and flowers, things that come from nature is that no two of them look exactly the same. So if your papaya is a little lopsided or it's not the exact same shape as the one that you're using as a reference, it's OK because you could probably go down to your local market and find a papaya that looks just like the one you drew. So don't feel too nervous about making it be absolutely perfect by any means. All right, But mostly that's pretty good for our whole papaya. Now I'm going to look at our half a pile. I think I'm gonna angle this one down just a little bit lower right about in here. Some papaya seemed to be a little bit shorter and rounder, and some of them are more elongated. So and then the other thing is they come in different a variety. Some are redder on the inside. Some are more of a yellow orange color. So as we're doing our our color mixing to if if it's not absolutely perfect, it's just fine, because it probably still matches some a variety of papaya that exists out there in the world. I like painting things that I don't have to feel stressed about making them entirely perfect. Okay, so now what I'm gonna do is you can see this little, um, like a stem that goes down in so very lately. I'm just going to sketch that and then I'm going to follow the inside where the seeds are sketch that part as well. I'm not going to sketch out. All the individual seeds will show you the technique I use for doing that. That makes it much, much faster than sitting in sketching out each seek. Okay, now that I have my pious sketched, what I'm gonna do is I'm gonna take my eraser and I am going Teoh, just go over my lines and make them. I sketch very lightly, but to make them as light as I can possibly make them toe where it can still tell where they are. So I'm just gonna run it over quickly and lightly, just like so, because we will be painting with those lighter yellow and orange and green tones that are very transparent. So pencil will show through. That was pretty easily if you don't like running your hand across your paper and I usually don't. Um, but sometimes, having just a old fluffy brush around Teoh brush off your pencil dusting of handy too. All right. We have completed our sketches and I will see you in the next segment.
4. Techniques: So now we're going to quickly go over the techniques that were going to use, the first of which is wet in wet. So when we paint wet in wet, it means that the surface of our paper is already wet as we add paint into it, or more paint into it rather than painting with wet paid on dry paper. So I'm going to show you two different, um, levels of wetness With what? What painting? The 1st 1 is not one that we're going to be using for this class, and that's when you have a lot of water on the paper. So I'm gonna go into this first square, and I'm gonna put water onto it to the point where it starts to cool some of what? This whole surface to the point where you can you can see water physically standing almost kind of bubbling on top of the paper. And now I'm going to take a little bit of this red paint, and I want you to watch what happens when I got it into this much water. So I touched it ever so lightly. It's spreading. Touch it again, and it will continue to spread until it dries, It will go all over the paper. It's very uncontrollable. It's going to go wherever it wants to go. It may end up in places that you never envisioned it and ending up. And this could be an amazing technique for some types of paintings or some subject matters . I'm gonna add a little bit of yellow over here just to show you see how the yellows kind of pushing back on the red, and probably as they continue to move around until the point where they dry, they will blend into one another to some extent. Okay, now, for the, uh, wet and what that will be using, So we're going to get this square wet, but we're going to get more of a damp kind of a wet. So imagine that you are buttering a piece of toast very evenly. You're gonna take that butter and you're going to spread it. Um, about as far as it'll go, you're working with what you have. You're not adding in more and more water. Okay, so now this is very evenly wet, but there's no pooling of water on the surface of the paper. Now I'm gonna take some red paint and put it into the corner and then I'm gonna rinse my brush. I have a paper tell down here in my lap. Type in, drag my brush on, take some yellow, put it into this corner. You can see how I actually have to move my brush more to get the pain to spread. So that indicates that I have a little more control over where the paint is going to go and end up. There's still definitely an element of, um, spontaneity. With this technique. Like you can see this red is bleeding out further than where I placed it. But if you look back at this one and how the water is kind of run all over and the colors have blended together far more out of control than on this one, where the surface the paper was just a little bit damp. Okay, Now, for other technique, when we do our detail work, if you are not familiar with creating fine lines with a round brush like this, this would be a good thing for you to just take a couple minutes to practice. So I'm going to get some more of that red paint on the tip of my brush. And ever so lightly, I'm going to practice making some very fine lines. The other thing is, if you are looking to Kate, straight lines to move your arm on the table. If I try to move my hand when I create a straight line, it's gonna be much more difficult because I have to pivot my wrist so you can see where that one did not turn out as nicely. Perhaps Aiken zoom in just a bit. Also, we'll practice creating some dots, um, practice, creating some parallel lines, just stuff like that to get more familiar with your brush and more ready for the detail work that will be doing in the last portion of our painting. All right, so after you've practiced some wet and wet washes and some detail work, then we are ready to move on to doing our papaya illustration.
5. Wet-in-Wet: All right, so now we're going to begin painting our papayas. So I'm going to start with the whole papaya that's on the left, because I don't want to be getting my arm and in the paint if I were to paint this one first. So what I'm gonna do is I'm going to get some water on here. What I like to do is and just a hint of the lightest color in the papaya, which would be this very light, lemony kind of yellow just so I can see where I'm placing my water. Because sometimes if you're adding just plain water to the paper and you get a little bit, you know, crazy you're outside the lines. Then you add the paint in and your paint starts going outside of your lines. And you didn't even realize that, uh, you had gotten water outside of them. So this just helps to see where we need to put the water. If you do happen to get too much water on your drawing and you notice that it's starting to pool, just grab that sponger paper towel or rag or whatever. And just a dab some off. Sometimes, too you can pick a little bit up with your brush and then just, uh, dab your brush on your paper towel if it's just a little too much. Okay, so now we have a nice wet even surface. So I am going to take some of this gambo ish color because that's the deeper yellow in our papaya, and I see it's kind of strong up towards the top, so I'm gonna drop some in there. This kind of let it spread. It's a pretty strong in the middle and downwards and then runs my brush just a little. Grab some more that lemon yellow. We're gonna pop that in just to kind of blend It blended into the lighter areas of the papaya. So I like to work kind of fast moving, moving over it just so that none of the area's dry before I get to them takes a more of that Jambos. Drop it in. I just like to look at the fruit, see where the where certain colors are the strongest in it, and then dropped those in in that area into that wet and wet wash. So we're off to a pretty good start here take a little more lemon yellow. Also, as watercolor dries, it usually dries about 20% lighter than how it appears on the paper when it's wet. So if you want some really vibrant fruit, you want to add in a lot of color. You want to make it super vibrant When it's wet. Don't be afraid to add a lot of color. Okay, now, take a little bit of this sap green, and there's a few areas on the papaya that are a little green. Yet papaya start out green, very green, and as they ripen, they actually turned yellow. And then more of that golden yellow color. And some people cook with green papayas. I haven't ever tried that, but here they're very good and some of the local Hawaiian dishes all right. And then they see a little bit of green in this area and kind of down towards the bottom. There some green as well. You see how the papaya has a lot of little, uh, kind of green specks on it? We'll be adding those in when we do our detail work. This is just the base layer. All those those base colors in the papaya. I m going, Teoh. A little more green over here. Intensify that a little bit. No more green over here again. It will dry, lighter, and it will spread out a little bit as it dries. We will do our detail work after after our wet and wet wash is dry. Otherwise, and you can imagine our details will spread all over the wet and wet wash. And they will no longer be details. A little more there. Just doing some little dots and letting them spread around. You can put as much or as little green on as you want. Because, like I said, as papayas ripened, they become more and more golden yellow. I just think the green ads, some interest. A different tone in the painting, then just oranges and yellows. Okay, so now we're gonna let that sit and dry. I'm gonna set this papaya off to the side. I'm gonna grab our house. The pious. So I had mentioned earlier that the inside of papayas can be anywhere from kind of a light yellowy orange to a very intense kind of a red orange, so I might actually paint this one just a little more intense than it appears, simply because I like to add as much variety and color to my paintings as I can. So I'm just gonna reload my palate a little bit with a few of these colors, and then we'll get to work. All right, So when I'm doing the wet in wet wash on this one, I am not going to touch the center of the papaya where the seeds are. That is going to stay dry. So I am only going to apply water on this. The meat of the fruit that goes around the center at just a dab of yellow to this like I did before, just so I can see exactly where I am placing my water. If you happen to get a little bit inside, it doesn't really matter, because we're gonna be going over that area with black. But we'll try to keep it as dry as we can. I think painting the inside of the papaya is the most fun part because we get to use some very vibrant shades. Okay, so get that damp all the way around that excess water off my brush. OK, now what? We're going to do is take this vibrant kind of a red shade and cadmium red, and we're just going to touch it around the inside edge of the papaya is going to draw a line a way around, because that is the most colorful part is towards the very center. So that's the first color we're gonna add. Rinse my brush a little bit. Okay, Now we're gonna pick up this orange. We're gonna add that in right next to the red so that they kind of blend together. Kind of like painting a rainbow here. Those blending I might add a little more red in, just intensify a little bit. Okay, then. Gonna take that lightest yellow color. And I am going to use that to blend the other tones out to the edge of the papaya. So just running my brush so that it's kind of halfway on the existing color and then up to the edge. And then papayas are always a little bit lighter in color up here by the stem, so I'm just gonna fill that in with some of that yellow. I won't worry about making that too colorful. Okay, And then I'll take a look at it. Maybe add just a little more of this Jambos color around the center. Bring it out a little further, More red. I was kind of did intensify it right there at its widest. Why this part? My brush off a little. Well, that the paper is still wet. I attended just kind of play around with the colors a little bit. Make sure they kind of spread out where I want him at any other colors and that I think I need. And then, without overworking it too much here, then we'll in a moment, we're going to let it just sit and dry. Okay? I think that looks pretty good. So runs my brush out, and, uh, now we're going to wait for this to dry completely, and then we will come back and do our detail work.
6. Detail Work: Okay, Now that are painting is fairly dry. We're going to go ahead and start. The only part that's still wet is a little bit up here. So I'm just gonna leave that alone and not go into any great detail work right now in that area while it dries. So we're going to start on the body of our whole papaya. So I'm still using my size eight round brush, and we are going to add some of those deeper green dots and details. So I'm going to take my sap green again and take a look at my papaya here. And, uh, if you look closely at it, you can see that there's probably thousands of tiny little dots on it. We are not going to do every single one of those dots. The idea with illustrating this papaya is too. Um, give give the viewer enough that it appears to be realistic without having to paint every single dot for hours. So, um, these areas where I had added some green in our wet in wet wash our where the darker dots of green are going to be most heavily focused. So start up here and just start adding a few little marks You can see in some areas they kind of cluster together and, uh, almost look like a bigger, a bigger Dr Mark. You don't want to make these perfectly circular either, because that's they're not nature is, uh, not that precise. So at a few there also going Teoh, define the edge of this papaya just a little bit. Put a little bit of green line there, and then what I'm gonna do is take just a wet brush and, uh, smooth that out a little bit there. Okay? No going down here. So I'm just kind of making some kind of erratic dots around the area, connecting some of them together. I'm gonna come and down here in this green area, the same kind of thing. Almost drop my brush. That would have been a calamity. Okay, It looks like it's getting a little too intense for you. You can just take a damp, wet brush and just kind of with the area around it a little bit. Give it a place to in a bleed out. Be more subtle. See how that softened it just a little bit. It's kind of like creating a little mini wet in wet wash, adding that water and letting it just kind of soften out. I'm gonna add a little bit more green down here at this bottom. Part two. Define the edge a little bit, okay? And then the last place that I want to add a little more green is gonna be over here. - Okay , then I'm gonna take a little bit of clean water again. Just kind of soft in that. Okay? So now the first thing we're going to do is I don't know if you can tell it on the camera, but this little stem that runs down is kind of a very light, greenish yellow tones and take a little bit of my yellow exit with a little bit of my green . And then I'm going to paint this little stem that comes down the very light wash of that earthy kind of green yellow shade. Okay, then what? I'm gonna dio Let's pick up some more of that sap green. And to help give our papaya just a little bit more of a defined edge, I am going to do some of those lines that we practice earlier, the very fine lines. So I'm not going to outline this, Um, with the perfect even line all the way around, I'm actually going to let my brush skip a little bit. In some places, it's just a little bit thicker. In other places, it's barely visible at all. If we do a very defined kind of a line around it, it's going to take away from some of the realism of the papaya, whereas creating a kind of a very thin, uneven line for the peel adds realism. Okay, hopefully you can see that Maybe I'll zoom in just a little bit like so. Okay, so rinse my brush out. Now what we're going to do is paint those seeds in the middle of the papaya, so let me actually zoom back out. Um, so you can see the seeds, so they're a dark kind of brownish black color. So I'm going to prep my palate by adding drop the brown, paint the drop of black paint, and then go ahead and start mixing those together. This is a place where I'm actually going to use my little test sheet and just going to see if that's the tone I'm looking for? Yeah, I'd say that's that's pretty good. Okay, so I'm using the tip of my brush. I am going to begin to paint the seeds. So when you look at them, you can see that they're that kind of have, like, a jelly substance covering the outside of the seeds. And I'm not sure if it picks up on camera, but it kind of gives them a little bit of a sheen. There's little highlights, like white highlights on the seeds. So we want to also create that in our painting and because in water color, we don't really, um, want to try to go back in with white paint. We want Teoh instead, preserve the white paper where we want to see the highlights on the seats. So this is gonna be pretty simple. We're just going to make little circular strokes and, uh, leave a little bit of a wait. Highlight on those zoom you in again so you can watch more closely. So and I don't feel like you need to make every single circular mark perfect. Because as you saw in the papaya, the seeds air kind of like they're they're overlapping. And, uh, you don't see each one of them perfectly. So I'm just making little circular marks. Some of them I'm filling in completely with black, other ones. I'm leaving that little white highlight on. I'm also going to overlap them just a little bit on the orange. Because if I have a perfect row of round seeds all the way around the papaya, that's not really going to look very natural because they're not all lined up in order like that. So these are just little things that I'm sharing with you because their mistakes that I made, um earlier on and painting when trying to paint things realistic, making them look too perfect. Like I said, nature isn't that that specific? So just gonna go ahead and continue to paint in each of these seats. Okay, So I finished painting in those papaya seeds off camera just to save us a little bit of time since, uh, I had already demonstrated to guys the technique for doing it. So now the last detail that we're going to add to our papayas is a little mark for the stems on the top. So what I'm going to do is take a little bit of this brown black mix A mix it in with a little bit of the sap green. It's to make kind of an earthy, um, earthy, greenish brown tone, I guess. And, uh, I'm gonna add water to make that kind of light. Take my little test sheet once again. Say, that's about the color I'm looking for right there. So now this top part of the papaya here that wasn't dry before is now dry, so you can see this is kind of what the stem looks like. Um, so at an angle, you know, you wouldn't see that much of it. So we're just going to paint in kind of like a ladder type of a circle appear and couple lines that connect would maybe be a better way describing it, just like so. Okay. And then on this other papaya half, you don't see a whole lot of it. But just a little touch at the top. Maybe a few lines that kind of connect together in there. And I was do min again so you can see Yeah. Okay, so that completes our papaya illustration, and I will be back in the next segment to talk about the class project
7. Class Project : All right. So here is the completed papaya illustration. Just to give you guys one last look here. So now it is time for the class project, which is for you to paint some papayas. So keep in mind that whether you just want to paint them as a watercolor piece, maybe something to hang in your kitchen or if you are an illustrator and you intend to digitize them, this is a great project. These would be super cute on wrapping paper, tea towels, greeting cards, all sorts of different things. So if you have any questions along the way, if there's anything I can clarify, please let me know. I will do my best to help with that. If you want to be back, you know are if you want to post a picture of your work in project of your work in progress , I would love to see that please post pictures of your finished pieces. Andi, let me know any feedback that you have, but I want to thank you guys for taking this class with me, and I hope that you will be joining me in the future for the rest of this tropical fruit. Siri's thank you by
 Holly Hoffman, Watercolor Artist