Transcripts
1. Hello & Welcome: Hey, there. I'm Nikki. Welcome to my class about Illustrating for
stickers in Procreate. If you love creating
colorful fun and eye catching designs and want
to turn them into stickers, you are in the right place. We are going to illustrate five spring inspired elements and add a motivational
quote to them. And then I show you
how to print them out at home on vinyl
sticker paper. This is a beginner
friendly class. I'll guide you step by step
through the entire process from sketching and illustrating to preparing your
designs for printing. You will learn how to
use Procreate tools effectively at vibrant colors and make your
stickers stand out. All you need for this
class is an iPad, Drocreate app, and
vinyl sticker paper. By the end of this course, you will have your own
collection of ready to use stickers and skills to
keep creating more. I recommend my process
for personal use only. If you'd like to create stickers to sell
in large numbers, I recommend working with a professional print shop that also does all
the cutting for you. I can't wait to see
what you create, so grab your iPad, open up Procreate, and
let's get started.
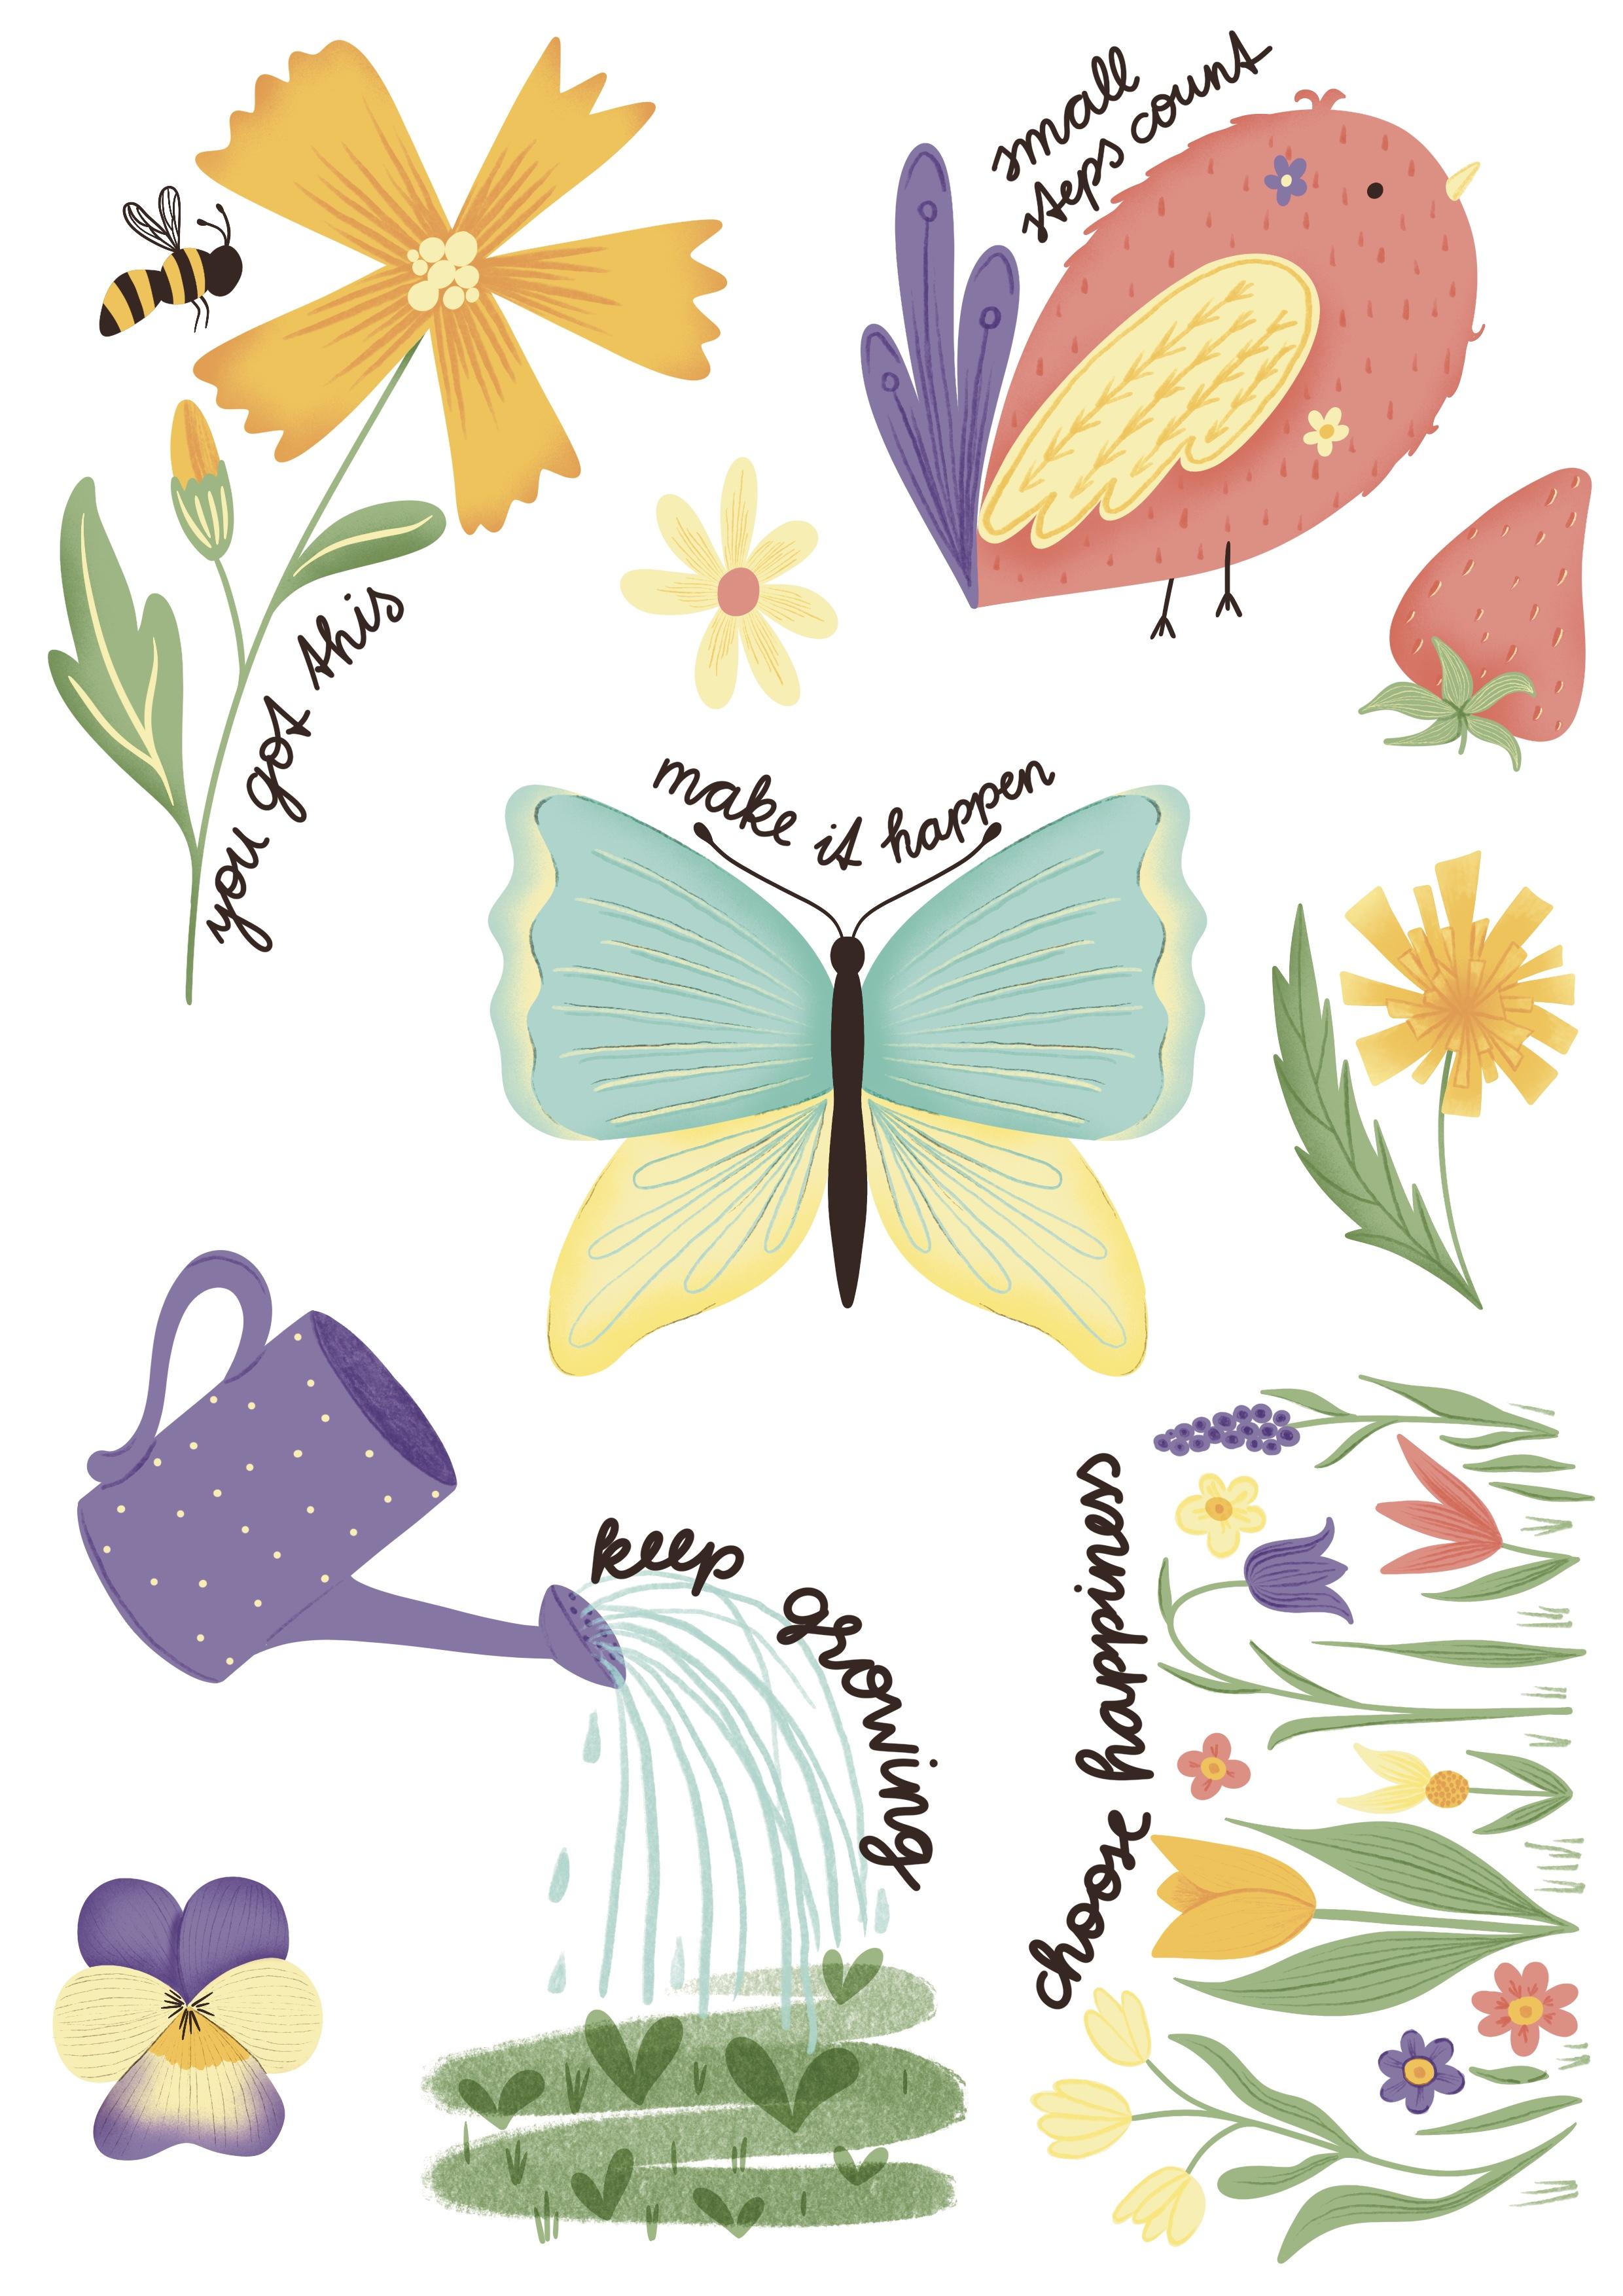
2. What it's all about: Your project is to
create a collection of spring inspired elements that you can print out
on sticker paper. If you like, you can use the same color palette as I or come up with
your own colors. Just be sure that you
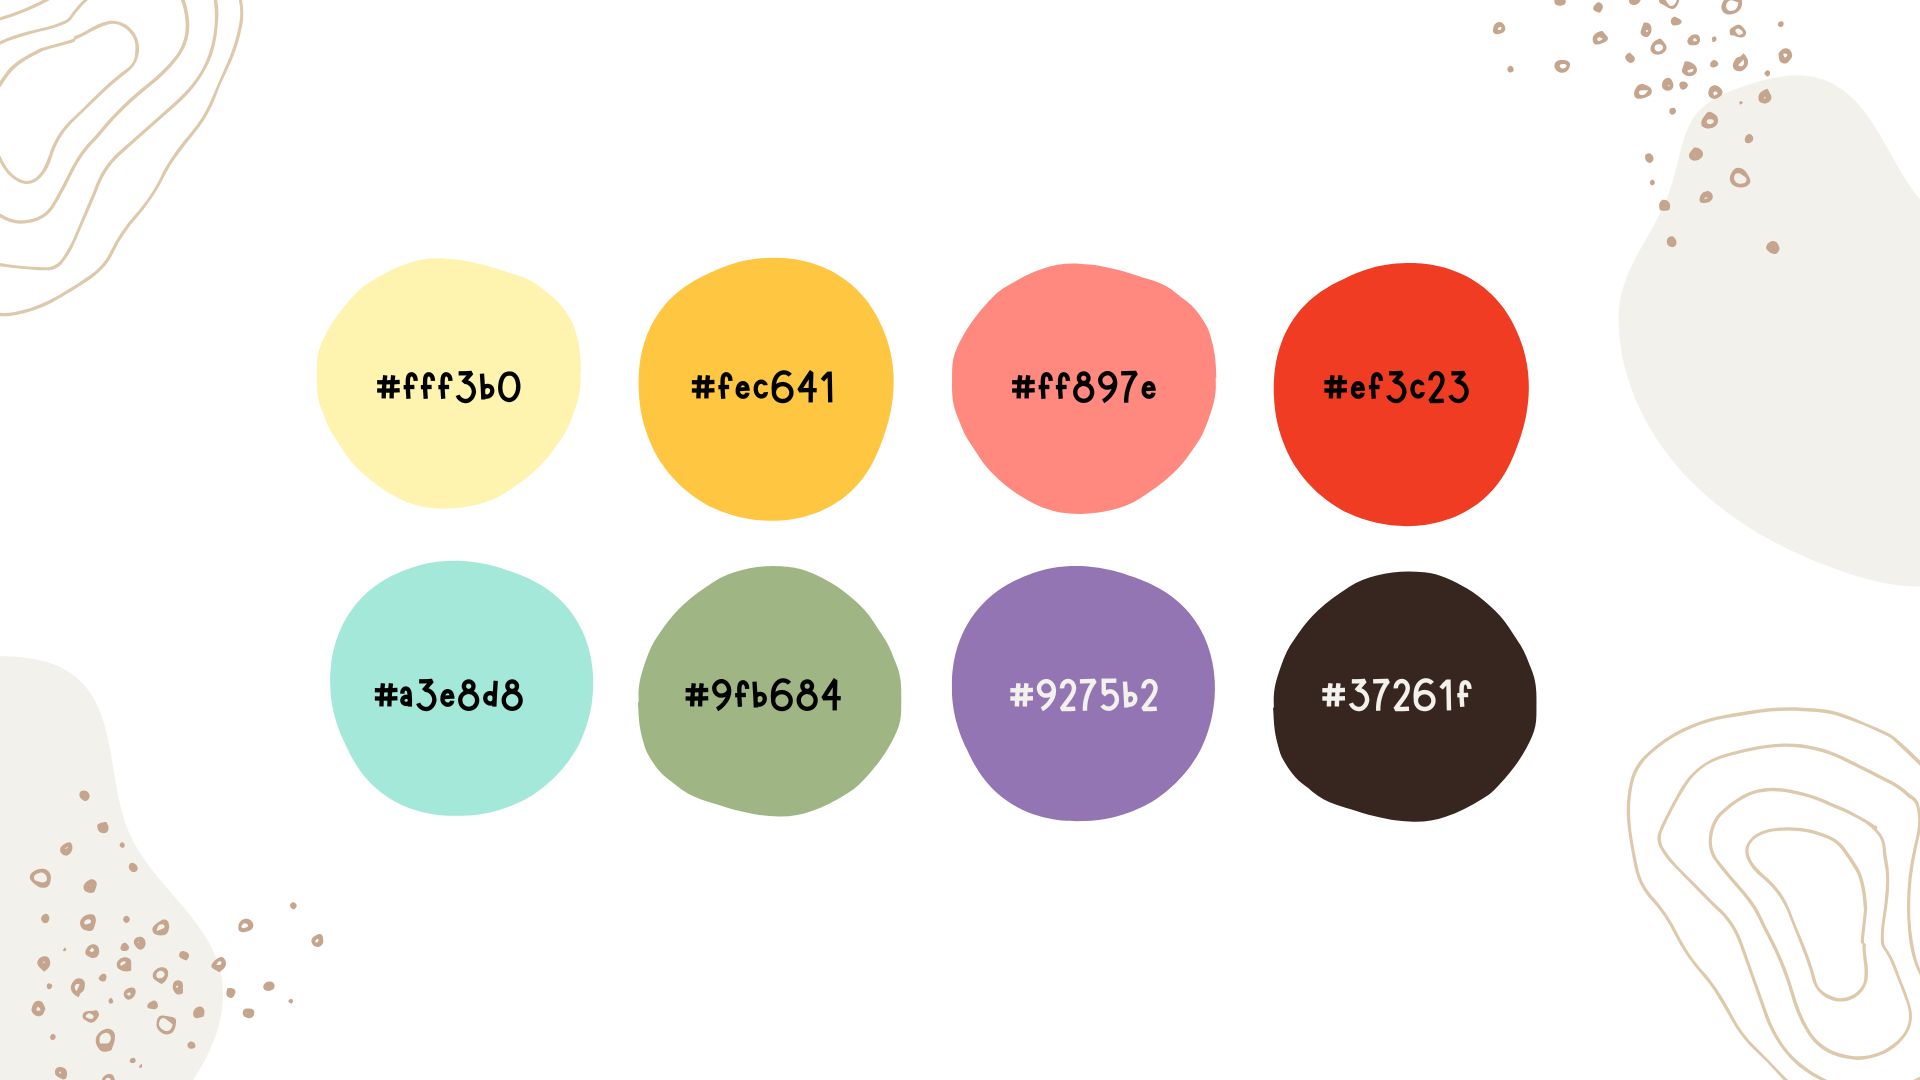
pick your colors from the CMYK palette so that you don't have any surprises
with the printing. You find my palette
under the resources tab. In this class, we'll take some time on sketching
out different ideas for stickers and I show you in detail how I illustrate
my elements. For the printing process, you need to buy some
vinyl sticker paper and I link the paper that
I used in the resources, but you can use any
variation of it. I use a glossy paper, but you can go with a made one
or even holographic paper. Just take care about what printer you have and if
the paper goes with that. Please upload your illustrated
stickers to the gallery. I'd love to see what you create.
3. Canvas Setup: Depending on what size of
sticker sheet you have, I have an A four, we need to create a new canvas. So I take the little plus
on the top right corner. And here I have A
for pre installed, but in case you don't have it, it is 210 by 297 millimeters. But this profile is with SRGB. And since we are going
to print it out later, we need to have it
in C and K. You can create another one
in the dimension. It's the millimeters,
210 and 297. 300 DPI and the color profile, we need to switch to CMYK. This is how your printer works. I choose the generic MK profile. Click Create. I have provided you with my
CMYK color palette, but you can use whatever
colors you like. And the first thing I'd
always like to do is to make some dots with my
colors on the top corner, somewhere in the
edge on the corner. To pick it later on. But you can also shift this
little bar here on the top. And so you have the palette
always on your side. But for me, it's too big. I don't like to
work in that way. So I like to make to choose
every color and make some dot choose a solid brush for that, so you don't have any textures, and you always pick the same solid color. Okay. And then shift it
to the very corner. And I stay with this
last dark color. And for sketching, I'd like to choose under sketching
the six B pencil. Okay.
4. Planning & Sketching: Let's choose another layer, and let's think about which
kind of stickers to create. So I think I'd like to
create five or six stickers. So when you have the sheet, so it's in that
size, the sticker. I think that's a nice size to have And, of course, I'd like
to have flower. So let's start with that. I'd like to make some
kind of cosmos flower. For me, it's the one that's that I like
the most in spring. So I guess it's too big
for what I'd like to make. And I twist it, turn it a bit, so that I
can make the stem here. And my sketches are
always very rough. And I'd like to spend more time on the
illustration process. On the drawing process
and not on the sketch. The sketch is only for seeing how I can
use them the space. So I'd like to make
a butt over here. So that kind and maybe a leaf. Okay. And I'd like to have a
little bee over there. So I have to spend some time on
the bee to make it good because my
partner is a beekeeper. So I'd like it's a
special one for me. I'd like to make it good. So he also likes. Okay. I'll make the details later on. And the first is done. So I think it's a bit too big for four F five stickers, so I make it a bit smaller. And shift it to the corner, but not to the edge because think about
the printing process, your printer doesn't print
on the til the they edge. So leave a bit of a room around. And I'd like to have some motivational words
around my stickers. And I thought about this a lot, so maybe you can come up with some short
motivational words. And I think I'd like to have
you got this here about I make it rough and think about later on which
kind of type to use and whether I type it I write it with my own
handwriting or use a font. But that's the idea
of my first sticker. And for the sketch, I'd like to to frame it
the sticker roughly. So to see where I will cut it later to not till the
wary leave some room. Yes. I think the first is done. And what else can
we draw for spring? Of course, we need
a little bird. And just don't stress
with any details and don't think about if
your drawing is good enough. So if you don't
know how to draw, just keep it simple. That's my tip for you. Use basic shapes, and then you can play around later
with the brushes, add some textures or little
doodles in your shapes. So just keep it simple. So I I'd like to make little birds make it in a kind of drop shape, maybe. Yes, that way. Okay. And fed us. Make a Make a nice tail. And Okay. And the I. For me, it's always hard to
choose where to draw the I. So here or more down. No, I think it's more on the
side or at the very front. I don't know. I will choose it. I will choose the right place
later in the illustration, so I make it in the
middle for the sketch. And I will also decide whether the peak is opened or closed. I don't know right now. It's a rough sketch. I
make some simple feed. And the next one is done. So maybe I'd like the feathers
a bit bigger, the tail. I choose free form. And shifted a bit. Yes. And what message we Can we give to the bird? So I think small steps. Count. I think it's perfect
for a little bird. So make the shape around. Yes. Nice. I think the peaket is too low. We need it more on the
top, but I make it. I correct it later
in the illustration. What else can we draw? I'd like to have a watering tin that is watering that
buds and the fresh grass. So let's start with
the watering tin. I make it rough. So make a square. So think about to turn it that the water comes
down on the grass. So handle, make a handle. Okay. I make it bit round on the top and on the bottom to make a bit
of a three D effect. So twist it and make I don't
know how this is called. So I'm not English speaking. If you probably guess. They make, um, this
kind of watering. D no, I don't like it here. Okay. And there is some water coming
out of of the tin. And shifted a bit to the site. And down here, I'd like
to have some grass, fresh grass, and
maybe some some buds. Make simple shapes. Don't make it too complicated. With the right colours and
the right brushes later on, it will be very nice also
with rough and simple shapes. Trust the process. Maybe some drops of water here. Yes. And what kind of
message can we give to this? So I always like the wording. Keep growing. So maybe we can write it here alongside
of the water. Keep growing. Yes, let's frame it. Oh, I think it's nice. And what else can we draw
that is a spring element? I'd always like to
have a butterfly. Let's turn on the drawing assist for symmetrical drawing
for this butterfly, go to the wrench icon
on the top left corner, go to Canvas, turn on
the drawing guide, edit drawing guide,
choose symmetry. And now we can pick this
little blue dot and shift it. Where can we draw the? I think we draw it here. Shift the bird a bit to the top, and I think here here is room. Okay. Let's shift the
bird a bit to the top. So there is enough room
for the butterfly. Let's start with the top Wink. I'd like to have
it a bit shaky on the corner on the
edge and the bottom. Mm. Maybe a bit rounder here. In that way, you
can make the shape you like as you like to have it. And it's okay to draw it very
close to the other sticker. I think it's room enough. And now let's make the body of the head and Body. Okay. And the little I don't
know how it's called. Okay. And I don't know which kind of pattern to make in a butterfly. For now, I'd like to define the edge bit maybe
make some stripes. Let's see what occurs
in the illustration. Maybe here some flowery shape. Yes. I'd like to shift it a bit. Okay. So now we can turn off the assisted drawing
again because we are finished with the
butterfly sketch. So turn it off and we turn
also off this drawing guide. Turn it off, so it's vanished. We will turn it on later on
for the illustration again. What kind of message can
we add to the butterfly? I think I'd like to
have it a bit smaller. I tend to always draw too big, but better too big
than too small. Okay. And I'd like to write something
on the top in a B shape. And we can write make it happen and frame the
beautiful butterfly. And the last sticker I'd like to make is we have room down here. I twist it, and I'd like to make a colorful meadow down
here with spring flowers. So, of course, in the middle, a beautiful tulip simple shapes. Draw simple shapes. Don't make it too complicated. We can always add
some doodles and textures to make it nice. And I think it's we
don't have enough room. So I'd like to make
this a bit smaller. Okay. And also the butterfly. A bit. Okay. So let's make a little
bellflower down here with small leaves. And kind of one
simple flower with three petals like crocus. Mm. Let's add a simple
Daisy down here. Maybe a second one. There's no need to
make the stems, so just play around
with some ideas. So this is your sketch
and your illustration. So this doesn't need to be
realistic. So make it fun. I'd like to add some here. It's also allowed to make some funky leaves
and twisted leaves. So play with some ideas. And maybe here. Mm. I don't know. This is a flower. For me, it's one. And make some grass. I can also make
some simple stripes for grass to fill up the space. And here. So maybe fox gloves or lavender. But your flowers
don't need to have doesn't need to have any names or so make some fantasy flowers. That's perfect, too. Daisy up there. Also here. Yes. That's it. And my last message for the
sticker is choose happiness. Always choose happiness. So let's frame this one. And we are done with
our five sketches. If you like, you can draw some more smaller elements
on the free space, so you don't waste
your sticker paper. Let's meet in the next
video to add some colour.
5. Flower Illustration: Let's start to add some color. For that, I'd like to reduce the opacity
of the sketching layer very low till I leave it bit higher so you can see it better on the video, 25% and go to multiply mode and always leave the sketching layer
on top of all layers. And I always like to lock it, so I can't draw on
that by mistake. Okay, then I group the
two to keep it organized, create another
layer and shift it under this organizational group. And then let's start
with the coloring. My process is that I like to have groups of layers
for every element. I draw, and on one layer, there is only one color. I'd like to add the color
with inking the studio pen. But you can choose
whatever brush you like. And I start with this
flour and choose the sunny yellow color. Okay. And then I outline so I said the sketch is
only a rough idea. So now is the time to
refine the sketch. So if you feel more comfortable, you can create a refined
a refined sketch before starting with
the illustration. But for me, it's okay to
work with the rough sketch. And also the but And this jam, I create another layer and make the stem with this green colour. I don't think about
where to start my stem, so I delete later the parts that are not in the right
place and that are overlapping in the leg to have the green layer over the yellow layer because
here on the butt, I'd like to draw this green but on top. And here I have a little trick. So you can choose
the yellow layer and click on that
and choose Select. So all that is on that
layer is selected now, and now you can go to
the green stem layer. Click choose the eraser and erase what is over
that yellow layer. So now you have a fine edge. Okay. And I'll leave. I always like to
zoom in and see if there are any spots left. So sometimes the
color drop doesn't work till the very edges or till some corners. Okay. And now let's add another layer and
draw shift the tear. I draw the middle of the
flour and choose this light, cream yellow, and make
some simple dots. They can the dots can
touch each other. But it's better to make
them in different sizes. So it's more interesting. If it's not all the
same this bigger. Okay. Fine. And I think where do I
have this light yellow? I shift it over the green. And I'd like to make them some details here in the
leaves with this light yellow. So and play with no. Where is it? Oh. Shift
it over the green. And I play with the
pressure of the brush. So if you press hard, if you press slightly, the stroke is thinner and if you press harder, it's thicker. So I play here in the
details with this effect. Okay. Okay. Now let's go to the B. Create another
layer, and I choose this dark brown color
and outline the B, make it proper for my partner. And I don't know
how this is called. The antennas and the wings. Maybe add some details. Only press slightly
with this brush, but you can also
reduce the size. Okay. I try to make it about the same as
in the first wink. Okay. You can also copy that
one, duplicate that one. But I'd like to draw it again to have this
hand drawn look. Okay, let's make
the details now. So I think I'd like to turn off this catching
layer for a moment. And I'd like to make
the stripes in the bee, and I'd like it with
this yellow color. Oh, I see. What
have I done here? Go to the yellow. There is some corner left. Okay. And I also forgot to make
the stem here, the green. Oops. Okay. And the stripes of the B, you can shift the B
to the very bottom, and then you can draw the
stripes on this yellow layer. I choose the dark brown, click on select and
then go back to the yellow layer and
make the stripes. To be exact, this is a
p and not a B because real B is striped in
different shades of brown and only the p has
this yellow and brown. But in our illustration, it's nicer to have
the yellow stripes. This is just to be a is S. So it doesn't have
to be too realistic. Okay, the details in the flour, I'd like to stay with this
yellow, bright yellow, create a layer over this
yellow and make it multiply. So when you draw on that, you have a darker tint
of that same color. But I'd like to
choose another brush. So go to the brush library, and I found one recently under drawing
the gloaming brush. I think it's nice to to make
some details with that. So it's also pressure
sensitive brush, so you can press slightly
and then harder to make different thicknesses
and also opacity. And I'd like to start small. I think I reduced the size to
5% press slightly and then a bit harder to make
that's stripes here. And I make it
clipping mask. Okay. Vary in the heat of the stripes. So it's more interesting if they are not all
in the same size. Okay. Last one. Okay. And to make it
more interesting, I'd like to This is one of my favorites and the spray
paints, the medium nozzle. And I have chosen 14%, and I go over the edges over the of the pedals to make
it a bit more interesting. But you don't have
to to do this. So maybe you'd like to
have it more simple. So interior is the butt, so I will go to the
ribbon and select only this one petal and then
the brush and go over that. So I don't have the butt. And for the butt, I go back to the inking. No, drawing the gloaming brush and make some details here. Okay, fine. And the leaves, I
think I'd like to have also some medium
nozzle on that leaf. So I go to that leaves
layer and add layer on top. Also go to multiply, choose the green and the
spray paint medium nozzle, and then go ops. We need to make it clipping
mask and then go overhead a bit and here maybe add some
shadow here on the top. I think that makes a difference. If you like, you can
add some more details here in the scent of the flower, but I like it as it
is, and I leave it. And now let's turn on the
sketching layer again. We need to create this lettering
down here. You got this. And I'd like to make all the letterings with
this dark brown color. So I choose the very bottom
layer with the B on it. And choose the dark brown. And I think I'd like to make the lettering with the monoline brush
under calligraphy. And I think I use
my handwriting for this to make it personal for my friends who I would like to gift the
stickers laid down. But you can also go to
the wrench icon add, add text and use your favorite font which
you've imported to Procreate. You can do this as
you like to do it. I use my handwriting
and try to make it. I'm not a good handwriter. But I try my best to
make it personal. You've got T. Yes. And we are done
with the first element. Next up, the little bird.
6. Bird Illustration: Stay organized, I give all
the layers in one group. I group them together, and let's add a new layer and start with the
illustration of the bird. I choose this light red color and go back to my studio pen. And now is the part where in every illustration,
it's the same. I create a layer for
every color I use and outline the elements
and fill the color in. I speed this up for you. I draw the peak a bit
higher and close it. And then I create
another layer and select the dark brown and straw the
simple feet and the eye. I erase that part of that 1
ft because it's behind on the other side of the bird and the eye choose
the right position. Turn off the
sketching layer now. I create another layer over this lilac layer,
turn it multiply. Select this lilac color and
choose my gloaming pencil, my gloaming brush from before, and add some details. Again, keep it simple. It's okay to stay simple to draw only simple lines and dots. I make it a bit stronger here. And it's more stripes. Yes. I like it. And the same here in the wink, I create another layer, turn it multiply, and
select my light yellow. No, I don't like it. It's too less of a contrast. So I turn it back to normal and select this darker
yellow for my details. It's much better. I outlined the wink and make some simple stripes. Maybe add some tips
to the feathers. No, the other way
around is better. Y and the peak, I simply outline it to have a bit of more contrast
to the background. And now let's add some
details to the bird. I select this red color. I create another layer over this red layer,
turn it multiply. And I make some simple spots. I think this bird needs
some more cuteness. So I go back to my studio
pen and go back to the original red layer and
add some curls to the bird. Let's add some more details. I go back to my lilac
and add a simple daisy. And the center is light yellow. And I add an other
daisy down here. And the middle is dark yellow. Last thing I'd like
to do is go back to this multiply red layer
and make it clipping mask. And then I select my medium nozzle and
add some shadows under the win and on the belly of the
bird and the back, And lastly, let's
add the lettering. So I select again
my dark brown and try to write it in a
proper handwriting. And that's it. Our
cute bird is down.
7. Butterfly Illustration: Okay, first, let's group
the bird elements together. Create a new layer and
let's draw the butterfly. Turn on the drawing
guide again here under the Varangicon and
edit drawing guide, and here is the little blue dot, and you can shift it till it's in the center of
your sketched butterfly. Don't forget to activate the drawing assist on
every layer you needed. I go back to the studio pen
and draw all the shapes. Next, again, I create some extra layers and
add some details, and I speed my
process up for you. But I can say that I always
use one of the three brushes, the studio pen to
make solid shapes, the gloaming brush to add some intricate details and the
medium nozzle for shading. And lastly, I add the
lettering to the butterfly. And we are done.
8. Watering Can Illustration: Let's group all the
butterfly elements together. Then let's illustrate
the watering can. Here it's the same principle as in the other three
elements before. I use only the three brushes, studio pen, gloaming,
and the medium nozzle. I speed this up for
you and at the end, I stop and we talk
about some details. I think we need to have more details in the
grass down here. I create another layer and play around with
this gloaming brush. Try out the different
blending modes for that. Finally, I came to this setting, the grass details
in multiply mode, and the shadow in normal mode. Let's add the lettering. And we are done with this.
9. Meadow Illustration: And finally, let's make
the meadow illustration. And there's nothing new here. I used brushes, studio pen, and clobing for that. Again, to stay
organized and flexible, create a single layer
for every color you use and add details
on a separate layer. Finally, let's add the
lettering to this last element. And we are done
with our stickers.
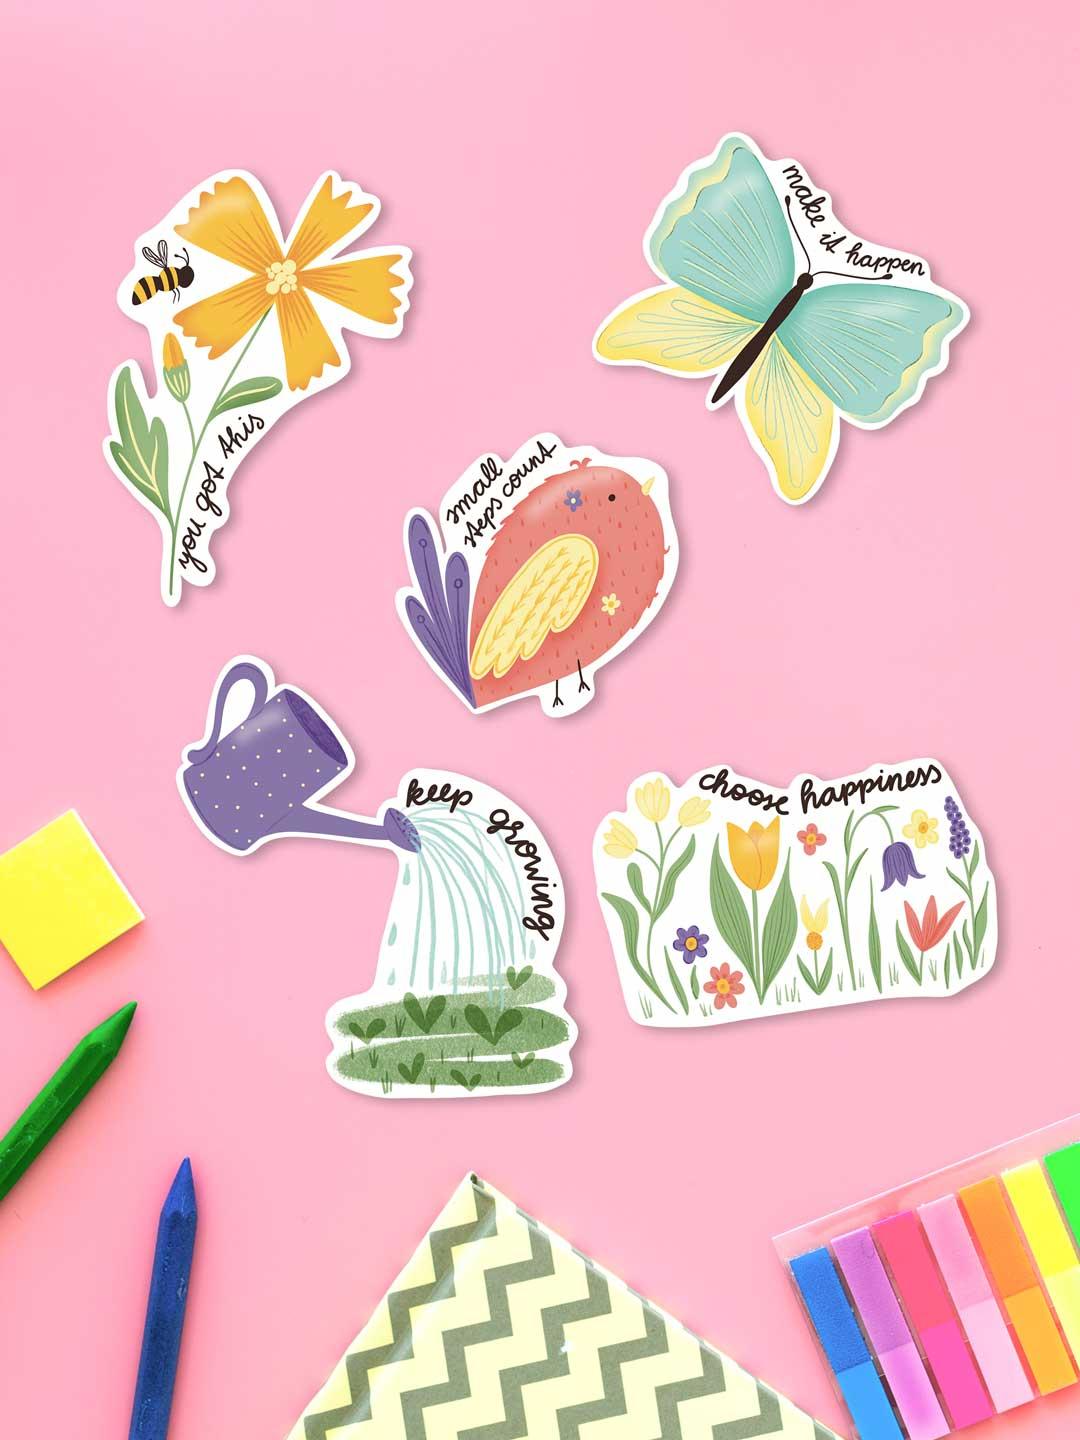
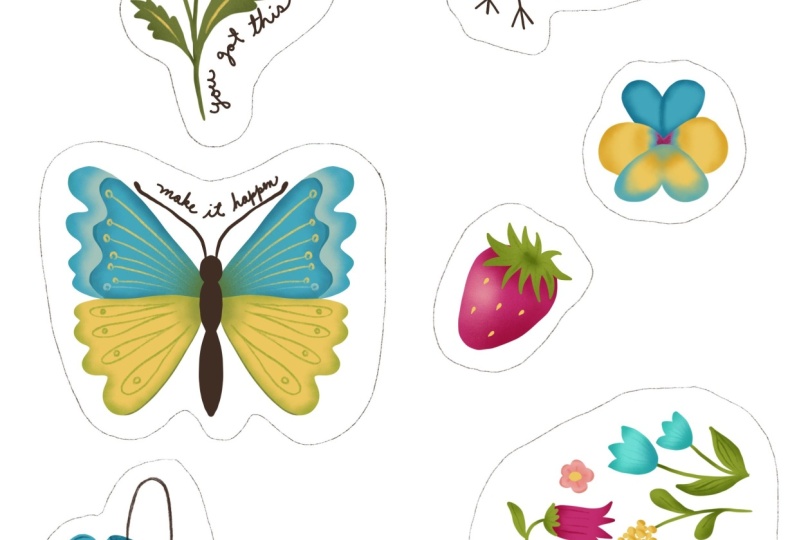
10. Printing & Cutting: I have added some
more elements to our sticker sheet for
printing that sheet out now, go to the wrench icon on the top left and choose Share and go to JPEC here you can choose
instead of safe to file. You can say print. And now you can
select your printer. I have an absen Ikchat and one copy printing
color activated, and paper size is
A four in my case. And here, it's important
media and quality. Click that, and here you
can choose the media type. Normally, it's a Atoselect but to be sure it
prints correctly, I choose the photoglosy
paper in my case. If you have a paper, you can choose met paper. Then you can say print. And now let's cut it out. For that, I use big scissors and a smaller
one for the details. So you can cut it out about, live in a throom
between the elements. And then make the fine
tuning with the small one. I go around the outline
of the element and about two or 3 millimeters to to leave this white
space around the sticker. And I cut about
the shape around, but you can make it as precise as you would like to have it. And here it is. And now let's go ahead and
cut all the other
11. Thank you: And that's it. I hope
you had fun creating this beautiful bird and all
the other spring elements. So please let me see
what you've created. Please upload your
elements to the gallery. If you need some more help
or have any questions, please reach out in the
discussion section. I'm here for you, and I'd love to see what
you have created. Thank you for taking my class
and see you next time. Bye.
 Nicole Gabriel, Procreate Artist