Transcripts
1. Introduction: Hello and welcome to this
intermediate watercolor class. Well, I'm going to
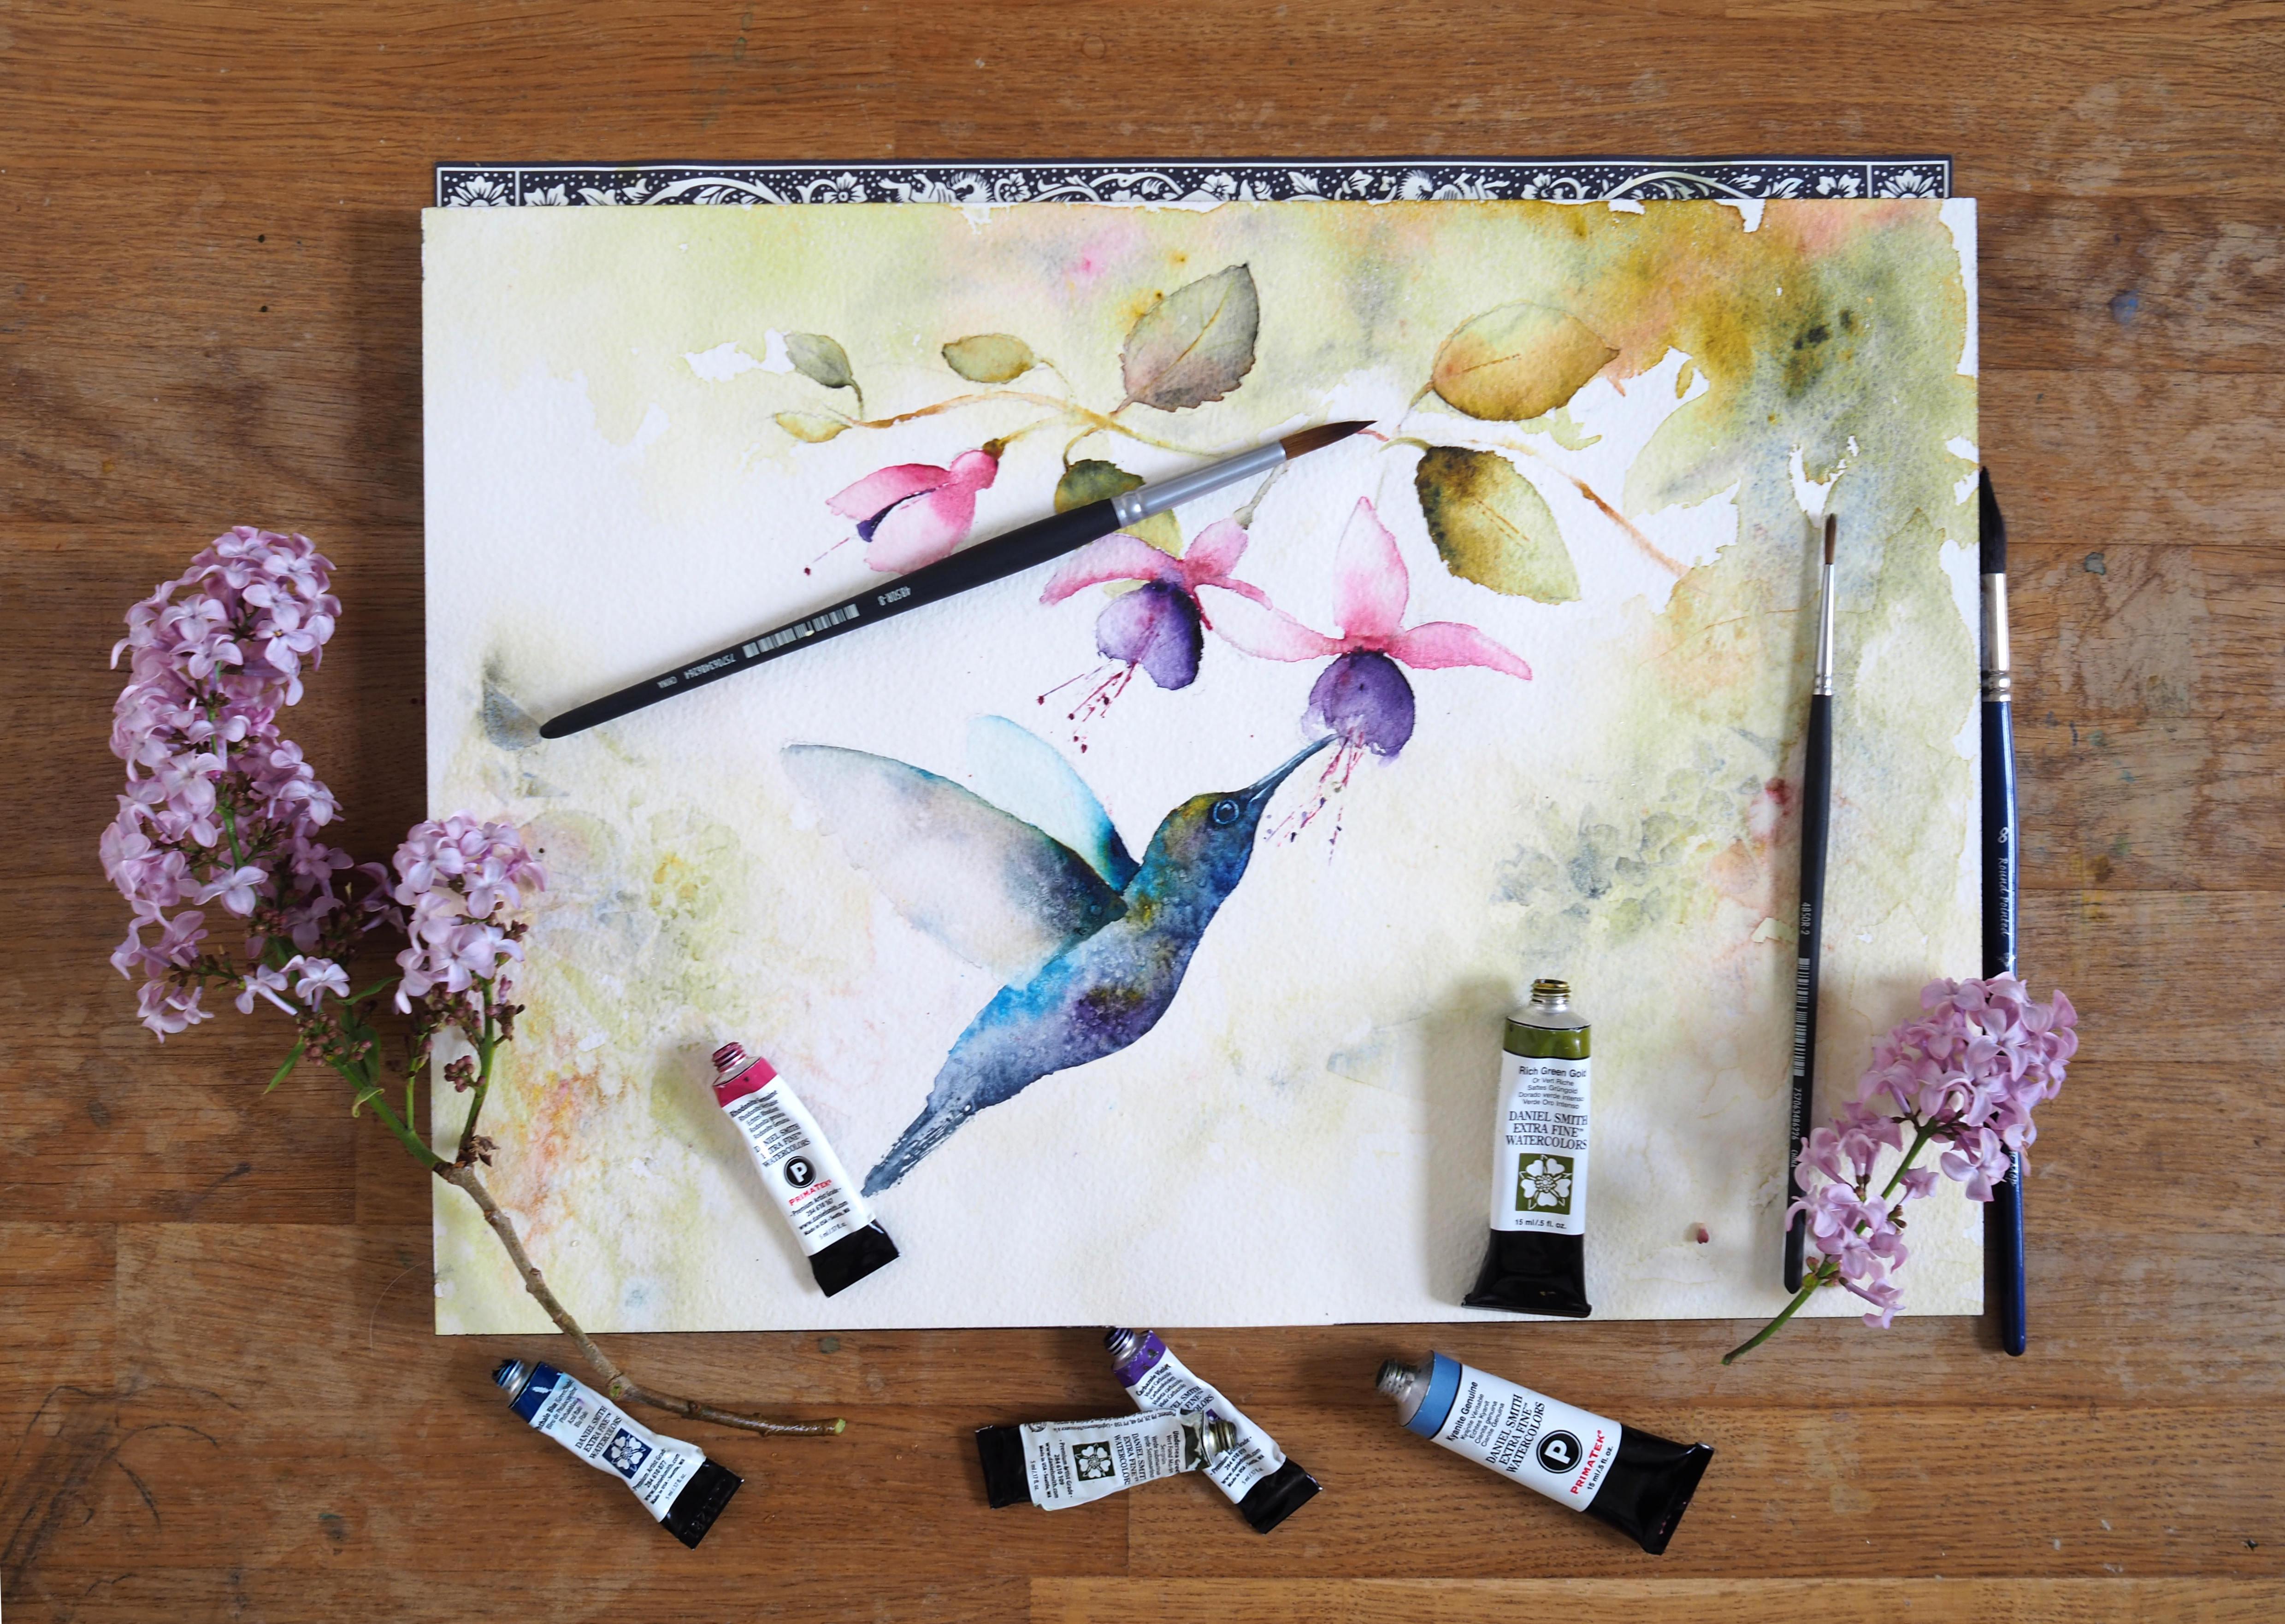
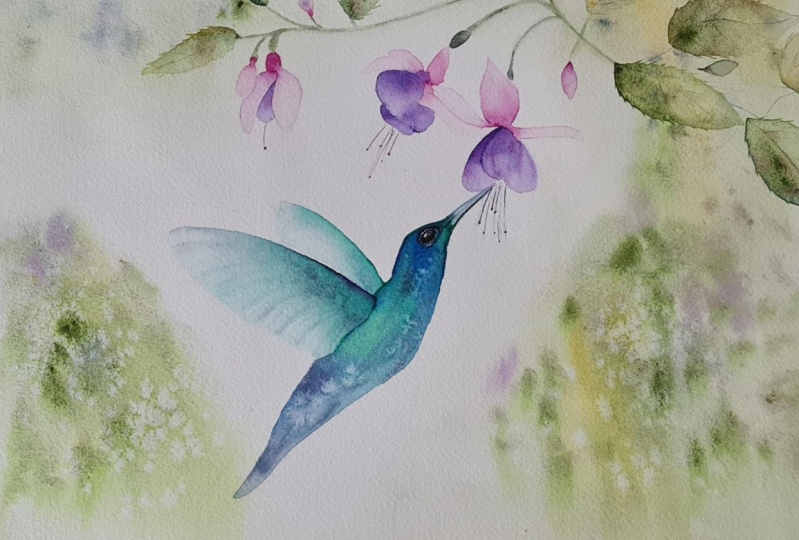
show you how to paint this beautiful
hummingbird. Darting through some Futures is a fabulous class who
I could show you the process of building
up layers and elements. This will give you
a magical painting. And one I know you're
going to be proud of, and you're going to
learn a few more tips and tricks along the way too. I am Jane Davis. I live paint, teach, and walk my lovely spaniels in the beautiful South Downs
National Park, England. Over the last 15 years, I've taught myself the
free flow technique that you see today. Not having been to art school, finding my own way has been
fun and sometimes daunting, but it has allowed me to
develop my own style. This has led me to
teach the others, either on a one-to-one
basis for as part of a group in a wonderful studio in the heart of the South Downs. Also run a successful
commission-based business, painting pet portraits and wildlife art in my
own home studio. In all my classes, you will follow
along in real-time. I can guide you to
keeping your work loose and fresh
without over fasting. I have over 20 classes
available on Skillshare. Now, if you're
just starting out, my three beginner
classes will guide you. Then you'll find over
20 masterclasses covering a wide range of beautiful subjects.
In each one. Share the techniques I use
in my own professional work. We have a lot of fun together and you'll gain the
understanding and confidence to
incorporate everything you learned into your own work. Plus or share a few of my tips and tricks
along the way too. I provided you with a
beautiful reference photo and template of the hummingbird in the projects and
resources pages. Don't consider the
template as cheating. This class is all about
painting, not boring. I'll guide you through
the steps to building out that beautiful
multilayered background. And there's some
interesting techniques I want to share with you. I'll also show you how to create that beautiful hummingbird
with one big bold layer. And how I achieve the delicate wings with a
lovely sense of movement. Of course, I'll share my tips. Tricks I'm usings as we work our way through this
magical painting together. If you'd like to learn more
about me, all my work, please pop over to my website at Jane Davis
watercolors.com.UK. This can be found
on my profile page, along with links to my
Instagram and Facebook pages. I'm very active on my
social media pages. I love sharing my art, especially on stories
with many ideas, works in progress and
tales of student life. I really hope you will share your paintings on the
Projects and Resources page. As I love senior most PTs. And don't forget,
I'm here to help if you get stuck or
have any questions. I want you to
experience that buzz of painting in his
liberating wet on wet, loose style. So
come and join me.
2. Materials: Welcome along to
this really lovely, loose, much cooler, I'd like to think,
hummingbird class. I'm firstly going to
start to run through all the materials I'm using today that you
see in front of me. Again, all of these
can be found on the projects and
resources pages, so no need to have to try and scribble them down
or memorize them. I'm going to start with
my lovely collection of Daniel Smith paint. Then to the first one
up is rich gold-green. Really lovely, bright
green, that one. Kyanite Genuine. I really love the
color and I've used that in a few of my classes. That's a good color. I don't use a huge amount, it's just the little blue
shades you see in there. A little bit of gouache, which is just used for
the eye detailing. On the sea green, it's a really nice yummy green if you're after a new green. I've got Rhodonite Genuine, which I use for the fitches. I've got a carbazole violet, A really strong violet,
quite a violent, sudden color, but it's fantastic
for the hummingbird and I've also got a phthalo blue, oh, that's a green shade. Again, that's for
the hummingbird. I've got a little
test card of some of Daniel Smith's iridescent paint
I've used as you can see, mainly used the blue. I've had a play another
time with gold, but I haven't used
the gold on him, but I could've done
and they're quite fun. Let's just move that out
of the way for a minute. I've used a little template again that can all be found on the projects and
resources pages and this. It's just nice, I don't
have to worry too much about sketching them
out and getting him. If you're going to do multiples
of these, it's handy. Just get a shape, that's what
I'm trying to say really. It's handy to use that. I'm going to put
that to one side. Follow me on some of
my other classes, I use this is to tilt
my paper. That's handy. We do tilt in various heights so you want something probably
with an inch high, maybe something that's
three or four inch high. Just something to pop
here, you paid up on it, doesn't need to
be anything posh. Put that to one side so I
can show you the paper. Let me see if I can do this without [NOISE]
that's upside down. I've got arches today and I've got a rough grain,
and that's £140. Again, all these can be found on the projects and resources page. We [NOISE] pop that around
the right way again. You see it? Got my little pot of water, a little bit of salt and
I've got some cling film. The film comes out. Bit of
kitchen roll or paper towel. I've got a tiny little
bit of watercolor paper, it doesn't have to be watercolor
any little bit of paper. It's stiffish, and
that's for doing, the fitch edges or the fitches
stamens, should I say. I've got four brushes today. I got a tiny number note. Again, that's a tiny little
bits of details in the eye, I've got a number two. Again I've used that
for smaller pieces. I got a little chisel brush, which is a brilliant
eradicated brush and just again taking
little bits of light out, I haven't used a huge
amount, must admit. The main brush I've used
is a number eight round. Again, you don't have to
have exactly the same, so don't worry too much if
you haven't got those sizes just a small brush will be fine and a slightly
larger brush. Paint colors and the choices
if you haven't got mine, the greens and the blues
in the background, and even down to the pink. I don't think it
matters too much. Again, the reference photo
shows a red color fuchsia, so it could be red, so don't
be a slave to those colors. I have found the two, the carbazole violet and phthalo blue really good
because they are strong, violent color so that
I was able to do that in one strong layer. But again, if you haven't got those or you don't
want to buy them, then just try with
the colors you have. Again, hummingbirds
come in varying shades. Sadly, I have never
met a hummingbird. But if you don't want
to do a blue one, there were various other
colors of hummingbirds, so you could find yourself
another reference photo and use their colors.
Don't be a slave. If you're panicking, you
haven't got my colors, then please think out of
the box a little bit, change the colors of
the hummingbird if you feel you don't want to
buy some of the two colors. I'm starting to ramble,
so I'm going to stop. Just the last little thing. Again, these iridescent
paints are fun, but again, really not necessary. I had them so I thought
I would use them. Oh, without saying hairdryer. Hairdryer is quite handy
in places if you want to just crack on and draw your
laser little bit quickly, but they're absolutely
not necessary. I think I'm looking
around my table. I think that is it obviously the reference photos and I will pop a picture of this again on the projects and resources pages that
we'll see you there. They're handy to refer back to and look as
you're painting this one. Let's go sketch them out.
3. Sketching Out: Righty who then saw onto the
sketching out little part. I'm going to give you
a few tips I felt are useful when you come
to sketch these out because it's really important
to get this really nice and accurate because a
lot of the work is very loose and open
to interpretation. If you haven't got the
initial sketch right, and the shapes right, it all can look a little bit messy. Really take your time. You can do this in one sitting, step away, maybe paint
it the next day. As you'd obviously
you don't have to do this in one swoop. Maybe if I try and do
a bit methodically, I would get this
lovely line right. It's not exactly the same as the reference
photo because I just needed it to
fit these aspects. There's not an exact
reference photo to work from. You may need to just
be guided by mine. Say get a nice swoop. It leaves a nice shape and try not to make them too regular, twist one way, twist
one the other way. Again, same with you
if you just try to keep everything nice
and random as you can. The shapes are nice
as a real sort of bulge and a nice
tip to the buds. With the fuchsia, I kept finding or maybe use this one is
more recent example. I kept making this
middle area too thick. Actually, when you look
at the reference photo in which this one I'm copying from the
reference photo you have. Make sure this area isn't
too chunky because actually, it goes into quite a point. Everything meets
just sort of here. Again, just take your time, get those lines
nice and accurate. Again, I've gone quite
heavy with my pencil marks. Ideally, it's nice if they're
a little bit lighter. These are going to
be quite loose. The actual painting
can be quite elusive. Really don't want to see these
very strong pencil marks. I've done a little
bit heavier so you can see where I'm painting. But if you can keep yours
a little bit lighter, that will really help
with your finished piece. Anything else? Don't think so. We probably won't necessarily be painting these as individuals, but actually, when it
comes to sketch them out, I found it was useful to
get the outside shape right by doing the
petal, that make sense. The little bird can use a stencil if you're unsure if you're a bit more
familiar with this bird. You're in a country
where hummingbirds are, which sadly we aren't. I'm not familiar with
this shape. It's not one. I see a lot, I've carefully
gone round my stencil. But just be careful
with the beak because the stencil will give you
a very thick, clumpy beak. What you want to
do is to either, either just don't
use a stencil part on the beak or when you
have drawn around it, just thin it down a little bit. You want this beak
to be nice and slim. I found again the
shape quite important. If you just take your time, make sure that shape is as you see on that
reference photo. I always like to sketch
stuff out and then step away 5-10 minutes and come
back because quite often you'll go. That's
not quite right. I need to adjust that or this. I would highly recommend
sketching it out, stepping away from
it, coming back, and then obviously adjusting
anything that's needed. I think we ought to get
on to the fun bit and get some paint onto this paper.
4. Wash One: Now, I've picked
up my big brush. I've got rid of some of
my little brushes which I don't need on this little part, and I'm going to pick
up my rich green gold and my undersea green. I'm going to do some splurging. Don't worry too much,
you want to get a nice amount of
paint onto the paper, so you can do some
good old splurging. It's a very technical
term. Like this. Then fairly quickly
you don't want to fiddle too long in here. I'm going to put those down. I'm going to need
this for a minute, and we're going to
pull this along. Get your big brush nice and wet. If you find it isn't moving, you can always tilt your paper. I'm going to see how
we go for a minute. You can always obviously
with your hand, give a little bit of a tilt. I can get a hold of this pad, and you can see that
starting to run now, so I'm going to give a
little helping hand. We got lots of nice clean water. If it's not moving, it's because you haven't got enough water down on your paper. You can load up your brush, lots of water and you can
just drop. Don't be afraid. If you feel it's looking
a bit wishy-washy, you can add more paint. You can add more paint to
this area again like that. Then we're going to work down. Again, you're going to
lift your paper up a bit. Let's do that. Let's pop
that there for a minute. [LAUGHTER] See my hand went on. Again, the same,
release it down. Try not to think too much. You can leave a few
little white bits or dry patches are
seen as white bits. That often gives us
of an impressionist there is light in a canopy. Now what we want to
do at this stage, I want something to happen. I want to some
difference of strength of paint and maybe watermarks. Anything that's going to give me a little bit of interests. As it begin to dry, I can add paint at different
stages and it will give me some marks and something
a little bit unusual. You might have a little bit
of Kyanite Genuine in there. Let's pop a little bit
of that on the top of the paint on my
brush would help. Can you stop trying
not to think too much. I know that's easier said than done with
this sort of thing. Let's have a little leaf. An impression of a leaf
popping out of here. Nothing too accurate, it was just an impression. Again, I'm quite happy
with that shape. It's almost shapes
you want really. Something that's just
pleasing makes you go, "Oh, yeah, that's quite nice." Let's put the two together, so I can write on top of it. I want this to be though
the stronger area here. As long as this is still wet, I can keep applying paint. Again, I'm standing and
it's really important. I personally think to stand at some of these
really loose parts. You're not sitting on top
of it and crowding it. You tend to work looser. I think that leaf says enough. I'm waiting for it
to dry a little bit. I don't really want to
put salt on this layer, but you can do if you'd like. I will put some salt
in another part, so I don't want to over salt it. I'm pulling some
of that water down there just to stop
it pooling and hopefully allow that
to run a bit more. Still quite paddly here, which is absolutely fine but
it's not doing anything. I need it to do something. I needed it to dry a
little bit more so I can pop some water down. I'm just going to let that dry for a minute, two minutes. Again, your paper,
your conditions, your painting will all vary, but you just want it to start
going off a little bit, so it's gone to
that tacky stage. Then you can add a little
bit more paint and something that will give you some
more unusual marks. I'm going to hang on for
say a couple of minutes. Now, I've given that probably
about three minutes, maybe roundabout. I'm going to put a little
bit more strength in here. You can add a little
bit more water, you can do a little
twisty thing. I want to mainly stick to
these colors at the moment. Just do a little wishy thing. I'm going to add a tiny
bit more water in there, see if I can get some watermarks
to appear. Bigger blob. Well, that's going to, again, look a little bit tacky, and I'm going to have
pick up my pink. Again, very lightly,
keep everything light. I'm tapping a
little bit of pink. Hopefully look like
these fissures amongst here to pick
up a bit of pink from the fissures we're
going to be painting. Again, try not to be too exact, don't do anything too
uniformed because that will lose that nice
sense of looseness. I think it becomes
a bit regimented. I think that's enough
actually for me. [NOISE] I'm going
to put those down. You want a nice bit
of a clean piece of kitchen roll in your hands. Clean piece of kitchen roll. Nice big wet brush, and we're going to wet
the corner of that and pull it out. We're just going to brush out. Hopefully, a lot
of this will come outward and give you a
really lovely looser edge. This is to let it blend, but you might put a little
bit of something here. Sorry, bending over the camera here.I'm giving
the camera my arm. Picked up the rich
green gold, sorry. Wet brush again, pull it out. I might stop that from
tilting that way and put a little tilt this
way. Looks better. I'm going to allow
some of that to move. I'm going to drop a
little bit of water in there and get some of
that to move over. I can see that it's
starting to move. Soften this edge with a little bit of a
hard straight edge. I'm not good with
hard straight edges. Lets add a little bit
more water in there. It hasn't really done anything very interesting for
me at the moment. That looks better. We do clean piece
of kitchen roll, make sure it's really clean. Brushing that out to stop
any watermarks that might appear where you've
wet this down. Again, that's going to pull
that color across as well. You don't want it to dry. You don't want it to do a hard
line of dry, dry and wet. You want this to be damp, just stops it from drying odd and give me some odd marks. I'm
pulling this out. Okey-doke, I think for
that right-hand part. I'm going to do a few bits similar to what we've done here. I'm going to soften
some of that down here, to stop that canopy
being too liney. I love technical term. I'm sure liney. Again, just pulling that
down and make sure your kitchen roll
is nice and clean. Checking ours is nice and clean. That's looking okay. Step away
from your piece of paper. Try and get a little
distance and you can have a better
impression, I think. I'm going to lay this flat now. I don't want that to be
running any further along. Right, before I over fiddle, that needs to dry completely. Again, you could hairdryer it, but it's best, especially with these very loose pieces
and loose bits of work, to allow it to dry
on its own because using a hairdryer can
push pigment around and you'll find it can blend
a little bit too much, so just allow that to dry.
5. Wash Two: Now I'm really pleased
with how this has dried. I've got this lovely softness here where you can see
it's just no hard edges. It's just moved outwards. Again up here, just lost some
of that hard edges here. It's got some
unusual markings by dropping bits of water
so that it worked well. Now what is a common
error sometimes and when I've had trouble with is sometimes you can
get left with a mark where that waters and
paint has moved out, dried, and then
left a watermark. If this is the case of yours, what we're going to be doing
is wetting a swive here. If you've got a slight edge, you can just soften and
hopefully I'll be able to show you what I mean. Big brush again, lots
of water on your brush. There's no real
right or wrong way, particularly where you're
going to put this line. We're just going to go
underneath the fuses right up and then we
can move up along here. If you've got some
really unusual markings and you don't want
to lose those, I would just go a
little bit lower. It doesn't matter because
we're going to just pop in some paint somewhere along here just to give us a
little bit more. Another layer of interest.
Go right over the bird. Don't worry about him. What we're going to
try and do is to leave this as light as we can. We're not going to put
any color over him. But we need to wet
this area down, otherwise again
we'll be left with a line where your
paint has run up to. Nice and wet. Again, you can leave some dry parts. It doesn't matter
so you can wiggle around and if you're
again bobbling your head. If you haven't watched
any of my classes before, you probably don't wonder
what the Cubism on about. But if you move your
head up and down, you'll be able to see where
you've wet your paper. Just do a little ball see where you are and what
we're going to do. I'm going to my little trustee heart and
actually going to, instead of having it that way, I'm going to have it
right on its edge. I've got a two-inch
tilt for base corner. Nice tilt. Hopefully you can
still see that. Yes, good. I'm going to pick up my
unseen green, rich gold. I pop a little bit and have a little bit of
kyanite in there as well. I'm just going to
mainly use the greens. Again, this is a
real randomness. Just have a little wiggle, pop a little color down. If you want to use
little pink, you can. Say this is that
your imagination. Be free and stitches,
allow that to run. You see by tilting. Obviously the more you
tilt, the more it runs. So if it feels like it's
running too much and you've got too much of a
strong downward flow, then you can just lower your board a little
bit or your paper. Again, we're going to go
over this side as well. As I was saying, if you've
been left with that line, you can just thrust all
that line at this stage. Just say if I had a
line running down here, I could just with my brush, just give a little soften. Hopefully you should
lose that line then because it won't be
very strong if you have. I'm just going to
do a few wiggles, pick up a bit of pink as well. I can't help myself, can I? I have a lot of
colors in my hand. I don't want to do is go
over this bird too much. Hummingbird not
doing any justice. I'm just going to
let some of that water run off my paper because it will sit
in a pool here. I'm now liking
what that's doing. I'm almost a bit too
much with tilt now, so I'm just going
to lower my tilt. It's not running as quickly now, so I'll get a little
bit of a softer. Do a few horizontal lines. All are looking like
it's wheezing downhill. The minute you've got
something you think, then it's quite
interesting, just leave it. Don't try not to do too much
because this is a very pale, just another little
bit of interest, but we didn't want
to do too much. I don't think she's put a bit more gold there.
She'll love this color. Now I'm going to use a little
bit of cling film here. Again, I found that just gave me another a little
bit more interest. Once I've stopped fiddling, picking up my random colors, sit right down with those. Put that down and I've got, if your English and
you're a certain age, you know what Blue Peter
would be like better. I got a little something here. Little square of a cling film and you're just
going to lay it on. I'll go with a piece
of where you've got some paint and you're
just going to, see that, you're just
going to crinkle. You should be left with some you can see the pattern underneath. You can't really choose
what you're going to get, but make sure you crinkle
it a little bit so it will give you
something interesting. If you just lay on top, you won't get any marks. Again, you don't want to
do lots of it and you want a little bit large
piece going on here. I'll just fold it over
a little bit more. I'm just going to pop a little
bit of salt well why not. I'm just having a little
bit few markings here. Again, that's very much timing. So have a look at
your piece and you want it just as it's going off. I may have done this a bit
too soon as I tend to. Actually put a little
bit of color here. I feel like I've lost
a little bit here. I'm just going to pop a
little bit more color. As long as this is wet, you can carry on
fiddling and it's a bit off putting a
cling film there. A little bit of dibbling, I'd like to drop a little
bit of salt in there. A bit of that pink on top. That looks nice. Put that down. I'm going to let that. That needs to dry
just a little bit before I lay that salt on. I'm just going to mop up
the bottom edge because if you have a lot of water
sitting here as it dries, that water can
sometimes push up and leaves an ugly watermark
or along the bottom. Keep an eye that
it's not pooling. You just want to either flick it off or just
with a kitchen roll, suck it off, and then we just need to
let this dry again. Little like that.
It needs to dry. Now again, ideally, don't use a hairdryer,
especially with the cling film because your hairdryer is going to blow your
cling film off. This does take a bit longer. You might need to let that
dry for half an hour or so and then carefully
peel that off but to say. Let that dry on its own and we can then do the next stage.
6. Flowers and Leaves Part One: I'm really pleased with
how this has dried. Now I left it a good hour
probably to dry and I did peel off the clean film a little gingerly and it was
a little dump underneath, so I gave it a quick whiz with a hairdryer and then
brushed that salt off. But a word of caution, be careful before
you start brushing any salt off that is
really dry because it's quite disappointing to whiz your hand over and realize
it's still a little bit dump. Make sure it's something dry, and then we're going to start some of these fuchsias
and the leaves. I've got rid of my big brush. I don't think I'm going
to be using that now. I've got a clean
little pot of water, so it's nice to start nice
and fresh and I've got my salt ready to hand. Wet your brush down. I'm
going to pick up my pink. I'm going to start on this one. I'm going to let
that dry and we're going to move around and then do the first fuchsia and
the second fuchsia. What we're going to do, ignite it on your brush, and we're going to tap a
certain amount under there. It'll be worth trying
these off before you start your main
piece especially if you've got something
you're pleased with, this is always a bit
nerve wracking, isn't it? It would be worth giving me the little try before
you do your main piece. Just adjust how much
paint you think you need, it's very hard for me to demonstrate on a video
how much I'm using. Sometimes it works for me, sometimes it doesn't
with your volume and the amount of water
that's on your brushes. It's quite a few variables, but it's worth getting
a little bit familiar before you dive in. What I'm going to
do, I'm going to touch just the
very edge of that. We have a nice dump brush, I'm just going to pull out. You can stay really
carefully within those lines and so
say it's always clear, lovely and loose. We don't want to do too much. But tiny little brush you're
getting a little detailed, but I just want to make
sure I've got a nice point. I might pick a
little bit up that just to make sure I've
got a nice, neat point. Because what I
don't want to do is to fiddle with it too much, I want to once
swoop and leave it. That's the plan anyway.
[LAUGHTER] Clean your brush off and make sure
you got a nice bit of water. Again, if you find
yours isn't moving, it could be that
you haven't gotten enough water on your brush. Again, just pull out. You should see that following. Again, you can give
it a little tilt. If you think that
might help you, you can always tilt the paper or you just dip a little tip. If you just dip over
that little bit of well of paint we've
managed to get there, that can sometimes get
it moving as well. Again, I'm going to
pick up my little brush because this will
continue moving. It's really interesting
to do a little time lapse video on a PC and just see how much is with these watercolors paint
to continue to move. It's very easy to fall
into the trap of going, Oh, there's not
enough color here. Actually, in the space that time it takes to dry you will find it's probably
moved over too much. Again, we're going to do exactly the same with the top petal. I'm going to work on the
right-hand edge to start with. Make sure you follow that line. I'm trying my hand is not to obscure the camera
as you can see me, but you might be able to
[LAUGHTER] obviously get your hand in a slightly
bigger position than me. Down, fill in the middle. Again, give it just a little tip
already just to get it to move. Just going to touch a tiny
little bit on the top. I'm going to leave that
and see how that dries. Worst comes to worst.
You can always do another layer if you feel it
hasn't got strong enough. There is always an option, but it's very hard to take out. I'm going to let that dry. I'm just pondering
whether I'm going to move on to this one next, and we'll do the bottom bit once we've let that
dry a little bit. I'm going to do these in stages. Again, I'm going to do
that little bulbous bit. I'm going to put a little
bit of paint, same thing. We're getting almost like a little tiny palette of
paint in a certain area. Clean your brush. Make
sure it's nice and wet. I'm just going to run down. Just notice on wet brush. I'm just wetting the
paper and then allowing that paint to run down and
you're going to leave there. I have done these in half. Let me just fill that little. I'm hovering over this
from a distance I can see quite clearly
as I'd like to. Again, I'm going to let that dry and we're just going
to go on and do some of these leaves because these are all going to be
little to sectioned off. Obviously, I don't want to
stop this one because I don't want to interfere with
that wet paint in there, so pop those down. Pick up your two greens. I'm going to do some of the
leaves and you're going to do a similar style. So I'm going to put two colors on my brush at the same time. Pick whichever one leaf here, you fancy, no right or wrong. You may have done
different layout than me. Again, just do a
stripe like that. Wet your brush, and then you're just going
to fill that in. The thing to do is just to try and leave it as
much as you can. It's so tempting to do too much. Just have a look at it. Get yourself a little bit
of distance away from it. If you feel it needs
a little bit more. Did find some little
touch of pink. It was quite funny
in there as well. We've put a touch,
a tiny little pink given a little vessel
if it's not moving. But I'd like to leave that because that's
going to leave me a nice little light up the top there and a better
strength from the bottom. I'm going to just repeat that. You can do them in different. You can put your little well of paint less do that
on this one here. I'm going to put
my little well of paint to the base of this leaf. That will give you a
slightly different shape. Again, clean your
brush that's nice and wet and just try
and touch the end. I'll try not to go too much
into all that paint in there. You just want to touch the
edge and then pull down. Just as I said, allowing that paint to
run into the clean water. I say go carefully around
your edges because this is you don't want to
get too messy edges. If it's not moved, you can give it a
little bit of tapping, use it as almost as I'm
telling you to palliate. I'm just going to curl a little bit down there and then I'm going to
leave that again. You can be some of them
because they slightly serrated edges, not hugely, but some of these leaves you
can just very carefully at this stage just gently
brush out with new shoot, find tiny little
bit of serration. Not too much. Probably don't want to go way around
the leaf either. You just wanted to throw
the hint of it and was it all becomes a
bit too mechanical. I'm going to leave that one. I've probably done this a
bit clear candy because now I'm going over the risking, putting my hand
into that better. We shall carry on. We've
tried not to do that. I'm going to do it a stripe down this side, again,
various colors. We might do all undersea
green on this one, and make a touch of pink. Some bold, clean your brush. Just fill that leaf up and you need to
do it quite quickly because you can see
that stripe there. If you don't do it quickly, you'll be left with a hard edge where you've put
that paint down. Just give up I'm just going to give you a bit of a vessel. I will actually pop
a little bit of pink in base on that one, I quite like that bit of that
pink because there's leaves are almost hinged on as
well with a fuchsia color. I'll leave that one there. What am I going to
do with this one? Because obviously that
ties in with I don't want to get too muddled
with the colors there. Let me just move on to that
mumbled I think about that. [LAUGHTER] That again. Please do it at this one. Put a little bit of
the green gold in there. Fill that in. You can see how these
are starting to feel. Just very easy for me to put too much color in and you
lose, all becomes monotone. So you can just
keep an eye on it. If you fill the colors
running over a bit too much, you can always suck a bit up and actually might put some of that. Can you try not to put my
hand in the way the camera can do a few serrated edges
on this leaf as well. Say if you feel too much
color is just going, you are fitting the
leaf up, you always put a dot of water in. Hopefully push some color away and give you
a different shape. We were trying to do
with the background. You want something like
your regular to happen. For this, actually
this little tiny leaf. Let's do a slightly
different knits and that's what I'm going to pick up a slightly
smaller brush. Number two, it's getting a
bit clunky. That big one. I'm just going to wet these
two little tiny leaves down. They're all wet and
we're just going to drop a tiny little
bit of color in. I see a big bubble of
water here to help me, but to see how a little
bit of a line Italic, as it's a new growth at the end, and that's not limey green. [LAUGHTER] It's the dark color. In theory, a little lighter
color would have been nice if that's a new
fresh growth, isn't it? They're quite small and
you're working quiet little. What we want to do is to
go around these leaves just so they're beginning to draw and we're going
to pull some of these little stems out
and we don't want to get. It's nice obviously there
needs to be attached, but you don't want to get
too uniformed again and too exact with these too looks
still, quick flicks. I'm trying not to get
the lines too chunky. I think that's plenty. Those leaves are drying well. I want to try and demonstrate
if one has gone too dark, I'm all over herself picked
up my slightly bigger brush. You can just gently move some of that
down if you need to. Just very gently long
as that leaf is wet. You can maneuver and play. But try not to do too much, keep everything nice and loose. Let's just for
pushing it back down again because obviously
you've got an under color there as well, because you're working
on top of a layer. I'm pleased with how
they're looking, so I'm just keeping on these. They're all a little bit dump. I just need things to dry. I can't join any of it up. So I'm going to let that sit for five minutes and let
that completely dry.
7. Flowers and Leaves Part Two: My leaves are lovely
and joined now. Because I had to pause the
filming as my neighbor did some mowing right outside
my studio window. Hopefully, I'll
remember my thread. I think I'm going
to crack on and do this leaf here where this
overlaps the fuchsia. I'm going to pick
up my two greens. Right here, mate, on this one, I'm going to wet it all down. I'm just going to dip a
little bit of green in. I'll see if we can get that to run up to the edge of that, what's going to be the
back fuchsia, Number 2. Might put a little bit
of that kyanite in there because that's a lovely mix. The thing if it's actually
wetting areas down, these small areas, that can end up being a little
bit of a puddle. See I'm just sucking that up. I've got a nice
little damp area to work on more than
a puddle there. That puddle, you
find that the paint won't move very much and
it won't get so stuck. Then also take very
long time to dry. I fill that little bit of
area in there, tiny bit. They keep all lovely neat. If you need to get
the little brush, then just make sure these
edges are nice and neat. I'm going to flick
a little bit out, try and get that serrated
edge on this one. But you can pop a little
bit more blue in there. More dark green and just
tap a little bit in there. I think that'll be
enough because that will all move around, hedge up while I'm here
with that stem out. I shall keep an eye on
that as that moves. Looking a little lumpy at the moment as you
might want to do. Just pop a little
bit more water on there and get that
to move a little bit and do some link.
That looks better. I'm going to finish off that few edges at fuchsia,
that other petal. Again, I'm going to keep
hold my little brush actually because it
gives me a little bit more control I think. I'm just going to fill that little area in
there with a bit of paint and then nice wet brush. Clean wet brush. Just going to pull that down
right to the edge. Lovely. Nice tip and that will be definitely
it for that one. I'm going to do
the little notches on the ends of these fuschias. A more technical term for notches, but you
know what I mean. A little green bit here, I'm just going to almost paint nasty and actually
if I'm wanting. I'm not going to do such
a little small area. There's not a lot in any
interest we can really do. Then we're going to
drawing up again. With these fuschias,
they do after nature, they all spring from nodes here. The leaf comes from a node
and so does the flower. It's worth bearing that in mind if you
actually look at them. That will give you
the illusion more of the fuschia and how
your fuschia should be. Swap brushes and we're going to go into this little twisty bow. What I'm going to do
actually is to wet the stem. Hopefully, we can
drop some color in and let that just to
run down the wet stem, so you want it nice and
wet, this little line. Almost. Yeah, it's a
proper little puddle, and I'm going to pick up
my little brush again. I'm going to have a
mixture of the two, pink and the green gold. Just going to touch
that and find my trusty support there. Let's pop that underneath
them and we're going to allow that to run. We might have to give it
a bit of encouragement because it's only a
tiny little line. But this way it will keep it as natural as we possibly can. You don't have to have
it all the way down. It doesn't have
to be consistent. Just touch little areas of it. Different colors again, a
little bit of the green. A little bit there.
That's probably enough. If you look away from it,
you don't want a very hard, obvious line, I don't think, just
where it meets. Nice loose wash. I'm just going to tipple
it with my finger. That will just soften anything. Took tidy. Tidy anything up, join any of these
leaves and flowers. Fantastic. Actually
what I would do, I'm going to start this purple because
this is still wet, so I can't work on that. I can't work on this fuchsia here because of the wet leaf. Let's put those down. We're going to do the
under leaf of this. I'm going to pick up my violet. Wake it up a bit. It's been
woken up too much now. Squished too out. The joys of working
straight from the tube. Suck back in again. I'm just going to get rid
of some of that. It's going to be a
little bit too much. Similar to how we did this, I'm going to do a
nice thick line, and then pretty quickly,
clean your brush. Nice lots of water. Again, just wet
everything else down, just allow that to run. Give it a little
bit of a rustle if it's sticking a little bit. Ideally, I've got this at
a nice tilt still so that shooting carries everything to stay on that far right edge. We don't want it.
That's almost enough. Just a little rough
edges, that's nice. So if you've got anything
that looks nice, it doesn't have to go right
to the edges, I don't think. I'm going to pop a tiny
little bit of the pink. I see there's a vein
running through pink. What I want to try and stay
away from these making it too detailed and too realism. I want to keep
really lovely light and as loose as I possibly can, so it's doing very little, will hopefully achieve that. Still keeping on that,
that's still wet. I'm going to have
to just hang on. I'm going to need to
leave that to dry for a minute and then we can continue on with that
little pink fuchsia. While I was waiting
for this to dry, I've just changed my
water in case you wonder where the
purple water has gone. That leaf has dried,
so I can get on with that Fuchsia there. I'm going to pick
up my pink again. I'm going to do exactly
the same as we did there. I'm just going to try and avoid
putting my hand in there. If you've got bits drying, just be careful where
you put your hand. It's easy done. I might swap my brush
and I'm going to use my very little
one, number 2. Just going to make
sure I've got that really crisp up against that number 1's petal. I want a nice amount on there. Probably made my life a bit more difficult here doing
them together. You can do them a little
bit more separate and that may have made my life
a little easier. It's the same thing. Contaminate everything with
that fall out, haven't I? Potent color that, okay, and we're just going to
do exactly the same. Pull it out and I've still got my board on a slight tilt, that should encourage everything
not to travel too much. It will give us that
nice, loose look. Deeply concentrating, making
sure I stay in my line too. Yeah, that's nice. I'm going
to do exactly the same. I'm going to back to
my little brush again, where I'm hogging of
the camera with my arm. Hope you can see that, and
it's exactly the same, and then back to
my bigger brush. I'm going to use that little
puddle of paint again. Make sure you go right up to
the little green notch node. I could do a little bit
more here, I think. I'm just going to apply
a little bit more, is just gone a little bit. I didn't probably
put enough there because of that having to work around that petal of number 1. They say, is nothing
to stop you. This is wet or even damp, so nothing stop you adding just a little bit of color
if you feel you needed it. We want to try and get
this a little bit darker just so there's a nice
contrast between the two. We might actually just run
a tiny little pink band there when we put the purple in or the
violet should I say. It will make a little
bit more sense, I think. Lovely, I don't
want to do anymore because it will easily spread. Again, we can do some of those little, oh, I know what we can do. Haven't done this in a
great order, have I? You might be a bit
more organized on how you go about all your parts. But I now picked up
my violet again and I can do just the inside, that small opening bud. It got a nice little curve. I'm just painting in, I'm not doing anything
I think more elaborate. Very carefully, number 2 brush. Lovely. That's really put
that one to life, isn't it? We're just doing that
little bit. I'm going to put that one down. I'm just assessing to see
if that's dry enough, I tell you what we
might do actually. I'm going to leave a very thin line between the two and
we can join those up. There's another
way of doing it if you're like me, a bit impatient. We're going to run that
down nice and thick. Very careful not to touch that pink and that
violet will be up amongst that pink
before you know it. A bigger brush again, I still got my
board on this tilt, and I'm just going to give
it a bit of a wiggle. Almost just wetting really
the rest of that area. Just keeping it a little tickle, a little dibble just to wake
some of that violet up. It's a very strong color. It doesn't need a lot of
engorgement to be bold. A little bit too much water, so I can just soak that
back-up my brush again. See that it's just dry brush, take the excess moisture off. Just touch, keeping everything
very light and loose. Now, we'll again just
pop a little bit of the pink just in there. Just to break it up and
you can see there's a pink of vein coming out of
there any ways, isn't it? That will give the impression. Of course, if this was done on a larger scale where you'd have more volume or more
area to play with, it would probably flow
and move a little easier, a such a small area to work
on with such a strong color. Just popped another a little
bit more water there, I want to keep that shadow. That's so strength one side and we'll really keep it
light the other side. Just looking and keeping my eye on the reference photos to make sure I'm getting
the shape right. Again, try not to
touch that pink. I think that looks okay. What we need to do
is some of that little stains are coming out. I need my little
piece of small paper, which has just gone to the
other side of the screen. It's just a little off cut
of watercolor paper. I'm going to pick up a pink. I'm just going to dibble and you can see that.
That makes sense. I'm just going to pop a
little bit along the edge. Again, you can bend your
paper, you can do whatever. They're quite
straight, aren't they? We don't really need
much of a bend, but I hope you can get the gist. We're just going to
see that, can you? Just going to pop
that down like that. A little bit of a wiggle
if it doesn't move around. Put a little bit
more paint if you're not getting the effect. Just going to do, I'm going to wet to the
edge a little bit to see if we can get that going. One of these things, it
worked so well in practice. Let's give it a little bit
of a go. That's better. Of course, you can do this
with a brush if you're confident of doing a
nice straight line. But this is just another way of controlling
where that goes to, so you're not going to
go a bit random with it. I think that's enough.
[inaudible] I think I'd just one more up here on
this part up here. Let's see if I can switch hands, so you can see what I'm doing. That's enough.
Don't go too crazy with this is a little bit
like the fluff on animals. Don't go to magic,
just want a hint. You just want to pick up a pink or the violet,
it's up to you really. We're just going to do a few of these little pollen pieces. Just a couple of dips. Again, don't get too carried away with doing too
exact order set, just want a few
little one on the end of this one. Job done. I think that's enough. Now I can see. This is dry, it's
leaked in little bit. Obviously, found a tiny
bit of pink, isn't it? Before I forget, I'm just
going to join that two up. That's dried
beautifully. Actually, I like how that's drying. I'm just going to see if I
can encourage some of that. Following the script
in a quick dip. Perfect. This is quite pale, but I'm rather liking it. But if you feel that's too pale, yours has gone a
little bit too pale, you can always do another lace. You could have wet any, obviously applies to
any of the petals but you could just
re-wet an area and drop the color again and
that obviously will give you more strength
and another layer. That's perfectly doable
and perfect acceptable. But I really want to try and
keep this as light as I can. The main subject is
really the hummingbirds, so I want those to be
as soft as I can and that violet is quite
violent and bright. That's how I want to see
it but you will see. If you want it to be a
little bit more precise, you can obviously go
on do more layers and then you'll get a more
realistic crisper Fuchsia. I've just noticed it's
not attached to anything. Just going to do a very quick, that'll do just enough, just so it looks like
it's attached to. It's so easy to overwork these and not make them a
little bit too, even that, it's a little bit too much, but I can still sort
some of that out in the finishing of stage. But to me, it's just a
little bit too structured. But anyway, I think we're
done for this little bit. The next one, it's the bird. Ideally, I would let
all of this dry, although the hummingbird
is down here, it's so easy to carry it away
and wash something across. We should let that dry and we'll get on with
the hummingbird next.
8. Hummingbird Body: Are you ready for this very
beautiful hummingbird? I've just moved some of my
colors that I don't need just so I've got a
little bit more room and you can see the
colors I'm working on. I've got my iridescent paint. To clean my waters
more cleanish, I got my salt. I got everything ready, and I don't need that
very big brush again. I'm going to work with my
number 8 and wet it down. I'm going to pick up
the three colors. We're going to game a little
bit like the flowers. We're going to pop a
nice heavy amount. You obviously see
his beak comes in, I'm just going to pop
it right at the top. We're going to go over the eye. Don't worry about the eye,
although we penciled it in. You don't need to,
that can be done. We can see enough. We will
be able to see where it is. It doesn't really matter. [NOISE] I've got a
bit green on the top. Again, you could do
it in any order. It doesn't really matter, but I quite like the green on the top. Let's get a little
bit more on there. I managed to do a big splatter. Clean the brush. I might
just have to remove that, put back down for a
bit of kitchen roll. [NOISE] We can sort that out later. Thankfully, it hasn't gone
on a piece of the nice wash, and what's that would be a
little difficult to get out. I've got a nice amount. I'm going to use this
as a little palette and we're going to run
it all the way down. A little bit more violet. I
think I got a lot on there. Nice clean brush. Just
again touch these edges. The trick is to
really stay within these lines because especially if you're using some
of these colors, they're quite violent and
won't come out very easily. We won't be to erase them like we can in some
of the softer colors. You're just going to
work, pulling it down. Just try to be brave. It's a bit of a
scary thing to do. If you feel you haven't
gotten enough paint or you think it's
going a bit weak, you can keep adding to the top. I would only add to the top. I wouldn't try and do
too much going down. Once were down there, I'll explain a little
bit more better. Just try to pull this
down from the top. Put a little bit more
violet, just up there. Let that one. If you feel
it isn't running enough, we can always do a little tilt. I think I've got that
violet on my brush again. If I keep moving down, you can see the feathers just this little come
in here, don't they? You need the tail
feathers to join, we're going to go
right down to here. Now we're down to the bottom. We can make sure we got
the edges nice and neat. Just start putting some
color down. Be careful. You don't want it
to be too full, too much paint
everywhere because it's very easy will become, just found myself a little
dot there, water overnight. He's not meant to have
a little lump there. I'm afraid he's going to have to have a
little lump there, I think that's where a little
dot of water has fallen. Just going to try and
tease that round, if you look at your
reference photo. I'm just going to swap brushes, I'm just going to go
with my little one. I feel I have a little
bit more control and I may not do anymore spluttering and I'm just going
to make sure I keep that lovely body
lovely and tidy. It's gone a little blue for me, so I'm just going to start adding a little bit of
the green down here. Again, you have to
be a little bit guided by how yours is looking, but try and keep it lovely. You can add water in there. If it's got a little bit, if it's gone too solid on you, you can suck what we will do, a little bit
of kitchen roll. I'm just going to
suck some of that up. Just bring some of that
water stop paddling in the bottom and that will bring some of that color
down [NOISE] as well. I've almost got enough
color and stuffs. What I'm going to do, I'm going to put those
down for a minute. I'm going to pick up some
these shimmery paints as well. If you haven't got these, just continue with the
other colors you've got. I'm going to put a little
bit of that blue there. It's going to give a
nice bit of contrast. Say I could have done
the violet there. If you [inaudible] just
working with three colors. These are lovely. Shimmery bit there, isn't there? I'm going to put that down for a minute and pick
up that file again. You can see where
there's a bit of depth underneath the
body here with just where the body starts to round. I just want to get a bit of
strength underneath that, give me a little bit of a shape. Become a little bit more green. Let's try that a little bit
more, put a green in there. [NOISE] I'm going to pick up the kyanite and
we're going to do that tail. Nice and keep my little brush. We're going to join this up. We're just going to put
a nice quick flick, some of that dry paper. You can keep it nice
and dry just like that. Try your best not
to do too much. It's so easy, isn't it? It's quite a small
little subject really. It's just going to try and get strengthened a
little bit under here because you've
got a dark area where that tail meets the body. Flick your eyes
back and forth over reference photo to get
that shape just bang on. Keep an eye open. If it starts to dry, we need
to put some salt there, so it needs to get to
that lovely stage just where it's starting to go
off and we can load it down. Mine's not quite ready,
but keep an eye. I don't think I want to
do too much more to him. He's already quite heavy. I'm going to resist trying to put any more paint on there, might just try and
lift a little bit up. I've got a clean brush taking
my excess moisture off, just to take a little
bit out if I need to. Just try and get that little bit more vibrant
green back again. Just as quite, I needed another
drop of water then. [inaudible] and you're
done whenever splatter. Just try and keep your eye
on that reference photo. While it's tacky,
you can just wet. You can carry on
to just shaping. Little bit disturbed
by my bubble now. I'm going to make him a very fat hummingbird
trying get rid of it. Let's see if we can make
that a bit rounder. Not an ideal drop,
but there you go. Just about coming out. I can just see it starting
to dry and then I've got a quite a rough paper so
I can see the tops are starting to get that
little dryness. What I'm going to do before
I missed the boat on it, I'm going to get that salt down. I'm going to pop a little bit there and a little
bit up on the head, a little bit on the back,
so pretty much all over. See how that dries, lovely. Put that down. While this is still
a little bit wet, we can pull this beak out. Hopefully you should. Mine, I've got a lot of
the paint up here, so I've got plenty to work with. But if you haven't,
then pick up. I'd go with the kyanite
and maybe one of the other stronger colors
you used to the bird. We're just going to
gently start small, so start in what would be
the middle of the beak, and then you can
always make it fatter. It's like there's a nice come off familiar with these
beautiful little birds. I'm not as familiar
with their shapes. I've never ever seen one. I'd love to see one,
they are beautiful. But you become familiar with
certain birds that you know, it's not a smaller bird
I'm familiar with. I think I'm going to need to leave its little chirp to dry. I'm just trying to
make sure I've got those edges nice and I've got myself probably
slightly portly hummingbird. Hopefully you
haven't done a drop. Just the bad time as I did. I need to put that
down and that needs to completely dry before
we can do the wing. Especially with the salt on it, it will take a
little bit longer.
9. Wings: I'm really pleased with
how he's dried actually. I'm pretty sure that salt's dry, but make sure your salt
is lovely and dry, but we're just going to
flick some of that off. [NOISE] Might have
cheated a little bit. I'd probably used the
hairdryer over it, it would be better probably to let it to dry it on its own. But I've got a limited time
window to get this filmed. But if you can let it dry, it sometimes works out
little bit better. If I can show you, that was another piece I did as a trial piece on
exactly the same paper. It's probably got
a little bit more texture than that one. Every one's going to be slightly different depending on how
much paint you put on, depending how much flow you got. It's quite variable, but that's the joy of
watercolor, isn't it? I know I can lift a little
bit of paint out there to lift some of that
color a little bit. But we're going to get
on with the wing next, so I'm going to
pick up the green, and I'm going to
pick up the violet. We're going to do a
little triangle of paint. In the reference photo, you
can see where that color is. We're going to run it a little
bit into the body as well. Nice clean brush, nice load of water
on, deep breath. Again, we're going to a
little bit of the fuchsias, a little bit of a running theme. We're just going to pull
that up, run this down. My body is flat, so I've got no tilt on it. Run that right out to
the edge of the wing. Make sure, again, you
stay within those lines. What we can do, I'm going to swap to my
little brush again. Already you can see
that's a really lovely. We need a bit more paint here, but be careful not to overdo it. I might add, let's have a little
bit of the blue. Very carefully, just run
up that line of the wing. Just so we get a nice line, a little bit of blue
in there as well. Again, just dibble
careful with it though, more to myself than
you [LAUGHTER]. Then we're going to pick
up a little kyanite. I'm going to pop a little
bit, too much water. A little bit just on the edges, almost stopping this
from running too much. Almost building a
little dam I suppose. Then again, just anywhere you
think needs a little bit. I'm not going to put
any of those lines in, I feel it just gets a little
bit too much with that in. But again, if you feel
that will suit your style, then do but just wants
tiny little bit of color just so the eye sees that there's a wing
there and where it stops, but I don't want to
put too much in this. It's looking all right. I'm going to shape
really on the end, say you make sure you got
a nice swing of that wing. There's not a lot to go on so
you've got to get the shape just right for the eye to see. Now I'm just lifting my head a little bit away
from it, looking away. I like that, I don't
think that needs anymore. That will continue to run and give us a little
bit more color. But I think that
yeah, that is it. I want to put a tiny little bit of salt down there as
well on that wing. Again, I'm probably going to be a bit eager beaver with it. But I'm going to
pop it down anyway so that I can allow that to dry. Again, that just needs to dry. Once it starts going off, you can give it a little
whiz with the hairdryer, but be careful because using a hairdryer can
blow pigment around and you'll lose that
nice freshness. It's sometimes best
to be patient. I'm sometimes not
very good at that. Then we can get on
with that back wing. That's nice and
dry, and I should get to leave the salt
on there for a minute. It's hasn't quite worked
but I know why now, I was probably too eager to get on with the
next little stage. Salt is a lot about timing as I'm still
learning, if I'm honest. Let's have a little
bit of the green. I'm going to get a
tiny bit of blue in there. We're going
to do the same. You can see there's
a little triangle of color there so we're going
to pop that triangle on. Very carefully. [NOISE] Let's
just use my little brush. Be a little bit more careful. I said a little bit of a sweep
there, sweep of the wing. Back to my big brush. I
should put those down. Again, exactly the same. We're going to touch
the edge of that wing. Sorry, it's edge of that paint and run up
the side of the wing. Keep your brush nice and clean, nice and wet, and you
just touching the edge. Try not to go too far in because you'll pick
up too much paint, and you'll find it always mixes. This really does
need to be a hint, this back winger, give you
the illusion of movement. Somewhere along the line
I've got a splurge of pink. I'm not doing very
good with [inaudible] I have unfortunate
a pink splurge. But that has worked perfectly, I don't want to do
any more to that. I'm not even going to put
some kyanite there in before, but I like how that's gone. Sometimes you just have to
look at your own piece, and if something's
worked and I've explained something
differently and you think, no, I like what I've got, stick with what you've
got, definitely. Say watercolor is
always a little bit of trial and error and
how your paper works and how your paints work so trust your
instincts sometimes. That's going to need to dry first and then
we can do the eye. We're almost there.
10. Eye: It's only the eye
and I've just had a peer him through
my camera screen. Somehow he looks different, on the camera screen he
does look slightly popping, doesn't he? Bless him. I've got my tiny little
brush and actually a zero. I'm going to pick
up my white paint. I'm going to get a nice,
creamy consistency, so it's nice and strong. We're going to have a look
at your reference photo. Also you may be able to see your line
where your eye was, but I know I can't but have a good look at
your reference photo, and almost flick
your eye back and forth in the reference
photo to your painting. You'll get a pretty
good mark on it. You just want to go.
It doesn't matter as long as the outside
line is right, and you haven't made it too big. It doesn't matter
if you go too much inside because we're
going to backfill that, but you'll careful not
to make it too big. Concentrate on the
outside, white rim, not the inside. Hopefully makes sense. It looks pretty ugly and
clunky at the moment. But once that's dried and we add the darkness inside then it's quite a nice
little technique. While that's drying, we
can do a little bit to this beak because we can
shape this a little bit more. We can put a little
bit using this, and let's get this guy right. I feel he just
needs a little bit more on top there, maybe. Look at your reference photo
and look at your own piece. If yours is perfect, then as I say, trust your instincts and
go your own piece. I'm obviously just
doing my bit and hopefully guiding you
as much as I can. At times you have to go no,
I don't want to do that. I'm just trying to
put a little bit light on top by
adding the white. I'm also going to put a little bit of
strength at the bottom. Again, you can just
shape and be careful, you don't go to make it too big because again
it's one of the things, it's quite hard to
get out it's easy to, oh goes another droplet. What is it with me
and droplets today? Just put those
down. Little bit of emergency kitchen roll and
let's suck that one up. That one hasn't done any damage. Now I lost my thread
of what I was telling you about, shaping. Yeah, just it's easy
to make it lean, go slowly and you can
easily edge outwards. But it's again, if
you made it too big, it's very hard to
then take back, especially with watercolor
and some of these colors. Yeah, I think he's
not a bad shape, so I'm going to leave that
before I overfill and ruin it or drop some
troppo, splurge of water. I'm just going to run
a hairdryer over that quickly just to make
sure it's nice and dry. Because if you start adding the dark inside while
that's still damp, you can make him look
like he's got a cataract. It's worth making sure
that it's nice and dry. We're going to go
inside this eye now. I'm using the blue
because it's gotten a really deep color and a little bit of the
kyanite together. Again, starts in the middle and we can make this line
as thin as you like. Thought I was going to have
another water droplet moment. Yes I am. Let's get rid of that. As I wet that, it's
running, so be careful. I may be passing on a water droplet moment.
Back to the task. You want to fill this in
and creep into that white. You end up with a
very thin strip of white and you can
go outside easy. You see there's a darker rim
that goes round as well. We might even lose a bit of it. When you'd like to be sitting
and getting nice and close, some slightly hovering a
little way away from doing my best to be as neat as I
can, see what I'm doing. It's a little line
here, isn't it? Let's try and get that
in a darker line. A little bit out here
that goes to the beak. Because I did that
splurge of water, I've lost my white matter. That can be done personally
in the finishing of stages, but you probably
haven't been too heavy handed. That's nice. As soon as you've got
something you like, stop. Because again, it's
very easy to overfill. I'm going to clean my brush, put those down, and again, I've just got to let
that dry because same applies if you put the white catch light in
there while that's still wet, you've got a poor
little hummingbird, what looks like a cataract so make sure that's
nice and dry. It looks like it's dry, so I'm going to pick
up my little brush, make sure it's nice and clean. A nice, creamy,
thick consistency. Have a good look
at reference photo and see where that light is. We're going to just
get a nice tip. See a droplet cursing me today. That's a little white spot. Could be a touch big. [LAUGHTER] But again,
I can sort that out, tiny little beak if I'm honest, but I can again,
once that's dried, I can go underneath there and just backfill that in again. Again like the eye, I'm
just getting rid of it. But yeah, that's the eye
it's a fairly simple, and quite little effective
little way of getting that ping of an eye.
11. Finishing Off: To the very last little part, we're just going to go
round our painting and just do any little bits we
may need tidying up, take some pencil marks out. I'm going to try and
lighten this a little bit, so that'd be nice to
be able to show you. I did just rectify the eye
before I came back on camera. I don't think you
needed to see that. I'm going to locate my rubber and I'm going
to go really carefully. If you've got pencil
marks on to the backwash, just be very careful you don't rub out some
of the back mark. I can't get my words out. You don't rub out the backwash. I'm just going to go very
carefully and lightly. It's probably enough. I'm just going to go around, point you in the white paper
that's absolutely fine. For any reason, just make
sure you haven't got any random water droplets anywhere that might
ruin your painting. [LAUGHTER] I should be checking
for those, shouldn't I? I'm just going to go around and take the pencil marks out. It always helps. It makes such a difference
getting rid of them. That's why it's nice if you've
gone as light as you can. Feeling rather nervous now, we're going to find a water
droplets that's going to jump out at me and make me
ruin the very last bit. I don't think I can see any.
Let's get rid of those. I wish I can brush off that salt there on that first wing, I think because I've
been a little bit eager putting it down it
hasn't worked very well. But I do know why,
just too quick. If I start from the top, I can put some veins in
some of those leaves. That's not always
a bad thing to do. Again, you can do that
little bit of paper. Let's see if we can
dip that in the water. I wanted a little bit
of green on that edge. Let's see if we can do this. You can bend it so you get
the right bend of the leaf. That's probably enough. You can do another one down
here. How's that look? Get that one bend there. That's quite
effective, isn't it? I'm always really
careful not to do too much because somehow
you look back and go, I wish I hadn't done all those little fiddly bits because it doesn't
necessarily help. I want to soften
that edge already. I'm just going to got
my little eraser brush. Just want to go to
soften that edge and to bring it down a bit. I'm not a fan of putting
lots of little leaves on. Maybe I'm not quite confident. Let's say I don't do a lot of flower into detail
work like this. It's something I don't
personally like to see. It's not to say you
shouldn't do it. This, you could go
around, put veins in. That will be absolutely fine. Again, just look at your petals, whether you need to
take any light out. Again, that can be
done by just taking [NOISE] a little bit
of the eraser brush. Just grab a little
bit of the edge out of one or two of these. Again, it can be done.
Just be careful. Don't take too much out. Again, you could have
done individual. If I wet this down, just merely wetting
this down will give you an illusion of
that petal shape there. Again, you could go around
and do that on yours if you felt you wanted to do
a little bit more detail. As I say, it's not something that necessarily
appeals to me. Nothing on that backwash. I really liked how
that backwash went. I like the wing
that's worked well. He just got a little heavy. I might have just been a touch heavy with the amount of
paint put down there. I can just very
carefully clean brush , I'm just dibbling. I can very carefully touch up the kitchen
roll with my finger. I think it's quite nice. It splurges it without
taking too much out. You can see that I just lifted a little bit of that green
and maybe zing again. I can do that a little
bit under here. If you've done, just be careful
you don't lift too much out. Have a look. If you felt you needed
any light taking out, but the salt normally
does a nice job and gives you a nice bit
of texture without you needing to do too much to it. My little body is a little bit fat because I knew I couldn't get that
little splurge out, but you can go around
if you haven't used very strong colors and
neating any edges up, depending on what
colors you use. Now we could go back
and have a little go at that beak where I did another
water droplet moment. What I was trying to do? If you can just run a little
bit of white paint along the top and there's
a little bit, just goes in there isn't it. It's a tiny little bit. We'll help soften that down. I'm not going to do the
little claws on him. I don't really like doing them. They can make it look a little bit stuck or
I do something wrong, so I'm not going to. Please, if you want to do them, it'd be lovely to see
some nice good feet because I know some of you
are very good at your feet. I'm just now going to
take a little bit of that nice little white
stripe that runs up there. I'm just going to try if
I can find that again. Let's see if I can
take a little bit of wet wing would have come
down here so that we can bring that down there [inaudible]. I'm just scrubbing out a bit of the body already that
was underneath the wing, so it makes it look more
like it's attached. That thorn got a nice shape. I don't think I need to
fiddle with anything else? Just looking around, what I might do? Being random as I am. I want to take a tiny
little bit of color out of that to see if I can
make that much better. I might do it with
this one as well. Again, I think I said I
could tidy some of this up because I feel like I might have put too many little bows and too many
little bits in there. It all looks a little
bit too uniform for me. I can even take it
a little bit out. I'll actually add a white, scrub some of that color out, so it's got like a little
bit more light to it. I'm going to just scrub
that out completely. I need to touch that again, I got a bit carried away. Just a tiny little bit, just enough for the eye to see. I'm going to down tools
because I know I will do. I will continue fiddling
and I won't improve it. Be careful. It's
always nice before you do your finishing off bits sometimes is to
actually step away, leave it probably overnight if I'm honest or a day or so, come back to it
and it will become glaringly obvious what you need to do or what
you haven't done, and then take action from there. I'm pleased with how
this worked out. The stalk could have
worked a little bit better and I could have been
a little bit looser, but that's watercolor for you and that's teaching
online for you. I really hope you enjoyed painting this
little chap because he's painted out of joy
to put together for you. As ever, please
share these with me because it sounds corny, but it really is one
of my favorite bits, is seeing all your work come in. Thank you for joining me.
12. Final Thoughts: [MUSIC] I hope you enjoy
painting in this class. It had quite a few elements, but I loved how it slowly built up to something really magical. Did you enjoy painting
the background? Remember, if you're painting
move is much as mine, your paper might
not be wet enough, or your brush could have
been a touch too dry. Wasn't it fun using the technique of
placing heavy paint in one area and slowly
dragging the color out to create something
so beautiful and loose. Remember, if you're not sure when to stop with
the final tweaks, it's well-worth stepping
away for a while. Coming back with a
fresh pair of eyes reveals so much you might
not have seen before. We look forward to seeing
you in the next class. [MUSIC]
 Jane Davies, Professional Artist and Teacher