Transcripts
1. Introduction - How to Use Procreate to Plan Resin Artwork: Hey, there. My name
is Katie Kroll and I'm the artist
behind West End Resin. This class will teach
you how to use the app Procreate to help
design concepts for your resin paintings to
share with your clients or just to give you a good reference point to
start your next piece. Procreate is an app that is
only compatible with IOS, so you will need an iPad. I also recommend using an
Apple pencil with this app, but if you can't get
your hands on one, you can also just draw
with your finger. I started using Procreate from my resin concepts
because I needed a better way to
easily manipulate and make changes to
my layout ideas. I know a lot of artists just sketch their concepts on paper and even use colored pencil
or marker to add color. And that's great, but I like to be able to change
things around easier, edit colors and change layouts without having to completely
restart the entire concept. Procreate allows you to get your ideas out in a
way that's easily adjustable if your client comes back and wants the colors
edited, for instance, or if you're working
on a larger piece and aren't sure what you
want your next move to be, I like to take a picture of my artwork and import
that into Procreate and then draw over the top of that so I can be competent
in my next moves. Procreate also allows
you to incorporate actual imagery of
glitters, stones, and textures to really
give your clients an accurate idea of how you plan to create with the material
you plan on using. This app has so many
features and capabilities, and I don't want to overwhelm anyone who isn't
familiar with it, so I'm only going to be
going over the tools and features I use most to
help create my concepts. Alright, let's get started.
2. Familiarize Yourself With Procreate: All right. So when you
first download Procreate, and you open it up,
you're going to see your gallery page. So this is where your artworks
are all going to live. You can have them
individually listed, or you can stack them in
groups like these are. This is kind of
where I keep all of my resin stuff right now, but you can stack
these more organized, like, within certain clients. Certain client work
or certain projects, you can kind of group
those together as well. I think Procreate comes
with three artworks already in it so that you can open those up and just kind of see
how they were created. But so within the
gallery section, you have some options here. You're able to import, select certain things to delete. So if I were to select this one and I didn't want this anymore, you could
just delete it. You could duplicate it
if you wanted to make changes to an artwork but
not lose the original. You can also share
it by exporting it or previewing it this way. So I'm just going
to X out so that I'm deselecting that again and
go over this other button, which is the plus icon. This is going to let
you create a canvas. So it comes with some
popular sizes already. And this little
button is going to allow you to create
a specific size. And when I make my projects, I typically like to make
them the same ratio that my artwork is going to be so if I'm creating
a super large piece, that's like three
feet by four feet. I'm not going to make
that exact size here. I'm going to scale
that down and just make sure that the
proportions are the same. I typically will only
need to print this on, like, an 8.5 by 11, so no bigger than that is typically typically
what I work with. It doesn't need to
be huge. I just needs to be big enough for
you to see what you're doing and not get a
super pixeli project. I just wanted to go over kind of the interface of the app
before we get started drawing. So this is basically
the interface. Once you go and create
a project size, you're able to pinch
to zoom or zoom out and kind of rotate your
canvas however you want to. We've got some icons over here for preferences and kind
of action type icons. And then these over
here represent kind of your creative icons or kind of the wheelhouse behind creating a piece is kind
of more so over here. Just to quickly give
you an overview of what these are before we
kind of dive into each one, we have the gallery
on this side, which brings you back
to your main gallery, and then just tapping
back into your project. We have this wrench icon
is your Actions menu. Then we have the
adjustments menu, the selection tool, and
the Transform tool. And then on this side,
we've got a brush, a smudge, an eraser. This is your layers panel, and then this is where
you select your color. Over here on this side, I have mindset to be over here, but you can change this
to be over here if that's better for your left
or right handedness. This is your brush size slider. This controls the
size of your brush, and this controls the opacity. This over here is your
quick actions menu that is programmable to
be whatever kind of buttons you think
you would use most. And then this is your
undo and redo button. But also there are quick actions that will
give you the same thing. If you tap once with two
fingers, it will undo. And if you tap once with
three fingers, it will redo. So that's typically what I use. When I'm creating it's
just a little bit faster in my workflow. Okay, so I'm going to go ahead and use the Brush
tool just to get some things on the
canvas that I can show you more about what
these tools do. So if you tap the brush, you're met with the
brush panel window, and this library has
so many great brushes that are custom programmed
into Procreate already. I have downloaded some other
brush packs from artists, but you don't need
anything else that Procreate gives you initially. And I typically only
use a handful of brushes anyway when I'm creating
this it's nothing fancy. So typically, the
sketching area, I might use some sort of pencil to kind of lay out
a sketch initially. I also like this
inking brush the most. I just prefer one that doesn't have a lot
of texture to it. That's pretty smooth, so that's kind of one
of my favorites. But there's many choices. And then painting, I use this round brush quite
a lot because it gives me some of the
transparency effects that resin also kind of
emulates at time, so I really like
this brush to use. And then lastly, we
have airbrushing. And I typically use one of these softer brushes
that just has a really feathered
edge and gives me a nice kind of soft
color application. So we're going to just choose this inking brush and go
over and pick a color. So in this color wheel, this is typically the
one that I use the most. It's the disc wheel. And
you can just kind of drag your cursor over the outer
ring to get a color, and then the inside is where you choose the value
of that color. So if you want it to be
more black or more white, if you were to double
tap near the edges, it's going to snap to that purest color that you're
kind of hovering over. You can switch it up to be either a classic view and
get more of these sliders. Harmony, which is kind of nice. If you want, you know,
complimentary colors, it's going to show you the complimentary
on the color wheel. There's also value, but I typically just
stick with the disc one. And then down here, you
have your color palettes. So this is where you
would add colors if you want to make
sure that you can easily go back to them. Like if you're creating
a piece that you know, you want specific colors in, you can kind of save them down here so that you're
not having to go back in and kind of refigure
out what color you had. So you can simply tap
an empty square here, and it will add what color whatever color you've selected
will be added down here. You can also override these if you don't want them anymore. Okay, so we're going
to just start drawing some stuff in here so
that I can show you kind of what these tools do. So in the layers palette, here's where you can kind of see where all of the things that you're drawing
are ending up. So right now, we have everything created on one layer.
It's layer one. And if we were to
make a new layer, all we have to do is
select this plus icon, and that creates a
new layer on top, and we can then
draw on that layer. And now we can see that
whatever layer is on top is going to be on top
of all of the artwork. So that's how it works. It kind of stacks and order. Whatever is on top
is most visible. And if we wanted to
rearrange these layers, all we have to do is press and hold and drag that underneath. And now this layer is underneath
the kind of red squares, and that's how that kind
of layer order works. Let's create some more layers
here with other colors. We can kind of see some
more effects here. I'm going to use a
different brush. You can really see the
transparency of this one, which is one of my
favorite brushes to use. Okay, and let's do
one more layer. Let's do a different color. And then let's just show you this other brush
with the soft edges. And this one is just
really feathered edge. Just like that. And then, again, here
is where you control the size of your brush
and then the opacity. Okay, so back to
this layers palette. So now we can see we have
artwork on all of these layers, and we're able to rearrange
them like I demonstrated. And you'll notice these
checkbox over here, these indicate whether the
layer is visible or not. So if you uncheck them, you're basically hiding the
layer without deleting it. And then this letter right here symbolizes the blending
mode that the layer is in. So if you see the N,
that symbolizes normal. And you can go in here and
kind of experiment with all the different
blending modes that there are. There's quite a few. Typically, don't use these
too much for resin concepts, but they're there if
you want to experiment. And then this slider up
here is just the opacity, which lets you
control that if you wanted to. Tap to close. And then on the left side, we can also tap this thumbnail of the layer
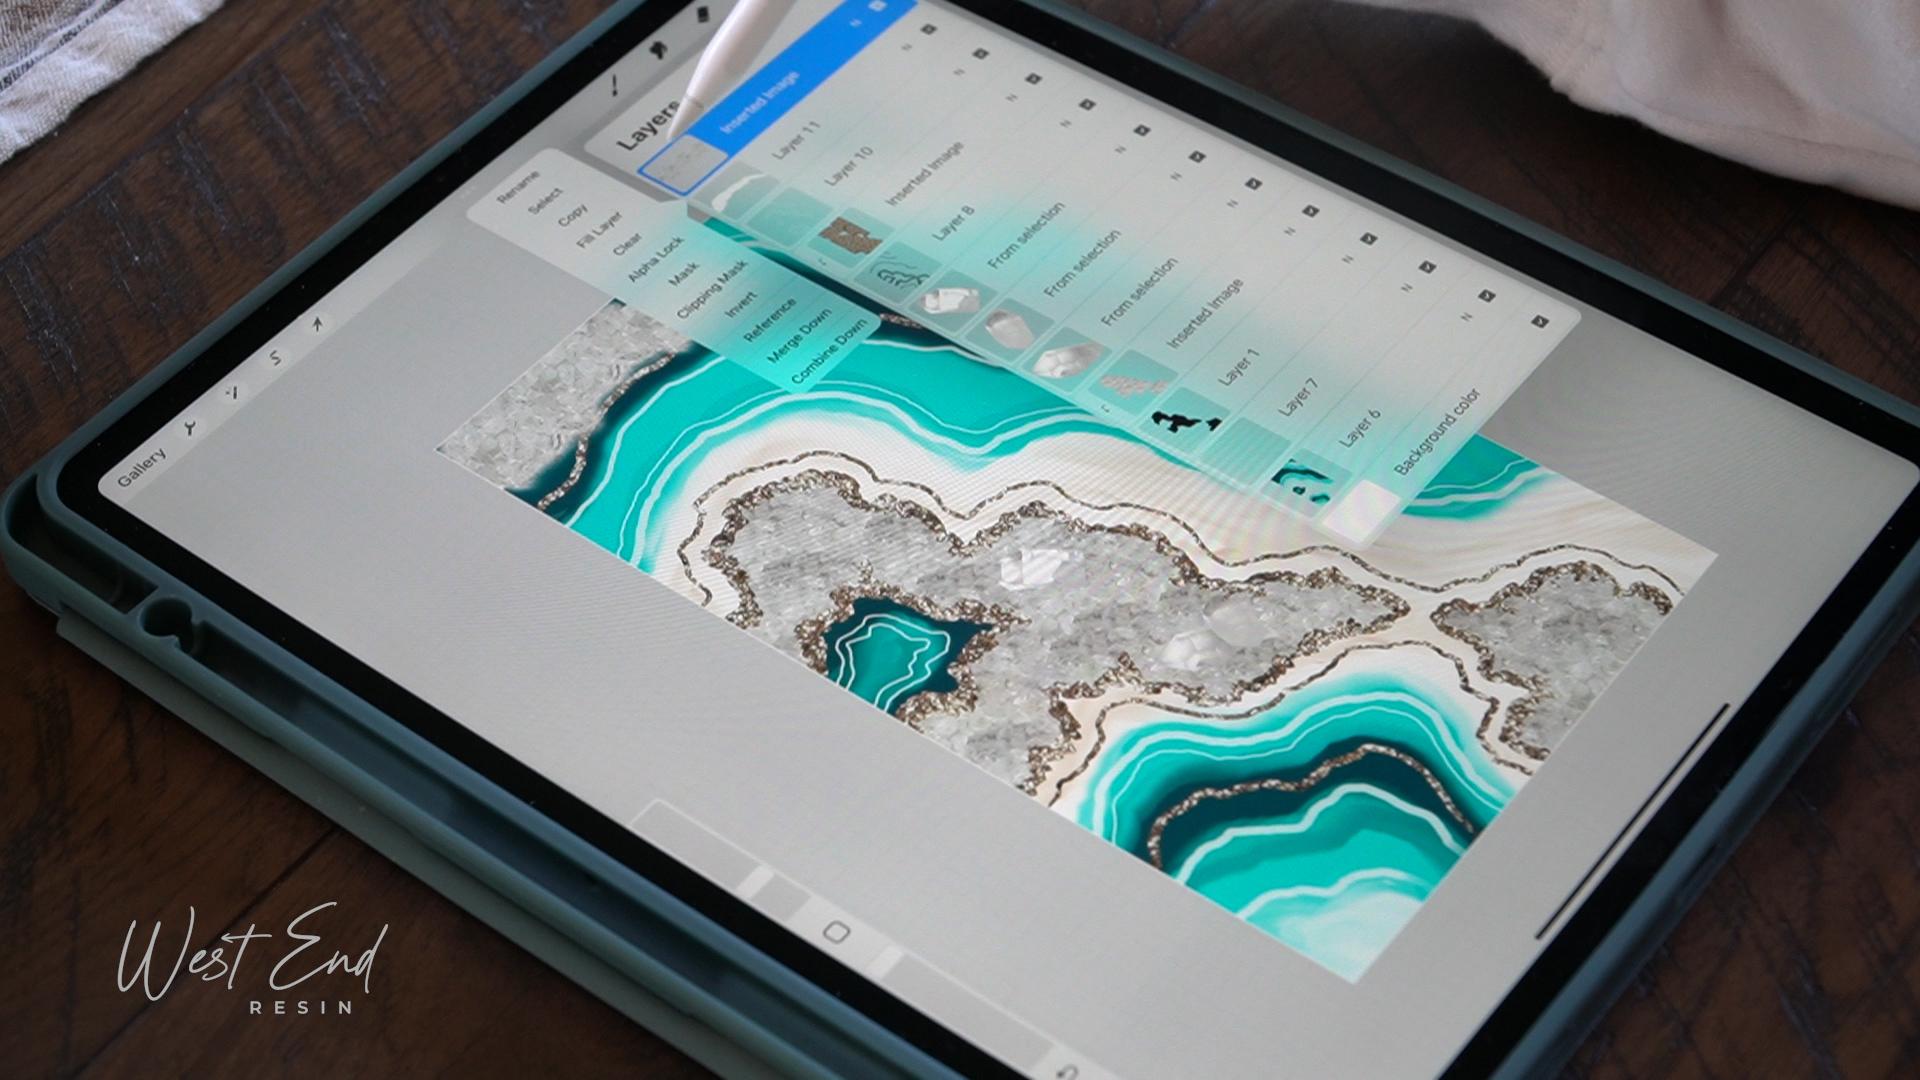
and get some more options. So here we're able to
do quite a bit more. Usually, what I'll do a lot
is utilizing Alpha lock, which basically, if you notice, there's now a checkered pattern behind this layer artwork, and that basically means
that it's transparent. So whatever I was to draw
on this layer now would only show up within the boundaries of whatever
artwork is already on there. So just to demonstrate that, I'm going to bring this
brush size a little bit. So now if I paint on this layer, you're noticing
it's only showing up within this red
square outline. If I were to turn that off, now it's just a regular layer, and if I paint on
it, it's gonna show up outside of that area as well. Another feature is
the mask option, which allows you to make changes to this artwork without
committing to them. So you're not
destroying the artwork. You're just hiding it basically. White symbolizes
revealing the artwork, and black symbolizes
hiding the artwork. So if I were to paint
over this with black, it's basically erasing it, but it's not
actually erasing it. It's just doing that
within this masked layer. So if you were to turn that off, we can see that the artwork
is still actually there. Ever wanted to delete a layer
or an effect on a layer, all you have to do is swipe
left and you can delete that. Other options, let's go
over to clipping mask. Clipping mask is one that
I use probably most often. And this basically clips
whatever this artwork is, I will clip it to
whatever is below it. So you can see it's
only clipping to this yellow blob here and a
very small portion of it. And you can see that it's
denoted by this little arrow that's sort of
telling you that it's clipping to the bottom layer, and it's always going to clip to whatever is
directly below it. And you can still move this
around if you wanted to, and now it basically undoes that clipping mask
because you've moved it. So if you wanted
to reapply that, we'd have to go back in
and select clipping mask, and now you can see that it's clipping to this green area. I use this a lot when
I'm adding, like, textures or glitters
or special stones, and I want them to only show up in a certain area
that I've drawn, I'll use typically a
clipping mask to do that. You can also create
multiple layers within that clipping mask. Everything that you create
underneath this sort of arrowed layer will be
included in the mask. And again, you can move layers around just by
pressing and holding. And then if you wanted
to delete anything, just swiping left
gives you that option. You can also
duplicate that layer. If you've maybe
imported a picture of crystals and you don't want to have to keep importing
the same photo. You can just duplicate
that layer simply, and then that's kind of
an easier way to do that. If you wanted to let's
get rid of this. Select multiple layers. You can just swipe right, and that will select
multiple layers, and you can then delete
all of them or group them. Grouping them is basically
putting them into a folder. It helps to kind of
organize your layers if you get kind of out of control with a bunch of bunch of layers. It helps to just
organize them that way. Um, what else do I
want to show you? That's basically all the effects that I tend to use there. Let's move on to
these other icons. So obviously, we have
the brush over here, and then this is the eraser. Eraser also has all of the same brushes that
the brush library has. And if you want to erase with the same brush that you
were using to paint with, all you have to do
is press and hold, and then it will erase with whatever current
brush that you have. But remember, it's only going to erase the layer that
you're selecting. So I was trying to erase for
a second that yellow blob, but that's not gonna
happen because I'm selecting this blue layer, so I can only erase
this blue layer. Smudge tool is basically smudging the colors
within that layer. I like to also smudge with the same brush that I
typically paint with, but smudging is
pretty let's see. I'm going to do
this green layer. Smudging is basically
like just smudging. It's moving the color around
that's on that layer. I like to use this one because
it does help to kind of emulate how resin colors mix together along
the edges sometimes. So I might use this for effect. Or if I want to simulate
sort of like a dirty pore, I might use the smudge
to kind of blend the colors together and make it look like it's a dirty poor. Alright, so let's move on to oh, I forgot to show you
a couple of things. So if you wanted to merge
group merge layers together, all you have to
do is pinch them. So whatever you're pinching
will merge together. So if I wanted these
all three to be merged, all I have to do is
pinch to merge them. And then if I wanted to
undo that, remember, two taps or a tap with
two fingers undoes. So now we can see
the layers are back. A tap with three fingers redoes, but I have to unselect that. So now it redid that
because I had three taps. It's kind of hard
to see with that. So let me just do
quickly some marks here, and then we can do two taps to undo and three taps to redo. So that's really kind of
a handy thing to kind of remember so that you
don't have to keep reaching back for these
buttons to undo and redo. Okay, and then one more
thing I forgot to say. So in this color wheel, instead of color picking
here, once you get drawing, you can also select
any color that you've already painted by just pressing and holding
with your finger. And that will allow you
to drag your finger across and pick up any
color that you see here, which is really handy. I do this a lot
when I'm working. It's just a quicker
workflow for me if I don't have to keep going
into here to grab colors. I can just simply
Whoops, hold it. See, I didn't want
to erase, so I can double tap to undo that. And then my pencil is set up to double tap to switch
between brush and eraser, which sometimes I do
that accidentally, and it can be kind of annoying, but the preference
can be changed in your preferences
window, as well. Okay, so let's move on here to these other
actions over here. So we already went
through the gallery, and this wrench icon
is your actions menu. Within here, you're able
to do quite a lot of changes to the app itself
and also some other actions. So in the preferences area
is where you can change the interface color and right handed or left handedness
and some other aspects. Video shows you your
time lapse replay, which can be kind of handy
for social media purposes. Um, you can also turn this off if you want to conserve
space on your iPad. The sharing lets you
export your creation. Canvas is for resizing and cropping your canvas and making other small adjustments. And then the add button lets you insert a photo is usually
what I use the most. I like to insert pictures of like I mentioned glass, glitter, crystals, gems, quartz, actual things into here to help give it a
more realistic look. And so we can insert
a photo of, say, this gold glitter, and we'll
bring that to the top. And I'll usually try to erase kind of the parts
that I don't need. So the hand and the kind of outskirts. So I just
want the glitter. It doesn't have to be perfect. And then maybe I want to clip this to this
area right here. I'm going to move
that down because I want to clip onto this area, and we'll do clipping mask. And now we can move it with the selection tool and have that be right over
the top of this. So it's also partly over
here because in this layer, artwork is also it's including
the green in that layer. So just to give you an idea of what the insert photo does
and the clipping mask, that's typically how I use that, but we'll get into that more
when I create the concept. Okay, also over here, I think we did all of this. Okay, so next is the
adjustments menu. Typically, I just use
the hue saturation, maybe some color balance, just to kind of edit whatever
layer might be in there. If the color isn't quite right, or maybe the brightness
isn't right. I just want to make
some small adjustments or maybe if I've taken a photo of my artwork and the
lighting wasn't quite right, so I'll need to kind of adjust
that in post in the app. And then next to this one
is the little S icon, which is the selection tool. This one I don't
use a whole lot, but it is handy to sort of cut out crystals or cut out
areas to move around. So let's just demonstrate
that with this orange layer. And we will notice
at the bottom, we have a couple selections. We can do an
automatic selection, free hand rectangle
or ellipse or circle. Typically, I'll
just use free hand and you're able to kind of draw freely with your
pencil or you can lift up and just tap
to get straight lines. And then when you're
done with your shape, all you have to do is tap
this circle to close it. Now you'll hopefully be able to notice maybe not
too well on camera, but there are faint
diagonal lines kind of along the entire canvas, except for where we
made our selection. That's just symbolizing
that nothing is selected except this area. So then what we can
do is we can color fill that area by tapping
this icon down here, and it's going to
color fill with whatever color we have selected. If we undo that, we
can also invert that, which means if we invert it, now we're going to be selecting
instead of this shape, we're going to be selecting
everything except this shape. And then copy and paste
is usually one that I use quite a bit for
inserting photos of, like, crystals and things
if I wanted to copy a certain area of it and just duplicate it and
put it everywhere. I'll copy and paste. And then what that does is it
copies that selection from that layer that we
were on without ruining the original layer. So that's kind of handy
if you like I said, didn't want to ruin that layer. It just helps you to kind of duplicate things pretty easily. And then this area
that I've kind of glossed over a little bit
is just the transform tool. And what that does is
it allows you to move around layers or
selections on your canvas. So you can see the
bounding box here has blue circles on the points. And since we have
uniform selected, it's going to scale, if I grab one of
these points it's going to scale it up and down uniformly, so
proportionally. If we were to choose distort, it will only distort and kind of skew it not proportionally. And then warp also has you'll see these lines kind
of inside of it. Basically, you're
kind of mushing it around with the warp tool. And then free form is
basically whatever you want. I usually keep it on uniform, but if I needed to
make adjustments, I'll also do distort
or free form. And then also down here, there are more selections. You can flip it
horizontally or vertically, rotate it a certain degree. So there's many options
here, but typically, I'm only using this just
to move stuff around in my canvas or to kind of scale up crystal formations
or something. Okay, double we'll
tap that again to release the bounding box. And, um, let's see. What else do I need to go over? I think that's about it. For the tools, we might have to dive in a little bit
deeper once we start drawing, and I can kind of
show you a little bit more of the techniques
that I use. So let's make a concept and
let's get started with that.
3. Find Inspiration and Create Resin Concept: So we're just going to
jump right into it. So I'm going to select
a color, a dark color, and I'm going to start in with my inking brush,
the syrup brush. And I'm going to start in just drawing my crystal formation. So that's typically
where I start. It just helps to kind of
anchor the piece and just help me build off of
that with my colors. So I'm going to start
drawing in sort of just a generalized
organic crystal shape. And maybe I want this to
be cut out in the middle. And we're going to go
ahead and fill this shape. So instead of painstakingly kind of coloring it
in which you can do, I like to just drag and drop
color to fill that area. So I'm going to grab
this color wheel gon and just drag that into the space
that I want it to fill. And if you have a
shape that hasn't been properly closed
up, like say, it looks like this where
it's just barely not closed, this color wheel is going
to fill the whole canvas. So double tap tap once with
two fingers to undo that. I'm going to make sure that the shape is closed
before I fill it. So that's kind of
how that works. Okay, so now we want to add some crystals to this
shape that we've created. A lot of people think
that maybe I used some certain brush that was like a crystal
brush or something, but that's not the case. What I do is I import a photo of crystals and then use clipping masks to
clip it to this area. So I basically have a
Pintresbard that's full of different images
that I've kind of collected that I would
use for Procreate. So I have, like, you know,
different crystal points, different crushed
glass, glitters, just anything that you want
to kind of collect and then save to your
iPad to import later. So I'm going to go over here to my wrench icon and
insert a photo. And from here, I'm just going to choose one of my crystals. And then I like to erase
the borders just with this soft blended
airbrushing brush just to erase any of that white edge that's in the crystal photo. Okay, and then I'm going to
grab my arrow tool and just move that over to cover
some of this area. And you can scale up
or down, you know, with that arrow tool selected or rotate it
however you want to. But I think that's
kind of a good size, and then go back up
to my layers pallet menu and kind of swipe
left to duplicate that. And then I'm just going
to keep selecting with my arrow and moving
around and duplicating, and I'm just going to keep
doing this until I can fill up this whole area
with crystals. And as I'm working, I find it handy to just
kind of merge as I'm going because I know I want
these crystals to all be together and they don't
have to be separated out, so I'm just going to
pinch to merge those. And we're going to select clipping mask to get
them into this shape, and we're just going to keep
duplicating until I can fill up this entire
shape with crystals. Okay, so now we're going to just merge all of
these together. And I'm going to insert another
photo of these crystals. And I like to do this to
add just more dimension. Maybe if you had, like, amethyst
or smoky quartz or like a specialty crystal that you just wanted
to plop in there. These are just regular quarts. I'm going to select my selection tool and make
sure free hand is selected, and I'm just going to tap to get straight edge points
for my selection, and then tap this
little circle to close. And now we can see that it's
only selecting this crystal. I like to just hit
copy and paste. And that brings
that selection to its own layer without
disturbing the original image. So I'm going to go back
to that original image, grab the selection tool again, and I'm just going
to keep grabbing a couple more of these crystals. Alright, three is probably good. I'm gonna delete
the original photo, and then now we can
with the arrow tool, select these, scale them
down and rotate them and just kind of put them wherever
I kind of want them to be. Maybe I've got some really
big statement crystals that I want to put in there, or maybe they're smaller. It's really up to you and what you plan on using in your piece. But just for kind of effect, I'll just show you a
couple placed in there. Okay, so I've got a
crystals in there. Now I want to get
started on the coloring. So I'm going to
create a new layer with a plus icon again, and I'm going to
drag it underneath my crystals and all of that. And we're gonna grab our color
wheel and select a color. I think I'm going to
go with sort of this dark teal bluish color. Grab my brush. I'm going to
use my favorite round brush. Make sure the size is good. And I like this
brush because it has some opacity characteristics
that I think really emulate how resin
actually behaves as far as, like, when it mixes with other colors that are
kind of next to it, but, you know, experiment with the brushes and procreate and just find the ones
that you like to use. And this doesn't
have to be perfect, because I usually go in
with the smudge tool, which I'll demonstrate
a little bit here as well to kind of fix these edges. Let's go in here, too. And maybe up here. Alright, so I'm going to choose a new blue. I'm going to choose
a brighter blue. And you could go in and do all of your colors
on a new layer, and that will just give
you more opportunity to edit things in the future. If your client comes back
and they're like, Oh, I don't like that blue.
Could you change it? You could go into that layer the layer of where that color is and either alfock it and then physically
paint over it that way, or you could undo that. You could go over here to
your adjustments layer and select the hue saturation brightness
and just sort of change the hue and saturation
brightness that way. But for the
demonstration purposes, I'm just going to keep my
blues on the same layer. So I'm going to start
painting with this one. And I really like to
follow the same kind of flow that my crystals
have where possible. Okay. So now I want to show you a little bit about what
the smudge tool can do. So we're gonna select
the smudge tool, and I just have it on the same
brush that I painted with. And we're gonna just
smudge the edges. I just think that this
really kind of emulates what resin kind of looks like when it kind of blends together
with the colors next to it. And how this smudge tool
works is whatever you put your brush down on is where it's going
to smudge from. So if I put it in the
blue and I drag out, it's going to bring the blue
and smudge it that way. Same with this eye
with the white. If I bring it from the white in, it's going to smudge the white. So that's kind of how
that smudge tool works. And I just like to
kind of finagle it, push and pull that color around, and just get it to
where I like it. Let's see. Okay, that looks pretty good. I think I'm going to add some, like, dirty poor area. So I'm going to make
a new layer for that, and we're going
to select sort of this creamy color
with a harder brush. And I'm just gonna
I'm not going to be too precious with
where I put this color because we're going to
use this smudge tool to smudge it together and make it look kind of
like a dirty pore. Alright, that's kind
of enough for me. Now I want to add
some glitter accents. So I'm going to go in and add a new layer on top of
my crystals and things. So at the very top,
we're just going to make it black and same brush. And I'm just going
to do some outlining with intentions of
adding glitter there. And this doesn't have
to be perfect either. I kind of like it to look
a little bit more kind of natural and imperfect. Not that glitter is
natural for geodes, but you know what I mean? Just kind of thinking
about how I would actually put glitter on this if I was making
it in real life. Just kind of adding the glitter up into the
stones a little bit. And you could do
instead of glitter, you could just do gold
by inserting a photo of, like, a gold metallic. That would also work if you
didn't want to do glitter, or you could do both up to you. Okay. And then I'm going to make my brush
a little bit smaller. And I'm going to also add some
glitter line details just to kind of keep all the glitter kind of on
the same layer. Okay. So now we're going to add the glitter the same way
that we added the crystals. So I'm gonna insert a photo
and choose my glitter. And then I'll scale
this down a little bit. So I want my glitter
flakes to be pretty small. And then we're just going
to start filling up the canvas like we did
before and, you know, merging as we go just
to keep it a little bit more organized and
quicker to fill it up. So I'm going to merge these, and then we'll make sure to
add this to a clipping mask, and we'll just keep going. Okay, that's pretty much good. We're going
to merge those. Alright. So now, I think I'm going to add
a little bit more blue accenting over here. And so you don't
have to keep going back into your color picker
if you don't want to. If you just tap on
your screen and hold, you'll notice that
your color wheel pops up and you're able to select any color
that you've already got painted on your canvas. So that's kind of handy oops.
That's the wrong brush. Just little shortcuts really add to speeding up your
process workflow. Then we'll smudge this guy out. Okay. All right. Let's create a new layer, and let's make some
white detail lines. So now, I like to kind
of pinch and rotate my canvas to kind of get it in the best angle for me
to draw these lines. And this is, you know,
completely up to you and how you like
your pieces to look. I'm just showing you how
I add certain details. And I like to try to keep my
finer details to a minimum, just because I don't like to
commit to that right away, and I don't want
the client to kind of get their hopes up, like, thinking it's gonna look
exactly like this when my details are kind of done
in a way that's I don't know. I like to see where the
piece is at and just kind of add them where I
think they need to go. So sometimes that changes based on how the piece
kind of evolves. And maybe you've got different colored markers that
you want to use. Okay. So now, sometimes
I feel like, actually, let's a one more little
line just write here. Okay. Alrighty. So sometimes I feel like the piece is sort of maybe
too bare in some spots, and you can
definitely just go in and just keep adjusting
and just, you know, keep drawing things and seeing maybe I want some more
crystals over here, or maybe I want this to be
like a German glass glitter. I love adding German glass
glitter to my works. So you can just
kind of, you know, add that in as you're
going and just see what needs to be filled. And we can import maybe
some more crystals. So that's pretty much how I
use it to create concepts. And then from here, I'll go
ahead and start my piece. And then after I pour
the first layer, I mean, depending how big it is, or if I just have more, you know, uncertainties about
how I want to proceed, I will take a picture
of my piece where it stands and bring
that into Procreate and just draw over the
top of that image. So to show you some
examples of that, here's a piece that I took a picture of and imported
it into Procreate, just to see kind of what different details might look like if I should add more resin. And so I drew out
quite a few things, but settled on
something like this. You can see I've added in
some more transparency, translucent white resin. I've added in some
more gold accenting and more glitter and stones. And that really gave
me the confidence to move forward with this piece. And this is kind of what that final piece ended
up looking like. So I was able to move forward confidently and kind of
finish this piece up. Another piece that I kind of
did that for was this one. So I took a picture
of this piece, and it doesn't have to
be a fancy picture. This is kind of a poor
picture, actually, but very messy at this stage. And what I did was just, you know, draw over
the top of it. I added some more layers
of translucent resin, more stones, and this might look messy to you, but for me, it makes perfect
sense, and that's all that really matters
is if it makes sense to you and helps clear
your mind and give you a clear path forward,
then it's doing its job. So this isn't really meant
to be shown to the client. In my opinion, I would
just rather keep this as part of my creative process and my
brain dump kind of thing, and I don't really
want to invite third party discussion with moving forward for
pieces like this. So it was for me. And this is kind of how
this piece turned out. So you can kind of
see the progression of the drawing and
the actual piece, just an invaluable
tool, in my opinion, it really gives you the
confidence to move forward. Um, and just know exactly what you want to do
and not be second guessing, Oh, I wonder if I should put
this here or this there. Try it out and procreate first. Draw over your pieces,
see if it'll look good. Another example of duplicating. So this was a concept that
I created for a client, and she didn't really
vibe on this darker blue, and she wanted more of, like, an ocean type blue, and she wanted some white with, like, a sandy representation. So I duplicated this
project and just altered it and basically was able
to come up with this, which added some more stones. I changed the blues
around a little bit, made it a little
bit more brighter. And this ended up being
that final piece. So that about wraps
up the class. I hope that this was
beneficial to you. I hope that you're able to take what you've learned
and kind of streamline your process with Procreate and create concepts
for your clients that give you the
confidence to move forward and the ability to change
things quickly and efficiently. So I hope you enjoyed
the class, guys. Thanks. Bye.
 Katie Krell, Artist, Designer, Animal Lover