Transcripts
1. Introduction: Hi there. Welcome. I'm Mark
Robin of recording too. I'm an independent recording
artist, songwriter, music producer, and I was
well trained in engineering. You're talking
about audio mixing, recording, and also
mastering as well. The topic that I'm
going to teach in this class is the equalizer. The equalizer will be defined. Also, I'm going to let you
know what it is used for. Also explain parts
of the equalizer, Ika kick, drum, also
a bass instrument, and also explain
and show you how to skillfully equalize
the kick and the bass for them to have a
proper connection and not have too much frequency clashing that can be unpleasant. This is the equalization class and I encourage you
to leave a review. Thank you very much. I
want to see you again. Leave comment to a review
and let us connect. Okay.
2. The Equalizer: Have you here with me. And this is a time for us to
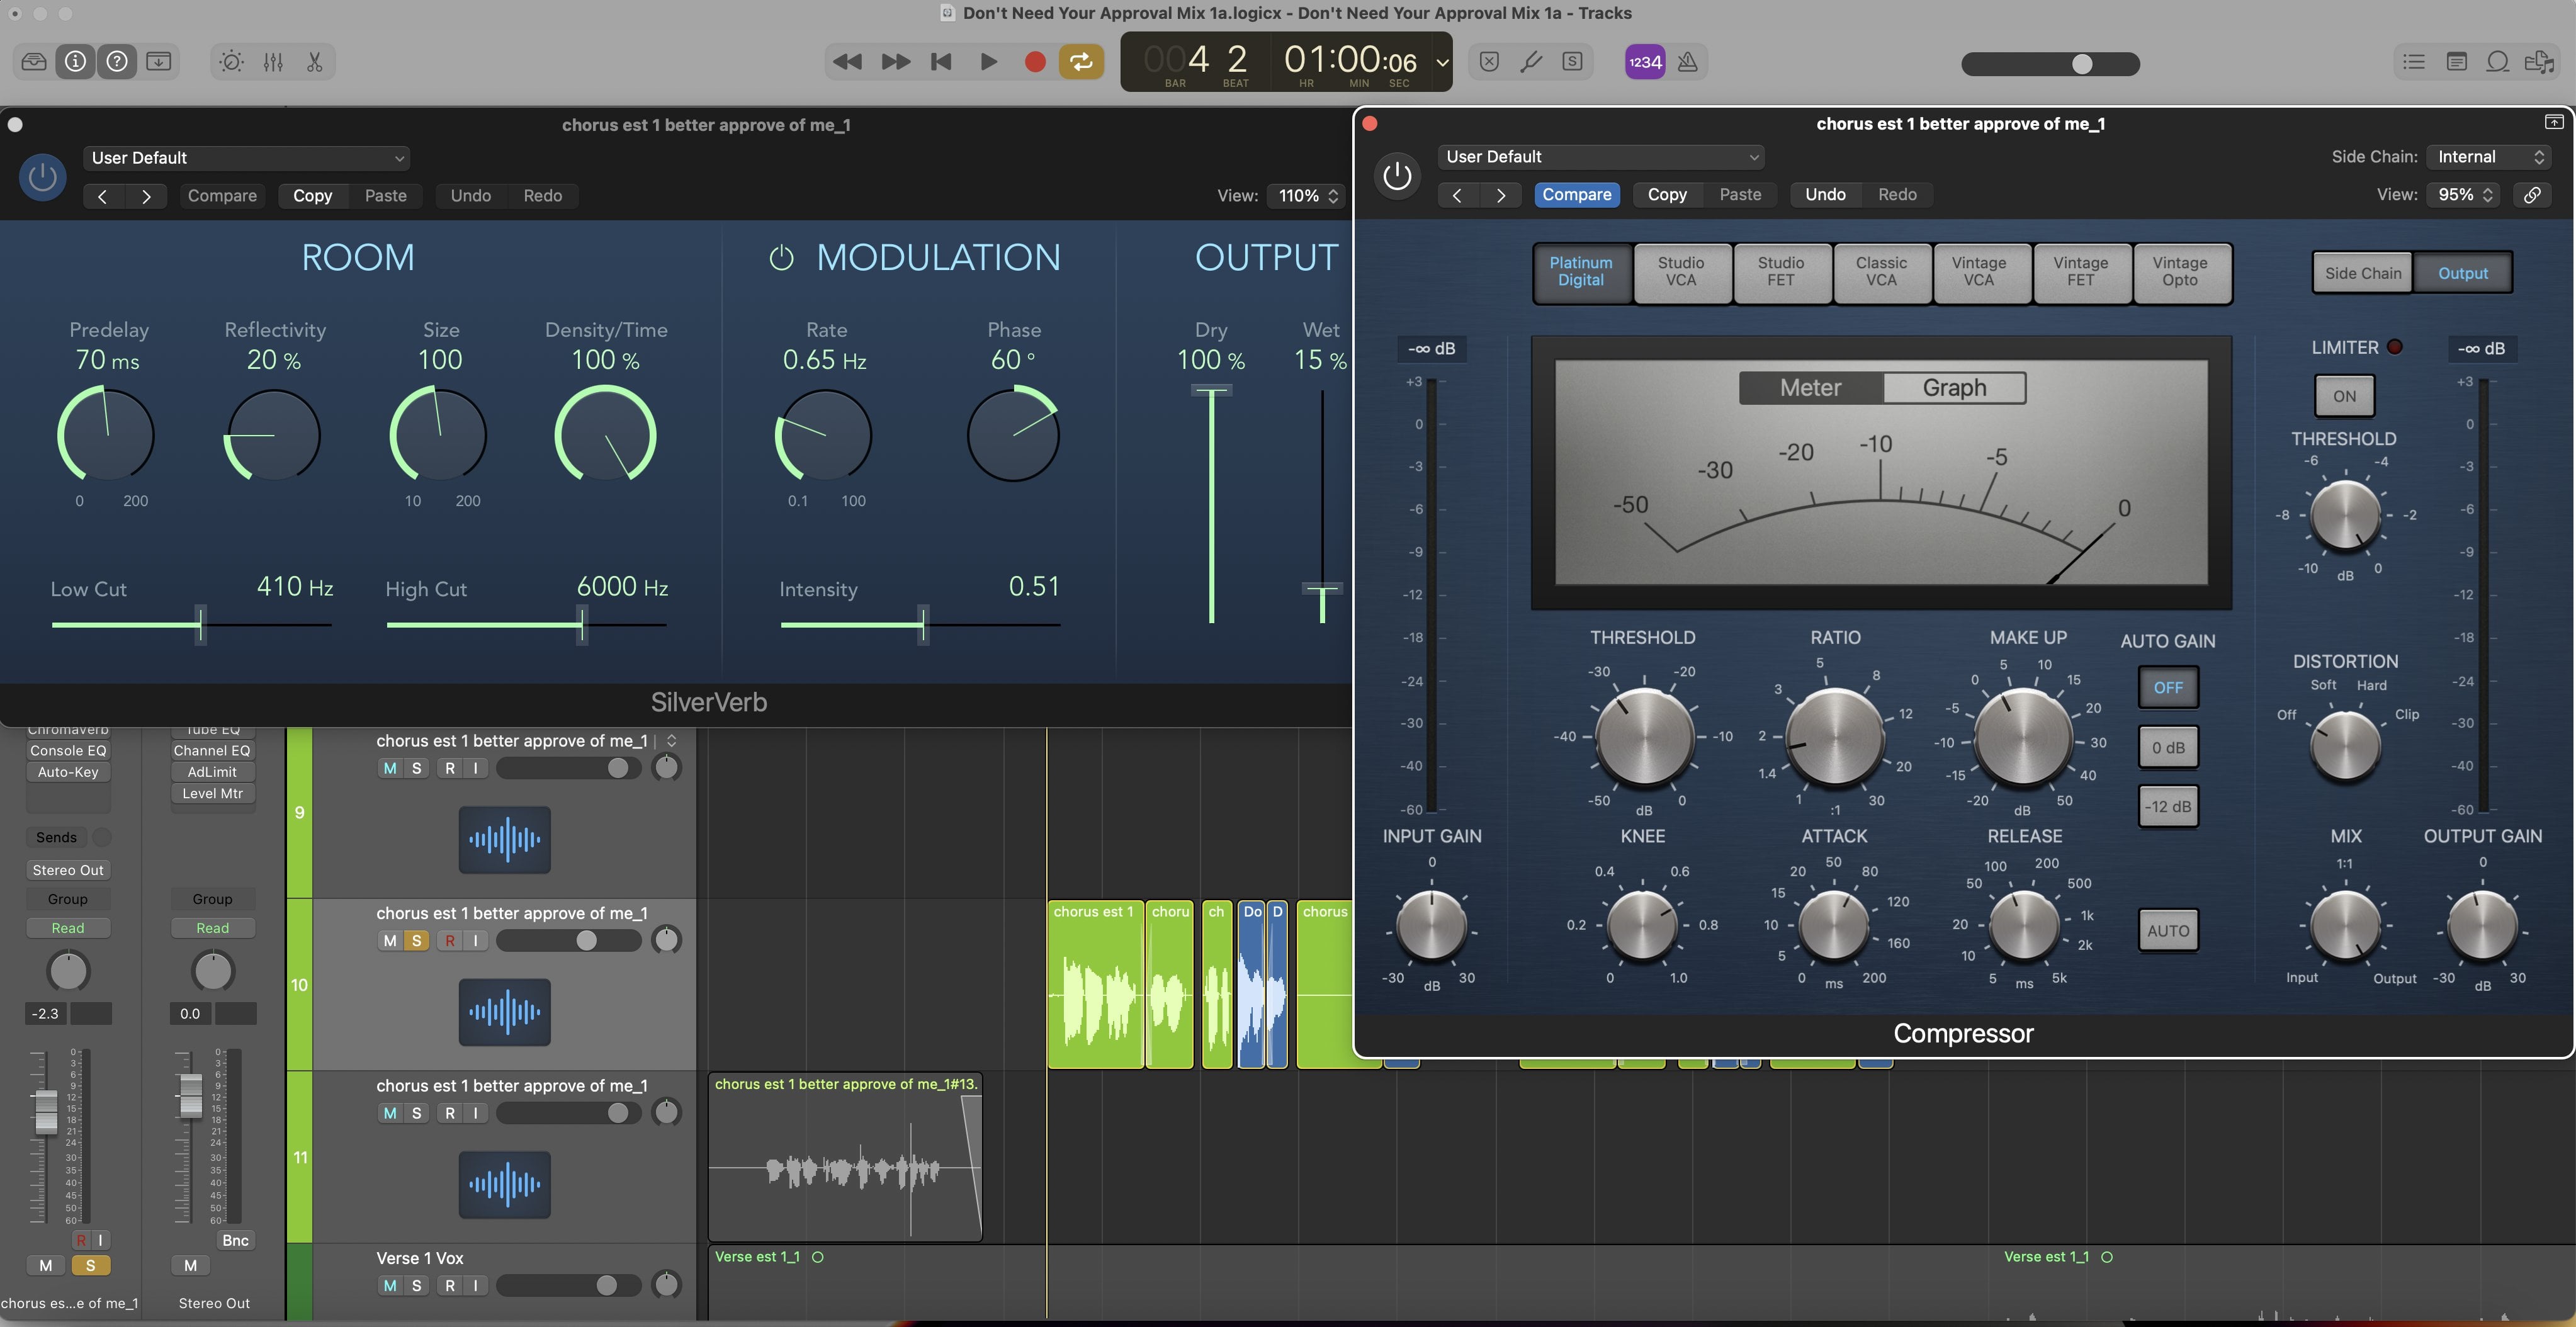
learn some equalization. So let's proceed. So I have here with
me a mix that I did. The title is Don't
Need You Approval Mix. Okay? And what we are
going to do basically is EQ or equalize
the kick and base. So let's proceed
one time. So I have selected the kick Alright, I have my channel EQ here. Let me just show
you what to get it. Hit the channel strip.
EQ, channel EQ, stereo. Okay? So this is the EQ with
a flat representation here. Okay? So let me explain
before I go further. So what's an equalizer? An equalizer is a
combination of filters. Okay? That is used to make adjustments to
polish your sound, to match to match
your audio signals or your recordings
for them to sound consistent and in the same tune according to what
you're looking for. And also to add different
types of features or you want more
command in the sound, you want it to sound brighter, a little darker, you know,
change the mood and stuff. So I set a combination
of filters, so let's proceed.
Look to the left. You see this, and I go down in order to the
right. All right. So this here, I'm
clicking it and you see the corresponding
identification at the bottom, around 20 hoots. All right, so this year,
look at what this is doing. It cuts the lows, okay? And allows the high highs
to pass. It cuts the low. When I say the low, I
mean the low frequency, and it allows the high
frequencies to pass. High pass filter, okay? Let's go to the other side.
This side cuts the highs. Cuts the highs. Because if you look down here, the high frequencies
are being cut. So highs are high
frequencies being cut and allowing the lows to pass low frequency,
low pass filter. Let's go along. This is
the low shell filter. So this low shell filter is a filter and
low shelf because it's on the lower end of the
frequency spectrum here, as opposed to this one
that's on the higher end. So this one here is
a low shell filter. Okay? So pay attention to. Okay. Understand. So if we
go at another point, okay? Let's say we go at, so we're seeing 5.7
here, 72 roots. Let's go at 50. You change that, it
changes. Quick undo. Back there. All right. So this low shell filter. Basically, when you adjust a particular frequency on
the low end of the spectrum, it also raises
other frequencies. You understand? So let's go
as opposed to this part here. Here is a particular
central area. The low shelf,
when you raise it, it raises frequencies going
towards the lower end, maybe a little before,
but more focused and emphasized on the lower
end of the spectrum. Okay? So you raise one point, and it raises the rest
of the frequencies going back on the lower end. Okay, to some degree. You come here now
and then you have your panned pass filter. This allows a certain band
of frequencies to pass. We call it the bell.
So let's click it. Highlights this yellow here. So you see from here
to this boundary to the other boundary.
This is your band. And we see a number
of those filters here coming down in
order to the right. Okay, so that's it, allowing the high to
pass a high pass filter or the low cut switch
low shell filter. The bell or the band pass
filters, high shell filter. So basically, same principle
applies just as in the low, where you raise a point on the higher end
of the spectrum, and there and there's
a reasonable amount of increase of the level on the higher end where there
are higher frequencies, you know, even though
a little before, more focused on the higher
end and continuing. Okay, we have our gain here. So let's pay attention. Let's say you adjust certain
points around here at 2:50, up, down, up. What this will do? This gain is going to increase or
decrease according to what you do with it and what you adjust every point on this
curve by that amount. So whatever you do to one,
you do to all. So let's go. So you see at these points, they would have
been proportionally increased at the varying points. If you go down,
proportionally decreased. Okay? All right, so that's some basics about
this EQ curve here. All right. So let's proceed.
Let's listen to this. Ie, let's select a
certain area or region. Let's put that on SMAT. Okay. Can you Okay, so we have this playing here. So now that we have this here, when you're doing
your equalization, it's good to give thought
to what you want to do. So, if it's a pop
type of track, okay, you might not want it too, um, aggressive, according to
the message you're sending. So the name of this song is
Don't need your approval. So Excuse me. So this song is a song
about reflection. So therefore, I
want some type of softness to the kick, okay? So softness, and you want to polish this and give it
some wet. So let's proceed. So in order to get
some softness, right? What I could do, I can decrease the higher end of
the frequency spectrum. Okay? But first before that, what I want to do is filter some of the unwanted frequencies in order to have a
cleaner mix, okay? So I go into the low end
here and let's proceed. So listen, let's let's send
it back by about 50 hoots. Okay. Okay. Compare.
So let's listen. I have a thing that I close my eyes and I click a few times, so I wouldn't know whether
the filters on or off on the EQ and listen to here
properly. So let's do that. This sounds, okay. Alright. So take out some of those frequencies there.
And then proceeding. So remember, I said a song
about need the approval. So if someone, you know, just a message for those a respectful message for those who think you
need the approval, it's about reflection.
So guess what? I want some reflection in this. So take out some
of the high end, so it wouldn't be too bright. You know, give you that softer
reflective tone, you know. So let's proceed. Let's go here. Option, click. Option, click according to your
settings can enable you to reset the points on the curve or your adjustment to your original position. So option, click this point here and go back to
that position here. Alright. So back to
what I was doing. The observing here. We have our high end of the spectrum here,
so we have this. Let's let's send it back to the original point.
Have a comparison. So I decrease some of the unwanted frequencies
here and let's check the higher end
where I would have softened the kick
drum to represent, like, reflection of
oneself, you know, within my my or within
one's thoughts. Yeah? Alright. So let's
go. So, let's go. Alright. This is brighter, okay? So if that was brighter, now, this would be softer. So that's that. So
also to add to this, I want to add some
command to this. So I'll come in the area of the two to 300 region to start because what happens is that you don't want to come too close. Now, it's your choices
based on the material you have and what you want to do in accordance
with your goals. But generally, a good remembrance is not to
come too close to this area here 80 to 100 or even to 150 because if it
is that you boost, then you may have to
now dip that area to fit with the base so that the
frequencies fit properly. So I'm going to come in
this area around here. Let's bring it to
about three here, using my band pass
or bell filter. Okay. Hold on. This one sounds lighter. Let me try again. Let me
let me drop this a bit. Oh, adjust that, right. Okay. So let's see if I'm
hearing the difference. Sometimes you have
to listen over and over to make sure, okay? If not, I'll just have
to raise it accordingly. And this is for you, too.
Sometimes you could encounter this situation
where you might be hearing what you adjust, so you listen to it until
you get it, you know? Up down. Okay, let
me close my eyes. This one sounds light. Okay, so let's try and
boost it a bit to see the difference. Open it a bit. Okay, let's do that. This one songs sweet? Oh, yes, so nice. So we got the unwanted
frequencies filtered out. We got some wheat, you
soften the higher end, okay? So that's that part there with
the kick, yes. Alright. H.
3. Equalizing bass and kick drum: Going on to the bass. So let's proceed. So this is our bass
instrument here. Okay, so just something to note, if you look at the bottom
left of the equalizer, the channel EQ here, you'll see something
Mark DB OCT. So that is DB per octave
or decibels per octave. And this basically shows
how aggressive you want to. You want to have your slope, which is the slope here. So you use your filter, your high pass filter, engage the slope, and, um, at least for
you to identify it, and then you adjust
so you can go from 24 down to 18 to 12 to six. You know, the less in terms of the DB is the more gently
slope, as you can see. The higher it goes up to 48, and now you see how
aggressive the slope is. So let's, um, bring
it out a bit. See how aggressive? Yes. Let's
put it back to about that. Okay. Alright, so that's that. Okay? So now dealing
with the Bs. So point to note about
the Bs Let's recall it. Prove base, recall
default, right? So in dealing with
your bass instrument, what you want to
do basically is at least have unwanted
frequencies or frequencies that
can make your mix sound inappropriate or unclean. You want to remove those
unwanted frequencies. So at least start from here, which is a good point
in the 20 hoots region. Just remember that the
equalizer here represents the audio spectrum or
the frequency range of 20 hoots to 20,000
hoots as highlighted here. Okay. And that 20 to 20
that 20 hoots to 20,000 Hot it represents
the hearing range of a typical human
being as last I knew. So well, as far as I know. Yeah, so let's proceed. So generally, you know, a good starting point is to filter from about
40 hoots depending on the type of bass instrument
you have. So let's go. So I'm filtering
from about 40, okay? So proceeding. Get the
comparison there. So let's go. So let me close my eyes and do my check. Okay,
so it's filtered. You can hear it clearly, right? Another point to note is
that even though sometimes, no, it depends on what you want. But based on what I want, I do not want my
bass rumbling too much down on the end
here on the left. So even though you have
filtered out that area, in this equalizer, you can raise the upper order harmonics, which is this range I'm using with the high shelf
here, filter here. Okay. And what this can do is when it raises and increases this range
of frequencies, it allows the basic cut
through the mix, right? And also can help you to cut through your platforms
that you're listening on, such as your computer, through your built
in speakers and your IMAC Apple computer or
computer speakers or laptop, maybe even your phone, okay? So this is what this can do. And even though
you have filtered out frequencies
in the lower end, because you are hearing
these frequencies, they now take the
rear front point. Of some of what you're
looking for in bass, and you can be
satisfied with hearing this upper order range
increased even though there's an absence of the
lower end of the spectrum. Okay, so just keep that in mind. So we're proceeding further. Another thing is based on the performance of
the bass instrument. So if the notes played on the bass
instrument are high notes, it can cut through reasonably, so you may not even have to raise the upper order
harmonics that I'm showing you here with
the high shell filter on the channel equalizer. So keep that in mind.
So let's listen. Okay. So that's that. So now I want to basically show you the base and
kick relationship, basically showing how
they play against each other and how to fit them
in between one another. So I'm pulling up
the equalizer for the kick and placing
it to the left. Okay? So let's play both of
them to get perspective. Alright. Stay tuned. Let me make this a bit smaller. This is for you to get a visual comparison in addition to your um, your listening information. So if you pay attention,
you can see the kick covers in terms of what is represented
now are not filtered, estimated from 50 hoods to
to about one, 40 hoods. And in the base, it covers estimated represented, estimated 40 hoods to
about 40 hoods to Hold on. Look at the curve here,
and the visualizer. 40 hoods to about 100 hoods. And we see that
frequencies could be fighting for the same space. So here's what's occurring. What you can do here
in this insituon is that since the kick has taken up so much
frequency range, okay? We can dip the kick a bit. Okay? So let's proceed. Let's
come like a scooping out or notching specific
jurisdiction on the equalizer in order
for them to fit better. Okay? So let's go.
I'll start by using my band pass filter here
within this region, and instill about 100. So 40 to 100. So inside dip around
this area here. 5.9, it's a bit aggressive, so let's go up 4.8. Let's go and do my EB. Up down. Okay, let
me close my eyes. Okay. So let me pick a point. All right, right
here. Let's go again. Up down two, three,
four. Alright. This one songs a bit more controlled. Maybe because I wonder if it's because I hear
you kick too loud. So then in that situation, if it is that you're not getting your response, let's go again. You can come over to the base and watch some of the
best as well. So let's go. Let me raise my output
on my enter here. This sounds comfortable, right. All right, so more solid here. So I'm reckoning
that it's up, okay? Yes it is up, right? So we have going that direction
in doing that, right? So so what I can do is leave her scooped
and come over here. And in this area, as I remember, the kick
is going to about 1:40. So let's come around
here in the base, and make some room
for the kick as well. So around there, 80 hold on. Now, we can come up here a little bit because
you don't want to shrink your kick too
small in terms of your song. And here now to control
your bass, 80 to 100. So let's see, like 90
to 150 that area there. Okay. Going down by about
six DB. Let's go. Alright, let's do
the comparison. Alright, let's do it again. This song's more contued. I reckon that it's
dipped one more time. This songs more controlled. Okay. Well, let's proceed. A
4. Equalizing bass and kick drum final: Et's continue. So we have
a kick and base there. So let's proceed to, you know, sort it out some
more. So let's go here. Alright, so that
was adjusted -2.0, not to take too much
body from the kick cause sometimes when you have a direction and you
want to engineer, you try one thing, and
then you may desire to readjust it for a better
direction that's more effective. So going over here to the
Base, again, let's go. So, the kick is wrong 5,000. Okay. So what we can do is this. We can do. All right. So this is where your base is. So we can scoop some here. So just to make a note, pay attention to this
curve here that the arrow is pointing at sloping. This is your base information. Here you see visually, right? So just to make it clear
if I didn't before, you observe that in addition to what you're hearing,
okay? All right. As it. So let's
scoop some of that. The kick is occupying
around 50 to hundred. And this space here 50-80 is
where I can do some dipping. Okay? So let's dip to five and drop down to
about six, right? So when it hits 50 to 80, that covers this 40 around 40 to the 80 here a bit as well. Yeah. So let's go. Set it up and do a
before and after. Let's go. Up, down,
up, done, right? This sounds controlled. Okay? Okay. And so that's your base
and ca relationship. So we went through the
equalizer the parts, also filtering your kick and shaping it to the
desire that you want. In my case, I wanted a
kick with somebody here. But I wanted to soften it a bit for reflection,
for the topic. I would like that for as well. Don't need your approval,
'cause you could think and reflect on how
people deal with you. So this softness can represent that and filter the
unwanted frequencies, do some cutting out
here, and that's that. So I thank you very
much for joining me, and this is the end of
this course so far, right? And have a good one. Follow, share, tell your friends come
and rewatch and relearn. Remember if you want
to remember something, you come here and
practice and look over. Okay? Goodbye.
5. Outro, It was nice.: Thank you very much
for joining in on this equalizer class and I really do hope that
you come back again. It will benefit me and
it will help give you a different perspective or
empower you. Thank you.
 Mark Robin