Transcripts
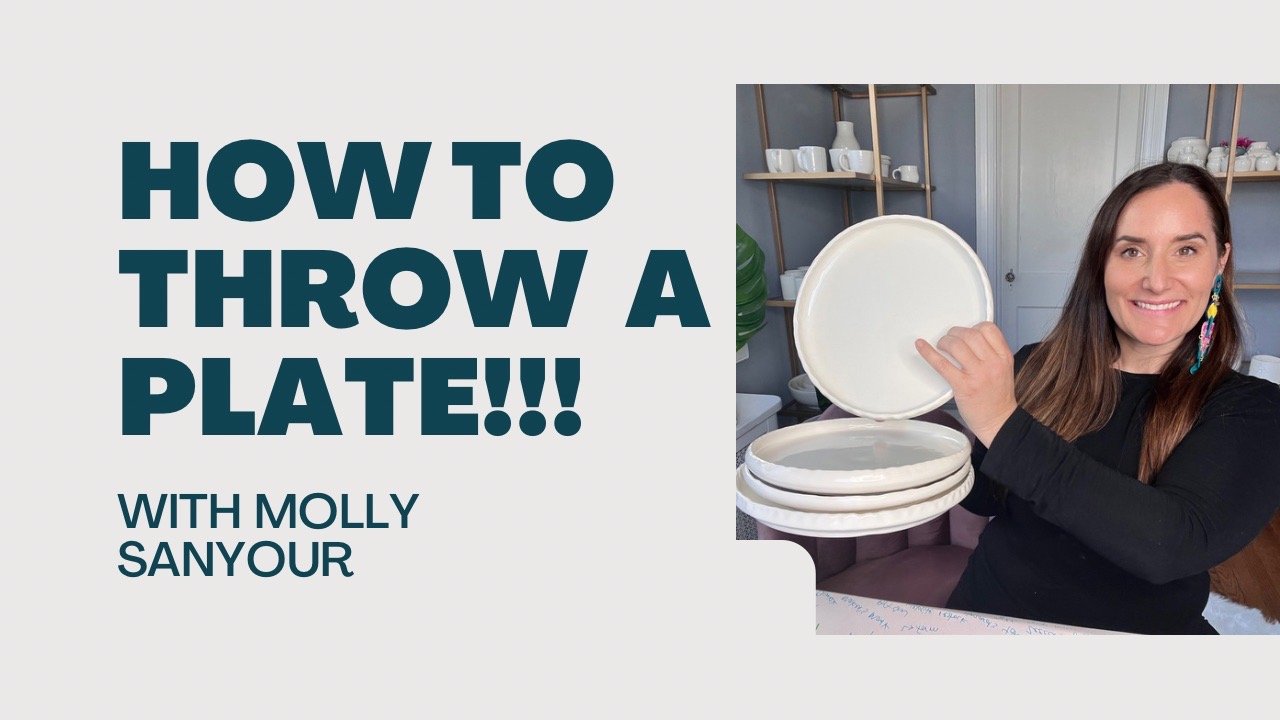
1. Introduction: Hi Skillshare, I'm
Molly Sanyour. I'm a ceramic artist and teacher coming to you from
Richmond, Virginia. I'm currently a high-school
ceramics teacher where I teach beginning
level ceramics, both wheel throwing
and handling. I also have my own
ceramics business, Molly Sanyour ceramics,
where I make my own wears, some of which had been
seen with Lizzo most recently in her Dove
campaign for body positivity, where she's naked
with just my butt mud covering her boob. She also had them in
her Vogue interview where she cheers with
the interviewer. My work can also found at the Virginia Museum
of Fine Arts and the Quirk gallery here
in Richmond, Virginia. In business, I've also
made partnerships with other pottery companies
like LL kiln, diamond core tools,
and speed ball bats, where we've just released the black Molly
Sanyour ceramics bat. I've also started a membership
called "Throwing with Molly", where clay enthusiasts from all skill levels and
all over the world, join weekly to talk
all things clay. If you're looking to
join a community, looking at further,
be sure to visit my website to learn
more and sign up. I've been learning
about ceramics since I became a ceramics
major in college. I can't stop learning, taking workshops from
all over the world from the Anderson Ranch Arts
Center in Colorado. Do you flying all
the way to Athens, Greece to learn about naked
raccoon firings with Galli, Galli, this art
through Skillshare. I'm really excited
to bring all of my knowledge and
tips and tricks to you to help you have a successful time in
your studio practice. Let's get into it. In this video, I'm gonna
be sharing all of my tips and tricks for how to throw
the perfect cylinder. I'll be asking you to join me in the cylinder challenge
that was slice them in half and see how we did. Let's get into it.
2. Part 1: Tools for Throwing a Cylinder: So let's get into it. How did there a cylinder? First off, the tools
that you will need. I love for a cylinder using a rib with a 90
degree transition. That makes it really easy
to get my vertical wall on the exterior wire cutter. This is going to be the
cylinder challenge. So we will be slicing our cylinders in half
when we're done. So you'll need a wire cutter. Sponges. I love several sponges. Sometimes they go
missing and sometimes I like to double sponge. You'll need a bucket of water. Keep everything,
go in and smooth. You'll need your
wedge balls of clay. I recommend a ball of clay
that fits in your hands. Too little or too big
can be a challenge. I also recommend a bat. These pop right on your wheel according
to your screw size. And that way when you're done, you can just take
the whole bat off. Then I do like a
towel to have handy so that as I need to dry my hands for different
times I can. Then your wheel your
wheel should be going counterclockwise if you're
a right-hand or like I am.
3. Part 2: Prepping the clay for success!: Now that we have our tools, Let's get started first, you want to round the
bottom of your clay. If you start with
a little crease in the bottom and you're already trapping a little air
bubble underneath. It makes sure that your clay is tap Smooth and it's tapped round into an egg shape
that is going to help you. If you just take
this and slam it on, it's gonna be more challenging
to get it up until tone, which will be our first step. Tapping this round at the
bottom and up into a cone. Next, you got to
look at your bat. Is there dust on it? Doesn't need to be cleaned off. Is it wet? I'm using a plastic bats and these needs to
be clean and dry, so I'll use my towel. Then I'm going to
gently but firmly place the rounded wire
edge at the bottom, wiggle it on there,
make sure it's stuck. Then tap, tap, tap open hands. I'm using the palms
of both hands tapping down and at an angle
at 39 o'clock. Let us been really slow, tap it down and tap
it up into a code.
4. Part 3: Coning up and Down!: All right. Time to cone up and down. Coning up and down is like
wedging on the wheel. It's a time that
prepares your clay. It works out inconsistencies that might be hiding
under the surface. And it helps get your clay
Center to count up and down. Now is the time that we
need plenty of water. And I love loading the sponge up of water in my right hand. So as I need more, I can
just squeeze it out. The left hand is the boss. That means that the
elbow is gonna go in your hip socket so that
as I lean forward, the whole forearm
pushes into the clay. I'm flexing my hand
really firm and I'm gonna be using from the
palm up to my thumb, leaning on that clay, the thumb is going to be part of what helps keep the cone. So plenty of water
pushing my forearm, you should have a
straight line from your forearm through the
center of the class. Plenty of now the right
hand will be the assistant. I'm going to load
up with more water. I'm going to start
down on the back. I'm gonna latch this
thumb on to that boss hands so that my right
hand is connected as well. And I'm going to allow
my fingertips to squeeze into the palm
of my left hand, starting at the
base of the clay, latching on and squeezing that thickness at the
bottom and then coming up, squeezing the thickness
there and then coming up letting the claim
rotate and then moving, let it rotate and then move, let it rotate and move, and they get all the way to the top and hold
onto that glider. Notice my that code, hold onto it and let
the glade rotate, rotate, rotate, slow release. Anytime you work with the clay, you want to let it
rotate, rotate, rotate, and then slow
release now will come down. So just like we
started off the bat, now we're gonna
start at the top and go all the way to the back. So the left hand
is still the boss. It's anchored in my hips. So as I leaned for
that whole alarm can reach to that clay. My left thumb is blacks, that palm is against
the glide in my right hand with a wet sponge, will hug around my
thumb making a fist. The fist part is going to catch the center of the collect. My left hand, hugging my boss hand speed is
my friend hands or slow wheel as fast and I'm slowly pushing down
towards the back. Now as I push down, I have lost my cone.
It is now flat. From here. If I cone up, I'm going to get a crater
every single time. In a crater traps air. You don't want that as
soon as you see that stop rehab that thumb for us
that coming back down. The trickier is as you come down and as you
approach the bat, the right-hand has to
kind of open up and apply pressure from the top of
the leg all the way down, all the way until you get to the base of the
gland all the way. Rotate, rotate, rotate. Slow release. Left hand is still the boss. The cone up and down again because it's still
is a little funky. So start at the base, get
all that blurred out, play down their left
hand is the boss. Left thumb is Flex
fund up to the cone. Right thumb is attached onto I can squeeze into the left hand. Right fingertips are squeezing into my palm all
the way to the top. Get to the top, hold it and let back leg rotate, rotate, rotate. You can already see
just after two times of coding up now and it's looking smooth and it's
looking centered. We'll cone down one more time, clean out your sponge, load it up with water. Boss hands supporting the
tip of the clients flat, leaning from the forearm, Hub your boss thumb, press down with the right fist and patiently that clay rotate, rotate, rotate as I push down, as I get to the fat
to keep that cone, the right-hand is going to
open up and I could drop down until the prayer hands and let that right
hand graph down. Or I can take my
right fingertips from the top and just press on
that clay from the top, press down, let it
rotate, press down, let it rotate all the
way until I get to the base, rotate,
rotate, rotate. And there's that cone because that let them was
supporting them. That's coning up and down. Anytime I'm thrown on the wheel, I'm gonna take that time
to count up and down. Now let's talk about centering.
5. Part 4: Centering the Clay!: It to center your clay. You want to first make
sure that it's ready. You have nice horizontal lines, it looks consistent and
it looks pretty centered. Spinney to center the
Clegg left-hand is still the boss speed is still our friend waters or friend. The right-hand is
always going to connect to the boss hand. I'm making a fist
around that thumb. And instead of
dropping into a cone, I'm going to allow my
break this depress down, down until this left hand
gets to the base of the leg. There it is. I know it's at the base because
I see that black circle. Now from here, I don't have
that perfect center form yet. So that's going to take
this left hand being flat, leaning on that clay in this
right-hand is now going to open up flat like a karate
chop across the center, the clay connecting
against my thumb. So both hands are
always connected. The left-hand to boss
leaning into the clay, right hands on top
and just hold it, squeeze want if you need
it and left the club, rotate, rotate, rotate. Slow release. That's a train from centering, you can make a bowl, a place, a cylinder cap, a base, anything that you want.
6. Part 5: Opening the Clay and Establishing the Bottom!: Alright, now that we
have centered our clay, let's talk about
opening the clay. Now. How you open the clay
will determine if it's going to be a bowl
plate or a cylinder. For a cylinder, the trick
is to keep the lip and the opening as narrow as
possible the whole way. First things first
left-hand is still the boss and looking
for that form of push from my hip socket
puts that whole form into the clay like
thumb is flats. I'm leaning on that claim. It starts to wobble. Side note, I do have a loose fat into my
clay jiggles around. Hopefully you don't. Speeds my friend water
right hand is on top. Hold it to make sure
it is centered. Now to open the clay, the right hand is
going to hug on top of that left
anchor boss thump. The right fingertip, just
my middle finger for a cylinder is going to find the centre of the clay and
I do like the wet sponge. I can squeeze water if I needed. Notice my fingertips are not
working in just the palm. And that middle finger is
going to find the center. And once I find it, I can
drill down to the base of the climb on that. Now, what I'm doing for mine is really actually
using connection from my palm around that thumb
and really supporting that clay all around,
keeping it center. That ready fingertip is
again, just drilling down. And I'm thinking how deep
visit in the bottom. You can always check by stopping or we'll first
get all the water. Then you can stop your wheel
and take a needle tool, press it all the
way to the bottom. Take a finger, reach sounds where it meets the
leg, pull it out. And that's how thick
your bottom is? A little on the thick side,
but we'll leave it there. Now I have an opening. It's time to establish
the bottom opening. And establishing the
bottom is where you really want to make sure
your containing this lip. If this lip opens up, it wants to be able
to open the bottom. What's going to happen
is this fingertip that's reached down
to the bottom. Just the fingertips
will pull back to make like a volcano or Hershey
Kiss shape underneath. I'm gonna be very mindful
not to lean on the slip, but just my fingertips
along the bottom of the plate is pulling towards my belly button to
open that bottom. And then when I get
it where I wanted, I hold it and let it rotate, rotate, rotate, slow, release. You can see I have an
open bottom in there but my lip a more contained. Now that I have a bottom, I can smooth the bottom, reach in re-up my sponge. No, not too much water. It's all wrong out
reach and while it spins and I can press
where it's taller, I can be easy where
it's thinner, but I started in the
center of the glide, let it rotate, press
over, let it rotate. And my pressure while my elbows are against my body can press on that claims from the center
slowly over to three o'clock, all the way to make sure
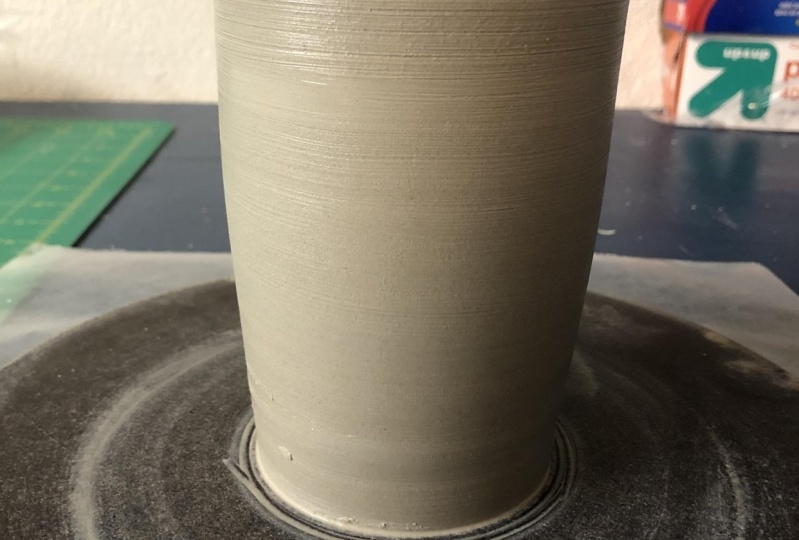
that bottom is flat. With a cylinder, we're
looking for a flat bottom. A 90-degree transitions, evenly thick walls and
horizontal throwing lines. So this right here will help
create that flat bottom. Now, if it has opened up, you're going to want to close it back in before you
do any pulling. Also, if my form is not
at a continuous angle, I want to kind of
establish that before I pulled one more thing as we open and
established the bottom, I'm also going to take
a run-out sponge, elbows against my body at three o'clock on the wheel and just lean on
it a little bit. This will push that form into that more continuous
volcano form, allowing me to have a nice
successful first pole leaning on that clay
to make sure it goes from wide to narrow. My bottom is opened up a
little wider than my lip.
7. Part 6: Pulling the walls!: Alright, now that we
have combed up and down, we have centered our play. So they have opened and
established the bottom. We are ready to pull. All right, when
we pull it is now the right hands turn
to be the boss. That means that my left elbow is in my hip socket not allowed to wobble around and that therefore my left
hand is not anchored. So whenever possible they
connect and work together. I usually like to connect
the meat of my thumbs so that they can hold
onto each other. Now before I pull it as water at three o'clock while
it's been encoded. So it'll slip through
my fingertips. Now, when you pull, it's the pressure between
the outside hand, which is the boss squeezing
against inside hand. Do you want to be
careful that the inside hand doesn't open up and make constant pressure
at different points. You only want to apply pressure against where the
outside hand is. Right hands, the boss, I do like a wet sponge. I'm going to anchor against
my body right fingertip. I use my index finger over the wet sponge just going to press at the base of the club. And already you can see
that claim moving up. The last hand goes in and
connects into this first Bull. I didn't get everything. I'd get the inside pressure
of the outside pressure. This thumb can latch around and everything's applying
pressure from the outside, the inside, even
a little holding onto this top lip
because I can reach it. Right hands. It lost inside hand is there and
down here where it's fat, we're gonna squeeze that
leg and let it rotate. And then we can come
up here and squeeze that clay and let it rotate. And then I can come
up here and squeeze that clay and let it rotate, come up here, squeezed back
clay and let it rotate. And notice this
little index finger, my left and I swear
it's coming on top. And that's allowed
me to compress the lip all at one time. So as we get to the top, I just hold it and let it
rotate, rotate, rotate and then slow release. You see I'm containing this volcano shape
as long as possible, and that is the trick to
getting a tall cylinder. Oftentimes our wheel
goes too fast and those we'll consider it out of
control and into a bowl. And sometimes the
left-hand wants to be the boss and it opens
outward for eating a bowl. Now here are just like
counting up and down. You do it as many
times as it takes. When you pull it up
and down, you do it as many times to make it smooth. But when we pull, we're doing it as many
times as it takes to get the thickness evenly thick
from the bottom to the top. Right now you can see
it's much thicker down there and it's
thinner down here. What I'm gonna do now is talk
my left hand all the way on so I can make that pressure
against my outside hands. Tuck it in, get right in
that corner, right hands. The boss says I'm an anchor up, drop that fingertips
all the way on the back and you'll see
what's happening is I'm actually using
three fingers and pressure to press
that clay into itself as I press up the clay at the face as being squeezed
by my right Fosse hand, the inside and the
squeezing back down there because
it's really fit. Then I taught here in squeeze
as soon as I can I connect that thumb to give me more
support, more stability. And then as I come
up here, I let it rotate and then I got going. I let it rotate here. It's not so thick. So
I relaxed my pressure. I'm gonna go ahead and press
that lip all at one time. Let it rotate, rotate, rotate, slow release. All right. Let's do it again
as water reach all in and get all this flared out play down there
at this Fosse hand. Get all that clay
inside him is waiting, helping to create that 90
degree pushing in that corner, pushing back against
the spat in his boat. They're squeezing hard at
the base where it's thick, go a little faster, which will now help
me contain that clay. And as I rise up with
that clay, it bends out. So I kinda relaxed my pressure, come all the way
to the top and put a finger on the top to depress
that lived all at once. Let it rotate, rotate, rotate, reach in there
and get all the water. Spin, check that it's so flat. And we can maybe do one more. I'm going to add a little water. Now our goal here for a
cylinder is a flat bottom, a 90-degree transition and evenly thick walls from
the top to the bottom. I'm going to reach in there,
make sure I'm not gonna lean on the lipid, open it up, starting down here, squeeze that back leg to ensure it's gonna be evenly thick
even down there. Come up here, hold it, let it rotate, rotate, rotate, come over here, hold
it, let it rotate, rotate, rotate, hold it here. Let it rotate,
rotate down fairly squeezing because not very
thick at all right here, it's nice and even I'm
just holding the clay. In fact, my inside
hand is doing this. I'm actually pressing against the straight edge of
my index finger there. Just hold that clay and let
it rotate, rotate, rotate. All right. I think the thickness
is pretty good. What we can do now
is put a rib on it.
8. Part 7: Using a Rib to Shape the Walls!: So what we can do now
is put a rib on it, that 90 degree rib, I can start by just putting
it on the bat and it will skim off some of that
extra clients a base. And you can see where
we did a good job containing that clay doesn't
even reach the rib tool. This inside hand is gently going to press
against the rib. You want to be sure that your
fingers don't open up and press where the rib is not
so open your cylinder. So starting at the bottom, the right-hand is the boss. The 90 degree goes on
the bat sliding against the cylinder inside pen goes all the way starting at
the base of the clay. I'm going to apply a little
pressure from the inside until it translates
to the air outside. Slowly come up, let
it rotate here, let them again slow and come
up with that reus tool, feeling the thickness of the
clay, making sure it feels, even making sure that this
feels straight and vertical. And again, connecting
this insight thumb as soon as I can to that red to give me more stability and let it rotate, rotate, rotate. Alright, so we have counted up and down, we have centered, we have opened and
establish the bottom, and then we have pulled
and shaped our cylinder. So before we cut this in half, I'm going to ring out my sponge, reach all the way to the bottom, make sure it's dry. Make sure I've got my
90 degree happening. Hold it and now we're ready.
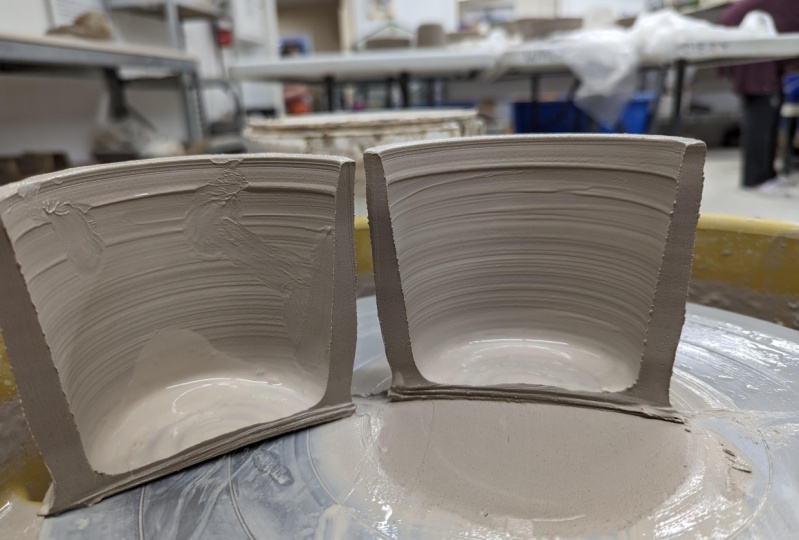
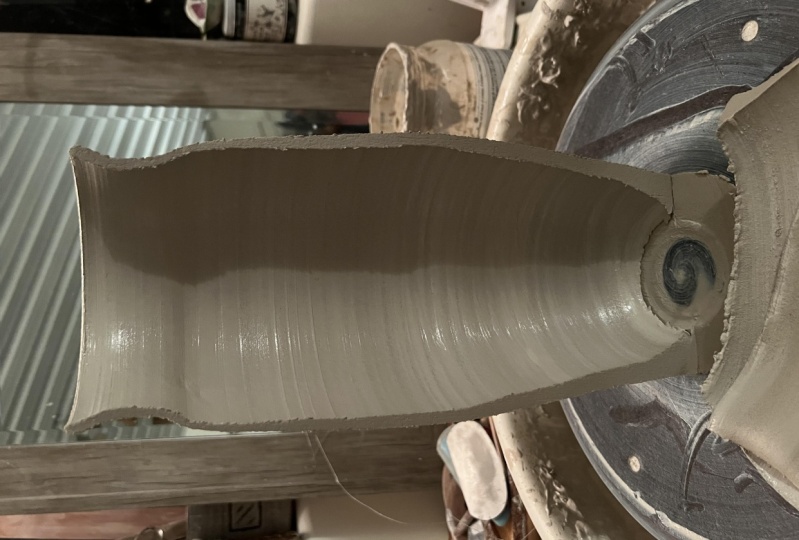
9. Part 8: Cut it in half!! For the Cylinder Challenge!: So with this project, I encourage you to take part in throwing with Molly
cylinder challenge. You can use hashtag, PWM cylinder challenge and posted on all of
your social medias. What you're going to want to
do is throw your cylinder. Then when you're done,
you're gonna take a wire cutter nice and
tight like dental floss. Drag your thumbs underneath. I'm just gonna go halfway
and then you want to pull up through the cylinder. This is going to allow you
to dissect your cylinder and see how you did if you're
just learning pottery, I recommend partaking in this cylinder challenge to
really advance your skills. When you slice it open, you're looking for a 90 degree
transition of flat bottom, evenly thick and
horizontal throwing lines. If you see anything different, you can kind of pinpoint
where you need to work on. We'll open this up and
we'll take a look. We've got our flat bottom, that 90 degree transition. It's a little thick, a little thin, and
then a little thick. So I could really kind of maybe squeeze a little bit
more right there, ease up there and relax there. I do see these nice
horizontal throwing lines. So that is what
we're going for with a throne with Molly
cylinder challenge. I hope this video helps and I hope that you'll tune in for
my other videos to come. And I can't wait to see your
cylinder challenges posted. For the next video.
 Molly Sanyour, Ceramic Artist & Teacher: Richmond, VA