Transcripts
1. How Take Take More Creative Photos With Any Camera Intro: Hey, I'm Rob Goldman and I
would like to welcome you to how to take more creative
photos with any camera. Part one, I designed
this course in response to countless
students asking me, how do I make my
photographs more creative? Or why are your photographs so much more creative than mine? So I decided to
answer that question. And I took the broader concept of creative photography and I broken down into 19
simple concepts, 19 lessons, each accompanied
by an assignment. And we walk through
the process of creativity one step
at a time together. Whether you're using
a cell phone or a DSLR or mirrorless
camera or shooting film. We're not going to be talking
about technique at all. We're going to put
technique to the side. No mention of f-stops and shutter speeds and
white balance. We're going to focus completely
on the creative process. Taking it one step at a time, layer by layer by layer, adding more interests,
more intrigued, more meaning to
your photography. So this is a chance
for you to really have some fun to let go of ideas of what you think your photograph should be
or how you should shoot. And really just
enjoy the process. And I promise you by the
end of this program, you will absolutely be
making more interesting, more personal, more
creative photographs.
2. Lesson 1 - Big Time: Welcome to lesson
number one, big time. The lesson is titled big time because we're
playing with scale. We're playing with scale, we're playing with proportions, we're playing with perspective. Our IC, with perspective and, um, but our brain really
correct for that perspective. So we're not walking around
consciously thinking, Oh my gosh, that object
in the foreground is so big and then object and the
background is so small. And yet you'll notice
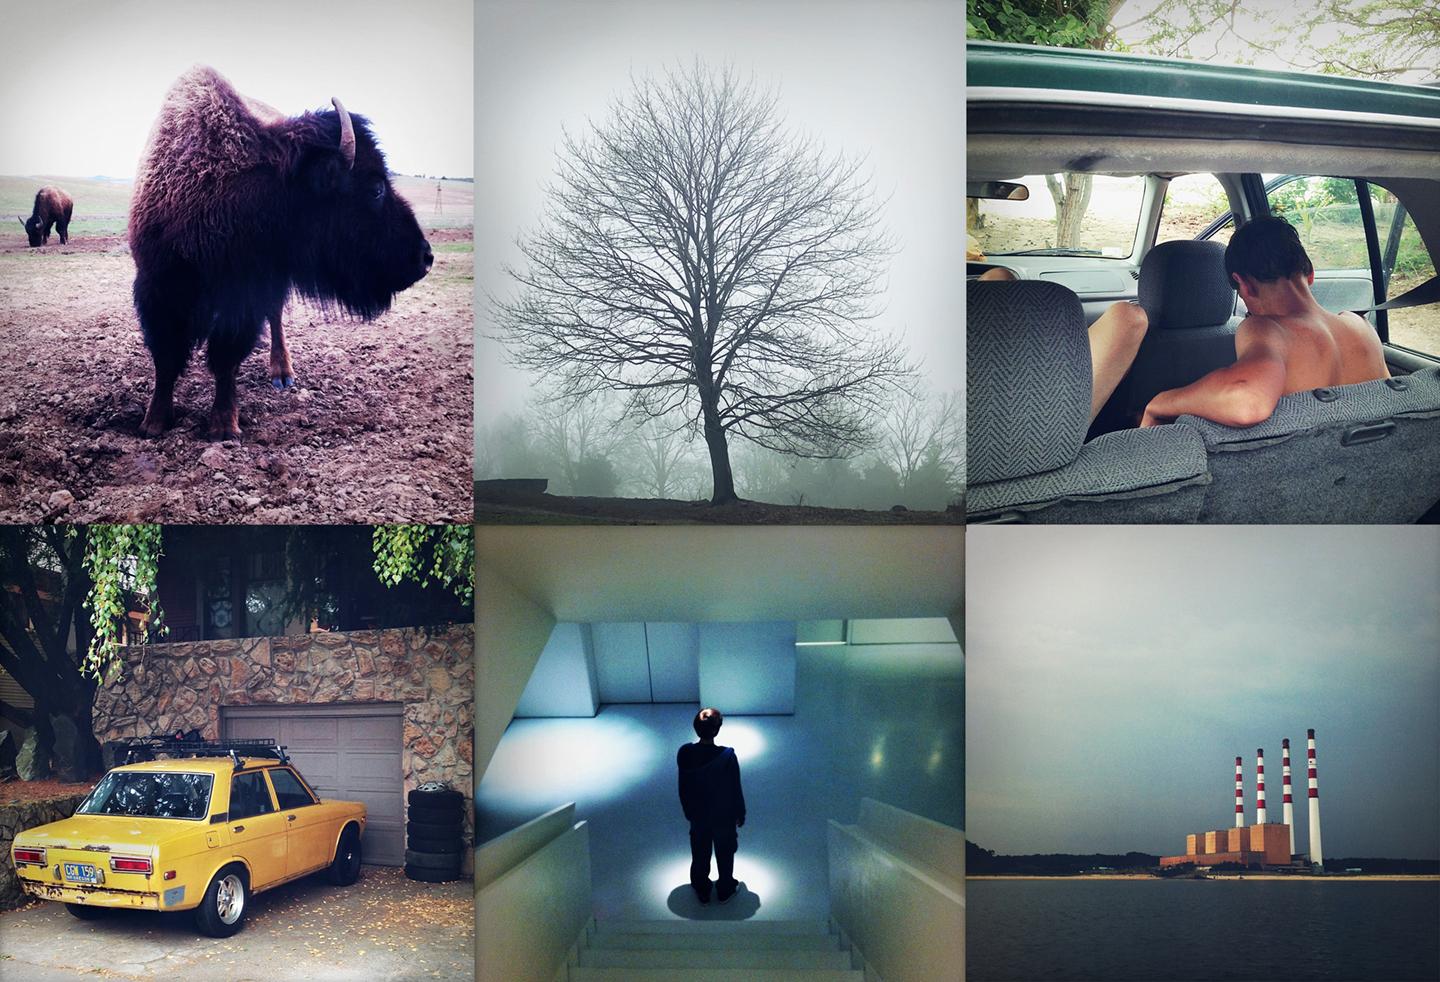
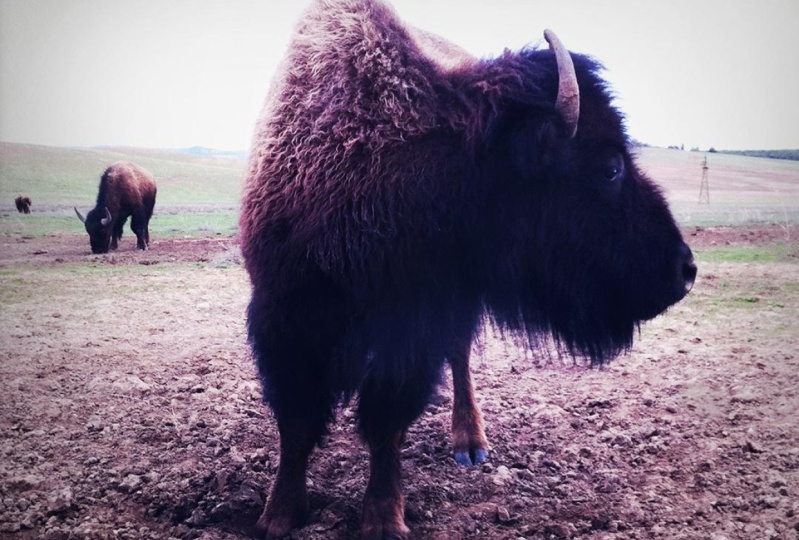
that if I bring my hand closer to the lens, it does get bigger, and as it comes back, it does get smaller. So although we have two buffalo that are the same size in life, the camera is showing the
difference in that scale. Simply because one Buffalo is significantly closer to
the camera than the other. It's this interplay of scale, this interplay of sizes that makes the
photograph interesting. It doesn't necessarily
play tricks on your eye as the viewer, but it, It's just an exaggeration
of reality in it moves you right away from making photographs that are
records of objects, which is incredibly boring, to photographs where you're
creating something that is taking advantage of the optics that are
built into your lens. So start thinking about this idea of
foreground-background, foreground background, of
exaggerating that scale. And as a result, you'll notice that
your eye travels from the buffalo in the foreground to the buffalo in
the background. And that's sort of a tried and true part
of my teaching is to create an opportunity for your viewer to enter
the photograph. And this is a sure-fire
way to do that. So think about scale. Think about perspective. Think about proportion. Think about this
idea of playing with those things to make your
photographs more interesting. And that does it
for less than one.
3. Assignment 1 - Big Time : Alright, now your assignment
for lesson one big time is, as we spoke about to create
a photograph that utilizes this idea of a foreground
background relationship to toy with the idea of scale. So what I invite you to do
is to set something up. Could be a still-life, could be a portrait, but set something up where
you have actual control of the placement of your
objects in the frame. If you're going to photograph
to people as an example, bring somebody we'll close to the camera and somebody else further away from the camera. And you'll quickly discover that you're playing with this, with this interplay of
scale and proportion and perspective and making more interesting
photographs like that. So good luck. Try once, tried twice, tried ten times. Play with with stationary
objects, play with people. You can, you can even do
it with found objects. You may find that as you're
walking around, you see Ola, there's one tree that I
can put in the foreground, and there's another tree that I'm going to put
in the background. And just initially play
around with the technique. And once you get the idea down, then apply some creativity. And let's see what
you come up with. Post it on the pH, and let's see what you can do.
4. Lesson 2 - A Splash of Colour: Welcome to lesson number two, a splash of color. You'll notice when you look
at a photograph of the car, that's your eye immediately
goes to the car. It is a bright colorful object in the middle of a
relatively neutral field. Our eyes and our
brains are programmed to see the most colorful
object in a field, in a photograph in life first, that's where I goes. So be aware of that. And when you're creating
your photographs, whether you're coming
upon an image, when you're coming upon I'm a situation the way
that I have with this car, or if you're just decided
that you want to create a photograph for the sake of creating an interesting
photograph. In either case,
place that object of color in a way that
is going to be significant and that is going to complement
your photograph knowing that your viewers eye
is going to go right there, right to that colorful object. So think about that as you, as you go on in your
picture taking, think about the
idea that drawing your viewer into the
photograph quickly and keeping them there is
one of the goals of making your photographs more interesting and certainly
more memorable. If you, if, if the photograph
is sort of like color here, color there, and there's not
much of a sense of a particular object or a
particular center of interest. Then you wind up in sort of a pinball machine of a viewing. And your, your, your viewer just doesn't
know what to look at first. When you do something like this, where you isolate your
subject based on its color, based on this idea of a splash of color
in a neutral field. You'll find that right away. You're making more
interesting photographs.
5. Assignment 2 - A Splash of Colour: Your assignment for week two, I splash of color is to create a photograph whose success
is based on the idea that your subject is isolated
and is drawing attention based on the idea that it is the most colorful
object in the frame. So I invite you to
either go out in search of an image
that you notice. There's, there's
the red stop sign. It's drawing attention. Or there's the yellow car or and or setting up a photograph where where you may say,
Hey, you know what? I'm going to photograph
my daughter and I'm going to put her in a bright
blue dress against, against the White House or
something along those lines. It could be a still-life,
it could be a portrait. It could be something that
you find out in nature. But either way, whichever
way you go about it, Just the idea is single object, bright color, neutral field. You'll find the instantly, once again, you're making
better photographs.
6. Lesson 3 - All In The Family: Welcome to lesson three, All in the Family. This lesson is really all about creating
photographs that goes significantly beyond
the classic snapshot of really invented by
Kodak in the 1950s. The Kodak moment,
as it was called. Kodak actually really invented the idea of a snapshot
in post-war America, where for the first time subjects were expected to
look at the camera and smile. It was a formula. It was a prescribed formula really that for
hundreds of years, 100 years of photography
that came before it, this idea of never existed. And for better and for worse, the idea of the Kodak Moment got cemented into our culture. And the unfortunate
thing is that it's a dead end for
making more emotional, more interesting, more evocative
photographs of people, especially our friends and
family members whom we love. So let's think more
about shifting over from this idealized
version of a picture of somebody that we're
photographing and more into a sort of a capturing
of an emotional moment. Which means the first off, we have to actually show up. We have to be there, we have to feel that emotion, we have to notice
our experience. Once were aware of
the experience. Then we can go on to step two, which is really to
compose an image that that really in
trances our viewer. And from a design perspective brings them into
the photograph and from an emotional perspective keeps them engaged
in that photograph. So if we want to
think of this in those two steps, it's step one. You as a photographer
become present. Move away from an expectation of what you think that
photograph should be. Move away from the idea of man handling your
subject of telling them, stand here, do this, do this, do that, and instead,
pay attention. One of them best ways that
you can move into step two, which is designed is to
start observing nature, start noticing the miracle of the way that everything
in nature is composed. I find it is the best teacher for understanding the nature of what balance and design really all about
from the tiniest, tiniest subatomic particle
to the grandness landscape. Two images that are taken
from space of the Earth. Things in nature are just
beautifully balanced. They're not necessarily
symmetrical. Oh, at times they can be, but nonetheless balanced indeed. So this is a kind of a nurturing of these two different skills. Skill number one,
presence, awareness, feeling the emotion, not insisting that things
be a certain way, the way that you
want them to be. But really looking
at how can I really, really be quiet
and pay attention? And notice what's arising. Step to design. You've really become president. You aware of what's going on. You're aware of the
feelings and the image. But now you have to add part two of photo graphy, the
graphic element. And again, fine tune
your seeing skills by taking the time and just really observing the
pattern in a leaf. Observe a ripple of water, observe a mountain range,
observed snow falling. Whatever it takes for
you to become more aware of the organic nature of design. You'll be able then
to be influenced and inspired by what is going
on in the natural world. So put those two
things together and I guarantee your pictures of
people will be off the charts.
7. Assignment 3 - All In The Family: Your assignment for week three, All in the Family
is to go back to these two aspects of what I'm suggesting it takes to bring your photos of family and
friends up to the next level. The first one is to show up, end to end, to simply observe and to feel
what's going on. So you might want to ask
some people in your life, a group of friends
or family members, or one-person, if it
would be okay for you to just kinda be with them in the capacity of a photographer. You don't necessarily have to do anything other
than pay attention. You can also do
this when you're in a conversation with somebody. Instead of just hearing
what they have to say, really, really watch
them, watch them closely. Notice hand gestures. Notice, notice body positions. Notice the light that's
falling on them. Notice how they fit
into the background. Just in of course, notice how you feel. Most of the time
if we're going to be creating photographs
of our loved ones, we are looking to portray
our love for that person. And that's a really
important point when you're thinking about this. It's not only about a
record of that subject, it's a record really of your feelings for that
subject in the moment. So that's the observing part, part to the graphic part, the design part, the
composition part. Go out in nature. Go and pick up a leaf
and sit and study and be blown away by the miracle of what the veins of
that leaf look like. Or go and sit and
contemplate a forest. Notice the incredible repetitive
nature of those trees in the hundreds and
thousands of trees and millions and billions
and trillions of leaves. And how they just miraculously all fit together in
one composition. And as you begin to nurture
both of those skills, you will notice that
your pictures of people are going to
improve greatly.
8. Lesson 4 - Back to Basics: Hey, welcome to lesson
four, back to basics. We're using this photograph of the Ferris wheel to demonstrate the concept of taking a
big idea, a big scene, something that is
potentially complicated, and basically eliminating
everything from that scene other than the most simple
expression of an idea. That idea is expressed through
lines, shapes, and spaces. So when we look at
the Ferris wheel, of course we know
it's a Ferris wheel, but if we just took a
picture of a Ferris wheel, it would be incredibly boring. So we're looking to do
is to reduce to Destiel. Photography is known as a reductive process with the idea that there's this
huge world out there. And we are taking not
only a little sliver of the world by deciding what it is that we're going
to include in the frame. But then additionally, once we've got that
object in the frame, we want to reduce
it even further to eliminate any
distractions to move away from a photograph that
that describes an object by including too
much information and really breaking it down
into its most basic elements, lines, shapes, and spaces. Again, reducing it, distilling, it's simplifying
it back to basics. So as you start looking at
the world as a photographer, start really paying
attention equally to what, what it is that's in
your scene as far as the the objects and the meaning of what
you're looking at. But additionally or,
or perhaps even more so just looking at what
happens when you boil it down, boil it down, boil it down. It's absolute basics of
lines, shapes, and spaces. And in thinking in these terms, you'll notice that your
photographs just start to become more interesting
and more engaging. Don't mistake the idea of basic being easy or
simple being easy. This is, this is not
the easy way to go. The easy way to go and see an object fall in
love with the object. Take a picture of
the object and have an incredibly boring
record of the object. This is a much more advanced way of thinking and
advanced way of seeing. But it's just a practice
like anything else. And once you're aware of
the difference between photographs of objects that are just records
of those objects, and photographs that are
interpretations of a scene, of a situation, of a concept. Taking that idea, boil it down
into its most basic form. Once again, sorry to be so repetitive lines,
shapes, and spaces. That's the way to think. Go for it. Good luck.
9. Assignment 4 - Back to Basics: Your assignment for lesson
four is to find a scene. Find a situation where
you're coming upon something that has particularly strong personal meaning for you. A place that you love to visit, something that's reminiscent of your childhood, your home. Look at that scene first through the eyes of your own
familiar way of looking. And then give yourself an
opportunity to just stay there. And then imagine what that
would look like if it was boiled down into its
most basic expression, into its simplest form, basically into lines,
shapes, and spaces. So in the beginning, this
can be an unfamiliar, tricky process that you're looking to shift
the way that you see from that of a pedestrian
to that of a photographer. But this is one of the
sure-fire ways to do that. To start thinking in
terms of your photograph, in terms of design. And design really boils down to those three ideas of
lines, shapes, and spaces. Of course, color is a component. But for this
particular exercise, I would ask you to
leave color out of the equation and really
just focus on form. Focus on your ability
to, to really, really simplify what
you're looking at down into its most
fundamental expression. And you will find that sharing
these photographs with people leaves a lot
for them to interpret. It's one, it's one
of the ways to engage your viewer is not
to show them everything, is to show them more
of something that is symbolic of the scene, symbolic of the object. And one of the best
ways to do that is eliminate the clutter
and get back to basics. I'm sure you can do a great job and I look forward to seeing your photos on the
Facebook page.
10. Lesson 5 - Alone At Last: As photographers, we
want to start to think of our work sometimes at
least in terms of themes, in terms of concepts beyond
photographs of objects, we want to start thinking
more in terms of meaning and even coming into the photograph from an intention perspective of making the photograph in the first place because we're looking to
convey that theme. So in this particular case, what we're specifically looking at is the nature of solitude, of kinda combine
the solo part of solitude with the quiet 2D part and put those two
things together, then we've got this
concept of what does it feel like to have this
tranquil experience alone? For me? My great sanctuary is the woods. And if I'm looking to
find peace for myself, that is the first
place instinctive, instinctively that
I'm going to wind up is in the middle
of the woods. If if it's in this particular
case with this photograph, that it's a foggy
morning, all the better. So what I want you to start to think about and to notice is, where do you go to find peace
when you're by yourself? What does it feel
like in that space? And how does the combination
of being in that place combined with the feeling
of being in that place. How do you take
those two things and combine them together
in a photograph? It's the nature of solitude, of conveying solitude
is that there is a spaciousness in
your experience and in your photographs. So simplicity is
king here, really. The idea that there's
all this space, but that there's,
that you're not lost, that you're not threatened. That space actually is the
space of peace and quiet, and that's really what
you're looking for. So start really noticing
as you're, as you're, as you're seeing
the world for four, in its, in its truest sense. And as you're seeing television shows, commercials,
movies, paintings, other photographs,
just notice when and how is it a sense of solitude
created in this work? And start to build that into your work and start
thinking again in terms of being inspired and coming out of the gate
to make a photograph. Not only because you're seeing something that you
find really interesting. And not only because
you have a concept, but more because you're looking to convey a
particular feeling, a particular experience,
a particular emotion. And in this case, that is
the emotion of solitude.
11. Assignment 5 - Alone At Last: Your assignment for
this session is to create a photograph
that is based on the intention of creating something that
has a sense of solitude. Which by its very nature
means that you must put yourself in a place where you're going to
experience solitude. It's like double your money for this particular assignment. So think about
where you would go. Where, where do you go
or where might you go? Is it a, is it a place
that is familiar? Is it a place that you've
been dying to visit for the last week, month, year, where you just know
that once you're there, that you have this
exquisite sense of peace. Just simply by
thinking about that, that's going to inspire
the way that you think about that
space and that place. Once you're in that place, allow yourself to
actually feel at peace. Allow yourself to feel the tranquility and the
spaciousness of that space. Then as a photographer, how are you going to
convey that sensibility? How are you going to convey that feeling of spaciousness and quiet tattooed by yourself
in that sacred space. It's not something to really ponder as much as it is
something to experience. So that's really
what this assignment about is certainly ponder where you might go or where you
will go and then go there. Absolutely positively do that by yourself and feel
the spaciousness. If there's, sometimes
for people there's anxiety that comes
up in a space like that where now they're now I don't know what to do or
now I find myself alone. You know what B
with that as well. But then move through it
and then use your camera as your tool to really
look around and say, where do I point my camera at? What what else do I
include in the photograph? What else do I exclude from the photograph so that
when all is said and done, I've taken this space and
I've taken this emotion, and I've taken this experience, and I have boiled it down
into its simplest essence. What I'm left with at the
end is sort of a feeling. That's what you're going to do. Do it well.
12. Lesson 6 - And Then There Was Light: Learning to see light as a
photographer is a discipline. And of course, without light, we wouldn't have a photograph
and with too much light, our photograph is
too bright and with them without enough light
or photograph is too dark. But beyond thinking in terms of lightness and darkness,
just have exposure. We really want to start to think about what is the impact, what is the effect? And specifically what is
the emotional effect and the emotional impact of light on your subject and
within your photograph. So light, it's
light in itself is a subject that the
quality of light, whether the light is contrasty, whether the light is cool, warm, is it, does it have
a particular color? Does it have a particular
sensation when you look at it? We're all familiar with how
light impacts our emotions. Just in a life situation. The one extreme of the horror of a flickering green
fluorescent overhead light, to the beauty of a warm
glowing light from a fire to the soft bathing light of a window coming
through a curtain. We understand this, but we need to do is to
become more conscious of it and more conscientious
of how we can introduce that emotional quality of light into our picture. Taking the best way to
do that, of course, is to become more conscious and conscientious of the way
that we see light every day. The real bonus for us
as photographers is that we get to observe
light all day long. And we can see any
object the most mundane, even perhaps an
off-putting or an ugly, ugly object, becomes absolutely beautiful simply because of the way the light
is striking it. Sometimes just light itself. Just light can be
just so mesmerizing. So it's a question of
training your eye. It's a question of training your senses as a photographer to not take life for granted. Especially when you're
looking through your camera or you're about to take a photograph
and you say, wow, this is such a
beautiful object. This is such a
beautiful subject. Look at my son, right? Look at my son in
this photograph. That is who we're looking at in this photograph, that is my son. So in addition to my absolute
love for him, is the light. The light as an
additional subject, as an additional layer of what makes this
photograph engaging. So start really paying attention in your day-to-day life when
you wake up in the morning and you just see that light
coming through the window or you're driving along
and you see this speckle, these dabbled lights coming, coming through the trees, give yourself the gift of
really staying with it. I can't tell you how
many times I have said to non photographer, like, Wow, you see that light. And they look at me like, like I've lost my mind, they just don't see it. So again, engage with this
idea, train yourself, become more aware, more
present of the magic of light. And then when you start to photograph with
this idea in mind, or because you've got
this idea in mind, you will notice that
your photographs just gets so much more interesting. They start to gain
an emotional layer that they hadn't had before. And your photographs will
just automatically improve. It's just the way it goes and you're aspects of your
life will improve. Also, you'll find that
there's a greater joy than, than, than maybe what you imagined possible just
from seeing light.
13. Assignment 6 - And Then There Was Light: Your assignment for this
particular lesson is, first of all to practice seeing. With more awareness,
seeing light. Again, you'll notice there's
a theme and my teaching that is asking you to
become more present, to slow down, and to
really admire and revere what's in front of you
more than you had before. That's one of the, one of the great gifts of
photography is this idea that you're training yourself to see this little sliver of the world. And just the right sliver
at just the right time with just the right design
in just the right light. So we can, we can think of light into terms is the light
that we come upon. And then there's
the light that we manufacturer or the light
that we, that we change. So for right now for this
particular assignment, we're going to focus more on available light,
on existing light. So I want you to
just take some time, put aside a few minutes, a few hours, and
just let yourself bathed in this awareness of
the magnificence of light. And then once you're
seeing that light, then pick up your camera, then start to photograph
and incorporate this other higher level of sensitivity into
your picture taking. It's, it's a relatively
simple idea, but it's a lifetime of mastery to really understand
and appreciate the nature of all aspects of light from a physics
perspective. Certainly from an
emotional perspective, from a shaping perspective. How does the quality
of light change the nature of the
form of an object? So right now we're not looking
to get too deep into this. We're more looking to begin to start to notice,
become aware, respect what you're looking
at in terms of light, and then add that into
your photography. It's gonna be great. I'll see that work on
the Facebook group.
14. Lesson 7 - Beyond The Subject: The title of this particular
lesson is very specific. The idea of going beyond the subject means that
the subject itself, as far as what it is, no longer becomes an importance to the success of
the photograph. So we're saying that we're
going beyond the subject. We're kinda leaving
the identification of the object behind. And we're moving into another
realm where that object simply becomes the manner with which to create
a photograph. We're gonna go back
to a teaching from a few weeks back about
the concept of lines, shapes and spaces, perhaps including color
this time around. And we want to start
to think in terms of coming upon objects,
coming upon scenes, noticing things as
a photographer, that regardless
of what they are, we're going to move past that. We're going to move beyond that. And we're going to be
looking only in terms of making an
interesting photograph. That boils down to almost
the idea of a drawing, of a sketch, of something, of a carving, something
that's really, really simple. If, if we were going to draw something that
was of this nature, we could create
something that was just lines, shapes, and spaces. We could create something that had an abstract quality to it. We could create something
that was just blocks, or it was just circles, or it was just lines, are a combination
of those things. The challenge with photography
is we're given objects. There are objects that
are placed before us, and those objects have
inherent meaning. They have an
inherent definition. A smokestack, in this particular
case, is a smokestack. No matter how you slice it. At the end of the day, it's still a smokestack. It still gives off pollutants. It still doesn't have much of a romantic sensibility to it. But what we're looking
to do here is to say, okay, interesting, but
let's move beyond that. Let's just ignore
what the object is, what it stands for, what its definition is, and what our, what our
relationship is to it. And let's simply see it as an object that we can use
to design a photograph the same way that we
would take shapes that color form shapes or we would create shapes and we would
design them on the page. We're gonna do the
same thing with this. When you're practicing this idea when you're out there
in the world and you're fine tuning
your skills as a photographer and you're engaging in the
practice of seeing, started thinking in those terms, start noticing just the design
that these objects create. Notice the juxtaposition of
shapes with one another. Notice the relationships of
objects and backgrounds, just simply in terms
of how things fit together graphically from
a design perspective, and completely ignoring
what the object stands for and what your
relationship is to it. Sometimes the more
obscure, the more unusual, the more surprising your
decision to include a particular object in your
photograph because of its, perhaps it's
negative connotation or it's negative definition, or the fact that maybe
it's off-putting, or maybe it's just
something that is typically not seen as beautiful and not
celebrated for its beauty. Oftentimes, going in search
of those objects and saying, Okay, I know that that's a
crumbled piece of paper. I know that's a trash can. I know that that is a dead bird. Okay, Now let's move beyond it. Let's look at its shape. Let's look at its design. Let's look at its color. Let's look at its form. Let's look at the light
that's hitting it. Let's look at the background. Thinking in all of these
terms and really divorcing yourself of your attachment to the object for what
it actually is, is going to move your photography into a much
more interesting place. Maybe adding some
contradiction in there, maybe adding some contrast
between the meaning of the subject and the display
or the interpretation, the expression of
that subject is just going to make
your photography so much more interesting.
15. Assignment 7 - Beyond The Subject: Your assignment for
this lesson beyond the subject is to create
a photograph where you're actually
intentionally seeking an object that you don't
typically identify as beautiful, something that has, has a quality to it that you
would never think of as, oh, I can't wait to
make a photograph of that because It's
so interesting. It could be something
really boring. It could be something ugly, it could be something
disgusting. It could be something
that you just don't have a particular interest in. What you're asking yourself
to do is to notice that is there a built-in
prejudice against that object? Is there so much judgment
that you find it really difficult to move
beyond its definition. Just kinda become aware of that, and then move beyond it. Look at the object purely
for the sake of its design. Look at how it fits
within the background. Look at its shape, look at its form, look at its beauty
in a new light. If you possibly can stay with the object photograph at a few different ways
and see what it's like to just let yourself move deeper into your awareness
to move deeper into an expression that is an artistic expression
that comes more from your heart and soul than
it does from your brain. And you'll see that you'll be making more interesting
photographs. Immediately. Get to work. Post those photos on
the Facebook group, and let's see what
you can do with it.
16. Lesson 8 - Beauty Is Skin Deep: In the last assignment,
beyond the subject, I asked you to pretty
much divorce yourself of the definition of an object and have a subject
and to move past it, to move beyond it and into the realm of
seeing that object in terms of its design
potential, right? So in this particular lesson, beauty is skin deep. I'm asking you to take
that one step further. I'm asking you to
actually notice that an object that is very
specifically off-putting, that is seen as somehow
gruesome or as this ugly, something that we would
rather just discard is actually something that has the potential to create beauty. It really just a
question of shifting and broadening your
perspective so that you are having the opportunity to stay with something
that is difficult. It's not all that
different than staying in in an in an interaction
with somebody that's painful, that's difficult, and just being with it and working
your way through it. And then inevitably you find you come out the other side and you see that there was
beauty in that also. So pardon, pardon my psychology. Little offshoot there. But I think there's
definitely something to tie together with
this idea that we, our tendency is to
move away from things that are difficult to see,
difficult to experience. But we find that if we can
stay with it, oftentimes, our experience of that object or of that situation
actually transforms. And we actually do
see something new. We come upon a level and
a layer of beauty that we otherwise would not have the opportunity
to experience. Because our tendency is, let's get rid of things
that are difficult. Let's get rid of
things that are ugly. Let's get rid of things that we just don't feel
comfortable around. So in this particular
case, we want to, we want to push the
limits of this idea of not only we going beyond
any particular subject, but we're actually
looking to, in this case, kind of go through to transform our experience of being
with an object that we, that we identify
as being somehow ugly or being distasteful. And we wanna be able
to see through that, through that prejudice,
through that judgment, and move into the realm
of photography as, as an act of creating beauty.
17. Assignment 8 - Beauty Is Skin Deep: The assignment for this particular session
is fairly self-evident, but not necessarily easy. I'm asking you to go out
in search of an object, of a subject that you find
particularly off-putting, something that you
identify as ugly, something that you'd rather not look at all the very best. You'd rather take it and
throw it in the garbage. And I'm asking it, it's just sort of be
with that object in terms of just an
object of beauty, but in a way that you
haven't considered before in terms of its texture, in terms of its color, in terms of its being. Maybe, maybe you're looking to place the object
on a background that really highlights the object
in a way on to maybe on a solid black background or
a solid white background. Something that says to the
viewer, you know what, It's okay to stay with this. It's okay for you to
have an experience that makes you feel maybe a little bit awkward
and confused. And nonetheless, you can't deny the fact that there's
something beautiful about it. So it kinda opens your eyes, it opens your imagination. It passes you through
that corridor of judgment where perhaps you're, you're leaving things out
of your picture taking. Because, because
of that tendency to move more toward things, experiences that are lovely. Lovely experiences make
for lovely photographs. They don't necessarily
make for art. They can. But for the sake of having an experience that's part
of this learning process. This is going to
push you a little bit out of your comfort zone and into the creation
of something that has a little
bit more depth, some more layering,
some more complexity, and see what happens. I wish you luck with this one. It's actually, it
can be a lot of fun, but it can be awkward
at the same time. So make those photos, post them on the Facebook
page and we'll see you there.
18. Lesson 9 - Boil It Down: Forgive me harping on this
idea for yet another week, but it is just so
crucial that we start thinking in
terms of photographs. In their simplest terms, it's really the
difference between, between a novel and a poem. Photographs are poems,
movies are novels. At least that's the way
I like to think of them. So what we're looking
to do is in one frame, in one simply composed frame is to convey a very large idea. So in this particular photograph
that you're seeing of the ore and the reflection
of the or in the water. If we're left with what is that a photograph of and
we're left with it's a photograph of an OR then
we have a dead photograph. What would I would say
the photograph fails. Okay. But that's
not what this is. This is so much more about creating that single
object that reduced, boiled down back to basics idea, but really starting to layer in emotionality
into the equation. And that's what poetry is about. The difference,
let's say between a beautiful moving epic
poem in a nursery rhyme. Nursery rhymes are lovely. Beautiful moving, emotive epic poetry is
so much more than that. It's evocative. It has you thinking it has
a haunting quality to it. And that's really when
we start to layer in our own emotional experience and combine it with this
simplification. That's when photography gets up there into a whole
different level. So again, I know I'm harping
on an idea quite a bit here, but it is, it is
in my experience, probably one of the most
important and perhaps one of the most difficult
things to do is to use design and use
the sense of space and how you place objects
and where you place objects in a way that when
all is said and done, that you've taken this, this concept that was portrayed
in a 90 minute movie, and you have reduced
that down into one single image inside
of one single frame. And that's really what
this is all about. So the more that you
think about this, That's the more you're
thinking like a photographer. I can't tell you how
many students have mine over the course of the years when they've been
given an assignment, have come back with an idea
and said, well, I have, I have this way that I
want to portray this idea and I'm going to do it in
three photographs, right? No. I mean, sure you can, but that's not what
this is about. That's a little bit of a cop-out and thinking
in terms of how am I going to convey a
story in a linear way, in a way that has to do with a beginning, middle, and end. Which when you think about
it poem that's not the case. A poem is more like I'm
going to use words. I'm going to use
language in a way that creates this
sense of an idea, a sense of an experience, a sense of space and time. But I'm not going to say in chapter one we did this
and then this happened. And then that happened. Where more saying No, what's left over in the end. The the residual experience
for me, the residual emotion, the memory, the way that
I've been impacted, is portrayed in a single frame. And that's our goal.
19. Assignment 9 - Boil It Down: Now your assignment for boil
it down is to once again, to return to the idea of being
able to convey a feeling, a sensibility through
one single image by reducing down something
from its big story. It's n, It's linear quality of beginning, middle, and end. And just saying, when
I've had that experience, when I've really metabolize
that experience. And I'm left over with this single image that allows me to recall
that experience. It allows me to recall that
feeling and it stays with me. What does that image look like? And it can be something
certainly that you can ponder, something that you can conceive of and then you can go
out and execute it. It's also something that just as you're becoming more and more aware of the fact that this
is what great photographs do, that you will naturally
come upon it. It's because your way of seeing is going to
start to shift, it's going to evolve, it's going to mature. So again, stay
with the practice, stay with the practice
of reduction, stay with the practice
of minimization. These are the things
that are going to take your photography up, up into a different realm that are going to
allow you to create those haunting images that just are embedded with meaning. So that's your assignment now, I wish you the best, have fun with it. And when you're all done, don't forget to post those photographs in
the Facebook group.
20. Lesson 10 - Breathing Room: This section is called
breathing room. And it's really
all about leaving lots and lots of empty
space in your photograph. Why would we choose to do so? You may notice that there
is a prevailing theme, at least for these first
weeks of this course, that a lot of the way that
I create photographs that specifically with the
intention of creating a sense of peace
and tranquility. It's just my nature. So now it's your nature also. At least for now it is. So when we think in terms in this particular
photograph, we can say, well, it's a beautiful beach
and this is a quiet beach. And that sense of quiet is multiplied by there
being so much space. For some people it might
be spaced to drown in. And for some people it
might be space to breathe. But that space itself
really needs to be seen as, as much of an object and
having as much importance, if not even more important
than the quote unquote, objects and subjects themselves, in this case, those few people. So this is a shift
again in thinking from space being something that is the absence of something and space actually being
the subject itself, the protagonist, this
photograph is all about space. Now, sort of like from a, from a Zen perspective, the space within the cup
couldn't exist without the cup. So is the cup about the space or is the cup about the
physical cup itself? This is again, that kind of interplay that we're
looking at between the objects in the
photograph that create that space,
the space itself. The most important part of this lesson is the space itself. And that's where we
want to be focused. So when you're thinking
about this and you're contemplating the photographs
that you want to make, It's really important that the space itself
be really clean. That there's a clear space that, that when we focus our eyes on that void that we're
not looking at clutter, that we're not distracted. There were actually
able to settle into that space almost like
the Grand Canyon. It's it's the whole it's the
void that is the subject. And in this case we're
looking at that same idea. So start paying more
attention to that emptiness. Not as something that's missing, but more as something that is created by the other objects
that are in the photograph.
21. Assignment 10 - Breathing Room: In this assignment,
we're out for space exploration space,
the final frontier. We're out there
to explore space. So the same way that we can
look up in the night sky, and we can only
notice the stars. We can shift our awareness
and we can shift our intentionality to looking at the spaces between the stars, the void inside the cup, or in this particular
case and my photograph, the sand that was on the beach, the sand and the emptiness. Emptiness as form itself, emptiness as an object, emptiness as the subject,
as the protagonist. That's what we're after. So take your camera, go out into the world. Go, go into your living room, go into your backyard, and seek that space. Pay attention to the
spaces between objects. See what it's like
to create this sense of vastness, of a void, of emptiness, which will convert most likely into
some sense of quiet 2D. But it could also convert
into a sense of danger. It could convert into a sense of looking energy that
exists within that space. So play with it yourself, see what comes up, experiment. And simply by engaging
in the process, you will discover things
about your photography and maybe even about yourself that
you may be surprised with. So get to work. This is really a fun one. And once you've got some images that you'd like
to share with the group. Pop them into the
Facebook group, and give people a chance to see your work and
share their comments.
 Rob Goldman, Photographer & Creativity Coach