Transcripts
1. 1 How to start a portrait Intro: Hey there and welcome to try to use art academy. Today. I wanted to take a few minutes and talk to you about how to start a dry. It's something we all take for granted. When we get to the art studio, we just rush into a drawing, right? We all do it. And that's our biggest mistake. And it's one of the biggest mistakes my students make. Because if we do that, something about our shapes, our values, edges, and proportions will be off and the whole drawing will go wrong, ending up in frustration. So I wanted to share with you just a couple of things, three things, that if you follow my promise to you after this video, is that you will have better drawings or solid drawings, more believable drawings. And you're going to be quite happy with your progress. Alright, so let's get started.
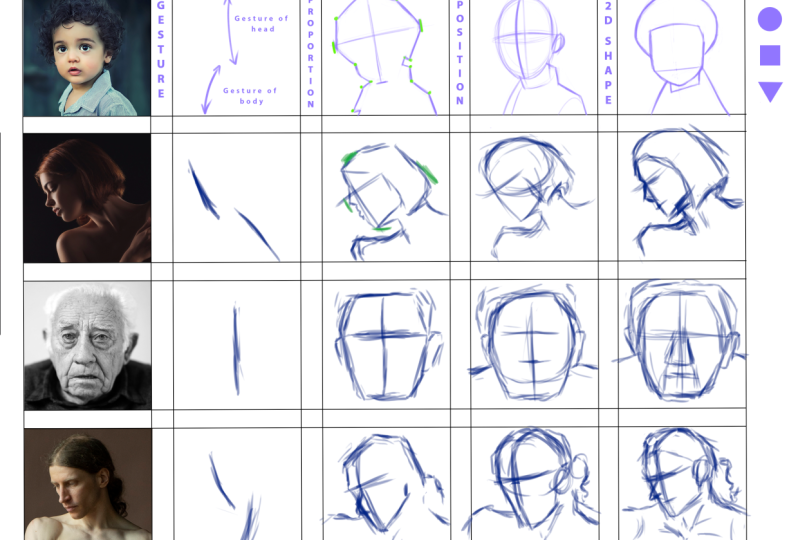
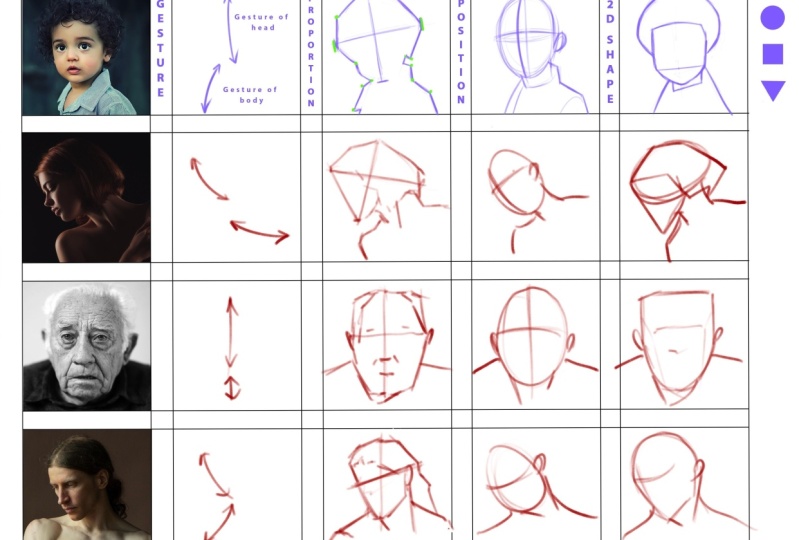
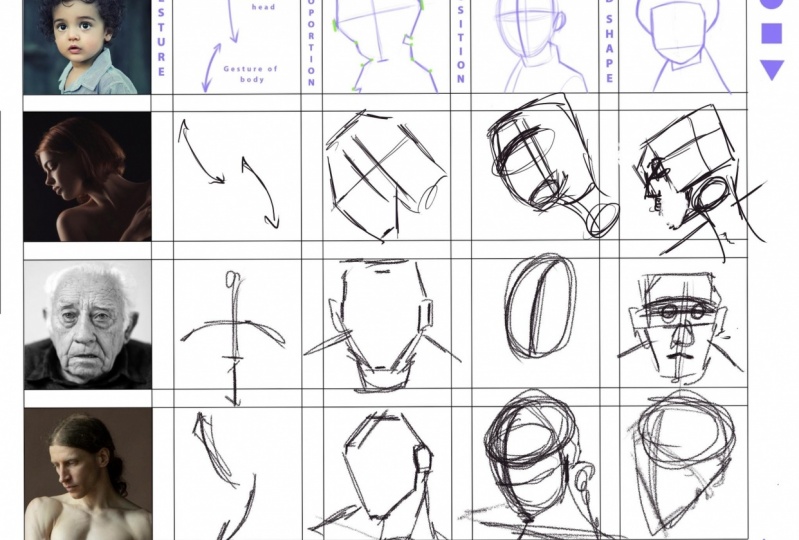
2. 2 Basic analysis of the head: All right, with respect to starting a portrait, let me start out with this. We need to set our intentions right straight out of the gate. If we don't, we're gonna run ass over key stir into a bad portrait. So what do I mean? Well, we want to start off with the law. Now, what does that mean? Well, that might sound a little strange. I borrowed it from my vocal coach and he said, the way to produce beautiful vowel sounds, open vowel sounds to get those strong tones and is the la, the open vowel? Well, everything's related. So here, instead of opening our throat, We're going to open our eyes. We're going to use our eyes. So what is the law? Well, first we want to look. Second. We want to analyze the position. And third, Analyze the 2D shape. So let's get into it. First. Looking, alright, when you're looking at the model, you get into a studio situation or maybe you're at home working from a photo. But there's one thing for sure. You probably really excited and all that adrenaline needs to be tempered. So what do we do? Well, we need to breathe. The first thing is to breathe. So you get all that oxygen into the blood that goes to your brain. It's going to help you think clearly and get centered, right? So you want to, you want to get centered, get that oxygen going. And then you wanna give your eye as a chance to assimilate or get used to the lighting conditions. But the model on the stage, the room lighting, and just look. Okay. And you can ask yourself, who is this, right? Is it male? Is it Female? Is it young, old? Okay. What's the, what's the pose? Is it static or is it dynamic and active? Right? So if I look at the model here, it's a female. Gaze is to the left. I'm slightly on top. The lighting is from the left camera left three quarters down. Okay, just very simple stuff like that is take a moment, breathe and look. These are really important. The next thing we're gonna do is analyze the position. With the position we need a standard ok, something that we can start from. We can't have the branches of the tree without a trunk. We can have the hero's journey without establishing a homebase. So that home base is this vertical axis in the neutral position. Ok? So it's just this. From there, we go to a front and back tilt. Okay. This is the head tilting up. I'm drawing with lines wrapping around. And that center vertical axis where it crosses the horizontal one. It gives it a kind of front. And we can tell very quickly that this, the position of this person in space looking down, the tilt is forward. Okay. So that's forward. And we have back. So very important to establish that access first. Because if we get that vertical wrong, then the whole drawings row. So then we have the tilt back. Simple, easy, effective. From there, we go to side to side. Now we're off the center and we're tilted right to the left and tilt to the right. From there, I've seen my drawings and many of my students drawings go wrong right from here because they get tilt row. Okay, and finally, we have the twist. So we have the head twisting to the left ceased to establish the center line. Right? And then we have a kind of front, right. So looking left and looking right. See how I'm setting this up just step-by-step. Can't get lost. And to the right. And then we could even make it a little more complex. Tilting to the right, looking down and to the left. Tilting to the right looking down until left. Okay, so let's analyze this model here. And what do we see? Well, if I use my simple oval and I try to get that tilt, so here's my standard is vertical. She's off the vertical, right? I'd need to get that tilde right. And then she's gazing to the left. So I'm going to kind of put a construction line where the brow is and draw around and then get that center line. So it's important to get the SIP, the tilt the center line and then line up something Horizontal around the eye line or the brow. And there we go. Now, another crucial thing is, you know, where are we? Are we on top, on the bottom to the side. And since I can see, if I use a little bit more construction here, I can see that I'm on the top. So I'm seeing front, top and side. We tend to draw things the way we see the most of the time, which is straight on, which is kinda that, that neutral position. If we go back to the neutral, right, this one here. So our drawings tend to be, tend to kinda pull them back if they're, if the camera position is extreme, up or down, we're not used to it. We kind of tend to draw things as if it's straight on. It's just kind of a thing we have to overcome. So getting the tilt and knowing that we're on top is good for us to know ahead of time, right? Because then we know that we, we've got to make our drawing will look like that and overcome the temptation just to make it look like in the front-facing neutral position. Okay? So we've got the neutral, We've got the front, tilt back till left and right tilt left and right twist. And then you just want to ask yourself, do we see the top? Do we see the bottom? Do we see the side? And you're good to go. Okay, for the position. Then we want to analyze the gesture. Alright, so the gesture is really, you can think of the head as flowing with the gesture of the body or breaking away from the gesture of the body. So with this pose, it flows with the gesture of the body, as you can see, right? Nice, really nice c curve. Okay? And then this example that had breaks away from the gesture of the body. So you have a C curve with the body and a kind of an opposing C curve taking a different direction. Okay? Alright, so what do we have here? Well, the gesture of the body is going this way. The head is going this way. Let's really kinda changing direction and breaking away from the gesture of the body. And you'll notice that you have to see curves opposing just like that. Okay? That's enough to give you that action and flow. The gesture is a lifeline. The flow, the attitude. Okay? And then we have a third thing that we could pick up as far as the the shoulders, right? Kinda going this way, the arm's going that way. So this is all about capturing the action. Okay? The previous capturing the position is all about describing the form and its direction in space. The gestures about capturing the action, if you can do both, capture the action and describe the form and its direction in space. You can draw. That's the definition and the rudiments, basic mechanics of drawing. So we'll also notice that we are, we have a, the axis is here, right? Lets do we see here? And we have a twist, right? Her gaze is down. And to the right. So it's twisting to the right and down. That's hard to draw. So if we do this really quick, basic gestural analysis, when we get to the real drawing, we're going to be a lot more confident to jump in, right? So if we do this quick analysis, you know, we have the torso, the head, get the Tilt first, the volume. Establish that center line. Where's the brow? Right? Looking down? And then the arms go out this way. Right? And so we've got ourselves a really good sense of what we have to accomplish on the real drawing, right? This is just the practice, practical analysis here. Right? Good stuff. Okay. So let's move on to the proportion. This is one that people really struggle with if you struggle with it. Okay? So proportion is the relative height and width of one thing to another and the parts to the whole. So what do I mean? Well, we're going to look for the extremes. Okay. Extreme at the high position and the width position. So for him, it's going to be probably the chin to the top of the air. That's the tallest dimension of his head vertically. And then if we look at the width, where's the extreme tip of the nose? To the back of the hair. Ok. Good. Because we don't want to draw his head too too narrow and cut off the back of the cranium. Right? That's that's something where you could go wrong. So what we want to now, the width to the height ratio. And then we want to find the angle breaks. So these angle breaks are our points where we see a change of direction, right? And abrupt change in direction. Things that jump out at us right there like points and their coordinates that we can connect, almost like connecting the dots. So we go straight up here to this change in direction of that hair from front to the top, moving back to the back of the cranium than the head, neck connection, right throat. This kinda stuff. Then what you do is you just simply connect the dots really with straight lines. You're just envelope ing this. And a very low-resolution, kind of rough and a crude way just to get it on the paper. They're all approximations. You can, basically, if you have a curve going in a direction, you can just approximate the curve, flatten out all those peaks and valleys, right? And get that general direction. It's faster and it's easier. And then later you can come back in and put the nuances into that, into that line. Ok. So you end up with a silhouette and just kind of a flattened shape. So you want to ask yourself, is it narrow or is it tall? Very simple. Just take ten seconds and do that. Okay. Nothing more than ten to 15 seconds of getting what you need as far as that goes. So again, you're looking for the extremes and you're looking for the angle breaks or changes in direction. Okay? Okay, moving on point number three, we're going to analyze the 2D shape. What is the most simple shape, right? That I can use to express this person's face. As we analyze the 2D shape or essentially analyzing what is the 2D graphic breakup of the space. And we're asking ourselves, what shape is it? Basically you have three choices. Circle, the square and the triangle. Okay? All right, from there, we can get that kind of tall and skinny circle. We can get a short squat circle. We can get a tall square, which is basically a rectangle or a short wide squat rectangle. And we can get a variation or to the triangle itself, right? It could be even, even a teardrop shape. Okay? And then we can combine shapes, circle with square, square with triangle. So we can get, you know, a circle with a square, right? Or maybe something like this. We can combine square with a triangle. So we can get these combinations of shapes, circle, right, triangle. And so there's a lot we can get just from these three shapes. And it's plenty, especially when you start to manipulate the shapes and kind of stretch them. And it's really a very fun, very easy. So let's analyze this guy here. He's a male, young, right? And something I wanted to say about these shapes, these, there's some shape language here. The shapes lend themselves to different people. The circle could be young and it could be the female. Females have more curves. So the young people, the square has more corners, right? It's a little more boxy. So that could be male, right? This circle says a friendly, psychologically, right? Approachable. The box is a little more because said masculine. And it could be thought of as stable, but boring. And the triangle has a lot of dynamism, right? There's 11 movement. It's a, it's a dynamic shape. And so, but it's thought of to be psychologically dangerous because of the angles and because of the movement, right? So there's that shape language. So all these three shapes have kind of a like a psychology of shapes. And I shape language. And you can mix and match them. And some of them work better for young or old male and female and so on. So as we look at this guy here, I would probably use, You know, I would go ahead and use a box, right? Because that box is going to really help us describe the form and its direction in space, right? We have kind of a center line here, is gaze is to the left and a little bit up. And so that box is a great form to help us show that we're a little bit underneath, right? So every head has a front tooth sides, a top and a bottom. But the most wherever we're gonna see is three sides. So right now we're a little bit underneath. So we're seeing some at the bottom. We're seeing the front and we're seeing the side. Okay. And the box helps us line up these construction lines in perspective to give that feeling that we're, we're underneath. We see the underside of the chin. And then we're connected to, we could just say a tube and out to the shoulders. Right, so we have a nice solid connection. Hadn't that connection to the shoulders? That's good stuff. That's good for a really quick analysis. And you could do that for yourself off to the side, say what, you know, what kind of shape works, works good for this or is it a box? You know, you could, you could just go ahead and box it up. And you've got to learn how to draw the box in space. Right? Stick the ear on there. And as we look, the ear will go down in relationship to the eyebrows. So they're in reverse inverse relation to one another. As the case goes up, the ear goes down and vice versa. And then we could stick a tube there and then up to the shoulders. So that might be something that you could gain some confidence before you launch into the drawing. That's a little bit complex, right? We're underneath. We're not used to seeing that. And so this kind of analysis could help. Alright, let's walk through these three points as we look and gays and set ourselves up for success. So the gesture, here's gesture in the body. Here's the gesture of the head. Okay, nice. We also have a twist, right? So we have a gaze that's to the right. So we wanted to just analyze that for ourselves, right? There's a twist to the right. There's a center line and we're slightly as far as the position. We're a little bit underneath. So again, I could use as far as the 2D shapes that could use a triangle with a circle. And we'd see a little bit of the underside. And then connected to the neck. Right? So that's our quick analysis. This thing can be done in 30 seconds or a minute, right? So you could have this little thumbnail called the design yellow in Italian. That's what they call it. And it's just to help yourself get little confidence before you launch off into the big drawing, right? And this also helps with the compensation. So if I have a triangular shaped head, right? Because there's a lot of youth in that, a lot of movement. We have the gesture of the body, gesture of the head, the neck, and shoulder right there. And we have a little hairstyle or little decoration there. Now to find the brow, which would tell me, you know, it's like that ellipse. We're looking looking slightly up and we're underneath. If I get that ear and the right relationship to the brow, I can communicate that pretty good. So that would be my design, yo my design. And I can go for the real thing. So let's do that. Right gesture. Then I can construct still kind of blocking in hearing. Using these flat 2D shapes. Finding this center line, circle, triangle. Neck is pulling from the jaw line this way. And the opposite move that way to the back. Nice c curve. I'm going to wrap around here and show where the brow is. Make your lines wrap around and draw through to the other side like glass. I'm gonna find the place the ear on the side of the head, somewhere here. So, so got a side plane of the head which is somewhere, somewhere here. I'm going to put that in as a circle. Placed the features vertically. Just real quick. I won't get into details, but we have a two cylinder rhythm of the chin, the nose, the position of the, I. Keep it real simple. Kind of finding the extremes, making sure that I've got these extremes horizontally and vertically. So that the bottom of the chin, top of the head would be the longest dimension vertically. And let's say from the cheek here to the back of the head. Okay, I just wanna make sure I've got the right dimensions. And then these, these angle breaks, right? The brow, the hair, moving back, very kind of faceted, blocky low as illusion. That's good. It's easier to measure that way. Mask of the face. Change it direction, right angle break right there. The top of the air with the part is It's just simple. And you can see how could come together pretty quick from here. Then we just get that shoulder in. And then there's a little design here, little fashion flare with this. Because it's these feathers. It's like a costume. And there you go. Right? So that's how I would analyze this thing. Would look, it would stop. I would breathe at gets centered, it gets blood flow. Going to my brain cycles. Analyze and see clearly what are the shapes, what are some of the values, what are the proportions? And really get myself off to a very good start with the law. Right? The look and the Analyze. And so I really hope that was helpful. I know it was took me a lot of years to stop making this mistake of rushing in and producing just bad drawings and being frustrated. And I don't want that for you. You don't have to. And so just with a little patience and a little observation, you are going to be miles ahead of where you were. Alright. So that's it. Thanks for watching. We'll see you in the next one. Bye-bye.
 Chris Petrocchi, I help artists grow on their journey