Transcripts
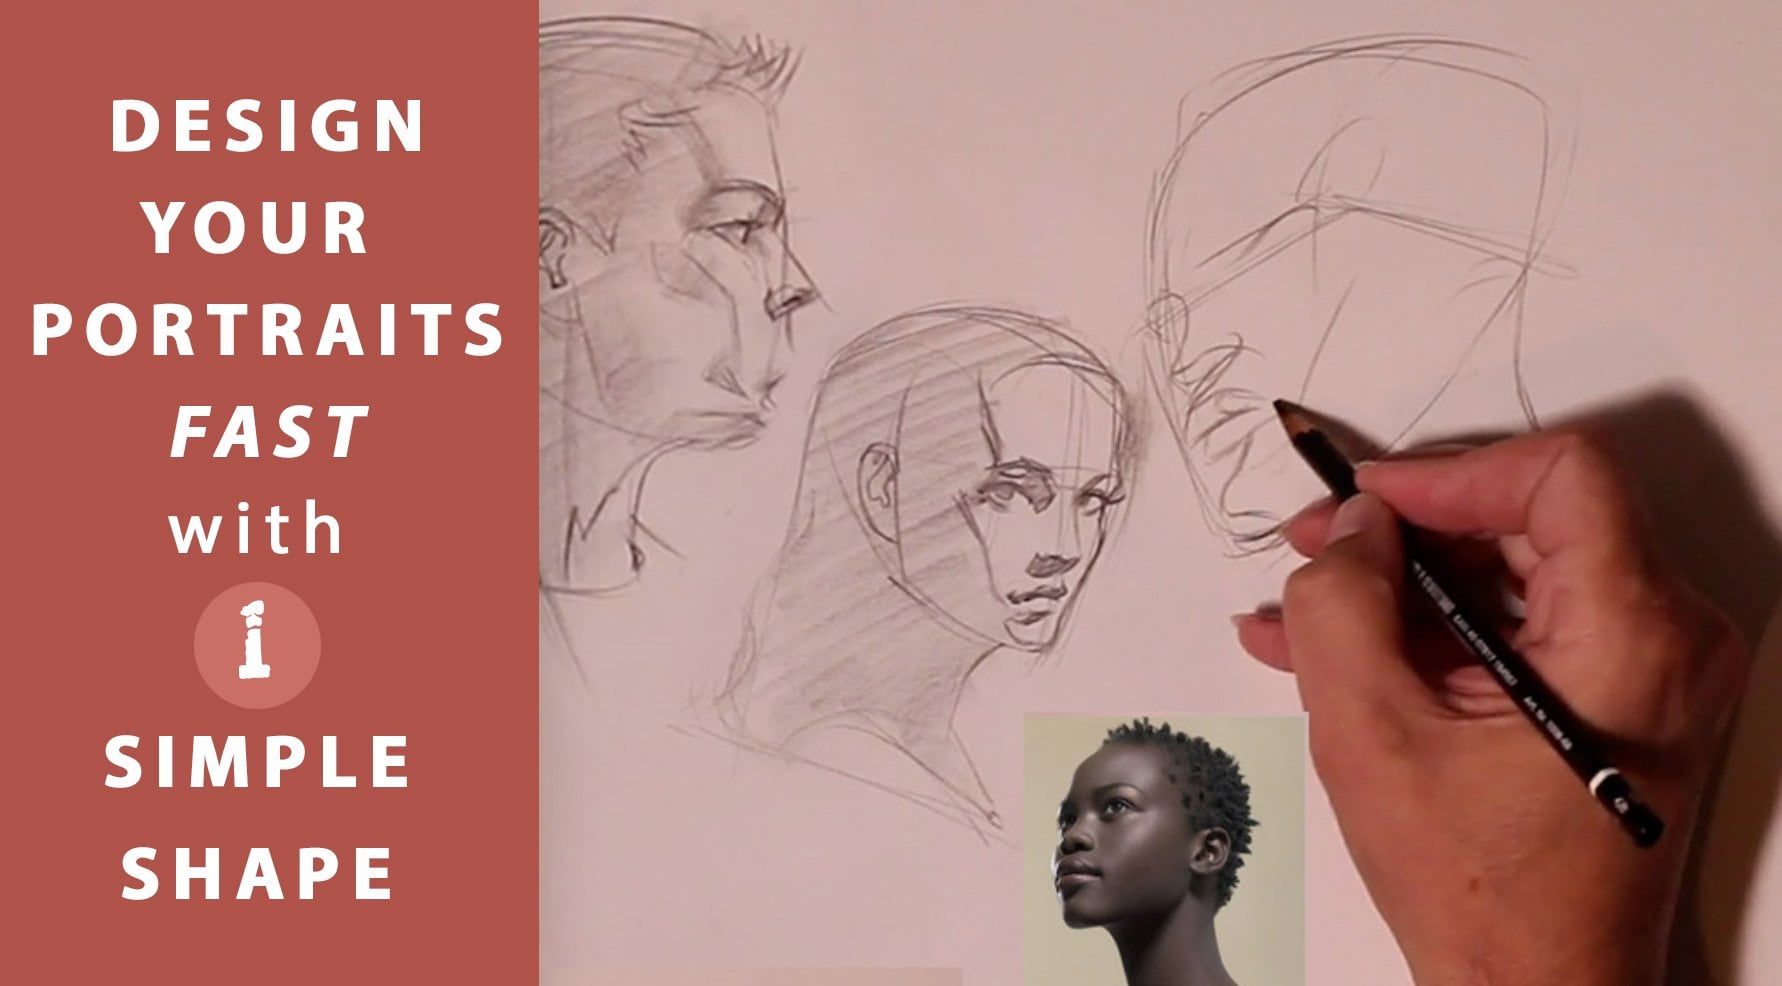
1. Quick Heads with Gesture and Shape Introduction: Pillow everybody, I wanted to take you through this really important lesson about how to draw fast, because that's the secret everybody's looking for us is how to do that. It is in fact the juice inside my scaffold method for drawing the head, which is capturing the action. So drawing fast is really not the act of just drawing quick marks. It's really the result of making good simple decisions. So how do we do that? Well, we want to capture the action and the attitude. And if you add those up, you get something we call gesture. Now with the body, the gesture is the weight, balance and proportion. If your figure drawing. But we have to remember with drawing the portrait, there's a person there, a thinking entity. And they are motivated by desires, dreams, thoughts. And so we have to just keep that in mind. So the action and the attitude are kind of ways to get to the essence of what's motivating the character in a dynamic and quick way. Who can benefit from this? Will anyone working in the visual arts field who needs to draw fast? Animators, storyboard artists. They definitely needed, if they can't draw fast, they're gone. Portrait artists, character artists and illustrators. All of these artists absolutely need to draw fast, quick. And the only way you can do that is simplify. All right, so let's jump in with a demonstration.
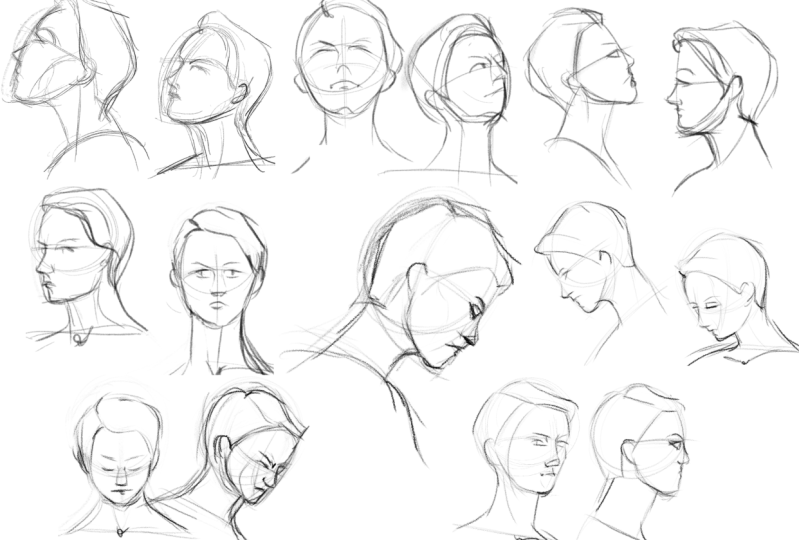
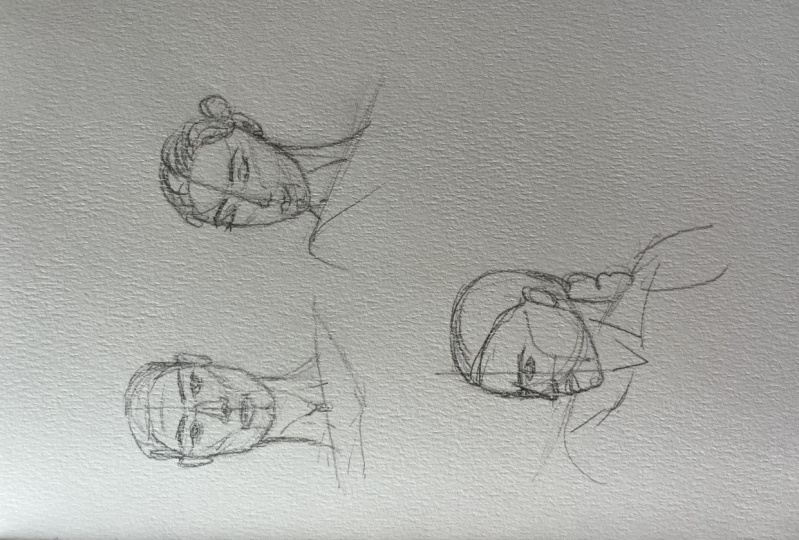
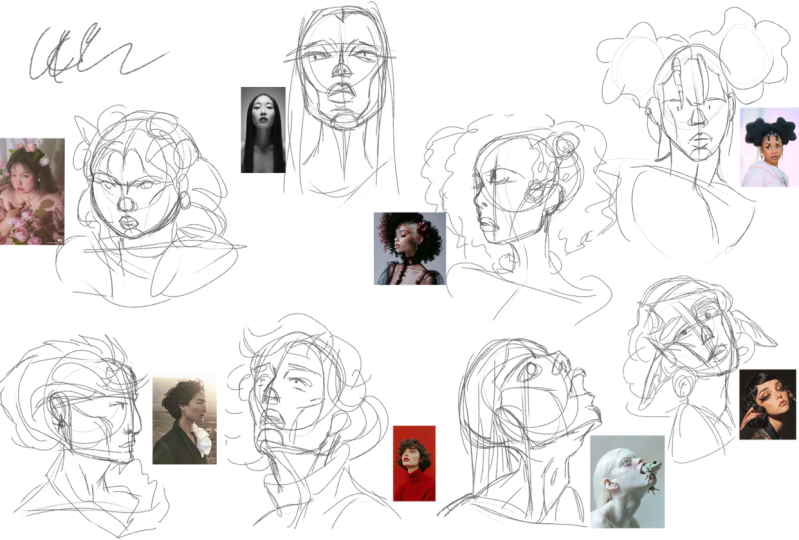
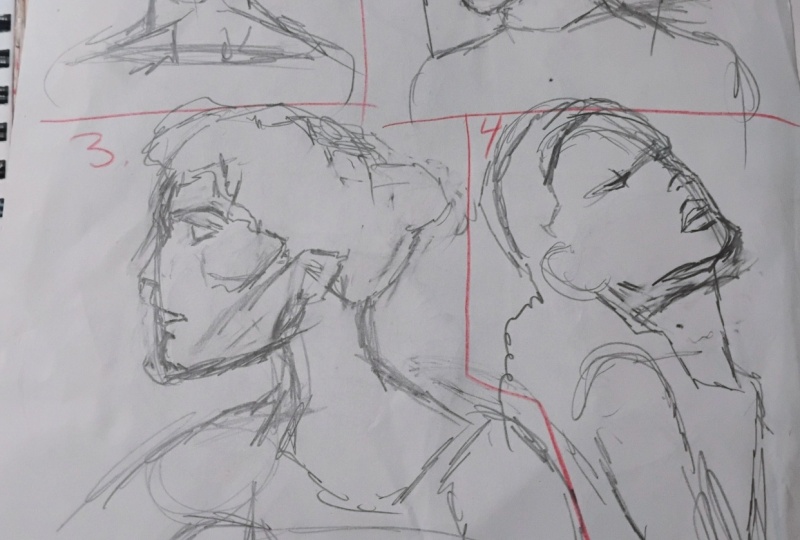
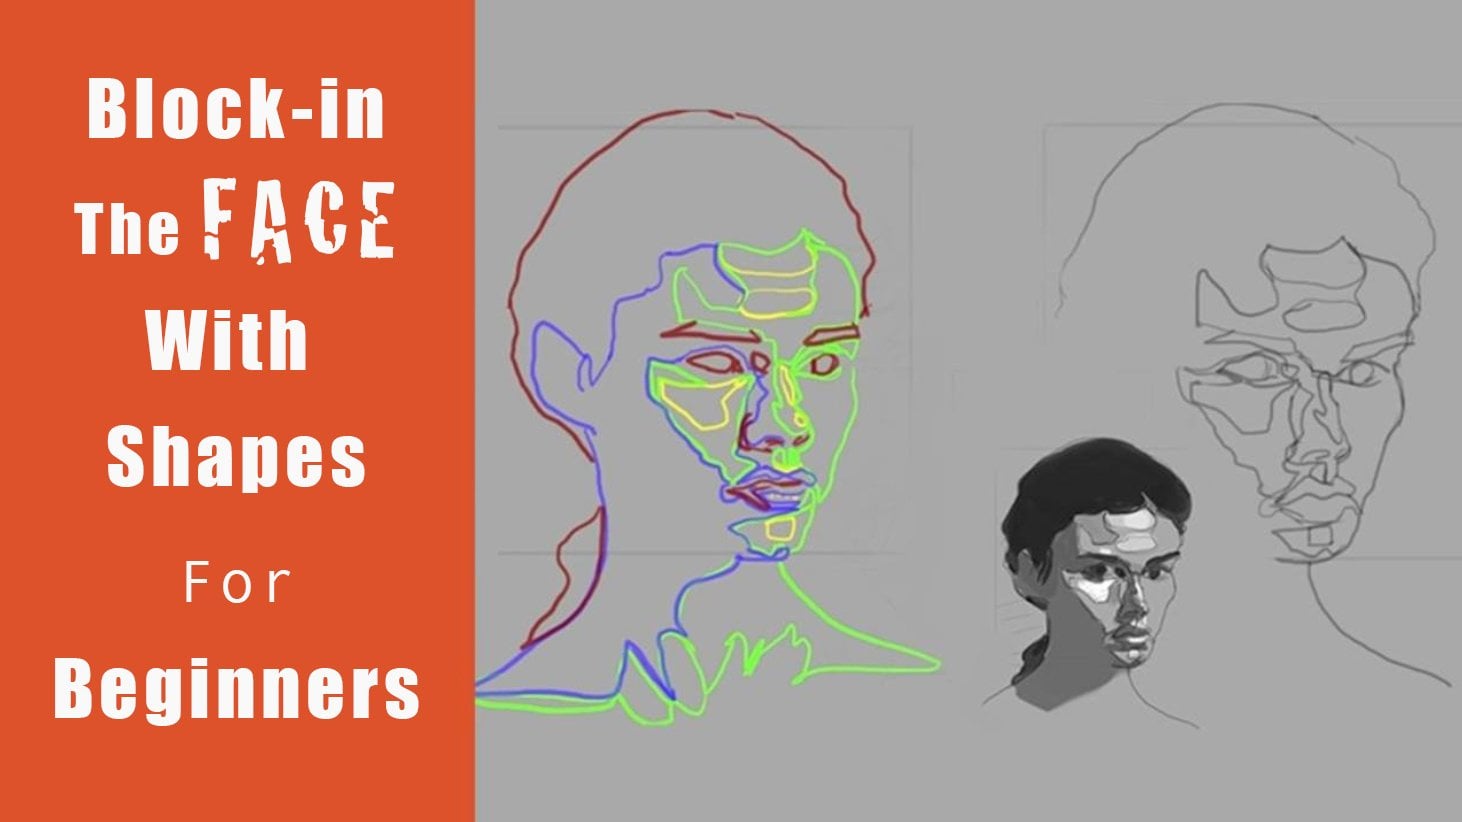
2. Quick Heads with Gesture and Shape Demonstration: Alright, I'm gonna go through this exercise several times and by the time we're done, if you practice this along with me, you'll be able to draw the head in any angle. So let's take the front gaze first. And I'm going to use a boxy shape. Nothing says masculine more than a boxy shape with some corners to it. So I'll find that characteristic outline of the head. Find the center line, place in the neck with a couple of C curves. You'll notice I use a letter V to block in the sternocleidomastoid down to the sternal notch and then the angle of the collarbone. In the face. You can see that I've drawn across vertically and horizontally. And that's the Cemetery of the face down the center and the horizontal center, which is the placement of the eyes. Then I placed the nose, mouth, and top of the chin. Then I build the eye socket to house the eyes and connect the nose. And just, just very simple positioning of the AIS. Put in a rhythm for the nose. And then I can find the lateral width of the mouth itself. And then refine the chin. Very simple to keep it really simple. No detailed drawing this fast. It is in fact, the draw juice in my scaffold measured. And it's going to help me make quick, simple decisions. Have to edit out all of the value information, all of the texture and detail, and really get down to the essence of what I'm looking at. So I have to simplify, and that's what this exercise is going to force me to do. Alright, just going ahead and with the time left, putting in some notes about the sternal notch, the neck, the rhythm of the forehead. And that's about all I have time for in a minute and 30 seconds for this one. Okay. Let's move on to the three-quarter view. And I'm going to start with an oval and a triangle, so it's a compound shape. And I'll quickly put on the location of the year, which tells me a lot about its location in 3D space. And I'll connect the neck real quickly to the angle of the shoulders and put on a suggestion of the sternocleidomastoid muscle from the ear down to the collarbone. And then I've got that center line vertically. And then I'll find that horizontal center, which would be the I line. And then I'll place the eyebrow above it. And then quickly note the nose, mouth, and chin positions. I can pull a rhythm or a suggestion of the planes from the ear down to the chin, separating the front of the face from the side of the face. And then start to build. The connection of the nose, gesture of the eye socket, placement of the eyes and cheekbone on the far side and sternum. So you can see the head breaks away from the rhythm of the body, goes in a different direction. Then I'll get the rhythm of the forehead separating the front part of the head from the sidebar to the head. And the hairline or mask of the face. And the shape of the hair mass, which is so important to getting a likeness. Just refine the upper lip with a simple C curve and then two vertical see curves to indicate the two cylinder and how the mouth protrudes from the front of the face. Alright, moving on to the profile view, notice how there's some light and shadow information, but with the small timeframe, it's going to force me to edit, edit that out, and just go with the simple shape and structure information. So I'll start with a circle and a triangle, again, a compound shape. And then draw through from side to side to find the angle and attitude of the shoulders. And then indicate the head and neck connection through the sternocleidomastoid up to the ER. And finding the widest part of the head in back, indicating the ear with a simple C curve, attaching it to the jaw. Really simple stuff. I just go through the same process over and over, and then further subdividing the head front of the head from the side of the head with a blue mystyle rhythm. And then I can find the brow, placement of the eyes and the center, nose, lips, chin. Notice how I connected the forehead to the ears with a construction line and then refining the brow. Putting in the nose with a simple wedge shape, keeping everything pretty 2D. Split of the lips, lower lip, chin box, and then the rhythm from the ear all the way across the cheek and down under the mouth. And the nice rhythm of the mask of the face. A couple of simple shapes to indicate the hair and then finish off the head and neck connection. That's it for this one. Let's move on to a head tilted back. This one I can start with kind of a cylinder shape works well because it shows you a clear underside and we can see so clearly the under part of the chin and the start of the neck. So I'm going to use those cylinders. And you can see the angle of the shoulders, the rhythm of the sternum. The connection of the neck to the collarbone and then up through to the head. Place the ear, which is very low compared to the eyebrow, which had normally lines up with when the head's tilted back, that ir really lowers itself in relationship to the eyes and the brow. And then I just put a pullet curve or rhythm line across and over to find the I aligned a rhythm to suggest the vertical center. Then this simple placement of nose and mouth using very simple shapes. The angle of the eyes, placement of where the eyes would be in the center. And then a little rhythm line for the chin, jaw line. And then a suggestion of the hair mass. Very simple. You can see it almost looks like a mannequin, but that's what we want. And that's all we can get to. Let's move on to the head tilted forward. And I'll start with a suggestion of the angle of the shoulders and then find a shape that's simple enough, but kind of characteristic of this person's head. Which is kind of a little bit of a boxy shape with a triangle thrown in. And then I'll indicate the head connection to the shoulder girdle and then the collarbone. Shoulders. Just using simple circular shapes are ovals. Getting in the mask of the face, which shows a clear top to the head. And then extending it out a little bit on top. For that fullness that we see. This is a difficult position to do. We're not used to seeing this and we tend to draw things in the same point of view that we're used to seeing them, which is straight ahead. So have to be really careful to just follow and think through what I'm doing. Make sure my connections are valid, mixture my, my architecture is valid and then also keeping it loose. So I've got that vertical center line, which is so crucial to place the features correctly. And the muscle bone connections. Got the indication of eyebrows where the eyes are gonna go. Quickly put in the nose, kind of a sense of the eyelids as simple letter V For the mouth in this position. And put in the nasal labial folds there from the alar facial groove and then the chin, which tapers nicely. I spent a little more time on this one because it is a difficult pose. And I'm just trying to check and make sure everything looks looks good. Fitting fitting tight together. I could probably put a rhythm in four to divide the front of the head from the side of the head. And suggesting placement of the pupil center of the eyes with that would go with two vertical lines and then a rhythm for the sternum. And this one, you can kinda see that the head is in line with the rhythm of the body. And that arrow for the sternum is kinda the continuation of the rhythm of the torso. And the head is pretty much in line with that. So the head will either flow with or break away from the rhythms of the body, gestures of the body. And so if we think of it like that, there'll be less of a tendency to have the head looks like it's just stuck on. Lastly, instead of at first where it looks like it flows and it is integrated with the rest of the body. Alright, let's move on to head in the back position. The ship go by pretty quick because there's no features. So I'm just gonna use this simple oval. And from the top of the head to the chin, in the back, the chin lines up with cervical seven vertebrae or C7. And that's where the back muscles, the trapezius connect at the origin. And a couple of C curves for that trapezius or sagging shoulder muscle. And you can see just behind that vertically you have the sternocleidomastoid, which it overlaps. And then line up the ears with the brow line and the bottom of the nose, which is indicated there lightly. And the connection of the trapezius is that the nuchal ridge. That's where the skull kind of end and meets the muscle there that connects the shoulders to the head. And then a simple indication of the shape of the ham ass. And then in back, the shape of the hair. And the job that you'll see just a little hint of. So the jaws overlapped by the sternocleidomastoid and putting in right there. And then sternocleidomastoid is overlapped by the trapezius. So there's two critical overlaps in the back position that you'll need. And then the vertical center line to make sure things are lined up and that's it. Let's move on to the three-quarter back position. And this position, I can use the oval with a triangle. I can use a bulging triangle. And I think I'll use that guitar pick kind of shape. And I'll pull couple of C curves from the head to the neck to the shoulders. Rhythm for the shoulder line. The gesture of the torso. With the arrow there. And then connect the sternal notch to the ear. Thereby connecting the head to the shoulders through the neck. And I'll put on the jaw line. And we can see a little bit of the under part of the jaw and then the hair mass. And you'll notice that there's a rhythm from the sternal notch all the way up through to the top of the hairline on the forehead. And that connects the top of the head to the sternal notch through that seeker or rhythm. So you want to find the commonalities, find the connections. So we've got the nose with just a hint of the two cylinder. No time for the split of the lips or anything like that. So you see it a little bit of the nostril little eyelash. So far, so good. It looks clear. It's so fun to draw this way. When you're drawing simple. It's clear, it's fast, it's elegant. And it's a lot more fun than trying to think of anatomy and muscle bone connection. Latin names for all that stuff. Don't bother with that. Keep it simple and use really simple 2D shapes. Nice long C curves for the gestures, and you'll be good. All right, let's move on to our last pose with a difficult pose, because it's a worm's eye view or extreme low camera angle looking up and saw again, I'll use that triangle, that bulging triangle to kinda get it in. And I'll combine it with a little bit of a oval shape. So quickly I'll get that ER placed. And that's going to help me with orienting this head in this particular position. C curve for the neck and other c curve for the throat and neck. And indicating the underside of the chin. And connecting it on the front side and then out to the sides, to the collar bone and then connecting the neck to the sternal notch and backup to the throat. And that rhythm that I first built the drawing on a nice C curve shows that the head is lined up with the torso in terms of its orientation. It doesn't really break away. It kinda goes in the same direction. And I've got a little triangle that I've built just above that rhythm from the ear to the front of the face. Put on a simple triangle or letter L for the nose, a hint of the nostril to cylinder and then rounding out the chin, put on the hair mass, eyebrow. The shape of the hair on top. And moving back, there's that little burette, the hair mass there. And then the fullness of the volume of the hair and the back using a couple of interlocking see curves. And then just refining the connections and overlaps. And that's going to be it for this pose. You can see how working with the gesture and simple 2D shapes and then connecting them really is powerful. That can help you draw the head in any position, especially in difficult positions like this. Alright, let's quickly sum up and then give a homework assignment. We did a lot here. We covered how to draw the head quickly by capturing the action and the attitude, otherwise known as the gesture of the character. We used flat 2D shapes to do this, the circle, the square, the triangle, or combinations of them. We found the center line vertically, we found the horizontal center line. We placed the features vertically. We found there lateral extremes, just with very simple straight line indications. We place the ear, which told us the 3D position of the head. And we connected the head to the neck, the neck to the shoulders. Everything was nice and tight and integrated. And we use gesture lines, see curves and S curves. So it looked elegant, clear because the shapes we used were simple and characteristic. And we were able to draw very quickly about a minute and 30 seconds for each of the heads we drew. Bet you didn't think you could do that. But you can if you practice it. So onto the homework assignment, what I want you to do is go through the video again and first, draw with me. Then I want you to go through it a second time and just draw the reference, OK, and then go through it a third time, finding your own reference. And just go through the process like we did here today. To get the best benefit. Run this, you should do 50 to a 100 of them. So maybe do ten to 20 per day and, you know, do more than a 100 over time, let's say over the next two weeks a month, do as many as he can and get comfortable withdrawing fast and going through the steps using simple shapes. And it'll force you to make decisions. Because of the time constraints. You'll have to edit out the value, a lot of the texture and detail. So it'll force you to not jump in and get stuck on those details, which is one of the biggest mistakes I see from my students, is jumping in, getting seduced by the textures that details the lighting. And meanwhile the whole drawing is off. So you want to avoid that. This is the way to do it. And I'll be honest, this is going to feel awkward to you if you're used to getting the most bang for your buck out of drawing details and textures. So be prepared for it to feel a little weird for your drawings to look wonky, even terrible. But don't give up. Do not give up, persist. Because this is going to free you and open up other avenues of ways into a drawing is going to give you a drawing more life than you thought possible. And then you can combine that with your beautiful texture and detail work. Practice on this level for awhile. And then just build on that. Because you're building towards better and better portraits. And we're starting from the ground level. Good stuff. I'll see you guys in the next video. And thanks for watching.
 Chris Petrocchi, I help artists grow on their journey