Transcripts
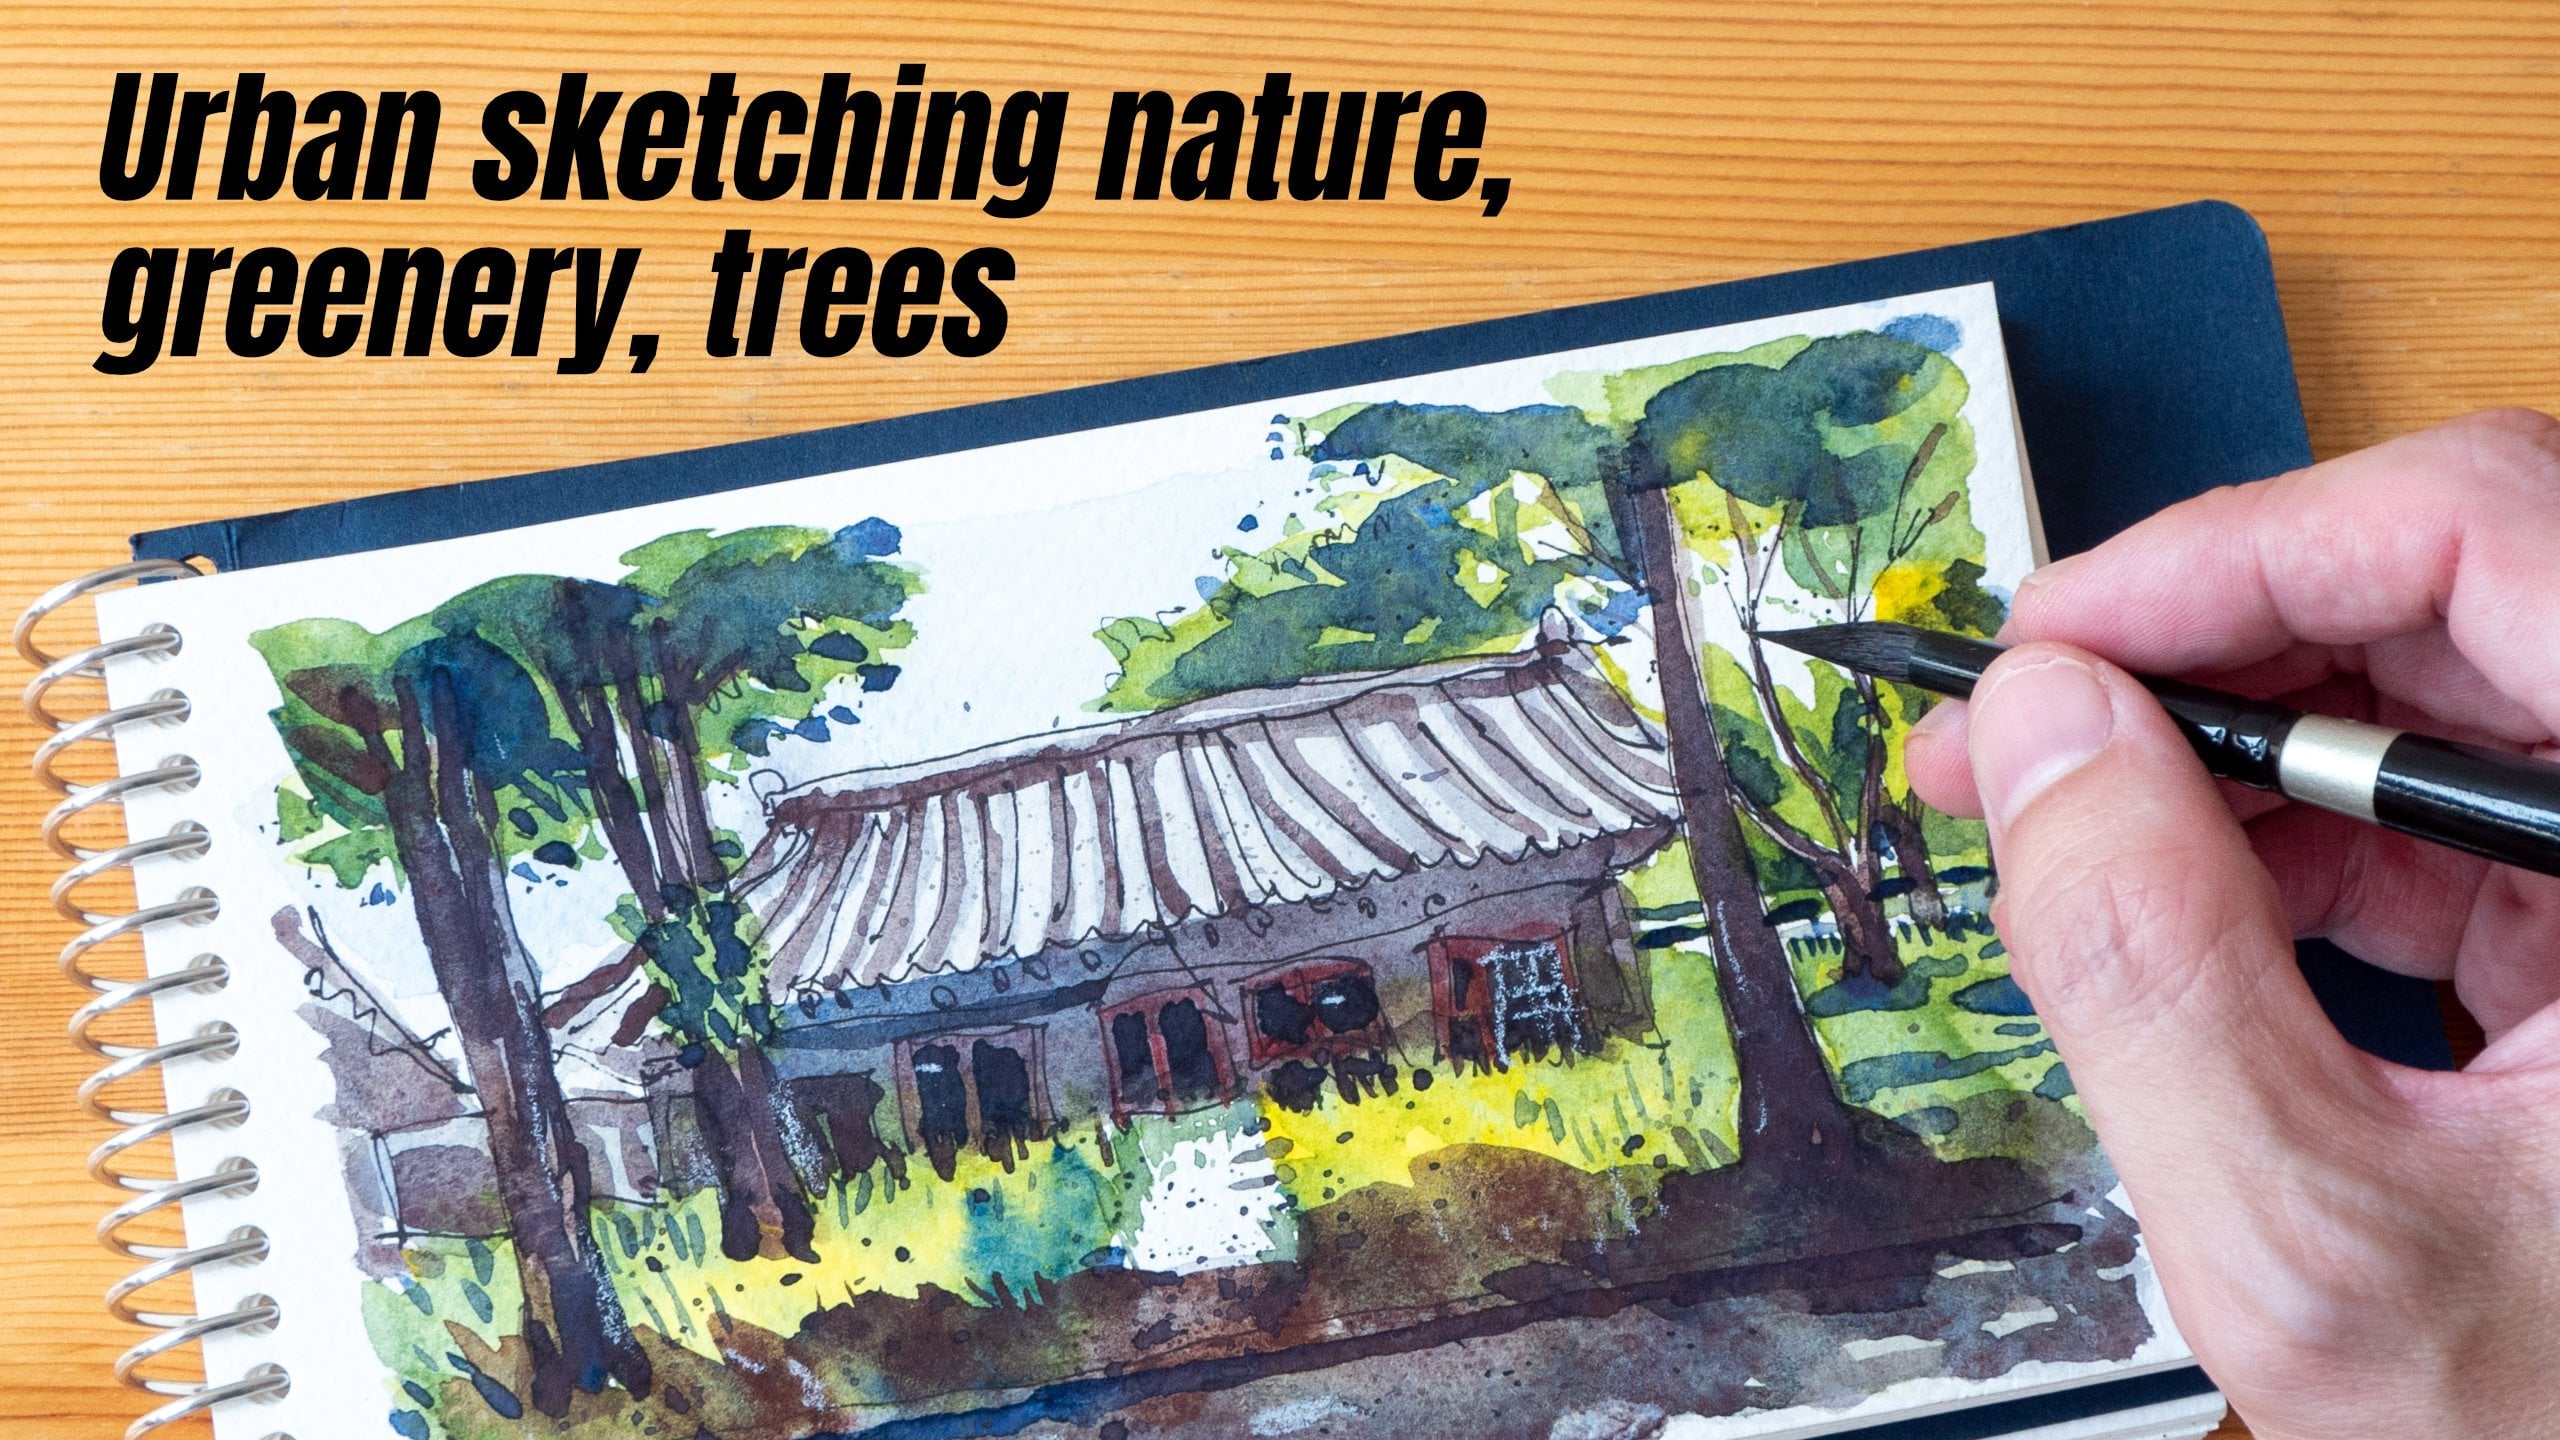
1. Intro: Hi, my name is T0 and I'm an
artist, graphic designer, and urban sketcher who enjoy
sketching out on location. In this course, I'm going to
show you how to sketch this, the street scene with
pen, ink and watercolor. Now this is an
intermediate costs, so you do need to
know the basics of growing and perspective in order to follow along smoothly. If you do not know
how to draw or don't know perspective
are highly recommend. You check out my other courses, the beginner's guide to
drawn on location and the beginner's guide
to perspective before you take on this course, this is the reference
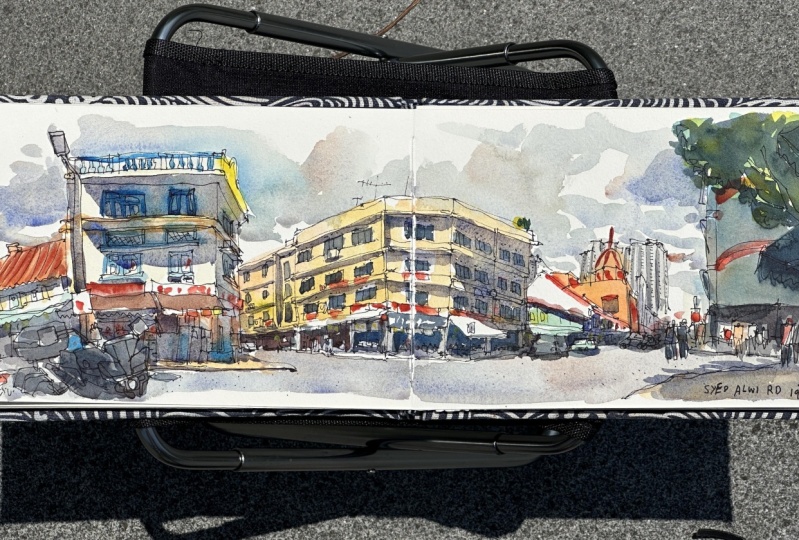
photo we are using which you can download
in this course, I'm going to teach you
how to analyze the scene. What to think about before
you start sketching, how to draft out the composition, identify
problematic areas. How to draw the details,
how to simplify, how to suggest the details and identify your
own mistakes and learn how you can correct your own mistakes to evolve
your growing techniques, the tools you need
for this course, our pencil, a pen
with waterproof ink, watercolor, watercolor brush, watercolor paper or
watercolor sketchbook, and two cups of water. In the first lesson, we are going to analyse
the scene that we are going to draw
before we get started, I want to ask for your help. If you find this course, you
will do live this course, a review so that you can
help other students to let them know whether or not
this course is any good. Alright, let's get started.
2. Analysing the Scene: Before you start sketching, it's always good to spend
a few minutes to analyze the scene or the reference
photo you are working with. This can help you identify certain areas that you need
to pay more attention to. And also if you're drawing
a vessel location, it would be great to
walk around the area to see whether there
is or there are any better compositions of views for this in
the camera man or woman was probably standing in the middle of the
street to get this V0. So this will not be abused. That is possible to sketch on location because you
wouldn't be able to stay in the middle of
the street to pain with your schedule
or your easel. So first thing
I'll do when I see such a complex thing is to
make it easier for me to draw, make it more accessible, make it easier because it can be quite overwhelming
to see so many things. We have the buildings
on the left side, the buildings in the background, buildings on the right side. These are all in perspective. What I wanna do is
to find out where's the vanishing point for the
building on the right side, because we can see
many diagonal lines. For the building on the left. It's not really
difficult to draw because it's kinda
facing you directly. So there isn't much
perspective going on. So the shapes are
mostly rectangular, even the windows
are rectangular. And for this building
in the background, again, it's mostly facing Earth. Perspective would be
here on the side. There is also some perspective
here on the side wall. So first thing, we
need to find a VP, the vanishing point
for this sin. Let me switch to a
different color here. Just draw the
diagonal lines down. So just have all the
diagonal lines connect. You can draw this diagonal
lines from observation, but it would be easier
to find a vanishing 0.1. So now that you know the
vanishing point is here, when you draw the
diagonal lines, you don't have to draw
them from observation. You can just draw them
to the vanishing point. This will help you
draw these angles way more accurately and faster. If you are going to
be drawing this as a detail, really
detailed illustration. You have to spend more time preparing, analyzing the photo, maybe create a few
drops on paper first, just to get a hang of how the sketch or how the illustration
is going to turn out. So even the awnings here are affected by the
vanishing point. We have two cyclists
in front of the car. So we have the cycle
is overlapping the car which is overlapping
the buildings behind we have this sorry, this car in front
overlapping the building. We have this person
overlapping the building. This is good. This is going to create
foreground background. We also have the
buildings on the left and right side overlapping
the building behind. We also have this building here overlapping the beauty behind. If there are
overlapping elements, just remember to
leave space to draw those overlapping elements
that are in front. And if this cycle is, are these two cyclists are actually in the
middle of the road, not overlapping and the
cars are buildings. I'm me actually just use my
artistic license to move them somewhere else
just to create the overlap being a look. So you can use your artistic license to
change certain things. We are not going
to be reproducing this photo in photo
realism style. So you can use your artistic license to
change certain things. You can even change the color of the building if you want to. The next thing I would pay attention to
would be the proportion. So let's take a look at this building that's called is the main building
in the background. This is the height. There is this smaller
building here, a shorter building here, which is about 1
third of the height. So when we are drawing,
we need to make sure that this is tall building is proportional to the
small building, or the small building is proportional to
the tall building. And we need to make sure
the buildings on the left and right sides are
proportional to the top. So we are going to be using this to mean building as
a measurement tool. So for example, we have
the cloth face here. So when we are drawing
this part here, we need to make sure that this point here
aligns to the clock phase. And you can see the corner
here of this building. This will ally slightly
above the club face. You can use windows here
as measurement tools. You can align, you can
compare this windows to the window here and here. So I can see the windows on the left side here on disputing. They are actually taller, higher compat to
the windows here. And I will use all
these points here and compare them to the main beauty. Sometimes my proportion
will be off. But if you really want to make your proportions more accurate, it will be great and
really helpful to mark out the general composition
and a proportion. With, we started
with pencils first.
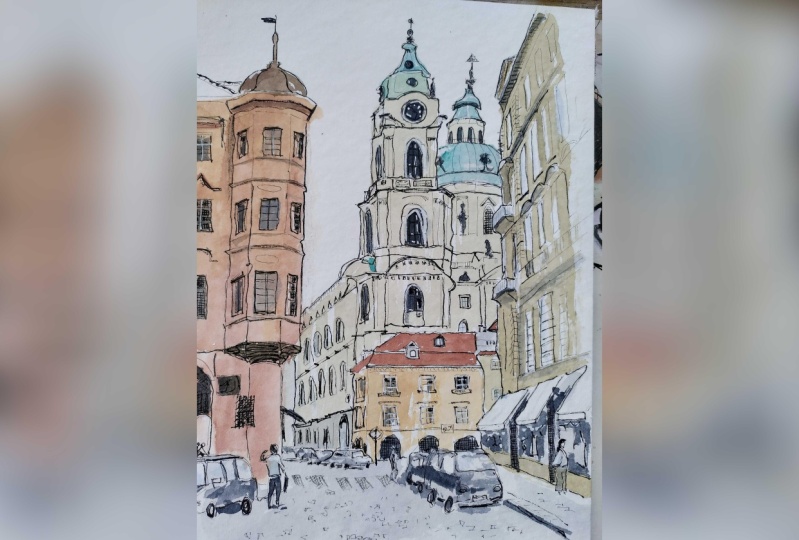
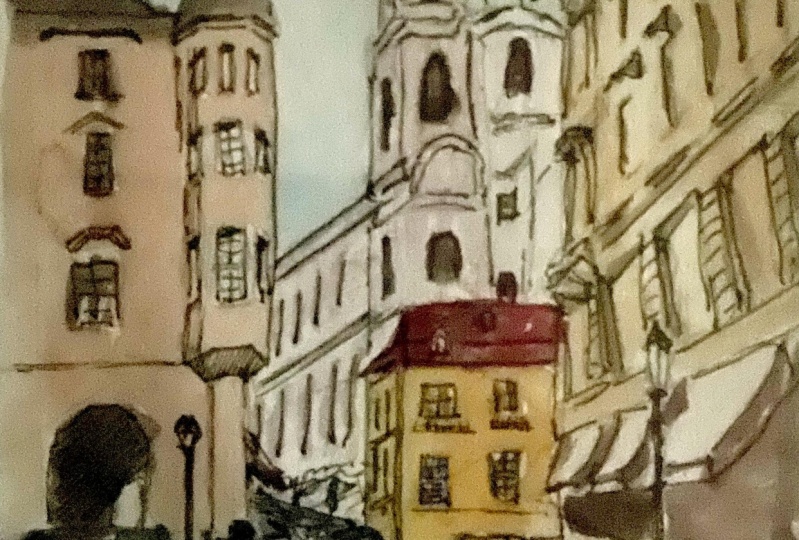
3. Finding Your Style: Let me show you what I
did yesterday before I start sketching
in the sketchbook. I tried to recreate the
scene with pencil and wash, and I didn't like the
look that I have here. So I was trying to
practice squash. Maybe it's because
I did not complete the painting and I had some difficulties with
the media that I use. This is cold press
watercolor paper, so there is some texture. I actually used a
wooden pencil to draw the lines and the pencil
became blunt really quickly. So I had difficulty is
drawing those thin Lysol. While drawing this,
I switched over to using a mechanical pencil
and that's why you see the lines here are
thinner and thinner here. The advantage of using
wooden pencil is you can draw thin
and thick lines. The advantage of using
mechanical pencil is you don't have to
sharpen the pencil. So depending on the look
that you are going for, choose the appropriate
tool. For this sketch. I feel like using a thin
and soul would be better. A pencil that can produce a thinner lines would be better. Or you can use hot press paper where the
paper's surface is smoother. It's going to work much
better with wooden pencils. So we have some pain here on the left
side and right side. This were painted. Wash. Gouache is opaque, but
it's not a 100% opaque. So that lies beneath, we will still show through. So one thing I like
about gouache is the colors can be solid. And this is what I have so far. I actually wanted to paint
the windows with guage. Here you can see up into
two layers with gouache. And I can still see
the lines beneath. What I want is actually
a 100 per cent capacity, but I don't think I
can get that with wash. Maybe I will have
to use acrylic wash, maybe acrylic
brushes more opaque. So for this sketch, I wanted to have some solid colors or gains are blank areas like this with light odd
to create contrast. There are some pencil
smudging here. Here we have solid colors again. These actually worked fine. I painted this in solid
color so that I can draw white lines to represent
the white window frames. Here we have black
against the white, the awning for the wars. It's very challenging. So I could have
drawn with pencils, but I just wanted to try
something different. So I went with watercolor
lines in a state. And this scene has
so much details, it's just not possible
to draw everything. So I didn't like how this looks. So I redrew, seen again
with pen and ink, which is my favorite media. I'm just more comfortable
with pen and ink. I feel like if you want
to try something new, especially a new media, it will be good to test out the media on scrap
pieces of paper first before you use
them to paint or draw. I have this big block of
watercolor paper that I use to test our color mix composition. Or maybe just dropped
out a scene to find out what's challenging
about this scene. I find that it's
more cost-effective to buy a big block of watercolor paper compared to
smaller watercolor paper. Pets with a big block
of watercolor paper. You can see I can do
some row studies on a single pitch and the paper quality for
this is quite good. I actually use both sides
of the paper because watercolor paper has
a 100% cotton content and it is more expensive, but watercolor
techniques do work much better on a 100% cotton
watercolor paper. The brand of paper is important, but it's not that important. So this brand is Bao Han, which is a brand from China. Actually purchase this
because I saw it at an art show and the pricing
is extremely competitive, actually, very
attractive compared to popular brands such
as Fabriano and arches. You can go with
Fabriano and archers. Fluid, Saunders, their wind, they all make good
watercolor paper. Just choose one that
suits your budget. Next thing I want
to talk about is, the more studies you do, the more practice you get, the sooner you will
find your style. Your style will find you. So for me, I don't feel like I'm a wash person
because you would think wash requires you
to really wait for the first layer to dry completely before you can
paint a subsequent layer. With watercolor, I feel
like it's more versatile. You can paint wet on wet. You don't really have to
wait for the first layer to dry unless you are trying to
recreate certain effects. So I feel like I'm
looser and more relaxed when painting
with pen and ink compared to
painting with quash. But just try out
different media just to see which one other
media tools you prefer. There are artists who loved to draw with wooden pencils or maybe graphite blocks or mechanical pencils or
markers or crayons. There are also beautiful
colored pencils. I actually purchased this
box several years ago. You can see it's
still quite new. And as this box of crayons, which is still quite
new because I'm not really a colored pencil
or crayon person. There are artists who
just draw with digital. The thing is, you want
to know which tools or supplies you'll live
until you try them. So try as many supplies, as many styles as you can. What you are looking
at right now is me applying watercolor crown on the watercolor paper in this sketchbook
because the sketchbook is already five years old, I'm not sure if
the paper quality is still intact because here in Singapore
it's very humid. Some of the pages from
the earlier pages, they were actually
affected by humidity. So I'm applying
watercolor ground to restore the sizing so that watercolor can still
work on the paper properly. And I'm only
applying on one page because I'll just be drawing
on this single page. I don't want to draw and
paint here because I'm not sure if the paper quality
is intact. If it's not. When I draw and paint, the ink is going to soak
over to the other sketch, which I actually kinda like. So I don't want bad surprises. So this has to be completely dry before you can draw
and paint on it. This is the Daniel Smith
watercolor ground, and there are several colors. Minute is titanium white because the transparent one wasn't
available at the Art Shop.
4. Let's Draw pt1: I will be drawing the scene in this portrait format,
A5 size sketchbook, which is actually
considered a small sketchbook for this
rather complex scenes. So if you really want to
draw all the details, you will have to use
a bigger Canvas. So with this model schedule, I will have to simplify
a lot of details. And it would help to use a fountain pen that can
produce very thin lines. Otherwise, if your
lines are too thick, the sketch is going
to look a bit off because you won't be able to draw details
with the thick lines. So first thing I want
to do is to mark out the composition, the layout. So earlier we saw the main building is three units and shot a building
in front is one unit, so I'm going to
live another unit here at the bottom for the cars and two
cyclists and front. So let me just mark
out the base here. We have the building here, the shot building,
and we have 12. So this will be the
top of this height. Here will be the height
of the main building. Not including the spiral, not including the very sharp
pointy and at the end. So I may also want to
mark out the shape first just to make sure I have enough space for the buildings on the left and right side. If I find that I don't
have enough space, I will have to redraw
the proportions. When I'm drawing later, I will probably draw
everything a bit smaller because I find
that for me as I draw, I will, I tend to draw
things bigger and bigger. So that is the concern here. I will not be erasing
the pencil marks later. So right now I'm just going to mark out all the areas were
very faint pencil lines, which are probably not
going to be visible when we ink and pin this
with watercolor. Speaking watercolor. I have applied the
watercolor grown this paper. Hopefully that will not affect the watercolor quality. Okay? Remember where the
vanishing point is. This is where you can use
the vanishing point to help you Macau diagonal lines. I'm just going to draw
a few diagonal lines. Okay? I believe I should
have enough space. I'll probably move the
main building slightly to the right side here because I have a tendency to
draw bigger and bigger. I will start by drawing
some thing, **** is small. So this is the triangular
part at the top. I'm drawing this really small. Hopefully I don't run
out of space later. So depending on your
drawing habits, you should draw things
either bigger or smaller. K, I'm holding the pen bit more vertical lease so that
the lines can be thinner. Otherwise, the pen nib for this fountain pen is
actually quite thick. So as you're drawing,
try to spend more time observing what you see
rather than your drawing. When you're looking
at your drawing, you should be comparing what
you have with the scene. So focus your attention to looking at your scene,
observing your sin. Makes sure that you
draw all the parts are correct when the
parts are left out. So for this part here, I'm actually not a growing this with perspective knowledge. I'm just drawing
based on observation. Come down here. Okay, I have a sense that I may actually run out of space. So hopefully I don't. This is the window here.
There's one we know here. There is also one window
on the side here, which I'm going to represent
as this vertical line. Because of perspective, this window on the
side is compressed. Continue to draw with
thin lines if you can. You can outline
the exterior with R. You can draw the 0
with broader strokes. But for interior details, draw them with in minds. The reason is because exterior outline should be more prominent because the
online is the building itself. K, where am I? So this
is the halfway point. This point here is line here. This invisible line here
is the halfway point. So it seems like I may have enough space to
complete this sketch. So from here down, this would be the second unit. Two-thirds of the height. I am not really drawing
exactly what I see. I'm actually using a
lot of artistic license to draw the impression
of this building. Hey, this is what I have so far. Is this building straight? It should look straight. Sometimes when I draw, I find that the building will start to move left, move right. So when drawing, it's
good to maybe put your sketchbook further wages to look and see what
you have so far. That will be a good
habit to have. Always look at the big seen. Oops, notice this line, it's a bit wobbly, or it should be a semicircle, but opps, I actually
drew it a bit wobbly, but it's okay because
it's a sketch. Again, if you are
drawing this as a detailed illustration or ask the Commission P
is for a client. Definitely be more careful. Definitely have
more preparation. I may even draw the whole thing with practice it one
time with pen and ink before I draw the
actual thing with okay, so we have the semicircle part here and we building
with code down here before it's overlapped by the other building in front. So far I'm using thin
lines to draw this. So you really have
to get a feel of how your tools we'll perform. Even know you align your pen can only
produce a thicker lines or maybe switch to her pen that can produce
a thinner lines. So this is the
building in front. Let's draw the site here. We have another line here. There is this little
triangle here and a roof. It may be too small
for you to see. So let's add some details here. I like to draw here and
move somewhere else. When I'm sketching with
the brush strokes, I can add little dots like this. I can add really thin dots by holding my pen more vertically. You can see some pencil lines. Hopefully they will
not show up later on. K. Let's draw this vertical
line to the right side. K looks fine. So for our research
looks fine so far. We have another horizontal line. Kay? As I draw slowly, I feel like my lines, they are first DFF. So for sketches I tend
to like to draw a bit faster so that aligns can appear there or look
more confident. So this part here, let me just zoom out slightly. We have the second unit, so this building
will be this tall. So remember there are
overlapping elements in front. We need to leave space for
the car that's right here, and maybe cars that are just right in front
of this building. But the base of the
building will be here. So this is the base of the
building that are marked out with pencil at the
start of the sketch. And as I've said, I tend to draw bigger
and bigger as I go on. So now I have to move the
bottom of the building down. K. Let's continue. Oops, not enough ink. I will one to draw. Let me compare the roofer. So the height of the roof here will be the height of
these two windows here. So there will be another
unit here at the bottom. So when you are drawing,
always compare. With things that you
have already drawn, it takes time to create art and I'm not a
very patient person, so sometimes I may want to save some time just by
drawing faster. Sometimes I may just
drove from my memory. If you drove from your memory, if you have good
memory, you can draw cars from your memory. But cars can appear with
different perspectives. So it's good to draw
them from observation. You have to spend the time
to make them look right? So when you are really drawing, it may feel like you're
in the zone or you will lose track of time and time
passes really quickly. Okay, so we need to draw the
diagonal lines and make sure that the diagonal lines
are of the correct angle. I don't have the vanishing
point for this diagonal lines, so I'm just going to draw
them based on observation. There seems to be a
street sign in front. We'll draw those later. There is a lady here
crossing the street. I will want to draw
that the heat is higher compared to
the vehicle there. Okay. Let's have longer legs. My shape is a bit of so
maybe it's a bit off. Which is why I said,
you need patients to draw detailed illustrations, otherwise, you may lose focus and start to take shortcuts. Like what I did just now. This is what I have so far. Let's continue to
draw the right side. This building on the right side will be the very
challenging building. Let's let's just
make sure we get the main building done first before we move
to the right side. Okay, So this is
the little spiral. Spiral was that
pointy n and the n, the n will be here. I notice in the photo this
triangle is actually polar, so mine is a bit squashed. You find that your elements are squashed or you
still need to use those squash elements as measurement tools
so they can please add elements are accurately. So I need to place, let me just draw the bigger
shapes first because I didn't know where to
place the pointy end. So I'm going to draw the
bigger shape of the dome here to the right side
and comes down like this. And I can draw now, I can draw the dorm
at a top like this. So you will find that it's challenging to draw
certain areas. Maybe you want to, or maybe you can move to other parts of your
sketch first and then move back. Okay? Okay. So this is the dorm and this
is the right side here. It's very challenging.
So remember, whereas the vanishing point, it's actually to the left
side of this vehicle here. So I place my finger here and
I'm going to draw this line here to that VP. And I'm going to draw
another line, sorry, I'm going to draw the balcony beneath this semicircle here. We have, let's see. We have this line,
horizontal line. This is the second balcony. There is another balcony here. So this line is directly
beneath this point here. This is the semicircle thing. Let me just draw it here so they can get some perspective. This is the side. So this point here is
directly beneath this point. And I can draw the
other balcony here. So I'm dividing
this into one too. Three. Just make sure I get
the proportion right. Before I draw the details. Next, I want to draw
the diagonal lines. The, with the distance of this line is very short compared to the horizontal line. Again here I'm going
to draw a smaller, because I have the
tendency to draw big. This is the bottom
of the balcony. And this is the balcony. And makes sure that diagonalized
good down to the VP. And also make sure that
balcony align vertically. So this will be the
edge of the building. On the right side. There are too many vertical
lines for me to see, so I'm just going to
draw them like this. If you cannot count
the vertical lines, you don't have to draw
those vertical lines. I mean the exact number
of vertical lines. Okay. This is what I have. We have the third balcony. Let's draw the bottom part here. That's fraud building here. So this is where having the pencil graph is
going to be very useful. As part of a k I should have extended
disputing to the right side. Doesn't matter. That's now when you
try to draw a line. When you're drawing a
line, try to draw it with one continuous stroke
cell here you can see me draw this line with
123 different lines. It's not going to
look good because you won't be able to those
lines per family. So try to draw one line with just one line whenever possible. Here I'm drawing this. We have several
lines because I made some mistakes with
proportional here. Next I want to draw
the first floor here. I may have made some mistakes
with the proportion here. So you can see this distance. It's actually, this part
here should be Lahore. It's a whoops, see things
like this will happen. So if mistakes like
this will happen, this perspective is a bit off because if you join these two, these two lines should
not be parallel. If you move them to the BP, the distance here
will be smaller. The distance between these
two lines here will be wider. So the perspective
is a bit off here. Should I draw another line? Yeah, fixed it slightly. Next, let's draw the awnings. We have 123. This one here is mid-size. The end of the earnings
should go to the VP. We have another one. This one is the smaller one, and we have another
big one here. Okay? Some street lamps which
we will draw later. Let's continue to
draw the thing here. So I made a mistake. So now this part here,
it's much taller. I'm not sure if I
can fix that now. I should just leave it as it is. So that's why I'm getting
the proportions right is fairly important because if
you get the proportion wrong, all the things that
you are going to draw between this area here, in this area here
it's going to be off. You may be able to get the
details to look right, but the proportion is of k. Let's continue to divide
this sketch here. Another habit that I have when it comes to
sketching is I find, as I lose concentration
will tend to draw faster and faster and that's where
I will make mistakes. When drawing on-location. Actually doesn't really
matter if you make mistakes because you are
drawing on location. So it is going to be tougher, spread likely to make mistakes. But that's part of
the fun of drawing. On occasion you
get that rawness. People understand that
you're drawing on location, that you will make mistakes.
5. Let's Draw pt2: Let's draw the top part here. The part that comes out. Oops, I realized that the part that comes
out should be here. So this angle is difficult. Draw this angle to the VP. If you cannot comprehend what you are drawing,
for example, if your brain is saying
that you should not draw this line at this
angle because it looks off. Just ignore what your
brain is telling you. Just draw that line to the VP. I can see this part
here is thicker. And I want to draw some
horizontal strokes here to remind me this is the underside
of this extruded part. The diagonal lines seem to
be at the correct angles. So next I want to
divide this building on the right side into
different sections so I can see another line
that comes out here. Again, makes sure to draw
that line to the VP. So what makes sure
that the line, I may have to do this action. So rho times just to get
that line, the angle right. Next, I'm going to divide here. So here and here. So as the lines
move down the line, the NGO should change like
this with the VP here. Okay, So this is the part where I met the mystics Ottawa
where I made a mistake. Otherwise, different
sections here should appear to
be equidistance. But it's okay. We'll just draw what make
use of what we have here. So once you have this, you can just form. There are similar or
semi-circles here. So you may want to divide
them into different sections. I count 61 trick you
can use to divide the six into equidistance is
to draw the bottom first. So we have 123456. So we have the bottom drawn. You can now draw
the semicircle top. And I realized there is another
balcony that starts here, just beneath the
semisolid over here. And I realized that
I did not leave space to draw that balcony. Because the balcony
actually looks like this. So if I draw the
balcony right now, you can see I did not actually
leave some space here. So if I had drawn this,
get, I've prepared, if I've drafted this more
carefully with pencil, I would have identified as problematic area.
I guess it's okay. It's a sketch, so maybe I
can just draw it like this. So when sketching,
there will be mistakes, especially if you
are a beginner. And just learn from
those mistakes. This is the balcony. Makes sure this balcony
aligns to the bottom balcony. And make sure all the
windows a line from top. Now, notice how thick
my lines are right now. Hey, if you draw our
elements with thick lines, those elements are going
to get your attention. So probably wrong choice of linewidth here, k, k. So here I actually, on this side of the sketch, I actually made a
lot of mistakes. So this is really where you
should be really careful. Let's divide this into
different sections. So each time you draw a line that is not at the
correct angle, you will know that it's off. Straight away. You will know that it's off. So that's really important. So that's why it's very
important to find out whether P, P is solve for. I think this still
looks alright. It's not like totally off. Just remember that when drawing, sometimes we are not trying to replicate the exact likeness. The final drawings to
see how you can use your drawing skills
to recreate a scene. Which is why it's always
very fun to see how RT, how different artists would
handle the same soon, interpret the same scene. Okay? Makes sure again that everything
is aligned vertically. If you find that you don't have space to draw the details, you can just leave
those details at all. Okay, So this part
is very challenging. Hey, for the top part again, and we're just going to
draw some vertical lines. If you find that
everything is compressed, you can just use vertical lines to represent those details. Next, let's draw
the vehicles puck here by the side of the
street and two cyclists. So the top of the car, for this car at the back, let me just draw this
with thin lines again. We'll go down like this. We have to tires, this is very compressed or draw the tires were
close together. You may not even be able to draw the details on this
side of the vehicle. And we have the
other vehicle here, this is the back. We have a wheel here. We have the side of the vehicle. So this shape, as
you are drawing, your brain is going
to tell you, Hey, this is not how the site
of a car looks like, but you should draw it. How are, as it's shown in C. We have the cycle is, the shoulder is here. Let's place the
shoulders here first. The head guy is wearing a hat. We have to hire, or maybe the years showed
us come out like this. Is pushing bicycle, bicycle. I'm just going to draw it
with a contour line drawings. The body. We have the lady here. If I had the side. So on the body we have
another bicycle here. So as you're drawing
really this part, you really have to
pay attention to the shapes and silhouette. This, let's continue
to draw the vehicle. This is the front of
the current window. The wheel which is here, which you probably cannot see. But if you have enough
experience with drawing cars, you will be able to fill in
the details from your memory. But when it comes to drawing
cars in perspective, it's good to rely
on what you see, drawn them based on observation. In the background we have the
buildings. Should I draw? I shall leave the windows. I don't want to
draw the windows. I can draw the windows
with white gel pen later. After this. This line will go down,
pass through here. We have this building here. So maybe I can draw the
street lamps right? Now. There is one here
that's ends here. Oops, my line is not straight. One here. One strip them is higher, taller than the other. And the street lamps are
in perspective as well. They follow the same perspective
as they're building, which is just behind. So the top here overlaps
this owning here. Okay, my street lamp
doesn't look that great. So at this point, I'm starting to
lose concentration. So if you find out you
are losing concentration, you may want to take a break and come back
to this sketch later. If I'm drawing out on location, I may actually just walk
around just to stretch. Our arms just to
stretch my legs. And maybe you just stand away from the sketch so
that I can look at my sketch from a new perspective and I can gain
some new insights. So that's what I would do when
I'm sketching on location, or just walk around, stretch my feet, and
look at my sketch again. Well, there are many
shops here in front. Photoshop is I'm just going
to use my artistic license to draw the shop France. Maybe there are some posters. Just do suggest. There are actually shops here. And next we can draw the
building on the left side, which is first simple
building to draw, relatively speaking, compared
to the main building and the building
on the right size. So for this building, I want to draw the
person here walking. The feet will end at tires here, so we have to feed her arms out. This guy is stretching, is scratching his head. We have a vehicle
on the left side. So when you draw the vehicle, make sure you use the person on the right as a measurement tool. I'm going to draw
this vehicle a bit smaller so that I can fit the vehicle on the
page because otherwise, if this vehicle is cut off, it looks kinda weird. So I'm going to draw
this vehicle a bit smaller so that you
can fit in the scene. Okay, so let's draw the
circular pillar here. This line will be
this direction. I may not be able to
fit the doorway here. Let's see if I can. Oh, I actually can. So this part here, this part here will be
the light delete area. We have our seems to be many
people here in the shade. So that's continuing to draw. As you're drawing up. Make sure to align
everything that you draw here to the main building. So in this case, I may just want to
draw the top first. So I'm going to align this horizontal line
to the clock phase. Make sure you align it to
the bottom here as well. I hope that this has
angled correctly. I'm actually not
sitting directly in front of my sketchbook, so it's difficult for me
to see where the line is. Notice this part here. I ran out of space here on the left side,
which is, alright. Maybe it would be more
convenient to run out of space for the
building on the right side. If you run out of space here, you don't have to draw
all this details. Okay, so now that I've drawn the top and I have
the bottom as well, just joined top to the bottom. And if you have measured everything correctly,
they should join. Well, otherwise, things are
going to look a bit off. For the windows. I'm going to divide this into 123 and then divide
into smallest spaces so that I can draw the windows
at the correct location. So this window is here. There's another one
here on the side. In perspective. I can draw a line, you can draw a line beneath from to help you
align the windows. We have another window here. Just draw the big ships first before you
fill in the lines. So in this case, half
and half and half. Same thing here. And not a window at the top. Just make sure that Windows on the site are in perspective. And for the windows
here on the left side, I'm just going to draw one. Minutes for this one, because there is a
unique feature here, which is a triangle top. Oh, I may want to draw this as well because it's a circular
one instead of a triangle. Okay? You may also choose not
to draw the windows. You can draw them with
white gel pen later. Maybe I can enhance this
with white gel pen later. Maybe I shouldn't have
drawn the windows. So again, if you have
done some planning, if you have dropped
out the scene, maybe you can leave
this undrawn. Can draw that. Next. Let's draw the vehicles here
and the buildings behind. We draw the vehicles
first because they are in front of the building. Behind. There are many vehicles
are behind. Okay. So the diagonal line here for
this part here will start. Align to the window here. And we'll, and West
a semicircle here. There is another
semicircle here. So you start here and here. So let's just joined the lights. We can see a slight window here. And let's divide this again into different height,
different sections. We have a line that
goes down here. This seems to be the
age of disputing. We can draw this line to this line here and
this line here. So again, as you draw
the diagonal lines, as you move down, the lines will become
more horizontal. And let's see, just keep dividing the different
sections into smaller and smaller sections. If you can see the details, just use R, in this case, vertical lines to
represent the details. I'm taking the shortcut here because I'm starting
to lose concentration. This is ready to scan, is going to take a
long time to draw. But if you have to patients or to draw something like this, the end result is going
to look pretty good. And I'm very sure you will
be very satisfied with the end result with what
you have accomplished. While there are a lot more
details in the background. So for Windows here, I did not draw them. I will draw them with
white gel pen later. Let's draw some windows
on the ground level. So this gadget is
almost complete. Just take a look around your sketch and
see what are they. Things you may have
left out accidentally. So for this part here, I really messed up here. So let's not over this area. So let's wait for the ink to dry completely before we paint. I'm going to place more dots
here for texture in front, compared two dots
in the background, which are going to be smaller. So I'm going to
place smaller dots and fewer dots in
depth background, but bigger dots and more
dots in the foreground. That is also got to
do with perspective. Things that are closer to us
are gonna be in more detail, is going to look bigger and you can draw them with more clarity. Before we paint the sketch, I will want to take a photo
or scan this sketch first just in case things go
wrong later and they may, things may go wrong later. Let me just add this
that I did not draw.
6. Adding Colours pt1: This cache took me
40 minutes to draw. If I were to draw this on
a larger piece of paper, it's probably going to take
me an hour to 1.5 hours. Most of the time is going to be drawing the building
on the right side because there is just so much details and perspective, it's
very challenging. So it's going to
take time to get the perspective right hand to draw the proportions
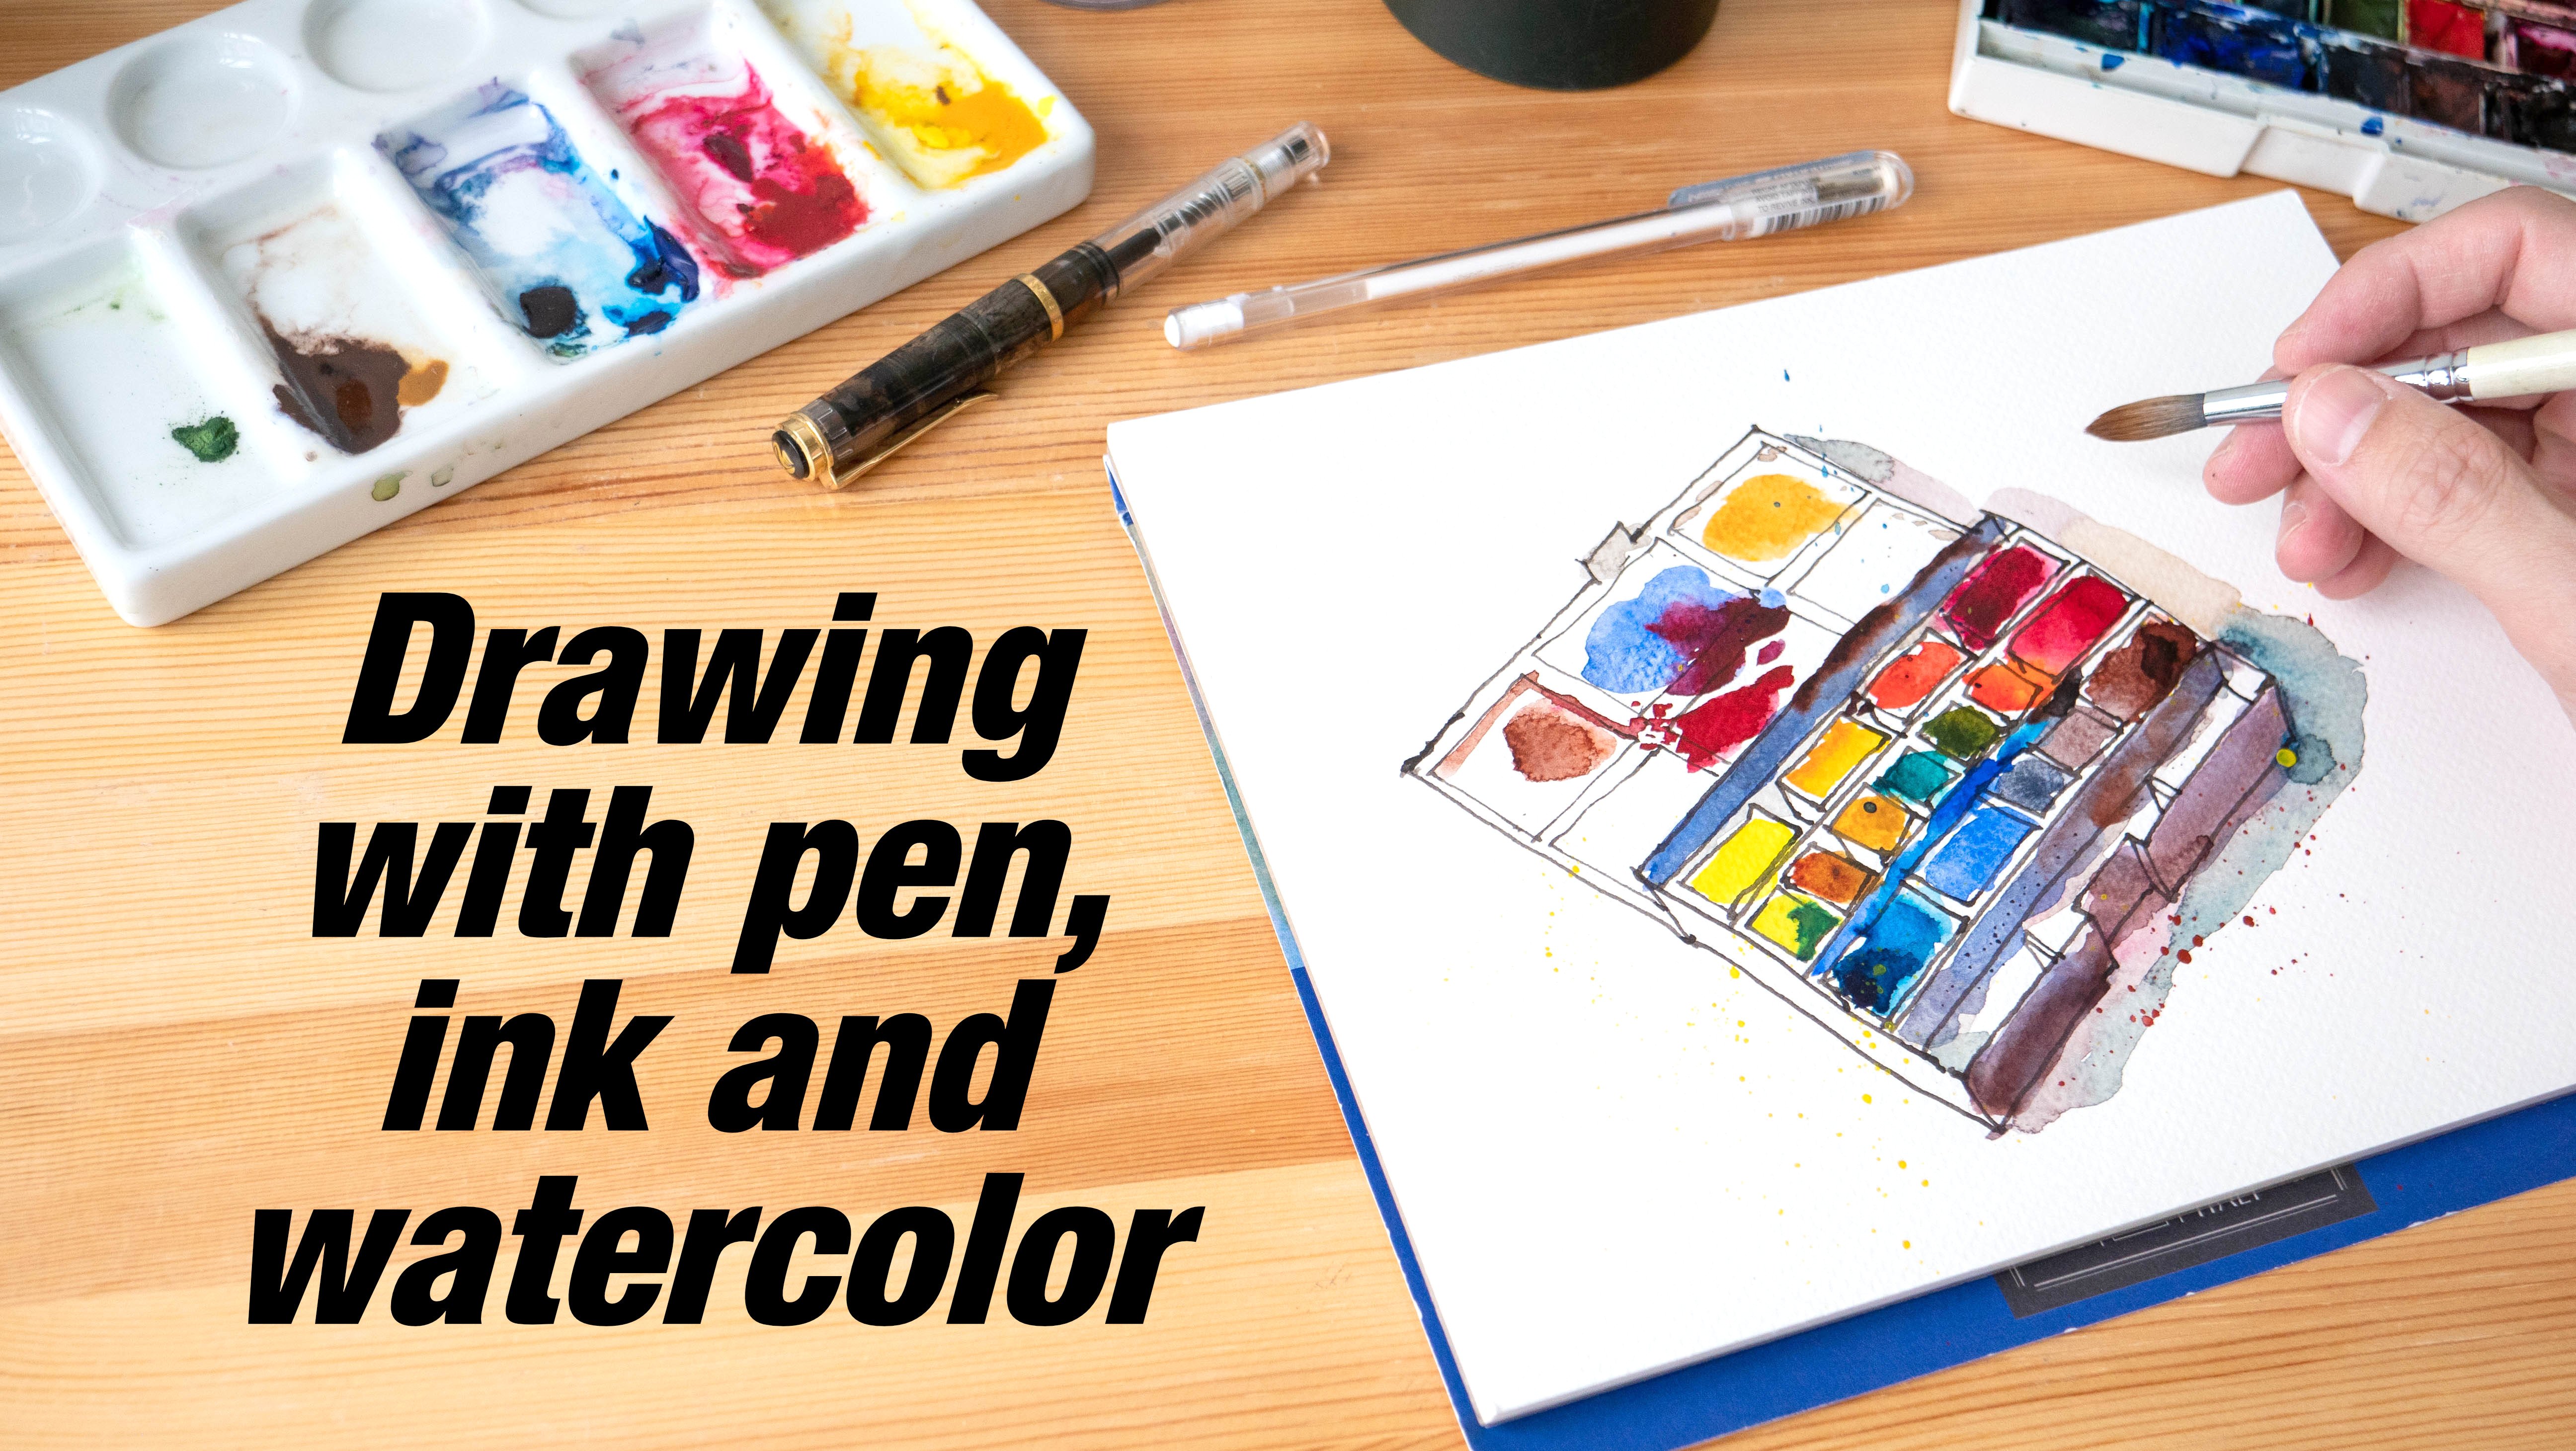
details, right? So before we paint, let me show you the tools that I have. Two cups of water. This water, mr. Too
wet watercolor. I have a small size
four brush and a bigger size eight round brush. The colors I'll
be using would be Hansa yellow, medium
french, ultramarine, blue for the really dark areas, and maybe a warm
red, raw sienna. If I remember this correctly, stick with a limited
color palette if you can, because it's going to make
color mixing so much easier. Don't use all the
colors even when you have all these colors. I'm going to start by painting
the main building first. So I'm going to use these
three colors, Hansa, Yellow, Medium, ultra marine. And this right here, I'm not sure what rate this is, either pyruvate or pyro scarlet. Just mix this neutral color. I also have some paper
here to test out my mix just to make
sure that I get that neutral color, right? It's a bit more yellow now, I, maybe I want it
to be more neutral. This looks fine. Let's paint. Make sure you don't paint
the green or the blue parts. Just paint over the building. There is some highlights
on the left side, so I don't want to paint like everything on the
left has this color. I can also add a bit more
water just to dilute the mix, just to get some variation. So instead of mixing
different colors, I mean, charging in different colors to get the variation I'm adding. I'm adding water to
make certain areas lighter and darker to
get the variation. So just make sure paint cover all the areas
that you need to hover. And I've got to say that
the watercolor paper, I think we're fine. Let me add some raw sienna to
pin this building in front. Just to make the color
slightly different. This brush is a bit too big, so I will want to switch
over to a smaller brush. Now, we're going
to pin this side first and applies to come
watch over this area here, just to give this site
which is not lit by light. More colors, I'm going to add more raw sienna and a warm red to make this slightly warmer. Just make sure you
don't add too much. Okay, so this is where I can see the pay per fiber is coming off. So That's the problem
with this paper. Let's to o paper,
watercolor paper. It can be damaged by humidity. We keep them for too long. So it's better to keep them in a dry box or maybe a Ziploc bag. And now I'm going to
use raw sienna to paint colored areas of
this beauty on the side. I'll be using this to draw
some details as well. This whole area
here seems to be in raw sienna here as well. But here I will want
to draw some details. Don't paint everything
with color. So I have some highlights. Don't paint everything with
the colors here as well. It's actually not easy
to know which areas to paint with the color and not the ears to
paint with two colors. So I'm just going to
leave the brighter areas. For darker areas, you may
want to add some ultramarine, maybe some red just to
get the darker areas. But let's paint the
colored areas first. The bottom of the balcony
should be in color. This is what we have so far. So far, so good. I left out this area accidentally
with the initial color. So let me see if I can pick
up the initial colored pin. This area here. Okay, I think it still works, although the color is not
the same as this color. So if possible, try
to pin everything with the same color
before we move on. Because if you go
and pick up a color, that color is not going
to look exactly the same. Alright, so next, let's pin this building
on the left side. For that, I'm going to use a lot more red and a
lot more raw sienna. Don't add too much red
at more raw sienna. First. K. If you need more red, just add the red. Just a tiny bit of red
because red is so strong. Here I'm charging the
red into the wet wash. Make sure you get a ****, right. I just realized that I'm
painting with the sketchbook flat on the paper, on the table. The water is not
flowing down. K. It looks alright. It looks alright, so far, I can see some problem
with the paper. The water actually just soaks into the
paper straightaway. I can feel that and I
can see that as well. So the problem with that is when water goes into the paper, the water is not going
to move on the paper. So if you want to
charge in colors, the color is not going to
spread out nicely because this paper is damaged from afar. I can tell this color is not correct because everything
is now in mid value. So the color here is
supposed to be much darker. So I will need to definitely add more paint and more water. Just to make this darker. I may also need to add some ultramarine here to make this bottom
here and darker. So it's lighter,
slightly lighter at the top, darker at the bottom. So let me just paint
another layer over this. Okay, this looks fine. So for the bottom part here, I'm going to add
even more paint. Okay? It seems like
there's even more red here, which is fine. And here at the bottom I
will want to add more, a bit of ultramarine just
to make it slightly darker. Oops, I accidentally painted
over this site here. Let's see if I can
rescue with that. Nope. Can't be done because
the paper is damaged. So when I paint over the area to the water and the
pigment actually just went in straight to the paper. If this paper is not damaged, I can actually just
lift off paint because the paint is still on the paper
and not inside the paper. So that's what
happens when you keep your watercolor paper too long. I can use the same wash to pain. Roof here. Maybe add more paint to make this color stronger, obvious. And here I notice I left
out this area again, you can see I did not paint that with the initial
wash with the first wash. So I will have to go in and
correct that mistake later. Let me make sure that
this line is horizontal. Okay? Next let's paint road for the row and it's
going to be Hansa yellow with a warm red and ultramarine just mix a
color that is more bluish, cool on the cooler side. So if you want it to
be on the cooler side, you will have to add
more ultramarine. So this looks nice. This is the mix of
the three colors, yellow, ultramarine, and maybe pyro scarlet
or piracy rate. There is a zebra crossing there. So our paint that later, the white gel pen. You can also use this wash
to paint over the car. Just make sure the
highlighted areas are white and paint over it
to highlight the areas. This requires while I kept seeing patients,
but seriously, you really need
patients to make art K. We have this guy here
and the lady here. And I can use this to paint front of the shops
which are in shadow. I will mix a darker color
to paint the blacks later. Right now, I just wanted
to paint this with a very light gray wash. The same marks that
you see on the street. Okay. So here you
notice it's a bit more yellow because there
is more yellow. If you want to stitch
the temperature, color, temperature just add
more blue, more Ultramarine. Okay, let's see. We have the window here. Parts of the cars, we will
have to be darker later. Let's go back to fix
this area that I left out accidentally.
Alright, not too bad.
7. Adding Colours Pt2: Let's paint the top. This is the little blue
mixed with some yellow. But more blue. Oops, x tend to lead paint
over the wrong part here. I think it's alright.
Sometimes you have to go with domestic rather
than fix the mistake. So I can see another problem. Notice how the color
become more saturated. That's the problem
with the paper. Oh, this part here
is also green. Maybe I can use the
paper to my advantage. So let me just paint
over this area. So rho times just
to make it darker, this happens to be the same color of the tissue
and this lady is worrying. So everything seems to be
in mid value right now. Nothing stands out except for the line art which is
black against the colors. So now we need to mix
something darker. The shadows, areas
which are really dark. For that, I'm going to use
blue mixed with the warm red. You find it too blue or too red. You can add some yellow just
to neutralize the color. Just to get something that
is black, close to black. But don't mix the
colors completely. Because you can see the
individual colors that were used to mix the color. It's more interesting. So be very careful when
you're painting this. You may also want to leave
some highlighted areas. The bottom of the vehicle
will be almost completely black. Make sure to sign. The license plate
is still white. Site windows look black. To me. This part
here it looks black. Guy is wearing black
pens with slight shadow. Shadow behind, beneath the feet. This part here is black. It's good to have a
brush with sharp point. This will allow you to paint
the details more easily. Some of the windows are
white, some are black. So just continue to paint
everything that is darker. Darker. Just create contrast,
where contrast is needed. Once you paint the shadows, the physical form of the
buildings will start to appear. And it's really
satisfying to look at. We have two windows,
black, black. This will dry lighter, so when it dries lighter, I will paint over the windows. Again. We found
the darker color. We have another wash
windows, black. This window is black
as well. Hopes. Here, black windows here. This looks black. The cost here, the
sites are black. So this is a bit more reddish, so let me add a bit
more blue to it. Oops. Just make sure the shape of the cars are still recognizable. That is the most
important thing. So you may want to
just look away. I'll stand further away from your sketch just to
look and see whether or not you are able to retain
the shape of the cars. The shape is very important. So when painting
the shapes are very important because the shapes will help you
identify the subject. We will paint does
influence later. So be careful. So this looks blue to me. Again, I need to mix it
with a bit of red and yellow just to make sure
that is this black. I'll close to black. Actually,
I think it looks fine. That's just continue. I'm going to make
sure that the head of this person is
still recognizable. So let me just paint
over the head. So the head at a guy
is wearing is black. But I'm going to leave
it white just so that. Hat is recognizable. For the shop France
makes sure you paint. Leave some details. I'm just going to paint
over the street lamp and maybe add some
details later. We've done white gel
pen to highlight the H. So for the shop friends, I'm going to leave the
signs, the posters. Why? Or unpainted. Maybe I can add some
white posters later with white gel pen
or colored posters. Hair for this lady is black. Let's make the pens here darker. So now I can paint over the areas which are
supposed to be darker. Just to create even
more contrast. I can draw vertical lines
here and grit textures. And here we get darker
windows, darker. K two cars in the background
needs to be darker as well because everything
here is now in mid value. Next, we will have raw
sienna and some way to enhance the darker areas, the shadow areas here. You don't need to add blue. Or in this case,
if you add blue, you can get a darker shade. That here I'm just going to
use raw sienna rate just to enhance the colors. Then I'll bit more to make, to create a darker
shade of the color. Just to create the
illusion of shadow. It looks like I'm
Medina the colors, so maybe I can stop. I can actually use the same
color for the skin tones. Are these are people
on the street. How to use the Posca paint
marker to add more videos. So I should have left this. I shouldn't have drawn the
window frames were black. Instead, I should have
drawn the window frames, my white gel pen. You can use the white
marker to add details. That's at sine parts
may be there are lights in the sharps. The truck, sorry,
the zebra crossing. Here. He showed when you're
drawing the zebra crossing, the perspective is correct. Let's draw the windows. So far this Windows, I should have painted
a dark rectangle. And then draw the white frames on top of the darker rectangles. Now I'm doing, I'm adding
details the other way round, which is drawing the frames and painting the little shapes. It's difficult. So the sequence of drawing
and painting is important. It will be easier to draw
the rectangular shapes first before you
actually paint this. And I just realize
while painting this, then this area here
should be darker. Because right now
it doesn't stand out against the beauty
in the background. So to help the beauty and the background stand
out a bit more, I'm going to make
this roof give this, make this roof darker just by painting
another layer over it. Notice the paper fiber. I'm not sure if you
can see the texture of the paper fiber. You should not see
the texture of the paper fiber if the
paper is not damaged. But here it's damaged. This part here is also
read a darker red. And there seems to
be a statue here. I'm just going to live
the sketch as it is. Maybe use the ink pen to
add some more details on. Just to give this
sketch some texture. We use the white gel pen here. I can see some highlights here. Or maybe more black
here in the background. Maybe black for, known for
blacks for the car style will use watercolor because the
black ink is just black. If you use watercolor black
that you mix yourself, it's going to look better. Let's take a closer
look at the sketch. Now if you still want
to add some details, make sure you draw
the venous line. You possibly can by holding
the pen more vertically. If you're using a fountain pen. Because once the
paint is on paper, you apply ink on
the paper again, the lines are going
to be thicker. So here I'm actually just
draw some thinner lines to add some details that
I may have missed out. Actually, I should have
drawn this before I paint. The sketch. Doesn't matter. You can do this
afterwards as well, especially if you want to
enhance certain details. This part here maybe I
can add more details. K here, maybe darker details. I notice there is this
extra line of detail here. So as you add more
details to sketch, we'll slowly home to live. So for the roof here, I'm adding really thin lines. I'm drawing those lines very quickly so that the
lines are thin. And all this part
here is where I should have painted over her with this color,
but I did not. So now I'm just going
to pretend that the roof or these
two are just black. Let me add some details here. 123123. So the watercolor that I
used earlier doesn't Good. Okay. Or bottom of the
vehicles are just black. Maybe use this sorry. Let me use this to draw the wheels to make
the wheels darker. There is an awning here
coming down this 45 degrees. The hair of this
person is black. Maybe depends, will be darker. He's holding something. Maybe this darker
to build a darker. Okay, maybe some texture here. This building looks quite dirty, so I can actually more details. Dots here on this side. This will also help
create more contrast. So we have texture against
non textured surface. So there are different
ways to create contrast. You didn't create it with just value contrast
black versus white. You can have color contrast, color versus non color. You can have texture contrast, texture versus non
textured surfaces. The bottom here, or this line
here seems to be darker. I'm going to pin this, sorry, I draw this line
here, darker as well. Okay. Yeah, So this sketch, does this hit a bit
of the board D? Yeah, I'm going to
leave this as it is. But if you look close, the head is actually of
the body to the right. So it should be in the
center of the body. So that was that was
me being colors there. Lady with handbag, looking at stone gain front
of the store. Make sure to write the
date of your sketch. And if you drew
this on-location, makes sure to write the
name of the place as well. And psi on him.
8. Fixing Mistakes: In this lesson, I want to talk
about correcting mistakes. So once you have your
sketch drawn and painted, I don't actually recommend
correcting your mistakes on paper because chances are it's going to make things worse. If you made a mistake
with your line art, you can try to draw over it. So here I have
extended this line all the way here
underneath the balcony, which I shouldn't have
done so because I need to draw the balcony first before I draw the lines
beneath, It's a mistake. And I tried to draw the
balcony on top of the mistake. And in this case the mistake
doesn't look that obvious, so it works here. But if you are not
sure whether or not the result is going to
turn out better or worse. I highly recommend you just leave that area alone and maybe work on some other
areas verse and come back here to decide again, the atomistic with
this sketch is the perspective
of this building. So I found a vanishing point, which is somewhere around here. So you can see that
diagonal line here. This is at the correct angle because it's going down in
this direction to the BP. So as the building goes up, we can see this line here,
this diagonal line here. It still looks, all right. But here you can see
the angle of the line that I've drawn is actually like this instead of like this. So there is this very
little difference, slight difference in angle. And that actually makes
all the difference. Here. This point, you can see the
angled lines like this. It should be like this, but it's like this. And at the top of the building, again, it's like this
instead of like this. So the difference between
the angles versus the actual angle will result in the perspective
not looking accurate. So in this case, if you want
to get the angles right, I highly recommend
you use a pencil to draft out this area
first and to mark out the diagonal lines at the correct angle before you
start sketching with ink. And when you are drawing, your brain is going
to tell you to draw, maybe fix the angles slightly, maybe change the angle slightly because it doesn't look right. Ignore what your
brain tells. You. Just draw according to the pencil drafting lines
that you have laid out. Because those lines that you
have laid out at the start, before the start of the sketch. Those angles are
going to be accurate. It's just that your brain is
going to tell you otherwise, growing angled lines
from observation, especially when the
perspective is very compressed, is
quite challenging. So it's very helpful to
find a vanishing 0.1. Mistakes can happen
with mental fatigue, especially if you
have been drawing the sketch for
more than an hour. Especially when you're trying to figure out how to
draw the details, making sure all the details
are where they should be. It can get exhausting mentally. So that's where, uh, when you may want to
take some shortcuts and that's when mistakes can happen. And mistakes can happen even to experience artists as well. It's not about the
techniques sometimes, sometimes it's really about concentration and
how focused you are. And when you're
sketching on location, there are other
external factors that play a part to affect
your concentration, such as the hot or cold weather, people looking behind
the shoulders, the noise, the
traffic, the smoke. So you may lose
concentration even faster. So that's where your knowledge of perspective will
really help you draw faster and more accurately
so that you don't get tired before you
finish your sketch. If you're drawing a one-point
perspective and one of the buildings is affected by
the one-point perspective. And you look at the
diagonal lines and they look like they
are parallel lines. That's a giveaway that
the perspective is off. So all these diagonal lines, they should be at
different angles. For these two diagonal lines, I can see the angles,
they are kinda similar. So this is of, even if there is a slight
difference of one degree, your brain will
know that it's off. If you take a very close
look at this area here, it may not seem like
the perspective is off. If you look at our
sketch from a far, you can tell in an instance that perspective
is slightly off. If you don't know why
the perspective is off, while you can create small draft sketches
to test perspective, to see what's going on. If you really don't know what's going on with the perspective, I highly recommend
you learn more about perspective because
it's really useful. So now I want to correct. The perspective of this building on a separate piece of paper. So these are some
really quick sketches that I have redrawn
for this scene. Let's do a quick
look here, right? So this is a very
classic mistake. The lines look almost parallel. This line is at an angle
which is different, visibly different
competitive this but this three lines,
they look similar. So straight away, I know
the perspective is off. So this is a pencil sketch, and I've drawn this
since rho times because each time I drew it
something as just a bit off. So this is the building here. I've drawn the building
as something that I can use to measure the
height of this building. So the vanishing point is here. So I tried to draw the diagonal lines as
carefully as I can. And again, I can see
the diagonal lines, they are a bit off. Now if you're drawing on a big piece of paper
or a big Canvas, make sure you get the drafting
lines down accurately. If you are drawing
on a smaller piece of paper or sketchbook, It's easier because when you
draw those diagonal lines, you can just draw
a short stroke. But when you're on a
big piece of paper, you have to draw a
much longer line. So you have to make sure that that long line has the
correct angle throughout. If you're drawing that
scene from observation, one technique you
can use is this. Let me just draw that small
building in front first. Okay? So this is the age of the
building on the right side. This is actually
much taller anyway. I'm just going to make
the height like this. So let's say there are
123 floors, three flows. So we need to divide
the three floors into C, 12 and three. So we can let the line fit up. People looking out, sketch, they were just imagine
the details up there so you don't really
have to draw everything. We have the vanishing
point here, which we will not be using because we are drawing
from observation. So for drawing, when you're
drawing from observation, it's very important to
make sure that this angle, angle at the boundary
is accurate. So this is a bit off. So let's use this line instead
of the line at the bottom. You have to make sure that
this angle is very accurate. And this angle is very accurate. I'm actually using the VP. So this line again, it's off. It should be like this. This is the line that I want to use. This is not the line. Okay? So once you have this
line, this line here, this line which represents
the front of this building. You can draw without
the help of the VP. Just find a midpoint
which is somewhere here. And draw this angle
between these two angles. So this will look like this. And with this line, you can again divide
the pots here. This just suggests
very faint light lines just to create the
perspective grid on this side of the building. So now that you have
created a perspective grid, you can draw the angled lines more easily, more accurately. This is roaring
from observation. This line, yeah. So it's very important to get this line and
this line accurate. Even if you make a
slight mistake here at this mistake here is going to affect the
perspective of all this lines. So every mistake you make at
the start of your sketch, it's going to affect
your drawing later on. Using this technique,
you can actually draw tall buildings where you have no idea where
the vanishing point is. So half, this is half, this is the halfway point of
this point and this point. And the halfway point
and this point and this point is up here. So we just joined them. Joy, joy, joy, joy, joy, joy. And all these angles will
be relatively accurate. Alright, let's try and draw this building again
and only disputing. So I'm going to draw
the small few thing at the bottom here
just to get some. Something that I can use to
measure the main building, the vanishing point is a bar, one with away, which
is a, which is here. While I'm sketching this, if
you can spot my mistakes, That's great while
you are sketching, and you can spot your own
mistakes. That's great. If you can identify
your mistakes, you can correct your mistakes. If you don't know
there is a mistake while you can't
correct the mistake. So the height of the building on the right
side is actually three units. So let's try and draw one unit, two unit, three units. So it's here. This is the age of the building. And now we want to observe
very closely the shape, the details of the building. On the right side, we
can see the balcony actually coming out of
the edge of the building. We need to this time divide the building
into different floors. We have 12345. There are actually five floors. So this is the top
of the building. So here I'm going to make sure this time I draw
this angle accurately. You can see how steep
this line really is. So once you measure the angle, makes sure you remember the
angle and draw that angle. And don't let your
brain tell you that, Oh, the angle is a bit off. Sometimes I may just
use two pencils or a ruler just to get
that angle right. In this case, this
pencil is actually better competitors pencil
because this is curve, so it may affect my judgment, which is why I changed to using this pencil with a straight it. So maybe I can use this
street H pencil to draw this. See, when I drew
this really quickly, the angle is off. So angles should be like this. Yeah, it looks better. It's a very steep line. This line will extend down. And we have this, you know what, let me just draw, extend this line from the
VP or we hear. Again, I drew this
angle slightly off. This is the correct angle. This is the wrong angle. So five floors, we need to
divide this into five floors. We have the mid
point will be here. So let's see. We have one here
for number 12345. All right, looks
good enough for me. And now we can just extend diagonal line
with the **** out of vp. Let's draw the
diagonal lines here, here, here, and here. This is the line. So now if you look at all
these diagonal lines, they are all at
different angles. At this stage, I can
actually start inking. So let's draw the
store front here. We have one owning coming
out at this angle. We. So when you're drawing, just make sure that
inclined follows the pencil lines,
the drafting lines. Your brain is going
to tell you, nope, that's not the angle, but follow the drafting lines. Okay. So let's draw the balcony. So the line will go up here. This line will go out of
the h of building here. This, and this line will go to the VP because it's
factored by the VP. And we have this
support here beneath, which I'm going to draw
with a very simple shape. We have some details. We have the other support here, this diagonal line that's
affected by the VPS. Well, let's draw this. There is actually
a lot more detail with this area that I'm drawing, but I'm just drawing
the main shapes here. This time we will draw
the balcony first. Make sure this part will
align to this part here. Draw like this, and this part here extend
all the way down. And again, I'm going to simplify the support beneath
this part here. There is, the balcony is
actually much taller here, and we have this thing
that stands here. If you are drawing on
a big piece of paper, you can draw more details
which can work too often teach or work against you because you have a lot
more things to draw now. Okay, so next, let's draw
the other balcony on top. Again, I'm going to align this
line all the way up here, push it to the left side. This is a circular or
semicircle structure. Oops, oops, because
this should go here. So again, I lost concentration. It is very easy to
lose concentration, especially when you are
drawing so much details. So let's draw this part. Sometimes it's
difficult for me to see the details as well. We have a pillar that's
actually standing here, and another pillar
which is ending here. Let me just color this black so they can see it more clearly. There is a gap between
these two pillars. The details here is lost because I don't have space
to draw the digital, so I'm just going to
draw it like this. But in reality it's
supposed to look like this. Supposed to look like this. This is the semicircle
being on top. Some details here. And I want to extend
this to the right side. This will x, this part here, we're actually aligned here. So I did not draw
it this way here. So it may be helpful to draw some of this with
pencil first as well. The angles here at the top
are extremely challenging. So it would be good to have
some pencil lines as well. So as you are drawing,
you will start to develop your own techniques and ways to solve challenging
sketching challenges. This line that I'm
about to draw, should the angle of this
line should be between this line here and
this line here. This. So let's draw. So there are different
windows here. Six, if I counted correctly. So how do you draw
the six windows? I've already told you that
this is actually a tiny thing that I learned or
discovered myself. Just draw like 123456, then draw the triangles on top. My triangles are a bit off, but that's the gist
of this technique. Same for the both of them here. Yeah, so once you have
divided into six, you can then just
draw the six K. We have semicircle
or design here. Once you've drawn this, make sure you draw the
vertical lines down and make sure that Windows a line
from top down all the way. So this is where I will tell
you to just go try to redraw any mistakes that you
have made and see if you can find any solutions
to fix those mistakes. Drawing is fun this way, because drawing is like
fixing a jigsaw puzzle, but it's actually
more challenging and fun competitive fixing
a jigsaw puzzle because you are actively trying to find techniques to help you
draw more accurately. K. So at this stage, once you
have drawn all the big shapes, you can draw the details within. Again, I need to emphasize that you need to
make sure you get the ankles here at the
boundary accurate. Because if you draw, for example, this angle, this angle, this angle, then angles of all
the diagonal lines here within the shape. They will all be
affected by this limit, this angle, then you have
drawn drawn this wrong. Odd angles within the
shape will be wrong. And no matter how detailed you are at
drawing the details, no matter how accurate you are growing all the little details. It doesn't matter
because the angles, the first angle is wrong. So all the other
angles are wrong. The more practice you get, the better you will
be at drawing. This is quite similar to playing a musical instrument where you will definitely play
the wrong notes for very long time before you
can play the song properly. So with practice, you will
definitely get better. Don't worry too
much about mistakes because every mistake is
a learning opportunity. And sometimes you
can learn and evolve through the mistakes
that you make.
9. Improving Clarity: This lesson, I want to
talk about clarity. Clarity is very important
because you want whatever that strong to be
immediately recognizable. In an instance, even though
I've redrawn this balcony, it's not immediately clear
how the balcony looks, because the lines
and the shapes, they can look confusing. So let me draw this
again with more clarity. Let's redraw the
balcony and see if we can make it look clearer. I'm going to draw this with as few details as positive pole, because I'd want to spend so much time drawing
the details. I just want to draw
this as simply as possible while making this
as clear as possible. So this is the support beneath. I'm using a lot of artistic license to
simplify the details here. Maybe I can add some
details at the top. Now if you are drawing
on a big piece of paper, you can afford to
add some details. But if you're drawing on a
really small piece of paper, just a single line, we'll do. So this time around. I'm not going to add any details here because if I add
too many details, the balcony is not
going to look clear. If you take a look
at this sketch here because I add too much details, too many, little
horizontal strokes. The shape is no longer clear. This looks slightly better. I can, maybe I can even
simplify this even further. Pretending, pretend,
let's pretend I'm drawing this on a really
small piece of paper. Now I've simplified the support
beneath into a triangle. This is how it may look, how the balcony may look. Maybe we can draw
the top as well. Deciding how much details
to add can be quite tricky. So what I think about when
it comes to adding details is if I have any hesitation
to adding details, I will not add the details. I will continue my drawing somewhere else and
maybe come back to this area to decide again and again if there
is any hesitation, I will not want to draw the
details because once you add the details with ink and
you mess up anything, it's gonna be difficult to
crack because it's ink. And now let's see if we can draw these two cyclists.
More clearly. I have an issue with this
guy here because the heat is not aligned to the
center of the body. It looks like the head
is on the right side. This is me losing
concentration while drawing. So let's redraw that part. Again. We have the head here. We can see some of the hair. We can see the hat. This is the color. We have a little shoulder here. The shoulder on the left side. There is more shoulder
on the left side. So as you draw this curve
up the sleeve this way, because the arm is
actually backwards. The guy is pressing
on the bicycle seat. And R is the lady beside. We have the head here, the top of the hat aligned
to the year of the guy. There seems to be pointed
heel. We can draw that. We have some hair here, we can see some neck here. Again, if you're drawing this on a very small piece of paper, you won't be able to
add so many details. So as you're drawing,
really focus on where you should
start your line, where you should annual lines. For the lady, the shoulder
on the right side is a bid, has a bit more with competitors shoulder
on the left side. We have the sleeve here, we have the body here. And shirt here will, and beneath this is
the bicycle seat. If you cannot see the detail, Alice draw the big shapes. Yeah. So should we n here beneath the bicycle
seat actually ends a bit further down. That's Rosen Chris
on the shared key k. So this is pretty much
it for this sketch here. When you're drawing, always think about
overlapping elements. So here it's very clear
that the lady overlaps the guy which is in front
of her with my sketch. It's actually not that clear. Where's the overlap? So when you are drawing, even if the two cyclists appear to be side-by-side
not overlapping each other, you may want to use
your artistic license to make them overlap so that there is clarity and you can get this
sense of depth. For example, if you have
two curves like this, I'm just drawing the
front view of the car. Headlights front, the
bumper. They will. And we have another car, which is actually just beside. If you take a look
at this sketch, you can tell or
actually you can't tell which cars in front of
which car is behind. A better way to
draw this would be to put this car in front. And the other car of your sleep. This we can see some part of the car
behind showing through. But this is actually
still not very clear because we're looking at
a front view of the car, so it's not very identifiable. This is the symbol of a
car from the side view. So when we look at
something like this, immediately we know it's a car. So let's try and make the
silhouette of the car clearer. So let's just draw the
three-quarter view of the car. We can see the front windscreen. We can see the
side of the curve. We can see maybe the
front of the car, the wheel of the car. So now we can see two wheels. So this is much clearer. And if we put another car
behind here like this, it's going to appear
much clearer. Okay. So we have
the shadows beneath the car with the overlap, it's much clearer that risk in front and there's a car
behind compared to this. And also in this case,
we are looking at the three-quarter view
instead of the front views. So again, there is more clarity. If you want to separate
these two cars even more, you can use contrast. So you can probably draw
this with thinner lines. Let me just redraw this again. This is drawn with thick lines. For the car behind. You can actually draw it, penalize just to separate. So this is one way to separate elements is
to use a thinner, thicker lines to separate. So this is the contrast
between line with. The other way to
separate these two is if you have a redrawn
them with equal line, with a wave lines that
are equally thick. You can maybe just shade
or color the car behind. Just to make it look, just to create that contrast. If you take a look at the shops that are beside the land pose, this is the front of the shop. That's a shop here. This is the awning. Here. There is
another shop here. We have another opening. There is a lamb. Here. The street dime
actually overlaps the shop on in which is good, the street lemon is actually here, overlapping the awning. So it's very clear that
straight line is in front. However, if the photo
is actually showing the street lamp here, like this. So this line has C
of the street lamp. It's not very clear whether
or not the street lamp is in front or behind and owning. So if you're faced with
a situation like this, you should not draw
the street lamp just beside the
awning like this. Even if the scene actually
shows you something like this, why you should do is use
your artistic license and just have to
strip them, overlap. Overlap the awning behind, which is exactly what
the photo is showing. So this will make your
sketch omega sin look clear. Alright.
10. Bye: Thanks for taking this course. I hope you found it useful and insightful and I hope you
enjoyed the sketching process. There is a lot I can talk
about when it comes to sketching and painting
and urban sketching. But I can't cover them
all in a single cost. So I highly recommend you check
out my other art courses. Alright, thanks for watching. See you guys in the
next course. Bye.
 Teoh Yi Chie, Sketcher, watercolour lover