Transcripts
1. Introduction: Hello, I am Stephanie and I am a sculptor. I mainly sculpt with polymer clay and today I am going to show you how to sculpt moths and more specifically how to transform these moth into brooches or jewelry. I am going to guide you through different techniques on how I sculpt these little beauties and I really hope you will get inspired to make your own moth brooch or butterfly and more importantly that you really have fun with it.
2. Inspiration and Reference: I cannot stress this out enough, but I always use inspirational pictures and reference pictures for my work. What I do when I want to sculpt something specific, I will search for it on Pinterest, and then look at pictures that I find intriguing or beautiful, and then work from several pictures to sculpt something that is mine. That is really important and I also think that the key to be a better sculpture or artists is to use reference pictures. Tutorials will only show you techniques and how someone else is doing something, but if you take a look at the real deal and try to replicate it, then you will find your own style and voice. I have many different boards on my Pinterest account about nature because that's what I'm most interested in and this is really how I like to work, and it's also what inspires me when I don't really know what to sculpt next or how to approach a new composition. Never skip this step, find some reference pictures, find some inspiration, and then take your clay and sculpt.
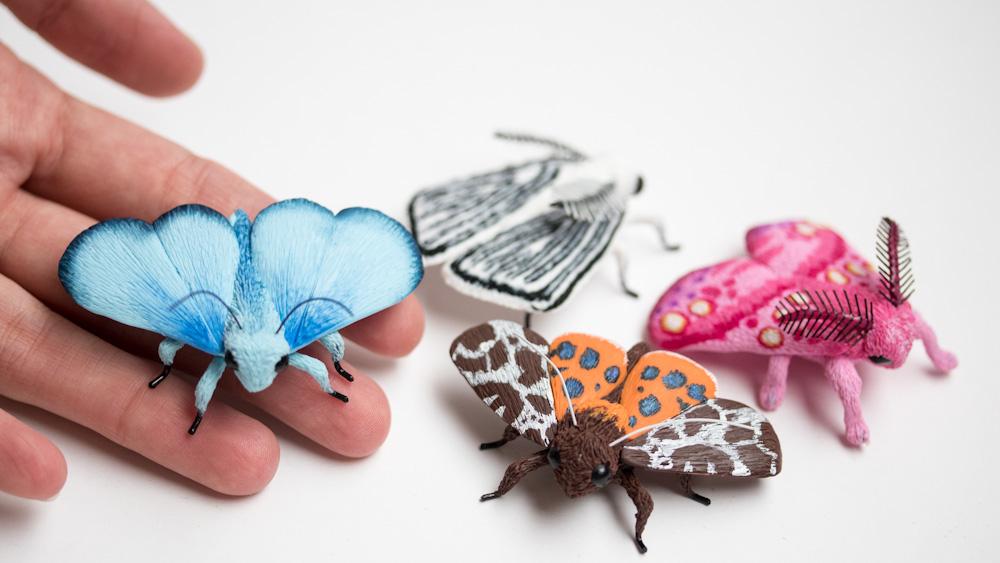
3. Black & White Moth: We are starting with a black and white moth. What I have done for every one of them is to make the wings first. I cut them out freely, the first one, and then I just replicate it on another time. I push down all sides to flatten them to make it look like it's thinner than it actually is. Then using a blade, I push down the sides to make them look cleaner. Now I am starting to paint with clay. This is a technique that I actually really like. I'm basically using some black polymer clay. I have rolled it out into a very thin snake. I push it onto the white clay, and I shape it as I wish. Because I think the black was a bit too thick, I ended up adding more white all around and even dividing the black lines in two. To give that specific texture of moths that looks like fabric, I am using my favorite tool, which is a spatula tool that is handmade by AM Creations on Etsy. I linked it in the class description so you can check his shop out. I am not sponsored by him. It has become my favorite tool because it's such a versatile one. If there's one tool I would recommend buying, one expensive or quality tool, then it would be this one. It's irreplaceable. Most tools can be replaced easily when sculpting, and you actually buy things you have laying around, but this one is not one of them. As you can see here, I am dividing the black lines in two, adding some white in the middle. That way, it looks a lot more natural because you can still see a bit of black going through, and it's easy to master the size of it. I've worked from reference pictures, so here I'm readjusting a little bit. I thought there was too much white, and I decided to add some more black. Now, if you don't have that spatula tool I was talking about, you could texture the clay with a toothpick. It's been one of the tools I've used the most over all the years. It's going to be a bit more difficult than with a spatula tool, but it's definitely something that you can use. That is durable. If there's one thing that I want to stress out is that you don't need expensive tools to sculpt. You really just need some clay and maybe a toothpick or something that's just laying around the house like pins and needles. With that, you are good to go and to start even just sculpting with your bare hands. Replicate this onto the other side. Now, I am making the antlers. For that, I made the snake of black polymer clay. Here, I'm using some wire that has been coated in white plastic. You want to use a wire for the antlers and not just clay. Because if you use just clay is going to be too breakable and not as thin and regular. Just go on and fold it in the middle, and add them one bit by bit. Once you have put on all the little details, use some liquid polymer clay, I am using the one from FIMO and just brush it all over to ensure everything is nicely glued. It a solder for a polymer clay, the liquid polymer clay. Then make two and then bake them. Now I am cutting the excess of wire to give it the shape. Again, I would suggest you look at reference pictures to get an idea of the shape you would like. Is like bee in shape. Now I am making the face. It's an alien face. I have pre-baked the two eyes. The two black eyes are simply too rolled black balls of polymer clay. I simply pre-baked them. Then I added the antlers. Now I am texturing the whole face using my spatula tool. The idea is to make it look like hair, make it look a little bit random. Again, best to look at reference pictures. Then bake the head. Then we are going to assemble the head and the wings. As you can see, I simply made a teardrop-shaped body, and I pushed the head and the wings onto it. Now I am starting to texture everything, so it looks like fluffy fell. On the other side, I remove excess clay and just push it down and bake again. Now we are going to make the legs. I made a little drawing as to be true on the exact size. I use some black colored copper wire. I shaped and cut the leg with the help of pliers, covered them in white clay. Now I'm texturing them. Repeat the process for the six and then bake on a sheet of papers. They stay mat on all sides. Bake again. I'm adding clay on the belly of the moth and now adding all the legs to the body. This is the moment you want to add jewelry finding if you want to transform it into jewelry. I added brooch finding, and I am putting clay all around, so it bakes into the moth. If you want to transform it into a pendant, be sure to put it closer to the head because you don't want the moth to tilt over when it's worn. Then texture everything with the spatula, like we did before, so it looks like a fluffy little belly. I signed my brooch, and I date it. Also, be sure that you can close the brooch. Then re-turn your brooch to make sure your legs stand nicely and add some aluminum foil, so the antlers bake where you want them to be, and then bake. After baking, add some paint on the tip of all legs and wires, so everything is nice and black. Don't forget to varnish the eyes.
4. Blue Moth: Now I'm going to show you how I made the blue moth. This time I made a double wing. I cut out a shape that looks very closely to a heart, and replicate it for the other side. I pushed down all the sides and edges to make the wings look a lot thinner and then I adjust it, the shape with the blade by pushing it. I trace the line for the wings in the center of the heart, if you will because I am replicating what are actually two wings and I start to texture by first giving lines to give the direction of the wings. Now I am texturing the wings to give it that fabric look with my spatula tool that specific spatula tool is a handmade tool I got from Etsy. If you'd like to get the same one, I have written about it in the class description and just go on and texture both wings. You could also use a toothpick, a pen or a needle to make the texture. Now for the ponders nuanced look, I use some dry pastels. I use dry pastels from Shcmincke and Schinodere which are very high in pigments. Then what I simply do is to dip a brush into the dry pastel powder. I simply scratch off the surface of the dry pastel with a cutter, then I dip a brush inside that powder and I brush it over the clay when it's still raw. When baking it the pastel gets baked into the clay surface. Now I am making the head, I pre-baked the two eyes, they are simply two balls of black colored polymer clay and the shape of the head is slightly like an alien. I made the antennas by using some plastic coated beading wire in black. I shaped them and I pushed them into the cray and now I am texturing the head so, it looks like fluffy far and then I bake. I now assemble the head and the wings. I do thin teardrop shape and I push the wings and the head inside. I smooth down the bottom on the moth just to ensure that everything will stick nicely together while baking and then give it just a bit of texture. We'll, add the legs thereafter, another baking and a texture the top of the moth. To give it some interest I brush some dry pastel on the body and I bake again. Now I am making the legs, I use some black colored copper wire, I shape and cut. I then rub some blue colored clay around the legs and texture them. Optionally, you could just use the black colored wire and don't add clay on top of legs. However, you really want to glue them into the body for your sure they will hold into place. Now you are baking all the legs on paper, so they stay matte during the baking process. After baking, we are going to add the legs onto the moth. For that you are going to add some blue clay on the belly of the moth, smooth it down a little bit and then push the legs into the clay. Now is also the time to add the findings, if you want to transform it into a brute or jewelry. Make sure you can close the brute properly. Maybe add some more clay to ensure that the finding will stay in place and now texture the belly so it looks like far. Don't forget to sign and date your piece and bake. After baking add some black paint onto the tip of the wire and vanished the eyes.
5. Moth Tiger: Lastly, the gum [inaudible]. This one is a little bit different from the two we just made as we are going to use two colors for the wings. We are starting to make a teardrop that is slightly askew and orange that we replicate. Then another slightly bigger one in brown also that we will replicate. We assemble them together. Normally they would overlap, but since clay is rather thick, we're just putting them next to each other. I readjust the shape a bit and then I push all the edges down to make them look thinner. Again, flatten all the edges and make it look prettier using a blade. After that, I start to texture as usual using my spatula tool. If you want the same one, you can find the link in the description of the class. Otherwise you can also use a toothpick, a pin or needle. Then bake the wings. After baking and cooling off, we are going to paint. For this one, I have a very precise reference picture, so I simply replicate the patterns onto the wings with some white acrylic paint. Here replicate on the second wing, the pattern you did on the first one. You can also go crazy and make something of your own design without any reference picture. However, it's usually easier to make something that looks good from a real moth. For the orange one, I made patterns using black, blue and purple. I start with a darker version. Then in the inside I use a lighter color by simply adding white to it. For the head I use the same alien look. I also prebaked some black colored eyes and start texturing the head, add some antlers and bake. After baking the head and the wings, we are going to assemble everything together. Prepare a teardrop shaped piece of clay, push everything into the clay, add an orange color and start texturing everything so it looks like fur. Remove excess clay on the belly side and smooth it out so you're sure it sticks all nicely together. Slightly texture it around the head and the tail. Readjust if necessary and bake. After baking, we are going to make the legs. We are using some black colored copper wire, shaping it, cutting it and then wrapping it in brown clay. Then texture each leg. Bake them on paper so they stay matte during baking. After baking, we're going to assemble the body and legs. For that, add some brown clay on the belly and stick the legs into the raw clay. If you wish, add the brute finding, cover it in clay and then texture the belly with the spatula tool. Then texture the belly so it looks like fur. Make sure the brute closes. Don't forget to sign and date and then bake. After baking, add some black paint on the tip of the legs and varnish the eyes.
6. Conclusion: We are done with this class, and now, it's your turn. I want you to make your own moth or butterfly sculpture and maybe turn it into jewelry on earth. It's completely up to you. Gather some inspiration, and then, just take your polymer clay and start. Don't forget to have fun, that's always the most important. Thank you so much for watching and I really hope to see you in my next class. Bye. Also don't miss out on my other classes on Skillshare about the crystals, the flowers, the mushrooms, the succulents, and the corals.
 Stephanie Kilgast, Contemporary artist.