Transcripts
1. Intro: Hi, My name is Jacob. I'm a musician and a music teacher. Thank you so much for looking at my intro to ukulele course. Have you ever wanted to learn ukulele but you found it too difficult or just didn't have the motivation. Well, here we focus on a song centered approach to learning your instrument. Will learn the chords needed so that you can play popular songs as quickly as possible with your friends or just on your own. It's going to be a lot of fun. We'll learn everything as easily as we can and break everything down into charts and notes that make sense. So let's get started.
2. Parts of the Ukulele: Now the first thing we're going to look at are the parts of the ukulele. And it's actually a lot like the parts of the human body. Up at the top here you have the head. This long part here is the neck, and that attaches to the body. Now, going down the length of the neck, you have four strings that we play to make notes come out. Going horizontally across the neck are these metal bars called frets, F, E, T, S. Now frets, or where we place our fingers to make a different notes come out. The higher we place our fingers on these florets, the higher the notes go in pitch. Finally, up on the head, we also have tuners, and these will change the pitch of your string. You'll be using them to make sure your instrument is in tune, which we'll go over together.
3. Left and Right Hand Technique: Now we need to know a little bit of left and right-hand technique so that when we play our instruments, we know we're playing it the right way and can make the notes come out nice and clear. Most importantly is your left hand. When we press down on these frets to make noise come out, we want to make sure we're playing just before our metal bar. So if we're playing the third fret, for example, we'll count up three metal bars, 1, 2, 3, and then we'll press just a little bit before that bar. If we're on top of the bar, or too far back towards the bard before the one we want. Our note can sound buzzy or not quite as clear as we want it. We also want to make sure we're playing with the tips of our fingers and not the pads of your fingers. This will keep your fingers from getting in the way of the other frets or strings you're trying to play. Which can be a big issue when we're playing multiple strings at once. It can really mess up our song. So we'll play with the tips of our fingers close to the fret that we want just before it. Our thumb is on the back of the ukulele, squeezing the neck nice and hard. And we'll also press nice and firmly. Sometimes we can also have our thumb on top or over the ukulele with our right hand. It's actually pretty simple. We play with our thumb coming down and our first finger coming up. Like this. We can also play with our nail to create a slightly louder, sharper tone, which isn't always the worst thing when you're trying to get the volume that you need. Let me play with my nail.
4. Names of the Strings: Another important thing before we start playing our songs is knowing the names of the four strings. That way we can reference strings together and always know exactly what string we're talking about. From the top string closest to you, working down to the string closest to the floor, we have G, C, E, and a closest to the floor. So that's G, C, E. And a. An easy way to remember the names of the strings is good cooks a lot. And it's true many good cooks eat a lot. I would, if I were that good a cook cooks a lot. G, C, a.
5. Tuning Your Instrument: If you play a chord or a note and it sounds incorrect, that might not be your fault. We need to make sure that our instrument is in tune before we play, so that the sounds we want to come out, actually come out. Now we know the names of our strings. And so the best way to tune is to use a tuner that goes on the head of your guitar. Or we can also use an app. Now, I've got an app up here that you can find if you just search up tuner in the App Store or the Play Store. Now, I'm going to play a note. If the note is too low, I'm going to have a little arrow on the left side telling me I need to tune it up. If my note is too high, I'm going to have a little arrow on the right side telling me to tune it down. The goal is to get our note right in the middle, where it will be green and give us a little checkmark that we're good to go. So I'm going to tune this very out of tune ukulele with you right now we'll start with the G string. So right now my G is too low. So I'm going to turn my tuner to move my string up. That looks good. I'll move on to the next string, which is the C string. It's also too low. Now I'll take a look at the E string. Now this one is a little too high. See the little tag is off to the right telling me it's too high, so I'm going to tune my tuner down. And finally my a string closest to the floor. Well that one looks pretty good. Now our ukulele is in tune. Remember as we worked with the tuners, we go around the head in this upside down U shape. Pay careful attention to see which strings attached to which tuners so that you're never tuning the wrong string and changing the pitch of another string that you're not hearing.
6. Reading a Chord Image: The last thing we need to know before we actually start playing. The next lesson is to read the CT images that we're going to be looking at. Now, I'm going to put one on the screen. Don't be overwhelmed. We're going to break it down step by step. We're looking at the ukulele straight on here with our G string all the way on the left side and our a string all the way on the right side. Now the white dots are where we're going to put our fingers, where we're going to press down on the frets. So these tell us what string and what fret to press down on. The numbers at the bottom are which finger we're going to use to press 1, 2, 3, or 4. The hollow circles up at the top. We're going to play that string when we strum. But we don't need to press anything down on it. It's just an open string. Now if there's an x, a white X means we're not going to play that string and all we're actually going to skip it when we play through. So we'll take a little bit of aiming with our right hand. Now for example, here's a really easy shape to learn. All of the strings are open except one. And that one that we need to press down, we can see is the third fret on the a string, the string closest to the floor. So we can count up 1, 2, 3 frets. Play right before it will press down nice and hard, and then strum through all four strings. This is how we read chord images and we're going to be doing that a lot in this class. Now, we're ready to start learning some of these chords and putting them to use in songs.
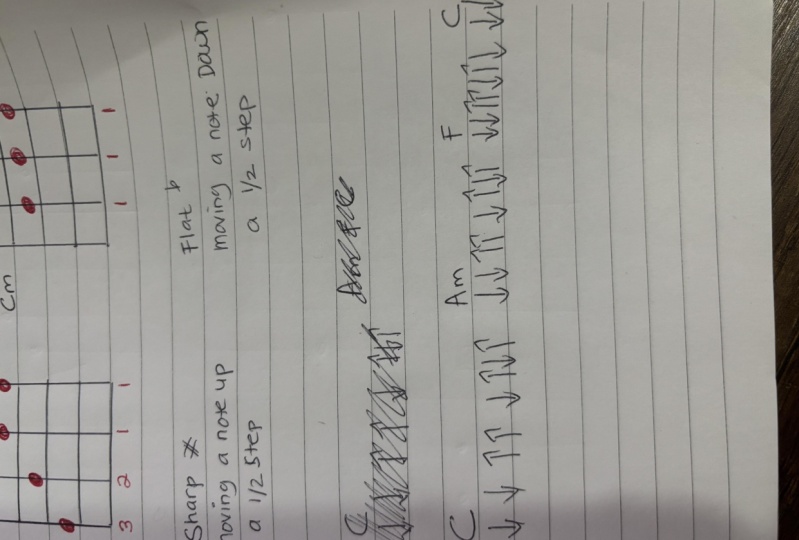
7. Chords 101 - Em, D, C, G: It's time to actually start learning some chords together. Now, if you don't know, cords are just three or more notes put together. So as we learn these shapes and play through multiple strings at once, we're playing a chord. Songs are made up of chords put together. Some chords sound happy. Some chords sound a little more sad. These happy chords are called major chords. It's not specified. So the cord might just say C or D, but these are major happy chords. Now these sadder chords are called minor chords and those are specified. So you might have a C minor or a D minor. Most songs combine major and minor courts, whether they're happy or they're sad. The difference is what chord the song focuses on. So today we're going to learn four chords together. We're going to learn an E minor, D, a, C, and a G. And the reason we're starting with those chords is that they are probably the most popular chords. Many, many songs are played with these four chords. So once we learn them, that unlocks a lot of songs for you, I'll ready. We're going to start with the E minor chord. Now we have our G string open with no frets pressed down. We have our C string. We're going to put our third finger on the fourth fret. And so we'll count together 1234. And we'll put our third finger right before that metal bar. Now on the next string, on our E string, we're going to place our middle finger on the third fret, 123. So now we have our open G string. Now finally, we have our first finger on the second fret of our a string. So open G string, third finger on the fourth fret of the C string, middle finger on the third fret of the E string. And first finger on the second fret of the a string. That's our E minor chord. Next we're going to learn a D chord. So we're going to place our first finger on the second fret of the G string. We're going to place our middle finger also on the second fret of the C string. We're going to place our third ring finger, also on the second fret of the E string. And our a string towards the bottom of the floor is going to be open. That's our D chord. If you want to pause here and practice going back and forth between the E minor and the d, You absolutely can. But now we're going to learn our C chord together. C is the one we actually looked at in the previous lesson. We have an open G string, open C string, open E string. And we'll place our ring finger on the third fret of the a string, so 123. And then just before that we have our C chord. Finally, we're going to learn our G chord together. Now, G has an open G string, just like the E minor. We're going to take our first finger and place it on the second fret of the C string. Our ring finger is going to go on the third fret of the E string. And finally, our middle finger is going to talk between those and go on the second fret of the a string. So we have an E minor, D, C, and a G. In our next lesson, we're going to combine those chords into our first song. So practice them individually and transitioning between them don't be discouraged if it's slow at first and it makes perfect sense. You've just learned them. Go easy on yourself, practice them, and then we'll learn a song with them.
8. Song #1 - Let it Go: We have two songs we're going to learn with these courts. The first one is the Disney song, let it go. The second one is Take it easy by the eagles. Do very different songs for two very different audiences. So you can focus on whatever song interests you most. Right here, we're going to listen to, let it go. For each chord. We're going to strum it twice with our right hand. Now, here are the chords that the left-hand place. G to D, E minor. And see, here are those chords without me, speaker. You can practice those chords in a row. I've got the cord sheet attached in the files for this class.
9. Song #2 - Take it Easy: Now if you don't want to learn, let it go, or maybe you want to learn both songs. In this lesson we're going to do Take it easy by the eagles with those four courts. So here are the chords on the screen. As for the strumming with the right-hand, we're either going to do for scrums or to steal drums. And I'll notate how many drums for each chord under the chord. So here is our song, nice and slow. The chords for this song are attached in the lesson files. And looking forward to hearing how it goes.
10. Chords 102 - E, Am, Dm: Now we've got some chords down and we've got some songs down. It's time to go further and put a couple more cords under our tool belt so we can learn more songs with them. The first chord we're going to look at is an E chord. We know an E minor. Now we're going to learn an E major or just an E chord. This one's probably the most complicated we've done. But the other chords are relatively simple. So it all evens out. For our E chord, we're going to get our middle finger on the fourth fret of the G string. So 1, 2, 3, 4, right before it. We're going to get our ring finger also on the fourth fret of the C string, talk to right behind it. Our pinky is also going to go on the fourth fret of the E string, so forth. Threat for threat, for threat, all in a row. And our first finger so far is free. But now we're going to put our first finger on the second fret of the a string. That's not the easiest or most comfortable shape for our hand that we've done. Adjust your arm, your elbow, your wrist, your fingers, until you can get it into a comfortable position backwards giving you trouble. That's okay. Let's learn the other ones and practice the E as we come to it in a song. The next chord we're going to learn as an, a minor chord. Now, this one, super simple. We're going to put our middle finger on the second fret of the G string. Now a C string, the E string, a string are all going to be open. So open, open, open. We just need that middle finger on the second fret of the G string. That's our a minor. Our last chord for this lesson is going to be a D minor. We know a d. Now we want a D minor. We're gonna get our middle finger in the same place as the a minor second fret of the G string. Our ring finger is going to go on the second fret of the C string. So, so far, so good. Our first finger will go on the first fret of the E string. And finally our a string on the bottom. It's going to be just open. So we've got our E minor, D minor. Now we're going to learn a song with those chords included in our chord progression.
11. Song #3 - Sunday Morning: For this song, we're going to use a D minor, a G, and a C. Now this song is Sunday morning by Maroon 5. We're going to strum each chord twice, except the C. We're going to strum four times. Very simple. Here's the song with the chords up on the screen.
12. Chords 103 - Bm, A, F: This lesson has probably one of the most important chords we're missing. And that's an F chord. We've got three more chords to learn here. We're going to take on an a chord, a B minor chord, and an F chord. Now once we know that F chord, we can practice many, many songs together. And we're going to after this lesson, but let's take these one at a time. First, we want our b minor chord. For b minor chord, we're going to take our ring finger and place it on the fourth fret, the G string. Now, here's something a little tricky that we haven't done before, but it's going to make the cord easier. Our first finger, we're going to press down and bar the second fret of the next three strings, the C string, E string, and a string. We're going to play the second fret on all three of those strings with just our first finger. And then we'll keep that third finger on the fourth fret of the G string. Next, we're going to look at the a chord. It's much easier than the b minor chord. Our middle finger is going to go on the second fret of the G string. Our first finger is going to go on the first fret of the C string. And our E string and a string, we'll just be open. So second fret of the G string, first fret of the C string, Open and open. That's our a chord. Now keep your fingers there because we're going to learn an F chord and it's very similar. Here's what we're gonna do from this shape. We're going to take our first finger and move it from the C string to the same fret on the E string. So we've got middle finger on the second fret of the G, an open C string, the first fret on the E string, and then the open a string. So B minor, a and f. Now before we learn any more chords, we're going to learn three songs using cords we already know as practice.
13. Song #4 - Somewhere Over the Rainbow: Welcome to the first song of our three song, little practice break. We know almost all of the chords now. And so we're going to learn somewhere over the rainbow. Now the chords will need here are a, C, G, E minor, F, and an a minor. Here are the order of those chords. And for each chord, we're going to strum down four times. All of the chords that you need are in this video or in the notes of the lesson.
14. Song #5 - Hallelujah: For our second song of our song practice, we're going to do hallelujah by Leonard Cohen. Now the chords that will need are an a minor, C, E minor, F, and a G. The amount of times you strum a chord is under the cord. Everything is twice until we hit our f, which is 3 times g, which is onetime. Then we move on to the chorus. All of the chords, like with the other songs, are in the notes and files for the lesson.
15. Song #6 - Ho Hey: Now our third song in this little song break. Our sixth song overall is ho, Hey, by the luminaires. Now the chords will need are an a minor, C, G, and an F. I'm going to play through the verse of the song. Then I'll play through the chorus of the song, and then you can take the song and try it yourself. One important thing to notice here is we are going to be working on transitions as we move from C to F very quickly. Here's the verse to show you what I mean. Now for the chorus of our song. Okay.
16. Strumming Patterns - 4 Beats: Now there's something important that our songs are missing. We're learning these left-hand chords. We're missing out on right-hand strumming patterns. Notice the difference when I play chords, just strumming down with when I play with a strumming pattern. So we need to learn how to bring our right hand to life on the ukulele. Now there are two kinds of strumming patterns we can learn. There are four beat strong patterns and three-beat strumming patterns. All that means is that some songs and some strumming patterns, you count to four with 12341234. And there are some songs and strumming patterns that you count to three with 1231231231234 beats and three beats are the most common strumming patterns and song Time signatures that you'll come across. So those are where we're going to focus our attention. For this lesson. We're going to focus on four beat strumming patterns. In the next lesson, we're going to look at three-beat strumming patterns. Right now, let's learn to four beat strumming patterns. Will put a chord progression on the screen that we're going to practice with, from C to G, to F, to G, back to C. Now for our strumming pattern, we're going to talk in terms of down strokes and up strokes. Remember you can use your nail for both, or you can go between your thumb and your first finger when you're coming up. This strumming pattern, we're going to go down, down, up, Up, down, up. Now I know that sounds confusing without a reference. I break it into two sections, down, down, up, and then the second section up, down, up. Now I'm going to play it nice and slow. And I'm going to speak between that strumming pattern and counting 1234. And you can see as well where the numbers go between the drums. It's a little tricky at first, but it can come naturally the more you practice it. So here's the strumming pattern. Down, down, up, up, down, up, and then you change your chord. Down, down, up, up, down, up, and change again. Down, down, up, up, down, down. Now I'll go between that and counting out the beats. Down, down, up, up, down, up, 1234, down, up, down, up 1, 2, 3, 4. For our next four beats strumming pattern. We're going to go down, down, up, down, up. That's a common ukulele pattern. I'm going use a same chord progression and count in the same way, going between the strumming pattern and the beats. Again, down, down, up, down, up. Here it is slowed down. Then I'll play it in real time. Down, down, up on 23, fourth, down, down, down, up 1234. And again slowly without me speaking. Practice through chord progressions of the songs we've done together using these two different strumming patterns, see which one you think fits better for the song.
17. Strumming Patterns - 3 Beats: Now we're going to look at strumming patterns using three beats instead of four beats. Our first three beat strumming pattern will be down, up, down, up. Super simple. It's back and forth, right, down, up, down, up. But there's a little bit of a swing too. It down, up, down, up. And then we change our chord. Let me play through our same chord progression we used for the four beat strumming patterns. Using this three beat. I'll play it first and then I'll count it out. Now I'll count down, up, down, up 123, down, up, down, up 1, 2, 3 on 2, 3, 1, 2, 3, 1, 2, 3, 4. To vary.
18. Chords 201 - Fm, Gm: In this short video, we're only taking on two chords. We're looking at an F minor and a G minor. Now here's our F minor shape. We're going to take our first finger and put it on the first fret of the G string. Our C string is going to be open. It's already kinda got a minor sound to it. Our middle finger will go on the first fret of the E string. And finally our pinky is going to go on the third fret of the a string. It's got a very sad, somber sound to it. Next, we're going to learn a G minor chord. Now our G string will be open, nothing pressed down. Our middle finger will go on the second fret of the C string. Our third ring finger is going to go on the third fret, the E string. Now we've just got our first finger to go on the first fret of the a string, really bringing in that minor sound. So open string. Second finger on the second fret, third finger on the third fret. First finger on the first fret. Back to the F minor, G minor. These two chords aren't as common as the chords we already know. But you will definitely run into them if you keep progressing in learning more songs that are important to know and practice all the same. In the next lesson, we're going to learn our last two chords.
19. Chords 202 - B, Cm: Let's learn our last two chords. We're going to be working on a B chord and a C minor chord. Now we'll start with our B chord. We're going to get our ring finger on the fourth fret of the G string. Our middle finger is going to go on the third fret of the C string. Now our first finger is going to lay down on the second fret between the E and the a string. We're going to borrow the second fret on both those strings. So ring finger on the fourth fret, middle finger on the third fret, first finger on the next two frets. Not too bad. Now we're going to learn our C minor chord. For our C minor, we're just going to take our first finger and lay it down on the third fret of the C, E and a string. Third fret. And our G string is going to be open if you want and it's comfortable. You could also use your ring finger to do this. It's a little more difficult, but it creates less space for you to need to move to your next courts. Using your first finger just means you have to shift your wrist a little more, which is okay. But little movements are always easier than big movements. You can practice both and see which is easier for you. The transitions or the cord with the third finger.
20. Half and Whole Steps: Now that we know a lot of chords and have a good amount of songs under our belt. Something that's important to understand about your instrument is half steps and whole steps. Now, a half step is the smallest amount you can move up or down on your instrument. For example, if I play an, open a string, the next step up, I can take the smallest amount I can move up is just one friend up from there. The smallest amount I can move down is one fret down. Same from the third fret to the forefront. These are all half-steps. A whole step is 2.5 steps put together. Which means instead of moving from one fret to the next frame, I'm now moving from a fret, skipping a half-step and moving up a whole step with a fret between. These are all whole-steps, or from an open string to the second fret. Now there's a reason that half and whole-steps are so important for playing songs. We're going to learn about that in the next lesson.
21. Sharps and Flats: Now that we know half in whole-steps, it's time to talk about sharp and flat chords. Now, a sharp is when you take a note and you move it up by a half step, move it up. One fret. And flat is when you take a note and you move it down by 1.5 step, a sharp is symbolized with the pound sign or the hashtag. A flat is symbolized by this squished up little lowercase b. But what happens when we see these symbols next to a chord? Sometimes you'll come across E flat or an F sharp cord. What do we do with that? Well, that just means we have to take our chord and move the entire chord up a fret or down a fret. For example. Let's take a look at our G chord. Here's our G. If we come across a G sharp, that means we need to take each of these frets and move them up from the second, third, second to the third, fourth, third. So we have a G and a G sharp, but we're left with an issue. One note we didn't move was our open string. So we need to find a way to make this shape and also move our open string up a fret. Now your two options are to skip the open string and just play your C and a. Or you can shift your fingers to cover that shape and grab your new node with the first finger. We're not going to go over sharp and flat shapes in this class. But that's at least the theory behind them. And it's always an option to take your chord, move it up, and don't play the open strings. Or you can find the shapes for the sharp and flat chords. Now for flat chords, it's the same idea. Let's say we're taking an E chord and we want to move it down to an E flat. Well, we take that entire shape and we would move it down a fret from the fourth frets and second to the third frets and the first. So E, E-flat, removed it all down again. You'd realize we're at a D chord. And we can take D and move it up to D-sharp. That's also E-flat. C sharps and flats share a common fret, and whether it's an E flat or a D sharp, depends on which way you're coming at it from, for taking an E note and we're making it flat. Well that's not a D-sharp, it's an E flat. And if we're taking a D chord and making a sharp, it's not an E flat and that's a D sharp. Now, yes, it's all the same. Frets. E-flat and D-sharp are the same exact things. So you don't necessarily need to worry about that aspect of theory. Your listeners won't be able to tell the difference because they're identical. But if it matters to you, it's good music theory practice to keep an E chord moving down to an E flat and not a D-sharp.
22. Reading Tabs: The songs you're interested in may not be just cords. They might have some single note melodies or instrumental parts as well. So how do we learn those without learning every single note on the neck? Well, there's something very handy called tabs or tablature. Tabs lay out the four strings of your ukulele from the a now on top down to the G on bottom, like you're looking at your guitar this way. So we have g on the bottom. See ie, a on top. Now, what this does for you is it puts numbers on the strings, read left to right, like a book. These numbers are the frets that you're going to play. So for example, if I put a three on this top line here, well that's my a string and that just means I'm going to play the third fret. And so you can put all these numbers on there that communicate what fret on what string to play. That way, you can write out or read melodies using ukulele tabs.
23. Warmups: In our last lesson before the final project, we're going to talk about warm-ups, which is a little funny to end with. But before you play your ukulele, It's always helpful to make sure it's Intune and that your fingers are warmed up. Now, cords are a great way to warm up, absolutely. But before you play your cards, you could also warm up with some single note exercises. One that I like to do with students is to take my first finger and place it on the first fret of my G string. Now what I'm going to do is work my way up 1, 2, 3, 4. My first finger on the first fret, second finger on the second fret, my third finger on the third fret, and my fourth finger on the fourth fret. And I'm going to do that 1234 pattern on every single string. So C string 1, 2, 3, 4, my E string, 1, 2, 3, 4. And then a 1, 2, 3, 4. When I'm at the top here. Now I'm going to work my way down from this same note, 4321, moving down to the E string 4, 3, 2, 1 down to the C string, 4, 3, 2, 1 down to the G string 4321. So this whole war up together, 12344, 234, and then come back down, 4, 3, 2, 1. The next warm-up is similar with a twist. So we're still going to take the same pattern, the same shape and move it up the strings and come back down with it. Only this time we don't necessarily have to start from the first fret. And the frets don't necessarily have to be in order. So let's start from the third fret on the G string. And I'm still going to number my fingers on the frets, one finger per fret. Except this time, maybe I'll go a little out of order. Maybe I'll want to play 1324. C. I take this little box shape. Number them 1, 2, 3, 4. Even though they're not the first, second, third, fourth fret, It's my first second, third, fourth finger. And then I mix up the order 1, 3, 2, 4, and maybe I'll follow that pattern up at the strings. And then I'll take that one 32 for pattern and do it again down the strings. You can play with different patterns and get your fingers ready to play some unique shapes and all the chord shapes for your songs.
24. Final Project: You've made it to the end of the class. Congratulations. Now its final project time. You're going to take the chords that you've learned, maybe your favorites, maybe if you're daring some of your least favorite difficult chords, you're going to make your own chord progression, which means you're going to take 45, maybe even six chords that we learned and play them in order with one of the strumming patterns we learned. So take chords, take strumming patterns and put them together in your own little progression. If you're feeling daring and adventurous, you could also upload a clip of video or audio of yourself playing through one of the songs taught in this class. But your chord progression and strumming pattern project could be uploaded as a audio, as a video, or even just a Word document. If you don't have a way to record yourself.
25. Outro: Thank you so much for watching through my ukulele masterclass for beginners. I hope you found this useful and helpful. If you have any questions at all about anything you didn't understand or anything that you thought could be improved. I am always happy to get emails and messages from students or just happy to meet you. Either way, I hope this helps your ukulele career and you can enjoy playing through some songs. Thank you.
 Jacob Lamb, Musician, photographer and videographer