Transcripts
1. Introduction: Hi there, Welcome. Throughout this class, you're going to learn how to make your watercolor illustrations more believable by painting shadows that give volume, dab and illusional space. You'll then use this technique to create your own artwork that can be a bookmark like these, or even any other kind of artwork that can decorate your homework. Even a present for a friend. I am louder. I'm from Italy. And a year of spatial passion for nato, watercolor, illustrations and cozy places. Start painting on 2017. And painting is a tool of well-being to me. And you hope it will be the same for you. You can paint is my brand. And it's about taking care of yourself through painting. This class is for all skill levels, especially for beginners. Actually, we are going to techniques step-by-step, so very easy to learn. At the end of this class, you will be able to paint leaves in different styles like this. You will be able to paint shadows that you can paint on leaves, but on all the objects. To abandon that shadows, you are going to learn soft shadows. I mean, shadows with soft edge. Shadows with sharp edge like this. I hope you will enjoy the process. And so let's get started.
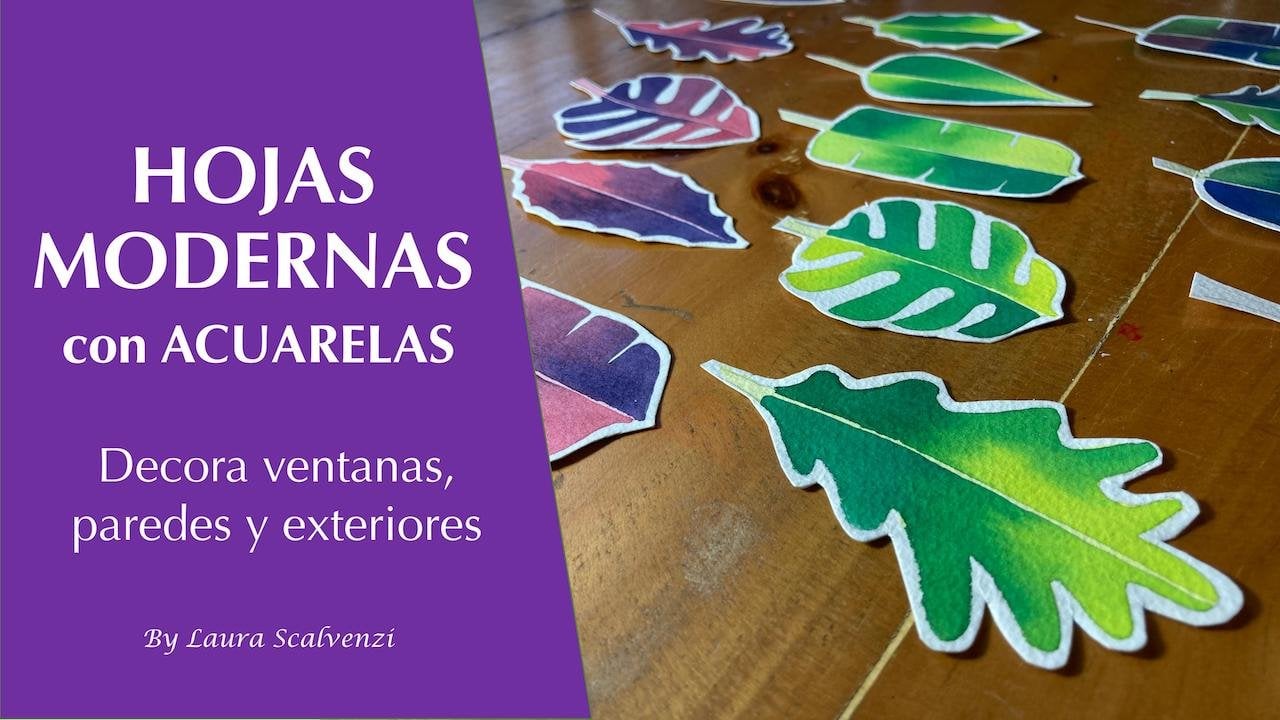
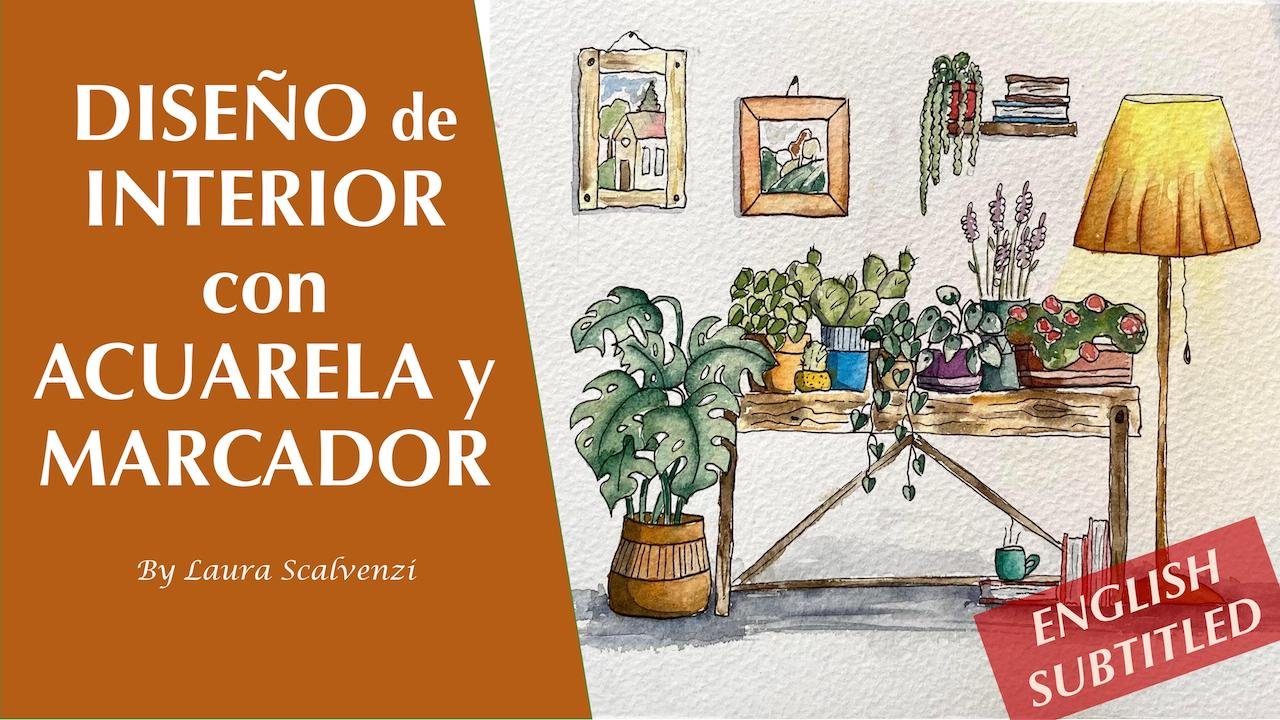
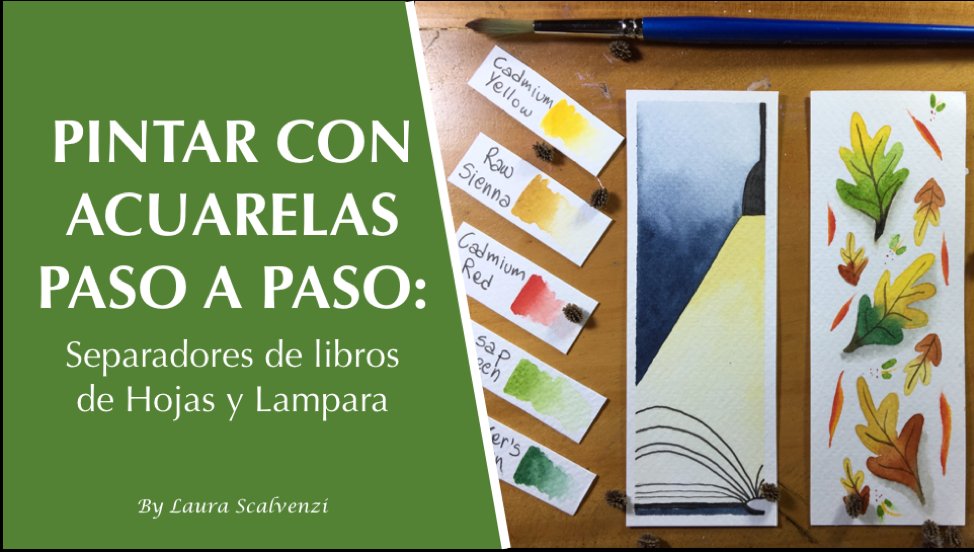
2. Your project: One of the things I like most about Skillshare is that it pushes you to work for projects. So at the end of a lesson, you will have in your hands something real made by you that will give you great satisfaction. For this class, the project you are going to create is a painting that you can use as a bookmark or even as an artwork to decorate your wall. If you want to learn how to paint, leave easily. Check out. The other lessons I posted on Skillshare are in English and some others in Spanish. Because actually, I spend most of my life in the Amazon rainforest and Spanish is my second language. So if you want to learn how to paint simple leaves, you can have a look to drawing modern leaves with watercolors. And Inca also has more awareness, can acquire a law. And if you want more realistic leaf, I suggest to you the more sterile leaf and ever look also to the other one.
3. Basics of shadows: Shadows give that and volume two objects. To understand how shadows work, we first have to understand and to observe the scene we have in front of us. The first step is looking where the light is coming from. When a line it's an object, will observe direct light and shadows. In these glasses are eat by light from the right side. So they create a shadow on the opposite side. That means on the left. Cast shadows are shadows that objects create on the surface. The light is the light that hits the object. And it's very writes. On this class, we are going to practice casts shadows for illustration purposes. That means shadows don't have to be realistic. Just get an idea of shadow to give the illusion of three dimensions. I'm going to share with you my tips century. To paint a cast shadow very easily. You just have to paint an area on the right side of the object similar to the object's shape, depending on where the light is coming from. I'm going to share with you some of my favorite authors. I'm going to show you how they represented shadows. One of my favorite is reached or scary. I spent my childhood with its book. They, they are really amazing. So look, for example, how he drew those daily, daily objects like cheese, coffee, salt, and Luke, the shadows just on the right side of the object. So that means that the light is coming from the opposite side. That means from the left side. Let me show you another example. The kitchen. So look the way he draws the shadows on, on a pan. And on order kitchen objects. In this case, the shadow is just a gray line under the object. And on that cases is on the right side of the object. So this is something very similar to the technique we are going to learn in this class. Let me show you another example of a book of my little child. So look at these kids, these sketched gray mark. It's enough to lead us understand thats is the shadow and the same ear. It's kind of, it's a kind of messy mark, but it's enough to give much more depth to the drawing. And now let me show you one of my favorite book. It's a playbook. You have to find in this book where the principal actor is. And I love that book, Luke, luke, look at him. It's full, full of details. Let me show you in this part. Look at those animals. They are fantastic. Hence you can see the shadow of the table. The shadow close to the chair is on the left side of the object. That means that light source is coming from the opposite part. That is from the right part. So look how a simple, messy gray sketch can be enough to give there and three dimensionality to the entire drawing. Let me show you another example. Look at this beautiful houses. Look the shadow. It's very, very messy, very simple, but it's enough to give a more realistic effect.
4. Materials you need: Let's see the materials you're going to use in this class. Brushes, a medium brush and a small brush. You can use a synthetic one or with Rhea air. You can use watercolors. You have on pen or on tubes. It's up to you. The main colors are cadmium yellow, magenta, cadmium red, cobalt green, Taylor blue, and sepia. We are going to mix them also to create the black. Then you need a palette. We're mixing the color. Then what're one glass of clean water and one for reads the brush and paper towel, one to remove the water excess on the brushes. And finally, you need paper, watercolor paper. That mean a paper that can absorb water. So I suggest you 300 gram per meter square. This is the best option.
5. Painting leaves: Let's paint vented leaves. Then. Leaves are leaves having a 2 third margin. It's very easy to pay in this kind of leave. You can simply tap the brush with the green pigment around and you can have this beautiful margin effect of vent at leave. We are going to paint now a round edge. So move your brush around on the left and right until obtaining the shape. I like this way to paint leaves because the final effect is very, very natural. And then you can simply around detail as the bottom corner until you are satisfied with your work. The third leaf shape I want to share with you is around edge. Draw a curved line with the brush until you have the shape you, you design. And then you are going to fill in it with with the color. We are going to paint the same lease in two different piece of paper because then we will need it for the shading exercise in this part of the paper. Now let's paint the round edge. So for these leaves, I'm going to use the orange color. The first round is very, very simple. So as you can see, a is very, very easy. Just paint the two borders. The CEO, the last leaf is powering Earth. Veins are arranged as the finger of an open-end. Draw. First the main vein and then the secondary row, the edge moving around the veins, making curved lines until you obtain the leaf you want.
6. Painting veins: Let's paint now the veins on the leaves. To do these, we are going to use the small brush for details. We're going to use concentrated pigments because this will allow more contrast between the veins and the leaf surface. About the lines of the vein. You can really find your own style. I mean, I personally love to experimenting and draw strange lines. I mean, we are painting and so we have all the chance to paint veins in the way we like more. So experiment your style to paint veins. In the narrative leaf, undecided to paint modern veins. That means that veins are not reflecting real veins on real leaf, but they are my personal interpretation of vein. So you can do the same. The most important thing is the final effect we are going to have. As you can see at the end, but the leaf will be very beautiful to look. And it's appeared like a modern leaf.
7. "Making" black: You can make a black or gray by mixing together the three primary colors, yellow, blue, and magenta. I'm going to pick them from my palette and I'm using these wide pallet with OLS to prepare the gray are yet a little bit of water to deal. And mixing yellow in the first one. Reads the brush. Pick a little bit of blue, rinse again the brush can finally the magenta. On this. All I'm going to make, black first, uh, yet yellow and then a little bit of blue, very, very little. I rinsed brush and yet magenta. Hence you can watch. We are going to obtain a very beautiful gray. And if you're not satisfied, edge a little bit of magenta or blue until you reach the final black, you, you want to. I usually taste the color on piece of paper to be sure to have the color desired. Yes. It's fine. Starting from the gray we have, we are going to test it on a piece of paper. Now, we're going to prepare value of the same color. Value is how light or dark the color is. In watercolor. By adding water, we can easily create different tones of the same colors as we are doing here. Another option is to use directly Payne gray. If you don't want to make your black using primary colors. In this case, you simply add a little bit of color on the palette. Water and mix the two thing to create values, as we, as we said before, simply had water and pigment. And so you will have lighter tone of the same color. Say a little bit of pain from the more diluted to have a third dilution. So we have three different tone tones. The darker, the middle, and the lightest. So why don't we are going to pay in shadow. We have first to decide what tone use. This is the difference between making your own black paint gray.
8. Shadows: sharp edge: In this video, we're going to do exercise 2, paying shadows directly with the leaves. Hence, we have previously learned we are going to prefer black mixing the three primary colors until we have the right gray we want. When the grade is ready, we need to test it on the paper. Just it's very important because we want to be sure of the color, the appearance of the color before painting the shadow. So I'm happy with this light tone, and so it's fine for me. I'm going to remove the excess water on the brush. By this way. This is allowed to have more control. When painting the shadow, we are going to simply paint a line or a curved line jumps around the leaf edge, trying to be the most closer we can. To leave edge. Painting PTO is very easy. You just a simple line on the right side of the real PTO. I'm going to prepare a more black and more gray, simply adding more blue and magenta to have our darkest tone. I also going to prefer values as we previously learned. So adding water and a little bit of the first, the first stone. So this is, allow me to have different tones, different values. I test them on the piece of paper to be sure. Now we are ready to paint the shadow of the second leave. As we did for the first one, we're going to simply paint curved line just around the leaf shape. Be careful because the paint on the brush. Doesn't have to be to watch. Even the brush is full of water. You have to remove it a little V8 using the paper towel. For the third one is the same process. I painted gold line, very defined, very sharp, just for round shape. To paint the pay-as-you-go, we have to paint a little line just on the right side of the real PE tube. So as you can see, it's very, very easy. Move on to the other leaves. This time. I'm going to paint it on the left side. And that is a little bit more to get to me. But anyway, the concept is the same. Painting, our line just around the leaf edge. This time in the PTO will be on the left side. Like this. Fine. We are now the biggest leave the person is the same. You ever really understand that is very, very easy. So this is just an exercise, but it's very useful to just sit on a biggest, an, a bigger leaf. The process is the same as before. Just simply paint a line just around the right side of the leaf. For you. If you want to add more depth to the shadow, simply paint a line of dark gray just between the leaf and the shadow. As I'm doing. This live, will help you to create a more three-dimensional effect. This is our final look, how beautiful it is. So in this exercise, we have a sharp edge shadings.
9. Shadows: soft edge: In this video, we're going to learn how to paint shadows, but with soft edge. First, we have to wet the paper just around the leaf. It's very important to use clean water needs to be absolutely clean. Then we take the color on the brush and remove the excess. We also have to remove the color excess on the paper towel. Simply spread the color on the wet paper. If you're not happy with the amount of colors, simply pick up a little bit more until you have the amount of color you want. Dry the brush on a paper towel to have more control of the water and pigment on the paper. You can use a brush, dry brush exactly as a paper towel to remove the excess of water. We repeated the same process on the second leaf. So we first add water to the paper. So we wet the paper with clean water. And then we take color. We remove a little bit the excess of color using the paper towel and then we applied to the wet surface. Too much water on that. You can use the dry paper towel and remove the excess of water and color with the brush. This is a very useful tool. We are going to apply the same process to the dentist leaves. So the concept is the same. First, I wet the paper on the right side or left side depending on what you what you prefer. And then after wetting the paper, add the color, the black or the gray according to your preference.
10. Final project: Okay, we are now and the final project, we're going to use cadmium yellow, cadmium red, burnt sienna, and sepia. We go into paint multiple leaves. As the final project. I'm going to create values of red because I want that the first layer of the leaf, It's very bright. I've decided to use the second leaf shape we have learned on previous video is that leaf shape that we can create moving around the brush on the left and on the right to have these very natural leaf. I love this style because every leaf is different from the other. This is a tree I'm going to share with you is one of my personal tips. And I add more concentrated pigment on, on the bottom and on the opposite side of the leaf. Because the contrast of color inside the leaf to create a more realistic effect, a more three-dimensional effect. Now, we're going to paint another leaf with yellow. I'm preparing the value more bright. And now let's paint the other leaf. I'm going to use the same technique. Let me show you a tip. If you dry your brush, you can use it as a paper towel to remove the water in excess. And this creates contrast between the colors inside the same shape. If you want to add a little bit of depth to the leaf, pick up a little bit of sepia and yellow and drop the color on the two parts, the bottom and the upper about the base. So look, I believe it's much more realistic because it has a dark part and brighter part. The third leaf is being burnt sienna. I play around on the right and on the left with the brush. And then I paint details. To final result. I push the pigment on the two parts of the leaf and add a darker, darker color to create the contrast. As we said before. We're going to do the same with the sepia. So hence you can see it's better to paint the first layer with, with bright tone, bright value. Because then it's more easy to create contrast between dark and bright parts. The leaves are completed, so let's now paint the branch line, but a little bit messy. You don't have to be perfect because it looks much more realistic. And we're going to make seeing the different color. Now, I'm going to use sapiens and before the burnt sienna. And you can add also a little bit off of cadmium red. I mean, like in nature, colors are different in the same plant. So we're going to do the same. Now, let's paint the veins. We have to use concentrated pigment and if it's too much on the brush and remove it with a paper towel. What so we go with the main vein and then we pay into secondary. If it's too bright, you can add a darker color as sepia. And you will have a beautiful tool to create a little bit of contrast with the leaf. And now paint the secondary vein. I love to bake them a very different way. Fine veins and completed. Now let's move to the shadows. I'm going to prepare black n values. And now I apply the technique that we learned before. So we simply painting with black with the gray line just around the leaf shape. Like a kind of COPI and COPII of the leaf. The branch is very, very easy. We simply paint on the right side the same line shape of the branch. If a copy, a kind of copy of the branch. So very simple. Now we're going to continue to paint the shadows for every leaf. I'm going to speed up the process a little bit.
11. Bonus Class: Texture: Here you have a bonus class. We are going to just see, I'll add texture to the final artwork. I mean, these watercolors spots, but give more interesting visual looking to the artwork. I suggest you to put paper on the table to avoid dirty the table with little pieces of paper to create a kind of frame. Decide where the watercolor spots will go actually. So we create a kind of frame. The next step is diluted with lots of water and the pigment. In this case, I am working with cadmium yellow and the brush full of pigment and water. I'm going to tap with the finger on the brush so that the drop of color will automatically fall on the paper. For you repeat the process with burnt sienna. It's important to use two colors are maximum tree. So in this case, you will obtain a very visual, a very good visual effect.
 Laura Scalvenzi, Artist | Educator | Scientist