Transcripts
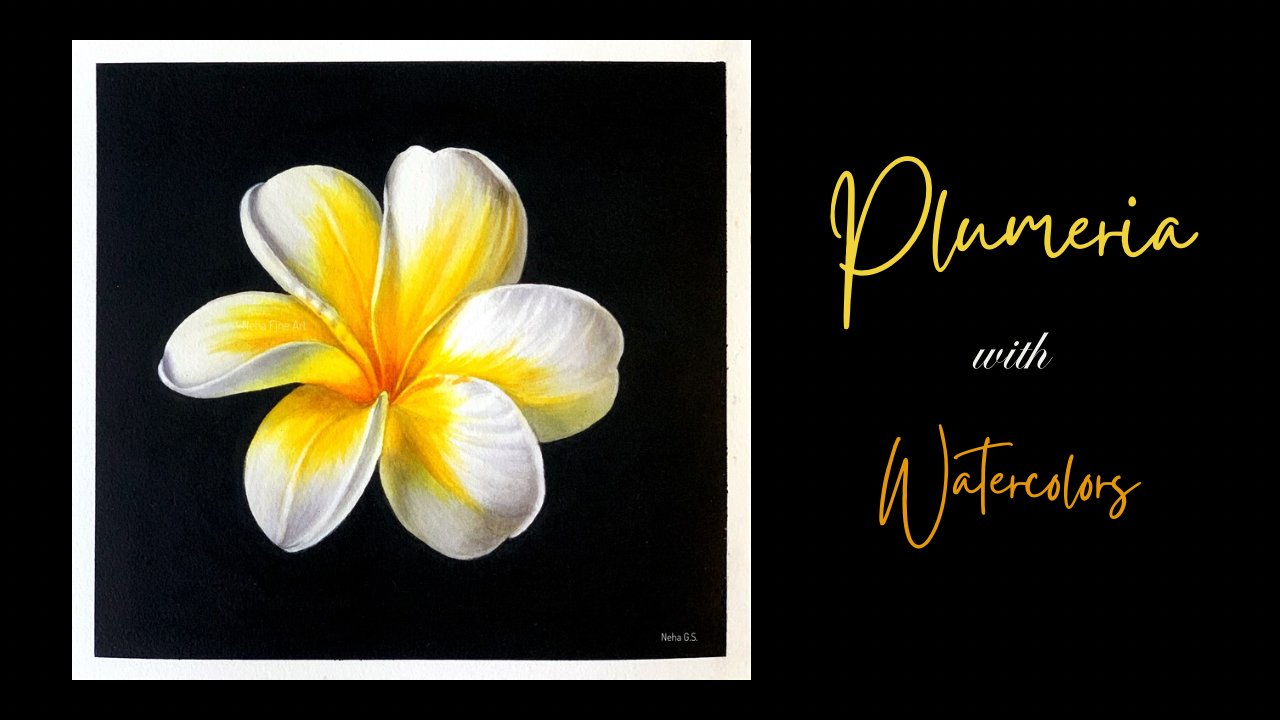
1. 1. Introduction: Hi, everyone. Welcome to my first tutorial
year on Skillshare. My name is Neha, and I am a w coolor and colored pencil
artist living in UA. I have been practicing and teaching art for
quite some time now, and it gives me immense pleasure to share this
knowledge with you. Highly detailed
and realistic art has become my signature style. And if you like to learn to
draw and paint in this style, then you have come
to the right place. Nature is my biggest
inspiration, and that's why I love painting flowers,
birds, and animals. And these two mediums, although they are
quite challenging, have helped me achieve the realism I want
with every piece. Through my tutorials, I'll be guiding you step by step through the entire process and help you reach your
artistic goals. I'll be explaining
all my techniques in detail so that you can
follow along with me. I'll be showing
you what materials I have used for this project, how to trace and transfer your
drawing to the fare paper, how to apply masking fluid and take care of your
brushes as well. I use a limited palette, so I'll be teaching you a lot of color mixing in
all my tutorials. This will further
improve your knowledge in color theory and
also tonal values. For my first base, I always use wet
on wet technique, which is the most important
technique in watercolors. I'll also be showing
you how to lift to reveal the brightest
highlights on the petals. How I use wet on dry technique
to intensify the colors on this flower and also to work
on some very fine details. We'll be doing a lot of brush, very fine brushwork on the
center of the flower as well. My technique is to work with multiple transparent layers to achieve the realism I want, and also to achieve the fine details and the intensity of the
colors that I want. I hope you have a wonderful
time learning with me. Thank you and have a nice time. Bye
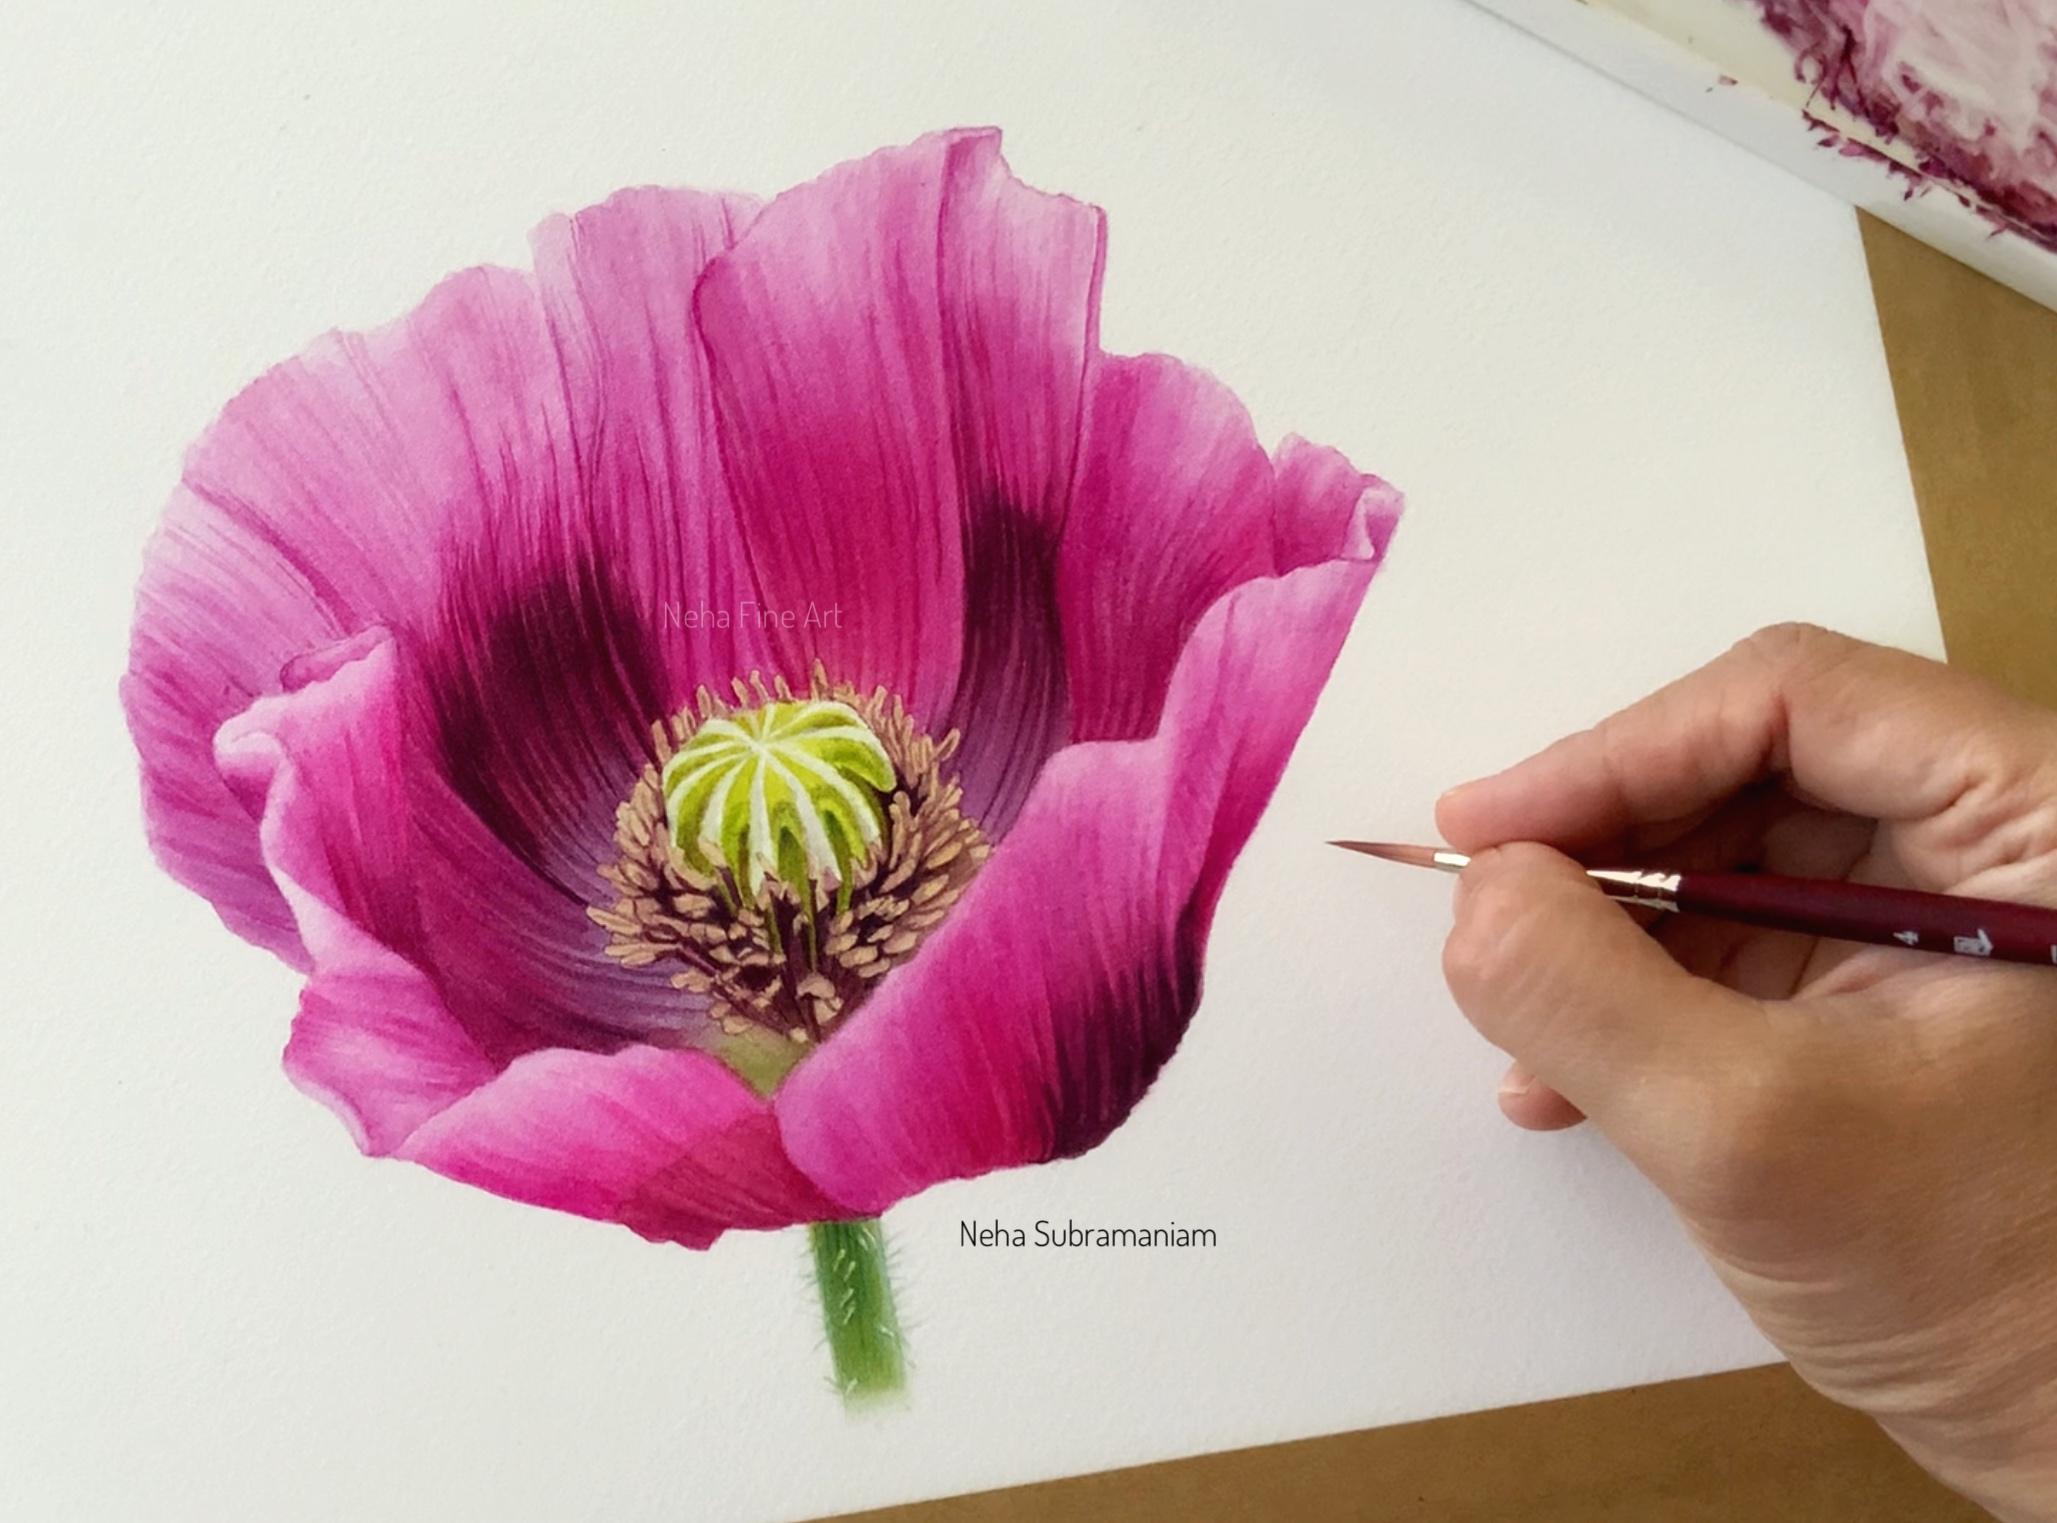
2. 2. Materials: H. Let's go through all the materials required
for this painting. So this is Canson Heritage, hot breast paper, 140 pounds. It's 140 pounds paper, so I'll be stretching it. You can check the how to
stretch watercolor paper video. This is my palette. These are my go to colors in the palette. The extra colors are
in my box over here. Then we require a
soft towel water bowl with one section to clean your brushes and one for
a clean water place. Now, these are the brushes that I'll be using, number six, number four, and this is my lifting brush.
Number two size. This is a mixing brush, any old brush will
do and a zero brush or a number one size brush to
give all our fine details. Now, other than this, we'll
be requiring masking fluid. This is from Schinky or
Schenka, and liquid soap. Again, you check out the video on how to apply masking fluid. So let's get started.
3. 3. How to trace: Hi. In this video, I'm going to show
you how I trace and transfer my drawing to a
fair watercolor paper. So this is my line drawing
number one and this stew. So what I've done is
while taking a print out, I have flipped it horizontally, and this is a tracing paper. So I'm just going to
put my tracing paper on the first print out like this. And I'll secure it
with a tape They they This is a low tack tape. So I use a mechanical pencil
to go over all the lines. I use a B grade mechanical lead because it's a softer
and darker lead. So that way, when we transfer
it to the watercolor paper, the imprint is a
little bit darker. With a hard lead, the
imprint is not very visible. So I carefully go
over all the lines. So I'll finish the whole thing, and I'll come back to you again. So I finished the whole drawing. So now let's remove the tapes. Now, before removing
all the tapes, I just check whether I've got all my lines on
the tracing paper. So now let's take our
print out number two. I'm going to adjust and then secure this
with tapes again. So I'll again finish the
remaining part of the drawing. After it's done, I again
remove the tapes and just check whether I've got all my lines on
the tracing paper. And what I'll do now is I
will just write wrong side on this tracing paper
so that we don't get confused while transferring
it on a paper. So this is my fare paper. I have stretched it on a board. So I'll take my tracing
paper, I'll flip it. And you can place however you want to build up
your composition, I just want it to
be in the center. And I'll just show you how I determine the center
of the painting. So I just take a ruler and just measure if it's equally
placed on both the sides. This is optional if
you want to do it. And now, again, I will
secure it with the tape. So now for the next step, I take my prisma call
erase colored pencil. Now, there are two
reasons behind this. One is that with
a colored pencil, you'll be able to see
what lines you have gone on that black outline. And the second one is
it's a softer pencil. Colored pencils are soft, so you'll not be
making too much of a hard impression on
your watercolor paper. So I just checked whether
my hand pressure is proper, whether I'm getting the
impression correctly, and I'll be continuing to
trace the whole outline. The outline is done completely, and now before
removing the tape, again, I'll just see whether all my lines are
there on the paper. I'm using a low tech
masking tape so that it doesn't spoil
the watercolor paper. So now, one last
step is remaining, which is, I take my hard pencil. This is three H, and then I'll be going
over all the lines. So I refer to my
reference picture and correct all the lines which I've missed out maybe
while making a line drawing. Of course, I'll be giving you a very accurate line drawing, but going over all these lines, seeing the reference
picture just makes me acquainted with my subject. And also, when
you're just giving an impression with your tracing paper on the
watercolor paper. Sometimes when you're putting your hand over it for
a long period of time, especially for a complicated
subject like this, this line starts to get faded. They just become light, and
I don't want to lose any of my line drawing by the
end of this painting. So before putting my
brush to the paper, I want my drawing to be accurate because for
any realistic painting, your drawing has to
be super accurate. And one more thing,
how it helps is, now, if you look at the reference
picture of the center, now, these are the anthers, and then we have these very
dark filaments. Please excuse me if I'm not giving any correct names for
all the parts of the center. So what I do is for
all the darker parts, I just fill in with my pencil. To distinguish between
the lighter anthers and the darker filaments. So this way, I exactly know what is in the background,
what is to be dark. And this pencil, we are
coloring it with three edge. So this pencil color will go underneath your
watercolor paint, dark watercolor paint,
so it'll not be sn. Okay. So I'll finish this whole thing and I'll
show you what I did. So this is the drawing. I have colored all
the darker parts, and I've left all
the lighter centers. So I'll be leaving
this drawing with you. And now the next step will
be applying masking fluid. So see you in the next video.
4. 4. Applying Masking fluid: In this video, I'm
going to show you how I apply masking fluid. I just take a palette, and this is the masking
fluid which I'll be using. This is from Sch Menke. And I have some liquid
soap and a thin brush. I'll just remove
some masking fluid in the palette over here. And I'll take my brush and coat the bristles of the brush
with this liquid soap. Now, what this does is, if you directly dip your
brush into masking fluid, your brushes will get damage. So dip it first in
your liquid soap or even rub it on
your regular soap, and then you dip it in your
masking fluid this way. The bristles will be protected. It will be smooth even after
you wash off the brush. And then I apply this in the
area where it is required. So I'll be going
over all the anthers on the periphery of the center. I'm not a big fan
of masking fluid, so I'll be using it only
where it is required. So all the outside anthers, which is touching the petals, I'll be applying
masking fluid over it. Take a thin small brush so that you can reach all
the small areas. I've just gone
over the periphery where all the petals
are touching. This way, when we are
painting the petals, we will not be concerned whether we are going
over the anthers or not. And we'll leave this
to dry completely. Now, I'll wash my brush. I'll tip it again
in the liquid soap and see how soft it is looking, and it is going to
dry also like this. I'll just show you where all I have applied this masking fluid. We'll leave it for drying, and I'll see you in
the next video. Bye.
5. 5. Color Mixing: Hi, guys. Let's see what colors we are going
to use for this painting. So I have my reference
picture here on my iPad. You can even take a colored print out of
your reference picture. So I have my mixing
brush in my hand, and let's see what colors
we're going to use. This is helios purple, loosine blue, lemon yellow,
cenar yellow, deep. We'll also be using
a little bit of rose and French
ultramarine blue. So Let's see what colors we are going to use for the petals. I'm going to take helios purple. I feel this color on
its own is going to be a perfect pink purplish
pink color for the petals. It's a nice cool pink color. And now let's see how do
we mix the shadow colors. For that, I'm going to
use helios purple again, which will be here and here, rose Maddale To this, I'm going to make
ilocin in blue, a little bit more
of hellos purple, and then car yellow deep. So I'm going to mix these
three primary colors for this shadow color. I'll be just adding a
little bit more of water, more of hellos purple, more of yellow,
just to warm it up. A. L et's water it down and see. This color will be used there. Now let's make up this
light violet color, so I'll be using the same
heliospurple to this. I'll make heloce blue. That is too much blue. I'll just remove some of it. A very light watery version. Now I can see it's a
little bit more warm I'm just adding sllilar
yellow deep to that. A little bit more of
yellow as these petals are more on the light
receiving side, then the left, which
is more in the shade. So for the shady areas, you can add a little bit
more of blue than yellow. Now let's mix up
that dark color. I'm going to use a very limited palette for this painting, so I'll be using same these
three colors even for that dark brownish violet
brown that you see. Again, I'm going to
take helios purple, plus locnine blue, plus
ciliar yellow deep. These all three will be in a very concentrated,
saturated form. Let's test it out. More of yellow. And you'll
have to keep on increasing or decreasing the proportion of each color to get
the desired color. I'm going to add
a little bit more of pink, more of yellow. If I water it down, y. I think a little
bit more of yellow, and we'll test it out here. See that. It'll go even there. Now, this color will also
go in those filaments, and if you water it down, you can get the lighter shade. Now for the anthers, what I'm going to do
is the same color, a little bit more water
down, and to this, I'm going to add
our cenar yellow, deep, a warm yellow, and we will get
that perfect color, a warm bag color. Now let's mix up
this green part. For this, I'll be
taking lemon yellow, a bright, nice lemon yellow. To this a very little
bit of talcnine blue. I just want that yellow to go a little bit towards
the green side. Use a nice green brush when you're mixing
your lighter colors. Now, this will be a
lightest yellow color, more of a neon
yellow green color. Like this. Then
for our mid green, I'm just going to take a
little bit more of locine. But it's more
towards olive green, so I'll be adding
cenlla yellow tea. Here again, I'm not using
any ready made greens. I'm using the same
colors that we have used in our painting. This will make the whole
painting very harmonious. This is the color
we are getting, which is locine blue
plus cenar yellow tea. Okay. Now the last, which is the stem. Let's mix up some
colors for the stem. I'm going to take enliar
yellow deep again. And now this stem, I'm going to use French ultramarine blue. I just want a little
bit more darker blue. The color just under the petals, the stem is in shade. So the color is more
of a bluish green. I'm just adding more of blue
french ultramarine blue. And for the lighter parts, you can just water it
down and use that. Now that we are ready with all the colors, let's
start painting. See you in the next video bye
6. 6A. Petals-First Wash-Part-1: Hey, guys, so let's actually
start painting now. All the prep work is done, and even the masking fluid
is completely dry by now. So let's lighten
the sketch first by dabbing it with
the needed erasor. So this will remove
the excess graphite. But while doing so, be careful
near your masking fluid, otherwise, that
will also come off. So let's start with
this big petal. I'll start with applying
helios purple in this area. There is one line over here, which I have accidentally
raised it off. We'll paint both these
petals together, and here there is going to be this light color
that we have made. And the darker, the darkest toe, we will not do it at this stage. I'm just going to t
purple on my palette. Go to make a little bit of rose madder lake
also to this one. I like to keep my first
layers very bright. They act as a very
bright undertones. Now I'll be taking brush size six because
it's a big petal, and we will start applying
a glaze of clean water. So as I always tell, in all my tutorials, apply water as if
you're applying paint, so keep it within
your pencil edges. And we have the masking
fluid over the anthers, so you don't have to worry
about working around them. You can take your water
up to those anthers. And we are going to do a
lot of work on this petal, so give it a nice two to
three ats of clean water. And as we all know that the paint will go
wherever the water is, so try not to go over the
edge with your water glaze. Seed from sideways, whether the whole surface is getting
that glaze of water, and you've not missed
out any spaces, nor there are any
puddles anywhere. So now I'm going to take a
mixture of these both colors, Los purple and rose, and I'll start right from
the center over here. So for a big petal size, I like to use a bigger brush. Now, the top of the
petal is quite light. Don't start from the top and
don't come towards down. Being very careful
near the edges. I'm just dragging whatever
color is there in my brush towards the top of
the petal because it's light. Is going to lift off some
of the color from here with a damp brush and apply a lighter violet
warm violet color, which we have made with
helios purple, locine blue, and a little bit of cenar yellow t. This is our first layer, and we are going to
keep all the colors, very light and transparent. Continue with your pink again. And now there's
nothing on my brush, and I'm just going to
drag whatever color is there towards the top edge. Because it's not
completely white. It's a very light pink. Always ting the edges as you go so that we don't have much cleanup to
do after it dries. I'm taking more color now
since the paper is still wet, and I think it requires a little bit more color and always applying color in
the direction of the veins. Keeping everything
nice and soft. I'm still feeding more
color to the area. And the darker shadow color, we will be applying
in our next layer. Now there's nothing on my
brush and with a damp brush, I'm just going to drag some
of the color on the top edge. Paper is still wet, so I'm
able to do all these things. And now I'm just lifting
off some of the light. I'm not taking any color now. Now, lifting off some
of the lighter veins. As your paper starts to dry, lifting becomes very
easy and sharp, your lines will
look much sharper. So every time after lifting, just wash your brush
and dry it on a towel and bring it to a fine point
and then just lift it. And you can do this till
your paper allows you to do till it is wet enough. And once you feel that nothing is happening,
then you have to stop. O. In the first layers, it's always better to retain most of the lights
as much as you can, because it's easy to
darken in watercolors than to leave your
lightest highlights. At the same time, I'm just
softening the edges as well. Oh. And once you feel that you have done enough and nothing
else is required, we can stop and let it to dry. So while this is wet, we will not do the
neighboring petals. So let's do this one. Actually, this is
a very big petal. So what we will do is, we'll just work on the
smaller portion over here because there is one
line dividing this petal. So I'm just checking whether all my drawing is good to go. So we'll work till here where
this vein line is visible. It's always better to work in small controlable portions so that our water glaze
will not dry while we are painting from going to A to B. I'm going to use size four
brush now for this section. And before you give
a water glaze, always see to it that your
color is there on the palette. I'm taking helios purple again. So the same way, let's
start giving a water glaze. Use the very tip of your
brush to go into the corners. A very even glaze, which should have a very even sheen when you look
it from the side. Just see that you don't
miss out any spots. Let's take color on the brush. I like to start always where
I see more darker color. That way, I don't
accidentally go into the areas
where it is light. I'll start with this
corner over here. Keep the edges lighter because as they are the
petals are going out, the top of the air
is receiving light. Again, you can see that I'm working in the
direction of the veins. There is nothing on my
brush now and just with a tamp brush with very little water on
in my brush, actually. I just taking that color to the top lifting it off. Now I'm going to take a
little bit more color. The glaze is still wet, and just trying to
lift off some of the highlights
with a damp brush. Oh. And your glaze is wet, and if you can,
you can just keep on adding a little bit
more color as you go. Now, here on the bottom side, I can see some shadow. I'm going to take the mixture of halos purple ello sinen
blue p sar ellow deep, and there is also a
little bit of rose. This will also show that
this petal is behind that petal and it's
in the shadow area. Again, just with a damp brush, I'm just neatening
off all the edges. Now, this side of
this petal is dry, so we can paint on the
smaller one next to it. Again, we have lots of
helios purple here. But then below, we have
this shadow color. This is a mixture of Hilos purple plus a yellow
deep and ello sining blue. And I'm again going to refill helios purple on my palette. Let's give a water glace again. I'm still using my
number four brush. Now, the size of
the painting here is ten inch by ten inch. I have deliberately taken a bigger size for just
for the center details. When we are going
to do the center, you will see that doing it at this bigger size was
very thoughtful. Giving a thorough glaze of at
least one to two of water. Let's start with
helios purple first. I'm going to put this color
right here in the center, leaving a little lighter
edge on the left. Now this is also
part of this petal. Going to put more color
here in the center. As you can see, there is a
nice bend to this petal. It's quite dark here. Going to add a little bit of pink rose meadow
lake in this corner. Again, the top air is
a little bit lighter. Now for the bottom part,
it's in the shadow. I'm just going to
add a little bit of yellow to this mixture. Use the very fine point of
your brush near the edges. Now I'm also going to
use a little bit of rose madder lake
in this section. This looks a little
bit more redder. Now, with nothing in my brush, is going to take that
color to the top. Adding a little bit more
of helios purple here. Now comes a lifting part, with a clean damp brush and make your brush to a fine point
when you're drying it out on your towel and just start lifting whatever highlights and the lighter veins that
you're able to see on the petal in the
reference picture. After every lift, you have to
repeat the same procedure. And this bend is very
important to show that flower is
bending backwards. If your painting
is too much wet, then you'll not be able to
get a very defined lifting. You'll have to wait for
that perfect window to lift off all your highlights. Now I'm just going to
soften all the edges, and we leave this petal. While that is drying, let's jump to this side. Now this petal is also dry. I'm going to work on this
triangular folded petal. I'm going to make a bit of opera rows to my helios purple. This to make it nice and bright. That, that folded part is receiving a good
bright sunlight on it. It's really shining. And then a little bit
of neat helios purple. And then we have a darker color for the bottom edge over here. Okay. Let's start
applying a water glaze. Now I'm going to work on
this entire conical shape. I'm going to include even this small
triangular piece here, and even the top portion. Everything at one go.
Let's see how it works. They're all very
small tiny portions, and they're all the same color. We'll be able to manage. But if you want, you can leave these two areas and
do it separately. Let's start with this
bright pink color, and I'll apply it on
this brighter edge. The top edge is again light, so I'm not going all
the way to the top, a little bit more color. Even here on the left, the edge is lighter. As you go down, a little
bit of helios purple. And then down we have
our darker color. The more and more
you paint and draw, you will start noticing, small variations in
your total values, small, small variations
in your color shifts. So drawing and painting every day daily is
very important. And now with the
clean dam brush, I'm just going to lift off the lighter edge. And even here. It's not completely white. Even if some of your color seeps into that area, it's
completely fine. We don't want to leave it white. Adding more color. Now, whenever you're going on
adding more color, and as the painting is drying, so take very little
color on your brush. Let's paint this small
corner triangle also. And the top portion, I'm just going to lift
it off with a damp bruh. Soften it with a damp brush. This is Hosp. As your painting starts to dry
and when you apply colors, you have a little
bit more control, the color will not spread that much as you did
in the beginning. I'm just teasing some of that color into
the lighter area. Now t's paint this
small section. This area has got almost dry. Actually, I'm
painting wet on dry. With a damp brush, I'm just
going to soften that edge, whatever we have applied. Just make it nice and smooth. Take a little bit more color. This is still our first layer, and we are going to make this much more darker and
much more in details. How much e you can do in your
first layer, that is fine. Now with a damp brush, I'm just softening
away all the edges, neat them, and we will this. This lifting of some
of the highlights. So Let's finish this
small tiny one over here. Here I can see more
of hilos purple. Giving water glace. You can even work wet on dry. Taking purple. And I can also see
this dark color mix it a little bit with
that rose Madal lake. Always working in the
direction of the veins. I'll just lift off
this harsh line, adding more rosemdal lake. Taking verytle
color on my brush. Now, I'm just going to lift off the highlights with
a clean damp brush. Still need this area to
be a little bit darker. And then just clean
off all the edges. Same thing for this tiny one. For this tiny petal, I'm just going to
go directly with. Oh. Adding more color, and with a
damp brush, just soften it. We will not do that small
triangular petal now. Now, this petal is, so I
don't want to do touch, but we can do this one. These lines which have vanished. And I've made some change
to the drawing over here and made this
as a whole petal. Now we have a bright pink on
the top side of the petal, and on the bottom edge, we have a more warmer red color. So we'll be taking
rose metal leg and then a darker color. We'll be mixing some cenar
yellow deep to a darker mix. Let's glaze it with
clean water once again. Don't skip this step
and hurry on this step. If you have a good water glaze, then you will be able to do your ton wet painting with a
lot of ease and confidence. It will give you a
lot of time as well. I'm going to add opera rose
to the purple mixture. This is the back side of the
petal which we are seeing. It's nice and bright
in the center, and even if it goes into the
darker part of its color, then it's not a problem. I'm going to take Rose Mao
Lake for the bottom part. I'm just going to soften this before it dries
with a damp brush. The top edge is quite light, so I'll just soften it off. Now to that pink color. I'm going to add
more of this pink. Going to add a little bit
more pink to this center. Just neaten off all the
edges before it becomes dry. And now I'm going to work
on this darker portion. I'm again feeding more of opera, sorry, rose madder lake. And to this, I'll be adding our darker mi with a little bit more of cena yellow deep
and the rose madder. Dropping in that color. Since we're working wet on wet, this color is still
going to fade off, and we'll come in with more layers to
darken those colors. Now it's time to lift. With a very clean damp brush, start lifting off
all the highlights. I can also see some
lighter sections in this darker portion also. With a very pointed damp brush, I'm just lifting off some
of the lighter veins. And we'll leave this too dry.
7. 6B. Petals-First Wash-Part-2: Okay. Let's continue. I'm going to finish up
that tiny one first. Go in with wet on dry with pink color and then just
softening it with a damp brush. Now, let's work on
this big petal. I'm going to use
number six for that. So I've just refreshed my palette again
with all the colors. This is our darker color with
hellos cenar and telocnine, with a little bit
of rose Matal lake. And then we have
our bright pink, which is helios
purple plus oper ose. And then we have a little
bit of rose materals. Now, my left side petal
is not completely dry, and then we have our
masking fluid on top of it. So there we don't have to worry. But just on the left side, I'm being a little bit careful. So quickly drag lots of water from left all the way
to the right side. It's a nice long petal. That's why using an
appropriate size of brush for an area
is very important. If you take a very small size of brush for this big petal, then by the time you reach
the right side of the petal, your left side
glaze will get dry. I'll start with this bright pink right in the
center over here. I'm going to feed in more color. Again, I'm not going on
the top edge of the petal. Leaving a lighter edge. And then I'm going to take
rose Mad Lake for this section Now, with very little
water on my brush. It's not completely dry. I'm just going to drag that
color on the top edge. I'm going to add a
little bit more color. Lift off the light highlight. Now, let's quickly work on this darker part below
before it gets dried up. Now my board is a
little bit inclined, so I'm getting a little
bit puddle over here, a water puddle, which I'm just drying off with a damp
brush, soaking it off. Before I go in with
the dark color, I'm just going to feed in a bit of rose for the left side. Now let's continue
with this dark color. Now, as I told you,
we're not doing that very darkest shadow color
and on this first layer. This is the color which I see in between those very dark color. Dark blackish color. Now before this top edge, I'm just going to soften it with a damp brush so that it
doesn't leave any hard edges. The glaze is still wet, so I'm going in with a
little bit more color. But now the quantity
of color is very less. If you go in with more color or more water in the drying stage, then you'll start getting
those water blooms. I've started to lift now with a damp brush,
lifting veins also. The more you practice
with watercolors, the more you will understand
when to start lifting. You'll perfectly know that that time when you will get
effective lifting time. If your glaze has got dried up, then just stop working. My glaze the painting
is still wet. I'm just feeling
little more color, not going in with too much color like how we did
in the beginning. Defining some of
the colors here. And then just lifting off
whatever light I'm able to see. At this stage, I like to keep more
highlights than required. The direction is very
important that will show the shape and the
flow of the petal. I've turned my
painting so that it's convenient for us to
bring the strokes to, especially for
this big petal and even this small one over here. Let's finish this smaller one. Same colors, a very bright pink at the same time, some helios purple. This is a lighter turn
side of the petal, but I'm going to include
it with this one. I mean, I'm going to include
it with the water glaze. Take water till the
edge of the petal. If the folded petal
was completely white, then I would have left it. But this is a very light color. I'm taking a very bright
pink and I'll start from the center and even
at the edge of this petal. The edge of the
folded petal as well. Now, just with helios
purple in this corner, I just tapped off a
little bit of color on the towel and with
a very light color, whatever is there on my brush. I'm just dragging that in
the center of the petal. I'm just going to lift off
this color with my damp brush. This is a light portion. I'm just going to add more
purple in this corner. And then again, with
a clean damp brush, just lifting off the
part where is folded. And giving a very thin
edge with os purple. A little bit pink color on this triangular portion as well. And then just soften that part. Now, what I'm going to do is, we're going to work on part
of this petal, this section. Let me just darken this line, which I've got very light. So we'll work on this petal. And now for that lighter violet, this is going to make
a little bit more of blue as this petal
is in the shadow, as I told you before, that it has less of yellow, and it has a little
bit more of blue. So this petal, we will do later. I'll switch to my size six. Here we have mostly
helios purple, and here we have
that light violet. And here, I can see
some rose medal g. I'll also refresh Los purple. It's a big petal. We
need a lot of color. Again, our dark color with a little bit
more of yellow in it. This will be the background
for that darker patch. Okay, let's begin
with a bigger brush. I'm going to give a
nice clean water glaze. Give nice two to three of water glaze so that you have
ample time to play around. I'm just going to include
that part in my glaze. Taking lots of water, and we still have
this masking fluid. So we don't have to worry about color going in the
lighter areas. Working very carefully
near the edges. If you cannot see the water, just tilt your head
sideways so that you can see the sheen of the water. That way you will not go
outside your pencil lines. Y. If you're living in a
hotter climate like mine, you can just give two to
three as of water glaze. Remove all the water
from the brush so that your color doesn't
get diluted too much. And with helios purple, I'm going to start
from this left side. Going in between those anthers. Let it flow on its own. Now, I'm going to take a little bit more of helios purple, especially here where
there is a nice twist, turn of the petal and just
drag that color down. I'm excluding the darker part. This color will even go here. Working in the
direction of the veins. Whatever color is
there in my brush. Let's take that lilac
color for this part. And then a warm red dark color. So this is the background
color of that dark patch, the in between color
that you're able to see in between the darker areas. That is the color we
are applying now. Again, at this stage, everything is very light and
very transparent. Let's keep it that way and slowly with different
layers, we will darken it. So I'm going to add more of rose matter to this red mixture. My paper is still wet, so I'm just going to add
a little bit more color. See how the direction
changes over here. And now I'm getting a nice puddle of water down
because my board is inclined. But in a way, it has helped
me to keep that area wet. So with the damp rash, I'm just soaking up the extra water and just
softening it, making it even. Still going to make dark. Even this warmer red patch. Keep your hand wrist movement very free when you're
doing these strokes. A little bit of this lilac also. Now let's start, lift up all the lightest areas
and even the lightest ves. Also paint in some veins. Continue lifting,
as you can see, I have lifted out from
the darker area also. Now we'll leave this pal to d. So I've turned my board again because we'll
be painting this petal. Now we have that olive green in the very corner of the petal, which we're going to mix now. But this, I'm going
to take lemon yellow, little bit of talcine blue. Same colors, and to make
it like an olive green, we'll use a yellow,
cenar yellow, deep. And to make it a
little bit more dull, I'm just going to add
this red mixture, very little bit of it. This will take away all the very brightness of that green. That green will come here. Then we have that lilac. It's a little bit. I'm just going to mix
up same three colors, purple, sin yellow, deep, and ello shining blue. Whenever you're
mixing so many colors and especially some very
rare colors like these. It takes more than a couple of takes to get
that perfect color. It happens with everybody. So it's not that
professional master artists like they get their
colors at one go. You have to keep on
keep on adding keep on subtracting to get
that perfect shape. And this experience will help you in getting
that perfect color. And now we require that
darker warmer pink. I'm going to mix os purple, same yellow and blue. This is a more cooler dark
color, cooler shadow color. So we'll be adding more of
Hos purple into this mixture. And mixing like this on a white ceramic palette will exactly show you what
color you're looking for. And of course, I'll be
taking helios purple on its own. So let's start. Again, I'll give a
nice clean water glaze to the entire petal. Even here our anthers are
covered with masking fluid. Always keep your hand in this
direction of your painting. I mean, keep it in a very
comfortable position. I'm applying that green adding a little bit more of
blue just to make a bit, especially here in the corner. And then with a damp brush, soften off the edge where it
is meeting the lilac color. Now let's take the lilac. Start off with very light,
if you're doubtful. And we're working so all the colors will
merge with each other. And now we're going in with
a darker shadow color. Even if we don't get your colors perfect in your first wash, we can always glaze it with different colors in
different layers. And now with neat helios purple, I'll start from the very edge and working towards the
center of the petal. So this bottom edge, bottom right edge is very dark. Also add some rose Mandal k. I just want to clean off this
edge before moving further. You can always do this
after the paint dries also. Taking very little color now on my brush as the
paper starts to dry. Again, I'm just going to
soften that hard line. And then start lifting
off the lighter veins. At this stage in
your first layer, leaving your highlights and
giving very light layers. Transparent layers is
the most important part. I'm still going to add a little bit more of helios purple. I want to make this
area a little bit more brighter and more. Paper is still wet. That's why I am giving a
little bit more color. So we'll leave this to dry now. It's very important to to let
each layer dry completely. And in the next video, I'll show you how to do all the darker colors
in the second layer. By
8. 7. Petals - More layers!!: Hello, everyone. So I left my
painting to dry completely. And now we will erase off
all our pencil marks. Especially the outside ones. If you want to retain the
inside ones, then you can. But please be careful
near your masking fluid. If you go with your eraser
near your masking fluid, there is a chance that
you might lift it off. And we require a masking
fluid for the second layer as well so that we don't
have to work around them. So very gently, just erase
off all the pencil marks. Okay. And now we are going
to darken each petal. So retaining the masking
fluid will be really helpful for us at
this stage also. And as you can see, our
colors are much lighter now, so we'll have to build up all the saturation of each and every color
at the same time. We also will be doing
the darker layers. Now, before jumping in
with the second layer, I always like to clean up, whatever mistakes or
if it's gone over the edge or any hard line edges that has been left over
after doing the first layer. So this is a correct time to lift it off with
the lifting brush. So what I do is, I just
wet the lifting brush and just lightly
wiggle over that area, which I don't want and then just lift it off
with a tissue paper. Here, I'm just softening the
outer edge of the petal. This is completely optional, but I don't like
any hard line edges when I'm doing
watercolor painting. And it's better to do it at this stage when your
first layer is dry. Otherwise, you'll be
applying more colors and those colors will
start becoming permanent. This is also a great opportunity if you want to remove
any highlights, which you are not able to do. So now let's work on
this first petal again. What I'm going to do
is I'm only going to paint in half of this petal. I want more control now, and also I'm going to work
wet on wet for this again. Usually, for second layers, I always go for wet on dry, but I want to keep these
layers still very soft. So applying a nice
clean water glaze. Now, always remember
when you're doing a water glaze over
your first layer, just do it very gently. You don't want to
push your layers, your colors too much. So just with a very
feather touch, apply a nice glaze of water. Of course, our painting is
completely dry, but still. So taking our hilos purple, and with the very
tip of my brush, I'm going to start from this
very edge, left side edge. Un In the second layer, we are going to darken
all our colors, as well as apply those darker
markings on the flower. Taking more color now. And again, I'm moving in
the direction of the veins. We are doing we on, so again, this color is going to
fade off a little bit. I'm also going to take
some rose Maddke. If you notice, you can
see some red veins. At the same time,
I'm going to take this darker color and just
draw in all those veins. Keep your hand in a nice
comfortable position so that you don't get
a very shaky line. While that dries a bit, I'm just going to work on this lighter part of the
petal, the top edge. So taking very watery, very little color on my brush. And then if you
want, you can still lift out the highlights with a clean damp brush
and even here. Before lifting. Now, as your painting
starts to dry a bit, you can give more cleaner lines. The lines will not spread that. At the same time, they will
be really soft looking. So add a little bit of that darkest color
also to the mix. And then lift off whatever
highlights you can see. It's basically lifting,
applying color, As you can see the
paper is still damp and start taking less and less amount of
color on your brush also. Drawing in more veins. Some of them are very light. So we are really going
into details now. Darkening these veins
a little bit more. If you get any hard hard lines, then just go over it
with a damp bruh. Any of your veins are
looking too harsh, then you can just go over it with a damp brush to soften it. So I dried off this
with my hair dryer. And now let's work on the
other half of this petal. So same way, I'm just going to give a nice
clean water glaze. Take water right
up till the edge. And here, again, we
have a masking fluid. So we don't have to worry
about the color going inside, but still work carefully
around the edges. So I'll take our helios purple. Working in the
direction of the vein. If the lines are bending, you also have to paint it
that way because that will show how the flower is moving, how the pla petals are moving. Then we have a nice
fold over here. Softening it off
with a damp brush. A. So now let's take our lilac color. Just softening it off. I
just feel it's too dark. I'm just going to water it down. So this is a very pale
shadow mix that we have created by using
three primaries. And now comes the darkest color. Same three primaries,
helios purple, yellow shining blue,
and similar yellow. M. Darker colors always
require lots of layers to get that intensity and always start with
a very light color. That way, you will
also get a lot of depth in your
dark colors as well. If you directly going in
with very dark color, it might look opaque
and very artificial. So again, on top of that, I'm going in with same color. Taking very little color on my brush and working with
the tip of the brush. Just going to soften some of the lines as the glaze has
got a little bit dried up. Whenever you feel your
lines are looking a little bit harsh,
just soften them up. Now, in between, I can see
more of this dark red color. I'm just going to fill it in. And since we are using
very less color, it is getting dried
also very fast. So I'm not overworking
on a wet surface. Adding a little bit of helios
purple to our darker mix. Always keep on adapting your mixes to the area
where it is required. So a good observation skill
is required over here. Now, let's work on the
top part of this petal. So I'm just dragging that darker color into the top section so that
looks very natural. This is just purple
plus that mixture. Oh So this your paper has to be just damp. It cannot be too
much wet otherwise you'll not get those lines. So now this area has dried, and I'm coming back on it again. So give some breathing
space to your paper. And I'm again darkening
that lilac color. So moving on to another petal. Start with nice
clean water glaze. I'm just going to add
some opera rose to Hosp. This section is nice and bright. Don't think that
we are darkening the petals too much
because when this dries, it's really going
to lighten it up, lighten up, and then just
dragging whatever color I have. And this is the folded
part of this petal. And now with a clean damp brush. I was going to soften
the other side. Now, let's take our darker red. Mixed with a little
bit of rose medal. Even nice bend to the veins. The veins will determine
the s and the flow of the, the bend of the pal. Oh and just soften off all the veins
that you have done just to make it look natural. Similarly, let's work on
this smaller one here. For this, also, I'm
going to do wet on wet. More color in the corner and
then defining that edge. Just cleaning off that edge. The corner. Similarly, let's finish
this tiny, tiny one also. And then with the damp brush, just spread it to the top. Even this one. Okay. So now we have finished with this side. So let's work on
the left hand side. So this, I'm just
going to take more of operas into as purple mixture. Now, this is a very small one. I'm directly going
in with my paint. In small areas,
it's better to go with wet on dry technique so
that you get more control. Just applying color
on the bottom edge, and then the top edge, I will just soften it
off with a damp brush. Now, for this petal, I'm just going to work on
this triangular piece first. And this is our bright pink mix. Take a damp brush
and soften it up. I just going to give a water
glaze to this petal also. The left side triangular
petal, which we just did, is still a bit damp, so just be careful. So taking our os purple
plus opera rose mixture. I gave a very light
glaze of water, so your color is not going
to, like, spread too. Nice and bright. And then just soften it with
a damp rash for the top. Now I'm going to take
our dark red mixture and separate this corner. More darker color as it's going inside
towards the center. I'll take neat helios
purple for the mid section. So adjusting your tonal values here and then just
soften off that line. L et's move on to this
bottom left petal. Again, I'll be working
wet on wet for this one. Now, as you can see, I have refreshed all the
colors on my palette. I prefer mixing small batches of colors rather than making
a big batch of color. It's okay if you don't get your perfect color every
time in the same painting. So that way, actually, it helps in developing the
depth of the e, the colors. So if it is less pink in one mixture and more pink in
another one, that's okay. Now for the top edge, just going in with a very damp brush and
just softening it. Now here, I'm just lifting off
some of the lighter veins. It's always important to retain all our lighter
highlights at any stage. Now let's take our
darker red mixture. So. Always moving in the
direction of the veins going. And now, again, I'm lifting
off some of the light. Let's continue on this petal. So for this corner, I'm just going in wet
and because I want to contain that
particular folded area. Ohh working wet on dry. I'll just soften it. Just go
over it with a damp rush. This darkening this part. Wherever you don't
want any color, just go over it
with a damp rush. Giving some details here. I You can see some diagonal veins going through just removing
some highlight. So those veins down, they're t this petal is
turning and twisting. And now for this part, I'll be doing wet on wet. Oh So I'll start with helios purple again. And I'm taking my strokes
from bottom going to the top. And now, this is Rose Madd Lake. I'm just applying a water
glaze again over here. It's got dried up because
in the second layer, I don't use too much of water. Just a thin water ge is fine. Still retaining all the
lighter areas on the top. K. Now let's start with
the dark color. The glace is just damp enough so that our all these dark strokes, they don't look very harsh. They look very soft. Start with lighter color
if you are in doubt. It's always very scary to apply a dark color a nice
pink petal over here. A a little bit watery mixture and just going in
between those lines. We'll let that dry for a bit. Now I'll just continue
working on the top. And then start lifting Oh Okay. So we'll let this
area dry and we'll come back to it again later on. So here, again, I've
turned my board. Let's work on this corner petal. Pink mixture. And a little bit shadow under that folded
the folded part, and then just lift off
some of the light. This one is too light. I was going to give a
little bit more of pink. Let's darken this one also. We actually have already
done this a little bit more. So we'll paint this a
little bit later on. Let's paint the
bigger petal now. So I'm just going to refresh
some of the colors again. And to this darker, I'm
going to add a little bit more of yellow and
more of purple. And for the bigger petal, I'm going to take
a bigger brush. Let's do one thing. Just work in this small section
over here first. Small manageable section. I'm only going to
glaze this s s. This one. And I'm going to switch
back to number four. Feeding in good color. Let your flower be
nice and bright. Go in between those anthers. Just removing some of
the color from my brush. I just tap it on a towel if I
feel that's too much color. So that way you
get a light color. Taking more pigment
now in my brush. But before that, I'm just going to lift off
some of the lights. Lift off some color
in between the veins. And then taking a little
bit thicker helios purple, more pigment, just
giving in these veins. Observing carefully the
reference picture, Oh, I will be coming back
on these petals for a third layer on
the bigger ones, especially in our
finishing stage. Let's leave that and
finish off this this part, the same way, a
nice water glaze. Taking a bigger brush so that you can move around
fast with more of water. So here I'm giving you
a nice glaze of water. We have lots to do. So first of all, we'll be
taking this lilac color. And then our warm red, which has rose Mato
lake, cena yellow, deep, os purple, and a little
bit of pillow shining blue. So this is the background
color for the darker area. And here the petal twists
towards left side. If your glaze is dry, then just soften all
your veins that you've painted with clean water
with a damp brush, sorry. Took me three layers to
get this petal right. You can work in
multiple layers as far as you are just keeping all
your washes very transparent. And letting each
layer completely. Now I'll move on to
the darkest color. So when I really am
concentrating on getting the strokes to the point, I hold my brush from quite
near the feral of the brush. That way, I get full control. Keeping still very light, so that even if you
make any mistakes, you can just lift it off. And then I'm taking the more dried color on my palette just to make
it a little bit darker. All the corners
have got dried up, and it's got a nice
saturated color. Slowly, and gradually,
I'm increasing the darkness of this petal. And again, with Lilac, I'm just going to give
some more details here. And just softening it
with the damp brush. So turn my painting
again and let's finish off this corner petal. So again, I'm
remixing this green. The softening of. Let it blend with that lilac. If you're getting any hard line, just soften it off
with a damp rush. And for this area, again, I'm going to work wet. Starting with our main color, which is helios purple. Be careful near the edges, and if you just go over the edge and just lift
it off immediately. The surrounding petals are now, so we don't have to worry
and taking our dark color. This area is not
that and then with our Try to make this petal a little
bit more darker as it's sitting in the corner
surrounded by the petals. That way you will have a feeling of depth in your painting. This is what realistic
realism is all about. And then just lift
off the lights. If you have gone over them, you can always lift
them off back. Let's finish off this
one. The last one. Again, I'm going to work. Just to get that nice soft look. O M We are still not done with the petals, but what we will
do is, after this, we will finish the center and then come back on the petals. That way, we'll get an
idea how dark or how light we have to go
with the petals. Our center is nice and dark. So that will help us understand gauge
the tonal values of the surrounding petals. Again, in this corner, I add a little bit
of that violet. I'm just getting these dots
on the paper somewhere. I don't know. This is actually a very good
paper from Canson. But in the whole pad
sometimes some sheets. They just they come like that a little bit
defected, I feel. But luckily, nothing major, just a few dark
dots I'm getting. Okay? And whenever I feel any of your lines are
a little bit harsh, just soften them off
with a damp brush. So we will leave this to comply. You take a nice break. And in the next video, we'll work on the center of this flower. See you. Bye bye.
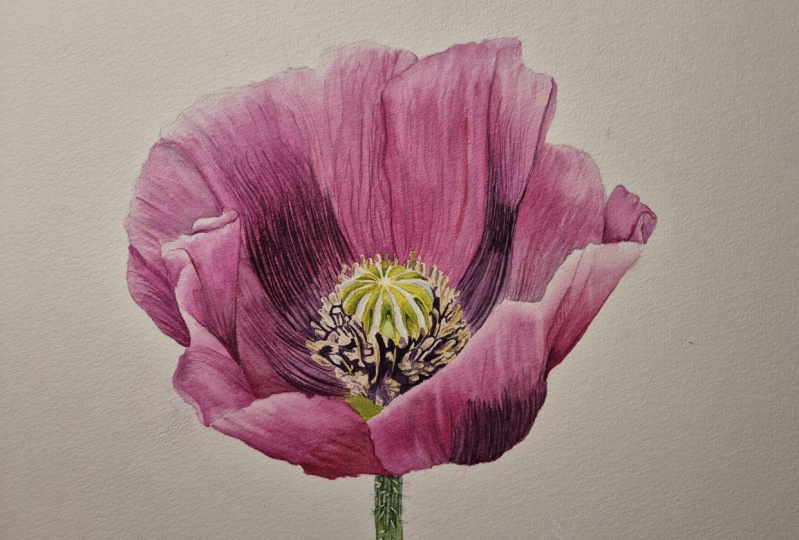
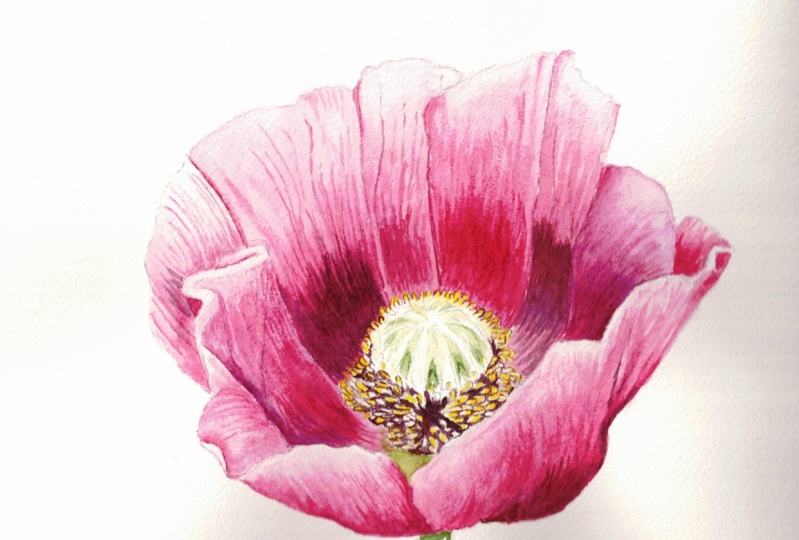
9. 8. Let's paint the centre: So the whole painting is
completely dry by now. And before darkening
all the petals. Furthermore, let's finish
off the center first. So I'm just going to remove
the masking fluid now. So I'm taking my rubber
cement picker and gently just going over and
lifting off the masking fluid. If you don't have this
rubber cement picker, then you can even use
your regular eraser, or you can even use your
fingers to remove it. So this will just lift off
all the masking fluid. And then just go over
it with your fingers, just check whether you
have anything left. Okay. Everything is removed. Now let's mix up some colors. We will first lift off that pink color which has just seeped into my center area. I'm just taking
my lifting brush. I'm just lifting it
is not required. Just made a small blunder. I hope you don't do it. Okay. So let's make a nice green color
for the center now. So I have wiped off my palette, except for the very
dark color which we'll be using in the
fi filaments over here. Let's make a beautiful,
bright yellow. So this is lemon yellow. In this, I'll add very teeny tiny amount
of tyrocine blue. Just to make it a nice
lemon green kind of color. I'll show you how this looks. See beautiful, bright neon
green on neon yellow. Next is a mid green. So I'll take lemon yellow plus cena yellow deep and tocin. We're using a limited palato. If you don't want to
make so many colors, you can directly go in with your sap green or
your olive green. This will be our mid green. You can even keep some
cenar yellow with blue, olive green thing at the side. Then one more darkest
green and I'll just take a bit of yellow in thick consistency for that
very deep color over there. Okay. Let's start painting. So I'll start with our
light green first, and I'm going to continue
with my number four brush, but you can downsize
it to one or zero. Now when we are doing green, we just have to take
care that we don't go over the white areas, the very pale areas. That is the only thing
you have to take care. It will look a little bit
confusing in the starting. Take your time. If you have
a printout of that center, just keep it next to
your painting or you can keep your iPad or phone
also next to your painting. Keep a finger on the
reference picture of where you're doing so that it's easy for
you to locate. So after I put the
light green color, I just took the darker
green without washing my brush and just gave
that shadow area. Similarly on the left side. So I'm just counting
and leaving where am I? And then with lighter green, Just giving the shadow areas. Now with the clean damp brush, I just lifting off the very light area within
that small green part. Similarly, I'll continue. So painting the center of
this flower at this size was fun and also it gave me a chance to paint
all these details. I find the center of a poppy
flower very fascinating. So just not concentrating
on the petals, but also giving equal importance to the center was also
important for me. So here, I'm working
with the dark green. And I'm going with
the light green over all the areas
that we have painted. Just to make it again brighter. Taking the mid green now. And then a little bit
of that dark green. Let's continue the same thing. Because we have colored
all the filament parts, the shadow color parts, it's easy now to know
where all our green lies going in with mid green and then
the darkest green. All the filaments, we know
that those are all filaments, and we'll be giving
that violet color. Make all your darker areas as dark as you can see on
the reference pictures so that your lighter parts. They come off the page. We are done with
a green part now. Let's start painting
the anthers. For that, I'm just going
to take a little bit of shadow, the darker. To this, I'm adding yellow to make a age of color
and of water. I'll show you how this looks. Needs a little bit
of lemon yellow, just to brighten it up. Okay, so let's start to paint. So I'll work and paint all
the anthers start from here. Again, you have to be careful working around
the pale white areas, which is next to our green. So there's a nice white
part which I'm leaving. I a lot of these pink lines will come
in between those anthers, which we will do next
after this dries. Very high concentration re here. If you have colored all the
filaments and dark areas, then just look out for
those shapes and spots. Those will act as
your anchor points. Now, for this area,
I'm just going to add a little bit of ils purple. The anthers are light in color, so it's getting the
reflected light from the surrounding petals. I could have gone on
the filaments also with this light color
because the filaments will be really dark in color. But then I wanted to separate the anthers from the filaments. So I'm doing this extra work. I'm skipping some parts
where it is repetitive. Otherwise, the video
will become very long and a little bit boring. It took me a good
1 hour, I think, so to paint the
center maybe more. B. L et this layer dry. While this layer is dry, let's color all the filaments. I'll be taking
this darker color, which is a mixture of pine
blue par yellow deep. I'm adding a little bit
more of yellow to it. I'll start with this
darkest color over here. This will act as
my anchor point. I'm going to switch to
my number one brush. That is better for more thinner
lines and more control. What I'm going to do
is, I'm just going to lighten that color and give a light layer first
and then darken it. Just work around the anthers, look out for some
peculiar shapes. If you get confused, just pause, that particular anther, search for that particular
shape and then continue. So as you can see, the color is much lighter than the
actual reference picture. We can easily darken it. It's better to work with
a lighter layer first. What I'll do is, I'll
finish the whole thing, and I'll come back to you, but also I'll be leaving
you this image with you. What I did, I went around
with a lighter color first, and then I darkened all
the very darkest areas. So as I told you, I'll be leaving an image of
the darkened filaments with you so that you can compare your painting with
mine at this stage. Now let's work on the ans again. So we'll have to make a color. I'm just going to take the page. I want a little bit darker. I'm going to mix a bit of the
same three primaries again. I want a very grayish
brown kind of color. I'll go on mixing it till I get that color, which
I'm looking out for. Test it out. Little
bit more of that pink. I mean, the hell is
purple, more of yellow. This is the color. I'm going to switch
to my long point. This is the same number four. It's a beautiful point. You can even go with
a line of brush. Now we are going to work
around the anthers, separating them from each other, giving them more definition, and also coloring the
shadows in between them. Very fiddly job, but
very important one. At the same time, I'm
just going to take a little bit of
that cenar yellow, very watery, and then
just go over the anthers. But first, let's do the darker
color in between the ans. Right now, all the anthers, they're looking like
one big mass of color. We have to separate each of
them by giving a darker line. And some of the anthers have a nice center line also in that. See if you can manage to give more details. Take your time. I have sped up my video to, I think 1.5 times
the normal speed. We'll take few after
a few anthers, you will get the hang of it. So I'm darkening
this part again. To do a painting at
this detail level, your drawing should
be really accurate. That is why I spend
a good amount of time in your drawing stage. Even if you have traced out my line drawing,
as I told you, I just like to go and just familiarize myself with
an entire structure so that when you're painting it, every area is clearly marked and you exactly
know where to go. I know a lot of us,
including myself, we just want to jump and
start with the painting, but the drawing stage
is so important, so don't skip that and
don't hurry that stage. I'm giving some shadows
in individual anthers. These are little fat anthers, so we can work with a
little bit more detail. The top portion is receiving light and the portion
which is going inside the center should
have some shadow. At every anther of hours,
they will look three D. I'll take a little bit of
that yellow very watery, as you can see, and then
just cover the lighter area. The light area is looking
too bright. Just go over it. Now, mixing a little bit
more of that helios purple. Here, as I said, it's getting a little bit
of reflected light from the petals surrounding it.
It's getting that pink. So what you can do is you can watch the whole video first, just get an idea of what you
have to do for the center, and then you start
with your painting. Keep on altering your mixes according to the
reference picture. Some places the center
is receiving good light, so they might be more yellow
than the other places. Work with a good pointed brush. It really helps you and I'm coloring the parts
which are in shadow. Even if you don't want to follow the reference
picture to the t, you can just overall, give it a similar kind of look. Now, again, giving that wash
of yellow over the anthers. This will just brighten up
the anthers at the same time. What darker color you
have been in the middle. That will also get softened up. I just missed out
anther over here. If you feel it's too yellow, then just take a damp
rash and go over it. But yellows fade a lot, it's okay if you leave it also. So I'm back to normal speed. I let the whole thing
dry completely. And now I'm just
looking at it from far distance and just
increasing the contrast, just seeing where anything
is required more. Some final finishing touches. The anthers are done completely. Now what we'll do is work
again on this green part. I want to brighten it up more. As you can see, it's
got a little bit faded. This happens when you're
using yellow color. Now I'm just going to add more
of yellow to this mixture. It has a little bit
of that teloce blue, and I'm going to go with this color over the
entire green part, leaving those white areas. This will instantly brighten
the whole thing up. And this is called as glazing. We just glazing it with
a nice yellow color. The consistency is
milky to watery. And it will also unify
all the green areas. Now we'll work on
these white parts. Of course, we are not going
to leave it completely white. As we all know, white gets
a nice reflected light. I'm just going to
take teloce blue, very clean with a clean brush. Very light pale blue. Actually, I want a little
bit of gray to it. I'm just going to
add this mixture to this one to the blue
gray blue thing. Okay. And I'm also going to add a little bit
of that yellow because as it is in between the
green yellow parts, even that light is
getting reflected. So what this will do is, this will push all the
white part into the paper. It will not look that white, I look very natural. I'm just going over the entire white areas
with this color. Taking a grayish color. And now, especially
the front ones can get a little
bit more details. I'm just showing some texture. So I'm just giving some dots. Observing the reference
picture very carefully. And then with a
clean damp brush, if you feel some of
the marks are hard, just soften it and leave it. Now let's work on these
darker green areas. I'll take this very green,
darken it furthermore. And then take your mid green, which is that olive green. Continue the same
thing everywhere. It's all about details
and working in layers. Oh. The tiniest details will just elevate your
painting to a next level. You're working after
applying color, just soften it with
your damp brush. Giving shadows so
that your green area, it starts looking three D. So a little bit finishing
touches here and there. Just a last final
glance to the center. Okay. I'm going to add a
little bit of pink here, which we can see in between
those anthers and filaments. Darkening some of
the shadow regions, just to increase the contrast. So with this, we finish
the whole center and we'll come back to this flower with more finishing
touches on the petals, and then we will finish
the stem as well. So see you in the
next video then, bye
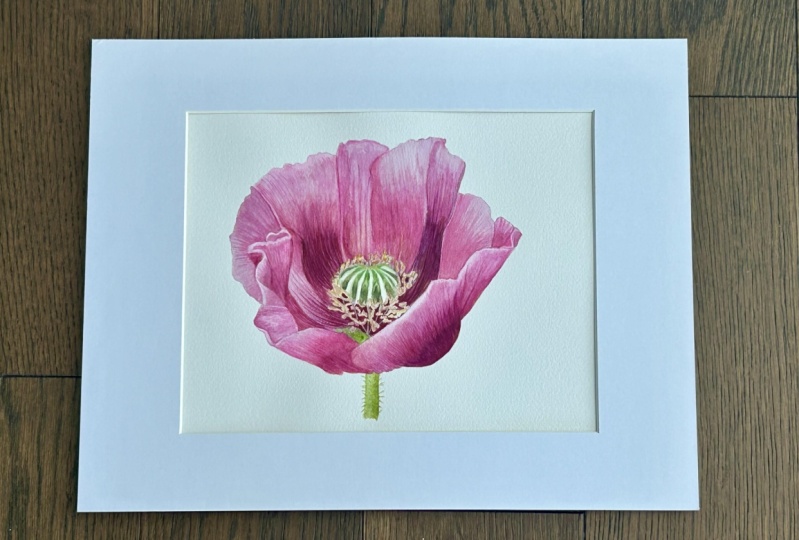
10. 9. Finishing the flower: So now, what I want to do is, I want to darken all the
darkest areas, such as these. As I told you, the
darkest tones need to be worked in layers to
get that intensity. So I'm going to take my mixing brush and mix
up all the colors again. So this will be a
nice brusher for you of what all
colors we have mixed. So that is helios purple, and for the darker mi, our three colors, helios purple, cenar yellow deep, ocyine blue. Now to this mix, I'm
also going to add some rose medal leg
just to brighten it up. And keeping all the
mixes milky to watery, little bit of more yellow, pink, rose madder, and a
little bit of blue. Not a very thick consistency, but a nice milky consistency because we are
going to work with, and now our light lilac
or lavender color. A going to take my
number four brush again. And let's work on this area. Whenever you're
working with wet dry, keep your color consistency
milky to watery. If you take very thick
creamy consistency, then that area might
start looking opaque. It's better to build
up your layers with the darker tones than going
in dark with just one layer. Also remember that now
our masking fluid is off, so be very careful when
working around the anthers. A Now for the top portion, I'm taking helios purple again. This is the finishing stage
and the details is up to you. If you don't want to go into
so much detail and just want to darken the darkest
areas, then it's fine. Adding ale bit of that bluish, I mean, the violet
color also in this. I want to emphasize more of
this folded petal over here. This stage is very
therapeutic for me. I take a nice good
amount of break, and I see it with fresh eyes, and I immediately come to know what areas require
what attention. So I feel very peaceful and calm while doing this stage because most of the
hard work is done, and now it's just giving that plus one kind of
boost to your painting. L et's continue with
this darker miture. So this is now our third layer. Adding a little bit of blue
to this darker mixture. A Now, taking that lilac. Now this doesn't
have yellow in it. So you can keep on altering your mixes in different layers. But still, your layer beneath
will definitely show up because we are using
such transparent colors and such transparent washes. So that is the beauty
of water colors. And now with this lilac, I am working around
those anthers. So it's even giving that
definition to the anthers. Okay. Okay. Taking some pink also to fill up in between
these darker areas. And then with a damp brush, just soften that color
into the background. Similarly, I'm going to
work on this petal as well. Working very slowly,
but meticulously. This is a final layer. And I will take this pink and I mix a little
bit of yellow to it and just flick the end of this dark color
into the pink background. Also fill up this area in
between the darker color. This yellow is
giving a good glow to that part of the petal. To this dark mix, I'm
just going to add very little bit of that
pink and just extend these dark tones
into the pink ones. Now, this big petal requires
a little bit of work. I'm taking our lilac again. If you compare it with our
petals which are already done, this one is looking quite
pale and unfinished as well. I'm filling up the in
between color first, working around the anthers, taking the rose
Mader lake as well. I'm working with very watery
consistency of color. And here, I want to work on these veins which are
turning towards the left. But first, let's finish
off this corner area. Okay. So A are turning
towards the left. Of course, our painting
is upside down, so actually it's turning
towards the right. Going in between the anthers. B. And now our darker mix. I'll start right from here. Try to flick your stroke so that the ends are a
little bit lighter. M. Just watering down the
mixture a little bit. Adding a little
bit of rose madder to this mixture and yellow. And the bottom edge, it is quite dense. And since we are using a
very transparent color, they will dry off
also very fast. So working on the lines which we have already
done should not be a problem because
they dry very fast. I'm filling in between these darker colors
with os purple. While that dries, I
just want to work a bit more on the top
part of the petal. Even on these veins,
as I told you, it took me a more than
a couple of layers to build up that twist
in the petal. Also using that bit of dark color to darken
some of the veins. Te With these lines, I'm just trying to
create that kind of texture which
the petals have. Okay. I'm giving very thin
lines, something like this. Keep a spare paper alongside
just to test it out, the consistency of
the color and also whether it's how much
light or dark it is. This is more of a
dry brushing now and I'm using my brush
more like a pencil. Giving that texture. Working with the very
fine tip of the brush. Now what I'm going to do is, after giving this dry brushing, I've added a little bit of rose, sorry, Opera rose also. Now what I'm going to do is, I'm just going to take
very watery pink color, so watery, because we have
done the dry brushing, I don't want that surface
to look very scratchy. I'm just going over it with
a very light pale wash, just like a glazing. This will just push
those veins into the paper and not make
the petal look scratchy. If you don't want that color, if you already have
a dark pink petal, then you can just
go over it with at just water on your brush. As I'm doing it over here. Now this last one, this petal also needs a
little bit of saturation. Now if you see I'm just giving some dot dots kind of line. Showing some texture, which I can see in the
reference picture. Just dotted line. The more you're working on the painting, the more finer details you start observing and you sho if you're doing
realistic watercolors. With every painting, your
vision also gets broadened. You will see more colors
and more details as well. This petal is nice and dark
sitting in the corner. So here also, I'm just showing a little bit talk that
dotted line texture. With this, we finish
the painting, the flower, and I just went over some of the parts
of the center also. Define some of the ans. So now in the next part, we will do the stem.
11. 10. Stem: Let's start with the stem. For this, I'm just going to make some space
on my palette. We'll just mix up some
green colors now. Taking my mixing brush, and we'll start
with lemon yellow. To this, I'm going
to adducin blue. And to mute it down,
I'm just going to add some yew ci yellow te. So this will be a lighter green, which we had mixed in our
previous color mixing video. So before we proceed
further to paint, the fine hairs on the stem
which are inside the stem, I'm just going to mask them off. So with a very fine brush, I'm just going to
use masking fluid. We could have even
done this when we were doing when we were
masking of the anthers. But I was not planning to use
masking fluid for the stem, but I felt that since we're already using masking
fluid for this tutorial, so let me use it here also. But if you're starting
your painting, mask this also at the same time. Let it dry completely, and now we will now,
other than this green, I'm also going to take
make some darker green, same colors, but in
thicker consistency. Now, in my mixing video, I had even mixed a little
bit of fn Marine blue, but I decided not to. Apart from this
green, I can also see some blue in the stem. I'm just taking very neat
loc blue, very watery, and I will just give a wash of this blue on the
top of the stem. If you see in between
those green areas, you can see a n blue tint. For the bottom part, I'm
using this green mixture. Oh. The bottom part is
receiving more light. The top portion is in shadow, that's why I'm
giving more of blue. Then with a damp brush, I'm just softening that edge so that it doesn't get
any hard line edge. For the hard line on
this left and side, I'm just lifting it
off with a damp brush. Now, still, this is wet. I'm just going to add a
darker green mixture. Drawing those veins
that I can see. Adding a little
bit more of blue. I'm taking very little
color on my brush, so it's drying off very fast. And with that green
will continue below. The top part is more
of a blue green and the bottom part is
more of yellow green. And soften away the bottom edge. I left it to dry, and now I'm coming in with more finer lines and
with a lighter green. Just finishing it off. A little bit of more yellow, lemon yellow, just to brighten the bottom
part of the stem. And then just soften whatever
colors you have applied. Now for the fine hair, which is coming out of the stem. I'm just going to give
this very pale blue color and the very fine tip brush, is going to paint with them. The reference picture,
the background is green, so the fine hair
is looking white. But as we're painting
on a white background, we need to color these
fine hair as well. So you can take a very
light grayish blue color. Okay. So now this entire
painting is completely dry. And just with my fingers, I am going to remove that maskine fluid
from those fine hair. And now, if you notice, because this hair is
coming out of the stem, there is some shadow
underneath those fine hair, which I'm just
going to do it with this darker green color. So this will just give
them an elevated look. Now, with just a damp brush, I just going over
the whole stem, so this will just push those
fine hair into the paper. Whenever you using
masking fluid, they just very
harsh white marks. And I'm adding with my
final lifting bruh. And we finally finished
this painting. So I hope you enjoyed watching this tutorial and
watching me paint. So I hope you also gave it a try and please share with me on social media if
you're painting this one. So I'll see you in the
next tutorial. Bye.
 Neha Subramaniam, Neha Fine Art