Transcripts
1. Class Introduction: Hi, I'm Katya. I'm a
watercolor artist, specialized in
botanical painting. My last job as a scientist
has pushed me to study each subject very closely,
observing every detail. My technique with watercolor
includes initial washes, but then I use the dry
brush technique which allows for total control or
where the color is applied. In this class, you will
learn how to create a botanical watercolor
painting of a viola tricolor. First, we will review the necessary materials
to complete our project. Then we will mix the colors. I will then show you my
technique step by step from first wash to second layer to applying the T DLs
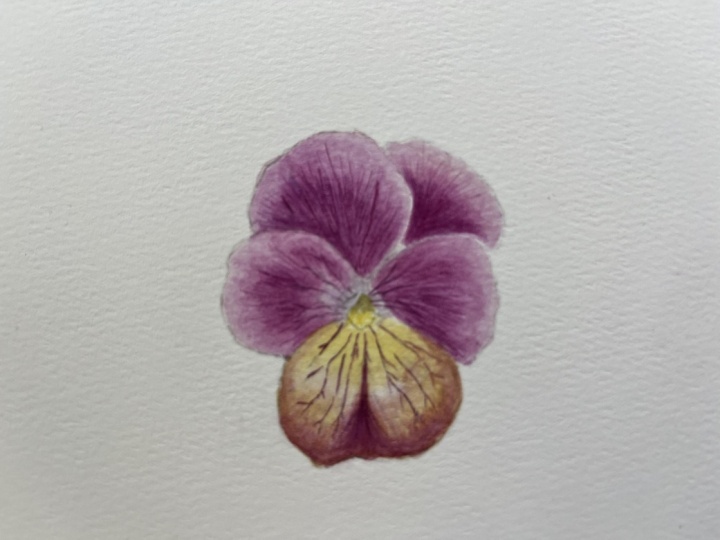
and final touches. I've included a tracing of the flower and reference
picture and a photo of the finished painting to help you every step of the way. From the first delicate wash to building layers of colors and adding those fine details at the end that bring
your painting to life. I'll show you how to create depth and
realism in your work. By the end of the
class, you will have your very own viola tricolor and the confidence to tackle
more botanical paintings. Whether you are a beginner or an intermediate
artist looking to develop your technique,
this class is for you. So grab your brushes, and let's get started.
2. Class Project: Your project for this class is, of course, to paint
a viola tree color. I love for you to share your final piece in
the project section. And remember, it doesn't
have to be perfect. Every painting is unique, and this is a space to celebrate your
creativity and progress. So here is how to
approach your project. Upload a photo or your finished painting
in the project section. Feel free to share any work
in progress shots or details. So anything like color
mixing or anything else, how you tackle a specific areas of your flower, for example, if you're feeling
extra creative, try painting a
small collection of latric flowers
experimenting with different shades
and composition. Sharing your project
is a great way to inspire others and
get feedback from me. I can't wait to see
your beautiful work and happy painting and don't
forget to have fun with it.
3. Materials: The materials you will need for this class are just your
basic watercolor supplies. So you will need some paints, of course. Not that many. I will write which
paints exactly you need, but you need some
watercolor paints. And then, of course,
you need the paper. I'm using arches,
watercolor paper, hot press, 300 grams. I advise you to use at least
300 grams because otherwise, the paper might start to buckle. Um, you can use a
different type. You can use fabriano but I
also would advise to use a hot press paper
because it's quite smooth and is the best paper
for botanical painting. Then you will need a palette. I'm using a palette with the whales and
it's a ceramic one. You can use a plastic palette, but I do love the
ceramic palettes, much better than
the plastic ones because they tend to stain and, um, the water sort of behaves a bit weird
on the plastic palettes. You need some water. So I have some water for
washing my brushes, so for rinsing them
and everything. And then I usually keep some clean water in a small
container like this one. Just a little bit, and I
pick it up with a dropper. So pick up the water like
this or with a clean brush and use that to dilute your
paint. So it's clean water. Then you will need
brushes, of course. So I have one brush that is
just to mix the paint because the brush will get damaged when when you pick up the paint from
your pants and so on. So use an old brush
or a cheaper brush. And then I have my
painting brushes which Winter and Newton Series seven, I have the miniature version and I have the normal version. So the number two and number no, the number two only is
the miniature version. The number one and number
00 are series seven. And you can use
different brushes. Of course, you don't
have to use these ones. But as long as they are
soft and not too big, so zero, zero, one and
two is all you need. And then some paper, preferably the same type of
paper you're going to use for painting to do your
color testing. So something like that. I do all my color testing in here. When I do the color match, you need something
to dry your brush. So a towel and paper towel, kitchen towel, and also
some scrap paper as well. It's always useful
to have handy. And I have provided you with
a tracing of the flour, so you need to print it
and then transfer it onto tracing paper so that you can transfer it to
your good paper. And for this, you
will need, of course, pencils and erasers, as well. Okay, so I think this
is all you need, and we're ready to start
mixing some colors.
4. Color Mixing : M. The first thing to do
is to match the colors. And unfortunately, I
don't have a real flower, but I have the
picture with my iPad, so the colors are quite good. And I'm going to use this. So I have here a swatch of
all the paints that I have. And usually I start
by looking at what color is closer to the color I see,
to the local color. And in this case,
the local color will be this sort of lighter color. And so for me, this brilliant violet,
this is from Sminke. It's the closest. And then I think the next one would be
if you don't have that one, probably the bright violet. I think this is also from
Shmken but I'll have to check. They're not Winter
Newton these ones. The winter Newton will
be cobalt violet. So you could try
that if you don't have the other two colors. So this is the bright violet, and it's quite close, but it needs something to bring it more to the
violet hue that I can see. I think I'm going to add
some carbazle violet, which is from Daniel's meat. If you don't have that, you
can try the Windsor Newton. Let me see Winter violet. I'm using the carbazol violet, this one here, but the
Windsor violet is not too far off, you can try that. This one here, I'm going
to add it a little bit. So always add it a
little bit at the time, because it's quite
a strong color. And I'm not sure if you can see because this emits a glow,
of course, the iPad, but it's quite close to the color the local
color of the violet. And then to make this darker, what I'll do is I make
a red darkening mix. If you've seen my other classes, you know that I like to
use darkening mixes, and I got one for the red, and one for the green, and I
show you here on this page. So the red darkening
mix is this one, and the green is this one. And then I have another couple of sorry, this one is the green. I have another couple
of darkening mixes, cool and warm color. So I'm going to use the red
one for this because this is sort of reddish bias, and it's winsor blue, red shade, que cdragena and
transparent yellow. And what I do I start. Normally, I start
with the blue and the red to make a violet. The red in this case is
the Quine quidra magenta, and I make a violet. And then to this,
I add the yellow. So in this case, the
transparent yellow. And when you mix
these three colors, you always get a gray or depending on the amounts you mix, you could get a brown. And usually, I mean, it's very rare that you get this mix right the first time. So it's just a
matter of adjusting your quantities of
red, blue, and yellow. It should be it shouldn't
have, you know, too much of a obvious bias
towards red or blue or yellow. So I think when this is okay. And then what I do I will
mix a bit more color. But what I do is I take some
of these at the moment, and I'll add the darkening
mix just to show you and it makes the
color quite a bit darker. So it's a bit diluted, but that's how I make
the darker color. So I might just make a bit
more to show you better. Always try to mix enough
color to last for the whole painting
this color here, and I will add the darkening
mix, maybe a bit more. As you can see, is
making it darker. Then we have the yellow bit, which I'll do with
transparent yellow to this, see the yellow is
not very bright, so it needs to be
tone down a bit. I will add a little bit
of this color here. The first one for the flower, just to tone it down and make it more like this color
that we can see here. So I will add less of the
violet color of the A mix, the first mix for
these areas here, which are lighter, and I will add a bit more for
these other areas. And then I will finish
with the dry brush. And I think we're ready
for the next step, which is start painting. And what I'll do is I'll mix
a little bit more paints. One more thing I
wanted to show you, I usually label my mixes with the letters
of the alphabet, A, B, C, and so on. To remember which mix is where just in
case you may forget. This was the mix A.
T I called the B. This we call it C and the
yellow mix was the last one D. And so you can use
this little trick, especially if you
have many mixes. This is only four, but if you have quite a few, then you can label
them like this. Okay, so we're
ready to continue.
5. First Wash: The first thing we need to
do when we start painting is the first wash. And
what I do normally is to apply a wash
wetting wet wash. So what I do is I apply
water, just clean water. So make sure you have a separate pot for your clean water, different from where
you wash the brushes. Otherwise, you will
have a tinge to it, and then pick up some colour. Try not to leave the
colour too thick, but not too watery either. And so the consistency of maybe semi skimmed
milk, something like that. And pick up the
color and I start to apply the color where I
see the darkest area. Then after that, I use a damp brush to transition
the paint from dark to light to ensure a smooth transition
instead of creating the marks of the
paint, defined marks. This way, you will smooth the paint and I can see there is a lighter
area around the petals. So that's why I try to leave that area as
light as possible. And I like to use a
different brush to do this. First because you
don't have to pick up always more paint
because otherwise you will have to rinse your brush
that you're using for painting and make sure
you rinse it properly, and you will you know it
doesn't take a long time, but with water color, it
might dry while you do that. So you will use this time
to rinse your brush, and then your paint may start to dry depending on
your conditions, you might do this in
a hot day or live in a hot area and you paint dries
while you're doing this. And secondly, if you have a brush that you use
only for this purpose, I'm just showing you
here that the water as a shine on the paper instead
of being very, very wet. So what I was saying
is about the brushes. When you use the damp brush,
it will always be clean. You just dip it in the water, tap it on your paper towel, and it's ready to go.
So it's much faster. So again here, I'm applying
the paint where I see the darker area and then make the transition
with a damp brush, teasing the paint a little
bit towards the lighter area. So when you apply the paint, don't go all the way,
like all the area. Don't cover all the
area that you see dark. Cover a little bit less, and then you can tease
the pigment towards the lighter area
and you will have covered the right
amount of space. Hopefully, this makes sense. So if you apply too much paint, then by the time you try to make the transition
with your clean brush, you will have covered
the entire petal. So you can always expand
the area with more layers, but sometimes it's difficult
to lift the paint. For example, these paints here, they stain, so it would
be more difficult. And I'll sped up the
video a little bit here because it's
the same technique. So just apply the water. Make sure there is
a sin to the paper, but there's not much water
on the surface, you know, just stay on the surface and
make sure that it's not dry, of course, and then start
applying the paint. And I always apply the paint, even if this is a wash and
it will dry quite smooth. Always apply the paint
the direction of the growth in this
case, of the petal. So if you look at the petal, you can see many little veins and they go a certain direction. Always apply the paint in that particular
direction because it helps with recreating
the three D effect. So even if it looks like that you don't really see
at the end a texture, but it still helps
because it does leave a little bit of a texture, very, very light at the moment
because it's a light wash. But it will contribute to the
final look of the petals. And when the petal is still
when the paint is still wet, you can apply a
little bit more paint if you feel that you can that you need a little bit more paint or you can make it a
little bit darker. So you can do that. But if you see that the
paint is drying, then don't try to
work it anymore because you might create areas of like they
look like stains. So when the paint starts
to dry, leave it, and then you can always
go back when it's dry and reapply another layer. So it doesn't have
to be two layers or three layers or four. You can apply more.
Or less depending. But don't try to work the paint when it starts to dry because you
will have problems. Then it will start making these little, like, white spots, and it's very difficult to, sort of, you know,
correct these mistakes. So I'm doing the
same thing here. This petal is quite dark. And also try, if you observe
the picture of the flower, there are lighter areas around
the petal that is on top. So let's try to leave
those light areas. Now just going to
apply the first wash on the largest petal as well. And so for this one, we need the yellow paint. And of course, always make
sure that the petals next to the one you are going to work on that they are dry because
if they're still wet, the paint might just merge. So I'm just using the yellow
as it is at the moment, because the top area is lighter. If you look, you know, through those dark veins, dark markings, that
area is quite light. And then it becomes
to be a bit darker towards the edge of the petal
and towards the bottom. So I will do the area with a little bit of the purple
color mixed to the yellow. To make it sort
of darker yellow. So just applying in the middle of the petal where there is
that very dark area. So I just apply
the purple color, and I will make that darker
and darker as I work. And always the same technique. Use your damp brush to just transition the paint and
give it a smooth transition. And always be mindful
of the edges as well. Try to be as neat as
possible with the edges. And remember to keep rinsing
your damp brush as well, because it will pick up the paint and start
transferring it everywhere. So sometimes it's
something that you want. Like, in this case, for example, it's okay to have
a little bit of paint because the
area is darker, so it's alright to do that. But otherwise, if
you want to leave the surface light or white, just remember to rinse your
second brush quite often. And in here I'm just applying a little bit of
lemon yellow because the area is a bit lighter. That's it. This is
the first layer, and in the next step, we're going to leave this dry
and apply a second layer.
6. Second Layer: Now that the first wash
is completely dry, we can apply the second
wash or second layer. And what I do in this case, I actually do a wet on dry. I use a wet on dry technique. So in this case, I
won't apply a wash. The petos are not too big. So maybe if it was a larger
area, I would apply, again, a wash with water, always being careful not to disturb the layers underneath. But in this case, the petals
are, you know, quite small. So I start applying this wash by using the
wet on dry technique. So the paper is dry, then I apply the paint. And I work on small areas, so it's easier to control
the paint in this way. And at least for me, I have more control over
where the paint goes. And you don't have, you know, the pressure of rushing before the paint
dries and it creates, you know, watermarks
and all that. So apply the paint a little bit thicker but not too
thick because you still want to be able to work well with the paint and
not apply too much. It's better to add more
layers and make it dark by adding more layers rather than apply a really dark
color straight away, and then maybe if
you make a mistake, you don't know how to fix that. So apply a little bit of paint, and then again with
the damp brush, create the transition. And keep looking at
your reference photo. And as you can see, I apply
the paint and then just touch the brush on the edge of the area of paint
that I have applied. So that way, you create
the smooth transition. It's like if you use
a pencil and then you use what is it called torchon or something
like that to make that, you know, smooth out
the pencil lines and make the transition. It's in a way, it's
a bit like that, but you use a damp
brush instead. So slowly keep applying
your wet paint on the dry paper and keep doing the transition with
your damp brush. Make sure you leave
the lighter areas. So don't apply too much paint on the on the area where
it should be left white. And again, keep following the direction of the
veins of the petal. So in this case,
it's almost like a vertical vertical lines. And don't worry if the
area on the edge of the petal looks too light because we will fix
that with another wash, so that it's okay
for the moment. You don't need to
worry about that. So in here, I've sped up
the video a little bit because the technique
is the same as before. So as you can see, I applied a little bit of paint and then transition it with a damp
brush and then keep doing. I'm just working in
sections so you don't have to work on the entire
petal at the same time. So it's a very relaxed way to approach this
watercolor painting. And I'm not sure you
could do that with, for example, a
landscape painting. But with the botanical painting, you can easily do that,
as you can see here. So make sure you always
give a little bit of mix to your colors in
your palette as well, because sometimes very often, the pigments tend to
settle at the bottom. And depending on what
pans you're using, they tend to separate as well. So every now and then
just give it a good mix. In here, I'm doing
the same thing always starting with the
area is darker. So keep looking at
your reference photo. Of course, it doesn't have
to be photorealistic. We're not trying
to do that here. We're using that as a reference. But I don't actually
don't like photorealism. I like to be you know, as accurate as possible. And when we do botanical illustration or
scientific illustration, then you have to be
as close as possible, of course, to your subject. But I don't really like
to do photorealism. I like it, you know, to see it from other artists. But for me, the way I work, I don't like to do it myself. So I use the picture
here as a reference. Uh, and yes, I try to follow
the light and dark areas, but I'm not going to do it, you know, photorealistic
version of it. So again, using little
strokes to apply the paint so that it reminds of the
venation of these petals. And if you have a real flower, it will be good
to really look at it before you start,
really study it, look at the veins and look at the different markings
of the flower, look at the inside, you know, the central area, and
really study your subject. This is a good thing to do
for all of your subject, whether you're painting
a leaf or a flower or something else or a fruit. It's always a good
idea to really, really observe it properly. Here, I'm just going
over the central part again because we need
to make it much darker. So I'm just applying many
layers here to make it darker. So just apply a little bit
more of the purple paint. And then I will add later on some the darker
version of the paint. And also, that purple is mixing with a
yellow in the flowers. So you will need to
do that as well, just add a little bit
more purple like I'm doing on the sides of the peto. And I always try to do that transition from the
dark area to the light area. I never really ve really neat lines unless
it's like this on the flour. Here I'm just mixing some of the yellow mix with
the purple mix. As I was saying earlier, just to make the yellow
a little bit darker to mimic what's happening in the petal because in that area, the yellow goes a
little bit darker and it's a good idea
to use the mixes that you already have instead
of trying to make a new one and it works
pretty well, in my opinion. And just use your damp brush again to smooth the color
and smooth the transition. I use little strokes here. And always remember to leave the light area on the top a bit lighter because it's more
yellow at the top of the petal. So this is the
second layer done, and we are now ready
for the next step.
7. Details: Now that the painting is dry, we can start working
on some details. And what I'm going to do
now is to apply some very, very diluted darkening
mix to the Petos. So I will apply it to the
light area or white area of the Petos because if you want to depict a white flower, you use a darkening
mix like a gray to show the shadows and the
folds of the white flower. So in this case, I'm
adding a little bit of darkening mix in those
areas that are white, which have a little
bit of shadow. So it's not a lot. Always go very light. At first, you can
always add a bit more. And then I'm adding
a little bit more of the green for the like, very center of the flower. And then I will do some dry
brush work on the petals. And what I do is I
pick up some paint, and then I use a bit of
scrap paper to do some lines and basically get rid of the
excess paint in my brush. And then just use the brush
almost like a color pencil. So you just do some light strokes always in
the direction of the veins, and then just either
short or longer strokes, but just very, very
light with your brush. Don't press too hard or you're risking leaving too much
paint on the paper. And just basically
color the petal. So this way, I find
that gives you a lot of control over
where the color ends up. And I always finish my paintings like this
with a dry brush, which it might seem that it
takes a little bit of time, but it's quite
relaxing, actually, and you can apply the
color exactly where you want instead of wearing with the wash that it would go in
areas where it shouldn't go. And when you work like this, as you work, of course, the amount of paint in the brush will become
less and less. And so what you can do at
this point is to move towards the lighter areas if you feel that you need to add a
little bit of color there, but you don't want
to add too much. So basically, as
soon as I pick up the paint and get rid of the
excess paint from the brush, I start coloring in the darkest area of the
petals, in this case. So where I see the darkest area. And then as the paint wears off, I move to the lighter areas. And as you can see, I pick up a very tiny amount of paint. You don't need a
lot in your brush. You only need a
little tiny amount. And if one day you want to
paint on vellum, for example, this technique is
very similar to what you would do if
you painted on vellum, because there you can't use
a wash. Basically on vellum, you're not able to do
a watercolor wash. So you need to use dry brushing. And I proceed like
this for all of the petos and it's
also in this way, it's also easier to leave that little tiny area of
light or almost white, which is around the pets. Sometimes you can see
in certain areas here, you have the area
which is almost white. So you can leave that in a more comfortable way if
you use the dry brush. And I sped up the video because basically it's just
that same technique. You just use your brush very lightly on the paper and just color as if you
would colour with any pencil. And sometimes you might
feel that you're not leaving any paint on the paper, but rest assured that you are. And if you want to test this, you can take a little
bit of scrap paper just white and then do the same technique
on that bit of paper, and you will see
how much paint you actually will deposit
on the paper. So this way, you can strengthen the color a little bit at the time and exactly
where you want, you know, specific areas. And you can always add a little
bit more if you need to, and you won't have any pressure, any worry, any stress about water going
where it shouldn't go. And you can shape the three
D of the petal as well. In this central area, I'm going to add the darker
version of the paint as well. But at the moment, I'm
just strengthening this color because you can
see that area is dark. So I will add more paint
and more darker paint. And then as you can see,
sometimes I feel like I still have too much
paint on my brush, even if I've been
using it a little bit. So you just keep some
scrap paper nearby. It doesn't have to
be watercolor paper. It can be just any paper. And you can get rid
of the excess paint. And then if you want to smooth
out some of the strokes, you can use your damp
brush to just go over your strokes so it will smooth them
out a little bit. And then over the
yellow underneath, I will just use
the purple color. So there will be the yellow
still shining through, but then you will
have the darker color that you can see on
the reference picture. I'm just using small
strokes in here. So the damp brush is
really just damp. There's no water whatsoever
in it, you know, like a lot of water
because otherwise it would maybe wet your
paint too much. You might disturb the
layers underneath. So just a little bit
damp, and that's it. So this is how I
apply the details. And then in the next step, I will apply a wash just to
bring everything together and also to give the colour
a more violet bias.
8. Final Wash: Now that I have
applied the details, I'm going to apply a wash and I'm using just the
brilliant violet as it is, but very diluted
so that I can give a little bit of color
to the area which is the area at the
edge of the petals, which is quite
light is too light. That will get this,
the violet color. Also this wash will bring
together all your strokes. So we make it more harmonious. And also to the entire petal, it will give a little
bit of more violet bias, which is what I wanted to
achieve as well with the wash. So I'm just applying the
wash all over the petals. Well, the darker
Petos, of course. And I'm still applying the
wash one petro at a time, even though it's the
same color and still following the growth in the
venation of the petals. Of course, be careful when
you get to the light area, which is supposed to
remain basically white. So don't put color in that area. And don't rub too much your brush because you would start disturbing
the layers underneath. So always be with a
very light touch. Always add the layers
with a very light touch. And then I'm adding
a little bit of this wash at the
bottom of the larger petal because there
is the darker area, just on that and then
with a clean brush, I just make the transition
towards the yellow. And then I strengthen
the green part, like the center of the flower. And I also add
some lemon yellow, where the pollen sack is because that's a
very light yellow. So I'm just adding
this lemon yellow and a little bit in the very
center there, and that's it. Now the next thing I
want to do is to add the very darkest details just
to finish off the petals.
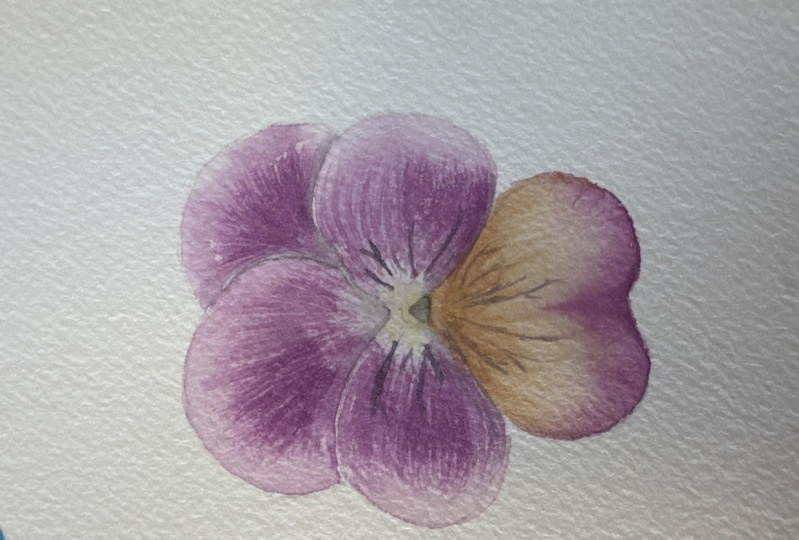
9. Darker Details: Now, I'm just going to add
the very darkest details. So I'm using my dark mix. And again, I'm using the
dry brush technique. So I pick up a very tiny amount
of paint as I did before. And in this case, you
have to be careful, you know, even more careful
with the darker paint. So pick up a little tiny amount. Use your scrap paper
if you're not sure if you have too much
paint in your brush, and then just apply this
dark paint only where you see the darkest details
in your flower. So on the top pet, there is a very dark area and also
on the back petal as well. Again, I just use the
brush very lightly. And always start in the darkest area and then just apply the
paint as we did before. So make sure you apply some of the darker paint on the
petals that are underneath. So between the two petals so that you will see
the three D effect. It looks like the
petal underneath is really sort of in shadow
of the petal from the top. And again, I'm applying
some of the darker paint in the center of the
lower petal as well. And that's it. What
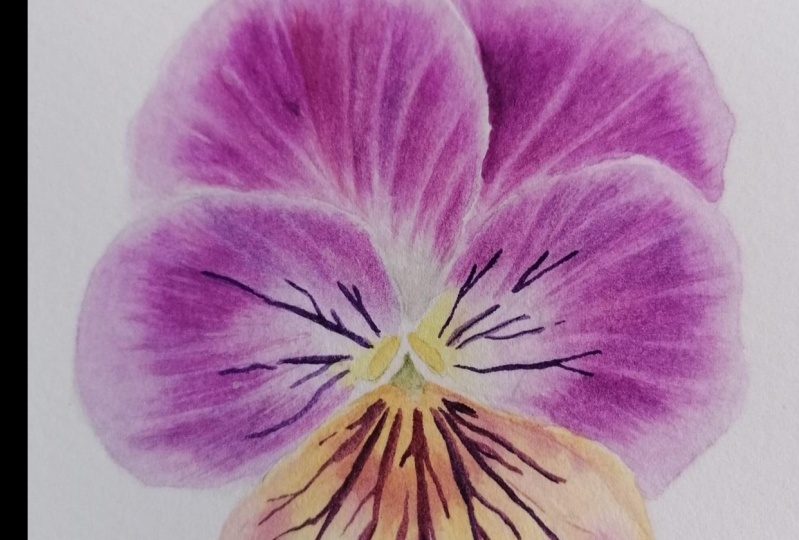
is left now to do is to apply the final touches, which are the markings
of the petals.
10. Final Touches: We're almost finished
now with painting. And what I do is I
use my darkening mix, and I add quite a lot of that to my violet color,
the local color. So it's not completely
gray or dark. There is a little bit of
violet coming through. And then carefully, I apply
this mix quite thickly. I shouldn't be very
diluted at all to the markings that I
can see in the violet. And I'm using a
double zero brush. This is the winter Newton
Series seven double zero brush. You can use any very
small brush that you have available and just
slightly apply the paint. And it's easier if you apply the paint coming
from top to bottom, so dragging the
brush towards you. And if you're not
sure how to do this, try to do some test runs
on some scrap paper. So as you can see, I
pick up some paint and then just slightly
apply the markings. It doesn't have to be
perfectly exactly the same as the markings
on the picture. But you can follow
you should still be able to see the
markings from the tracing. Follow those which are very similar to the
one in the picture. And, of course, don't
forget to apply the ones in the side
petals as well. And I'm trying not to move
the painting too much, but it's easier,
as I was saying, to bring the brush towards
you when you apply the paint. And that's it. So I'm applying a little bit of really dark paint in the
very center as well, because that's quite dark. And I will leave the painting
for a few days and then go back and check if there is anything else
that needs adjusting. But that's it, we finished. I hope we have enjoyed
these lessons, and I can't wait to
see your violets.
11. Final Thoughts: Congratulations. You've
completed the class on painting a viola tri color. I hope you have enjoyed
learning the step by step process and feel proud of the artwork you have created. Botanical painting is such
a rewarding practice. It allows us to slow down, appreciate nature's details
and express our creativity. Whether this was your
first botanical painting or one of many, each brush stock adds to
your skill and confidence. So here are your next steps. Don't forget to upload your finished painting
in the project section. I love to see your work, and sharing it helps inspire
others in the community. If you are looking for
your next project, check out my other classes
here on Skillshare. There will be
classes on painting, but also on book binding as well if you want to
make your own sketchbook. For more botanical
inspiration and tutorials and behind the
scenes and different content, visit my YouTube channel or follow me on
Instagram and Facebook. And finally, thank you
for spending your time with me and for trusting me to guide you through
this creative journey. Your support and enthusiasm
mean the word to me. If you enjoyed this class, I'd be so grateful if you
could leave a review. It helps students find the class and keeps me motivated
to create more for you. So until next time,
happy painting. Bye.
 Katia Galante, Botanical Artist and Illustrator