Transcripts
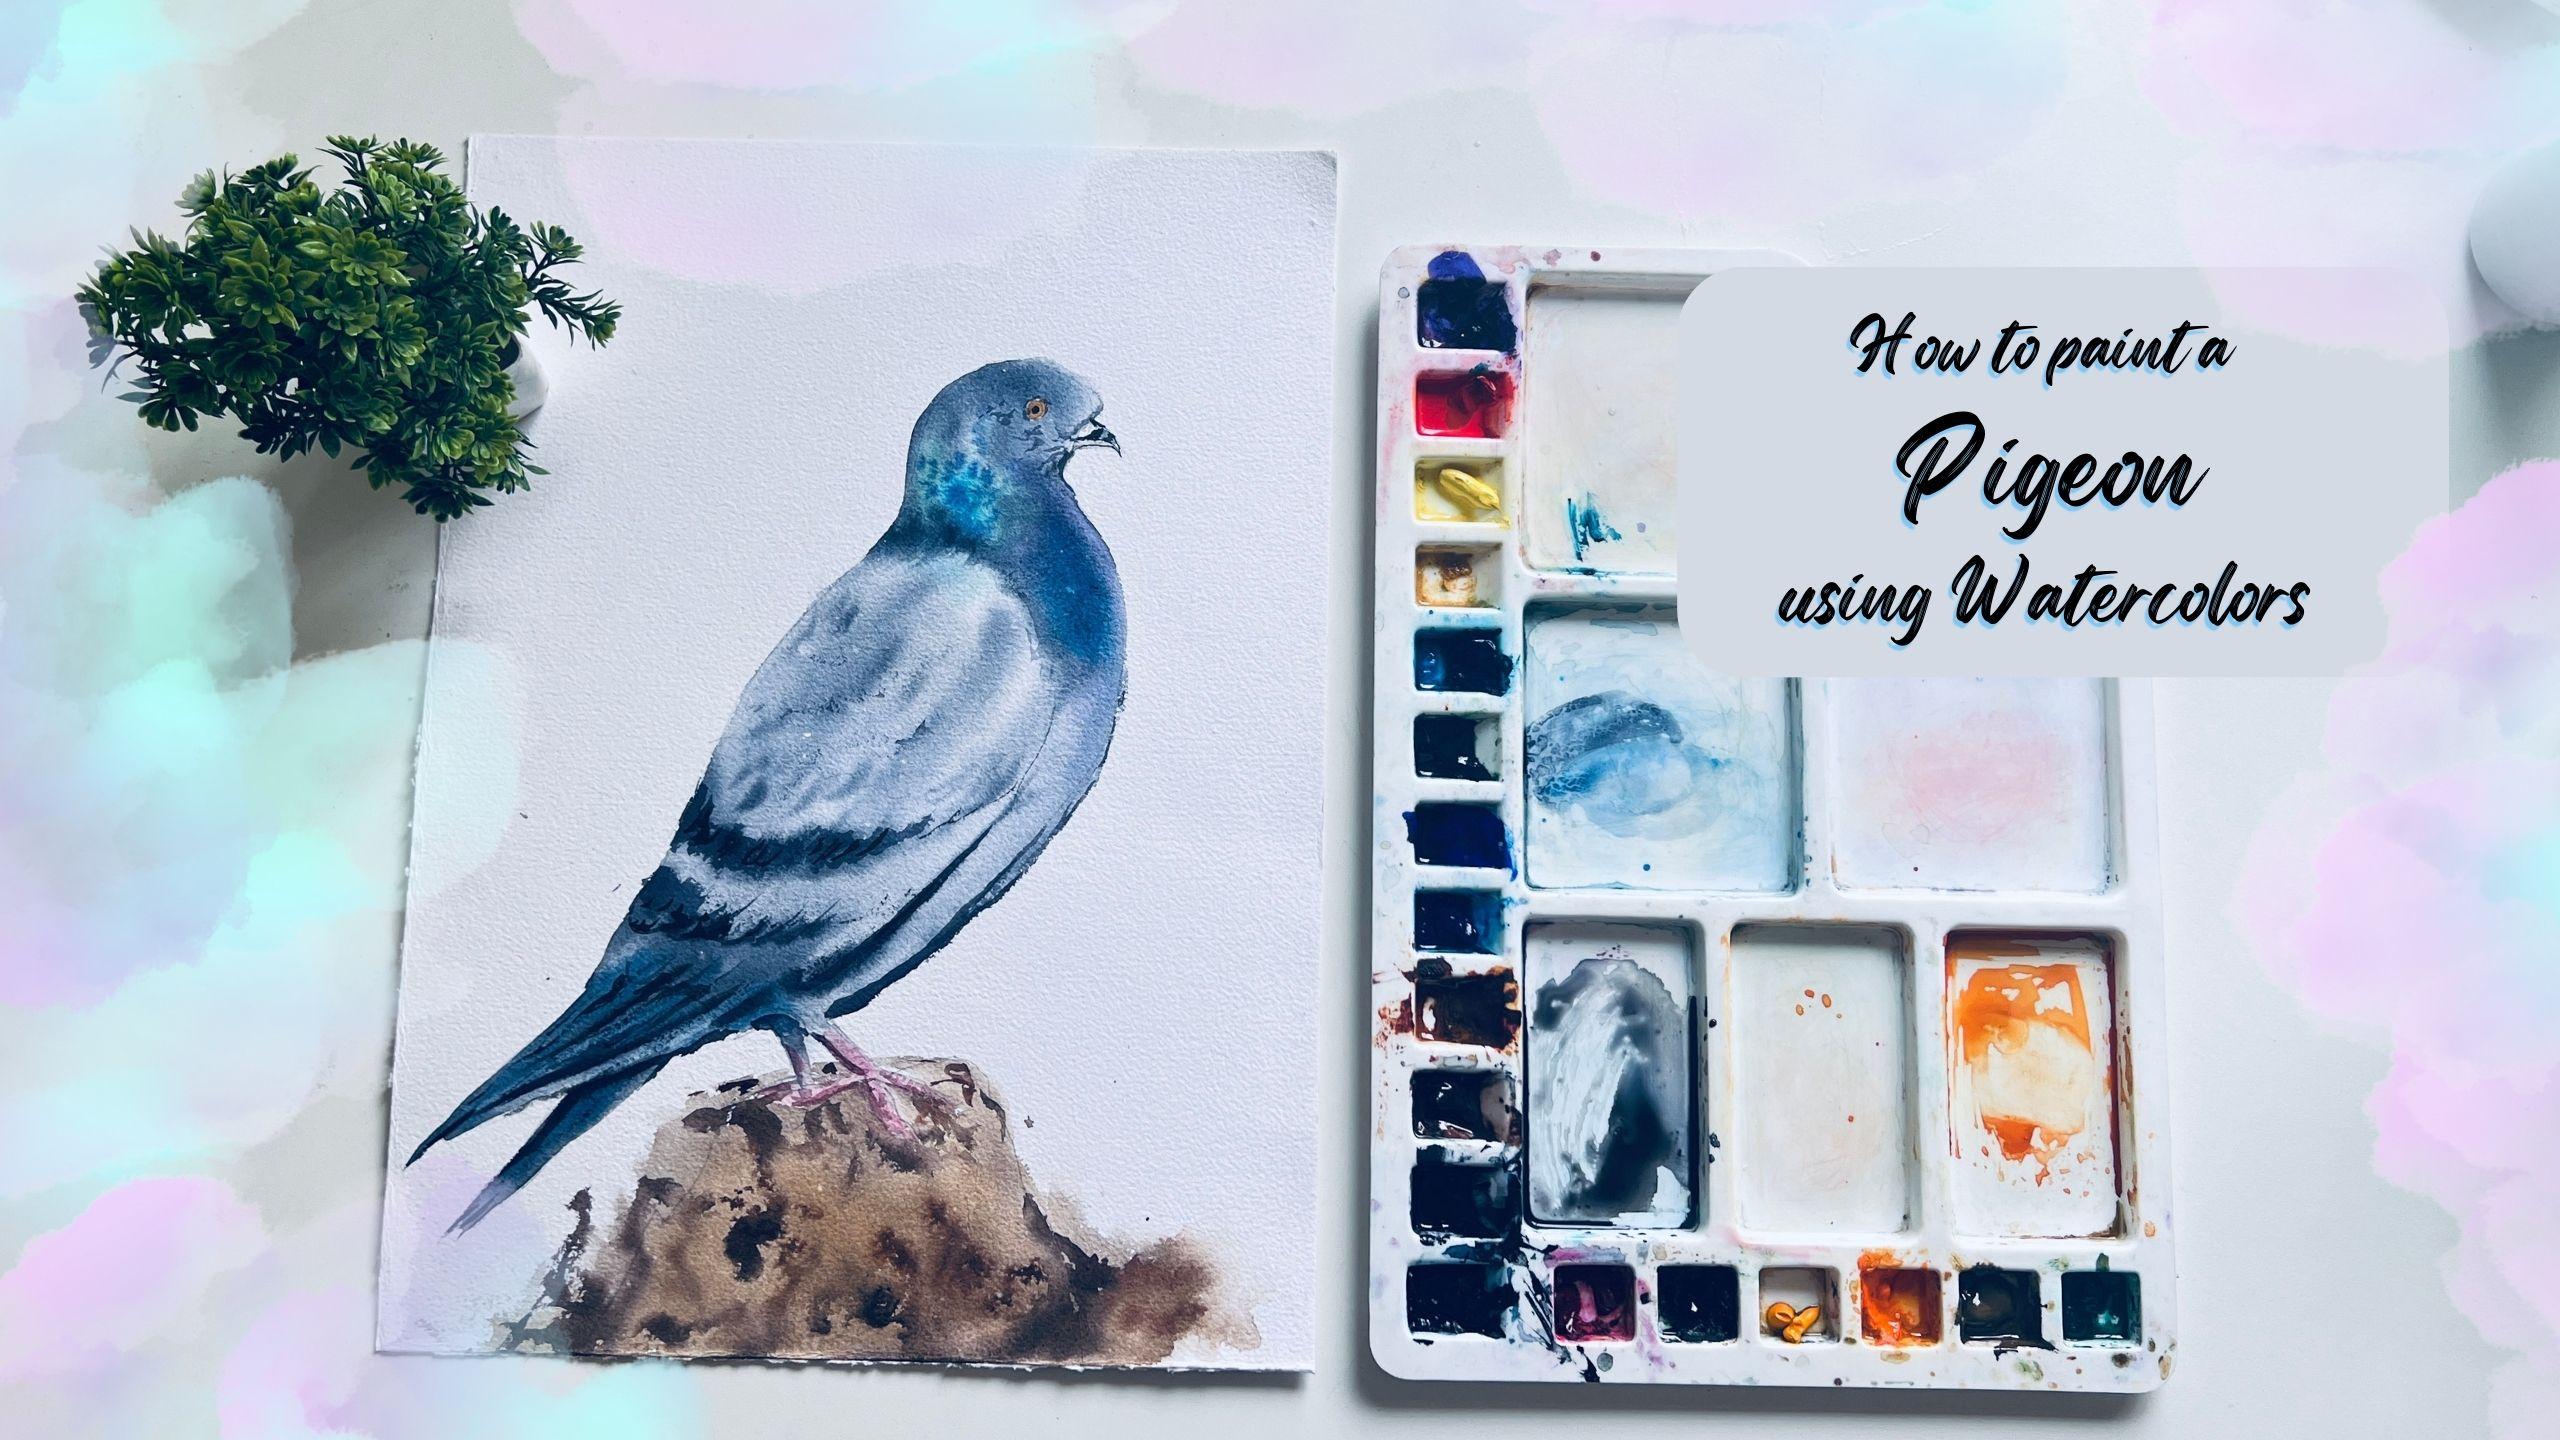
1. How to paint a Pigeon using Watercolors : Hello and welcome to
my Skillshare class on how to paint vision
using watercolors. I'm challenged one, and
I'll paste from India. You can check out my art works on my social
media profile. I go by the handle watercolor. This is going to be
a very simple class. I'm going to teach you to paint
pigeon using watercolors. If you are someone who is intimidated by the
idea of drawing, then don't worry, I'll show you some simple and easy
ways of drawing. So even if you're a beginner, you can still draw and
paint along with me. I'll explain all the required
watercolor techniques that will be needed
for this class. I'll also briefly about some
colors and tonal values. Then I'll walk you through all the supplies that will
be needed for the class. The class project
will be painted in step-by-step manner with
great care and instructions. So without any further delay, let us get started
with the class
2. Art supplies : Hello, welcome back. I'm glad you decided
to join my class. To begin with, let
me walk you through all the art supplies that I'm
going to use for the class. Let's talk about the colors. So this one is Payne's gray
number 812 by white knight. I'm using this for the body
and the head, the tail part. I'm using different tonal values of Payne's gray for
different parts of the body. Next is born Tiana says
by Magellan mission. Next to this as your
blue 5.9 by white light. I'm using this for this
part individually. Make started to be
using this dioxide. Dioxazine purple
917 by Sennelier. This color is more
like violet color. The next color is roseola. I'm using this for the wooden piece that we
have in the building. I sometimes call
it as raw umber, but this is raw
sienna for this part. Makes this bond Dumbo,
by art philosophy. We have cobalt blue. The purple colors for this part. Again, blue is also
for this part as well. For the eye, we would
need to orange. Again by White Knight. I'm using this orange. You could use any
color on black. For black, I don't remember which color I have
reached Brian. Black I have used. So yeah, these are
the colors that I would be using for this class. You could use any similar brands that is already
available with you. We don't have to
use these colors. It's okay if the shades
vary a little bit. Also, I forgot to mention one color which is viridian hue. You could use any alternative,
cool green color. This is for the neck part. So all these colors
are stored in this palette and it is
easier to mix your as well. But in this class, I'm going to use a
separate palette to mix the colors so that I can move it around wherever
I want to make. About the brushes. I'll be using. This Princeton Neptune
size six brush. It holds a good amount of water. So it is easier for
washers and for applying larger
strokes of colors. Then I have size 12,
silver black velvet. 3,000 is down CVs. So this again is still larger brush than I have saved eight for medium to
thinner strokes. So I use a size two round brush for some
fine liner detailing work. I would also use water mist sprayer to wet
the paper just in case. And a benzyl and it is or you
could also use a kneading. It is all for wiping or removing
the darker pencil lines. Anything that works for you. Then we would need
some tissue papers and some napkins for
cleaning the brushes. And to lift some
paints of the paper. We would need two
jars of clean water. This has already become dirty. One that is for cleaning the
dirty brushes and other job is to take the clean water whenever we have
to do the washes. User, artist like this, where they can stick
the paper on the site. Don't have to put
on all the sides. Just this much is enough. Talking about the
paper I'm using for 40 GSM to triplet paper. This is 100% cotton
Indian paper. You could go in anything about 300 GSM, that will work fine. The measurement of
this is 15 by 11 ". And we will be using the paper
in vertical orientation. So these are the art supplies that I'll be using in the class. You can go with any alternative similar supplies that
you already have.
3. Tonal value: Let us talk about
the tonal value. So this is the darkest tone. If you apply a
little water to it, it becomes slightly diluted. And then we have the mid tones. We will add more water to
paint to get diluted colors. In watercolor medium. If we want to achieve lighter color or a very
transparent effect, we add more water
to the pigment, and those we achieve lighter
or highlighted effect. Tonal values determines
the depth of the painting. Can be used for shadows. This can be used for highlights. This one is for the transition. These middle tones are
very important to have a smoother transition from
darker to lighter tone. In our class project, I'll be using Payne's Gray
in different tonal value to achieve lighter and darker
effects in the painting.
4. Required Watercolor Techniques: In this tab though,
I'll be explaining some basic and very
important techniques required for this class. The two main techniques
that would be required for this is wet on wet
and dry on wet. Wet on wet is nothing about
you apply the hard water and then you apply some paint. When I say red veins, you have already
mixed some paints and that you will be
applying on the paper. Now next is wet on dry. So you have wet layer. You will take very thicker paint and then you will
apply it like this. This can be used
for darker shadows and denser effects
in the building. The paints could be even more. So when you combine these two, wet, wet on wet and dry on wet, Let's say we have a
spirit draws locally. No. No. If you apply one
single color to this, it is going to appear
flat in appearance. In order to give some
dimension to it. I'm going to use highlights
and shadows in it. So first, I'll read
the entire paper. This is a technique
that we are going to use for painting the pigeon. Okay, I've read this paper. Now let's apply though. With paint. This is
going to be wet on wet. Meaning I'm applying
that you did paint here. And this will act as
the highlighted part. The paint spread well, because of the
redness on the paper. No. I'm going to
use darker paints. This will dry on wet because I'm using
dry and thicker paint. And add the shadow side. I'm painting those peer. It should have darker side
as well as highlighted side. So let's add the
highlighted side. So before that, you need to know the weight lifting
technique where we lift the paints using damp
brush to give a highlight. The light and shadow
is determined by the direction of light
that falls on the speared. Next, I dilute these
darker color in the mid area to have
midtone values. Also adding some
darker color for the darker shadows should have a smooth transition from
lighter to darker value. So here we have darker tone, then we have mid
tones, lighter tone. This now appears like a spear. You can achieve similar
effects in anything you bend by using darker
and lighter values. Next, I tonal values
are very important in watercolors or any other medium. So we will use this same
technique here for adding the darker shadows and
some lighter highlights.
5. Composition: So I'm going to be drawing
this vision in my painting. This is the frame. You can skip the
background part. And I'll draw this pigeon
somewhere in the center. Then he already have
this wooden area. So this is the composition. And I'm going to skip the
background elements here, only focusing on the
pigeon and the load part. This will be roughly painted. The retailer will be added here. I'm going to paint
this in a semi realistic or semi loose, tight. Certain parts of the
bird will be painted in a loose manner and some of the details will
be added at the end.
6. Drawing - Warm up Exercises: Before we start our
actual class project, I want you guys to do this
little warm-up exercise. This will help us loosen
up our creative muscles and make some movement
just like how we wanted. So we'll start with
very basic exercise, which is marking two dots and connecting them
with straight line will replace the
dots further apart. So this way or
Huntsville freely move. Next, let us draw some circles. After this warm-up exercise, you will feel a sense
of ease in drawing. Next, we will draw some
squares and rectangles. Going back to the circuit, I'll be filling up the
area here with circles. Next I'm going to
draw some triangles. So these are some
basic shapes that can be used for drawing
complicated figures. With the help of circles,
rectangle, triangle. We can simplify any
given complicated shape. So let's say we want
to draw a tree. So this is the shape. Now, I can first draw a triangular shape and
then rectangle like this. And this spot in a square
or rectangle shape, then I can further
simplify it like this. Here. This is how easy it is to simplify the shapes using simple
geometrical shapes. Similarly for drawing boards. By doing so, good, triangles can draw
it very easily. You can take your own
reference image and try to simplify the shapes
that you want to draw. Now let's say we want
to draw this board. Then I'm going to
simplify the shape by bringing this oval shape. And then another circle here. A triangle angle. Honestly after know the
angle between this. Then once you're comfortable
with the overall skeleton, then you can easily
refine the shape. And it is okay if it a
little bit here and there, we are not looking for drawing. Perfect. Good job. Next, let us take
this board so we can draw a circular
shape, lightly. Rectangle here. Notice the angle. So this should be
aligned ahead of this. Once yogurt endoskeleton, right, then you can make
changes later on. You can make more such examples
and practice on your own.
7. Sketching : Okay, so I have
this pigeon here, and I'm going to draw
it using simple shapes. Here. I'm just taping the paper on the sides and not on
the entire paper. Alright, let's begin
with the sketching part. So I'm forced draw an
oval shape for the head. Doit very lightly. And then another
vertical oval shape. We have triangles. Another category here, the beak of the bird
is slightly inside. So I'm drawing this
triangle here. The freeze. We were drawn. I'm here. If you absorb the beak is not
aligned with the stomach but the stomach or just
leave this precisely, by the way, excuse me for the
confusion in the drawing, but I'm still learning how to
draw in right proportions. I have always struggled
to make good drawings. I love painting. That is where my passion is. This pidgin may not look exactly like
the reference image, but I'll make sure that I'll make it look like
vision at the end. That's my intention. I don't want my fear of failure stopped me from
trying new things. So these days I've been
trying new painting subjects. And I must say it really helped me gain some confidence
in my drawing skills. Okay, So here I'll
just note the angle. So it's somewhere like this. So I will just note
that angle here. No, draw a rectangle. Then again, some
straight rectangles. You can alter the shapes. For time being. We just
want the skeleton. On the backside. We have data feed. You'll see how I'm struggling
to draw this simple shape. But I think having these
so tiny rectangles and circles helps us draw in
somewhat decent proportions. So here I see that the head
is comparatively smaller. You could even do the
tracing on an off paper and then sketch it on
to the actual paper. That is also one way
of drawing your eye. I should be aligned
with the beak. So it is this here. I'm going to draw the
beak a little upper, aligning with the eye. So it is very important to draw using light handed
so that you can erase or corrected later once you feel you're getting
the proportions right. Next, I'll draw
this wooden thing. We need our fleet. Now I do some detailing on the
feet of this region. And highly panic as well. You can, I know the
detail to feel one. So I'm not going to draw
each and every detail here. So while painting, I'll try
to capture the essence, like my shadows and
the highlights part. Here, I'll just lightly
mark the feathers. This darker area as well. So we're pretty much done
with the sketching part. If you have not finished
the drawing part, pause the video, take your
time to complete the drawing. Will see you in
the next chapter.
8. First layer : Now, first I'm going to mix the colors that
I'm going to need. So we would need or Payne's gray mixing getting
thicker consistency. I need some more cobalt blue. This is already violated. This from later. Okay? So first I'm going to apply
clear water inside this. This is to perform
wet on wet technique. This entire drawing video. Carefully apply water
around the boundaries. I'm not applying any water
inside the beak area. Why? Because it has
this lighter color, so we will paint at the end. But for now, let's add water completely inside
this body area. So if you'll notice, the lighter areas are
the feather areas. And I don't go near. It has some darker green areas
though, is again darker. So based on this, I'm going to apply the colors. Suppose title go
with Payne's gray. You take my size two
brush so that it is easier for me to
spread the colors. And I don't want this neck area, I'm going to just apply
some green color. So I've taken this is
forest green color. Apply that color. And then we'll use purple
around the chest area. Sorry, it is violet
color. Purple. I don't know why I keep saying
vocal, vocal for awhile. It the head of this pigeon
is slightly darker, so I'm going to
use midtone value. The backside feather part
will remain lighter. Next, let us paint
the tail part. So here I'm using slightly
concentrated Payne's gray because as you'll see
in the reference image, the tail is darker. I use my damp brush to spread the color and also to
live the extra colors. Darker or thicker. Robbins green. I fly here. This will add a
sense of dimension. I don't know, feathers. We need to have a slight hint of green color and on the neck. So I'm going to add
some darker color, darker colors around. You're now moving
to the tail part. I'll be using concentrated
tone to define those I, those letters. Sense of shadow Adding this darker strip, that is then the reference image can take some Coburn
added in the tail, but this will have a slight
underdog in the darker areas. Next I'll take my
fine liner or five. Size two brush, wipe off
the water from the eye. But this is only possible. If you perform it
before the paper dries. You could come on the back
of your brush without issue. I don't paint. Ok, so this step has
helped us at you wipe Israel for the normal
while this is wet. I'm going to use Payne's
gray and add some texture. The fire doors fuels oh, fine liner brush for
tiny brush strokes. Also to add highlights, you can use your
fine liner brush. I'm adding highlights
and shadows are very essential part
of any painting. Without the shadows and highlights we'll be
ending is going to flag. So make sure you capture
that in your beam. And you can lift off all the
beans that has come outside. Also. If you have
achieved any sharp edges, then you can solve it
using a clean damp brush. The floor lift and
blue dots like this. This is to ensure that the
green color won't be very flashy and it will blend
well with the background. To give some highlights. We're going to lift
some paints from here. Always use a clean damp brush. If your brush has water in it, it will create
background effect, which we do not want your listing some paint from the bottom to define
the feathers. Gil some feathery texture. I'm doing the lifting job. Norway, and this
is slightly damp. I'm going to take pick a color using concentrated
Payne's gray here. I think these darker shadows
while the paper is damp. I think we are almost done
with the first layer. Once we are done with
the first layer, we will let it dry naturally
9. Second layer & Final Details: So the paper looks dry. I had left it to naturally
dry for about 05:10 minutes. Next, let us do the billing job. Start with the I. Here. I'll be using
orange color. Next, let us move on to
the beak of the bird. So I'm using Payne's gray. I leave some white gap and
then apply this kinda. You could also use some black. So I don't want this
lower part very dark. So I've lifted though
being choosing tissue paper for the feet, going to be using color. Switching to my size
eight, round brush. For the feet. This
is the first layer. Once this dries, you can add
another layer to add adept. Front of backside, I'll
be using slightly darker, pink because of the shadows. Now take Payne's gray. This should be darker. To suggest though, brighter, I'm sorry, for shadow side of the pigeon, the underneath part. So adding those shadows
will make the board FPR or more dimensional. Otherwise it is going to
end up building flat. So to prevent that, we will add the darker shadows, which in turn will enhance
the highlights of the board. I don't want to be doing
a lot of detailing work. So I'm just going to add some
suggestions she had ended. Oh, I'm adding some curved
lines depicting the shadows. Here. I'm going to glide my
brush against the paper, creating this darker
textured effect. Big darker color,
probably black. And draw a.in the I know to add some texture in the leg in
the front of the board, I'm going to add
some darker lines. You can make spin and some
black to make it darker, pink No, I'm simply gliding my brush, creating this date actual
audio brush should be done, should have very less pain. Next, I'll add
some darker colors to enhance the facial
features of this pigeon. Next, load some
more Payne's gray and load your brush
around this test area. This will add a sense
of extra effect. Although this is optional step, you can skip it as well. Next, I'll be doing some minimal detailing on
the feather part. So I have used black
yard and simply I'm adding some loose strokes
to enhance the shadows. I'm not trying to achieve
any realistic effect here. As you can see, I'm applying
some loose dress books. Doesn't have to be both
act on a defined way. Next, let us move on
to the beak Barb. I'm adding this black patch. Okay, So we're almost
done painting the pigeon. Now, let's paint
the wooden part. I'm going to paint this with
very loose approach style. Where did that only when
the entire area is wet. I'm going to add some brown
color for the base wash. I'm using raw sienna
and spread it well. On this red area. This is wet on wet technique. Next, some darker brown color. This will add a
sense of dimension. So I'm going to fly some
sprinkled some water here. So this one does play
a very loose fn. They don't want to spend
much time on the be, dealing of this wouldn't be. My focus here is just
the pigeon, right? So very loosely I'll
be covering this, applying paint and on
both feet of the region. Okay. So we will
wait for this to dry completely and we'll see you after. This has dried. Now, I'm going to take
burnt umber and Payne's gray to make a
darker brown color. Here. This area. And create the picture of the North trying to achieve any poll section. Maybe lose them been doing this splatter, some painters. Am I being slightly
darker pink for the feet? Okay, So we are done with this. Works remove the masking tape. Alright, so this is how
I'm painting looks like. I hope you have enjoyed
painting this with me. Do share your projects
under the projects gallery. So please do share your
review for this class. That would really
mean a lot to me. You in my next class,
until then, bye-bye.
 Shanan Subhan, Watercolor/Gouache | Art Educator