Transcripts
1. About this Class: Hello and welcome to my new class that you
take an action or watercolor wash. Today we are
exploring a new technique. We painted these small wash
landscape, painting it. I left these smaller
SketchUp, small landscape, but we will be painting different layers
without waiting for the first layer to dry
technique use with Boyd. Using a washer,
the result will be very painterly and similar to it's a very
spontaneous expression is the way of painting. And I'm sure you would
be amazed beggars out. This is the way I like to paint. Wash without waiting for the first layer to perfectly dry before applying a new layer. It's an easy fun technique. That's the way I like
to use floss should. It's easy. If you sketch with me, I will follow you step-by-step. You can get lost
with my explanation. Also. You need some basic supplies
so you can see soup lines. I will explain in
detail what you need. A matrix that's waiting for
joining me in this field, partial venture and can sketch with me. In
my next lesson.
2. Art Supplies: Let's talk about supplies now. The most important thing you need to start painting
with gouache is paper. You'll need paper that is, for a wet medium,
like watercolor. You don't need fancy paper. As per watercolor, you
don't need cotton paper. You need just a good, sturdy watercolor paper,
cellulose cotton. And this, for instance, is 200 GSM, is not even 300 GSM, but it is hot pressed. What does it mean? Hot
press, cold press, miss. It means it has a texture. But as hot pressed, it's small. But I personally
prefer smooth paper for Gua Sha because it's
easier for details. It's easy to spread
to lay down the pain. I also like sketchbooks,
not too rough. I can this small sketchbook
where I like to paint. I have a different version
of this same painting. Here is a sketch
book, cellulose. You really don't
need a fancy paper. Any paper will do if
it is for watercolor, even 200 GSM is enough. But it's better if it is a hot, then you need, of course, the wash and you can use a student grade or
artist grade coercion, even student grade will allow
you to make this painting. I have used a mixture of artists and student grade
in these sketcher. I keep my To already squeezed. Stay wet palette. Tight, airtight
palette like this. You see this is completely airtight so the
paint stays fresh. But you can squeeze
directly from tube. You will need a whole
lot of white wash. I suggest that you buy it
in big tubes like this. You see, this is going to
run out very, very fast. It's better if it is a white
that is opaque and opaque. Gouache is Cheney
white, not zinc white. This is titanium white
and it's very opaque. It does say opaque. Or maybe it can say
special titanium white. You see this is to genuine. Why? The pigment of titanium white
is p w six. Can you see it? Yeah. Whereas P W4 is zinc
white splatter, if it is p W6 to genuine. Why? What colors I have I
used in this sketch? I have a USDA yellow, cool, and a warm
yellow, lot of white. I used the blue. I've used a cooler
blue cyan of tallow, but you can use Colbert
if you have it. And ultramarine,
which is the warmer, then I use some sap green
or any green we'll do. I have used yellow ocher,
burnt sienna, brown, black, and a touch of
Alizarin crimson in the sky, but it's really optional. But any basic set of
quash we have this color. You will find that in the project section
of a this class. Then you will need the brushes. I have a passion for filbert brushes that are
flat brushes with the round. But you can also use a regular flat brush and also
have used a thinner brush, round brush for details. It's a smaller brush. Palette knife. If you use this is
gonna be very useful to dig color out of this palette
without polluting it. Then mixing palette. This is porcelain,
which is better for wash because I want stain, whereas plastic stain, It's
better porcelain for gouache. You can use a dish. Then you will need
a class like this, or kitchen paper
and a lot of water. I use two jars of water, one a big one for dirty water, and then one jar
that I keep clean. Or you will also need
some artist tape, paper tape like this. Or maybe some washi tape. See no one like this. I don't use it very
much because it doesn't stick very much
because I don't know. I always find it that it disappears in the
middle of my painting. That's all. That's all absolutely
all for now. And see you in my next lesson.
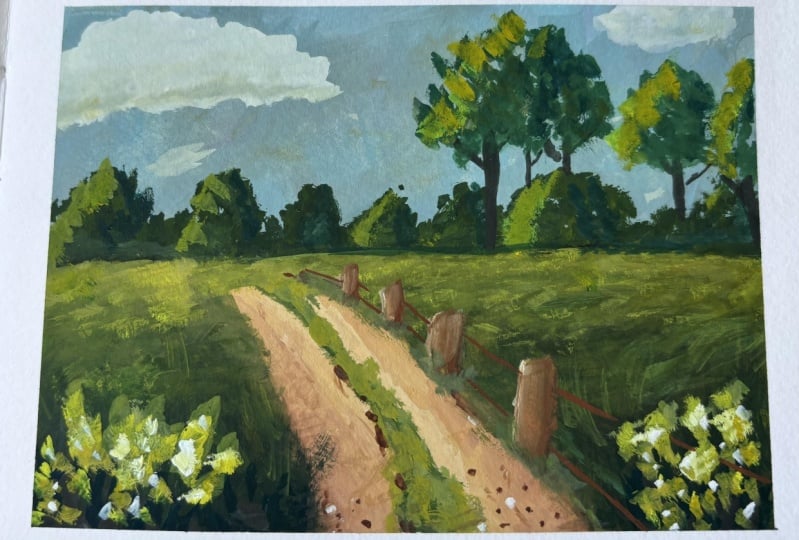
3. Pencil Sketch: The first thing you have to do, put some oxy state along the border so
you have increased. This is a very thick taper, so I will not apply
the whole length, but just half of it. Now to a drawing. The drawing will be very simple. Remember that? Interesting if you put the
horizon right in the middle. So just above the middle would
be more interesting here. Then you have a hill like this. And then the road
that is broader towards us because
of perspective. And then here you
have some trees. Just place them and draw them. In here you will
have the bushes. That's it for our drawing.
4. Let's Paint the Sky: Now I have prepared some paint. I have prepared some
wine, some blue, I will add more, some burnt sienna that I
have mixed with the blue. Then I have some yellow. I have mixing yellow with
black to have a muted green. Yellow. I have two types, lemon yellow and
a warmer yellow. Use what you have. A lot of white, of course, some burnt sienna, magenta or alizarin
crimson for the sky. Because the sky have you sired
by you can use sky blue, cobalt blue what you have
has some burnt sienna. Then also have some yellow ocher ready for this country route. And this guy then start
painting the sky. I take a broad brush, maybe even too broad for
our small sketch book, but I like it wide
brush strokes. When applying just some water. Because the sky meets
multiple layer. I wet my paper, have a moodier losers sky. Then I take some of these
cyan mixed with white. And then we'll apply on top, go in each direction. So you have a moody
sky with the texture. So it was an oil painting. You can put some color variety, some more blue in
some cognitive. Then I apply some
very small amount of burnt sienna to get a gray. And then it makes it again with one more blue, more white. You can even make some paper
more white. Definitely. No one. Just remember
to add texture. And then I will add more blue. Just blended, keep blending.
In each direction. We will add the
clouds at the end, but you can start adding
some white to make it more. Wintery. Can have
touch of magenta. Here. I have magenta, some corners. Going to add some drama. And also now I can add
some yellow on the Dr. I clean my brush. I take some yellow ocher
and mix it with some white. And on the bottom part
will add this battery, white with a touch of
yellow here, on the bottom, here and there every direction. Very moody sky. I'm going to add some
strokes, or yellow directly. Some white, more yellow. Okay, I think we're done. And now we will
apply clouds later. It's already quite moody. Now, we go to the bottom
part. Throughout.
5. Let's Paint the Road: Wrote, I keep my large
brush and then we'd make so wide and okay. Remember that? Nice colors always dry, darker and darker
colors always try. Lighter. So you have to play
with colors and values. Quite, quite wide strokes. Enough, water too. Let your brush glide. Just fill the shape. To worry about perfection
of this stage. We'll worry later. Now, you take some pure
white and you just apply it in the middle so you will
have a lighter center. And also you take
some burnt ocher. And you can have
some darker sides. Just you mix this burnt
sienna, yellow and white. It's dark. But then we would
blend it some strokes. Now I clean my
brush and blend it with some just planting. Take some yellow ocher
mixed with white. Some texture. Clean brush. I clean my brush and then
make this horizontal strokes. Some yellow ocher. Just to give some texture. I'm more white in the middle. You just play with your
colors until you're happy. You see now we have a larger
center and darker side. Just keep applying the cell you have this small c
battery texture. Just keep applying. Now we'll go to the
green tomatoes.
6. Let's Paint the Grass: Always clean. Your brush, duct to water jar and then
the clean water jar. And then in paper. Now you start applying some poor yellow
towards the horizon. Down. Don't worry here that would
be the bushes to stop here because it will
be lighter way. Then we aren't really tall, black, so that it
becomes a muted green. Just applied
horizontally like this. It's quite watering
at this stage. Now. It's thicker towards us, more black and go in
horizontal movements, but also nearest
infrequent movements. Because here we have
feasible graphs. Cross invading the toll road. We keep blending. We take the warmer yellow, check the warmer yellow and be applied here and
there to add variety. Same here. Same here. We take, we have, here, we take some lemon with black and we applied it
with a lot of texture. And then we apply more
black towards us. We can also take some sap
green if you have it towards us and you add it just to
give some color variety. We had some on our rush. It's good thing. We
can add some variety. Here. It's Hailey. It's full of grass. Texture, texture, texture. Here you keep adding, just mix some yellow
with your black, gets a different green. Here you have Krauss, upward strokes in
all directions. Here. Some horizontal strokes. Because it's
invading little rod. Here, you have a much lighter
green here. And here. And in the middle. You
can take a smaller brush. This stage if you want. I take also some sap green. We'll apply some
cross hearing them into small bushy grass. You remember that you want to
see the white of the paper. We had some here and here. So some yellow on
top of this paper. Don't be afraid to add texture. Flickering moments for grass. Darker yellow. Keep adding, keep blending. Some darker yellow here. To add some variety. I have green on my brush, black on my brush, so we
add even more variety. Remember that strikes or
horizontal when they fell away. And hello here. And more vertical when
they close to us. These are horizontal.
Grass invading the road and then you
have grass upwards. My larger brush. Why does chunks keep the blend darker? Be affected their job. And then you slightly darker. Now to you, pushes on the
horizon towards your horizon.
7. The Background Trees: Now clean your brushes. Can even change your
water by you rotate it. You rotate them against the glass like this so you
get rid of all the paint. You should do that.
On the other job, this is the clean water. And now we must go with
some different green here. And we take some, we add some blue, actually add some ultramarine
blue to our black. So we get cooler. We take our black, plus. We draw some trees
of different size. Fairly loose. You can also use some black. You can also draw the
shadow line fast. Then on top of these
huge IQ, cooler, green with some
ultramarine blue, just take any blue
is so important. Small the values. And you just paint this distant trees
with dancing movement. You can even grab your
Rush more towards yen, so it's more free. Scholastics, more
painterly. This. Okay. Now we'll take the same green, some ultramarine blue,
some yellow and black. And we paint some trees. They are like wide. Just show the sky
through the branches. Here we have another one. Here we have another one. This should be two. Now we take some more black
and we apply some shadow. We know that the light
is from the left. So we apply it. Well one side, some
shadow on the bottom. Like this. Now we
take some yellow with sparingly apply here
in the top of the tree. Same with a yellow. We apply some on
this side of this, pushes out, this is too watery. And we can take some black and apply on the
right-hand side. So we have some movement
and then we can take our green and just try and plants and texture until you are happy. Keep adding. Now we check the thin
brush with some brown, some brown with some of these black and some white. On black. You can draw trunks. More plaque, this becomes track. So these will stop in the
middle of the bushes like this. Very thin branches
here and there. Yeah, same here we
put two trunks. Now, want to add some
flowers here in front. And also I'm not completely
happy with this. I will take some. My green. Maybe we packed with
my black, white. And how I add some texture here. This memo, yeah. No, so taking this lemon
yellow mixed with white, so it's more opaque. We'll add some flowers here. And I take some green and
add some leaves here. Just endless chain of color. I want to put some yellow here. Just blend it now. Yellow stains humid because of the file flowers. And we'll put some
white here for clouds.
8. Add Clouds & Details: Now clouds, we could have
applied them before the trees, but we didn't, so we do it now. And I would put
that on top here. Because remember
the Sun is on top. The white will be facing
the top of this guy. Puts one here and maybe
one hand behind the trees. And now, clean my
brush with some water. Clean water to paint, some white wine done brush. Now we'll just plan to the
bottom of the cloud. Why? Usually the bottom
is say flatter. Top is fluffy x 03 non-life paper. Gouache can always be
fixed. More white. Just touching in. Okay. Some final touches. I take a smaller brush. I would put some stones
on the country road. I take my burnt sienna and some of these brown, dark brown from the trunks. These one. And I will add some dots, some shadow and on some grass. Extra white here and there. Just so high that
you can also put some dots or white
among your flowers. Maybe you want to
blend slightly here. Completely happy. Horizontal movements. Because that's how in
reality would do is route just develops horizontally
towards the center. Okay? He's going to be doing reality. Trying to invade. Remember the column varieties. One of the secrets. Panic. I could go on for hours, but maybe I will stop here. Now we take the tape off.
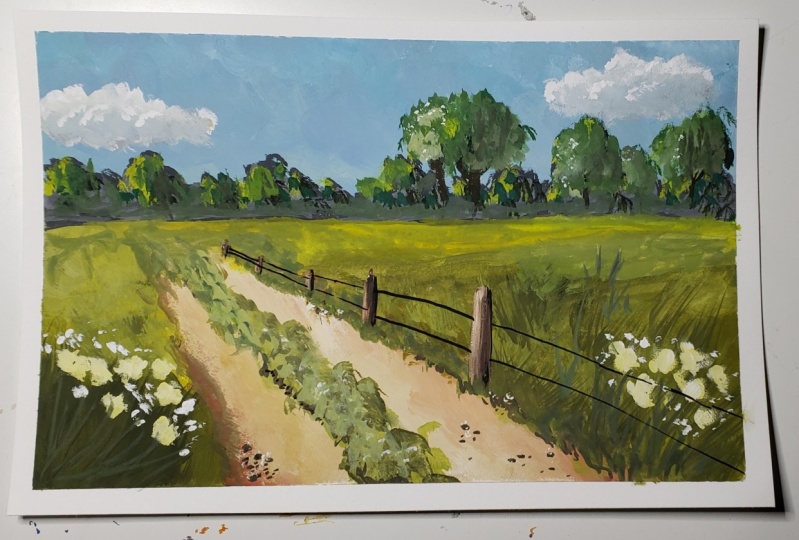
9. Add a Fence!: Now heated with
heating tool, my tape, and because I'm very scared
that it tastes of the paper, which happens quite often. And just very, very, very slowly away from you. Heat it before we
them blow dryer. One is losing up the glue. Now that I have
taken the tape off, I realized that I'd like
to add some details. You can always do any pointer. So this is also a class
about fixing mistakes. I take a smaller brush
and I will draw the poem. So, yeah, take some
of these brown. I need to be yellow. And don't mix it. I've
taken this brown or the trunks and mix it with
white and yellow ocher. So I have this muted, I have this matrix, dark color. And then we'll draw a poll here, disappearing in the
middle of the grass. Here. Now I would take some white and just
applying towards the live here. So we take some black exhibit, the crown as high no one would apply. It doesn't have to be perfect, just believable. Now I have that clean
brush and I will supply some yellow, yellow ochre. They're slightly blended. Clean brush, white. This side. This too much
water on the brush. Just go on and T2, happy. I think I will just
draw some wires. One to the other face. Here. Why S becomes slightly thicker and disappears
because there will be a pole. We don't see okay,
flowers going outside. They think these rallies. Sienna with blended. Hello. Okay. Now I'm happy. Absolutely happy. Okay. So you can add some grass
in front of our pulse. Like this. So slightly blend. Loser. Okay, I'm ready
finished now, I promise.
10. Wrap Up & Congratulations: So you have finished
your small landscape. I bet that it's amazing. I will be so happy if
you can upload it in the project gallery so that other students can see what you can achieve
in this class. You can also post your masterpiece on social
media where you can tag me, you find me and my name. And he said, Hey,
congratulations for finishing this class. It would be great. If
you could review it. That would be great to me so that I can have a
feedback from you. And we'd be happy to give you my feedback on your project. Thank you very much and as
human next class, Bye bye.
 Elisabetta Furcht, Anyone can paint!