Transcripts
1. Welcome!: I have painted a
lot of mountains in acrylics and also taught to
thousands of my students. From my experience of
teaching mountain landscapes, in my teaching career
of eight years, I realized that most of my students struggled
to paint mountains, and yet painting
mountains is so easy once you understand the basic
structure of mountains, my inspiration of
painting mountains came from my hiking
trips in the Himalayas. I have been to the
Himalayas multiple times from various parts
of northern India. And every time I just
felt magical being there, after returning back
from one of my trips, I painted mountains are
two big canvases of five feet long because I was fascinated just
looking at them. So before teaching you
how to paint mountains, I want you to get a good
grasp on mountains. So that anytime you look at a mountain landscape or you are traveling
to the mountains, you should be immediately
be able to say, I can paint that. In this class, you
will learn how to look at a mountain
photograph and how to visualize a complicated
looking mountain in easy ways in your mind. Before you attempt to paint it. Then you will learn to decode the different types of mid
lines of every mountain. And once you understand this, it will help you paint
3D mountains very easily and make it look like it's popping out
from the Canvas. Then you will learn some of the important knife techniques
to paint mountains. And I'll demonstrate
the technique by painting two different
types of mountains. And finally, you
will learn to paint a very complicated
looking mountain range, gathering all your knowledge
from the previous lessons. So are you excited to
dive right in I short ab. So let's go paint
some mountains.
2. A Mountain in 6 easy steps: Before learning to
paint mountains, let us understand what
are the basic shapes of each mountain so that
when you look at a photograph of our mountain, single mountain or
a mountain range or whatever
photographs you have, you understand how to decode that photograph
into painting. So the first step I'm
going to teach you is how to look at a mountain and understand how to divide it into small bits so that
you can start painting. The very first thing
that you already know, the basic shape of the mountain is like
an upside v, right? So this is the first very
basic shape of a mountain. This is how we painted
mountains as kids. Right now. We are becoming a
little bit more mature. So we are going to
be in data or rather sketch it in a little
bit more mature weights. So the first basic thing
about the outline, if you look at a mountain, is that the line
is never straight. It is always little undulating. It's a little uneven, right? So that is exactly what
we are going to do now. Okay? Also, rather than
creating it simple v, I'm going to change the angle of the top weight of the
mountain as well. So I'm going to just
vibrate my hand little bit and create the outline
of the mountain. So this is how we faint mountain now, right?
Second thing. What if you look at any of the
photographs of a mountain, you would see that
every mountain has a dividing line in-between. All the mountain peaks
have a dividing line. You notice that There's a dividing line in
the front, right. So that is what I'm going to
do now. In the similar way. Good. Now, the next thing is if
you look at this lines, they are never a
straight line of course, and they are going in various
directions. So say e.g. the center line
of this mountain, it's going almost
towards the right. This is coming straight like the one that
I have done here. If you look at this one,
this is going to the left, so they go in
various directions. So your next day of painting any mountain would be to sketch it out, of
course, first thing. So if this is the
shape of the mountain, the midline goes almost
like something like this. Let me just do it a
little bit more nicely. I'm just, you know, modulating my hand little bit, kind of making it shiver. And in the process I'm creating this uneven lines rather than creating a straight
line like this. This is very much straight
line I've seen in my classes. Students also creating absolutely straight line
mountains like this. And they look, to be honest,
a little bit garish. But if you just undulate the
sides like this little bit, it just starts looking very
realistic, very gorgeous. And if the one photograph
that you're looking at, if it has a central line, then by all means
do a center line. But for most of the mountains, you will see that the lines are going little bit
crazy like this, just left or to
right or, you know, in all different directions. So this is our state three. State four. Now, you'd never really, if you look at a
mountain, he would never really find one mountain peak. They're always in ranges. So which means there are multiple ranges
next to it, right? So it's like up,
down, up, down, up, down, up, down and so
many mountain peaks. So that is our next step. So to be able to create
a mountain painting, you need to understand that
how mountains go. Okay? So I'm trying to create, so at the moment
what I'm doing is creating the outer line
of older mountain peaks. Ok, so this is my outer lines. So if I look at this one, it's almost like the
outer line that you see. That inside that
outer line there are few lines which are
coming in front also. So that is what I'm
going to do here. I'm not exactly following
this photograph. I've just using
it as a reference to make you understand
what I mean. So what I'm doing is I am taking couple of lines
in the front like this. Maybe this one like this. Maybe I will create one
in the front like this. Okay, that's not all. Now we create all the
things your lines also. So let's say this
goes like this. This goes like this, maybe all sorts of like even
in the one in the center. So in the fourth state, what you're alone to do
is basically creating a mountain range rather than just a single mountain and
then create the division. Alright? So you understand how we are gradually
progressing towards dividing a mountain by
dividing into simple stages. Now, I don't have
much space over here, so I'm going to create
one big one here. And what I want to
show you is that in the next step is that should
until the fourth step here. Let me just mark it out. 123. Okay? So at the moment we have just created the center line, right? So divided the mountain
into two halves. But if you look at the pictures just between
the two halves also, there are so many lines that
are going in all directions. So we have to, the
reason we need to understand this is
because you are going to learn to create all those between lines
also in your painting. So it's never just one. So if this is my division line, you're not just
going to fill this up with one straight color. Even inside this,
you're going to create so many pictures. So all these textures, this is the division line. Between this division
line and the sideline. There are so many small
textures as well. So if you're itself,
you can see 123. So that is what is
the next thing that you are going to do
in the sketching? Oh, okay. I kind of made them a
very straight line niche. So I'm making it a
little undulating. Okay? Now let me create
the central lines. So all these center lines
are created now in-between the center line and this
other the boundary line. I'm going to create
multiple lines, more. I'm just making a few lines like this to show the ruggedness. And whenever you want, you can refer back
to this picture to understand how you are going to create a mountain, right? Okay. So you understand all
the textures that are coming in between the center
line and the outside line. Now, the very last step, this is step five. Now for the very last step, I'm going to create, again. This time I'm kind of
making it undulating, which I forgot to do
in the first one. Again, I'm just creating
I'm not referring to any photograph are
doing this. Doing it. However, I feel like doing
reading the center line. I feel creating the center line, which is basically step three, is one of the very important
step of painting amount. And if you can create
the centerline nicely, your margins are going
to turn up amazing. And I'm gonna teach you a
very easy way of creating the center line also
with paint directly. Until here, you have already
learned in state five. So I'm just repeating the state five because after this I'm going to add
something brilliant. So now let's look
at the photograph. You see for every center line, I haven't in this one, I haven't yet added the
ragged lines in-between. And I'll tell you
in a minute why. If you look at the two
sides of this middle line, one side is dark once I disliked based on where
the light is falling from. So if this is the sun direction, this is the side which should be light and the other side
is going to be dark. Same thing over here also. One side light once I've done that is how all
mountain ridges are. And if you can just do
this simple trick of making a highlight on one
side and dark on one side, your mountains are going
to look realistic. Coming out of your canvas
like this in a 3D direction. So that is exactly how
you achieve that by adding light on one side
and dark on one side. And that is exactly
what I'm going to do. Let's say this is
the sun direction. This side is going to be a highlight and this side
is going to be dark. So to show the darkness, I am creating some
pencil sketch right now. In this time, in this space where I'm making
the marks right now, you are going to add the picture as well
as the dark color. This is my dark side, which is the shadow
side of the mountain. I'm going in every direction. And during painting also, this is pretty much what I do. Kind of go in all direction, which I'm going to
teach you in a bit. Okay, So this is the dark side. Light side, on the other side. On the light side also, I'm going to add a
few more marks to show that there are
extras as well. There you go. This is number six. I hope you understand how
to look at a mountain and divide the shapes so that you
can paint it very easily. Now what I'm going to do is, like I said, number three
is the most important step. So I'm going to teach
you how to look at a mountain and how to create the center line easily so that it helps while
you create your painting. So you can do this
exercise yourself, ones, to get a good understanding of what you do is
for teaching you, I just showed like created some mountain from without
looking at anything. But what you can do is say e.g. you're painting this this
photograph and a sketch it out on our Sketchpad and see
what all lines are there. So create the outline first, then create this
mountain in the front. Then create the division
line and practice it on your own couple of
times by looking at multiple pictures to
understand how things are. To demonstrate a
point number three, I'm going to create a few
more mountain shapes with different types of
middle lines so that you can understand how
you can do it, okay.
3. Different mid lines of a mountain: I am looking at this one and let's do this
center one first. Okay? And the center line goes
something like that. Okay, then I let's say
I'm doing this one. No. This one and
the one in front. Let me try and do that exactly. However, I'm seeing this. I'm seeing that this is
connected to another mountain. Okay? And I'm going to do the shadow side and the highlight side for
better understanding. For this one, this is inside. There is a shadow. Okay. So you understand two
different types of beaks. Let me look at a couple
of more pictures. And so I'm looking
at this one now. And I am trying to
create this line, okay? So this peak, which is pretty
much towards the left, and the system shadows, so I'm creating the
shadow on the side. There is one mountain peak
in the frontier that, that is in the
middle line is here. And then this is the
shadow side for it. And then pretty much
some lines like this where I see some shadows on the side because this is the
light source on the right. This is the one I'm
looking at and doing. Okay. I just keep it here so that you can understand,
see, and understand. So this is a topic that
you are looking at, that is the one I'm doing. And there are few ragged lines. This is continuing like this. I'm not going to continue
more. I'm going to end here. You see, just by doing in this tree mountains
that have created, you see there are three
different center lines. So it's very important to be able to create the center
line for the mountains, to be able to paint
them really well. Okay. Let me do one more. Right? So similarly, I'm going to do a few more, are looking at multiple
pictures to make you understand how many that
can be so many, okay. If you look at, if you take any mountain
range photographs, just google and see
if there can be so many different types of
central lines for mountains. I mean, this is such an
interesting thing, thing too. Absorbed because we don't really observe well while
we are looking at, like if you visited
mountains, I mean, I'm being too hemolyzed
so many times, but I don't think I ever
actually looked tried looking at how many different types of center lines at the hair in the mountains
when I was there. I am only I only learned it
just because of painting. Okay. That's ridiculous. I know. That's how it is. We don't really observe things
unless we are painting it. Because I have noticed
that while painting, I actually get to look at an object much more carefully and understand
them even better. So that is why I feel this
exercise is so good to do. Because you learn
how to observe also. Doing crazy shaped mountains, because I was searching
for mountains. This is a very common kind
of mountain peak that I saw, kind of like little tarnish. This shadow color. It was the center
is quite dark to create the contrast between
the highlight and shadow. Alright, so that's all, I'm
going to leave it here. But I hope by
watching this video, you understood how to look at a mountain and how
to decode them. Practice these basic shapes, download some pictures,
and try creating this, because this will give
you a very good idea so that whenever you
look at a mountain, you can readily look
at the central line, the fixtures that are
happening and all the middle, in between the middle
and under silent, all the textures that
are happening like this. And you will be able to paint
a mountain very easily. So it's really important
that you try this out and understand how
exactly a mountain is. Unless, because, unless we actually decode a
mountain like this, we don't really know
what a mountain is. I mean, just by looking
at these sketches, you can understand how much 3D and realistic the
mountains are looking. Okay, so once you
have done this, we are ready to deep dive
into painting the mountains.
4. Knife Techniques: Okay, before moving on to learning how to paint mountains, I want to teach you a few simple techniques
that is going to help you in painting much
beautiful mountains. So I'm going to teach you the basic the technique of creating the
mountain fixtures. So for that, I'm using this paper pad
palette that I have. And other colors that I will use are just for fishing
the technique, any color is fine. So let me take out any color. I have this one
right now with me. I mean, does it the color
really doesn't matter. Pick up with whatever pick
body acrylic paint you have. The focus is on
learning the technique. And I have this
knife with me, okay, so whatever knife you have, whatever color you
have, just take it out. And we're going to learn
this very simple technique. So watch it first. Okay? All I'm doing is touching
my night very gently. And you see the amount of
paint that I have picked up. This is not the amount
that I'm going to use, so I'm just kind of
getting rid of maximum of the paint and this
is remaining amount. And now you come on Canvas
or wherever you are doing. And very gently you
touch on top of it. So you see you get
these broken lines. Okay. Let me take a little bit more. This is the direction that we're going to
take when painting the mountain ones
towards the right ones, Let's select the texture
that you want to create. The technique that I
want you to practice is having such broken lines. Okay, so I'll show you
the problem that happens. What most people do when
they're doing it first time, they pick up a little
bit extra paint. And if you press too hard, this is what you get, okay? But this is not what you want if you don't
press too hard and if you hold it gently and
drag it down like this, so you get these
broken lines, right? It's not really lying there
like blue broken dots. So if I, if I do it again, this is the kind of extras
that you get, right? So this is what you want, because when you do
this on the mountain, this gives like amazing snow. Look on the mountain. So let me do it a couple
of more times. Gently. See, look at this. And if I want to do it in the
direction of the shape of a mountain, this is okay. So just once you can't
really do this twice. So cheers to one's. Gently. I'm going to teach you
one more technique of doing the mountains, which is probably fairly easy, which is just in
case you're having. So if you're doing this
for the first time, I want you to practice this a few times and see
how you get it. But I know normally people
find it very difficult to, I'm giving you a very easy one, which is touch and pick it up. See, there was too much of pain, so that's where it
became like a blob. But if you don't have
too much of pain, so why should a little bit
on the patch and pick it up? This is the kind of
texture you get, which is also a very
beautiful snowflake. So again, I picked
up quite a bit. So all I'm doing is basically
touching and picking it up. Okay? Now I'll teach you
one more technique in this aspect of what I'm going to do is fill this up a little bit. So say e.g. you wanted whilst
trying to create a snow, you added too much of the
color on top of it, right? So then what you do is with the other color
that you have, just for the sake
of understanding, I'm picking up I have taken out a different color to show you. What you do is pick
the other color. You can go on top of it. And this time, this is cheap
way of getting the texture. So now you see the green is actually broken,
that is short-term. And since these two
colors are very similar, It's kind of difficult
to understand. But when you do it on
the on the mountain, you will understand what I mean. So I feel this is a very easy way of getting
the textures right. Doing a few more, let me try with blue as well. Okay, so just practice
this for some time on our rough sketch book or
journal or whatever you have. And you will get a very
good understanding of how to hold your knife and
how to get this texture.
5. Basic Mountain Painting Demo - Part 1: Now, before moving
on to creating the actual mountain technique
that I want to teach you, let me teach you the same thing, what we just learned in the technique in
the previous video, in a very basic mountain. Alright, so let's do
a basic one just to understand how this
mountain thing works. Okay? So all I'm doing is
picking out some white create a little
sky background. Otherwise it's not
going to be visible. So that's why I've
taken my flat brush and creating the sky. Okay, I'm gonna do one more of the same thing
and show you with, uh, with both the techniques. I showed you two techniques
in the previous one, right? So I'm going to use both
the techniques and show you how you can do it
in a very basic way. Then you can pick and
choose whichever you find comfortable or
whichever you like. I mean, I obviously
like the technique, one technique to is just another easy way of
doing the same thing. Okay? So this is just a simple
sky background that I did. Now I'm going to paint
the mountain, but this, since this space
is really small, I don't want to do it with
a, with a flat brush. Instead, I'm gonna do
it with a round brush. And for that, I am taking out some black. Alright. I'm just creating a very
basic mountain shape. So that's it. And now I am using black and blue to take it
all the way down. Same thing I wanna do here. And this one, let me do
the shape like this. Alright, so now I'm
just going to let it dry for a couple of minutes. And then I'm going to do
the texture on the top one. I'll do the texture one
that I showed in this one. This texture which
I did on the top. And then this bottom
picture that I showed, the easier one that is what
I'm going to be SU here. Alright, so doing it the first takeaway with
the first technique. First thing I'm gonna do is, so right now I am
using fluid acrylics, but I'm mixing it with. Turquoise blue. I am going and doing the
highlight on the right. See very gentle. And I'm getting those
broken textures that I just showed you. On the left side of
my turnout, right? Gently, you adjust dragging. So some of the background
is showing the black, some of the black background
is showing, alright. And what you can do
is you can first do the highlights of
Buddhist mountains or do the highlight shadow and
the highlight shadow. You can go whichever
way you want. I really like going highlight, shadow, highlight, shadow way. But let me show this one
in this way first we want the highlights to get very
gently dragging them. And so as I was telling you in this one, that if you feel you
have added too much, which I had just did over here, I added too much and the
black is not visible. And then you can come with a
different color on top of it and once again on doubled
way to make it visible. So that is exactly
what I wanna do here. I did not do it on purpose,
but it just happened. So it's a good thing that
I really, to show you. All I'm doing is adding
some mode of white. Okay? And that's done. Now. I'm going to do the shadow
section on the left side. And for that, I'm going
to mix black and blue. And check this out. I'm going on that. Joining this two in the center. Similar thing I'm
gonna do here also. And I'm also taking little
bit of white and on with it. And why it is very less
compared to the right side, on the shadow side also there
is little bit of white. Brown nine, the way
you feel comfortable, it is no right or wrong here. So I generally like to rotate my canvas and hold it whichever
way I find it easy. So adding a little bit
more black on the side. Okay. Now, since I
did a lot of blue, I'm just adding little bit of black over here to
make that cool. No, the highlight is
so much gone, right? So for that, I'm taking out it, actually it's gonna
be better if I take out some pig body acrylics for doing the white snow, because we picked body acrylic, it's easier to
create the texture rather than with
the fluid acrylics. So I'm taking out
just a little bit of pig buddy acrobatic. Alright, so I want to
take some more blue. So since the highlight is
almost covered while doing it. So I'll tell you the
reason honestly, because I'm doing on a
very small space, right? So that's why I like painting
mountains on a big canvas. It's very easy for you
to move around and in the small place becomes
a little difficult. So I'm creating the middle
line of the mountain as well. At this time. If that is not very visible, you can just go and
create a line like this. What I like to do is
add a good amount of white towards the midline just
to make it very permanent. And then gradually I cannot do the technique and break it down. Alright. And just go a little bit on the side
with a black shadow. And in the center
is kinda Twain. I can just add a few of them. So this is basically
going with another color in between if you feel
you have too much. And that's it. Also I'm adding
because if you look at the shadow side
of the mountains, it's not really always dark. There are few snow
falls on the left side, on the shadow side as well. So for that, I'm just adding little touch ups of
white Karen there. Okay. I feel it's too much. So I'm adding little bit
of black on top of it. You just go back and
forth a couple of times, unless you're getting
the exact thing that you'll want to achieve. Cool and you'll see that you 3D texture of the mountain
is visible, right.
6. Basic Mountain Painting Demo - Part 2: Hi, so now I'm
gonna do this one. The midline is going
to be somewhere here and this one here. Okay? So now I'm going to
do, use the technique. Do that I just
showed on the side, which is I feel
comparatively easier. So taking white and blue and
very gently just tapping. For the age, I'm taking
quite a bit of white. One good thing happens when
you paint on a bigger scale. It, by the time you come back with a highlight and
shadows or highlights, whichever you're doing later. The other section
gyrase by then. The problem I'm facing in
doing this small section is that it's not drying and
I'm coming on top of it. So that is a little problem. So give it a little time, let it dry a little bit, and then also you can do Okay, I'm coming all the
way in the center. Now. It's time to create the shadow
on the other side and put that going like this. Especially where
the mid-tone is, I am midline is I am
creating the middle line. Something like this. Okay? Also, I'm taking some white and eating the absolute
midline, like this. Same thing I'm doing here. Now. I'm doing the left side
with black and blue. So this is the batch and
pick up, touch and pick up. I'm going to add some more of
white on the side as well. It's a little bit not as
much as on the right side, which is still a little bit
in that scene, they should. So the knife is a little
bigger for this small area. So that's why I'm having a
little trouble moving around. But in the next technique
where you will learn to create the actual mountain, which I'm gonna do
on a bigger area, is going to be much
easier to move around. So you can clearly see the
midline that has been created. And if it is not very visible, you can again go on top of it. And just with the
age of the knife, you can create the
midline that we want to. Also, one thing that you can
do is just for the sake of showing that say you want
to create right in front. So you call like this
at the mountain. And on the left side you
create the shadow for this. So you see this district,
it's kinda easy. So even if you mess
it up a little bit, you can always correct it. So you can see that
how easy it is to create that 3D image
of the mountain just by creating the shadow
side and by creating the the highlight side. So just playing it
out a little bit. Once it is dried, you can do whatever you
feel has been missing. Okay? And like I said, I like this technique
much more than this because I like kind
of like dragging this. And I find it much easier. I showed you what
the techniques, try it out, see
which one you like. And then accordingly
you can choose that. See again, I'm going back
and doing it my way. But you have learned
how to do it. So you should be
able to do it now. Do it on a rough paper, this technique and understand how it is happening so
that in the next class, next video, when I show
you the actual mountain, you will be able to
do it just well. Okay. So practice this a
couple of times on another sheet of paper and experienced the fun of
creating 3D mountains.
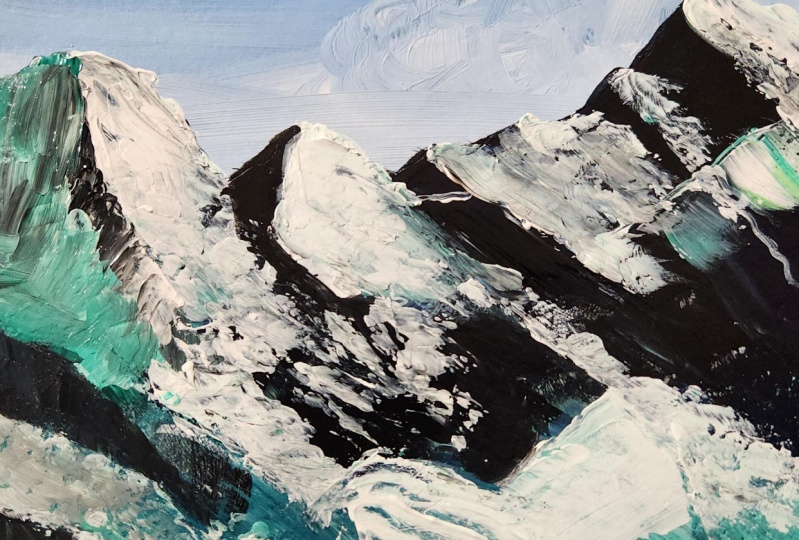
7. Painting A Snow Cap Mountain Range - Part 1: I hope you've practiced
all the sketches that I shown and
you are ready to paint a beautiful snow-capped
mountain like this. So the one that you
see at the back, this is the mountain that
I'm going to teach you. Now. Have a look at this, I am going to attach
though this photograph. Look at the broad
range of the mountain. And I'm going to teach you this how to paint
exactly this mountain. Alright? So the art supplies that you need for
this class are, I'm going to use this color
for creating the snow color, which is absolutely white here. But I'm going to use a
little touch of this. And the other color I'm going
to use is Prussian blue. So Prussian blue and this turquoise blue are the two
colors that I'm using, but you can use any blue. So any, honestly any
blue color is fine. Whichever blue-collar
you use this, good. And along with that, I'm going
to use a black and white. And I am going to
use this knife to create this mountain or
extras and the snow textures. I'm going to use
the brush to create the background and the
basic mountain shape. And I might use a liner brush. So I'm keeping one flat brush, one thin brush, and a knife. For this class. I had some Keeping my iPad
out of the screen. And you can refer, download this picture and
refer to it for this class. Okay, let me, let me start
by taking out the colors. I'm using this paper palette
because I find it easy to paint with knife. Just a tiny bit of blue. Black I'm going to take
out later because black, I need only for shadowing, creating the shadows
of the mountain. Okay, So I'm going to
start by painting the sky. The sky is important
to paint it because otherwise the mountain will
not be that prominent. So just creating
little bit of sky. I am trying to keep
the gradation. I don't think I want to go down anymore. This much is fine. There's the mountain is going
to come all the way till TO just want to make the top
a little bit more dark. Because you always
know that the sky is dark on the top and a
light at the bottom. Trying to create that
gradation of the sky. In the photograph,
you see that the sky is the absolute smooth blend. But I like pictures, so I am keeping it like this. But if you want, you can make
it as smooth blend as well. I got a good sky. Now, let's paint the mountain. Now the next step is
creating mountains. So for that, I'm using pen and creating the outline
that I see here in the And I'm trying to create the outline just
like the way it is. Could be a little bit here
and there, but that's okay. Who wants to create
exactly what you see? Have your own fun. And now I am trying to create all the
lines that I'm seeing here. See, once I start painting, this is all gonna
get covered up, but I still want
to do it a little bit to make you understand
how I do a mountain. Alright, so this is good. Now I'm going to pin
this on for painting. I'm going to mix blue and black. I start off by creating a
dark shadow of the mountain. Okay? So now I'm not going
to use directly black. So I'm going to mix
the black and blue. And I am going to come
here and being dead. And you see how identity
you don't sketch it out. Okay, So whenever I am
painting a mountain identity, look at the mountain directly and use my
brush to move along. So right now, whatever
I have sketched out, I might do a little
adjustment to wait while painting with a brush. Okay, and like I said, all
these outlines that I did, It's all going to
get covered up. So this was just for
my understanding, but it's not going to stay. Then I'm going to cover
the entire mountain area with black. And as I'm coming down, I'm going to make
it more bluish. So kinda black on the top
and blue at the bottom. Pretty dark black. And now I'm coming to town. As I'm coming down, I'm going to add some more
white and ended here. Alright, so this
is my second step. So if you want to, you can ignore doing
the drawing in the middle center lines that I did earlier because it's
all gonna get covered up. So you can choose
how you want to. But just for practice, you can just do it once so that you understand how things
are progressing. And the texture really
doesn't matter because it's all going to go
in the background. And after this step, I'm going to start painting
directly with the nice. Now, one important thing
is I'm going to let it dry completely and then
come and paint on it.
8. Painting A Snow Cap Mountain Range - Part 2: Okay, My background
has completely dried and I will move on
to doing the next step. So generally in this tape, I start painting
directly with knife. So what I do is I just
go along with it like this and create those divisions
directly with my knife. But just to make it
easy for you guys, I am going to show you to create the midline first and
then do the texturing. For creating textures. I have taken out some
thick body acrylics, which is white, and I have
some fluid acrylic as well. And let me create All the mid lines that
earlier I had done. So wherever I am
making some mistake, I'm going to cover it up
with the way like, Well, I do the actual stuff
with the night and all the main peaks
first and then some in the front. Okay. This is just a little
bit off the drawing. I did. But so much of it is going
to be done with a knife. I'm just washing it off and
I will start painting with. Okay, so let's learn to create the textures.
Other technique first. So first thing what I'm doing
is taking simple white, nothing else on the
back of my knife. And let me start with this one. I didn't like to start
from the left so that as I'm moving to the right, my hand doesn't go
on the texturing. Very less pain. So I had a lot. That's why I'm coming back
here again to wipe it off. And you go almost on the border and very gently on top of this. She has such textures. Right? Again, if you have too much
of paint on your knife, this is not going
to come out Good. Make sure you have. So now you see this space is very little for the
back of my knife. So what I'm gonna do
is use the edge of the night and come here. And I'm going to do, I'm
pretty much using the tip of the knife to be able to do this and touching very
gently on the canvas. Now, like I said, I generally
do don't do the sketching. So what I do is wherever I feel while painting, I just come. So say e.g. this is a
mountain over here, which you can already
see very clearly. I have already
sketched out, right? But let's say it's not there. So what I do is I
come here directly and create the
mountain of my design. And then, you know, all those lines that we created, let me get scheduled
for 1 s. So here you see all these curves and
all these center lines, whatever Covey's Center
lines are there for those, what I do is, so this one, I came and I moved my knife, and I created this one. And then I come
here and basically use the knife to create
the shape for me. But when you're jogging, make sure you are
very less paint. Otherwise, the texture
will not be created. So this is the end of this week. Okay? So this is where this peak ends and I'm Jack lead all the way down and going and adding
a little bit like this. So sure also, I can create just one highlighted
related stuff like this. Okay. Right now we continue overhaul
and let me do this one. So absolutely on the
age of the middle line, you can have a good
amount of paint. If you see here, I have added
very big amount of paint, but as you're migrating, Avi, make sure you have
less paint so that you can create these
kind of pictures, right? Bailey, I spent almost no
paint and I'm just rushing the knife on top of this
and leaving it at that. That's it. Because from here my right
side is starting it. Okay. So the amount good
amount of paint to add it on the clothes
line of the midline. And then with very less amount, I'm just dragging it and
look at the photograph. There is so much of
textures with the snows. I'm creating those texture
lines also at this point. Okay, not going too far away, because over here I'm going
to create a good one. I'm a good amount of
snow line and I'm using the edge of the night because
it's a vape pen area. Using the age again
and going all the way. Coming back here and this
is again front snow peak. So for that, I am
following this line. And then in the frontier. Now say good amount of
paint has been added. Now, without adding too much, just dragging this paint out
and creating this texture. Okay? Now what I wanna do is go
all the way to the end. And at this, just to finish
off the edge nicely. Okay, Now if I want to create
some textures to this, what I'll do is use the age of the knife and
kind of like, you know, create some pictures like this a little bit in
different direction. It looks kind of like
scratching off with the night. Alright, so this is done
where it ends, where else? These are kind of a big
mountain peak or rather lots of white snow over
here in the center. So I'm just adding that. Alright, so this is done. This is done. And then doesn't that look already so awesome? You can see the peaks clearly just by adding
the highlights. So all the highlights are added. I would say not all, but the main
highlights are added. Now we're going to go and add the shadows on
the other side. So the shadows are very
clearly visible now because we added a black
color at the back. But that's not all. We're going to go ahead on top
of it and add the shadows. And then after that, we're going to do a
mix-up, shadowing.
9. Painting A Snow Cap Mountain Range - Part 3: Okay, I'm going to wait for this to dry because this
is thick body acrylics, so it's going to dry really. It's going to take
some more time. At this moment, what I'm
gonna do is go ahead and add the left side, which is the highlight side, and the color you can choose
based on your preference. I really like this. This top is blue, so I'm going to use this color mixed with a little
bit of black. The color that I'm
going to create is this color. This is black. Folk Prussian blue mix
also looks really good. So kind of a little bit
of the Prussian blue. If you look at the photograph, the shade in the photo is
pretty much this color that I created by mixing
both talk with an operation or it can be
just brushing as well. Okay? So again, I'm going to
start from the left. So it's the same thing
that we did on the left, except that color is different. And I'm going to take
some white also with it. Okay, I'm going
to keep moving it around to get the
shape that I want. Kind of difficult to do
it at the same place. And you see, it's kinda coming
and mixing with the white. The black color that
we did earlier is almost gone and even
dissuade some of the, some of this dark color is going to come on top of the highlight, white that we have done. That is why I said
that we're going to revisit the whites once
I could see right now, it just came over
here a little bit. So don't worry about the small, small stuff, it's
going to happen. But our focus is mainly
on creating shadows. Okay, coming here,
adding some fixtures. And most important lecturing is on the left side
of the middle life. So this is the middle line. You come here and I'm adding little white also along with it. Okay. Now, along with this, I'm gonna take some
white and go ahead and add on top of this blend. The stop wherever I want
to, not everywhere. Okay. So there's a peak and
there's a little bit of white coming out with IDT or even
sure I'm adding it touch ups. Okay, do you see how I am spoiling this part by
adding some blues? But honestly for my experience, this kind of accidents, sometimes I leave them on if
I like them or I fill it up. Okay. So depending on my
mood, I do that. It's not really something
I'm too worried about. Okay. So I'm coming on the ages of the white lines to make
sure they are nicely done. I just had to make
some more color. Okay, So that's a good amount
of paint I mixed here. And now I will come to your ear. Okay, Now that most of the
paint has been added here, I can create the
texture that I want to. So for that, I'm taking
little bit of light blue and coming here and
adding some strokes, textures in different
directions. Maybe little bit over your, maybe a little bit of white. You see the white over
here is totally mixed up. But this, and I'm adding
some more of white to this. I think it's too much or black, so let me just wipe it off
and taking some more white in creating some
fresh snow on top. Right? This is the thing that you
can do wherever you want to. So if I want to
add little bit of fresh snow here, I can do that. So all this mistake that happen, you can just go on top
of this and cover it up, add a thick layer of snow and
it will be gone in no time. So it's not something to
really worry about why you are adding the shadow color. Okay, Now, let me
go here and add especially the shadow is
very important exactly on the other side of
the meat to Midland. Okay. So it's sure and at this place I'm just
going in all directions. So remember while
sketching also, I was going in all directions. And I said I kind of
liked doing that. So I'm going to go in whatever
direction you feel like it just have fun with it. I absolutely loved doing that. It may not turn out
exactly how it is, but it's going to turn
up really awesome. Really like this blue shade. So I'm going to add
a little touch ups here as well. Okay? So this part is added
next to this side and gradually moving
towards the right. Can you see while
doing the shadows, I'm getting on top of the
white also little bit. So if you are watching this and doing it
for the first time, if you can come up
with it directly, it's a great thing. But if you are not
able to do this, please don't think
that it's you. Trust me, it's happened
with everybody. I did it. I have done this mountain
probably thousand times. Okay. So it's kind of looks like
I'm doing it so easily. It's easy for me only because I've done it many, many times. And I want you to
understand that. So if you're doing it
for the first time, don't be too hard on yourself. Give yourself a pat on your back just for trying this first time and then do it at
least three times more. Do it four times and telling me, how do you feel about this? I'm 100% sure. Once you have done this
for like four times, you will do such
amazing mountains, even you wouldn't
believe yourself. So trust me on that because I usually
remember I'm telling you not some random number because I remember when
I started doing this, I didn't like it at all. I think I first created
mountains in 2017, after my first Himalayan
mountain trick, I came back home. I was like, I have
to paint mountains. And I remember doing it on small canvas and
absolutely not liking it. And then I did it again
and again and again, unless I was really
happy with what I did. And it was by the fourth time
that I was really happy. So I'm telling you by
my own experience, that don't be too hard on yourself when you
do it first-time. Okay. So now if you
look at the photo, there is, just to
show this mountain, I have to add some highlights here to show that distinction. So only by light and
shadow that you're differentiating because we just playing with very little
amount of paints, right? So to show the difference, you have to use light
and shadow a lot. And here, there's a lot of snow in this center area if
you look at the photograph. So I'm going to do all of that, come all the way here
and go like this. And then a little bit
of it is coming here. That's it. Now I'm going to add, if you see that texture
over here is kind of like vertical lines. So I have already
added the column. All I'm going to do is use the edge of the
knife and create this. Having fun in the process. Absolutely fine. Also, I feel I want to
correct this line little bit. And for that, what
I'm doing is taking this shadow color
and this white. Yeah. I mean, it's not collecting. It was fine. I'm just
doing what I am seeing in this photograph so that you understand where
I'm coming from. Some snow here, some shadow. As you can see in the center, the green mountain is coming, which I am not doing. So I am going ahead with this and imagining what it would be like over here
at the backside. And creating gin, Which is like in from
this side to this side. It's alright, so this is pretty much done.
And what awesome. One more thing I don't like is that this line is
E Street, right? So let me go over it and
make it a little refracted. And I'm using just the tip
of the knife to do this. And some of the snow is falling. This link, link connection
between here and here. So all those details, I love doing them small things, but they just look so good. And because I've been to the Himalayas and
seeing this up close, it's, you know, that this is exactly what
is happening over there. The snow is falling
from the top. Okay. This place I feel it's
a little less wide, so I'm just going to go and
add just a little touch up all y in a very extreme way. And even display as you see, it's vague, kind of dark. So I'm not going to
cover it up a lot, but just a very smooth halite, like almost no
paint on my knife. Just a little bit. Shooting with the back of this thing I'm doing
everywhere, almost wherever. There are little. Look at this list. This is a very black
and I don't want that. So I am taking some
bluish, blackish white. Okay? And I'm coming here and write a few textures
of white over there. I'm fixtures with the edge of
the knife is these are kind of like vertical axis. Right? So what was done and creating some white snow
textures here I'm dead. I think. This is it. You can play around with it at some more textures here and they're very fun thing to do. And you can see how
nicely or 3D texture. So if I hold it like this, it looks like almost like
a 3D mountain, right? So this was the longest step, the last step of adding
highlights and the shadows. And also one more
thing I want to say is that if you like over here, there's a lot of white
tonight on this week. Now, what I'm doing is taking a little bit
of shadow and going and adding just a little bit on top of just to make it not so white. And you can happily do this
wherever the white is dried. If it is weight, it's
going to mix up. Let's say this one
is pretty dried. So can go on top of this and
add a few of the shadows. More such texturing you keep
on doing kind of realistic. It starts becoming already it
is looking very realistic. Just playing around with it and doing lots
of stuff to it. All right, so that's all
for the mountain class. Try this out and let me know. What came out of your night. I am excited to see what do you do and
thank you for joining.
10. Your Project + Final Words: So that's it. We reached the end
of this class. I hope you enjoyed this
class and learning new ways of looking at mountains and be able to paint
it with a knife. Now your project
for this class is to practice the midline
of the mountains. Just browse random
images on the Internet, look at some mountains and just sketch it on
your journal and, you know, try to shade it like exercise I showed you here. See how well you're
able to do it. Because if you just try it once, you will absolutely be able to understand by looking
at a photograph, mountain photograph,
how it is to be done. Then after doing this, your next project is to practice the knife techniques and just do a little bit
of the basic mountain, a structure like this. You don't have to do exactly. Both of these are
watching it is enough. But while you're
practicing the techniques, just try it on a canvas by adding a darker
shade and then adding the snow white color on top
of it to see if you're able to get the right knife extra, like I have shown you,
they follow along with this one where I have showed you step-by-step how
to create the beam, create this
snow-capped mountains. So paint along with me Do
not try to think too much. If you just do it once, follow the entire steep
and to this painting, you will be able to create any
other painting after that. So after you have
done this following my step-by-step
tutorial in this class, you will be able to
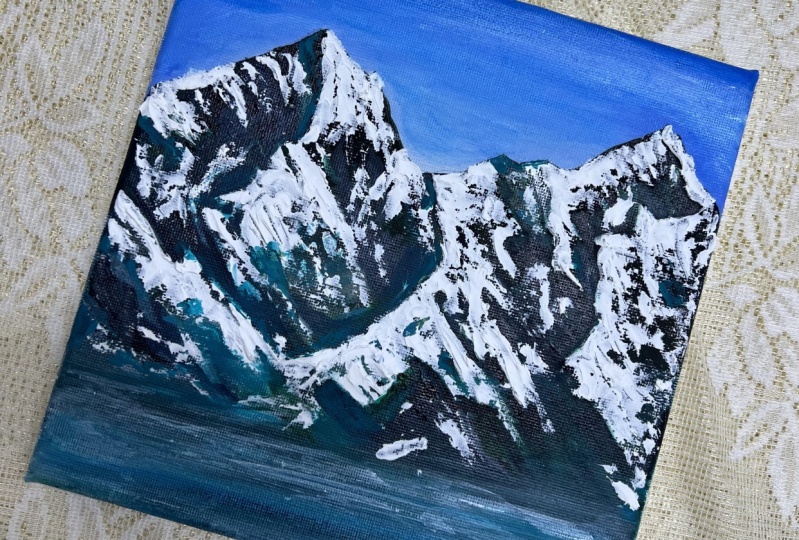
take any picture and paint landscapes like this. Look at this mountain
range over here is looking so 3D straight as if it's
coming out from the painting. And even paintings like this. Check-in, check-out. Just
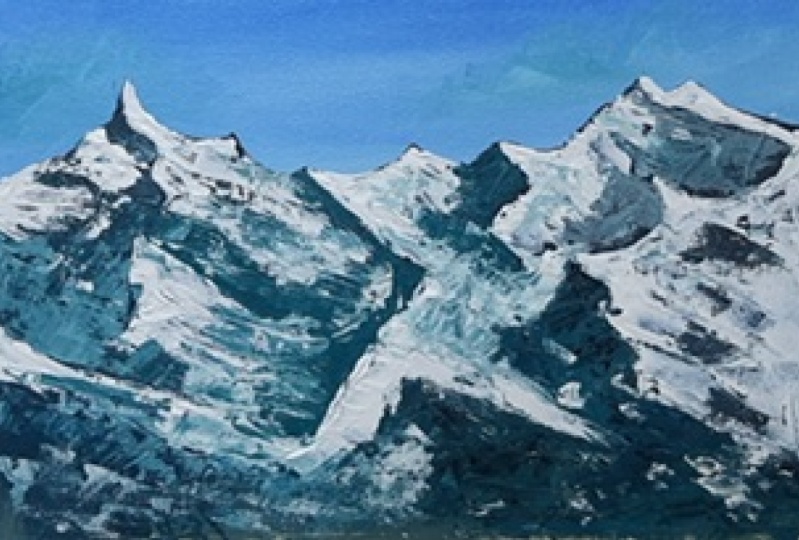
so that you can eat. Your project for this class
is to be able to create paintings like this on your own without following any tutorial. Because if you actually understand the
techniques, It's so easy, you can not just these two paintings that I'm showing
you that I have done, but you can get any
picture online, art pitches that you have clicked and you should
be able to do so. I wish you the very best
for painting mountains. And thank you so
much for joining me in this class and I will
see you in the next. I invite you to explore all the different
classes that I've created for you
here in Skillshare. If you want to apply
your paintings scale, and create some
amazing landscapes. If you enjoyed painting with me, feel free to follow me
on Skillshare to get notified every time I
publish a new class. If you want more, check out my painting
tutorials of my website, my artist portfolio, as well as all the other
works that I do. I appreciate all the
love and kindness from you guys in terms
of review and rating. Thank you so much
for being here. Follow me on Instagram
to keep up with the latest updates and
all the fun stuff. Thank you once again
for joining me in this class and happy painting.
 Debasree Dey, Acrylic Artist & Educator