Transcripts
1. Introduction: Hello, I'm Sarah. I run a ban on Dekalb business, and I also love to teach
people how to make and sell decals to check
out my other courses, if you would like to learn
how to make decals from scratch or start your own
decal or SVG business. In this quick class, I'm
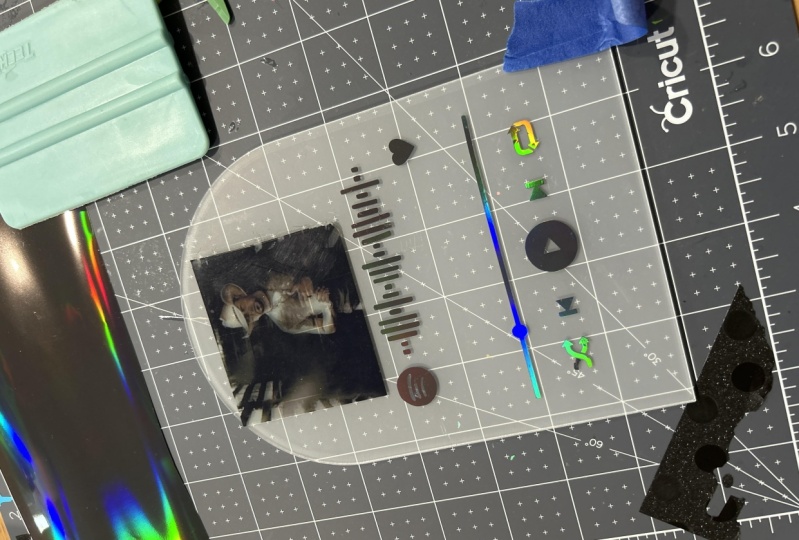
gonna be showing you how to make this song plaque. It's a perfect gift for
Valentine's Day and anniversary. Wedding present for
your best friend, or just as cute home
deco for yourself. And not only does
it look super cute, It's also interactive as well, you can use this QR
code here to link to any Spotify style
of your choice. For this course, you will need a cutting machine and I will tell you all about
the rest of the materials. In the next lesson, I'll be showing
you how to create the design and
Cricket Design space, and I'll be cutting
it on a cricket Er2. But you can use any
other design software and cut machine that you like. I will add all of the links you need to the resources section, as well as a free music controls
design that you can use. So don't forget to
check those out. And then for your project, you will make your
very own music plaque. Please add a picture of it. Once you're done to the
discussion section.
2. Materials Needed: This lesson, I will
go over what you need to make your
Spotify plaques. So first you will need
an acrylic sheet. You can either get these
from a vinyl blank supplier. I'll link to a list of these
in the resources section. Or alternatively, you
could use a fourt frame, either with or without firm. You will also need
some sticker paper. I am using this inkjet
white sticker paper, but you could use clear as well. Then for the music controls, you could also use
clear sticker paper, but I'm going to be
using permanent vinyl. Both of those things
will be cut out on my cricket Er2 and I'll be using some transfer tape
as well to apply my decals, as well as some scissors. That is really all you need. But then there are some
other tools as well. It can help you like a
squeegee, a weeding tool, and a vinyl scrap collector, or none of them
are requirements. Again, I'll add links
to everything I use in a document which can be found
in the resources section. And then we can get
onto making the design.
3. Create The Design: Let's create the initial design. The first thing I'm
going to do is to make a template of my acrylic sign within design space so I know how big to size
everything else. I'm just measuring it
and creating a box. Then I'm going to
upload the SVG of the music controls that can be found here in the
resources section. And then our size that to
where I want it to go. Then I'm just going to
add my song title and band name using a font I already have
within design space. Make sure to size it
so that it's within proportion of the
rest of the design. But also you don't
want to make it too small because if you do, it's gonna be then tricky
to cut out a vinyl and tweet once you've done
that and you're happy with it, the next thing we need
to do is to upload the picture that we're going to be printing out on a sticker. So upload that as a
print and cut image, resize it so that it fits
within the gray rectangle. If you want to make it into a square and the picture
is not already squared, then what you need to do is
to put a square over the top, kind of cover the bit you
want to take out the picture. Then select everything, select the photo and the square slice. Then you just need to
get rid of all the bits surrounding the square foot
or in the middle like that. And that's what
you'll be left with. Again, you might want
to resize everything, just make sure it looks all in proportion, just like that. Then another thing you
could do if you're using a larger canvas is to add the
sometimes in there as well. It's just another
cute all detail. But because my plaque so small, I'm not gonna do that
because they would just be too small to weed out final. So I'm going to take
those ones off. And there's my
design, I'm finished. I just need to add the spot
fires section underneath. We'll do that in
the next lesson.
4. Get The Code: We'll now add the
Spotify design and QR code in the gap underneath that you left
in the last lesson. For this, you first need to find the track that you
want to use on Spotify and click the
Copy link button here, then open Spotify codes.com
and paste that into here. And it will bring up this
design that you can download. There are various things
you can edit on the size. You can change the
format, the size, the color of the bars, and also the background. I'm going to just change it
to white with black bars. I'm also going to
download it as a PNG. Then once that's downloaded, you can drag it into
design space if you have cricket access or do
this for you automatically. But if not, make
sure you get rid of all the white sections
before you upload it. Then add it as a cut image. Once it's uploaded, you
just going to resize it again and add it
within that design. Make sure it's within the
gray rectangle again. I just swapped it around. I thought it looked a bit
better that way instead, made sure everything
fits properly. Now it's time to cut
and apply everything. So we'll do that in
the next lesson.
5. Cut And Apply The Designs: Once your design is created, the next step is to cut all of the elements
for your plaque. Let me show you how to
do that in this lesson. So first we'll
focus on vinyl bit. So just hide your
rectangle and then hide your photo on
the right hand side. Then you're going to want
to select all and weld. If you don't do
this, I'll try and cut it all in separate sections. You need to do that so that
when you click Make it, it will look like
this on your mat. Then you can either set your
dial to vinyl or vinyl plus. But I'm gonna do
custom and washy tape. This is just a really good
setting to use if you're cutting something quite small
and intricate like this. So makes sure your final is
stuck down well on your map. Then pop it in your
machine and press cut and let that do its thing. Then once that's done, we can move on to
doing the photo. I'll get back up instead,
makes you print them, cook is selected and go to
Make should look like that. Then you can send
to your printer, I always take the bead off
and use system dialogue. And this will bring up your printer settings screen behind design space like this. So you can set best
quality and adjust any of the settings
that you need to before pressing print. Make sure if you've
got a printer like this that feeds
it in that way, make sure you put your back of this ticker paper facing upwards and I'll
come up by this. Then just add it to
your cricket match. And I'm going to select
a sticker paper from the custom settings to cut paper white and then
add it to your machine. And it will scan the document
first before coding it. If you get something that
looks a bit like this, that means you need to
calibrate your machine. So if you go to
settings calibration and you basically just
follow the instructions, do you want it
tells you to do or print out a sheet like
this that it has to cut. And then you tell tell the machine which cuts
the most accurate. And then hopefully
you'll come out with something that
looks a lot better. So now we're going to just read the vinyl that we could earlier. Just go super slow as you're pulling the excess final awake. He may lose some
dots and letters. Just make sure you're
checking the vinyl before we throw it away so
that you don't lose any. Yeah, I had a missing
I dot there and also the C got
stuck to the vinyl. So I have to add that back on. Happens quite a lot with
small letters like this. You need to just
get rid of all of the in-betweens of letters on
icons and stuff like that. Again, just be
careful that you're not accidentally
pulling any letters up. Then once it's done, you need to add transfer tapes. I just use a medium tap gridded
tape for permanent vinyl. And this just helps to get it
straight as well as really, I really love a graded
one for this reason. Once I've added
it, I just burnish the back with a squeegee, but you can use a store card
if you don't have one of those and then just peel
away the backing paper. It might pull stuff up, just push it down, or you might need to
burnish it again. And then just keep going until everything is stuck to
the transfer tape and nothing is being pulled up with the backing paper once
they're all cut and we did, we're then going to apply
them to the plaque. So let's get started with that. So take off the plastic. If you're using a per
spec sheet like this, you don't have to
take the backing off as well, but I'm going to, because it makes it
easier to apply. And what I'm gonna
do is just print out the design and use
that as a template. So select all, print
them, Kurt, make it. And actually I took the
rectangle off here, but it's probably easier
if you leave that on. It easier to line up, send that to your printer. And this time you
can just set it as a basic print because it doesn't
need to be high-quality. Save your printer ink
to it as a draft. And then once you print it that, you can use that as
a template of where to place your photo
and your vinyl. Just make sure it's
lined up straight. There you go. You can just add that to the
top of the acrylic sheet. Make sure it's stuck
down really well before you start peeling off
the transmitter tape. Again, go super slow. This it might need quite
a bit of burnishing. I also try not to touch the
acrylic too much because it's very bad for getting
fingerprints and gets dusty quite easily. So the less you can touch it, the better you might want
to put some paper or something over the top
while you do this. Then that's the
final section done. So you can just use
the template again, line that backup, then you know where to put
your photo as well. You can just smooth that out. Be careful you don't
add any air bubbles. That is the finished plaque. Now for the moment of truth. So once you open Spotify and he got in the
cameras section, the top right, just
pointing the camera. And it will take you to
the song that you've chosen as quick as that success. Plus you have a gorgeous
park perfect to give as a gift for Valentine's
Day and anniversary, as a wedding gift, or to a best friend or anyone
you want to give it to, that you share a
special song width. If you're thinking about
selling these plaques, then don't miss my next lesson.
6. Selling tips: Maybe you just want to
create one of these for yourself or to
give as a gift. But if you have
considered selling them, then let me go over
a couple of things. First, the legal bit. So this is a little
bit of a gray area, but from the research I've done, it looks like that you
can't sell plaques with that little Spotify logo
and QR code on them. And I would take a guess that it isn't technically legal to sell plaques with a band name
and song on them as well. I think that would go
against copyright, but you may be able to get around this by putting
something like our favorite song or something
alternative as the title. And then just using a
standard QR code to link back to the song itself.
I don't know for sure. However, I would
recommend looking into the legality of everything yourself before
starting to sell them. If you can't find a way to make sure that you're not
breaking any copyright law, however, and you're
happy to sell them, then do be sure
that you're using good quality permanent vinyl and good-quality sticker paper
that isn't likely to fade or peel and will last a long time in
your customer's home. Then when pricing
your acrylic plaques, make sure to take into account the cost of
all of your materials, as well as all of the
time that it's taking you to make the
design and apply it, as well as any extra packaging costs and
things like that. You can have a look
at competitors to see what they're charging for theirs so that you're not undercutting or
overpricing anyone. But don't just copy
what they're selling. Those four do take into account all of
those other things.
7. What's next?: Congratulations, you have made
your very own some plaque. Be sure to add a picture of your creation to the
discussion section. I would really love
to see what you've made if you do
want to sell these alongside of the decals stickers and you don't already
have a business, then do check out
my course how it started vinyl business next, if you do have a business, but you want to make
sure you are charging the right prices
for your products. Then you could also
check out my how to price your decals and handmade
crafts course as well. If you enjoyed the course, I will be forever
grateful if you would leave a review and please also follow me here on Skillshare as well as TikTok and
YouTube where I share lots of other helpful tutorials
on inspiration videos. And thank you so
much for watching.
 Sarah Bradley, Making & Selling Vinyl Decal Classes