Transcripts
1. Creating your own Avatar in Clo: Intro: Hey everyone, it's Liana. And in today's video we're going to be learning how to create your very own custom size avatar in Clo, Clo is a garment making software that was created for pattern-making, specifically if you like to sew or fashion design, create cosplay, create costumes, endless possibilities, and it's a great tool to have. Some of the great reasons why it's cool to have your own avatar in Clo, is you can make your own garment to your own costumes, your own cosplays without having to purchase a dress form or size patterns or adjust everything, you just start from your own avatar. Another great reason is you can create everyone else's avatar, you can create your families, your friends. and that way you don't have to re-size, re-cut, make new dress forms, size a dress form. We just pull in their avatar, which is something that I do all the time and trust me, it comes in handy. So if you're ready to learn how to create your avatar, I can't wait to see you in class. Let's go.
2. Measurement Information: All right, Welcome to the first section of the class which is measuring yourself. So in the downloads you'll have a blank female PDF and a blank male PDF. You can reference both anytime you're taking someone's measurements or your own. Each image has A through L measurements and the corresponding image to show where to measure for those measurements, feel free to just use this as your guide. Those are the measurements that I take. Not all of them are what I necessarily used to change the avatars in Clo, but I do use them when creating the garments. The more you mess with clo's avatars, sometimes the funkier they can get and measurement start going everywhere. So we kind of just like to modify the basics, which is the chest, the waist, the hips, the thighs. And then we just do a general overview of what all the other measurements are to see if they're relatively similar.
3. Measurement Essentials: So in order to take your measurements, you're going to be needing, a measuring tape. Any measuring tape will be fine if you don't have a measuring tape, a lot of people use rope and a ruler. So you take your measurements with the rope and use the ruler to measure the rope, which is another method that you can use otherwise, tips for measuring yourself, I'm sure there's many videos on YouTube if you want to research one. So you're just gonna wanna make sure that you hold your measuring tape as parallel to the floor as possible when measuring. Once you finish taking all of your measurements that are on that list, then we can begin creating your own avatar. Feel free to print this sheet out and fill it in or just write on a piece of paper. As we take these measurements, I will be letting you know whether or not that I use them in clothes or on the pattern. So let's begin.
4. Taking Measurements: So for height, for height, I don't always change it in Clo, unless it's a very dramatic height difference that I really want to take note of and visually see, then I will change the height, but otherwise I try not to, because sometimes it does change. The avatar is significantly in ways that I don't love it, which I will show you and we will go through, I am 5' 3" , which you're going to want to convert to inches, which I just do that on Google. 5'3 inches is 63 inches. We're going to go chest, which like I said, don't forget to keep the measuring tape has parallels with a floor as possible. You're also not going to want to wear like a big sweater. For you, make sure you are wearing a slim fit T. Or you can be in your undergarments. So let's begin with our chest. We are going to take our thigh standing and then our thigh sitting. 25", then I'm going to sit. And it is also 25. I take the two because depending on if I'm making pants, I just want to know what their general thigh shape looks like. Everyone's is different. Then we're going to take our inseam, its approximately 25. Bicep 13 Wrist 6.5. And arm length, I like to start like this seam of your arm to your shoulder, is what it feels like. you're just gonna wanna stand relaxed. It's approximately 20 and a half. So now we have all of our measurements that we need to create our own avatar. So let's go in and get into Clo.
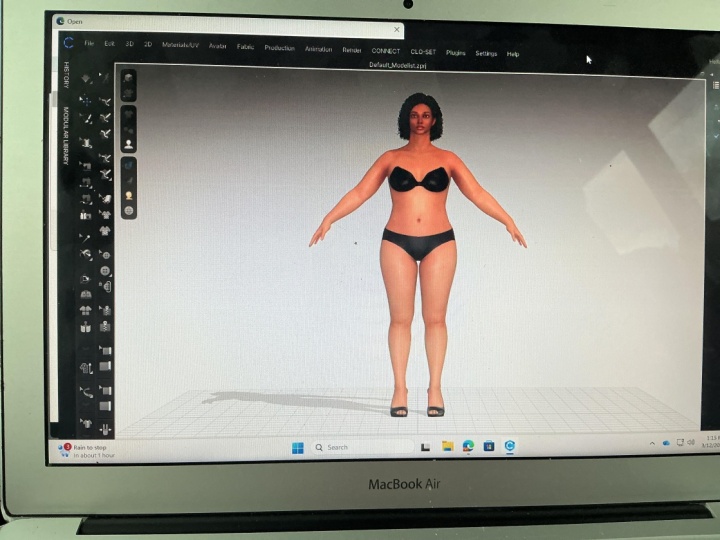
5. Clo Intro: Now that we have our measurements, we're gonna go into Clo and select the avatar that is the closest to our size. So now we are in clo, as we're learning, we have our 3D window on the left with all of its tools. Are 2D window on the right with all of its tools are Object Browser on the far right, our property editor on the bottom right. What we're gonna wanna do is make sure we are in a new project. So just file, new, which I am.
6. Male Avatar: If you go to your library, select Avatar. Avatar again. If you are going to be selecting male, you will upload any male, which there'll be a variety, mine aren't fully downloaded. And I like to turn the skin off, right over here in the 3D window. Just so it's not distracting. I'm making the clothes, I don't really care about the skin. And so this is the Clo default mail. So then you go over to size. And you will just select any of these sizes, depending on what your chest measurement is. If you have a 40 inch chest, we will select 40 male. And that will size as a 40 male.
7. Female Avatar: Now similarly, women, if you go to female, load in an avatar. So this is Clo's default avatar very long, very lengthy. Think of the classic fashion illustration. That's how tall and lengthy she is. So if we go over to size, there are folders of sizes from maternity to curvy to missy, to missy straight. I have created a size chart for you to help you determine which one you should choose. But we're only referencing the bust, waist, and hip measurement on your measurements. Once you find on this chart where your sits, that's the size avatar, then I would open. There's also a little bit of a description of each folder, so that way you can know what the differences between each folder's is. Also, I just want to point out that these aren't the avatar sizes. These are close block sizes, which eventually we will get to working in Clo'c blocks, but they are okay to reference when selecting that avatar. Plus size has a little bit more room in the hips and chest. Petite has a little bit more give and the height department, obviously. And then these are just your standard sizes. Maternity is the standard sizes, but with a relatively large baby bump. So I am 38.5. So in between 10 and 12, my waist is a 34, so closer to the 12. And then my hip is at 44, which is closer to a 14. So between the 10 to 14, I'm an average 12. So I'm gonna go in and open the size 12 avatar. I am going to be going with curvy because it gives a little bit more room. Double-click on size 12. So this is Clo's avatar size 12.
8. Avatar Editor: Now we're going to begin editing, the avatar to make it my custom size. So if we go to the top menu, There's Avatar, Avatar editor. So you will see every measurement that is here is now displayed on the avatar in the 3D window. We are going to go first to the human measurements. I just find that they work better for me. My height is 63 inches, this is 65 and a half. I'm gonna go ahead and leave it, like I said, because if you change it sometimes too dramatically, it'll change all of Clo's ratio aspects and we just don't want to get into that. If you do decide to change the height, the height is we're going to want to adjust first. So let me give you an example. If I am 63 inches, I'm gonna go and put 63 and I'll turn it on its side so we can keep an eye on it. And see how It got rid of my waist and just smoothed out this whole thing. It's not going to change a whole lot when it comes to your pattern because the human body is still relatively squishy and smooth like this. So it really doesn't matter. If I don't have to deal with it, I don't want to. So I'm just gonna delete this avatar and I'm going to load it in again. That's the one thing that you can't "control Z" is that body shape. So go back to feifei, go back to missy curvey and load in a size 12. So now we'll go back to my avatar editor and leave the height alone. We're going to change this back to human. And we will do our chest, our waste and we will see what the hips are at. Most times since there's a high hip and a low hip, everyone's high hip hit differently than these avatars. And so that's why just kinda I like to keep it vague. As long as the measurements are relatively close, then that's a good point to be at. Let's go down the list. Chest, which this is at a 38.75. I am 38 1/2". We're going to go down to waist. This is a 30.5, I'm at a 34. I like to up my measurements slowly sometimes if they're dramatic. So this is close to a 32, so I'm gonna put a 32 just I can see what it's starting to look like. And then I'm gonna go ahead and go to a 34. Okay. Then we're gonna go to our high hip and low hip. My hip is 41 and my low hip is 44. So as you can see, we have quite a move to make here. Okay, so let's go in and adjust our a high hip to 40, which is a little bit less than 41, but just cause I want to see the move slowly. And then change this to a 44. And then I'm gonna go in and change this to a 41. And this is at a 44.5. You don't have to make the small moves like I do. You can feel free to just put it, but I like to make sure that it's not dramatic. Like if I just in and put the 41 and 44.5, the jump would have just been so big. My mind wouldn't know if that's accurate. So I like to see the little increases in size, which this honestly looks pretty accurate. Then we're just going to reference our thigh. See what it is that this is at a 24, 25, so we can go in and change that. It wasn't too much of a change. So that's why I don't mind changing it. Our inseam is 25. We're not going to change it, like I said, because if you change it sometimes Clo's ratio gets crazy. But since there's is 30, then I just will know, if I'm making trousers. I'm going to want to cut that by five inches. So that's just something that you'll be able to see when your pattern-making. She's also wearing high heels, its just something that we don't need to get into, If we don't have to. Then we're going to check our bicep. Mine is a 13. Hers is that in 11.75. I'm going to change that to 13. You will see the more you manipulate avatars or the larger in size that they get, the armseye gets really, really, really weird. Essentially what I've come to my own conclusion is that Clo just doesn't do armpits. And that's okay to be honest. This is already more than enough for me. When I'm making sleeves, I make sure that they're not in the armpit. They sit good where they're supposed to sit. So just always keep that in mind. That Clo doesn't do armpits. So don't try to go out of your way to make this a perfect circle here on the actual avatar measurement. It's not necessary just using your garment knowledge of where in armseye sits, is all you have to do. Then we're gonna go to wrist. It's 6.25 mine is 6.5. So we are going to change that. And feel free to look at any other measurements that you would like. I personally only use these when it comes to commissions or my own garments. And then I just use my own garment knowledge to fit the clothes better in pattern state.
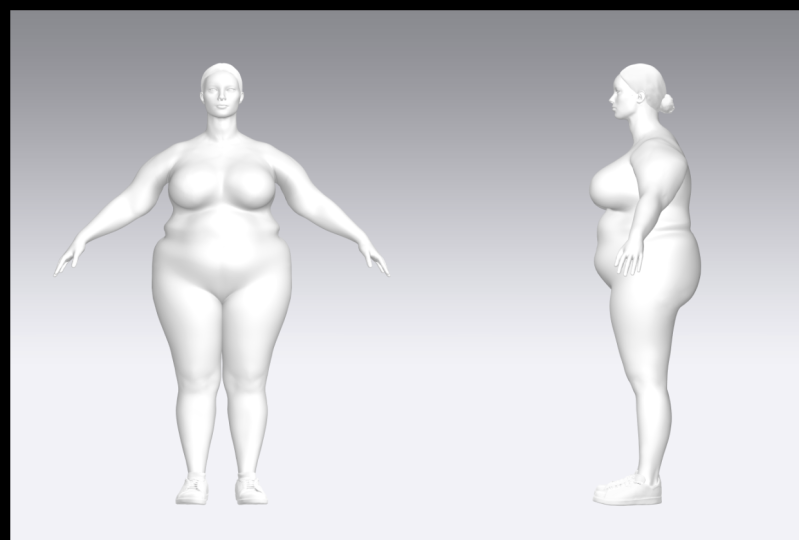
9. Saving Avatar: So once I have all these measurements made, I'm going to use this save button over here. And it's going to save this avatar as an avatar for me to use in the future. When I change it to Liana 2021. And I'm going to just put it in the size folder so that way it lives in Clo. We can close this, so now it you go to library, go back to Avatar, and we go back to size. My liana avatar will be living right here. Anytime I open an avatar, I can just double-click this one and it'll drop in my size. Let me show you. So if I delete this avatar and I open up FeiFei, if I go to size, I can double-click Liana or I can even just drag and drop it. If you have it saved on your desktop or in a folder, you can literally just drag and drop it into the avatar and it'll modify the measurement to the measurements you've created. Now I have my own custom avatar that I can create anything and everything on. The things that I'm gonna keep in mind when I'm creating clothes is the fit of it, how I like my closed personally fit and just any general measurements that I took. I am just an always reference them.
10. Avatar Snapshots: So now that we have our own avatar, we are going to just take some snapshots of it. So file, snapshot, 3D window. And we are going to put it as Liana 2021. We're going to do a front, left and a back, Save. And perfect. So now we have our images of our avatar.
11. Class project: So for the class project, what I would like for you to do is to create your own custom size avatar or use my measurement is to create another avatar in my size, or make up some measurements and follow the exact steps that we did in this video to do that, take snapshots and then go ahead and upload your snapshots to this class so we can all see! Whatever you feel comfortable with, you don't have to share your own measurements. But like I said, feel free to use mine or make up new measurements. And that is that you guys. So we have created our own avatar. You have created your own avatar. And the list of creating avatars is endless, like I said, from maternity to plus to slim. This comes in handy when you're creating garments for yourself or anyone else. You don't have to go above and beyond trying to fit and pattern and grade and size, you can just start from scratch on their size avatar. So if you enjoyed this video, be sure to join me in these new classes that I will be having. Leave any questions if you have any or any comments of what kind of videos you would like to see in the future. I hope you've found this relatively easy to pick up on. Thank you so much for taking my Skillshare you guys, I will be back again soon with another video. So until then, thanks for watching and I'll see you in the next one. Bye!
 LemonLeePatternMaking, Costume Pattern Maker