Transcripts
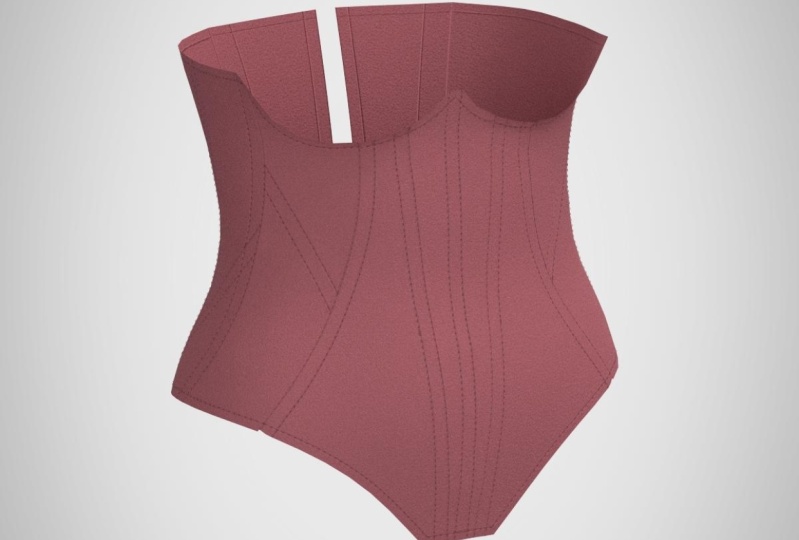
1. Intro: Draping a Corset in CLO 3D: Hi everyone, My name's Lana, and this is another video on an introduction to CLO. If you sew or pattern maker, or make your own Halloween costumes or cosplays, fashion design, literally any of the above CLO is a software that you're going to want to add to your tools. But what is CLO you might ask? well, CLO is a pattern making software that was made with sewing and pattern-making in mind. I use CLO literally every single day. And one of the best parts about it, that I always tell everybody, is that you have the potential to create any size avatar that you could ever ask for it. So you don't have to get a bunch of these (dress forms) or the multi-sided one, you can just have hundreds of avatars on your own computer. And on top of that, you're able to modify avatars to get them into your own measurements. So you can have custom size garments every time, which I do have class on if you're interested. Another great thing about CLO obviously is that you can create your first run sample in 3D. So that way you're not flat patterning and draping and trying to get your shape right, you can focus more so on your design aesthetic and fine tweaking once you're done, but you can do all the initial starts in CLO. In today's video, I'm going to be showing you how you can go from design to actual sewing patterns in CLO. And then I'm also going to show you how you can set your patterns up to be able to print them so that way you can start constructing them at home. For this video, I've designed like a paneled corset, at the two tools that we will be focusing on today is the avatar pen tool and the flatten tool. Which essentially what these pens do in the real-world is they are your markers tape and draping. So essentially we will be draping today in 3D. Its the same idea where we would grab a dress form and draw our lines of the corset. We would draw those lines of where we would want our panels to be. And then we would put fabric up against it. And then we would trace our pieces and then go all the way around until we're done. Well now, using CLO, we can just draw directly on the avatar and we can lift patterns straight from that, which is literally just a click of a button or a tool. So that's really exciting. So if you're ready to learn another skill in clo, join my class and let's get started.
2. Class Refresher: So welcome to the actual class. Class. Thank you so much for enrolling. We're gonna go and get started and open up CLO, which like I said, if you haven't seen my two videos, I suggest you go watch those because we will be draping on an avatar. And you are more than welcome to drape on your size avatar. So that way you can just go in and make something for yourself today. Otherwise, we will be using
CLO's avatars. For the sake of letting you see everything on the screen, I will be swapping over into VoiceOver mode. If you'll have any questions or concerns or comments, please leave them in the discussion below, or feel free to email me if you have specific questions. Otherwise it's going to get started. All right, So now we are in the CLO window, just a refresh on your environment. We have our 3D window over here on the left. We have our 2D window over here on the right. And then of course, on each side you have matching tools for whichever environment you're working in. So these tools all work for the 3D window. These tools work all for the 2D window. We have our Object Browser, which has our fabrics and our buttons, button holes, top stitching, which those are the only ones that I really ever tend to work in. And then down here on our property editor, this opens up as soon as you click something, whether it be a piece or your fabric or any tool, it has a bunch of settings for your tools. In this window. At the top you have all of your file menus, which is the same 3D 2D your sewing, It's essentially all of these tools. And another helpful tool is if you click Help and type in anything that you're looking for, it will show you exactly where something is either in the 3D window, the 2D window or appear on the toolbar. Or it will take you to a CLO tutorial which CLO's website also offers many tutorials on each individual tool, which is really fantastic and I highly suggest you check that out.
3. Loading an Avatar: So now we're going to open our avatar. And if you've taken this class before and you've done the how to make your own avatar, fee free to open up your avatar or just a female avatar if you'd like. So I'm gonna go in and go to My Library right over here. Double-click on avatar, will go to female. Double-click. And I have my Liana custom avatar as we made our own avatars before. But I'll go ahead and load in one of CLO's standard avatars, which as I've mentioned before, the standard avatar is just a long, lengthy fashion type avatar. So I always highly suggest that if you're making cloths for a regular human, that you size the avatar to either a size close to what you're working with, or you can modify measurements to create a new avatar. Let's go ahead and open the size folder. And we can go to Missy straight. And I'll go ahead and be draping on a size 10 today. Um, it really doesn't matter what size you want to drape on. I'm just using a size 10 because I feel like that works for me. So I can go ahead and collapse that file menu. If you hold down the right-click of your mouse, you can move her around in any direction. And if you hold down the option key on your keyboard and then just click with your mouse. You can move her in any direction. So rotating with the hold down right-click and then hold down the key on your keyboard, which for me I'm using an iMac, it's the Option key. You can drag her around with the hand. You will see in the 2D window that her silhouette is now added, which means anything we place in here, it will be in this vicinity. So if we placed a shape right here, it'll pop up in right in front of her over here. If we place the shape way up here, it will pop up way up here. So this is also kinda like a little layout guide for you.
4. Getting Familiar: So now that we have our avatar all loaded, the next step, which is always the fun part, is in your 3D window there is a tool called the Pen tool. It is located where the flatten tool is. So if you press and hold the flatten tool, you'll get an option for 3D pen on the avatar. There is also a 3D pen, but for the garment, which is this tool up here, which this allows you to draw on garments. You can draw across seams, which is really cool and this is another tool that I will do a video on, but for today, press and hold in the flatten tool to highlight the 3D pen. And now we have a little point on the 3D avatar that will follow anywhere your mouse goes. So just a tip on this. If you are drawing and you press and hold command, it will add a curve point. And if you are not holding command, it will add segment points. So this comes in handy when you're shaping. If you wanted to add a curve point, you can just add as many points as you want, or you can add a hard point wherever you might need it. And then also if you press the Delete or Backspace button, it deletes 1 at a time, which that comes in handy when you have a lot of points and you're trying to create a perfect shape. It doesn't delete the whole line for you Just 1 point at a time. So feel free to give this little try and just draw on your avatar in any which way you want to see it. Just to get a hang of the Pen tool itself. And otherwise I have my reference image open and I'll have the reference image up on the screen for you so that we can see the corset that I will be making. And let's go ahead and jump into it. While we're using this tool, you're going to be using your rotations a lot. So I suggest you get familiar with holding down the option key to move her around, and then same, holding down your right-click to rotate her. I also always only work one side. That way I can just mirror it when I haven't in the 2D window. So you don't have to do the whole side either. You just have to really focus on one side.
5. Avatar Pen Tool: Press and hold in the flatten tool to highlight the 3D pen. So I'm gonna go ahead and start in the center front and draw all where I think my center front seam would be. So I wanted to start relatively high underneath the bust. As you'll see, you can see how long your line length is right there with the numbers. I'm going to try to make it around, a quarter of an inch, because I know I'm gonna want a boning channel there. add a segment point, and then I'm going to go around the, and then I'm gonna go around the bust and I will be holding down the option key on my keyboard. That way I get these beautiful curve points and see the beautiful thing, I'm going to go to an already make a new design decision. And that's going to be to add that little cup shape and then make it straight across the back. Compared to as you can see in my image, it just has the point and goes straight across the back. That's the great thing about CLO, You can visually see anything while you're doing it. So you can make those design decisions ahead of time. Double-click to end your line. I'm going to go in and do the same for center back at my center seam. And now we can add our hem seam, which this looks like it comes out a bit, if you hold down the Shift key, it will guide you either straight horizontally or straight vertically, which is also very helpful. So I'm gonna go ahead and have this be, it looks like it's about, here. I'll do a double-click to end that segment. And then I'm gonna go ahead and start curving this up. And I'm kind of just eyeballing where I want it to be. Delete that point, it's a little too low. And you're going to always want to make sure that you add more points than less. Because if you see, if we drag this all the way out, see how it changes the shape of the hem? So with that, you have to add more points. You'll also see that if you're draping over something that has shaped, sometimes it'll look straight across, but when you go to look at it, it'll actually have a lot of curve to it. So you're gonna want to accommodate for that. Now that we have our base shape, we can go in and start adding in our panels, which it looks like I have a straight one coming down from around here. Which if I went straight down, you can see it has that little divot right there. So I'm gonna go ahead and break it up a little bit with some curve points. And then I'll also note that I am going to be straightening out these points in my 2D window. Double-click. Let's go ahead and add this one that looks relatively close to this point. And then it curves out. That looks nice. And then let's add another channel here. Which I think im going to have this one start at this point here. And then let's curve it out. And if you see that it started another line, just go in and delete that. So right above your pen tool, if you click this, this is your edit pen, you're able to move points as you wish to clean them up while you're still in the pen tool. I'm going to go in and adjust some of these. The closer you are, the more movement you can make, the further you are, it will make a drastic move. I'll bring that one back in. Okay. You can right-click on a line and add a curve point. You can add as many points as you need. You can right-click and delete curve points. You can drag full anchor points over. Okay, let me go ahead and draw some of my back panels, which I can just make these up since I don't have a back image. Go back to our Pen Tool. And I'll add one relatively close to the side. And then let's add like an angled one to reincorporate are paneling from the front. And we'll know we'll have a channel here at center back, but we just don't need to draw that in because we'll do it in our 2D window. Okay. So you'll see I have these horizontal design lines. I'll be showing you how to do that in the 2D window.
6. The Flatten Tool: So the next step that you would do is go back into your Pen tool, press and hold to get the flatten tool. When you're about to flatten, you'll have to shimmy around in the pattern piece that you're trying to flatten. If it turns blue, that means it's flatten-able. If it doesn't turn blue, it will just literally stay white and you can't find it. So that means you probably have a broken segment. So some troubleshoots as to why a piece might not turn blue, is that your pieces too big over a large surface. So if we just tried to lift straight over the bust since there's so much curve in it, we might not have that much success unless we have plans to use a knit fabric, it wouldn't even fit properly anyways. So we're going to want to have some seams in that. So it will let you know if it needs another seam or not or you can have a break in your line. Or like I said, it's really just too big of a piece. So just make your way around the avatar highlighting until they turn yellow. So it looks like all of those highlighted. And then as you can see on the screen, it says select all areas to be flattened and then press the Enter. So we can go and press Enter. And now we have all of our pattern pieces already draped on the dress form. So the next thing that I'm going to do is clean up my 2D window because I always like to keep my workstation clean. So let's lay these out in the correct orientation that they would be. So this is my center front. This is my front side. That looks like my center back. This is my front side, side. This is my backside, and this is my side. So when your pattern-making this way, its going to add as many curve points as it thinks it might need to simulate. I usually go in and I clean this up, which if you go to your segment tool press and hold and go to Edit curve point, you'll see all these red points that are the curve points that it has created. I'm going to go and clean some of these up so we don't have that many. And I'm going to be making my pattern adjustments as I feel needed. So for example, my center front panel. I know I'm not going to want any shape to it, so I'm gonna go ahead and delete all of these curve points. So now I just have a straight center front seam. This front side seam here. There's like this lump right here. I don't need that so Im going to go ahead and get rid of that. We'll just smooth it out completely. Another little lump here down, we can get rid of that. And now we have a nice curve. And also in our 2D window right up here in our information display, I have our line links turned on, which that's a shift Z keyboard shortcut. And that is where you'll see our measurements are here. And you can always keep an eye to make sure that your measurements are lining up. Now we have this seam here. Looks like we have a nice curve here, but a little lump here, so we can go and get rid of some of these points to smooth that out. Same for this point. And these are just visual. If you end up deleting a point that either moves your pattern shape too much, you can go ahead and just Control Z and add your points right back in. That one, changed that shape quite a bit, So I'm gonna go in and add that back in and maybe just bring this point back out a little bit. Just so that when we have a smooth line and a smooth line, then our last same over here. This point looks like it's causing some dent. Same for this point. And I'm gonna go to bring, add another point and bring that back out a little bit. And I'm gonna go ahead and bring this one up a little bit so we have a little bit smoother of a line. So okay, and I'm also going to delete the center back points to have a straight center back.
7. Symmetric Pattern with Sewing: So before I delete points that are at the top or the bottom, I'm going to highlight all my pieces. Right-click and clone, clone pattern with linked editing, symmetric pattern with sewing. And that's going to make sure that when we make our other side, all the panels will still be sewn together. And anything we added on one side will also add on the other side. That's the symmetric sewing. So just place that right next to it, in the 2D window. And we will go to our sewing segment tool. And sew the center front seam together. And our center back seam together, which enter 3D window. We do have sewing turned on, which is the show threads. So that way we can have a good visual as to what's being sewn. We can go ahead and press the space bar or this arrow over here in the 3D window to simulate. And now we have a really form fitted corset. And now that we have both sides, we can take a look at our hem, with looking at our hems, this looks really good. Let me go around the back. This comes up a little bit, and this comes down a little bit. So I'm going to clean that up in the 2D window. So I can see that here that this does point down a smidge. So let's go and bring this up. Alright, that's nice. I kind of like that shaping how it comes down just a little bit. Let's have a look at our top edge. There's a little hump here which is this curve points. I'm gonna go ahead and get rid of that. That looks nice. Nice and even all the way around. Okay! This looks really nice.
8. Render Preparation: So now that we have our corset, I have the color inspirations that I would like this corset to be. So I'm gonna go ahead and go to fabric over here in our object browser. If you click on fabric, we can also confirm what fabrics were using, which since this is a corset, it and I know it's going to be relatively strong. I'll go ahead and change it to a twill or a canvas, anyhting that doesn't really have any stretch. So we can go down to our physical properties. There's a bunch of presets and we can go to Cotton, Heavy twill. So now this fabric is Cotton Heavy Twill. Lets go ahead and go to our color, which is this block over here. And let's make it like that nice mauve color. I just think it looks so pretty. That's nice. We'll click Okay. So now we have our corset colored now. And another thing that I'm going to do is prepare for top stitching. Being a pattern maker who uses CLO for pattern-making and not digital fashion, I still do a couple of things to make some beautiful renders so that way I can have pictures to share or for my documents. So I'm going to go ahead and do that now. Things that I want to include for that is top-stitching. So I'm gonna want this to be a little bit darker of a color, so that way it's a little bit more visible. Go to our top stitching tool, which is right here. It's got a default top stitching. So I'm gonna change this to 0 since we are going to be adding it to our own segment lines. And then we're gonna go down here to the color. We can take our color dropper tool and click our mauve color, press the Escape button. And then I'm just going to darken that a smidge and click Okay. So now our topstitching is ready for whenever we might want to use.
9. Modifying Patterns in 2D: So now that we have our base patterns, there are still those horizontal lines, detail lines that I want to add. So we're gonna go ahead and do that in our 2D windows. That way you can have another demonstration. Our first one looks like it's on this piece here. For this, what we're going to do is make sure that our internal lines are shown in our 3D window. So that's selected. And we'll go ahead and go to our internal line tool, which is right here, internal polygon. So we can go ahead and add this diagonal line, which it looks like it starts at the top and goes a little bit below the waist. And since we have our mirrored sewing turned on, it will appear on both sides. So let's go ahead and get our segment tool. In my mind, I have that. I'm going to be using quarter-inch boning. So I'm gonna want my casings to be three-eighths of an inch, so that way they're nice and snug. So I'm gonna go ahead and right-click this, offset as an internal line to create that channel. And let's do .375, which is three-eighths of an inch. And we will click Okay, so now we have a visual on that. And then let's go in and add our second line to our side panel, which if you click in your 3D window, a blue dot will appear in your 2D window. So we can kind of eyeball where we think it might sit. It kinda looks like it starts a little bit before this one. So right around here. Now we have this blue dot in our 2D window. So we can click our line tool and start right around that area and go down to the bottom and double-click to end. And then we'll offset as internal line. Just to get the visual. I will reverse that direction, so it's on the bottom of that. Okay, so now I have those two little details, which I quite like that. So what I can do is select our top lines, which are actual base patterns. And then we can right-click, cut and sew. And that's going to cut our pattern piece where those lines are and sew it together. If we just cut it, it will not add the sewing. And that comes in handy if you're trimming something off. So now we have our upper and lower piece. And as you can see here, if we turn off our internal lines, you can see the beautiful new panels that we've created.
10. Topstitching: Now that we have all of our base panels done, we're gonna go ahead and start adding our top stitching lines so we can get a good visual and a good render of what we're about to do. So we will go to our segment tool line. And we will start offsetting where we want our boning channels to be. The .375, Since like I said, our bone is going to be a quarter of an inch. Well, it's to hear offset as internal line 0.375. If you notice it's on the other side. So we're going to want to reverse the direction and keep extend selected. That way goes all the way to the top and all the way to the bottom. Lets also turn back on our internal lines in the 3D window. And also I am planning which panel do I want this casing to be created? And the casing will probably be created by sewing through this and the lining. So I'm gonna go ahead and also add the channel also on this side, since we have this break here, I'm going to go ahead, and leave those two pieces as they are, offset as internal .375, extend perfect. Then we have two beautiful boning channels here. Let's go ahead and add one to our center front, which I'm going to also merge our center front, which is a right-click and merge. And then let's go ahead and rotate this back so that it's straight. So I'll go ahead and draw a center line from the top to the bottom point. And then we can offset each side, right-click offset as internal, the half of .375, which is 0.187, press ok. So it'll go on both sides since it's mirrored. And let's go ahead and continue adding our boning. I'm going to leave these pieces alone until I figure out how we want to add bone into them. Let's go ahead and add some channels to our back, which I think would look nice on this side. So we'll select this seam. Click Offset as internal line .375 and press Okay, let's add one to this side. Right-click offset as internal line .375. And okay, and then for our center back, I want enough space in there. So that way when we tie our core set, there's still about half an inch of room. So I'm going to offset 0.25 and I'm going to actually cut and sew this line. So right-click cut and sew. So that way this essentially won't even be a piece. We'll just have seam allowance in this one exist. But for the sake of it staying on our avatar, I'm going to leave it there. If it also gives you a better visual, we can go in and go to our fabric. We can copy the fabric, which copies all of its properties. And then we can just lower the opacity of the fabric in our property editor all the way down to 0. And then select our two center back pieces and change the color to this nude fabric. So now it looks like we have a space there, but really the fabric is still there. So now we can go ahead and let's offset as internal line our.75 and press Okay, now we have this channel here, and then we can go ahead and offset this line to be the center of where our grommets would be. So that way we can have a line for that. So let's offset as internal line. And that's also do 0.5. Since we're using quarter-inch grommets, I don't want that to collide with our boning. So we'll click OK. So now we have our boning channels. I think we should add one here. So looking at this, I think I'm gonna make a design decision that's to add a channel on this side here. So let's go ahead and select both of these lines. Right-click offset as internal line .375. Alright, so now we have all of our channels. Let's go ahead and add our top stitching to the top edge and hem edge, so if you click all of your top edges, hold down the Shift key and select all of your lines. We can right-click, offset as internal. Let's do, let's do a .25, so it's a quarter of an inch, and let's press, Okay, and we'll do the same for the hem. Select all of our hemlines. We'll right-click offset as internal and 0.25 press Okay. so now we have all of our top stitching, which in turn is our channels and our new paneling. So for the top stitching, we can go ahead and go to our top stitching tool, which is this segment top stitch down here in the 2D window, we'll go ahead and confirm our top stitching. So if you click top stitching here, we're going to have a 0 offset. Since we drew our own lines, we will have the color a little bit darker than this mauve. So if you go to the color dropper tool and select your mauve, I'm gonna make it a little bit darker, just so it's a little bit more seen. We'll press OK and we can go in and start clicking through all of our red segment lines. And this will add top stitching. I'm not going to talk to to the center line because we wouldn't have that. Continue making our way through all the pieces. All right. So I'm going to leave this one not top stitched because that's just a guide for our grommets. I think I got them all. If you go back into your regular tool and if we go into our 3D window and turn off our internal lines, we should be able to see our top stitching, which there it is. And that looks gorgeous.
11. Final Rendering: So the next thing that I wanna do for a render purpose is let's go into our main fabric and let's add a normal map in there. So by adding a normal map, that's what's going to give us our texture. So if you click on these four squares here, clo comes with a bunch, as you can see here, there's so many, the ones that are gray means they're not downloaded. And you can click through them and you'll see what the texture looks like. Um, since we're using just a heavy twill, let's go ahead and just use that. So Cotton Heavy Because I do like the image that tool provides anyways, the intensity is right below it. So if you zoom in on your 3D window, you can see it looks like twill. And if you up the intensity, the higher the intensity is going to really bring out those shadows. And then if you go all the way back to negative 100, it's doing the same but inverting your image. So go ahead and put it where you visually like how it looks, which I'm gonna go in and up until about 36, that looks pretty good. So the next step that I'm going to do before we get this prepped to print, I'm gonna take some images of this. So if you watched our first video where we learned how to take images, That's what I'm gonna be doing. So I'm going to go in and turn the avatar off. So that way we don't have a picture of her, I don't need it. We're focusing on the garment, position it in a way that I like it. We can click Render over here at the top menu. As you can see, I'm gonna go ahead and press stop. That way you can check out our settings. Right here is your image settings. And these are your camera properties which none of these you really need to get too deep into. But I do go to my image settings. And I am going to save my background with a transparent background so that way I can add this image to whatever I might want to add it to. The next thing that I'm gonna do is I have it as a square right now, which is my height and my width of my actual image, and that is it. Everything else. I'm okay with. Its relatively small, so I know I can zoom in a little bit. Let's go and click refresh right up here. And that fits this square Much better. So I'm gonna go in and let this render. So our image has been saved. We can go in and view that, press Open the folder. And this is our beautiful image. So now I can go ahead and drop this image into any type of backgrounds or anything that I want it to be. And post my images, make review notes if I have any and or just show it to any clients. It's just endless possibilities, We can go ahead and close that. We can get out of this render.
12. Prep Pattern for Sewing: So one thing I want to do before we do that is go back to our grommet area, since our top stitching is a quarter of an inch, I'm going to want to add our first grommet half an inch down. So we're going to split this line to 0.5 on the top and then do the same for the bottom right-click split 0.5 and press Okay. And then we can go ahead and right-click this internal middle line and split it. We're going to go to the bottom where it says uniform split. And then we can essentially add where we want our grommets to be and get a good visual as to where they might sit, knowing that our grommets are about three-eighths of an inch in diameter. I'm going to want to make sure that there's enough room in between three-quarters of an inch space in between each grommet. This is going to work great. So we can go in and click OK. And now we essentially have points for the center of our grommets. If you go to our segment tool, there's an internal ellipse. If you click a circle, you can go in and put your diameter, which let's do .375. Going back into our select tool, we can position this right over our point. So it's Control C, Control V, and do the same until we get all of our grommets placed. All right, so now we have our grommets positioned. So the next step that I'm going to do to prep these for printing is add in segment lines as our grain lines. Because if you go over here and go to the 2D window and show grain-lines. The shape of CLO's grain-lines, I'm just not in love with them. I just want to put a little short grain line that way I don't have to worry about these large ones. So we can turn those off. Everything is already in the orientation that I want it to be positioned, how it wouldn't be on the human body. So we can go back to our internal polygon tool and just add two inch little grain-lines. If you hold down shift, it'll make sure that they stay vertical. Alright, and then I will go over here and add a new fabric. It doesn't matter what it's going to be, but you can highlight all of our pieces and turn it white. And then I'm going to move all of one side over because we're only going to work on one side since we only need a print one side, we can go in and move this little center back piece also to the other side, since we won't be using it, I'm going to turn off my measurements so that way it's not as crowded. So now we have white patterns. We will go and our 2D window and go to our seam allowance tool, which is this one here. Highlight all of your pattern pieces. Make sure every edge is selected. You might have to highlight it twice. I usually do, and I'm going to be working with small seams since this is a corset. So I'm gonna go to put the seam allowance at 0.25, just a quarter of an inch. And then we can go in and click OK. And since these panels are relatively small, I don't necessarily need the notches. I think I will add notches though where there's breaks here so I can always line up these seams better. So an easy way to do that is turn on your sewing. And you can see this point here is exactly where this line meets up, like where the collision it is. So we can leave so in turned on and go to our notch tool which is right above the seam allowance tool. Zoom in on our so line had a notch and it will add a notch on the internal and the seam allowance line. We can go in and add a notch to this so point as well, which is going to be this collision. And same for this green one down here. So now we have those notches in place. The seams are relatively small and I don't think I'll be needing notches, but if you did want them, all you have to do is add them in and you can even right-click your notch and it'll pull up a box for you to put an exact measurements so you can put like one inch 1.5 and then make sure you do the same on the other side so that way they're all the same. So now our pieces have notches, have grain lines, they're turned white. Of the next steps that I do is I will add the paper so that way I can position them how I want them to be printed. I go to my rectangle tool and we'll add a rectangle. And most print shops print on 24 inch paper. So I always use a 24 inch layout. And then should I want to tile and print at home? I can always just pull in that same size PDF. It won't change anything for me, but otherwise I do the 24 inch that way. If I want to, I can go ahead and send this straight to a print shop, I'm going to put 23 to accommodate for margins by 34. Arch D is 24 by 36, we'll position our rectangle, right-click, We will go to order and send it to back. Just like in Word, we're sending the image to the back of all the other images. Let's select all of our pieces and move it on top of the paper and began to position our pieces. So that way we save paper, you want to make sure that your seam allowances aren't colliding. Okay, so we've positioned all of our pattern pieces in the upper portion. Like I said, you can control C and control V and put another copy down here that way you can just have multiple copies of the same pattern if he needed, otherwise, The next thing that I'm going to do is delete all of our other pieces and this rectangle. So that way we only have left these patterns here positioned in our print layout. We will go to file export, Adobe PDF, and this is going to save it as a PDF. Let's save it as core sets V1 to our desktop is fine. So this is the box that will populate to show what's going to be printed. So we're going to make sure our internal lines print our baseline and notches prints pattern, outline and seam allowance. We don't need the additional information which is pattern names. We don't deal with that. No annotations, no grain lines. We don't need any of that, but you do have the option. We will leave all of these settings just as is. We'll press OK. And now we have a PDF. So as you can see, it's just a full PDF. So now that you have this PDF in the size paper of ARCH D, we can actually just send it straight to a print shop to print. Or what I like to do is upload this into Adobe Illustrator and I'll add all my annotations in there. Or like I also have a large format printer so I can go in and print this directly to my printer.
13. Annotations: I Just also wanted to give a quick example for CLO's annotations. I don't use them because they always get a little bit messy. So if we go into the info button and turn on your piece names. So one of the reasons I don't use CLO's annotations is because as you can see here, the names are always in a miscellaneous place and sometimes they're not always in their own pattern piece like this is beyond the pattern piece, so I really don't use it there. I always export and add annotations in Adobe Illustrator, and then I print it from that, you can always just print this nameless. And when you get your paper patterns, just go in and write down the names and any annotations that you might want to add. You'll have your CLO file, So of course, you can always reference where things go so you don't ever get lost. But that's exactly what I would do.
14. Class Project: And that is it you guys, we have went from a drawing that we made to an actual physical corset pattern that we can then make our physical Corset, which I probably will in the future, which is very exciting. For the class project. I would like for you to do the same thing. Either draw your own corset or even use the image that I will provide a picture of my corset and create it on another size avatar or your sized avatar would be even cooler. Take a snapshot image of it, change the colors, whatever you think you might want to do to make this corset. And I can't wait to see the types of corsets y'all come up with or like I said, if you want to do the exact one, I have feel free. I still can't wait to see what you do with that. Be sure to upload your little project images. I love looking at those. It's so cool to see how y'all are making your own things from the advice that I'm giving, which is really neat. As you can see, by using flatten tool and the Pen tool, you can create endless possibilities like the amount, of corsets that you can make the amounts of over bodices and your seam lines from your neck all the way down like is limitless, which that's why I think CLO a great tool to be using when you're not sure what you want to be designing. Or just also get all your designs out there like you can make so many in one day, which is phenomenal. I also want to say again, thank you so much for taking these classes on my CLO for beginners. I hope you enjoyed it. I hope you picked everything up if he didn't it please leave a comment below in the discussion or feel free to email me at LemonLeePM@gmail.com Be sure to check out all of my social medias. I have a lot of content and related stuff that I post all the time. And I'm only getting better at being more informative and descriptive about what I'm doing. I hope you enjoyed this class everyone. And if you have any future videos that you would like to see, please let me know. I'm creating a list right over here of topics that I think ya'll would like or that you have mentioned. They all would like to see be sure to check out all of my social medias. Like I said, I have a lot more content coming. Otherwise, I will see on the next Skillshare class, thanks for joining.
 LemonLeePatternMaking, Costume Pattern Maker