Transcripts
1. 1.0 Course Overview: Hello, I'm Daniel. And in this course we are going to be ten x hinder productivity using the app of the decade notion. An app that has completely revolutionized my professional and personal life. And that's a mouthful. What this provides is the possibility of creating pages and databases, allowing you to interconnect them. And with those main feature, you're off to create a system that can accommodate whatever outcome you want from the app. And believe me, this up is super flexible. So I'm sure that whatever you want to system iss in your life, you can do it within notion. So maybe you have heard of this before. I've been diving into YouTube trying to find different tutorials, but left not really knowing how to build a system that is both easy to use and effective at the same time. Or maybe you're just interested in productivity and you're always looking for new ways to become more productive. So if this is u, then this course is for you. But as I said, the main advantage of notion, it's also, it's main problem. It's flexible, very flexible. We can build everything with it. And this can paralyze even the most tech savvy users, leading to confusion and frustration. So for easing it Well, we all need gardens in order to shorten its steep learning curve. And this is what this course is going to help you achieve. In this course, we're first going to be covering the basics of the app. For those of you who has never tried notion before or how very little experience and after that, and once we have a very good foundation on the app, I'm going to take you by the hand to apply what we have learned into creating what for me has become my life compass, unreliable system that one setup, it almost works for me and it also tells me what I have to do every day, so I don't have to think about what I need to do in all of these while ensuring that I'm always on the right track, advancing toward my life goals. And at the same time giving me the necessary perspective, they checked at a moment's notice how my life is going. So believe me in this system has thoroughly ten x my productivity and focus. And it's been what I've been waiting for all these years of drifting around, trying to find the one and only productivity app. So for me, those days of drifting away, has family gone away using this system and using notion? Since in this course we are covering theory and practice and discourse is suitable for everyone interested in maximizing their productivity using notion beginners and advanced notion users like. But note that if you're already a producer and you've been using notion for some time, you can directly jump into the practice part of this course and start building your own systems. I'm so excited to be sharing the app that for me has substituted all the productivity apps that I was using before has revolutionized the way I approach my work. And they're also has allowed me to create this life-changing course because these horse was all plant within notion. So see you inside of the course and let's maximize our productivity once and for all.
2. 1.1 Getting Familiar with Notion: Welcome back to the course. In this lesson, we are going to be talking about notions. Main interface is this one right here. This is what we are going to be looking at when we opened the app. We can separate this area into this big one where we are going to be seeing all our data. And the sidebar, which we are going to be seeing all of our pages and all of our databases, which we are going to talk more in detail in the future. If we head back to my private notion, here, we can see that I have everything separated into favorites, shared private, and also it can be workspaces. This is meant for teams to share information and have everything organized in the same place. On my private side. This is the thing that that's just me can see. Then on shared, these are all the pages that I have shared with different people, but there will just have access to that page in shared I can have multiple pages and every of them can be shared with a different person. And then Favorites, which is kind of like a shortcut for the things that we use the most in notion, the sidebar, we can hire it whenever we want. We can click here. And this is going to be hidden. And then we can go to the hamburger, an open area up again, another thing to note is the breadcrumbs that are located over here on the top side of the page. This helps us to know where we are in our notion. So for example, now, this is in the main page that I, that I am, if I go to documents, documents appear on the breadcrumbs e, And then if I come to here, then this appears there. Ok, so this helps us navigate through all of our documents in notion, we can create different workspaces. So for example, this is my private workspace where I have all my life and better into. And then for the purpose of this course, I have created a new workspace to start everything from scratch. Which is this one. We can create as many workspaces as we want for as many purposes as we want. I like to give my workspace as to the minimum, so I just have one, but you can create multiple workspaces and they're all free to use. In order to create a new workspace, you will just click here on your workspace and create or join workspace. Then GSA, that is for myself. And take me to notion, and this will automatically create a new workspace for you. Now we're going to head over to the settings of the app is located here in the sidebar. And in this city is mainly what we are going to be using is the notifications notion provides three different kinds of notifications. Mobile, desktop and email. We can be receiving notifications for reminders that we set up for updates that some of our team members making our documents and they work in this way. First, we are going to be receiving a push notification in our cell phone. If we don't see this notification after five minutes, we are going to be receiving a desktop passionate defecation. And if we still don't see this notification, then we are going to be reminded by email after five minutes more. So in ten minutes we are going to be reminded three times about certain updates. That happens in our notion. And the last thing to note in notion is that they have included a dark mode in order to activate. These are small, we will just click this button over here. And all is going to turn into dark mode, okay, this helps with readability. For example, I always use it in the arc mode. So that is if guys, I hope with this introduction to notion, you are more or less familiar with the interface in how is it composed. And in the next video I'm going to be talking to Evernote users, which I was myself. And to help you migrate all your Evernote into notion. Okay, so see you in the next video.
3. 1.2 Coming from Evernote?: Hello, welcome back to the course. So in this lesson we are going to be talking specifically for people that use Evernote before getting into the notion world. This was me, for example, and the fact that I was using Evernote for the past six or seven years really scared me away of using another app that I will have to migrate all my files into. But I have good news for you. Notion has made so simple to migrate everything from your Evernote account. In order to do this, we're just going to go to import. And we are going to select Evernote. Here. He will ask us to log into our Evernote account and authorize the access from notion to Evernote. Good, yes, authorize. And that says, here is everything that I have, all my Evernote account. So now if we want to migrate everything from our account, we will select all and then click on Import. Now the is going to take awhile. Okay, so they import process has finished. And so now I have all my notebooks here in Evernote. But now I'm going to walk you through the differences between Evernote and notion, because in order to be using notion effectively, you will have to have a mindset shift. So I'm gonna go to Evernote. So Evernote is organized mainly in notebooks and in nose. In the notebooks, you cannot write and you can just write on the notes. In Evernote, there is a limit of three hierarchical levels, which is stack of notebooks, notebook. And then note in notion, you have unlimited hierarchical levels. So as you can see on the left-hand side, this is all my stacks of notebooks. And this is exactly what notion has important. So then for example, let's take this stack with languages. These languages have two notebooks, one for Chinese and one for Russian. In notion languages. If you open it, it's also unfortunately one for Russian. So same structure. So we could say that languages was this stack of notebooks. Of course, it is in Spanish, is the notebook. And then here are all the nodes that were inside of or not. So these are the three levels of hierarchy that we have in Evernote, these less notebook was important as a database. We're going to get much more in detail about how databases work in Lecture three, these more advanced. But as of right now, we just want to know is that inside this database we cannot write anything that is not even a new note as we were in Evernote. So if I click here, nothing happens, I cannot write anything. I can just add a new page for these, for these nodes. And that's it. And this is going to be added. So this functionality will be the same as Evernote. And then how the stacks of notebooks, having created a notion. This has been created as pages that we're gonna dive into in Lecture two. And this will be the notebooks that we had in Evernote this soon. So to make things clear, notion, Evernote import respects 100% of the functionality of Evernote, but it's going to lack the great functionality that notion has to offer, which is much more flexible than what we had in Evernote. So what if I want to be able to write in these new database? That is my Chinese course. Because here I cannot, I can go back to the parent page, which will be the notebook stack on Evernote, right-click on a database. Unclick turned to inline. This is going to give me the view of what is in this database. I can do the same with my Russian course, turn into inline. And I will have here also might note from my Russian courts in here. And here. I can write wherever I want. Ok, maybe right now you are wondering why would you want to change, however not worked. And the longer that we explain everything about notion, the more that you are going to understand the amount of possibilities that notion can give to us and how we are going to have to tweak a little bit this structure that the Evernote import created in our notion account. But the good news is that all our information is going to be directly imported into notion. So now that we have imported all of our data in notion, and we're starting to see how this app works. We are going to be diving into one of the two principal blocks of information that we have a notion, and this is pages. So in the next video, we're going to introduce the lecture two, which is going to be talking about those pages. And we are going to be diving very deep into how to better use those pages for our own productivity and for our own life. So see you in the next video.
4. Section 2: Pages: Welcome back and welcome to lecture two, in which we are going to be diving deep into pages in notion, we are going to be covering heroku, create new pages. How pages can help us create our hierarchy. In the sidebar of notion, heroku create beautifully formatted pages. So we are going to die to use notion in our daily life. Haroche, share them with our team or with our significant others so we can be both always on the same page. And finally, we will be going to work on our first notion project, our own trip planner. I am so excited to be jumping into this journey with you. So stay tuned and see you on the first video of this lecture. See you there.
5. 2.1 Pages and Basic Blocks: Welcome back. In this lecture, we are going to be covering what is a page? What can we create inside of a page? How we're going to be able to set vase and reminders inside of one of our pages in how creating different pages can affect the hierarchy on our sidebar. So first of all, let's create our first page. For creating a page. We can always come here to add a page. And this is going to create a blank page for us, is going to be the title, this thing page. And here we have different options. One of them is empty with icon which is going to create a page, is going to add a random emoji to this page. And the other one is empty, which is not going to create these emerging third one is Templates. Notion has already created a lot of templates for us to choose from taking the time to dive into these templates because they can open your eyes to all the things that notion can do for you. I'm going to select Empty with icon. There is two main things that we can use to format our pages in notion. One is the emoji and the other one is the cover. We can select here other cover. And we can change this image, whatever we want for this Harley Davidson for example. So now that we have created our first page, what is a page? We can think of a page as a real-world page, white paper where we can write everything and everything can be put into this space. Everything in a notion Page is a block. How can I recognize each of the blocks? When I hover my mouse into any of them, the six dots are going to up here. This means that this is a block. Here I can send typing normal text, and this is going to be block number one of these page. If I hit Enter, I'm creating a new block. Okay, then I can drag and drop blocks. I can change the order. And I can also create different columns. In order to create a column, I can just drag this to the side of the other block and is automatically going to create a new column. If I want three columns, I will do the same. I will drag and drop this. And this is going to create another column which are the kinds of blogs that we can find on notion if we type forward slash, these are all the blogs that we can create within an ocean page. We're going to be going over the basic ones. We can embed a page. So if we click this is going to create new page within these page, page number two, until we've icon. And then if we come back to our testing page, this page is going to be created here. And this we can also move everywhere we want. The next one is going to be the headings. We can create heading 12 or three depending on how big we want our text. Next one is going to be the to-do list. This is base, basically text with a checkmark that we can mark as done and it will get crossed. The next one is going to be a part at least can also create a numbered list. And one thing that we didn't have in Evernote. Is toggles and then we can drag things into this toggle, which we can later height. In order to do that, we're just going to drag and drop these, for example, into the toggle. And this is going to be hidden. And if we want to see the content of the Togo, we simply click here. And this is going to be what is inside of the total. We can put as many things as we want inside of this tuples. And next one is going to be a quote. We can also add dividers to separate content within our page. And finally, we can use call-outs to make text pop out from the screen, which we can also change the emoji for a different thing. Finally, we can create links to other pages within our workspace. And this means all the pages that are already created within our notion linked to page. And here we are going to see all the pages that we have in our notion workspace. So this is not creating any new page, is just going to be a shortcut to going to that page that are really existed. Another good thing about notion is that we can drop any type of content into any page. For example, I can drag any of these icons and they're going to be embedded in an image. We can, for example, embed YouTube videos just by pasting the YouTube link. And he's going to ask us to embed the video. We sell up here. And we aren't going to have our YouTube video embedded here. Have very many strong beliefs in law. We can do the same with Google Drive dogs, with Google sheets, with almost any kind of content that you can imagine, you will be able to embed into a notion page in order to see what you can embed, you can simply go, go to this section where it says embeds on here. And you will have a list of all the things that you can embed into notion. Now, I don't think that we can do is of course to duplicate blocks. So in order to duplicate one of the blocks, we can hit here unselect duplicates. So in the case, in the case of this total, this is going to duplicate everything that it was also included in the struggle. For these action. We can also use contour all common D has a shortcut and it will automatically duplicate that block. Another feature that notion has is the possibility to add dynamic dates. So for example, I can type at today. And today it is going to be shown us today. Tomorrow. This is gonna be shown as yesterday, the next day. This is going to be shown as the day that is today. So this is going to be changing all the time. We can also create reminders. So the shortcut for creating a reminder is going to be at Remind. And then we're going to add when we are going to want to be reminded that tomorrow nine AM. This is going to create a reminder and we are going to receive a notification for these all the blocks that we have created. In this page, we have a keyboard shortcut that we can use to create them. This is the list of shortcuts that we have from notion, these kinda be changed. These are all the same for everyone. And if we have created some texts that we want to change into a different thing, we can go to the block that contains that content and right forward slash, turn, turn into or TU. It's enough. And we can turn these into whatever we want. Let's say we want this block number to be heading one. And lately for this lesson, we're going to dive into how the pages affect the hierarchy of our sidebar. So for example, here we have a new, we have created a new page, and we have it right here. But if we create a new page within this page, here we have the page. And if we open this dropdown, this is going to be all the pages that we have within this page. If we go to page two here, we can create a new page. And this is going to create a new hierarchy to page three. And this is unlimited. We can create as many nested pages as we want in notion. So that is it for this lesson. This was charged with a lot of information, but I hope that now you have a much better understanding on how to use notion pages and how to create different types of content. So in the next lecture, we are going to be talking about the formatting options that we have for the changes in hurricane. So see you in the next one.
6. 2.2 Formatting Options in Pages: Welcome back to the course. In this video, we are going to be talking about the different formatting options that we have within notion. And I'm also going to give you different examples on how to organize the information within a page. So it's actually going to be very useful for you for this lecture I have created already in this blank page, which is called dashboard. I can make this page full width, going into the three dots over here, and then selecting the option for width. And this is going to give us all the space possible for this page. And the other thing that we can change is the font for the page, which is have three different funds. But I actually always used the default. We can also make the text small. And here also we can add the page to favorites. So it's going to appear in the top part of our sidebar in the past video, we knew how to make columns, but I'm gonna give you a practical advice on how to use columns. Columns can be very powerful to organize different kinds of data within the same page. So for example, we can create three different columns for our Work-Life, for our personal life, and for the things that we are currently learning. So laser are in the column for personal stuff. And then we are going to drag-and-drop to create the three different columns. It notion we're going to also change the color of the text. So in order to live, we are just going to simply select the text. And here we have the basic formatting options. And here we can change the color, we can change the color of the text or of the background. We cannot change both at the same time, so we have to choose between texts or background. So for example, let's add yellow background to personal. And then if I want to apply the same style to a new texts, there is this keyboard shortcut, common shift h. Common Shift H. These changes to the last formula in that we have used. So now in order to organize our personal work and learn in life, we can create different pages in each of the columns. So in order to do that page, sopping list for my personal life. And I can also create, let's say, home tasks. So like this, we can have an organized view of the different parts of our life. And within each of the pages, we can start adding new information to them. For example, it will go to work tasks. We can select here all the to-do list that we want to do. And so on. Final types, let Sarah new cover to this page. We can reposition this image. And we can also change the width of each of these columns by simply putting the cursor here and dragging it to the left or to the right as we choose. Okay? So these are very simple and practical way to use the common feature within notion. For example, I'm gonna go to my private dashboard here, where I have my main dashboards shown here. Each of them for a certain task that I want to do whenever I'm in learning mode, I enter here and here I have my notes, I have my courses and everything. And then here are my different areas that I have also added an image to make it look more beautiful. And with my main pages right here. Okay, so I hope this was useful. And with this, you're starting to see the power that this app can do in terms of organizing all your data. So that is it guys. If you have any question about this video, just let me know and see you in the next video.
7. 2.3 Real Time Collaboration. Shared Pages: Hello, welcome to this lesson. In this lesson we are going to be talking about sharing pages with our teammates, with our relative orders and with whoever we want. The good thing about sharing pages with all the people in notion is that they get updated in real time. This means whenever the other people is typing in one document, we're actually seeing that the other person is typing in that say, documents. So now let's jump into the dashboard that we created in our previous lesson. And let's say that we want to share the shopping list with our spouse. So in order to share the page, we are going to go to the page that we want to share. These are going to be our shopping list. Now in order to share it, we're just going to go here, click Share, and invite people. Here we're going to write the email. And here we can set the permissions, full access there is going to allow that person to also share the page. But for these, you didn't get paid plan, edit, common or view. So I'm going to check, edit and invite. The person that we're inviting to is going to receive an email like this. So that person will just have to click here to view it. And if this person doesn't have an account, he's going to create it. And that is it. This person will have the shirtless. He can make any changes. And here we see this D is the other person and he just did it. This one from the other side. This is the person that we share with it. We position the cursor here. Here we see that HE position the cursor, OK, so this 100% real-time interaction, we can also add comments to any part of the page. And we can mention people that are into our workspace or that we have shared some pages with. So for example, if we want a integral spaghetti for example, and we want to tell it to that person. We are going to highlight this heat comment. And then here is the person that we have invited. So and so and that person is going to receive a notification with that mentioned that we just did. So here we see in updates that we have made a mention to that person, he can reply from here. And that comment is going to be added to the threat. So now if I go back to my account, I can say here two comments and then innovate. We can also mark the comments as resolved if we have finished the conversations. So we click here, we solve, and that is it. So the sharing methods is no revolutionary. But the fact that that is also built into notion can create so many possibilities, for example, to share tasks within a team. So everyone is on the same page like this one, shared a shopping list. If we are working with a video team, we're gonna share scripts and collaborate in real-time. So everything can be baked into the same map into notion. So we are not going to need any other app for me. These are real magic of notion that it can actually replace a lot of apps that we were using beforehand, such as Evernote, Google dogs, etc. So that is it for sharing pages with our teams are friends. I hope everything was clear and see you in the next video.
8. 2.4 Creating Templates: In this video, we are going to be introducing a new feature of notion, which are templates. Templates are basically creating a button that is going to perform certain actions that we configure beforehand. So to give you a real life example, I have created this new page, which is meeting notes for work, which my idea is that they contain all the meeting notes that we are going to have in our company it quickly here, this is the format that I want every midi note to half. So then my idea is that in this page, we have a multitude of pages, one page for each of the medians. So therefore, I'm going to create a page and I'm going to paste all of this information within that page. This page is going to be the templates. And here we are going to use this function. So therefore, whenever we create this page, this handle is going to record the day that this page has been created and is gonna integrate in the title. Now if we go to midi notes, we can drag all of these into the page. Let's pull it out. Cool emoji. And we go back to Meghan nodes. So then I'm going to create what is called a template, which is basically a button. As I said before, this first field contains what that button is going to read. So this is going to be add new Nitin nodes. And here where it says template is where we are going to add everything that we want to duplicate every time we hit that button. So in this example is this page. This is by default we are needed and that's it. Close. So now whenever we want to add a new midi note, we simply click here and the main node has created. Okay? So we can see me knows if we click on the template again, we are going to create a new page and so on, so on. So this today, as I said, is going to be changing over time. Now to give you another real life example on how I use templates, I'm gonna go over to my personal account. And here ON reflect. I have two templates for creating a weekly or a monthly review for myself. So if I hit in which you review, all of these is going to be created. The wigged aware that I'm in all the tasks that I have completed on, on this week. And this is going to be a to-do list for every week. Okay? These already more advanced stuff because we haven't seen what these tables are. But so you can browse possibilities that templates can have within notion. So that is it for this lecture. I hope you liked it and you'll find it useful and see you in the next video.
9. 2.5 Use Case. Trip Planner: Hello, welcome back. So in this video we're going to put everything that we have learned so far together. And we're gonna do a mini-project. This project is going to be creating our own template that we can use everytime we are gonna go on a trip to help us plan this tree. So in order to do so, we are going to go to our dashboard and we are going to create a new page for our trips. So I want this page to half all the information about all the trips that I am going to be making. But these are going to be a list of different pages, one page per trip. So let's start by creating the page template page. So in this page is up to you. You can either create a one page for each of the things that we want to intrude on the trip. For example, the budget, one page for the flight tickets, one page for the whole tails, one place for the to-dos or we can put all the information on the same page. I prefer to create it as less pages as possible because like this, I can see all the information in the same place. So let's start by by are in the travel schedule. All these fields are going to be fulfilled whenever we're planning a trip. But these checklists is going to always be the same. This is for things such as to put the underwear on the bag, to bring the camera, to bring their cell phone charger, to bring a bag for the dirty clothes, et cetera. So I'm gonna just put four just for the sake of this demonstration. Again in this loved one, just the flights and hotels that we're going to go to. Here we can embed PDFs of the confirmation tickets, the flight tickets, everything. So then let's go back to the previous page. And let's create a template of this page. Add a new trip. And we are going to drag this patch here. So now whenever we are gonna go on any trip, we simply click here first change the trip. Germany. Like these, we save a lot of time having to copy and paste the same format for the same notes over and over again.
10. Section 3. Databases: Hello, welcome back and congratulations on passing section two in which you have learned how to use pages in notion, how to make them beautiful and also how to make them work for you. But now, let's dive into the real power that notion has to offer, and this is databases. So in this new section, we are going to be covering what our databases, why they are useful for us in how to get the best out of them. We're gonna be looking into filtering in to sorting into managing different views, into linking databases, passing data through databases, using formulas for automating different tasks were in few words, we are going to supercharge your notion knowledge and the capabilities that this hub has to offer. I'm super excited to go into this with you because this is the real, real power of notion. So I'm going to see you in the next lecture where we are going to be talking about databases. So see you in the next video.
11. 3.1 What's a Database: Welcome back to the course and welcome to the first video of lesson three. Before we dive into databases in notion, let's first explain what they are. We basically can look at databases as tables that store information, this information we can then filter to see the information that we really care about. We can sort the information in different kinds, from a to set, from one to nine, from different categories, different properties. But the cool thing about databases is that we can create a database for a filter for each use that we're going to give it. For example, if I use databases to create a task manager, I can have a property that is going to be the project that I'm going to be working on. One for website development, one for course creation, one for video editing. And then I can create different filters for what I want to see. So let's say I want to see all my tasks about video editing. So I will just filter by video editing and I will just see those tasks. And these can be applied to anything that you can imagine. So now let's head over to notion and let's see how we can create those databases. Here we are back into our dashboard. We're gonna go to the work tasks that we are going to delete that because we are going to create a database for all the tasks that are work-related. Okay, so here we have two options. We can either keep this as a page and embed a database into it, or we can make this page be its own database. If we keep this as a page, we're going to be able to embed our database in it. And then we can also write something. We can create multiple databases within the same page. We can format it and everything. But if we are to make this page a database, this is no longer going to be a page. This is just going to be a database and that is it. So I'm going to make it a page and I'm going to create a database inside of it. So in order to create database slash data. And, and here we find all the different kinds of databases that we can create. Here the difference between inline and full page is that if I choose inline, the database is going to be shown in the same page. But if I choose full-page, the database is going to be shown here as a page known as a database. And within that page, there's going to be that database. So I'm gonna create an inline database. I'm going to call the database tasks. So now let's look at what we can see here. The first field is called name, and it's identified by these two a's. And this property is always going to be in all our databases. This is called the title property. We can change the name. We then call it task. But this cannot be deleted. Here. There is no way to delete this because this is the identifier of each of the rows, then the rest of the properties. We can delete. Okay, but not the name. Also one thing to note in databases in notion is that in each of these properties and you can actually create a page. So let's say task, this task one, okay? And here you have the button of open as page in here. Actually you can write whatever you want. For example, we don't put all the information that we need about this task in this page. And now, how does creating a database effect to the hierarchy on our sidebar, if we look at here we're tasks, we can see that this database is also shown. So this means that in the sidebar, what we are going to be looking at our pages and databases. And this is the tasks database, which we can also change the emoji. But what if we just want to be looking at this database and not at the page that contains it. We simply can't click here. And this is just a database. I cannot write anything outside of it. Okay, so that is it for the introduction about what databases are in notion. And in the next lecture, we are going to be diving deeper into how to use them properly. So see you in the next video.
12. 3.2 Basic Database Properties: Hello, welcome back. In the past lecture, we created our first database. And in this video we are going to be diving into what is a poverty and the different properties that notion can offer to us. So each column is described as a property and its property has its own type. So in order to change the type of our property, we simply click into the property. And here we can write property type. We hover here and we can see here the different types of properties that we can use. In this video, we are going to be diving into the basic properties, the advanced properties. We will talk about them in a future video. First, the text property, this basically for writing tests. We can also use a number property, which is going to allow us to write percentages, to write currencies, cetera. Next property that we can find ESA select this basically a dropdown, which we can just select one item from the list. In order to create items for this lease. Simply click on this, the 50% of before. Simply click May for a, for a task manager. And this can be the status of the task. Not started. We hit Enter, click again in row grids. Here again, and completed. Slowly, we are going to be building our task manager. Start use. The next property type that we can use is multi-select. These the same as select, but we can select multiple properties instead of just one. Next one is going to be dates. There's going to be very useful for due dates. And if we click here, we're going to have a calendar and we can select a date if we want to delete property, simply click on the three dots and delete. The next property is going to be person. If we are working with different people in the same page, we can assign tasks to those people, for example, phi Somalia. This is going to allow us to upload PDFs, photos or whatever we want. And then the check box, we are going to use this one to mark a task as completed or not. As you can see, there is some redundancy here because whenever we went to a task to be completed, we have a status here that say completed, but we also have this checkmark that is checked. So this up to us, we can do it in one way or the other. And you're showing you the different possibilities. If we want to create more properties, we just click here. And we can create URLs. These jazz going to allow you to input URLs, emails, and phone numbers. The only difference between phone number and the number is that whenever we add a phone number, there is going to be a button that is going to allow us to call to this phone number. So I'm using a Mac right now. So for example, this is going to open iMessage and he's going to call this number. But for our Task Manager, we are not going to use this, so we can delete it. Then maybe there is some properties that we don't want to show, but we still want to store that data. So we can always hide one of those properties by clicking on the property itself and select hide. So these properties still exist within the database, but we're just not seeing it. If we want to show the property again, we can come here to the three dots, select Properties, and then check it again. And it's going to appear here. So that is saved for properties within notion databases. I hope that by now you're starting to see all the different ways in which we can use databases. For example, right now we're doing a task manager. We can create a project manager shopping list. We can create our reading list, film list. We can create anything within notion databases. We can even create a database for the nodes that you are taking from this course. There is no limitations in here. So in the next video, we are going to be learning how to filter and sort within databases to make these databases even more useful for us. So, see you in the next video.
13. 3.3 Filtering and Sorting: Hello, welcome back to the course. So by now, we know which properties we can include into our databases within notion. But these databases can become a monster if we keep adding and adding different data to it. So one way of keeping our data organized in jazz scene, what we want to see in each moment is by using filters. So for example, here, I have already deleted the checkbox that we had before. I have created a new property which is called Project that is going to be containing these three projects over here. So now, give me a minute. I'm going to add several tasks so we can start understanding what those filters can do. Okay, so these are, these are all the tasks that we have in our database. So now let's say that we just want to show here the tasks that are pending. This means the ones that are not started under are in progress. So we can create a filter for that. In order to do so, we can head over here and select filter, or we can select the three dots. And select filter is the same. Right here we're going to add a new filter. This first field corresponds to the property that we are going to be filtering. So in this case is going to be Studies. And I want that the status is not started. But in this case, I also want to add the tasks that are in progress. So for this, I can create a new filter. When we said that here, a filter and the one that the status is in progress, o. But here I'm seeing that, I'm not seeing any of the tasks. What let me review the filter with you. What is happening here is that what I am telling this filter to do is to show me all the tasks in which the status is started and the status is in progress and these impossible. So right here, we have this end, which we can change to one, or we can read here, at least one filter must match. So this means that either the status is not started or this status is in progress. And this is what we wanted to do to show the tasks that are not started or in-progress. If you have a database with a filter in it, whenever you add a new entry to that database is going to respect that filter. So how can this be useful? For example, we have all this area here and we want that all the tasks that we add half already the properties status as not started by default. So in order to do so, we can just add these filter. And filter by statute. Not started. So now whenever we are going to add a new task, this task will have by default the status that the filter was filtering. So here we can filter as many things as we can. And whenever we are going to be adding a new entry, this entry is going to be respecting that filter. We're a 100%. But now we are seeing here that we have all these tattoos mixed out. We have no standard. No, sorry. In-progress. Not started. In progress. In-progress not started. So let's say that we want to sort this data and we just want to see in the not started first and then they progress, for example. So in order to do so, we're going to click sort. And then other sorting rule. We want to sort by statues. And this ascending or descending, this is not an alphabetical order. This is going to respect the order in which we have organized our settings in this case. So let's see this ascending right here. If we click, we can see that the order is first not sorted, then in progress, and then complete. But if we change this order, you see this order is going to change. So it's not alphabetical is the order that we have. Our sati says pay now that we have understood what filters are and what sorting can-do, we can dive a little bit deeper into Filter groups to better illustrate where a filter group is, let's create one. These are the filters that we created before. But let's say that I want to filter by the tasks that are not started or the tags in which studies is in progress. And that the ones that marketing is a project. So I can turn this one into a group and add here that the project is marketing. So right here the filters are going to show either the tasks and or the status is not started, or the ones that comply with these two statements. For example, these first four is going to comply with the first statement over here. And this last one is the one that is complying with this statement over here, which is our filter group. There's a way to group sorting, but he's not a group in itself is sorting within assault. So in order to do that, we head over to sort and we can add a new source. So let's say that within the ones that are not started, we can, we want to also sort by project. So we can go here, project. And within each of these statuses, we are sorting by project. Okay, maybe let, let's remove the filters so we can see the sirtuins inaction. Both. So you see the first sorting is the status, and then within this status is filtering by project. So now I'm going to show you a practical filter that I will use for a task management. Let's say that we want to hide those tasks that are completed because we just want to be focusing on the tasks that we need to do. So we are going to add a filter by the statues. And here we are going to select is not completed. So right now we're sort of, we're filtering everything that is not completed. And whenever I'm, I complete a task. This gets removed from our list. Again, this doesn't mean that this data has been removed. I'm just filtering it out. So I am not seeing it. It's still there. Okay. It's seeing the database. But by now you may be wondering, Okay, but what if I also want to see the tasks that are completed? Do I have to remove the filter unfiltered jazz by the ones that are completed. And if I want to go back, I need to change the filters. Once again. No, the answer is no, no notion for these uses what they call views. In one database, we can create different views that can have their own different filters. And this is what we are going to cover in the next lesson. So see you in the next video.
14. 3.4 Database Views: Hello, welcome back to the course. So in this lesson we are going to be talking about the views within databases. So let's say that within our database, we want to be able to look at the tasks that are completed, but also at the tasks that are pending. So in order to avoid changing the filters or the time notion has created these feature which are called views. So let's jump into notion to see how we can create different views. And then we are going to be diving into the different kinds of views. So we are going to click here in the view, let's call this completed tasks and we're going to create it. So right now, this view is showing us all the data that we have in the database. But in order to make it work, let's add the filter to just see the tasks that are completed. And that's it. So now if we want to go back to our previous view, we click here. It's called default view because we didn't name it, but let's name it to pending tasks. And we go here n, we add a filter to yes, show dependent tasks. Filter status is not completed. So like this, we can jump into these two filters to show the data that we want at most. So now let's explain the different views that notion has to offer. When we click here, maybe you saw it before. There is five kinds of views. The first one is stable, the one that we've been using up til now. This next one is board. This is a Kanban boards. So if you views apps like Trello for example, you may be used to it. For me, this view is very good for tasks that half a chronology. In this case we have a chronology from the status not started to in progress to complete it. So let's see how this comes from view looks with our data. So this by default is grouping our data by the statues. But if for example, by default he's grouping by the project, and this is not what we want. We can just click here and change what he's grouping. And I don't want to see this no Status column. So I'm just going to hide it. And like this, I can progress all the tasks within our workflow. For example, if I drag and drop this task to, to In Progress, first less open it. Let's say the status is not started. If I drag it. Now the status has changed to in progress. And if I continue their workflow, this status is completed. Another view that we can be using is the calendar view. This is going to create a calendar and he's gonna position here all the tasks that have due date. In our example, we just add a due date to one of the task. But if we want to go back to our tasks in a due date to another task, we can go back to our calendar. And this task is going to appear here. And here is the same. We can drag and drop. And the due date will change now is 16. If we drag it here. Now is 18. Ok? If we don't want to go back to the previous view to check which one have due dates or which haven't. We can always come here. And he will show us all the data that don't have any due date. And whenever weekly one is going to add it to our calendar to the day that we are in. And from here, we can drag and drop it. In. The next view that we can be using is the gallery view. What this view is going to create is a gallery of all the entries we have. So here in the case that we want to add images to our TAS width for a task management doesn't really make sense. But for example, for our, if we want to create a database for recipes, we can add an image to each of the recipe. So the photo of the dish is going to be shown here. So unassigned example, let me take one image and paste it into a task right now. And this is going to be showing the image. And the last view that we can create is a ListView. This basically the same as a TableView, but it's simplified. So if we don't want to show all the properties and changing the properties and everything. We just went to see the data and don't interact with it. We are going to be using this view. For me, this view is useful if we are storing book notes, for example, that maybe we don't have so many categories for them and for wherever usage that you are not going to be using a lot of properties. In like this. There is no columns, so it's just a list and it's much easier to see. We can add more properties because right now it's just showing the statues. We can add more properties. For example, the due date and is going to be shown here. But as you can see, if I click on the date, I cannot see the calendar. I have to go into the task itself and from here to the calendar. So this why you say that these four databases that you are not going to be missing with the properties too much. And that is it guys. This all the five views that notion has to offer in terms of databases, each view has its different use case. So for our example of the task manager, we're just going to be using the table so we can have an overview of all the tasks that we have and we can add tasks from there, the Kanban, so we can move the task in time under the calendar view so we can have an overview of the due dates that we have for our tasks. So that's guys, thank you so much for watching and see you in the next video.
15. 3.5 Database Templates and Examples: Hello, welcome back to the course. Remember that in the first lecture we talk about creating templates within a page. Well, we can also create templates within databases. What does this mean? In the first lesson of this lecture, we saw that we can open any of the entries of a database, acetate. And here we can write whatever we want. So we can create a template or all the entries within the database. Let's say that we went to report all the tasks in the same way and with the same information though, in order to create a template for the database. Remember, this template is just going to be used in this database. We come here next to new to this dropdown. And here we can see all the templates for these database. We're gonna create a new template. And this is this loose like a page. And here we're gonna create a template for the task. So once we have finished editing the template that we are going to be using, we guess click outside, and the template has already been created. So now whenever we open any of the entries as a page, here, we're going to see our templates. And when we click on it, both the template appears. So for example, if I go to my private notion for creating this course, I have here the curriculum. And I have a template here, notion course template. And this template I select here what I have to prepare for the lesson before recording. Here is the outline of the things that I'm going to talk about in the lesson. And this is common for all the entries that I have for the zettabytes, which is the curriculum of my course. So that's it for templates. So far, we have just been talking about single databases. But in notion, we can link databases and pass data from one database to another one. So that is what we are going to be covering in the next lesson. See you there.
16. 3.6 Linked Databases: Hello, welcome back to the course. Before we dive into how to pass data from one database to the other, I wanted to make this quick video into how to link databases. So far, we have just seen how to create a single databases in notion. But what if we want to access the information of that database from another place in our workspace. Let's say, for example, that we are working in marketing project. And we have a page for that project. And we want to see in that page only the tasks that are related to marketing. So let's jump into notion to see how we do that. Here, we have all the tasks that we have pending. And here we can see that we have different projects. Okay? So let's say that we go to our projects and we create a page for our marketing department. So what we can do here, instead of creating a new database in just importing tasks for the marketing department, we can use these tasks database as a master database. And then in this page, create filters that are just going to apply to our marketing department. For this, we're going to create what is called a linked database. Create linked database. And here we're going to have a drop-down of all the databases that we have in our workspace tasks, the one with the fire. We can know that these are links and database because of this arrow over here. So right now, this is an exact copy of our master database, but all the changes that we make here are going to be reflected on the other database. So for example, if for task ten and we change the project to wave depth, you will go to the master database. On task ten. This is web depth. It will change it from the master database to marketing. Come in to here is going to be also marketing. Okay, so they're linked. So now let's add some filters that are just going to be useful for the marketing department. He has create our filter and the project is marketing. Okay, well, let's make these columns beautiful. And as we are in the marketing page, we can even hide the project because it's obviously going to be a marketing related task. So now let's add different views. This is going to have four. They complete it. They start Hills is complete. And then in this default view, let's call it in progress or pending. And let's filter out and the ones that are completed and start use is not completed. So right now we have this link database with the tasks that are pending and details that are completed. One very practical use that I give to link databases is I create a page just for adding tasks. I'm going to show you how. Let's create a new page, open as page. And let's create here that link database to our tasks database. My only purpose of this database is going to just use it to add new tasks to my master database. My normal way of r intos is I go in order through all the columns from left to right. I write first the tasks, then the project, then the sadness, and finally the due date. As we know that all the tasks that we are going to be including are going to have the status as not started. We can already filter by not started. So whenever we add a new task and this is the studies that is going to have not started. What I want is that this view is always empty. As soon as I finish are in all the fields that I want to add for each task, she also gets filtered out. So how am I gonna do that? First studies I can hide because it's always going to be started. And I am going to filter by due date is empty. So like this, I'm just going to show the tasks which due date is empty. And whenever I will feel that you date, she's going to disappear from here. So r in this filter, I cannot see anything. Ok, so now whenever I add a new task, task 11, I select the project and I selected unit in as soon as I select the due-date. She's gonna disappear from this view, but it's going to be added to my master task Database. Boom, that's it. Now if we go to our tasks database, we can see here task 11, with their status not started, that there was automatically fulfilled by the filter that we put, and that's it. And I always like to have this page as favorites. So I can access it from here. And these are very easy way to add tasks on the Gulf. For example, if we are using notion on our cell phone, we can go just to this page. New task, set a due date and by white. So I hope you like this tip. This for me is super, super useful. And then in the next video we are going to be talking about how to relate databases in passing data from one to the end and see you in the next video.
17. 3.7 Relational Databases: Welcome back. In this video, we are going to be covering, which is for me my favorite feature in option. And this is related databases. So basically this is having two databases that can connect with each other. This means we can pass data from one database to the other database. So let's dive into notion. Let's say that we want to create a database that is going to store our projects. Because maybe we want to store data in a project level, such as the budget or the amount of resources allocated to this project, the progress of the project, etc. N like this, like we have in Syria before, we cannot do so many things. So let's go to our projects page and before we create the space, but we can delete, we're not going to use pages, we're going to use the databases and less creates and database for our projects. Okay, so the first thing that we want to do is to show the tasks that are assigned to each of the projects. So for these, we have to relate both databases, the database and the tasks database in order to do so, there is a property in the databases that is called relation, and this is what we are going to be using for connecting both databases. Here we are going to link these database, the tasks database. And now both databases are related. If we go to the task database, we can see that a new column has been created. So far, this relation is yes, relating the title property. So whenever we click in here, well, let's call these projects. So whenever we click in here, we're just going to see the projects. But we cannot select to see the tags or the files, in this case the projects. So let's say that this task is video editing. Okay, so now we have related the tasks with the projects. So now if we go to our projects database, we can see that we have added all the tasks that are related to each of the projects. In like these, we can have a much better overview of what is going on inside a project, but we're just passing through the title property. We're not passing through the status of the tasks or anything else. So in order to pass different kinds of data between two databases, we are going to have to use another feature which is called rollup. And this is what we are going to be covering in the next video. So see you there.
18. 3.8 Advanced Database Properties: Welcome back to the course. In this video, we are going to be talking about rollups, which is a feature that is going to allow us move data from one database, the other. And we're also going to be covering briefly formulas. If you have already used Google sheets or Excel, you may be used to formulas there. So there's also formulas in notion, but they're a little bit different. The syntax is different. So let's jump in. So right now we have here our database of projects, but less changes to task, sorry, and so far files we don't need. Okay, so we have here our database with the projects and the tasks. But let's say what if I want to know which is the status of the tasks? Just look in here so I can create what is called a roll-up. It's worth mentioning that in order to use a roll-up, we need to have already created one relational property, okay? Because if not, there is no database that we can bring the data from here. He's going to ask us about which relation we are going to be taken in theta from. This is going to be tasks. We just have one. And which property are we going to be bringing into our database? In this case, the status? Right now, this has no practical value, ok, but this was just to demonstrate how we can bring data from one database to the other. And whenever we change the attributes from the tasks, let's say that this task five is completed. We can go to our projects and we can say that here, task five is completed. So now in order to have a good overview of our project, let's try to see how many tasks we have opened in the project and how many tasks we have already completed in the project. Here in the rollup, I can not only just show which is the real value, I can make calculations. Here. We can count all the values, unique values count empty, not empty, but as we have three statuses and we just want to show how many completed, we will have to find a different way. Because if we count values here isn't going to matter, which is the status. Every SAT you, it's going to count as one. So we are going to create a new property within our tasks database that is going to allow us to see if the task is completed or not. So we go to this task database, and this is going to be the first formula that we are going to be using in this course. Let's add a new one. And let's create this as a formula. When we click here, we have this popup that shows us the main formulas that we can use within notion. So what I want this formula to do is that whenever the status is completed, that This creates a checkbox in with this from our projects database, we will be able to count the number of check boxes that we have, which is going to be the same as knowing how many completed tasks we have in order to do so, we're going to start with an if statement. If. And then here I have all the properties listed. So if status equals completed, then true. If not false. Let's remove this filter though. Now, whenever a task is completed, this checkbox is already ticked about these formulas. Don't worry if you still don't understand it. There is a description of each of the formulas whenever you hover on it that explains you what they do. So take your time, go through each formula, see the possibilities that notion formulas can have for you. So now that we have this check box done, we can go to our projects and create a new Roll-up is gonna be done tasks. And in these roll-up, we're going to be taking data, again, the task database. But the property is going to be the done by default this year showing us the original data. But what we want is to count the number of checked tasks that we have. Right now here we have one task Tan, I'm seeing that I I haven't selected pray for everything, so let me do it in 1 second. Okay, and we are back into our projects. So this is counting the number of the done property there are checked, and this means the number of already completed tasks. So if we want to know how many tasks are active, just have to know the difference between the Don tasks and the total number of tasks. So in order to do that, I'm going to change these column instead of just showing their statuses. I am going to join the count of all of them. And this is going to be referencing the total number of tasks that I have in that project. So I'm gonna call this total. So now in order to know how many tasks I have left for each of the projects, I can create a new formula. And basically angles gonna know the difference between both. So it's going to be total tasks. Miners don't tasks. That's it. Here is tending tasks in like this. We can have a very good overview of the number of tasks that are pending for our project. And now for example, when, whenever we complete a new task and this is going to be updated in real time. So let's say we have development has two pending tasks. Let's go to our task database. Web development. Let's just filter web development to the ONCHIT crazy. There is two pending tasks. So whenever we complete one of them, if we go to our projects, we see that this has been updated. Now there's just one pending tasks. Okay guys, so this is all for the theory part of this course. Right now, you have a lot of tools to use notion width, but we're notion really excels is in the flexibility that it gives you to create your own workflow at your own way. So the purpose of the next lecture is going to give you a set of ideas that you can implement in your professional and your personal life who have everything organized and almost automatic. This is the part of notion that really, really is so powerful that you can customize it in your own terms. So I'm so excited to share this journey with you so that you can see what this tool can do in our life. And I cannot wait to start. So see you in the next lecture.
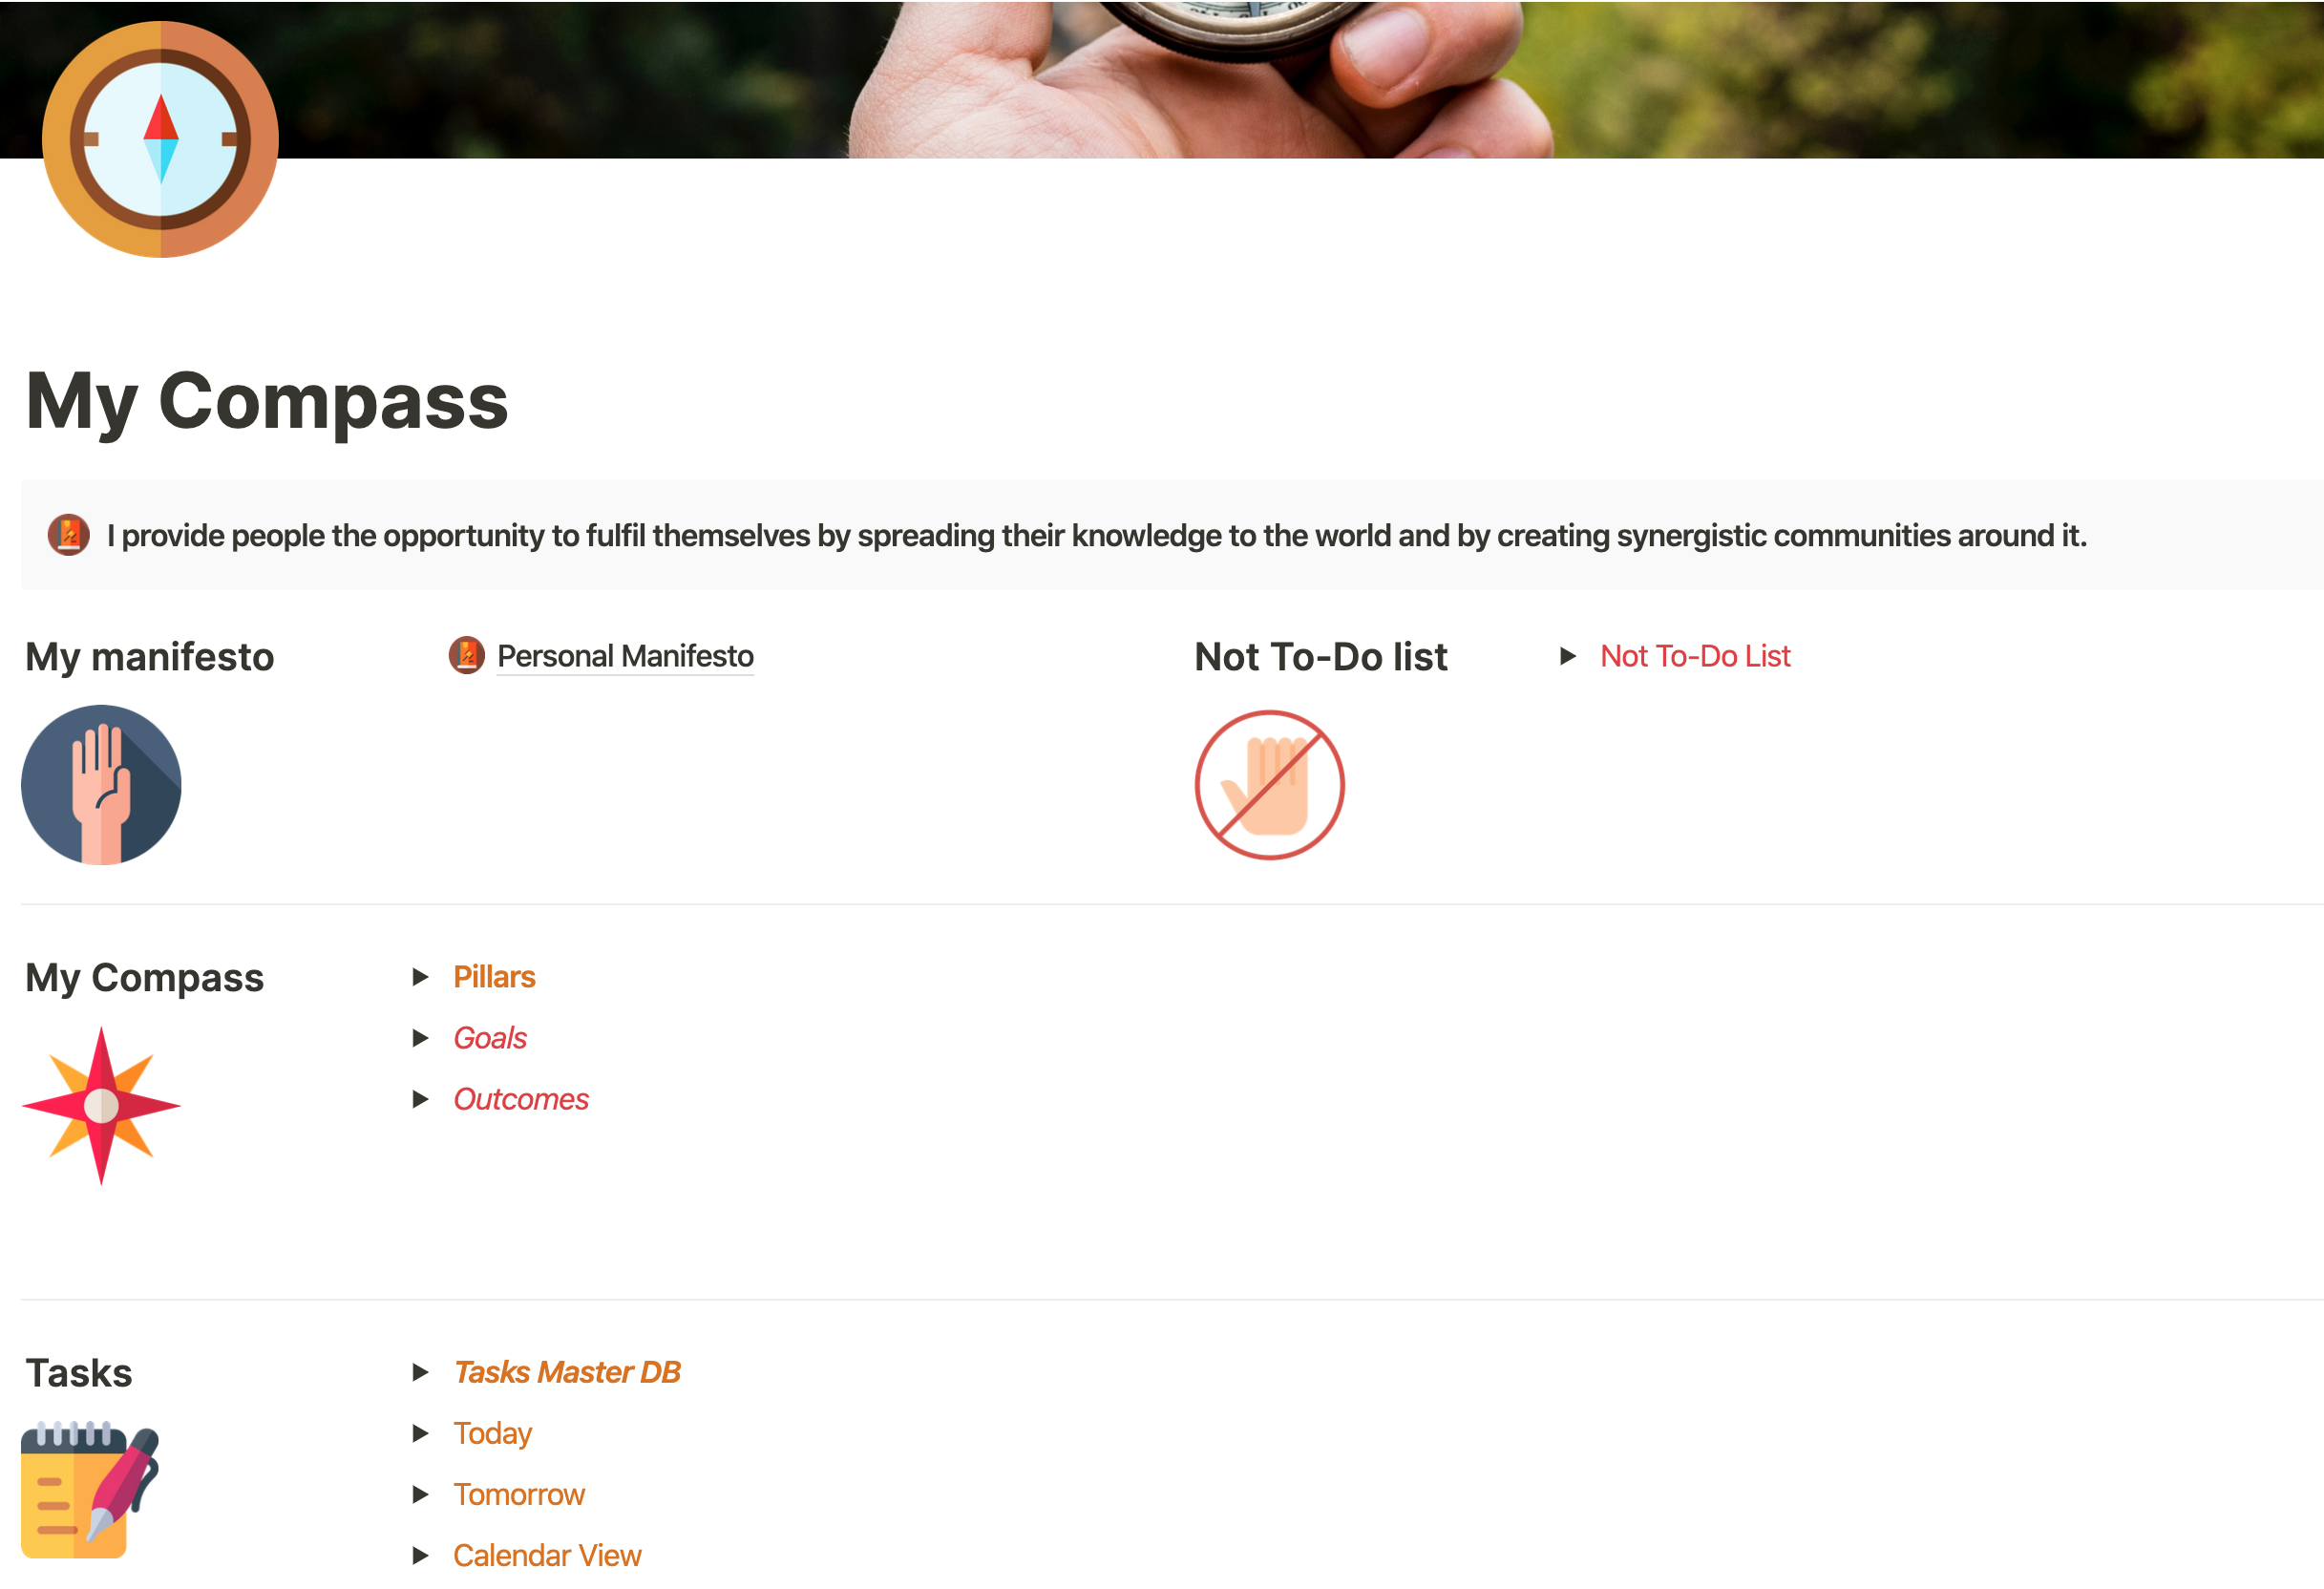
19. Section 4. Goal Oriented Task Management: Hello and welcome to section four. Congratulations on passing through all the theory part of this course. You already have all the pieces that you need in order to build your life system in notion. So from now on, we will be putting all these pieces together in order to build a system in notion that handles all parts of your life. So needless to say that everyone has their own particularities. So if you find that some system doesn't apply to your personal life, feel free to change it. The objective here is that you are confident in using the system that you've built for yourself. So these lectures are going to give you a wide variety of things that you can build a notion with the objective to show you what notion is capable of. And from there, There's Kaizen limit will be focusing on task management. We will learn how to link our daily tasks with our goals and with our life pillars, which are the main structures that sustain our life, we're also going to learn how to set our system. So our tasks are always set on the right direction and bringing us where we really want to go. And also, we will be building our life calendar. You will be able to use this calendar in every situation and for everything in your life, and may potentially replace your Google Calendar or other calendar of choice. So without any further ado, let's start with the practice part, which is really the gem of this course.
20. 4.1 Setting up Weeks, Months, Quarters and Years: Hello, welcome back to the course. In this lesson, we are going to be creating our first dashboard that is going to be containing the four parts of the system that we are going to be learning in this course. And later on we will create our time databases. These will include four databases, one for the weeks, one for the months, one for the quarter, and one for the years. But why do we need these databases? They are going to allow us to aggregate different kinds of data for each of those time intervals. And also they're going to support us into doing weekly, monthly, quarterly, or even yearly reviews. We are going to be storing in each of those databases. For example, we will be able to see all the goals that we have for a certain quarter or the average of activity of us convenient to our daily habits in our weekly or monthly basis. And then we will be able to use these data to make changes to our life and to improve our effectiveness. So first of all, let's create this dashboard. Let's go here and ocean, this is the dashboard that we have created before. I am going to delete all these pages and I'm going to rearrange these three categories because I'm going to turn them into four. Ok, so after we have created all these four categories, I'm going to create a page to store all these time-based databases page. And this is going to be called cycles. So first of all, I'm going to create the years database and each entry is going to be for one year. These columns we don't need. Next, we are going to create our quarters database. Let's write the quarters for this year. And we also don't need these columns. Then the Moon's database. And also we don't need these columns. And finally, the waves database. I like to call them with one, with two, with three. And I'm not going to create the 52 because for the ways I like to be creating them every Friday or every Sunday before I enter in that week. This way you don't have to create all the weeks at the same time also needing this. Okay, so in this case, I'm going to be relating the week with a month's database and the quarters to the years database. And the reason for these very simple, I'm going to be using the Weeks to track my habits and to be able to see their aggregation in a monthly basis at a really carried in a quarterly or yearly basis. And then I'm going to be used in the Carter's database to link them to my personal and professional goals because that is going to be the deadline for each of them. In likewise, I will be able to see all those goals aggregated in each of the years. So each time database is going to be used for a different purpose. So let's start to do these relations. I am going to add four weeks new relation to the Mongo database this month and change this default name two weeks. When one is going to be January. And I'm gonna do the same for the quarters and the years, year relation tiers. And I am going to relate this to the 20-20. And you see how these are aggregated here and the changes too. Sorry, Carter. So now that we've finished creating all these databases, we will be able to aggregate all the data that we want to include in the quarters database, in its yearly database. So for example, if I'm going to be importing all the outcomes for each of the quarters. I will be able to see all these outcomes aggregated in here by using the ROLLUP feature that we learned in the previous lecture. So for now, let's leave those databases here and we will come back to them once we are a little bit more advanced into creating our system. So see you in the next video.
21. 4.2 Pillars, Goals and Outcomes: Welcome back to the course. I'm so excited for this lesson because this is going to be the base of our system. And this is going to allow us to really put our life for success. So in this lesson, we are going to be covering three of the main databases of our system. Those are the pillars, the goals, and the outcomes. Before we start building them, let me explain them a little bit. The dealers are going to be containing the main areas of our life. Things like product development, health, and fitness are all going to be included in this database. So those are the areas of our life that without taking actions towards nurturing each of them, our life will fall apart. We can think them as timeless and in variable, in time. So of course, no due dates will be assigned to this database as they're supposed to be neutral throughout our lifetime. The next one is a goes database here, we're actually going to be reading our real goals that are going to be supporting each of our pillars. They can be a little ethereal, such as have a thriving business or I want to be healthy. Those aren't measurable, but are easier for us to create in the first place. So we can think of our goals as the bridge that is going to help us tie our pillars with our outcomes are quantifiable and that we are going to explain now when we are in the process of creating our goals, we are going to make sure that we have at least one goal for each of our life pillars. And to finish the outcomes database, this database is going to be tightly related to our goals database and it's going to be containing the measurables that we are going to need to fulfill in order to achieve each of the goals. Needless to say, that each goal can have multiple outcomes. So for example, to the, I want to have a thriving business goal. We can attach the outcome of I10, earn 60 K dollars in this year. Or I want to grow my website 25 thousand visitors every month or two, then I want to be healthy and goal. We can attach the outcome of I10 work out four times every week. And we have to make sure that we create at least one outcome for each of our goals. So now let's jump into notions so we can start building all these databases. We are here in our dashboard. And before we start building the databases, let me show you a little diagram that is going to make the system a little bit more easy to understand. Each of these squares is going to be one database. We have already created the quarters database. And we're going to be creating the pillars that goes and the outcomes. And then in the next lecture we are going to be creating the database for our tasks. Those lines are the relations between each of the databases. So back to notion. I'm gonna create a new page here, which is going to be called my compass. I like to call this one my compass. Because for me, this page is the one that is going to give direction to my life. So I'm going to be building the first database, which is going to be our pillars, less than these two pillars. And I also want to give it a category so I can see at a glance which parts of my life are those pillars corresponding to? So these are my eight pillars. And I'm going to be assigning categories when it's going to be growth. The older one, the other one is going to be business. And the third one is going to be personal. Learning is growth. Health and fitness is growth. And we're not going to be needing this one over here. These are my pillars, but maybe yours are going to be different. This is, this is going to depend on everyone's life. Ok, so feel free to change my pages or even to copy them, start using them and maybe change them over time. Next setup is that we are going to be using is our goals. So what I like to do here is go through each of the pillars and think, OK, which goal I want to achieve in this pillar in particular. So for example, in learning, I can include that I want to learn copywriting, which is actually true. So in this goal, I am going to write. And then this goal is going to be attached to the learning pillar. So let's create the relation between both databases. And also for the goals. I like to give them a timeline which is a soft due date for me. So in this case is going to be eaten by quarters. So I'm going to be relating this goes database to the quarters database that we created in the previous lesson. And let's say that I want to be learning copywriting by the quarter three of 2020. So now I'm going to be doing the introspection of setting one goal for each of the pillars. Okay, so we have finished reading all our goals. And you can see that for each of the pillars, we have selected one goal filter only free to put more than one goal for each of the pillars are now do this exercise by yourself. Take your time, maybe 30 minutes, one hour in, write down your goals and make sure that each pillar has at least one or more goals. Now next up we're going to be treating our outcomes database. So remember the outcomes are the measurable things that has to happen in order for us to achieve each of the goals. And this is going to be related to our goals. And we're also going to be relating it with our pillars. And you may ask yourself, why do I need to relate it to the pillars? Well, my objective that by just looking at the pillars, I'm able to see how my system is working. And for this notion has a little limitation. Let me go to this diagram to show you. You can see here that we have four levels of databases, right? And I want to show the aggregation of all my tasks in my pillars database. So if I just relate then task two outcomes, outcomes to goals and goals to pillars, visa for levels. So I won't be able to make a relation from the task to the outcomes and do a roll-up to aggregate those to my goals. And then I cannot make a roll-up of a roll-up in order to bring the data pillars. So that is why I am relating the outcomes database to the pillars. So then it just become a three-level relation from tasks to outcomes and from outcomes to pillars. So from the pillars using just a roll-up, I'm going to be able to aggregate all the tasks that are helping each of the pillars. So now in order to be your outcomes database as yourself, this question, What measurable events do I have to achieve in order to fulfill this goal? So with this question in mind, I'm going to take my time and now write the outcomes for each of my goals. Remember that I can have more than one outcome for each of the goals. So that's it. Those are my outcomes for each of the goals. Now, if we go to our pillars database, we can see that for each of the pillars, we have at least one goal and we have at least one outcome. So now the next step is going to be creating our tasks database in pulling the data from all those tasks into these pillars to ensure that there is at least one action item for each of the pillars, which is going to mean that each of the pillars is taken care of. So this is it for this video. I hope this helped you a lot, also injure introspection. And let's see you in the next one.
22. 4.3 Outcome Oriented Task Management: Welcome back. So now that we have created the base of our system, let's create the database that is going to be contained. The real actionable items that we are going to be using in a daily basis. This what we are going to be calling our master tasks database. The database is going to allow us to import everything that we want to get done, assigning two projects, create due dates. And most importantly, we are going to be making sure that our tasks are aligned, our outcomes, goals, and pillars. So lazy I'm writing, we are now in my compass page. So you can see that I have put all the icons and now I'm going to be creating dead tasks database. The first column is going to be for the task. And the second one is going to be the urgency. And the third one is going to be the projects. These very personal, you can either create a database for your projects or you can just use oscillates depending on the complexity that you want to add to your system. The next one is going to be a status column. And then the next one is going to be the due dates. A is going to be the data we want our task to get done. It's different to adduce aids. And I mostly work with due dates instead of due dates. But these, again, these up to you. You can select a due date or even have two dates. They DO date the due date or the due-date. Give me a moment to create all the audiences produce and statuses. So now let's create our first filter in this database. I want that everytime that I complete a task, that it gets disappears. So I am going to create the same fields that we created in our past lesson. Coming here to filters. And add a filter to just show the statuses that is not completed. And that's it. And this is going to hide all the completed tasks. And we can create a new table which is going to be containing all the tasks. And then our previous table. There is going to be covering in the active tasks with the filter that we previously set up. So now in order to be getting overview whether or not our tasks are on the right track, we are going to be related in this database with our outcomes database. Outcome in relation to the outcome database. And changing the name here tasks. So now that we have built all the relations, let's look back at our graph. And we can see here that whenever we are going to add a new task into our system, the only relation that we are going to be adding to the task is going to be this of the outcomes database. And the rest is going to be completely automatical through the relations and through the rollups that we are going to be implementing in the next lecture. So as I said before, this way, we can see in our goals and our pillars database and the number of tasks that we have pending, the total tasks and everything that we want. It's very important to force ourselves to link every task to an outcome. Because we may be in a situation in which we think of doing something, but then we check our list of outcomes. And there is not one outcome that we are going to be helping with this task. So maybe we can solve ourselves and think, Do I really have to do this task? Is this going to help me move forward? Is this going to be supporting my pillars? Is this going to be supporting anything in my life? Or it is going to be a lot of time. Or maybe we need to set a new goal in a new outcome for that task. But like this, we will be reflecting every time that we want to create a task whether or not this is going to be helping us moving forward in life. So now I'm going to create fast tasks for each of the outcomes. Okay, so we have already populated our task database and we have at least one task for each of the outcomes, except for working out because I don't want to be creating one task every time I'm going to work out from these kind of useless. I forgot before. I'm going to be adding one extra column to my tasks. That to me personally, this helps me a lot to organize my days. And this is how long it's going to take me to do each of the task. There's going to be a select property and I'm going to be creating these fields. And like this everytime that I am going to be planning, each of the days, I can select a realistic number of tasks that I can tackle everyday. So this is it for this lesson guys. Now we have all our four databases working between each other, but we haven't still created the automatic process that is going to allow us to see whether or not we are on the right track. So this is what we are going to be covering in the next lesson, is going to be the icing on the cake. So let's see you in the next video.
23. 4.4 Automating System Overview: Welcome back to the notion course. In this lesson, we are going to be automating certain things using rollups and formulas. So just by looking at our pillars, we can know whether we are on the right track or not. So let's compute the notion. We are now in our task master database. And now the only thing that we could bring into our pillars database will be the number of tasks that we have in total. Let's see how this is done. I'm going to create a roll-up. And because we have this database related to the outcomes, and the outcomes are related to the tasks. We will be able to bring here the tasks and property tasks. So here we have all the tools that we have for each of the pillars. But at this level of the system, I don't want to be looking at the name of the task. I want to see the number of tasks. So I'm going to count unique values. But there is a problem here, which is what I said before. I'm just seen all of the tasks. If now I go and complete one task, this number is going to be the same because this is not taking into account the status of the task. So my objective now is going to see the number of active tasks in my pillars. For this, I'm going to go down and let's take a look at our task database in order to know whether a task is completed or not. Right now, we have these statues. But the thing is that these studies have three statuses. So it's not possible to know in a binary form whether or not this task has been completed, not started and in progress is going to be not completed and completed is going to be completed. So in order to transform the status into its binary form, I'm going to be creating a formula. Now, this formula is going to be very easy. If the properties sat use equals completed, then true, if not, False, has come here. And we can see that these tasks with no name has already been ticked and the rest of them know if I put this progress, this is still not checked. But if I put this incomplete is checked. Okay, let's go back to the previous view. So now I'm going to go to my outcomes database. And here I am going to bring to properties from my task database with a total number of tasks and the tasks that are done and then calculating the difference, I am going to be able to know the active tasks that I have for each of the outcomes. And later I'm going to bring that number, which is going to be a formula. Because remember we cannot do a roll-up of a roll up to the pillars database and thus having the overview that we want. Let's get into it. First, I'm going to create a ROLAP with all tasks. These roll-up brings the data from the tasks database and count unique values. These are all the tasks for each of the outcomes. And now I'm going to create another ROLAP with the tasks that has been done. Select from the tasks. And then I'm going to be using this formula. And show checked. Like this is all the tiles that has been done. So right now, for example, if we see these organized lectures tasks, if we completed organized lectures, completed here, we will see that we have one completed task into tasks in total. So now by calculating the difference between these two numbers, I'm going to be able to know the active tasks that I have for each of the outcomes. Active tasks formula, and this is going to be all tasks minus completed tasks. So now we are going to be bringing these data into our pillars database. We come here, remember that we already did the old tasks roll-up, but we will not be needed it, and I'm going to create an active tasks on roller. And this is going to be using the outcomes database. And you see that here? I cannot see any of the rollups or the database. I can just see the titles, the formulas, and the relations. So that's why I did it this way. That's why I created a formula to see the active tasks. Now we said that the active tasks and show original because it's already a number and that's it. This we don't need anymore. So like this, we are going to have a very good overview about the status of our pillars half. So now that we're finished setting up this system, just simply by looking at our pillars. We can see everything that is happening in our life. We can check that for each of the pillars, we have a goal. That for each of the goals, we have an outcome. And that for each of the outcomes, we have at least one active tasks. For example, here in health and fitness, I don't have any active tasks because I have decided not to create a task for each time that I am going to work out, but for each of the remaining pillars, I have at least one task so I can ensure that everything is running smoothly. So that is it guys, in setting up our goal oriented task management system. But we still have one thing left into our system that's personally it helps me atan, which is to create our calendar. Dy is going to serve for us to see all the events that we have coming up, all the tasks that we have scheduled. And also a very easy way to schedule our tasks just by drag and dropping them to our calendar. This what we are going to be covering in the next lesson. Thank you so much for joining me in this one and see you in the next one.
24. 4.5 Bird's Eye View. Your Life Calendar: Welcome back to the course. In this lesson, we are going to be setting up a system that I love and that I use every week when I'm planning my week to organize my tasks in my calendar. And also we are going to read tweaking a little bit our task Database, ng-show, show also they events in our calendar and remove them once the event has passed. What do I mean by events? Things such as meeting for coffee, having a car with my mom on Sunday. Did these kind of things for me are events. They are not husks. So let's jump into motion and let's create a page for our planning. I like to create a separate page for this, because whenever I go to this page is going to be just planning my tasks. And like this, it's a much more focused way to do it. So I'm gonna create a new page. So what I want in this page is to be able to see all the non scheduled tasks that I have and also my tasks calendar. Because and this is one of my favorite features of notion. I can simply use to link database for the same database and drag things from one to the other. And their properties are going to be changed accordingly to the database that we dropped them into. So for this, what I want is to have two columns. So let's create these two columns. First, I'm going to create a linked database to our tasks. And in here, I'm just going to be showing the tasks that haven't been scheduled. So this is to say that tells me that the due date is empty. Let's create this filter where the due date is empty, n, Since I'm just going to be using this view to organize my tasks, I don't need anything of these columns. Okay, so now I'm going to create another link database, but showing the calendar view of the test database. Link database has. And I'm going to add a new view calendar. In the case that you have more than one property that is storing dates mixture, that's going through Calendar by and you are selecting the property that you want. In our case, we just have one date field, but make sure that you select the one that you wanna get displayed in this calendar because is not very easy to drag and drop from here to here. I want to create two columns. But if I drag this database here to the right, you can see I cannot do it. I don't know why, but so far, we cannot create columns using databases. So as our work around, what I do is I'm going to create two empty blocks, and I'm going to create the columns with those empty blocks. So right now we have here the two columns. And now I can drag these database in this column and this database in this column. And now we have them as we want in this database. I'm going to be removing all the completed tasks because I don't want to see all my current are polluted with all the past tasks. So filter. Other filter, w1 is not checked. So now let's say that I want to create these recipes database Today, Saturday First. I just have to drag this and select here. And you can see that the task has been removed from here because of the filter and has been added here. And we can see that now the due date is August first. Now, if we want to change the date of this one, we can drag and drop. If we want to make it longer. We can make it longer. I love this calendar in notion seriously is, is amazing. Okay, so, so far we are seeing here the tasks. But I want to also be able to see my events that previously I was searching in Google Calendar. I want to see them in notion. So how to do that? Because we are using the task Database, we're going to have to use the same database for our events. So I'm going to do little tricks so we can include these events in our tasks database. So for this, let's go back to our task. They always, and I am going to add a new project that is going to be called events. So now let's add an events coffee with Mark, The Sunday and projects events. So for events, we just need to put the name of the event, they due dates and the projects events. So now if we go back to our plan page, we can see here the event. And I like to also show that this is an event that is not a task. So for this, I'm going to click in properties. And so the projects like this, I can check that this is an event, but now I don't want to automatically, every time that an event has passed to check it as completed, so it gets disappeared from this calendar. So in order to automate it, I have created a formula that I'm going to show you now that after the time of the event has passed, the event is going to be ticked as completed or as past n. We are going to be using the new property in this calendar view to filter them out. So we will just be looking at the events that are going to happen in not the ones that has happened. So in order to do so, I'm gonna go back to my tasks database. And I'm going to be creating and new property. That is going to be our formula. And in this formula, I'm going to be writing if. And now in this formula, what I want is that whenever the project events and the due date is smaller than the time that it is now. So this means that the event has already passed. I want a check mark. And if this didn't happen, the checkmark is going to be empty. So for creating this, I need to add an and formula. And projects equals events. And this is the second part of the young comma date between. Due dates. And now in here, we can select the time unit I'm going to select in seconds smaller than 0, then true. If not false. So what this formula is doing is whenever they've projects is events and the delta between the due date are now in seconds is smaller than 0. So these means that the due date is smaller than the time that it is now, so that the event has passed. I'm going to return true. If not, I'm going to return false. So whenever an event has passed, this checkmark is going to be checked. Let's try it here. Today is August first. If this coffee with Mark, I put it on July 30 and you see this one has already been checked and this is going to serve us to remove the events from our calendar. Let's put this back to August second, and let's go to the calendar. Here. We are going to be filtering out the new property that we just created. When event past is unchecked. If it's checked, we wanted out. So now if this coffee with Mark I put in the past is going to disappear. Okay? So this is going to automatically remove all the events that has passed. Now in order to have a very easy way to add new events, I'm going to be creating a new page. So it's going to be very easy to add new events. For this, I'm going to be creating a linked database to the tasks database. And in order to add a new event, I just want to add the name of the event, the due date, and that is it. So I'm going to be hiding everything else. And I'm just going to be showing here the ones that are events. Events like this, every time that we add a new task, in this case is going to be automatically categorized as events. And also I want that whenever I add a new event in IAD date, this gets removed and goes directly to my task database. So this view is just for our new events, this similar to the page that we created before in the course to add new tasks that whenever we finished in a task, it gets removed. So in this case is totally the same. So I'm going to add a new filter to filter by due date is empty. And like this, whenever I want to add a new event and I select the dates for the three of August. That's it. Now to check that everything was correctly, let's go to our plan page. And we can see that here we have our our coal with Monica with a project directly tied to events. And whenever this event pulse, this is gonna get checked in, filtered out from our calendar view so that you see now we have our calendars setup so we can see what's coming up in our life task-related and events are related. In the next video, I'm going to be covering how I personally use this system in order to maximize its benefits. So see you in the next one.
25. 4.6 How Do I Use This System: Welcome back to the course now with all our system in place, I'm going to show you how I personally use the system in a daily basis. But before that, we need to create two new pages that I literally use every day. Those are the pages to add tasks very quickly that we talked about before. And then another page that is going to be there today page. So in this page, I'm just going to be able to see what's relevant for me to do today. So let's dive into it. Here we are in our dashboard notion. So I'm going to be creating first the page to add tasks quickly. And since we have already created this page in the lessons before, I'm just going to fast forward. One different thing that defers to the page that we created in the past is that we are going to be also filtering out via events. So that's it. We have our way to quickly capture new tasks. And this is very mobile friendly, and I mostly use it on the phone and for us to access it very fast on the phone, we can just fair it here. And this page is always going to be shown right here, and it's very easy to use on our phone. Let's cool emoji. And let's go back to the dashboard. Now the next place that we are going to be creating is a page for today. For this, I'm going to create a linked database too, our task Database. And I'd like to see this database in a Kanban view and grouped by the task status. Because like this, I can drag and drop from left to right when I pass a task from not started to him progress and from in-progress to complete it. Or let's create this view right now. Board today and creates, and right now it's sorted by priority, but I want to sort by studies. Who, by studies and the ones with no status. I don't want to be seen, so I can just hide it because this is mostly events and that's it. Now I'm gonna filter by today. The filter where due date is today. But I also want to see in the tasks which due date is in the past, but that I haven't completed. So as you can see, these groups, two conditions. So I am going to create a Filter group for this in which due date is on or before today. And the status is not completed. That's it. We have already set it up. Let's Buddha cool emoji. And now I'm also going to favorite this page. So I have quick access to adding new tasks and for today's view. So now, how do I use this system consistently? So every time that I come up with a task, I use the ARRA new task page and I just simply write it here. New task, the due date. I want to show it here just in case I already know weekday i'm going to do this task, but normally I don't, so I leave it blank. And then the duration, the project that is referring to, the urgency. And then I select the outcome that is going to fulfill. Again, if I cannot find any outcome that this task is supporting, Maybe I shouldn't do this task. Okay, so these are very good step to force ourselves to do. Because like this, we can discover which tasks are really worth doing and which tasks towns. And once the alchemists fulfill, the task is done. So I'm going to be doing this every time that I come up with a new task. And then every Sunday in the evening, I take some time to plan my week. So for that, I always go to my plan page. And here I have all the tasks that I haven't scheduled, so I just simply drag them. I also like here to know the duration of each of the tasks so I can see if I have too much going on in one day and I can rearrange things. So let's also see the duration. And then once I have finished schedule my upcoming week every day, I leave all my today page. And what is cool about this page is that once you have gone through this scheduling process, every day, that today page is going to tell you what you have to do every day and you don't have to think. So. Now, if I just go to my today day, here, I have the tasks there are pending for me today to do. And then as I commit with one task, let's say that I want to start doing this one here. I will just drag it here. And I will close notion and start working on it. Once I finish it, I will move it to complete it, and I will do the same. But then how about the outcomes and the goals? Well, for these, as they're more variable than the tasks every end of the month on the 30 or on the 34's, I'd take some time to look at my goals and my outcomes NIS myself the following question. Is there any goal that is no longer relevant? If so, I will delete it easier. Any new goals that I want to pursue that is not included here. If so, I will add a new goal, and therefore, I'm going to add all the outcomes that I need to fulfill for that goal to be completed. And that is C. It's just by doing these monthly check on their outcomes and goals and the weekly planning every Sunday. In my case, there is nothing else that we have to touch in this system. As every day, we will be sure that all the tasks that are in our plates are moving forward to our goals. And we don't even have to think about what to do every day because notion will tell us. So now feel free to customize these systems to your own needs, but be careful to don't over complicated systems are supposed to offer very, very little friction for us to use them consistently. So my advice to you is set your system getting rolling for some weeks to figure out the tweaks that you need to make it to adapt it to your own life. Don't over complicated and then just continue using it without friction. So thanks so much for watching. I hope this lecture was very useful for you because it is, for me it has totally changed the way I approach my work and it has made me much more productive every day since now, I will have totally clear when I have to do every day and I'm sure that those aren't the right tasks to do. And if you have any further questions, please let me know.
 Daniel Canosa, Productivity Master