Transcripts
1. Introduction: Quick, you have 60 seconds to draw the human figure. If someone says that to you and you panic, you're in the right place. Hi and welcome to how to gesture sketch like a pro. Getting started with drawing with a tight time constraint can be intimidating, but we will break it down into actionable steps and take the pressure out of it. Gesture sketching is a foundational skill to have whatever your aim is an art, whether you're a cartoony or doing hyperreal is today's class will break the process down and you will learn the principles of making a successful gesture sketch. My name is Taylor May and I've been an independent artist for over ten years. I started an enemy, but my style has varied over the years to my current semi realistic painting style. I specialize in portraiture, but do work in character. Our InDesign as well. I was entirely self-taught up until last year when I started going to school for game art, being a self-taught artist, I have made and seen just about every mistake that can be made. And I aimed to pass that knowledge onto you. In this class, you will learn what a gesture sketch is, why gesturing is important? The basic principles of gesturing, what not to do, how to utilize reference, and how to draw a form in 60 seconds or less. This class will focus on the human form, but the concepts can be applied to just about anything. This class is great for beginners who are just learning Fine Arts. Basic anatomy knowledge can be helpful but is not required. I will be using Photoshop, but you can follow along with another drawing program, procreate for the iPad, or even good old-fashioned pencil and paper. By the time you finish, you will have at least ten sketches, each done in 60 seconds and more if you follow along with the exercises in the lessons. So let's get started.
2. Project Introduction: For the project for this class, we will be doing ten 60-second gesture sketches. This is a great digestible amount to begin with. The number isn't too daunting and it won't take up too much of your time. It's a good amount of practice with, without being overwhelming. This exercise is one I do often as it can be done in such a short amount of time, you get the benefits of gesturing all in a bite-sized piece. 10 minutes of gesturing is good for beginners and experts alike as a warm-up or as a daily project. I often use it as a warm-up before working on larger pieces or as a brainstorming method for finding poses I like for my finished pieces, be sure to read the project description for any tips after the main lessons, I will do the project alongside you to prepare either start a new 2000 by 2000 Photoshop or Procreate document or get out of Sketchpad and pencil. See you in the lesson.
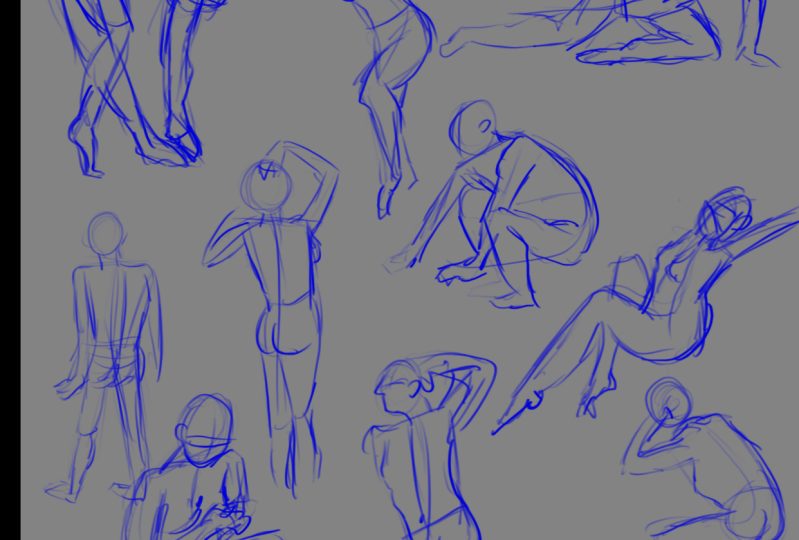
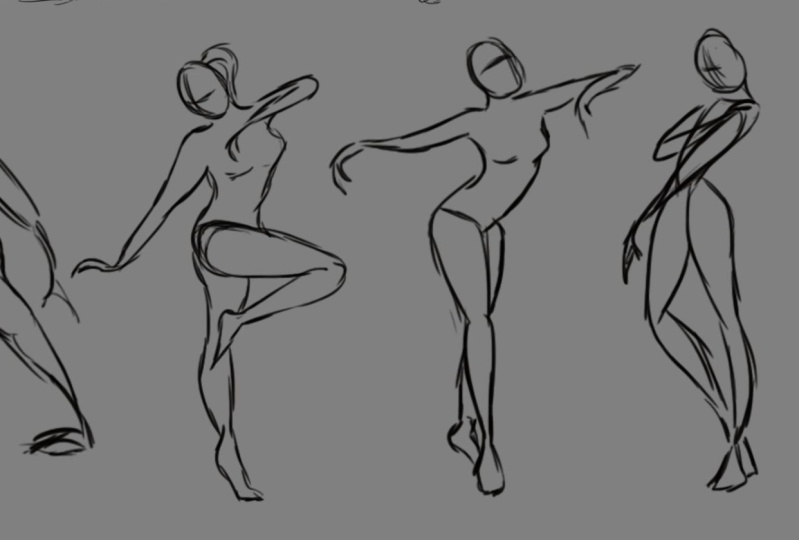
3. What is a Gesture?: So what is a gesture sketch? Why is it important? A gesture sketch is capturing the essence of a figure, pose, or action in a limited amount of time. Gestures can be done in as little as ten seconds, but they can go as long as five minutes. Today we are going to be doing 60-second gesturing. For our purposes, we will be talking about sketching of the human form. Gesture sketches are done from reference. I'll go into more detail on this in a later section. But always, always, always use reference. Gesturing without reference defeats the entire purpose and you learn nothing from it. When gesturing, you focus solely on capturing, not anatomical correctness necessarily or certainly normal construction. However, practice makes perfect and good anatomy will follow good figure sketching. The more you study the human figure, the more you will get to know it and the better you will understand the form and body. It takes time, but keep working at it. Gestures are often done of nude or almost nude figures. This allows the artist to see the form rather than a pile of cloth on or around the figure. I mean, you can gesture just about any figure clothing or not, but it is easier to see the form of the body if the model is nude or almost so, we will be working with nude and partially nude figures today. So why is it important in gesture sketches do several things for an artist. It teaches economy of line, which is learning to use less lines to convey more. This is useful especially in cartooning, but also in realistic drawing. Every line, every brushstroke should further the drawing not detract from it. The more you learn to use lines to enhance your drawing, the better your drawing and sketching will become. As you can see in my example, I use very few lines to actually convey the figure. It teaches speed, trains you to capture quickly and efficiently. This is especially important if you're wanting to go into the professional world of art. Being able to produce quality art in a timely manner is invaluable and gesture sketching helps train you for that. It also teaches AI training. It trains the eye to see the whole of the pose. Trains the eye to quickly assess anatomy and motion, and trains the eye to study reference for what it is without getting too obsessed over the details first. Furthermore, it teaches hand training. This trains the hand to work confidently. This is again important in the professional world, but also if you are just a hobbyist, forcing yourself to draw confidently will boost your confidence in your overall. Even if you don't feel the confidence at first, keep forcing those bold lines. In my example, I did the one on the left with confident bold strokes. The one on the right is done with non-competent tiny strokes, and as a result, it is stiff and not nearly as dynamic. Gesture sketching also trains your hand to draw lines the correct way the first time. All artists mess up sometimes, but if you continue to train your eye-hand coordination, your lines will go more the way you want them to go on the first try. Daily gesture sketching is the most beneficial. You'll see quick improvement in all of these things by practicing with proper technique, everyday. Gesture sketches also do things for a finished piece, starting with a gesture, allows for movement and action and moods to be captured first prior to construction shapes being laid down. This can make all the difference between a stiff pose, an unnatural one. In my example here I did the middle sketch with a gesture first as seen on the far left, the one on the right, I just detailed from top to bottom with no gesture. The results speak for themselves. I believe.
4. Using a Reference: All right, using a reference, there seems to be sometimes this preconceived notion that all the best artists don't need to use reference. And I am here to tell you that that is complete and utter nonsense. All the best artists make the best use of reference. Now your reference should be a clear, high-quality image. Obviously, I went a little nuts with JPEG in this image, but you get the idea. You don't want it to be blurry, dark, and frankly, unreadable. You need to be able to see what you're referencing as much as possible. The image should also be well-lit. The reference figure should be nude or near nude, at least for our class today, this can include underwear or things like loin cloths and shorts. The reference on the left is not a bad reference picture. It's clear, it's well lit, but for our purposes today, it is not useful because you cannot see the form of the figure. Reference should not be a close-up on any specific body part. Ideally, you want to be able to see from the top of the head to the tip of the toes. If a little bit as cut-off, It's okay but avoid half body shots are photos that show only the torso, the arm, the head, et cetera. Again, the reference on the left isn't a bad arm reference, but it's impossible to sketch the whole figure from that reference. Two great places to find good pose references is quick poses.com and sketch daily dotnet. These sites also come with built-in timers. Don't ever gesture from memory. Why? For two main reasons. For one, you don't learn anything to your training your hand and I incorrectly, which defeats the purpose of gesturing. You can see here I did the sketch on the left entirely from memory. The sketch on the right, I did in the same amount of time while looking at a reference. I think the results speak for themselves. The anatomy is leagues more accurate, the poses more natural and there's form to the reference sketch, whereas the one from memory feels more flat. Exercise one, pick a reference photo from either quick poses or sketched daily.
5. Principles of Gesturing: All right, The Principles of gesturing, we're in the real meat and potatoes now folks, exercise 2 is the process of gesturing using the reference gathered in the last exercise. So step one, scribble before you even begin, loosen up your hand. This can be done by scribbling on a page prior to beginning. The purpose of this is to allow freedom of movement and to achieve flowing lines rather than stiff ones. So scribble away, step to posture. It's easy to get hunched over and tensed up when gesture sketching, especially when you're all too aware of the time constraint. Relax. Don't press too hard with the pen or pencil. This isn't life or death. It's just a sketch in all actuality, people aren't going to see your gesture sketches very often. It's not what you put in your portfolio. It's not the finished pieces that you show off. It's a warm-up, it's practice. It's not the end of the world if they aren't quite as amazing as you'd like them to be. So relax, gesturing should be fun, not stressful. Step three, draw the head. We're actually starting the sketch now, established scale by drawing a circle for the head. This is not necessary in some artists to skip to the next step. However, I find it to be very helpful in proportioning the rest of my sketch if I know the scale of the head, step 4, the line of action, exactly what it sounds like, a line that captures the action of a pose. This is important because within a second, you have already captured the movement and mood of the pose and you have something to immediately work off of. This is an important step, whether you are drawing a closed figure or not. A line of action is a single line, though, more often a curve, and will often follow the direction of the spine, but can sometimes differ from that. Such as with a sketch of a ballerina. I might do the line of action going from her hand to her foot in one fluid motion, the line of action is always present whether the pose is an action or not. Here you can see that he is just standing, but here is the line of action. I highly recommend checking out this rundown of the line of action by veteran animator Preston Blair from his book, animation. Learn how to draw animated cartoons. You can easily find this by searching Preston Blair, line of action. Step five, hip line, shoulder line. This step may be especially helpful for beginner artists. Adding a line for the shoulders and aligned for the hips can help orient you and help with proportioning the torso. Step 6, blocking in the form, capturing the basics, detailing later, start by blocking in the whole pose, working as much on the whole at once as you can. If time remains, go back and refine the shapes. Don't worry about shading or being perfect. Focus on capturing the energy and the mood of the pose. Now, just as an aside, don't get hung up on what brush or pencil you use. I've provided my two favorite Photoshop brushes in the download section, but use whatever you're comfortable with. I recommend something plane like a pencil or simple paintbrush. Different brushes can yield different results, but the principles are the same.
6. What Not to Do: Okay, So now for what not to do, do not gesture without reference. Do use clear references. Gesturing without reference defeats the purpose of training the eye and hand, as well as opens you up to training yourself incorrectly. Do not do tiny hair lines, do bolt binds. This is something that I see most beginning artists do and something that I did myself back in the day. This is where you draw tiny, tiny strokes to make up what should be one continuous line, tiny hairline show a lack of confidence. It will take some practice but work on making longer, bolder lines. Do not draw faintly, do draw boldly and confidently. This ties into the hair lines. It has almost the same solution. Many beginning artists are too afraid to press down on their pencil, resulting in extremely faint lines. The downfall of this is it lends itself to a lack of confidence in your art of mortal sin and gesturing, which is all about confidence. Do not erase or undo, do keep going if you make a mistake. This is something I've done and some times I still do. It's a force of habit to just press Control Z and erase that wonky line, but resist the temptation. Don't use that eraser. You will learn more if you keep going, your eye-hand coordination will improve and over time, you will become better at making the lines that you do want rather than wonky ones, every artist makes mistakes, so just keep going. Fixing, aligned, gone astray. Try going over it or around it with a darker bolder line. The eye will focus on the bolder strokes and dismiss the lighter line. I sometimes sit on my left hand to keep it from going to Control Z or E for eraser, whatever works, just don't undo. Do not do just the outline of the pose. Do capture form and body drawing an outline of the pose, literally just an outline, is not a gesture sketch, nor is it helpful artistically. It is counterproductive because of all the missing information that blob could be anything. Do not draw a stick figure, do drawl supporting lines. This isn't hang man, we aren't drawing a stick figure. The goal is to capture form. You may start with lines that represent the limbs, but tried to add shape and dimension to these lines, which should be more curvaceous than a typical stick figure.
7. Demo 1: All right, We're ready to get started on our demos. Now I'm going to really slow down my process. So instead of taking one minute for these, I'm probably going to take around five minutes just to explain what I'm doing as I do it, I'm going to follow the same process that I outlined in the principles of gesturing. So if you followed along with that, then you can follow along with this. Alright, so first we draw the head. Easy step. I always just draw a little cross hair just so that I can kind of get an idea of which direction the person is facing. All right, line of action. This one is very simple. It's very static pose, so it's just basically downwards. I kinda did two lines there but my hand slipped. So whatever. All right. Shoulder line, hip line. Now, getting the proportions of these, take some practice and training your eye to see the measurements basically between the normal, the measurements of the torso. But over time you'll, you'll get the hang of it and it'll come more naturally. All right. And then blocking in the form. So I'm just going to start I usually just kind of start with the torso. And since I've already blocked that out with the hip line and shoulder line. And you really want to accentuate outlines like this, like this curve. I like that. You can really see where her hip dips in. And I don't focus too much on the hands because when you're doing a one-minute gesture sketch, hands are really not the priority unless you're doing a gesture sketch of hands, in which case that is your only priority, but that's not what we're doing today. Hands are a whole another ballgame. Now, I think I made her shoulder bit too wide, but it happens sometimes, like I said earlier, it really isn't about the anatomical correctness per se. It's going to be kind of wonky. If I was going to edit this, I would certainly bring that in. But, you know, it's just a gesture sketch, so it's fine. I actually haven't warmed up at all either. This is my warm-up for the day. So I'm just recording what I'm doing as I do it. And that's just what I'm doing for the day before I get started on some other pieces. So this is not only for you but also for me. It's practical. So there we have it. We have a simple gesture sketch. Now, if you have more time, like say you're doing a five-minute gesture sketch. And you have some more time, you can add in little details like where the rib cages naval kinda work on defining some of these curves. And I just really messed that up. But whatever it happens, our largest make mistakes and when you're gesturing, you don't want to undo. So just go over with a bolder line. And there you go, your eye will focus on that. And there you have it. And it's a pretty simple gesture sketch. Don't worry about the face. Maybe just get the outline of the head there. But don't really worry about the face unless you have time and you really want to draw a face. But honestly for gesturing, I don't recommend it. It gets to be too tedious. And what you're focusing on is the, the gesture, the action. So the face isn't really important for that. So I guess we will move on to the next demo then.
8. Demo 2: All right. Gesture number 2. So I'm in the same Photoshop document just starting on a new layer here. Now this one's interesting because she's laying down, but so it's still a static pose, but it does have some movement to it with her arm up. So what we're gonna do, we're gonna draw all the head. And then the line of action. Now, the line of action does not have to be exacted, doesn't have to be, you know, this is the line of the spine. It doesn't have to be like that. It's basically just, okay, this is the direction, the push of the action, essentially. So this more or less follows the line of her body, not necessarily the line of her spine. So I'm going to get the shoulder line in there, get the hip line in there. And then we're gonna get to work. I personally really like the elegance of her arm and I really want to capture that. So email like a different part of a pose and 12 and unseat that. And that is fine. Just sometimes use something stands out to you and oppose and you just want to capture it. And that's what you're doing with gesturing. You're just capturing. And I'm going to sort of get the line of her ribcage in there. So that kinda gives me a point to start her hips because you see where her hip dips in lines up with where her ribcage ends pretty much. I'll raise that. I'm allowed to erase arrows, but and you just wanna kinda just block things in with general shapes. And don't worry about shading, don't worry about any of that because that's not important right now. Really, when you think about a gesture, sketching is pretty bare-bones. And that can be intimidating for some people because you don't have you don't have shading to hide behind. You know, you don't have the time to put into it to hide behind other things. It's very wrong and you get what you get. So for some people, gesturing is intimidating in that regard. But it can also be very helpful because of that. All right. I'm not entirely happy with her arm, but it'll do. So. I mean, if you again, if you have a little extra time and you want to sort of drill in the prompt that she's leaning against. That is perfectly fine. But again, not a priority. So if you're doing 60 seconds, don't focus on the prop, just focus on the pose. And I think that about wraps up Demo Number two. I think that the scheme owl quite solid for a gesture sketch. So we're going to move on.
9. Demo 3: Okay, and gesture sketch number 3. Now this one is an action pose which you may be saying, Oh no, how am I going to do that? We've just been joined stationary poses. There's a scary I get that. But the process is exactly the same. So we just break it down. And again, I'm in the same Photoshop documents, so I just started a new layer. So all we gotta do draw the head. Alright, line of action, boom. Shoulder line. And this hip line is actually going to start pretty close to the shoulder line. See there's only that little bit of distance there. And then it's just simple blocking in the form. Action poses can be very intimidating when you first look at them. Because, well, you know, there's so much movement. There's, It's weird anatomy sometimes, especially when you get into like gymnast and ballet dancers, they can really move their bodies in ways that you wouldn't normally see. And that's intimidating. And trust me as it beginning artist, I was very intimidated by these things. But come to find out it's all just the same process. It's just breaking down the shapes as you see them and working from there. So now this figure I chose even though he isn't completely nude. But going a little off the page there, don't be afraid to move a few if you're on Photoshop, if you're not on paper, don't be afraid to move your drawing over a little bit. Sometimes it just needs to be nudged. And that's okay. Now if you're on pencil and paper, I don't know what to tell you. That's just something that comes with practices, knowing what fits on the page. But I'm usually pretty good about it and my Photoshop document, but every once in a while, just going to nudge it over and that's fine. But even though he's wearing pants, you can still see the form of his legs actually pretty well, at least the movement of them. So I'm happy with it as a, as a reference. All right, and just like that, we have ourselves in action pose that has dynamic movement and it feels solid. Like it feels like he's really has his weight on this hand, rather than just floating in space. So action poses, intimidating at first, but you can conquer them. They're actually not as bad as you think they are.
10. Project Preface: This class is project will be to do 10, 60-second gesture sketches. You can follow along with either the same poses that I use and show on screen, or by setting up your own references. Begin by gathering your references and setting up a timer or using a website built for gesture sketching such as quick poses or daily sketch. I usually set my timer for 65 seconds to give myself a few seconds to create a new layer in Photoshop. Setup a 2000 by 2000 Photoshop or Procreate document or get out a blank sketch book, page and pencil. If desired, change the background color to a medium gray. Not necessary, but it's nice on the eyes. You can also use toned paper for this purpose. If you have it, loosen up your wrist with scribbles first. If you're in Photoshop, you can delete these when you're done. If working on paper, maybe don't use your nice paper to do this. Keep a scribble page where you always scribble or use a scrap piece of paper that can be easily thrown away after you use, I will be using quick poses and setting my timer for 65 seconds. My settings are turned to nude and partially nude to avoid heavily clothed figures. See you in the next lesson where we will do the project together.
11. Project: Hi. Hi. Good. Hi. Okay. Hello. Hello. Okay. Hi. Okay. Hi. Hello. Hello. Hello.
12. Wrap-Up: Great job on those. I can't wait to see what you've done. So be sure to share your class project down below. So the outcome of today's class should be that you know what a gesture sketches. You know what makes a good gesture sketch, you know things to avoid when gesturing. And you're able to effectively draw a form or action in 60 seconds. Again, be sure to share your class projects. I really look forward to seeing them and follow me on social media if you'd like my art and want to see more. Thank you for watching.
 Taylor Mae Conforti, Digital / Independent Artist