Transcripts
1. Introduction : Hello. My name is Braden. Miss her. I am an artist, YouTuber, and I may content for
the Internet of Things. I'm your instructor
for this one. And today we're going to
be going over how to draw the Loomis head from
seven different angles. Now there are multiple
methods for drawing the preliminary steps
for a portrait, such as the Bridgeman method, the Reilly method,
Loomis method. I'm sure there are
other ones out there, but in my opinion, it had been drawn
for awhile now. And I believe that this method, Loomis method that
I'm going to teach in this class is the easiest. What to expect. In this one. I'm going to be
showing you how you can draw a basic circle. And then from there, analyzing
your reference photo and figuring out exactly where
you can put your oval, which of course is the side
plane of your drawing. And then establishing
the vertical and the horizontal axis of each of seven references that we
will be walking through. And also how you can
effectively split the head into three equal sections and
established the hairline, the brow line, and the
bottom of the nose, and then of course, the bottom of your chin. Once we get to that
point, it's really easy. That is all you
really need to do. Now I'm going to be teaching a follow-up class
where we're going to be drawing these exact
same seven references. I'm not only going to draw the Loomis head as I'm
teaching in this class only. But then I'm also going
to be sketching in the features and we're going to be discussing
proportions. And that is step two in a three-step series
in between where I'm going to be drawing each one of these seven references with
my personal drawing method. For those of you that have been following my videos
for awhile, you know. But for those of you that
don't know, it will tell you. It's called the
three-layered method, which is a very effective
chocolate approach. I got links in the
description of the class for all the
tools that they use. So that if you want to
pick some of those up and draw along with
me, absolutely. Make sure you do that. That's the 401 on
what to expect. And I hope to see you in class.
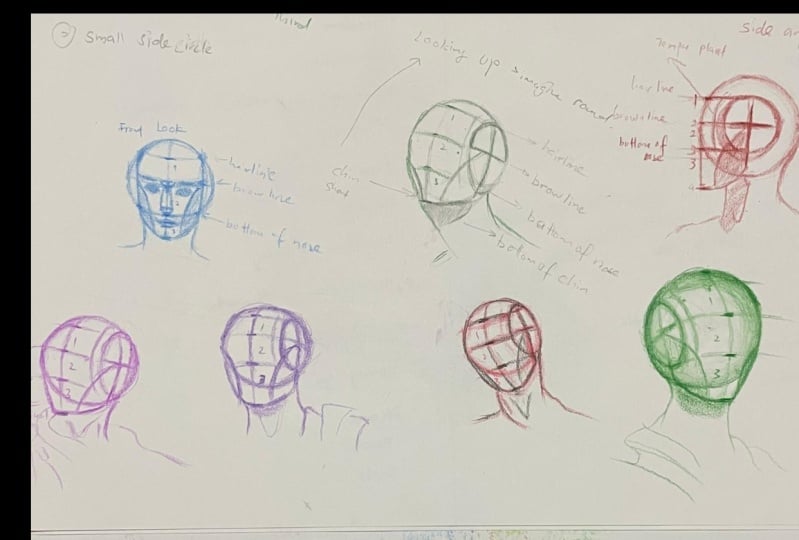
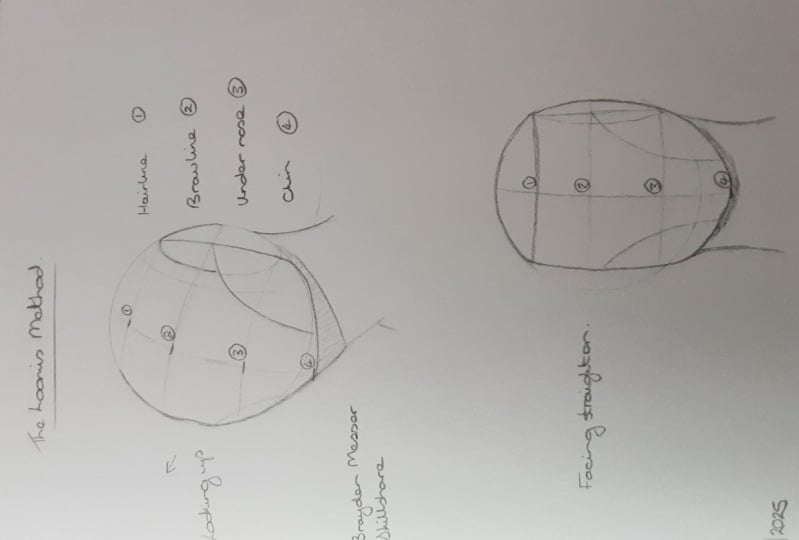
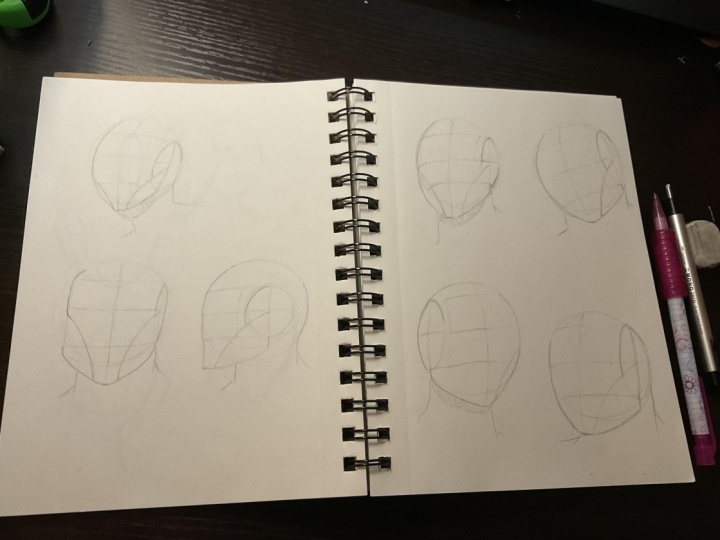
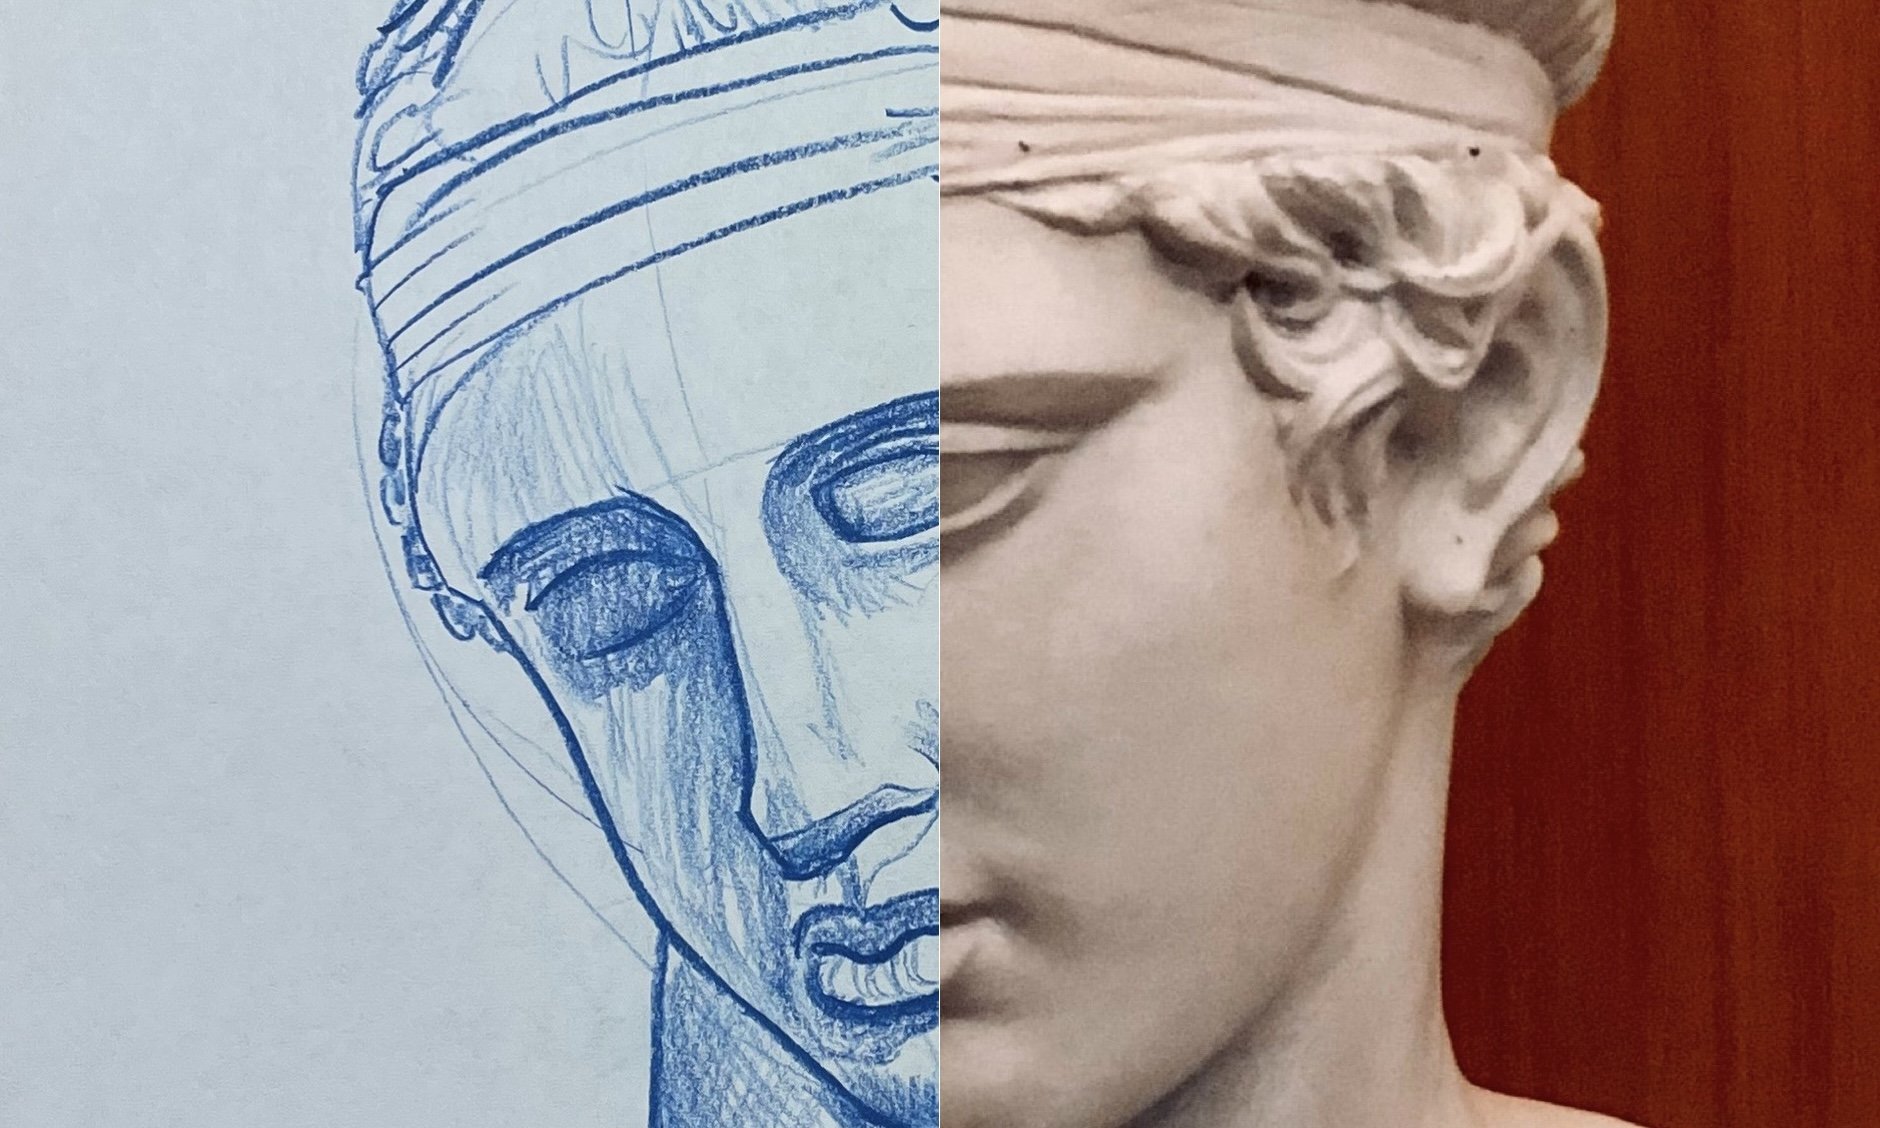
2. How to draw a Loomis Head Angle 1: Alright, so for this
one we're going to be using our helix campus. We're gonna be using
green sketch pencil. And don't have things
to these tools and the description of this
class for you guys as well. But we're going to do
is we're gonna set our campus to a two. Right here in the
center of the paper. We're just gonna do
a nice solid circle. This is the first step in
drawing any limits head. Now what we're going
to do is we're going to identify the oval, which is our side plane. And we can see that the eyes
go up at an angle like this. Way our reference is looking
something just like this. Then once we have our
oval established, we're going to identify
our vertical axis. And the horizontal axis, which is going to follow the direction of the eyes because our subject
is looking up, that horizontal axis is
going to look up as well. And then what I like
to do is I like to put a little plane right
here for the temple. And then we're just going
to pull these lines over, up and over just like this. We have our hairline first, our brow line second, the bottom of our nose. Now, we're going to identify the center line or you can think of it as the
center of the face. I'm just going to
pull this line down. This line goes between the
eyes over the top of the nose, through the center of the mouth. And this one's a
little different. And this is one of the reasons
why I wanted to do this. One is because our subject is looking up because
she's looking up, her chin is going to be shorter. We pulled down from
our vertical axis, then we connect the
bottom, right over here. Boom, just like that. Then we have a little plane right here that we're
going to pull down, down and then over. And this is going to be
the bottom of the chin. You can see because our
subject is looking up, something just like that. Then we have our throat. So we can just kind of very, very suddenly punching where
we want that throat to be. But see now here effectively
what we've done is we have identified the proportions, proper proportions of
where our features, such as the eyes, the nose and the mouth
are going to go. And then here I'd just like
to draw out the cheek plane. We can kind of draw
out that other one. But I've said it in lots of other courses that I have on YouTube that when you're
doing these luminous heads, don't be afraid to grab
your sketchbook and draw literally hundreds of them,
all different angles. And after a while, you'll start to see that every Loomis head is
principally the same. And the only thing
that really changes between portraits that you
will draw is on the ankles. Then here what you can do is you can identify This section. Then you can have some fun with the two and you can be folks, certain lines you can play with your line weights
and your qualities and these start to dress it up. But this is all real-time, so I expect you
guys to draw these. And then once you've
drawn the heads, I would very much
love to see them. You can go ahead
and you can upload them to the class projects. See, I'm just beefing up
certain lines. Not all lines. We want our lines to have differences in
weight and quality. That's pretty much that one. Now what we've done
here is we have 123, so I'll just label them here. You have your first,
second, third sections. That's what we've
done. We've split the face into three
equal sections. That's a principle of bloom as head called the
rule of thirds. So every single
reference you look at, you want to identify
those thirds, alright, onto the next
one, a different angle.
3. How to Draw a Loomis Head Angle 2: Same thing as the last hidden. We've got our helix compass and we're going to be
sketching this one out in blue instead
of green instead, or comes to, to place it right smack dab in the middle of the paper and we're
in draw our circle. The whole point of these
classes that I want you to see that it's the
exact same approach no matter what the angle of your reference. Now
this one is different. This subject is looking
almost straight on, is heads kinda cocked
to the left slightly. We won't be able to have our oval on the left side
butt right here slightly, slightly because of the angle, we are going to have
the oval a little bit. As you can see, this oval is quite different
from the last one. Our subject was showing us the whole side of the
head and then looking up. This one's more or
less looking straight. Hitchcock slightly to the left. So we have the oval on the
right side but not the left. But it's the same. Okay.
Don't overthink it. You have your hairline.
Pull this over. There's your brow line and the bottom of the
oval and pullover. And there's the
bottom of the nose, center line from the top, pulse straight down sunlight. Then this one's
more or less equal. They're equal thirds
equals sections. Once we've established
the bottom of the chin, we're gonna pull up and over, connect it to the
bottom edge like that. Just like that. And then
just for proportion here, I'm going to draw out the neck and the top of the shoulders just
so we can start to get an idea for how the overall shape of
this sketch will be. Subject has a thicker neck. Then we have that cheek
plane right there. Then it's slightly off. It's not symmetrical
because of the way the head is looking. But even if it's
off, you can just pull the line right
there. Such a big deal. Remember, in this class
we're just sketching. We're trying to get a rock solid fill for how the loom is, head is for all of these different angles
that we would sketch it out in our preliminary
steps for portraiture. Be from that up. I would recommend guys, while you're going
through and drawing these heads, is obviously, you can use these references that I have in these classes, but don't be afraid to find your own references and
draw those as well. But look at them
and try to build up looking at your references through the lens of
the Loomis method. When you look at a reference, I want you to start
thinking about them in the sense
of, okay, cool, I need to draw loom said, what does that look like
for this given drawing? And then that way
that'll help you with your initial approach to drawing pretty much any
portrait that you want. Nice and light here. See,
that's pretty much that. Now if you were doing
this in charcoal, obviously this
wouldn't be graphite. That is the general approach. That's two different angles. Now, let's move on
to angle three.
4. How to Draw a Loomis Head Angle 3: For our third angle, this one is a profile shots, so I'm going to sketch
this one out in red. Again. Don't overthink it. So circle center of the paper. Then. Oh yeah, that's right. This is a profile.
So check this out. You can take your compass on profiles and just
cut it in half. So if we set that
first circle at it to set your second
circle at a one, then just do a nice circle
inside the other one. You can make it more
or less center. But this one, the angle is
slightly, slightly off. It's not exactly
straight on profile. So technically on portraits, it's not necessarily an oval so much as just another circle. So just be aware of that. But once you have
that established, you have your vertical axis or horizontal axis,
your temporal plane. And then you just pull
those lines over, hairline, brow line, and the bottom of your
nose just like that. Then with these ones, when you start to draw the
front of the face, pull down and when you
get to your brow line, you pull straight down. You don't follow the circle. Then boom, there's
your three sections. Then you have your
jaw right here, connect that Boehm and
just do a generic jaw. Remember, the Loomis head
itself is a generic approach. So don't get caught
up and do not worry about proportions or features at this point in time. Just draw the best loom
who said that you can. Effectively, what
we're doing is we're practicing and building up our muscle memory
for them was heads. As they apply to
actual references. This will, this will
help you start to understand exactly how to look at a reference photo and how to draw something just like that. Beef up these lines
and mess with the line quality, if you will. We got some certain
planes instead of fear. I can't wait, sketch these in the next class and you guys
will really like that. Alright, so we've got our
first section, second section. In our third section, it can be felt these
lines, Why not? It's not gonna hurt nothing. That's it. Rule of
thirds. It's that simple. Just like that. The next one, I'm going to be showing
you a different angle. We're gonna do seven
different angles.
5. How to Draw a Loomis Head Angle 4: Alright, got our compass. We're going to sketch
this one out in green. Set it to two, just
like all the others. Center of the paper are Circle. Lots of artists will call you, shouldn't be doing
that freehand. I'm like, No, we're
doing it with a compass because I'm lazy
and it works perfect. So super quick. That's always gonna
be right about there. Right about there,
something like that. There'll be afraid to
go around in a circle a couple of times
to establish it. And then once you've got
the oval vertical axis, the eyes go something like that. Almost more or less
straight across. So don't forget that angle because when you look
at the reference photo, he isn't looking straight. He's looking up and over
from where we're at. So we're going to pull
the hairline over, pull the brow line over, pull the nose line over,
something like that. Then that center line
from the top pulled down, down again, down again,
and then one more time. The chins, something like that. It why not? Right about there. The jaw straight to the chin. Let's pull this up and over. It's very easy to
start messing around with proportions of what
you're actually drawing. But for this class, just do the basics,
just a basic level. We said that's all
you have to do. The neck, something like that. And then he's got
his robes here. Sketch out the road real quick that way you
just kinda get a sense of sense of form. Even though we're totally not worried about for right now. And this is more or
less framing form, but it's not formed
because there's no value. Just shapes. Cool. Something like that.
That first section, the second section,
that third section. Simple guys. You just drew a Lewis acid based
off of a reference. This is how most
portraits are drawn. This is how I draw every portrait with the
three-layered method, which of course is a
charcoal approach. But you could use this even
for a graphite approach. You could use this for
painting portrait. If you started out with
the Loomis method like this, would serve you well. Just keep that in mind. Then, just like with that first one that
we did and this one, the chin, you do
have the bottom of the kings were more or less
looking up at the subject. So we want to make sure
that we stay true to that. Something just like
that. Alright, onward to the next one. Another angle.
6. How to Draw a Loomis Head Angle 5: All right, Our fifth angle. Looks campus. We're gonna
skip this one in blue. Just like all the others said, it's two center of the paper. Solid circle. I hope by now you're
starting to see that it doesn't matter the angle. The very first step is always
going to be that circle. In this one, the
subjects looking down, down until their rights so that, that oval is going to
be something like this, something like this
side plane there. Our vertical axis is
going to go like that. Horizontal axis is
going to follow the eyes and the angle
that they're looking. We've got our temporal plane, which is something like that. We're just going to pull these
lines over. There we go. Wonderful. Then that center
line, stepping over, across top of the
head, straight down. The bottom of the chin is
going to be right about there. Let's pull up and up and over. Don't worry too much
about detail guys. A lot of this, the whole point of this class is just the habituation of it. Drawing almost the same thing over and over and over again. But I want to see all
your limits heads. Even if at first you're a
little unsure, don't worry. The more hedge you draw, build up that muscle
memory and the more confident you will become. And before you know
it, you'll be bus now Loomis heads like it's
nobody's business. For section the second
section, third section. Will pull her cheek
plane over there. They're cheap plane,
something like that. Something like
that. Just kind of thicken up the quality
of some of these lines. Dark enough the weights? Yeah. Something like that. See if we just drew that and
just under three minutes. Lot of times it's just it's just taken that initial time when you're drawing a portrait. And then making sure that
your proportions are as close to the real thing
is you can get them. All right. We got two more angles. Let's get them done.
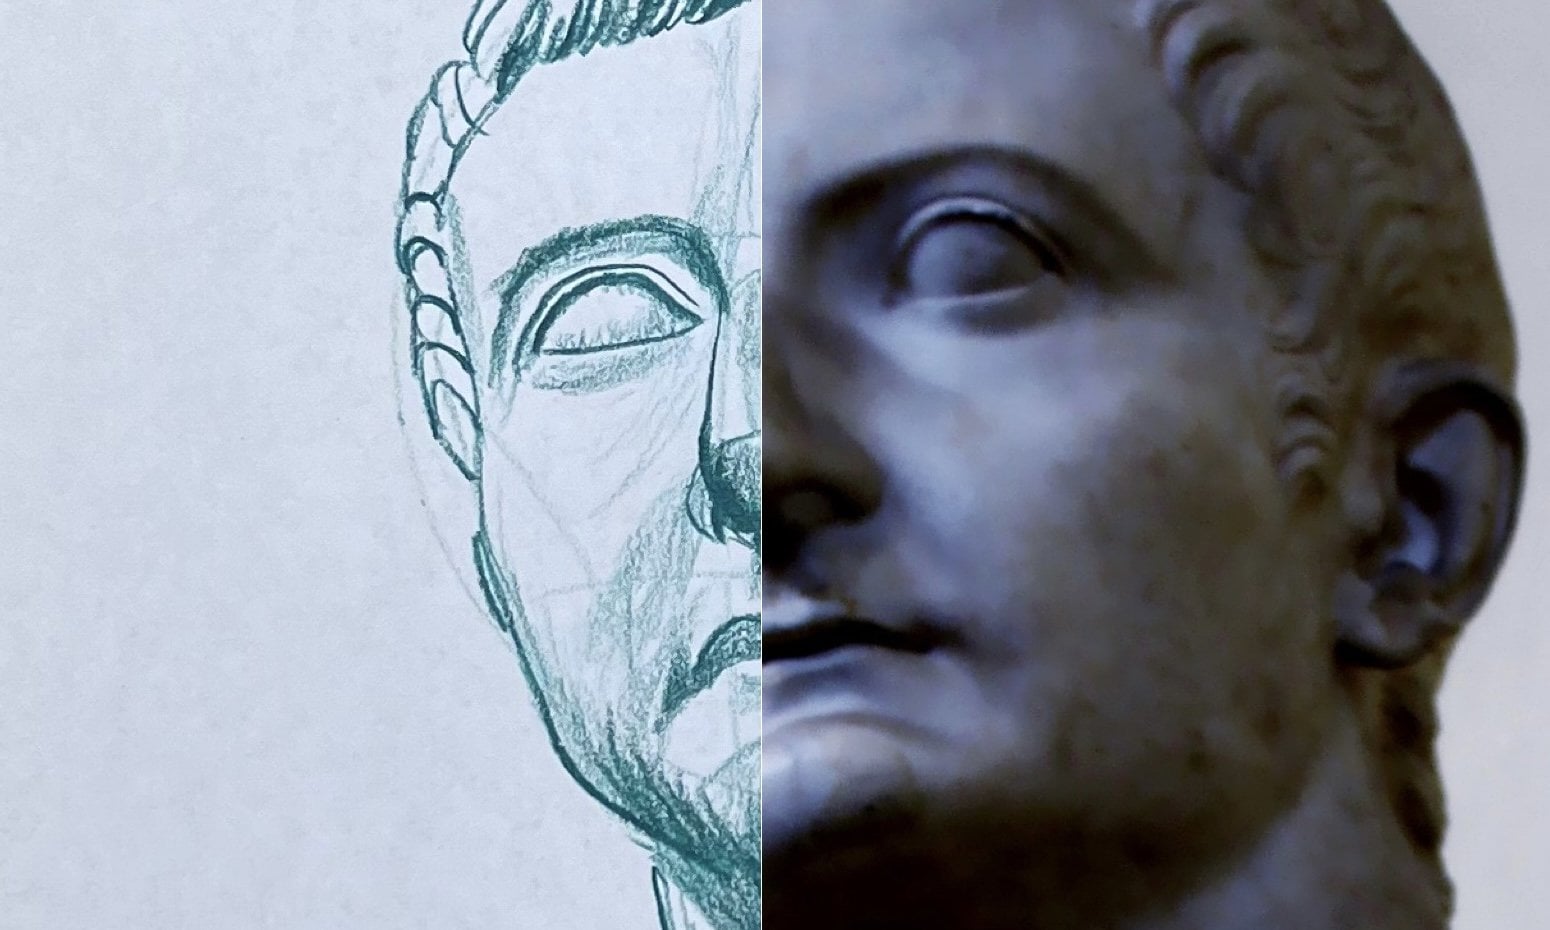
7. How to Draw a Loomis Head Angle 6: All right, This angle
is one of my favorites. Helix compass. We're going to sketch this one out and read. Just like the previous
five. Set this to two. Dead center in the paper. There's our circle.
Let's follow the eyes. What are the eyes doing? What are kind of doing that? The oval. It's going to
be something like this. Something like this. There we go. Vertical axis. Horizontal axis is going to follow the eyes. Something like this
temporal plane. Let's start pulling
these lines over. Hairline right about there. A brow line right about there. Knows right there. Center line down. Like that. The chin
right about there. There we go. Actually, I think I don't
want to do right here top of the jaw and then
connect the chin to the top of the jaw and
just pull this one up. Something like that. Then we got the bottom of the,
bottom of the chin. We got that plane because
the subject is looking up. So this will be a very low value when it comes time for, say, the charcoal. Put in this step, we
can still very much identify it. Drop shadow. And technically it's not
even really a drop shadow, it's just a plain of the
actual channel itself. Just got some robes, so
we'll put those in there. The biggest thing with the Loomis method when
you're looking at reference photos is you need
to look past the features. You have to look past the
hair, past the close. This is one of the
reasons why I'm starting you guys sketching
now, Loomis heads, four sculptures is because
sculptures have very, very little detail
compared to, say, the photograph of
an actual person. So I don't want
to overwhelm you. I want you to focus on the
principles in the first steps. The Loomis head is the
first five steps and say a 25 step process. Something just like that.
Just reinforced the jaw. There we go. We've effectively
identified our first, second, and our third
sections of the face, so we followed the
rule of thirds. Here is a drop shadow and we can just kind of iron that out. All right, cool. One more to go.
8. How to Draw a Loomis Head Angle 7: Okay, last one, helix compass, and I think I'm
going to sketch this one out and in green. You know what to do. Your compass to two. Right smack dab,
middle of the paper. Draw your circle. There it is. The subject. He's looking off to his right, so he's showing us quite a
bit of that side planes. So the ovals going to
something like this. There we go. Vertical axis. And of course look at the eyes. The horizontal axis
follows the eyes. Temple plane. We're going to pull these
lines over hairline, brow line, bottom of our nose. Identify that center line. I'm going to pull that down. Then like nice equal distance,
something like that. And there's the bottom
of the chin, right? They're going to pull this
up and over top of the jaw. Pull that down to the chin. There we are. Now let's work on this robe. It's something like that. He's got his medallion. There are like a pin,
something like that. Getting carried away. I can't help it, man. I want to draw everything. But yes, something,
something like that. Remember, the whole
point of the luma said is to establish
your proportions. Give you a baseline, a framework if you will, for when it comes to start
using your charcoal, graphite, or your painting. I mean, this cool thing about it is the general approach and it can be applied to any medium
of art that you wish. But of course, this one I'm
gonna be teaching charcoal. So I'm really excited
for the next class. I hope that you join us. Because in the next one
I'm going to show you, we're going to do the
exact same thing that I did on all of these angles. But I'm going to be actually sketching them and implementing the features with
the sketch pencils. And so when we put in
the eyes, the nose, the mouth, that type of deal. So I hope you enjoyed it. And I'm looking forward to
seeing all your limits heads.
 Messer Creations, Artist | Author | YouTuber