Transcripts
1. How to Draw with Ball Point Pen: Hey, how's it going? I'm Enrique, I'm an artist and illustrator. I worked on movies like Transformers three, dark of the moon, and the Smurfs movie. So basically what I want to go over is there are these like Ken's that you find everywhere, right. When you go to the gas station, When you do anything, the ballpoint pen and I know most people use it for writing and they don't think anything about it. But the truth is you can make some really amazing artwork with the ballpoint pen. And that's what this entire thing is about. How you can make great artwork with it by me going over my process with you. So the process can be broken up like so. Number one, I'm going to go over the tools, right? Which specific pens can use, you can use any. But, you know, I have my favorites and I'm going to go through that with you. Secondly, I'm going to go over line weight. We classify line weight within 123, like these number scale. It's a method I've been using for at least 15 years. I learned it back when I was going to art centers for design. Use it ever since. Amazing, amazing method. I'm going to show you that. So you'll start drawing differently right from that lesson. It's also we're going to go over, after that is we're going to go over control, right? Controls a very important part when you're using pen because you cannot erase. So I'm going to show you some exercises on how to gain control. Then we're gonna go over crosshatching, which is incredibly important writers, I have an entire lesson on that. This is similar to that. It's the same method, but it's, it's altered for this type of pen because this pen is different than using like a fountain pen or like a quill or anything like that. This is different, so I'm going to go over that. Then. We're going to go over shapes and how I see everything as different shapes. There's three shapes that you can use to draw anything you want. And I'm going to go over that very quickly. And then lastly, I'm going to show you a page out of my own personal sketchbook and I'm going to work on it in front of you. So and I'm going to talk about everything we had previously talked about in this course. This course is aimed and generally at intermediate, but if you're a beginner, you can absolutely jump into this. It is just an amazing rewards. Actually do some art with these things that we see all the time. And that's kinda what I wanted to get through. That said, if you're ready and you're excited and I hope you are, let's jump into it.
2. Tools to Use: All right, So first thing is, let's go over the tools. Obviously, ballpoint pens are similar, but there's a few favorites that I have and I think I've used in school and they told us to use, you know, when I went to Art Center. So I'm going to go over that. So here's the regular ballpoint pen. Write. The one you find like random stores or you can get like 25 or 30 of these, right, for like a couple of dollars. And this is all you need as well. By the way, you don't have to get these other tools. I just kind of recommend it if you're gonna do a lot of ballpoint pen stuff, but you can use a regular one like this and it works completely fine, super cheap, inexpensive. What I recommend is if you really want to get into ballpoint pen, I recommend these two. It is the zebra F31, fine point. So this one right here. You need it to be a fine point because a fine point has a much finer point, right? It's smaller. It won't be, but it's cool. You're going to get lines with this one you will never get with a giant ballpoint pen. The other thing about it is that at some point when you start using this regular one, it will let out a big blotch of ink for some reason when you're shading, when you're doing things with this, it will just store up a little bit of ink in it would like, boom, just shoot on the paper in, at moments you don't want like you're shooting someone's face like a small face and it's like, wow, completely screws up. It could completely screw something up. So you have to be aware of that. This does it as well, but it doesn't do it as anywhere close to the amount of times that the basic one does. So what I recommend is you maybe get like even a piece of tissue paper or a napkin, every noun then if you're using either one of these and as you're drawing, let's just say you're shading something, right? Every now and then, just do this, wipe it every now and then you wipe it to prevent those big Blache from hitting your paper. This sun right here is the zebra F 40 to, I think it already has a fine point as well. I recommend this one as well. These two are basically the same thing in my opinion, the 301 and the 40 to so it's not there's not really much of a difference. It's just really up to you what you prefer. This one is a little bit the 40 2 is a little bit heavier than this one. So it can kinda handle more and just kinda feels a little more. I don't know, powerful, I don't know how to say it, but it's heavier. I think it does have more ink. But there's really no difference between these two. Same pros against just a regular ballpoint pen, but I might be out probably using this most of the time so that to let you know that you can just easily use that as well. But that's it for the tools part. That's mostly what I recommend that you use. Like I said, if you're hardcore, buy these, they're not very expensive. They are expensive compared to like a ballpoint pen you just find around the house though. But that's it. It's up to you. So let's move on to the next section.
3. Line Method: So in this section I'm going to talk about line weight. Line weight is incredibly important. And what we do is we usually go over line weight in a 123 number set. So let's just say, uh, one is this like a double line right there, but let's just say that's a, let's say a one is just a straight thin line. A number two would be a slightly thicker line. See how it's more noticeable on the paper, hopefully you can tell. And then number 3 would be an extremely bold line. All of these changes, by the way, these three changes right here are actually really subtle. But when you're putting them in a, you know, an artwork, right? When you're doing linework of our character, or even just boxes, they are going to be very, very noticeable. So let's do 123, okay, three is the thickest. Two is probably most of your lines. And then one is a basic, been a line I just kinda like Dell did a little bit there, but it's a basic command line. So what I did from, what's the difference between 12, right? So like a one between a 12, all I'm doing is taking my pen and going over it a couple more times to make it a little bit thicker. And then for like a three, I'm going over it several more times to make it even thicker than that. Right? And there has to be the difference. What do you use these four? So I'm going to show you what that is. How do you use these lines to make your drawings better? And this is like the general rule, but it's obviously it's a principle, not a rule, right? So principle is this works and has worked for a lot of drawings, but it doesn't mean you have to do this. So let's go over this right now. So usually a bolder line is something that would be, how do you say this on the outside? On the outside of something. You can use it on the outside. So for example, if I was to draw just a quick box right here, let's just say it's a just a quick like a shoe box or something. Right? That's made up of a one. That line, right there is a one. But let's just say I'm going to take the outer border and make it a two. So I have to take some carrot here. And what I'm doing right here is I'm making the outside line a2. And normally what I would do is I would turn the paper. But since I am doing this as a demonstration, I'm not going to turn the whole paper on you because it might just be weird. See, actually I might have to turn that 1 second notch. I can do this. So this outside line right here is a two. When the inside right here, this inside lines are a one. Normally that can, and it many times can make things look more attractive. It makes when you have a slightly thicker line on the outside. It, it kinda I don't know how to say it like a contains the complexity of a line on the inside and it gives it a better look. This is just a principle. You don't have to do this. This is just something that I recommend and that this is the way I was taught. So that's, it's like a one. That line is a one. This is like a two threes are very, very thick lines and they're more for special cases. But so what else in terms of thickness and thinness is it for? Usually if something is behind, that is when you use like a two so or even three. So let me think anything closer to us as far as like object wise, like an actual object would have a two. So for example, if I do this, let's just say have this like cylinder right there. And then I have a, another cylinder lying behind there in the back, right? Let's just say I have that. What I wanna do is I want to make this object, the entire object. First off, I'm going to make it a two. But I'm going to I'm going to make specifically this line that comes in front of it, like a two or even three. To show that it's more bold. And if it's more bold, it's going to, it's going to attract more attention. If it attracts more attention, it's closer to the camera. And that's pretty much what I'm doing there is I'm, you know, this, this back here and these are very subtle by the way. So let's just say that's like a one. I might even make it a little bit differentiated a little bit more. So normally thicker lines are for objects that are closer to the camera. That could be like a two. And obviously the 12 and 3 method is just a basic structure, but, you know, things can be in between and stuff like that. So, you know, you're, you're kinda more or less just kinda saying, Oh, there's a difference between this line right here in this line and this line back there. If this line was like a two in the back, let's just save. This line was also two in the back. I'm going to try to make this one like more of a three. And again, that's like a style decision as well. But it is the way I was taught. And when I went to Art Center, they taught us this way as well. And it just kinda works because bold lines attract attention, like I said, bolder lines. And this can make sense of line art. Sometimes line art can be really confusing, right? Because if it's all the same line weight, it can be really confusing. But this is one way to simplify it. That's pretty thick right here. But it's not, I can make it even thicker, honestly. Like a really extreme 3, just as an over-exaggeration. And you're getting into the subtleties of these things as well. So that's just one thing I highly recommend you do see that line on the inside. It's like that's still a one. And we make, and make that a little bit thicker, more like it to and obviously toy with this stuff. But that's generally what Like see that too looks so small now compare to this three, and this is in the back, even looks like a three. But anyways, that is a way I use line art. So you can imagine if you use like a hand, like let's say Hand shoots out at the camera, right? I would bold that handout, that line art or the hand and then have the forearm in the back a little bit like like, uh, to, you know, and I think about this 1, 2, 3 out, like line art even now. And I learned this 10, 15 years ago. And I still use this in almost all my line art. But that's like one of the basis of when I'm drawing in my sketchbook of what I think about in terms of my liner. And I'm going to show you that in an example soon. Let's move on to the next lesson.
4. Gain Control: So one thing you're gonna have to do when you're drawing and ballpoint pen is especially because it's all like, you know, it's all permanent. I mean, for the most part, right. You can you can kinda lightly, right? Do stuff like that. Whereas like a, like a fountain pen, It's just like boom, immediate Blache. But you can kind of good stuff in there lightly before you really dig down deeper. But what you really need is control. And I've talked about this in my other lesson. When I say start here, I talk about control. This is a little bit more control with a pencil. This one, it's, if you really want to gain control, I can give you one exercise that I think gains me the most control. And that is, and I think it's one of the exercises as well that I display. If you really want more control exercises, go to that intro section over there, and v in the, go to my intro lesson on like if you've never drawn anything in your life. So I'll draw any abstract shape, for example, like that. If you want control of this any abstract shape. And what I'm gonna do is I'm going to trace that shape and make the line a little bit thicker. Like I'm gonna make it from a one to a two, right? And make it a two. And doing this gives you more control because you're going to be tracing over lines many, many times. When you're doing the line art, especially if you try and make things can forward you deciding what's going to be more focus. But just in general, it helps. It helps a lot. Do this exercise and take your time with it. You know, turn the paper as needed. By the way, I'm not turning the paper here because I'm demonstrating, but I encourage you to turn your paper. Like I encourage you to do that right now. I don't want to screw up that camera angle. And you do that. See homeless lens are returning and do, uh, to do that? I do that. I would do that all the way around. You do that with several different organic shapes. That's one exercise, right? The other one I talked about this in my other lesson is I would say draw a dot and I'm not going to be two extra control exercises here. Okay? I'm only getting to be too, but they're so good for Penn. And I talk about this in my intro lesson as well. So if you already took that, cool, it's a repeat for, you know, this. I'm going to draw a dot on, on one side of paper and on the other end, I'm going to try to hit that in one shot. That came super, super close. Let me try again. Oops. One more time. All right. I kind of made it a little bit past it. And then you just draw a couple of dots over here. And you try to hit that dot in one shot again. Who went way past the Let me try one more time. It's its author, but you do that throughout the whole paper and you're gonna gain a lot, lot, lot more control. Okay? Because what I'm doing here is I'm drawing not for my from my pom here, you know, my palm on the paper, I'm not doing that. When I do this right here, I am moving at the elbow and the shoulder in a combination. Right? Like see this. Right now. I am moving at the elbow right now and shoulder, a little bit of the shoulder. So that's really important right here when I'm doing this, I am using anchoring my palm, but with larger range of motion for something like this. I am moving my shoulder, elbow, all that stuff as needed. Right. Because that's going to give you a much bigger range of motion. So those two exercises improve your control. Unless you've already done them, then you already got decent control these. And I got more access over there in that intro lesson. But, but for Penn, these two, I think are the 100% absolutely most important. Like do these, I would say do a whole page of these wobbly shapes, do a bunch of them and trace them as like a warm up maybe every time, maybe not the whole page, but maybe do like three or four shapes every time you start do it like for a couple of months even and you're going to, your control is going to go through the roof. It might seem like you're doing nothing, but in reality you are burning it. You're getting the muscle memory in your hand. You're training the muscles in your hand and arm that are normally not trained through regular writing. And same thing with this. Do a page. These are easier, right? You put a dot here, dot here. Try to make it there. Do a whole page of those before you start. I still do this stuff for control and it helps immensely, immensely helps out. So highly recommend that for control, I cannot emphasize to you this is probably the most, the most important lesson in this, by the way. But I'm giving you those two exercises, doom as much as possible. All right, so let's move on to the next.
5. Cross Hatch Like a Champ: Okay, Let's talk about crosshatching and some always kind of somewhat crosshatching. And I'm going to tell you high cross hatch with this sort of pen. So you have another lesson on cross hatching that's a little different. That's crosshatching more with like a fountain pen, right? It's a little bit different than drawing with this, this one you can blend with ballpoint pens more than with fountain pens. Fountain pens or something like the microns. Let me grab on to show you what I mean. Hello. Something like this. These are not what we were going over, right? When you touch the paper with like a micron, it puts a dark well, it's a very thin one, but it's a dark thick line in there. Immediately write these, don't do that. These, you can kinda go light on it and then go darker almost like a pencil and away. So you're kinda you again a little bit safe. You're safer than with like a fountain pen. So let's talk about really quick with crosshatching with this, it's different for me. So let's go over very, very quickly, general crosshatching. Okay. I'm going to assume you don't know what that is, which is fine. Let's just say, you know, if you're a beginner, this is for beginners. Crosshatching is essentially where you are shading in object. So for example, let's take this little square here, right? And let's just say there's a light source coming from, I don't know. Yea, there's an arrow right? Come from this direction, hitting it at an angle. The lightest area is going to be here and the darkest areas going to be over here in this area. So how do we cross hatching? How do we make this look darker than this, right? What we normally do is I throw a line, since it's a square, a line like less, and draw a line here. Draw another line here, here, here. And I'm going to keep drawing the lines. And maybe they'll dissipate out this direction, right? So that area is still not dark enough. I'm going to go the opposite direction. And like a net or like a checkerboard. Keep doing the same thing and they get shorter and shorter and shorter until they dissipate. Right? But let's say that net isn't portraying good enough. Let's do it more. Let's go. Let's fill in the holes of that net. Like this diagonal, right? And that's going to dissipate as well, right? And so you can just keep doing that. The more of these you put, the more and more of these holes on the net that you fill in with this essentially texture, right? The darker this corner is going to look because it's further away from the light and the lighter that's going to look in comparison, that is the basic cross hatching, right? In a nutshell, this is a square. You can do it obviously for a circle or anything organic. But the way I tend to use it for, for this, for ballpoint pen, he's a little bit different, so I use it. That's the construction. So remember that that's what's going on in my mind, right? Is this. But what I do is I do it a little bit more organically, right? See, that's like a net, very systematic structured and that's fine. You can, That's the style. What I tend to do is I do it more like this. I do it thinner. Right? And that's pretty much the same thought pattern except I'm doing it thinner. And I'm going over it again right here. See, I'm going over like, you know what, let me go over again, right? Almost like it's just like the basics of shading, like almost like a pencil. But instead of a pencil to very thin pen, right? I'm going to do like this as well on this side. And it's thinner, but that's literally what I'm doing right here. That's like, it's like if you zoom in on, I'm doing this right there. But I'm doing it thinner right here. And a little bit more organically. Let's say the light's coming from the same directions to make it clear a little bit more organically. And it can be a little bit messy, right? It doesn't have to be as structured, right? And you start to create a different look like just that, it's just a different style. But this is the way I do it. I'm teaching you how I do it, right? And then I go over here as well. And it doesn't have to be one pass, right? You can take several passes and I can go back this direction again, right? Like this. And that's literally what I'm doing. But I'm, this is the structure right here of how I'm doing it. And then right here I'm making it look a little more organic. And you're gonna see me apply this to like a face or something soon in the next lessons here. But that's literally why do I do it finer? And this is why I wanted to find, oh, actually see that there's a couple of blocks as it came off, I need to grab at what he called napkin here. See a couple of these weird blotches came out. If I did that and that was like working on someone's face, it would be would kind of leave these weird look like acne. Right. So but yes, so I do it. This is the structure. That's what I'm doing. But I'm doing it thinner, wispy layer and a little bit more organic. So I'm going over it over and over again. And you can take different angles on it. But the overall structure starts to come up with something very, very clean. You know, I mean, that's clean too, but that's just a different way of doing it. That's the way I do it and you just kinda keep doing it over here. Wispy you can all these different directions. And, but ultimately it's the dark over here and it slowly, gradually rolls into light. So that's the way I cross Sache with specificly this I don't cross hatch that way with other stuff. That is the way I cross edge with a ballpoint pen. So anyways, let's move on to the next lesson. Hopefully that was clear. If it wasn't, I want to hear questions and the comments. I wanted your questions. Okay. So I'll make an in-between or video if I need to, but I want to know if that's clear now. Okay. All right. Let's move on to the next thing.
6. Thinking in Shapes: Okay, so let's do a quick little lesson on how I think of things when I sketch them out. When I'm usually a lot of this stuff with ballpoint pen. A lot of this is free styling law. This is just stuff from my mind. And the way I think of anything is I think of it in simple shapes to begin with. So what I would do is, for example, if I think of like a head, I think of it as a circle with like an extended shape below that. And I think of the center line of the head here. Thank you know where the eyes are going to be. The neck itself is going to be a tube. For example, like a cylinder. I'm thinking of that cylinder shape. You know, the shoulders itself move as a line across. The shoulders themselves might be like a little place holder at the end. And kinda so on. And I think that with anything, if I think of a mountain, I think of a giant, you know, like almost Lego-like structure. And I tried to imagine the shapes and try to feel those shapes in my mind. So in other words, I think in 3D, so I'm like, okay, there are three large masses on this mountain. And then I would break it down into smaller tertiary shapes, right? These secondary, smaller forms. So everything has this primary form, right? The big overall shape. And then they have tertiary, secondary and tertiary forms. Meaning for a head it looks kind of like a big ol, a great like a big circle. Initially, right? You start cutting into it for the eye sockets and now you have smaller shapes. I think of like, I think of that with every single thing I draw, there's an entire lesson on it. You can go check that out here on Skillshare or you can go check that out. Um, but this is just a small primer to show you kind of a little bit about it is you always think in 3D, anything I do, I think of that and I'm going to show you that in the next lesson. When I show you a page out of my sketchbook, anything I think in 3D. Okay, that's super important. But like the shapes I would think of are usually circle, cone, a cone like a cylinder shape, and a box of some kind. And the boxes can be anything from a rectangle, right, to a regular square two cube to like a combination of any of these, right? Cylinder for the arm. For example, if I want to draw an arm, I think of it like a cylinder shape. Right to cylinder shapes. And then I go in and I think of the muscle on top of that. That is the way I think about it so that you fully, I can actually continue and have fun to just draw whatever I want. So think in 3D that's a small little primer just to get you started. Alright, so let's move on to a page into my sketchbook in the next lesson.
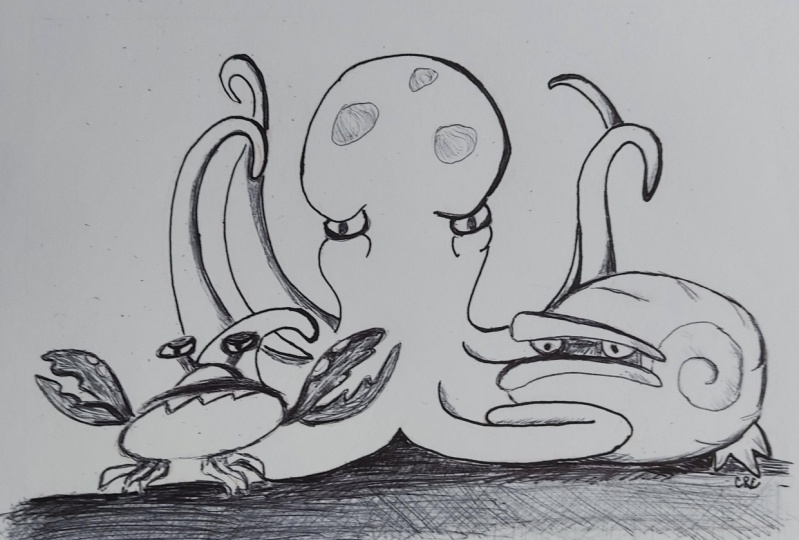
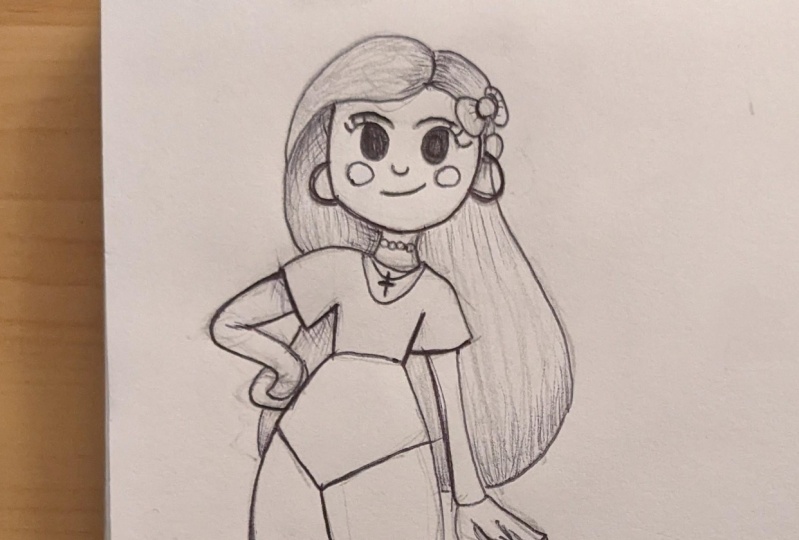
7. Demonstration: Okay, so let's go over some of the things that we talked about. Okay, we talked about the lines, the cross hatching and so on. So let like this is a sketch that I did in my sketchbook. First off, I'm going to go over really quick how I went over these sketches, how it started these, right? And then I'll go more into how to edit them. So the way I use this is, so the typical way that you draw, and I actually recommend is you grab a pencil, right? And you, especially if you're a beginner, you should do this. You draw a circle. Let's say you're drawing a head, draw down right here like the center of the face. And you draw up, you start with very simple shapes like cones, things of that sort. And then you go into the complicated stuff around it when you have the general proportion of that. That's the general way to do it. The other way that the way I do these sketches as a little shortcut version of that, and I'm going to teach it to you right now. You can use this to explore ideas, but I don't recommend you do like Long Drawings this way, but it's up to you. It's just, I'm going to show you It's a little advanced. Okay? I am thinking of this stuff in my head. But the way it tends to come out with ballpoint pen specifically, pretty much only I use it with ballpoint pen because I don't do this with the, with the other kind of pen very much is I go over here and I start to just feather vary. You can prank, can't even see that. I'm barely putting stuff down. And what I'm doing is I'm kinda more or less scratch really, somewhat messily. Finding my shapes very messily right there almost like an scribbles, right like okay, now his eyes are going to be here. It's, it might even be hard for you to antecedent. So you might barely be want to see this. But that's, you know, and then I just kinda like say, oh, okay, that's a strange abstract shape. What does that going to be? Okay. And maybe a mohawk, maybe a helmet. And that's kinda why I, that's the way I do it. I'm almost like looking for ideas in these little scratchy doodles. And then I like, then as I get an image in my head, then I go in and I start pressing down on the lines here in general and start finding out what I want to make solid and what I want to not, and because of the viewer will, will almost all pretty much always look at darker lines. You can just put darker lines and these little squiggly lines you can barely see, we'll just kinda fade in the background. You won't even look at those if once the picture, once the sketch is actually done. And that's the way they understand. And so once I finish it, quote unquote, whatever, you know, to a certain degree, I'll have all these solid lines and uniting a look at these scratchy little things, they'll still be there. The scratchy lines will be there, but you will not look at them. And that's how I ended up with this. All right. This is just one of many pages I have in my sketchbook like this. And it's literally just a hodgepodge of random ideas and things that were in my mind. There's like a Roomba right here. There's like a girl, like a tree girl or something like that. There's a guy with armor, they're kicking Eric Clapton his hand. There's his Batman want to be guide as a cartoon character here. And that is how I come up with that. It's a shortcut version of it. I am still thinking in my head of this, of the simple, simple shapes. I am thinking about that, but I'm skipping ahead into the scribbling part. I actually encourage you, if you're new to stay with something like that, maybe use a pencil first, or you can maybe do this, but really light Here, light, keep it light. Maybe don't start with the the searching method that I do. But anyways, I just want to give that to you to know that it exists. Try it out. Maybe you won't like it, maybe you will. Just that idea. Let's go to the sketch is once I have my line art here, this is a great example right here. If you look at this, this line around her is like a two. And this two comes forward, right? A little bit, just a little bit, it comes forward just enough to be a little bit more focused. So the idea of finding focus, right, only do Number 2's here around the edge. The whole idea of like darkening these lines is for guiding the viewer's eye. Because if you don't guide their eye, it's going to be huge, huge mess, right? And it can be a mass, but it can be like an enjoyable meatus so that you can guide the viewer's eyes. Look over here first, and then you can look back here. And then you can look over here on the sides. You know, without changing the line weight up. It's just going to be like it's a huge, huge, huge mass to the point where it's really I can't see my hurts, my eyes, you know. And you don't want that. But right now, there's a little bit of solid right here is contrast as well. I want to bring focus maybe to the halo bit more. So I'm going to make with that cross hatching stuff I mentioned with the cross hatching, I'm doing it right here on the neck and I'm making it very dark so that the silhouette of her head comes up more. So I'll do it over here. And obviously this is like an ambiguous background, right? I don't know what's back there. I didn't plan for it. But that's how I would use the line in this case, which is what I went over. The other thing would be something like value, right? Value would be, let's say maybe here in the arm. I'm going to show you another little trick that is actually kind of advanced, but you can try to use it if you can't. So let's say this tree of an arm here she has, I'm pulling down and I'm throwing a little, this little lines here. Remember these little cross hatching lines for direction. But once I throw a few down while it's fresh, I put a finger through it just a little bit, just a little bit like that. And it smears it a tiny bit. And it gives it this little glow effect. It. And I want to have to pile up over time. But if you do it enough, it starts to have this cool little effect to it That's super advanced by the way. So I'm just giving you another advanced one right there. And it's just one of these. It's like topping on the pizza, topping on the cake, the frosting on the cake. All this extra stuff. The core thing to stick to would be the line, right? How you use the lines. That's incredibly important. Like I was saying, the 12 things that you want come forward, things that you want to bring focus to. The other thing about this would be showing off the form, right? What kind of form would you show off? So let's go zoom into this Batman guy sitting here in the back. Well, should I do that? Let me see. Let's go over here to the Batman guy. So over here you don't see the other temple, right? You could be any form. Let me pull in and draw a little bit of a draw a line there for kind of the side of his temple. And I throw a few very thin lines kind of curving that you can tell it as a curve at the front of the head, right? I'm drawing these lines. That wasn't when I draw these lines down. I'm trying to show off the form. I'll try to show off what shape that is making. And because these are out of my head, it's kind of up to me. But all of these are based on things that I've seen before, seen a human before. I've seen someone, a cow like that, like Batman, right? I've seen that. I've seen other artists interpret that. Right? And when I do that, I'm putting it in there. There, there is like a rhyme and rhythm to that. So I do have the experience of seeing that everything I've done here by the way is from my head. But the way I put that stuff in my head was from watching media, watching their remixes. Everything you do is kinda loosely based on other ideas, is obviously a tree on her head, right? This is a woman is a tree right here, bark. These are things that I took, remixed and repurposed for the purposes of just sketching. So I do recommend you do something like this. It's pretty wild to do that and it feels frame when you're just kinda doing this from your mind. If you find this way too hard though, use references all over the place. And by the way, references, I use references for almost everything I just happened not to use it on this page. But if I want to draw some kinda like I need a certain crocodile or somebody that I'll look up crocodile reference. Reference is important and I might do a whole video on that, actually a whole lesson on that at some point. But anyways, that's it. That's what I used up four as you can tell this stuff up here, that's not finished. Thank you so much. I appreciate it. If you want another little explainer video in the middle, I can absolutely do that, but use this stuff. Okay.
 Enrique Plazola, Learn to Draw the Easy Way