Transcripts
1. Introduction: Welcome to part 1 of how to draw the head from every angle. In this three-part series, I'll be giving you the tools to interpret your simple character drawings into three-dimensional forms. Part 1 will walk you through the basic structure of the head, showing you how to apply this information to you in character drawings. In part 2, we'll use the front and side view drawings to make a mini three-dimensional model of our character's head. Then in part 3, I'll show you how to use your mini model to draw your character from every angle. My name is Nina Rycroft. I'm a children's book Illustrator. I've been illustrating picture books since my first publication in 2000 and since then I've had more than a dozen picture books published worldwide. Now, there's a lot of information out there on how to draw the head from every angle, but usually it's demonstrated using an adult male. Characters for picture books tend to be young, fun, and even of the imaginary world. That's why I've developed this series. It gives you the tools to interpret the technical information into your characters and develop them into three-dimensional forms. For this class, all you'll need is a pencil, some paper, a ruler, and a character that you'd like to explore. When you finish watching all the lessons, please leave a review. Your recommendation will give the class more visibility on Skillshare so that more people can find it and take part. If you post a front and side view drawing of your character onto the project section of the classroom, I'll then send you my facial expressions printable, detailing the facial expressions for the six basic emotions. It would really help bring your character drawings to life. Once you've learned how to see and then draw your characters from every angle, you'll no longer be restricted by your technical ability and this will give you a sense of freedom that you can then bring to your stories. Having said this, lets get started with our first lesson.
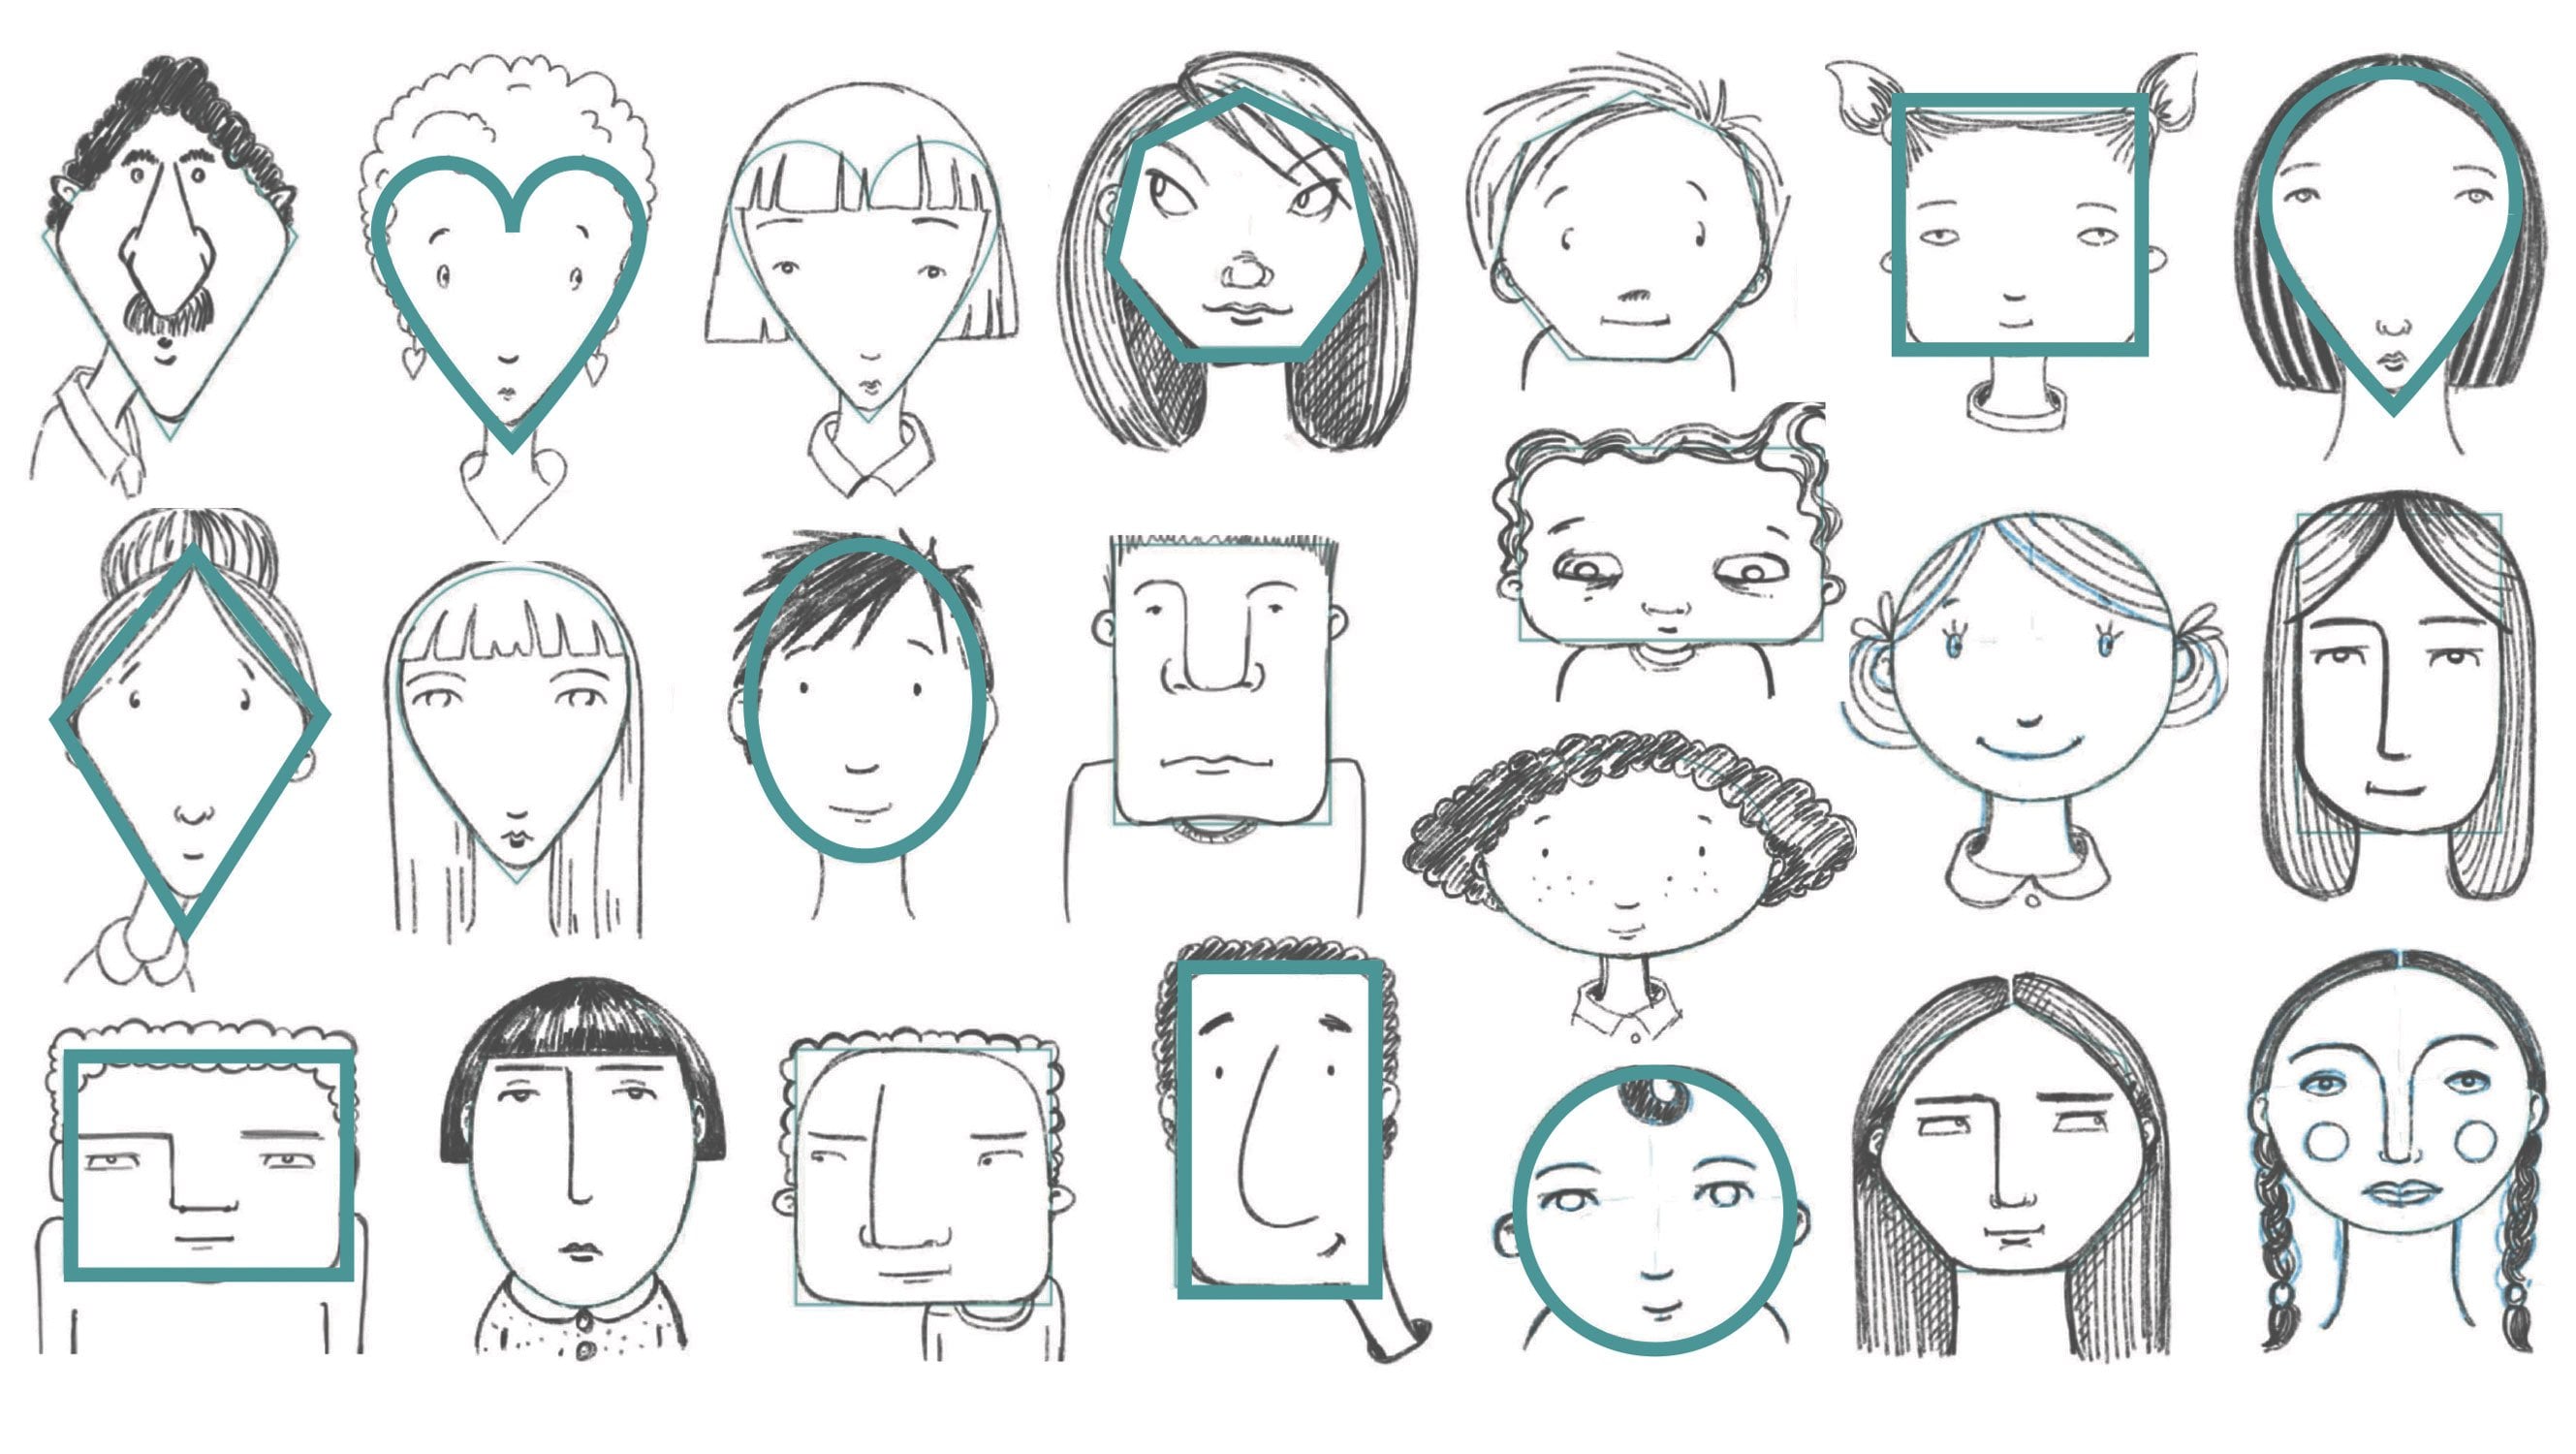
2. Drawing the Basic Structure: In this lesson, I'm going to show you how to find the basic structure of the head. To draw the head from any angle, you must first understand its basic structure. Try looking past all the details like the facial features, the hair, and the accessories. Try and see the underlying forms. If we remove the hair, the ears, the lips, the nose, the eyes, and the eyebrows from the head, we are left with two simple masses. The first is a sphere for the cranium, and the second is a block shape for the jaw and cheekbones. To draw a sphere start off by drawing a circle. It might take a few guys, but stick with it. Just make sure that the circle is as wide as it is high. The sides of the head of flat, so we can slice off a piece from both sides of the bowl. Do this by drawing an oval inside the circle. Just like we draw a line down the center of the face, here we draw a line marking the center of the sphere. Divide the oval into quadrants. From the profile, this plane would be a perfect circle, but when drawing it from other angles, it would appear to be oval because of the perspective. The vertical line represents the beginning of the jaw, and the horizontal line represents the brow line. The top of the jaw start at the brown line, and the back will start at the center of the oval. This block is a three-dimensional structure with a front plane, here it is, and the side plane, and a bottom plane which you can only see with some angles. So once you have this, you can start adding in the brows and the eyes, the nose and cheeks, the mouth, ears, hair, neck, and other accessories. This is all very well if we're drawing a portrait of a person with an average shaped head. But when we're designing characters for a story, our characters can be quite unique, and the rules are often very much broken or at least exaggerated. So I don't know if you've taken my face shapes class, but if you have, you'll know that there are nine different face shapes to work with. With each of those shapes, there's further variations when it comes to the size and the shape and the placement of the eyes, nose, and mouth, and ears. In my next lesson, we'll be drawing the head inspired by the shape of an actual egg, observing the egg moving up and down, left and right, and learning how to transfer this information onto your own drawing will allow you to see your two-dimensional drawing as a three-dimensional form.
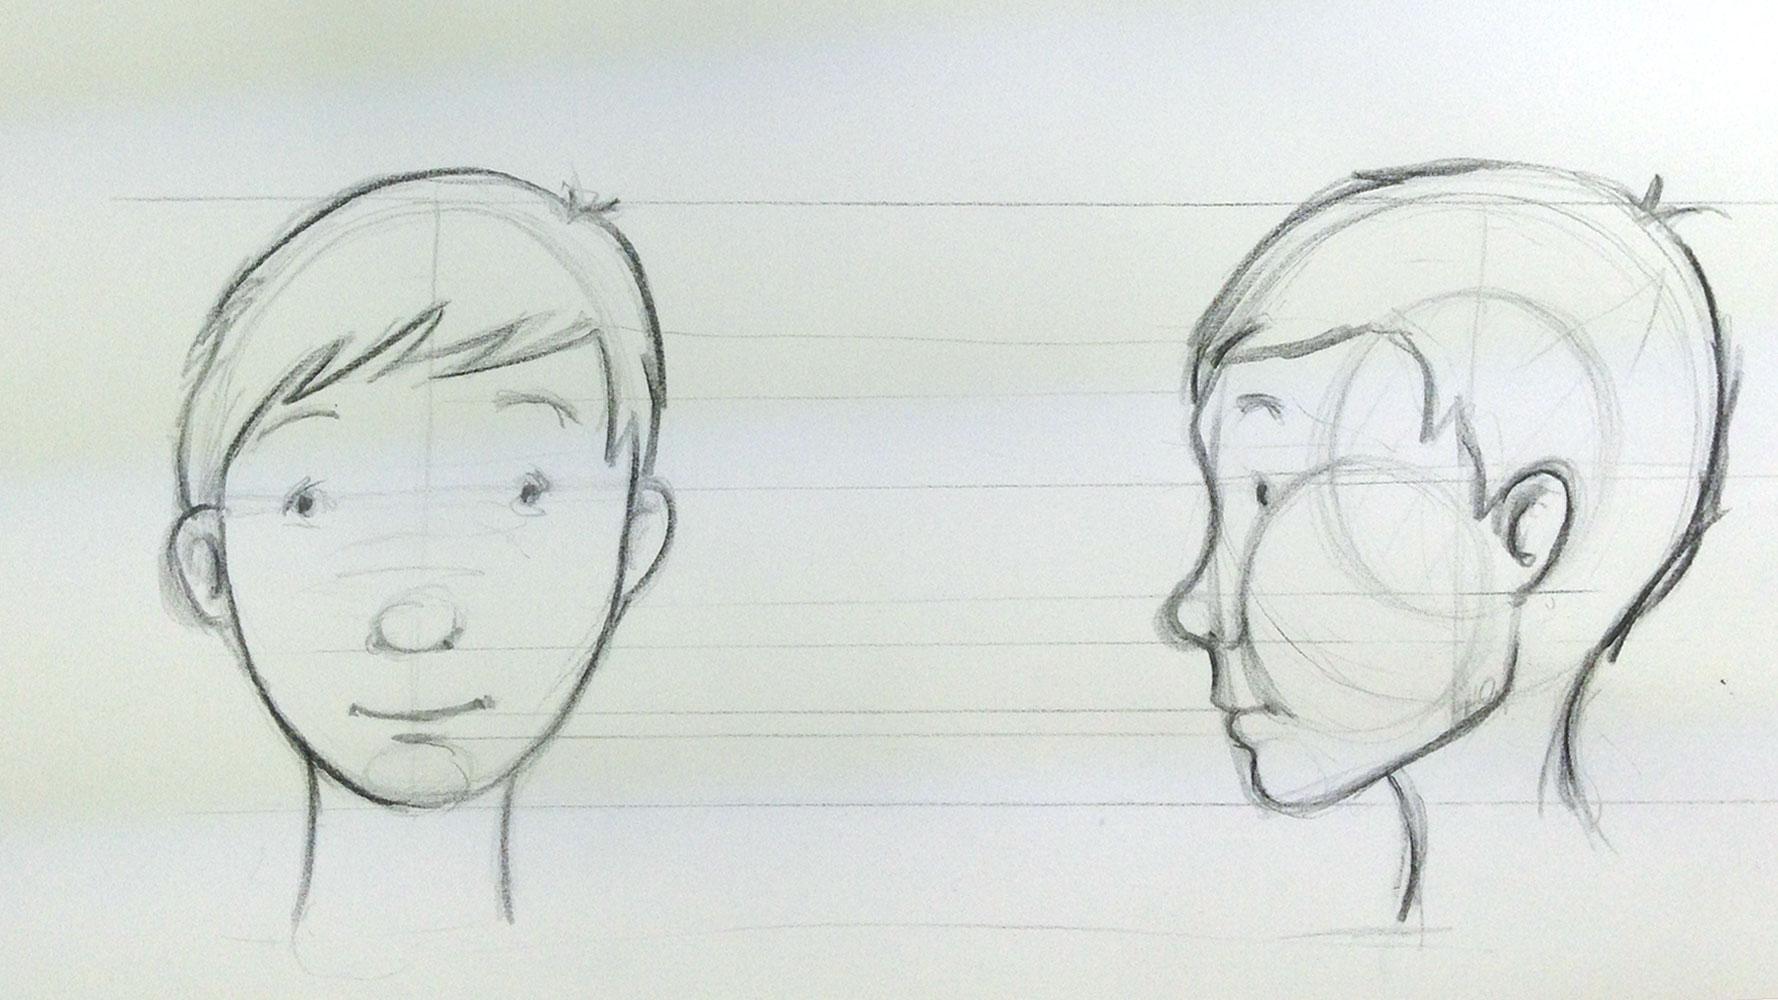
3. Front and Side View Explained: In this lesson, we're going to learn how to see your two-dimensional drawings as three-dimensional forms. Putting this into practice by drawing a character's head inspired by the shape of an actual egg. If you want to try and set yourself, please make sure to hard boil your eggs first. To draw a basic head shape, we first draw a circle for the cranium, and then we draw a block area down the bottom of the chin. Here I'm going to draw a circle area on an actual egg, so that we can see our two-dimensional drawing of a face as a three-dimensional mass. If I rotate the egg from the front view to the side view, you can see how I've marked the flat plane with a circle, and just like I did with the egg, I've divided the circle into quadrants. The top of the circle marks the hair line, and the center of the circle marks the brow line. The bottom of the circle marks where the tip of the nose sits and the base of the egg shape marks the bottom of the chin line. You can see how there are equal distances between the hair line and the brown line, the brow line and the nose and the nose and the chin line. From the hairline to the chin line, we can divide the face into thirds. Rotating the egg head from the side view to the front view. I'm now going to draw a head next to the egg. I'm going to draw a circle for the cranium and then from that I'm going to draw the pointy part of the egg and that will be the chin area. Now I'm going to mark the hair line and the nose line, the brow line, drawing a guide for the center of the face. Here I'm drawing a very simple set of eyes with eyebrows resting above. A simple line to mark the tip of the nose. Between the nose and the chin line, the mouth. I use the hair line to help me find the top of the ears, and then I add in the hair. When designing characters for a story, you may decide to bend the rules, as your character may require larger nose or smaller chin or a completely different face shape altogether. If you've taken my 101 guide to drawing eyes class, you'll also know the many possibilities that you have just with the eyes, by changing the size of the eyes and the placement of the eyes, your character will look completely different. Now that I've drawn the front view of my character, I'm going to transfer all the information from the front view as I draw the side view, and just like I did with the egg, I'm going to mark the flat plane with a circle divided into quadrants. Drawing the area for the chin and the jaw, I draw a line down marking the front of the face and a line from the center of the circle, marking the back of the jaw. The view from the side shows just how round the back of the head actually is. On the nose line, I'm drawing an oval to mark the tip of the nose. I skip jump bridge, and the brown line actually protrudes out from the face. Now marking where the mouth rests, the top line extends from the base of the nose. The bottom lip can vary quite a lot depending on whether your character has an overbite or an under bite. The ears are in line with the back of the jaw and rest between the eye and the nose line. Adding in the position of the eyes and the eyebrow, I now add hair and other accessories. The neck curves out from the back of the cranium and the soft curve from under the jewel. Join me in my next lesson, where I'll expand on this information and demonstrate how to rotate the head using three very different looking characters.
4. Drawing the Head Rotating: In this lesson, I'm going to show you how to draw your character's head rotating on the y-axis. Imagine a rod entering the top of the head and working its way down through the center of the neck. This is the y-axis. If we pivot on this axis, we would be rotating the head. I've chosen three different characters to demonstrate the process of rotating the head starting with an elongated character of a girl, a young boy, and the head of a baby. If you've taken my face shapes or my 101 guide to drawing eyes class, then you may already have your own character to work with. Once I have the front view of my character established, I then draw a series of guidelines out from the positions of the eyes, the nose, ears, as well as the top and the bottom of the head. You can use as many lines as you like to transfer the information you need from one drawing to the next. Here we rotate the head 45 degrees. This is probably one of the most difficult perspectives to draw, so it may take a few goes to get it just so. Here you can see how the facial features shift over to one side with the characters left eye sitting on the edge of the face. Now, depending on the character, the cheek might plump out under the eye and the nose will always overlay both the cheek and the eye. Imagine the round sphere shape at the top of each head, the flat plain on the sides of the sphere with its horizontal and vertical lines. The ears are usually positioned on the vertical line and they attach themselves to the back of the jaw. You'll also want to keep an eye out for the details like the hair with its curls, flicks and partings, and also, for the size and shape of the neck. You can see that the boys has a very thin, long neck, the girl has a bottleneck and the baby's head sits directly onto the shoulders. Rotating the head another 45 degrees, we now see the side view of our characters. Here you only see one eye and the profile of the nose and the mouth. The ear sit much further back on the head. You can see the round cranium shape. Once again, try to understand where the hair sits and also the size and shape of the neck. Rotating the head another 45 degrees, we now start to see the back of the head. We also see the back of the character's ears, definitely the right ear and possibly even the left ear, depending on whether the hair is covering it or not. The girl's hair is a straight sheet covering the nape of the neck. The boy's hair is short, so you may need to work out a treatment of how to work the hair into the neck. The baby's head is nestled into the shoulders. Rotate another 45 degrees and we have the back view of our characters. Make sure that their head is the same width as it is in the front view. Here we can see both the ears, the back of the head and the back of the neck. Now, take note of the hair, which way the hair pats and also try to understand how the neck sits within the shoulders. Here's the boy's head rotating on the y-axis. Join me in my final lesson where we'll recap on everything that we've done so far and I'll also walk you through the process of drawing your own character from the front and side view.
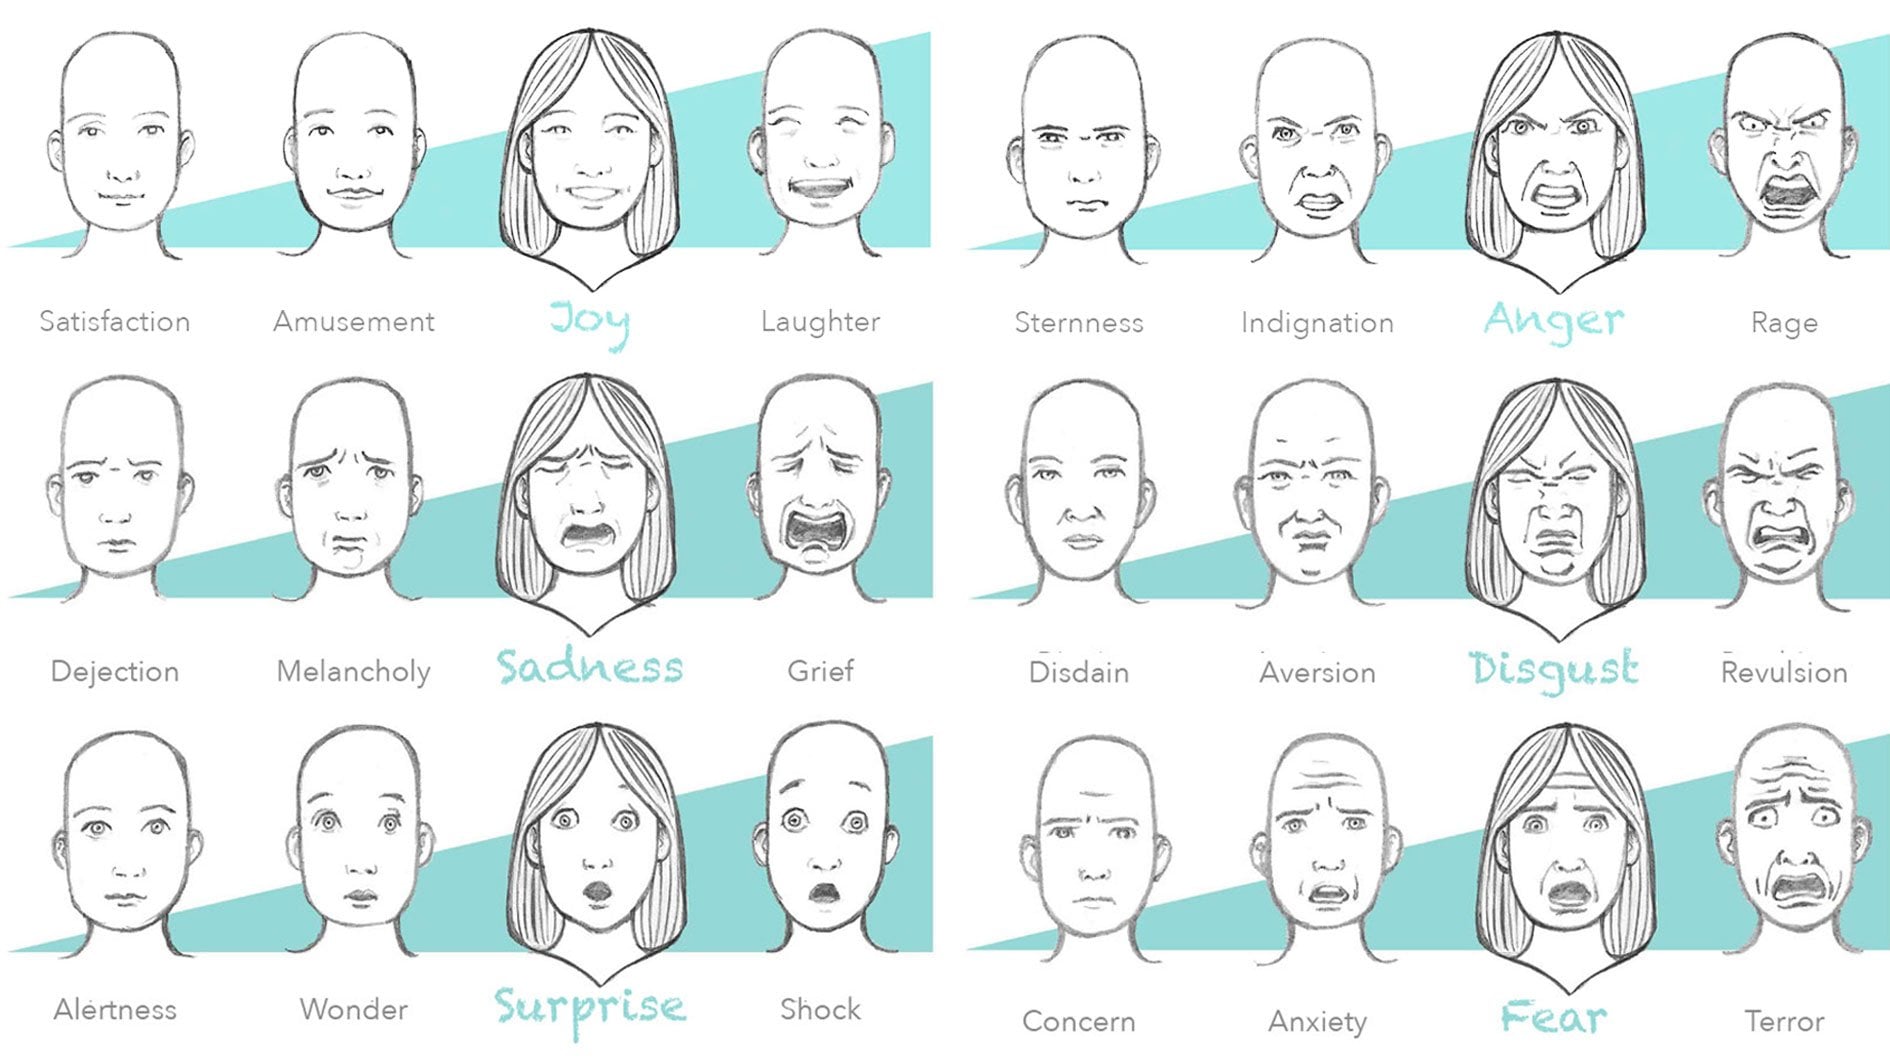
5. Drawing the Front and Side View : Once you have the front view of your character, what you need is a bit of space to draw next to it. Using a ruler, draw a line from the top of the head and the bottom of the chin. Draw another horizontal line to mark the tip of the nose. Now draw a circle from the top of the head to just under the tip of the nose. Draw a smaller circle inside that circle, and this will represent the flat plane. Also draw a line that will represent the front plane of your character's face. Divide the smaller circle into quadrants. Extend the vertical line down, and this will mark the back of the jaw. Join the front plane and the back of the jaw with a slight angled line. Draw another line to mark the position of the mouth, and draw an oval to represent the tip of the nose. The nose tip curves down to attach to the top lip and the bottom lip tucks in under that top lip. Then we have a circle that represents the chin. Draw a larger circle to represent the cheek. Now, this will hit the edge of the mouth, the edge of the nose, and the edge of the eyes and reach as far back as the chin line. Now, I'm drawing a line across to mark where I'm going to put the eyebrow. Here, I'm marking where I'm going to be positioning the ear. Now to draw a curved line for the front of the neck and the back of the neck. Adding in the hair and the other details. Now don't forget if you post your front and side view drawings of your characters onto the project section of the classroom. I'll send you my facial expressions printable. Now these details the facial expressions for the six basic emotions and it's really good reference for bringing your character drawings to life. I look forward to seeing your projects, and please leave a review if you like the class or found anything really helpful.
6. To Finish: Congratulations for completing part one of how to draw the head from every angle. In this class, we've learned how to look past the detail and see the basic structure of the head. We even used an egg to help us see our two-dimensional drawings as three-dimensional forms, learning how to transfer information from the front view to the side view, and eventually being able to rotate the head on the x-axis. When you finish watching all of the lessons, please leave a review if you liked the class or found any of the information helpful. Your recommendation will give this class more visibility on Skillshare so that more people can find it and take part. You can post the front and side view drawing of your character onto the Project section of the classroom. I'll then send you my facial expressions printable, detailing the facial expressions for the six basic emotions. It would really help bring your character drawings to life. Congratulations for completing part one of how to draw the head from every angle. I look forward to seeing you again in part two. We will be using the front and side view drawings of our characters to make mini models of our character's head. I'll then show you how to use the mini model to help you draw your character's head from every possible angle.
 Nina Rycroft, Picture Book Illustrator