Face Facts: Beginners Guide to Drawing a Self Portrait | Nina Rycroft | Skillshare
Search

Playback Speed


1.0x


  • 0.5x
  • 0.75x
  • 1x (Normal)
  • 1.25x
  • 1.5x
  • 1.75x
  • 2x

Face Facts: Beginners Guide to Drawing a Self Portrait

teacher avatar Nina Rycroft, Picture Book Illustrator

Watch this class and thousands more

Get unlimited access to every class
Taught by industry leaders & working professionals
Topics include illustration, design, photography, and more

Watch this class and thousands more

Get unlimited access to every class
Taught by industry leaders & working professionals
Topics include illustration, design, photography, and more

Lessons in This Class

    • 1.

      Introduction

      1:20

    • 2.

      Drawing the eyes and eyebrows

      2:18

    • 3.

      Drawing the nose

      1:33

    • 4.

      Drawing the mouth and ears

      3:42

    • 5.

      Drawing the neck, hair and accessories

      2:22

  • --
  • Beginner level
  • Intermediate level
  • Advanced level
  • All levels

Community Generated

The level is determined by a majority opinion of students who have reviewed this class. The teacher's recommendation is shown until at least 5 student responses are collected.

7,217

Students

87

Projects

About This Class

Learn how to draw a face ... starting with you!

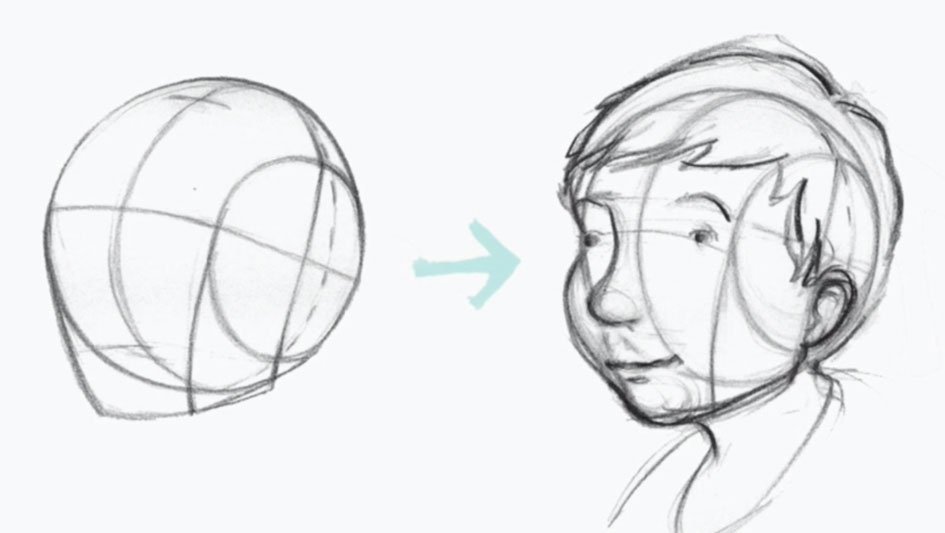
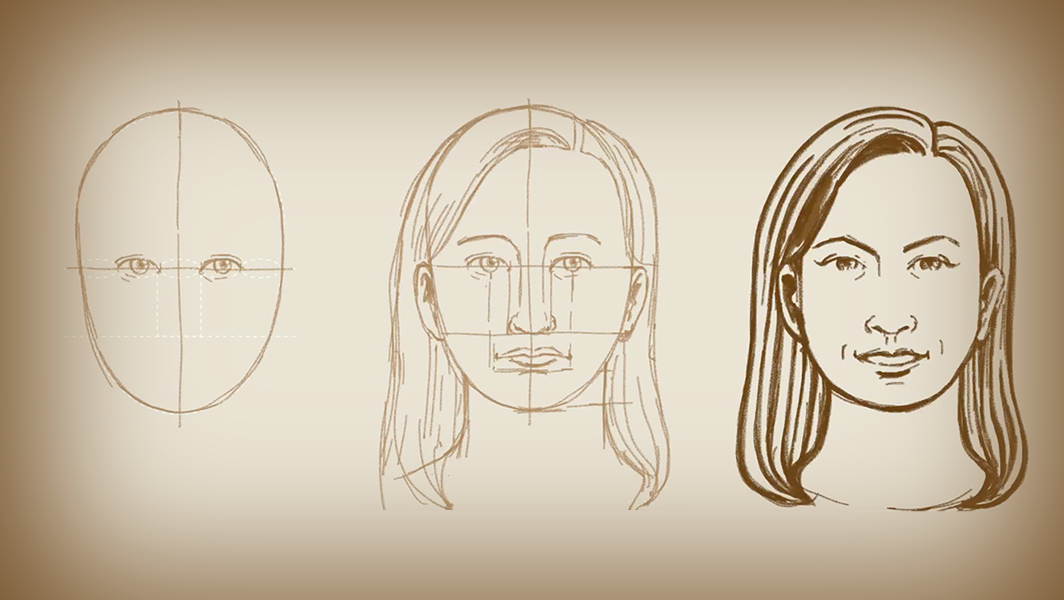
Learn about the shape, size and placement of the eyes, eyebrows, nose, mouth, ears, and how to piece together individual features to create a framework for your self-portrait. Adjust features, add hair and accessories and discover how easy it to create a true likeness of you! 

Nina offers a multi-sensory experience learning to look, feel, understand and then draw your face step-by-step. This class shares key information that will have you, not only completing a self-portrait, but it will also give you the skills to draw any kind of face well. This class is suitable for beginners and anyone wanting to learn the basic principles of face proportion.

In this class, you will ...

  • learn the basics in face proportion
  • learn about shape, size and placement of the eyes, eyebrows, nose, mouth, ears
  • gain confidence in drawing any type of face well

Interested in character design? 

Below is my series of Skillshare classes that walk you through the entire process of how to illustrate a character from start to finish. Use this series to either brush-up on a particular skill or work your way through, for a comprehensive guide.

Nina's Skillshare Character Design Series

  1. Face Facts: Beginners Guide to Drawing a Self Portrait
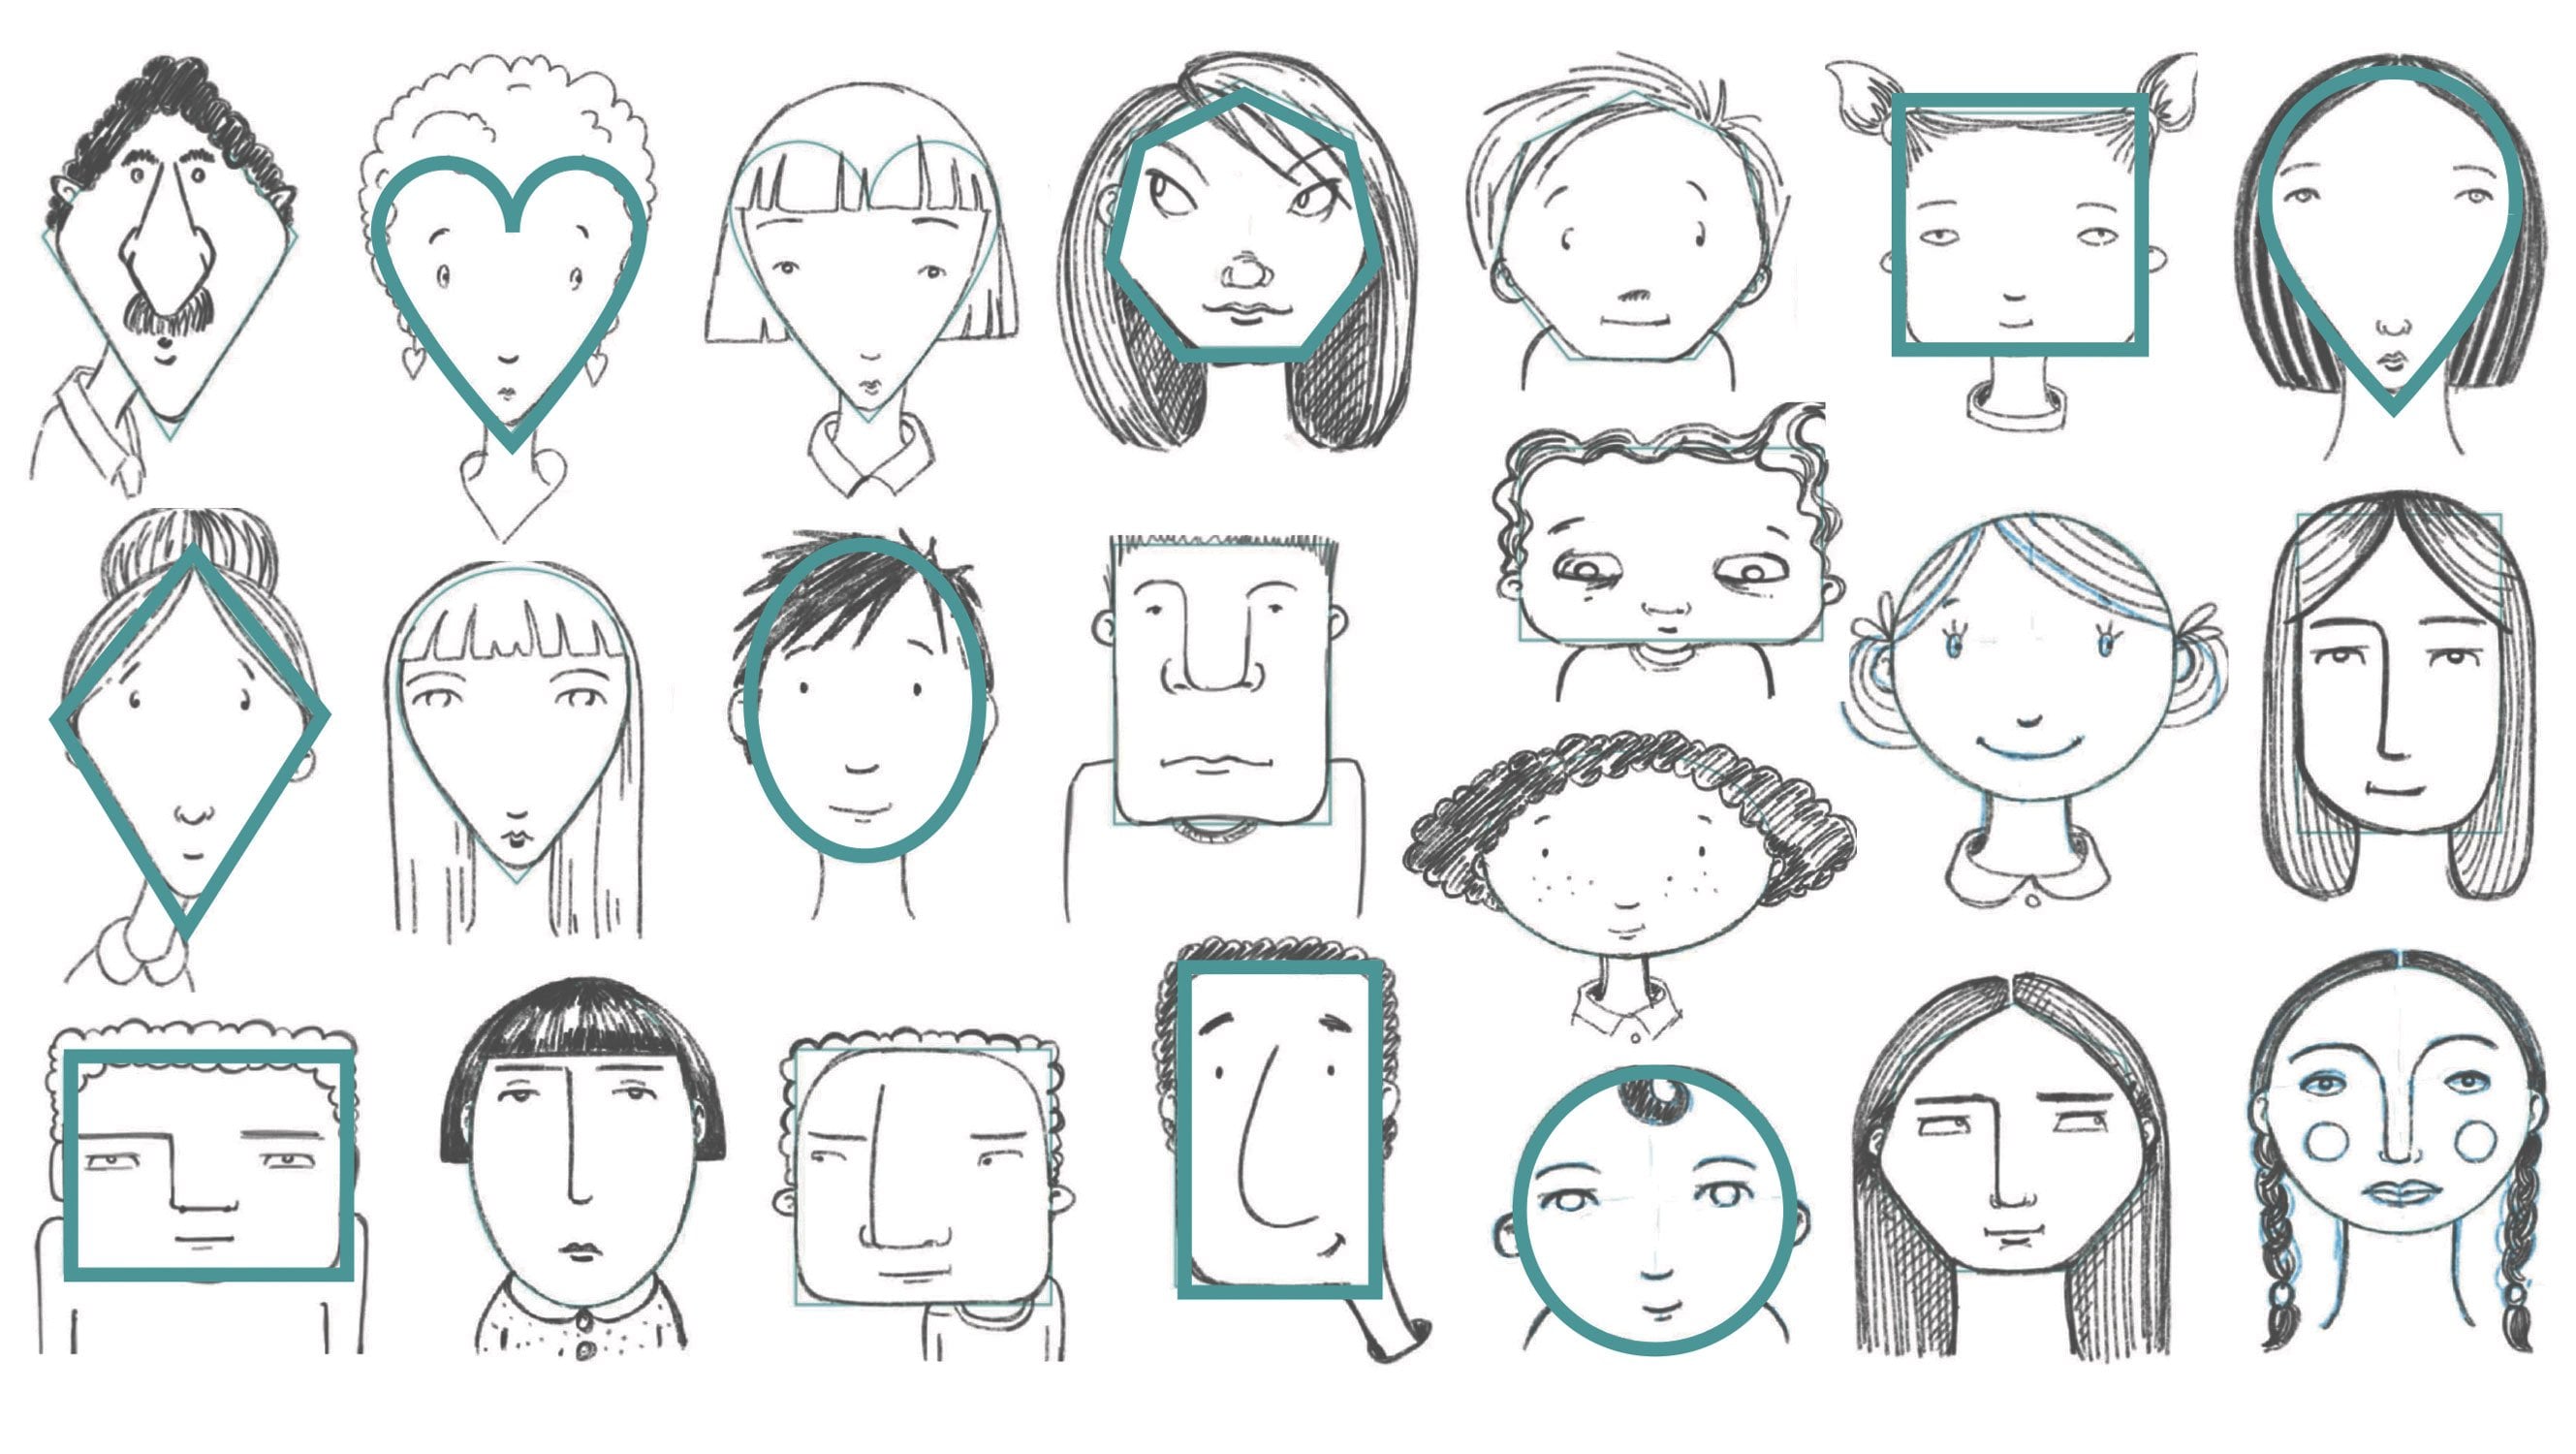
  2. Face Shapes: Draw a Series of Character Using Simple Shapes 
  3. 101 Guide to Drawing Eyes
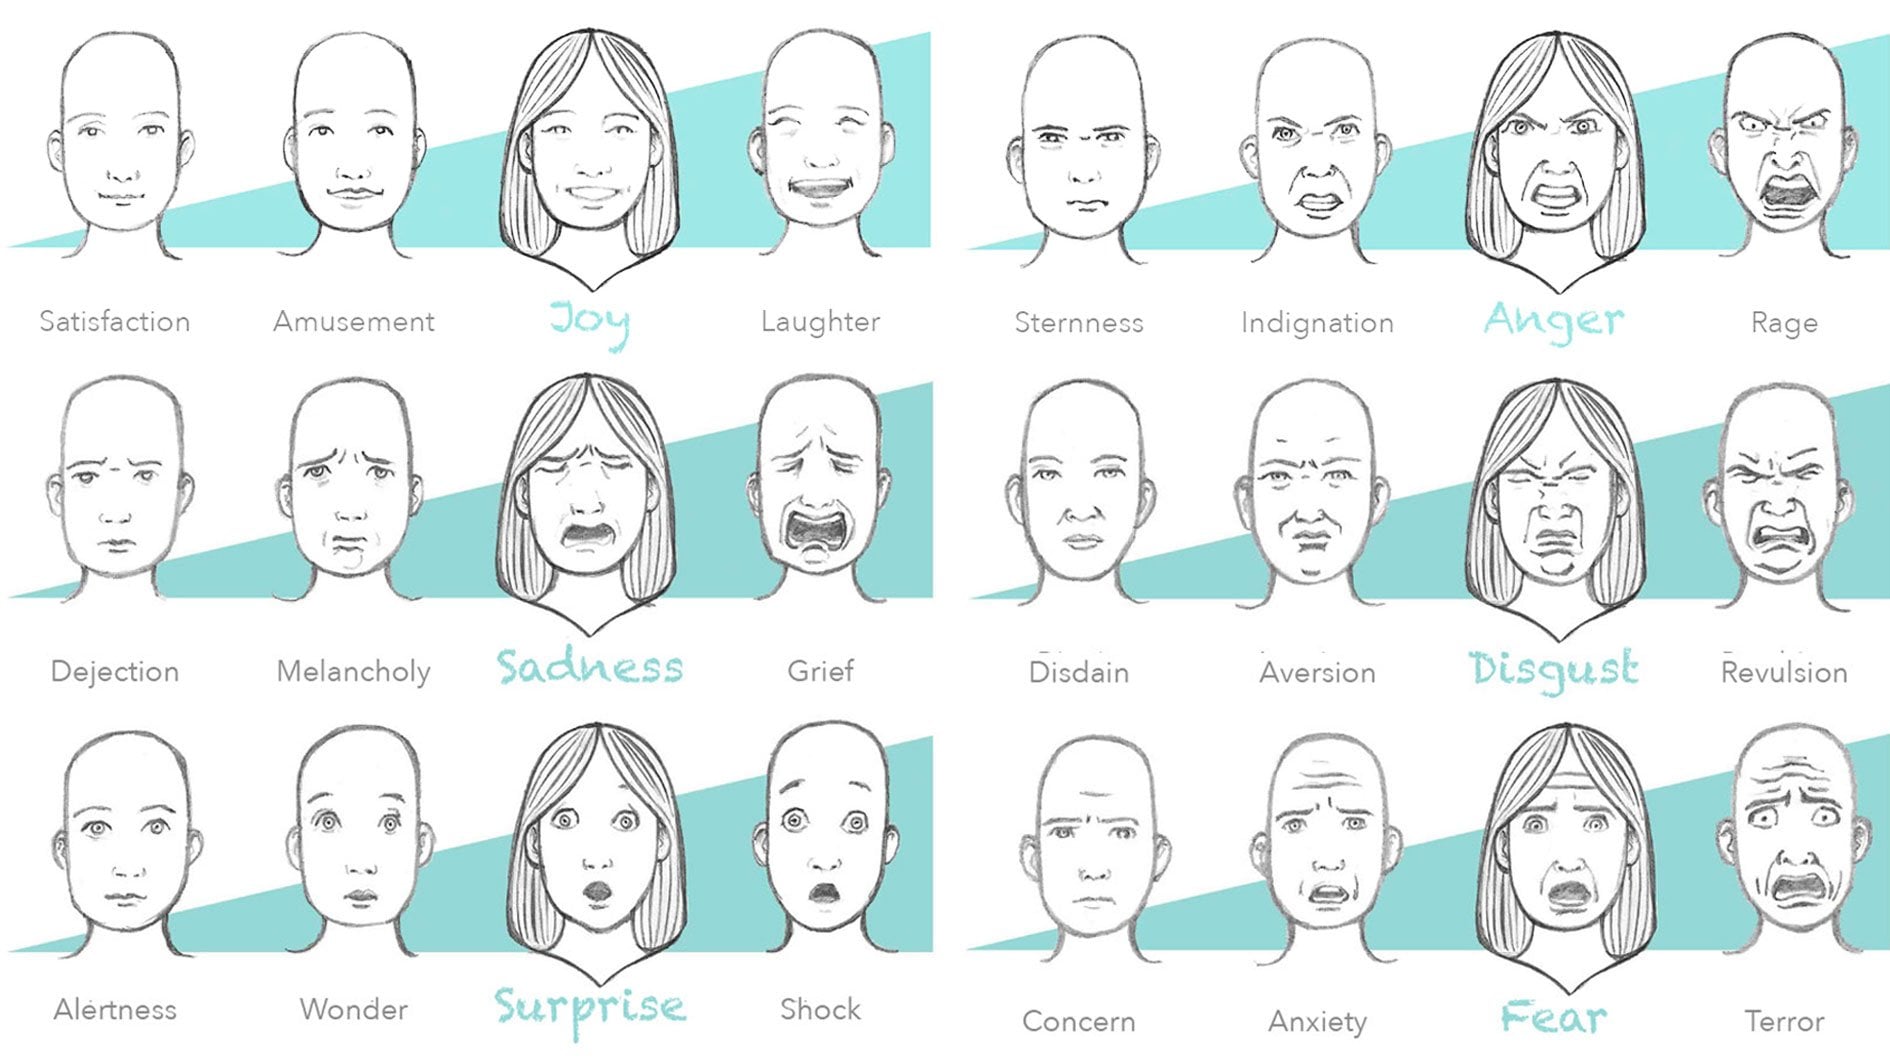
  4. Emoji Me: The art of Facial Expression
  5. How to Draw the Head From Every Angle: Part One
  6. How to Draw the Head From Every Angle: Part Two
  7. How to Draw the Head From Every Angle: Part Three
  8. Draw a Circus of Characters: Exploring Body Shape and Proportion
  9. Draw a Circus of Movement: Simple Techniques to Bring Characters to Life
  10. Draw a Circus of Line & Gesture: Design a Picture Book Character From Start to Finish
  11. Watercolor Magic: One Character Five Ways
  12. Illustration Masterclass: Exploring Technique and Style
  13. Learn to Use Procreate: Design and Illustrate a Bear Character
  14. • NEW • Animal Character Design for Picture Book Illustrators: Techniques and tips for designing characters with a narrative

Meet Your Teacher

Teacher Profile Image

Nina Rycroft

Picture Book Illustrator

Teacher

Please link up, subscribe and follow me on: Facebook I Instagram I Pinterest I Website

Hi! I'm Nina Rycroft, a picture book illustrator. I worked as a graphic designer in Sydney and London before turning my hand to illustration, with my first picture book Little Platypus received a CBCA (Children's Book Council of Australia) Notable Book Award in 2000. Since then, I've had more than a dozen picture books published worldwide, winning some awards along the way. To view my list of publications.

If you're interested in learning how and design and develop character, illustration techniques and picture book illustration, then please follow me...or even better...try one of my classes :)

My dozen or so Skillshare classes >>> taken in this sequence See full profile

Level: Beginner

Class Ratings

Expectations Met?
    Exceeded!
  • 0%
  • Yes
  • 0%
  • Somewhat
  • 0%
  • Not really
  • 0%

Why Join Skillshare?

Take award-winning Skillshare Original Classes

Each class has short lessons, hands-on projects

Your membership supports Skillshare teachers

Learn From Anywhere

Take classes on the go with the Skillshare app. Stream or download to watch on the plane, the subway, or wherever you learn best.

Transcripts

1. Introduction: In this class, I'll be walking you through the basics in face proportion. I'll be giving you an in-depth understanding of the size and the placement of the eyes, the eyebrows, the nose, the mouth, the ears, and the neck. Then after we've worked all the fundamentals out and understand the framework of the face, and the face proportions, we can then accessorize with hair and other elements like glasses and earrings and that sort of thing. So this class is more than just creating a perfect likeness to your face. It's more about learning and experiencing how to draw and understand the face proportions. It just so happens that you'll create your own self portrait from this. What I really want for you is to feel confident with the information that I'm giving you, that you can approach and draw any face well. I'm really looking forward to seeing you in class. I'm super excited and I can't wait to get started with lesson number 1. 2. Drawing the eyes and eyebrows: If you divide this line across into five eye widths across, and you've got a really good grounding for where we're going to place the eyes. Here I've divided my face into quarters and now I'm just marking where the eyes are going to go, so dividing that face across into five spaces and filling up two of those spaces with an oval. That will be where my eyes are. Now you can see that I'm filling in the top lash darker than the bottom lash. I don't know about you, but with me, my top lash looks darker than the bottom lash and hear I have a top lid that I can see over so slightly underneath the lash areas. I'm just marking that in as well. Again, I'm just coming over and darkening. Now I'm putting in the pupil and I'm not drawing a full circle. You can see I've got the eyelid over the top of that, and I'm drawing in the highlights and the pupil and filling that in. You can see that I'm just going over the areas that I want to add in more detail. I want a bit of a shadow under that top lid as well just to make it look a little bit more 3-D. You can see that I'm just using a smudging tool. You can see I'm using this smudging tool to just blend a little bit of the charcoal that I have around the the pupil area. We're going to draw a gentle arch for where the eyebrow goes. Now you can see that I'm happy with the eyes. I'm going to mark in the eyebrow. A gentle arch across the top of the eye, and just again, looking into the mirror just to see what shape your eyebrows are. 3. Drawing the nose: So now we're ready to start drawing the nose. Noses come in all different shapes and sizes, and what I do want to draw is, where does the nose go on the face? What we're going to look at, is the halfway line between where the eyes are resting and the chin. We're going to draw a line from the eye line and the chin line, and if you draw halfway, it's actually going to be resting where the tip of the nose is. You also want to look at the width of the nose, and so what really helps, is to draw a line from the inside of the eye and straight down. You might just want to do two very slight guidelines, and this box that you create will be where the nose sits within. Have you got a little button nose? You might have a larger nose, or a wider nose. Just take a look, but use the shape of that box as a guideline. You might want to start just drawing the tip, the nostrils and that area. If you've got a really strong shadow, possibly on one side of the nose, you might want to draw a line to represent that on one side. So if you want to just approach the nostrils and the tip of the nose, that might be fine for now. 4. Drawing the mouth and ears: So now that we have the eyes, the eyebrows, and the nose, we're going to start drawing where the mouth is going to rest. What we're going to do is just be drawing a resting mouth. We're going to look again at ourselves in the mirror, and we're going to seen where the end edges of the mouth sit. The mouth sort of sits between the nose and the chin. So what you might like to do is draw a guideline between the tip of the nose and the chin, and draw a line across there. So you've got sort of an idea of the placement of the mouth. So we're going to found the corners of our mouth and we're going to draw the line up. Usually, with a resting mouth, it's kind of where the pupil sits and we draw a line down to the edge of the mouth, and then we can do that from both sides. Now, when it comes to the mouth, please don't draw the lines too hard, unless we're wearing really strong outline lipstick or whatever. The strongest line for your mouth should be that center line. So have a look at the shape of that line, it's never normally a straight-line. It normally curves around. Just notice the curve of that line. You can draw that first. That can be sort of your stronger line, and then you might want to just get shape of the lips. I will be doing more details on the shapes of the eyes, and the nose, and mouths, and that sort of thing later on, but for now, just look in the mirror and look at the general shape of your mouth, and make this center line much darker and deeper. I don't want you pressing too hard, but make the outer lines just really gentle shapes, just so you get a sense of the shape of your mouth and the fineness or fullness or whatever your shape of your lips are. We just want to get an idea of the resting mouth, right. So now we've got pretty much most of the features on the face. We're going to spend time on the ears. Now, what I have noticed is that when you ask people to draw ears, they draw them really quite small. Ears are a lot bigger than you would first imagine. If you actually think about the ear, it's actually the same length as your nose. You might want to just put your hair away. The top of the ears sit, in general, around that eyes line. So the mid-line, where you've drawn for the eyes, if you continue that across, that should be the top of your ear. The base of the ear, let me just draw. Have a look in the mirror, look at the base of your ear and bring it across. It's almost like somewhere between the tip of the nose and the mouth. My ears aren't particularly huge, but they would seem a lot bigger than what I would first imagine when I start drawing them. So we're just going to draw a gentle sort of arch shape for the ears. I mean, have a look, see if your ears are big or small or they might be tucked right behind. You might have really largely ear lobes. I mean, everyone's got individually ears, but we're just going to draw a general shape for the ear, and just understand where they sorted of sit on the face. 5. Drawing the neck, hair and accessories: So we're going to be drawing our neck from her ears down. If you look in the mirror, you will seen that the neck, you might want to pull your hair back and have a really close look, but they sit underneath the ears, some under the chin, coming in a little bit and the neck will go straight down and then go out and join up with the shoulders. Adults tend to have sort of a fuller, thicker neck. Women tend to longer, more elegant necks. Men, with that whole strength thing, tend to have a wide, a stronger necks coming, again, all sorts of different shapes and sizes and it depends completely on what your neck looks like, but have a look in the mirror. See what in general, just sort of get a sense of what your neck looks like and draw those two lines down from the ears all the way down with the gentle arch to the shoulders. So we've got the eyes, the eyebrows, the nose, the ears, and the mouth, and the neck. What you might like to do after that is just have fun and add in your hair, accessories. You might want to put a little bit of a color of what you're wearing. Just go to town, just have fun and make this your self-portrait. Again, when you are drawing your portrait, don't forget to keep looking back into the mirror and really getting, especially when it comes to the details of the eyes, and the nose, and the mouth, and you really want to get a good sense of that, and what I'd love for you to do if you feel confident enough expressing yourself in this way, I'd love for you to feel really proud of your work and I'd love for you to be able to post it in the classrooms so that others can see. You might introduce yourself and people can see what you look like, and really celebrate yourself and make this your own, and I look forward to seeing all of your work in class.